How to update the US Social Security Number (SSN) or Individual Taxpayer Identification Number (ITIN) on your account
Background:
If you have been informed or believe that your account profile contains an incorrect US SSN/ITIN, you may simply log into your Account Management to update this information. Depending on your taxpayer status, you can update your US SSN/ITIN by modifying one of the following documents:
1) IRS Form W9 (if you are a US tax resident and/or US citizen holding a US SSN/ITIN)
2) IRS Form W-8BEN (if you are a Non-US tax resident holding a US SSN/ITIN)
Please note, if your SSN/ITIN has already been verified with the IRS you will be unable to update the information. If however the IRS has not yet verified the ID, you will have the ability to update through Account Management.
How to Modify Your W9/W8
1) To submit this information change request, first login to Account Management
2) Click on the Settings section followed by Account Settings
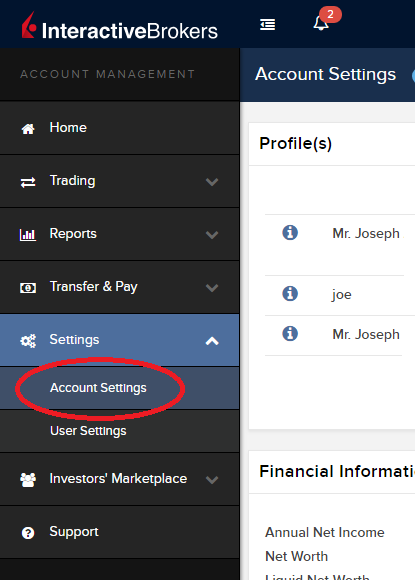
3) Find the Profile(s) section. Locate the User you wish to update and click on the Info button (the "i" icon) to the left of the User's name
.png)
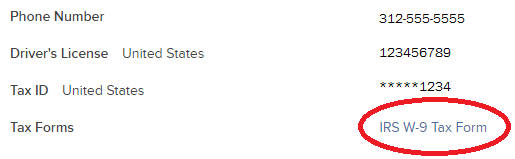
4) Scroll down to the bottom where you will see the words Tax Forms. Next to it will be a link with the current tax form we have for the account. Click on this tax form to open it
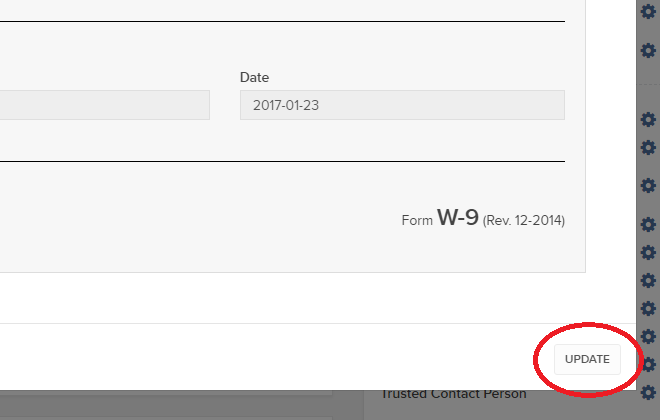
5) Review the form. If your US SSN/ITIN is incorrect, click on the UPDATE button at the bottom of the page
6) Make the requisite changes and click the CONTINUE button to submit your request.

7) If supporting documentation is required to approve your information change request, you will receive a message. Otherwise, your information change request should be approved within 24-48 hours.
How to adjust font size in TWS
Background:
By default, Trader Workstation (TWS) is designed to display in a font size and style which can be read comfortably for the average user across various screen sizes and resolutions. With the advent of new technologies, there has been an exponential push to make monitors with higher display sizes and your layout may need to be further adjusted manually. This document serves to explain how to manually adjust the font size for TWS.
Procedure
To adjust font size throughout TWS:
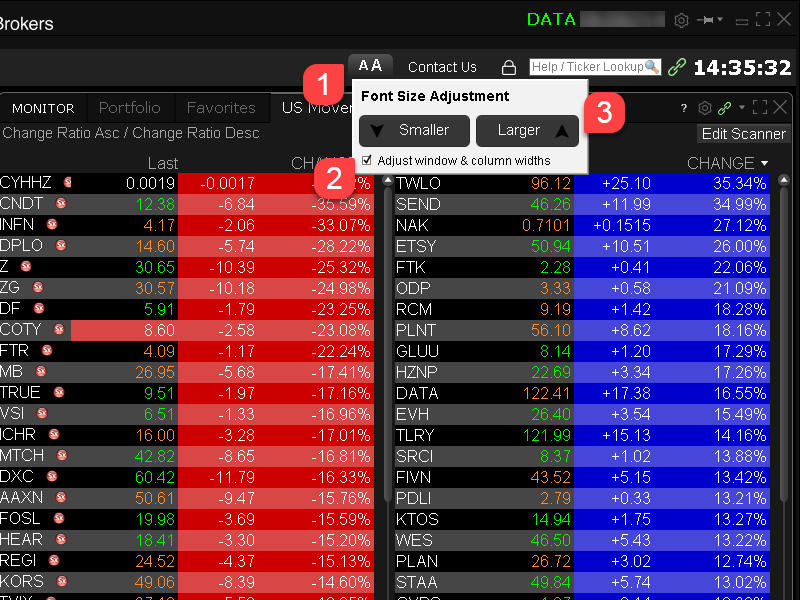
- From the Anchor window, click the Font Size Adjustment icon.

- Check the button Adjust window & column widths to ensure all windows will resize automatically to keep the same font:window ratio. (If unchecked, only font size will change but window size will remain the same).
- Click the button Smaller or Larger until the font size is correct.
Notice that the font size will change immediately as you click the button. - Click the Font Size Adjustment icon when done.
Note: It is possible that currently not all windows will be adjusted in the same way.
How to check and solve connectivity issues affecting the Trader Workstation (TWS)
Background:
The Trader Workstation (TWS) software needs to connect to our gateways and market data servers in order to work properly. Connectivity issues affecting your local network or your Internet Service Provider network may negatively affect the TWS functionality. In this article we will indicate how to test your connectivity using an automated connectivity test web page.
How to test the connectivity using the automated "IB Connectivity Test" web page?
1) Launch the Firefox browser and open this link with that browser: http://www.interactivebrokers.com/cgi-bin/conn_test.pl
Note: due to browser specific constraints, the above connectivity test link will only produce consistent results on the Mozilla Firefox browser. If you do not have Firefox, you can download and install it form here.
2) Please wait until all the tests have been completed and results have been displayed. If you see "Success" as outcome for all tests, your connectivity to IB Servers is reliable at the present moment. No additional connectivity troubleshooting or configuration should be needed.
3) If you see "Fail" as outcome for one or more test/s, please click on the link "Fail" itself in order to display the "IB Network Troubleshooting Guide". That section will help you conduct some manual tests to identify the cause of the failure.
Note for Corporative environments and Proxy server users: the automated "Connectivity Test" page may return misleading results in case your machine is accessing the Internet through a Proxy server. This usually happens if you are connected to a company network. If this is your case, we kindly ask you to contact your Network Administrator or your IT Team and ask them to perform a manual connectivity tests towards the destination servers indicated in the table on the top of the IB automated "Connectivity Test" web page itself. The manual connectivity test should be conducted using destination TCP ports 4000 and 4001. Should they prefer to have the server list in another format or should they need to set up the firewall / IP Management rules, you can forward them this page.
如何重新加入安全登录系统
Overview:
选择了退出安全登录系统(SLS)的客户可能会面临一定的风险且会受到某些限制(如不能交易粉纸市场和场外柜台交易系统股票)。考虑到这些因素以及SLS提供的保护,您可能会决定重新完全加入安全登录系统。下述文章提供了完成此操作的详细步骤说明。
Background:
请注意,要修改安全设置,您的使用者需具有适当的访问权限。如果您的使用者没有权限更改安全设置,系统会给您一则通知并向您指出具备该等权限的使用者。
要重新加入安全登录系统,请按以下步骤操作:
1. 打开浏览器,访问网页ibkr.com.
2. 点击登录> 客户端登录
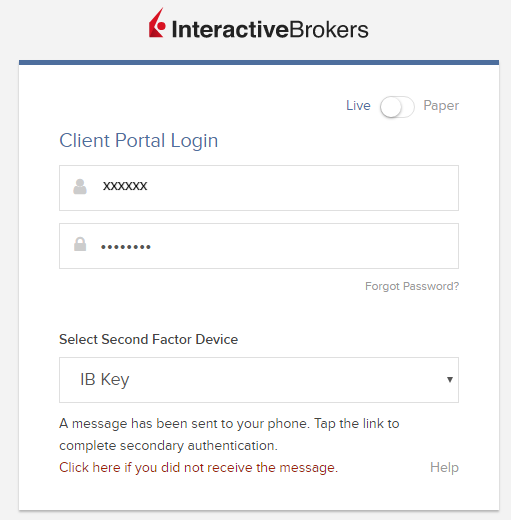
(1).png)
3. 输入您的登录信息并使用安全设备完成验证

.png)
5. 您将看到一个标题为“安全登录设备”的框。在该框内,点击配置“齿轮”图标。您将跳转至“交易无需安全登录”设置。
6. 选择"我希望登录时始终使用安全登录设备"旁的单选按钮并点击继续
.png)
7. 您会收到设置已更新的确认。点击“确定”完成操作。
.png)
注
1. 如您使用的是旧版客户端,请在顶部菜单点击管理账户,然后点击安全 > 安全登录系统 > 安全登录系统退出。然后选择您的使用者对应的行旁边的重新加入单选按钮。
盈透证券欢迎您
Overview:
现在您的账户已完成入金并获批,您可以开始交易了。以下信息可以帮助您入门。
- 您的资金
- 设置您的账户以进行交易
- 如何交易
- 在全球范围进行交易
- 拓展您IB经验的五个要点
1. 您的资金
存款&取款基本信息。所有转账都通过您的账户管理进行管理
存款
首先,通过您的账户管理 > 资金 > 资金转账 > 转账类型:“存款”创建一个存款通知(如何创建存款通知)。 第二步,通知您的银行进行电汇转账,在存款通知中提供详细银行信息。
取款
通过您的账户管理 > 资金 > 资金转账 > 转账类型:“取款”创建一个取款指令(如何创建取款指令)
如果您通知要进行超出取款限额的取款,则会被视为异常取款,我们因此将需要匹配银行账户持有人和IB账户。如果目的地银行账户已被用作存款,那么取款将会被处理;否则,您必须联系客户服务并提供所需文件。
错误排查
存款:我的银行发出了资金,但我没有看到资金记入我的IB账户。可能的原因:
a) 资金转账需要1至4个工作日。
b) 存款通知缺失。您必须通过账户管理创建存款通知并向客户服务发送一条咨询单。
c) 修改详情缺失。转账详情中缺失您的姓名或IB账户号码。您必须联系您的银行索取完整的修改详情。
d) IB发起的ACH存款7个工作日内限额为10万美元。如果您开立的是初始要求为11万美元的投资组合保证金账户,最好选择电汇存款以减少您第一笔交易的等待时间。如果选择ACH,会需要等待近2周时间,或者可以选择临时升级至RegT。
取款:我已经请求了取款,但我没有看到资金记入我的银行账户。可能的原因:
a) 资金转账需要1至4个工作日。
b) 被拒。超出最大取款限额。请检查您账户的现金余额。注意,出于监管要求,存入资金时会有三天置存期,之后才可以被取出。
c) 您的银行退回了资金。可能是因为接收银行账户与汇款银行账户名称不匹配。
2. 设置您的账户以进行交易
现金与保证金账户的区别:如果您选择快速申请,默认您的账户类型为配备美国股票许可的现金账户。如果您想使用杠杆并以保证金交易,参见此处如何升级为RegT保证金账户
交易许可
为了能够交易特定国家的某一特定资产类别,您需要通过账户管理获得该资产类别的交易许可。请注意,交易许可是免费的。但您可能需要签署当地监管部门所要求的风险披露。如何请求交易许可
市场数据
如果想获取某一特定产品/交易所的实时市场数据,您需要订阅交易所收费的市场数据包。如何订阅市场数据
市场数据助手会帮助您选择正确的数据包。请观看该视频,其解释了市场数据助手是如何工作的。
客户可以通过从未订阅的代码行点击免费延时数据按钮选择接收免费的延时市场数据。
顾问账户
请阅读用户指南顾问入门指南。在这里,您可以看到如何向您的顾问账户创建其他使用者以及如何授予其访问权限等等。
3. 如何交易
如果想学习如何使用我们的交易平台,您可以访问交易者大学。在这里您可以找到我们以10种语言提供的实时与录制网研会以及有关交易平台的课程与文档。
交易者工作站(TWS)
要求更高级交易工具的交易者可以使用我们做市商设计的交易者工作站(TWS)。TWS有着便于操作的电子表格式界面,可优化您的交易速度和效率,支持60多种定单类型,配备可适应任何交易风格的特定任务交易工具,并可实时监控账户余额与活动。试试两种不同模式:
魔方TWS:直观可用性,简便的交易准入,定单管理,自选列表与图表全部在一个窗口呈现。
标准模式TWS:为需要更高级工具与算法的交易者提供高级定单管理。
基本描述与信息 / 快速入门指南 / 用户指南
互动课程:TWS基础 / TWS设置 / 魔方TWS
如何下单交易:标准模式TWS视频 / 魔方TWS视频
交易工具:基本描述与信息 / 用户指南
要求:如何安装适用于Windows的Java / 如何安装适用于MAC的Java / 需打开端口4000和4001
登录TWS / 下载TWS
网络交易者(WebTrader)
偏好干净简洁界面的交易者可以使用我们基于HTML的网络交易者。网络交易者便于查看市场数据、提交定单以及监控您的账户与执行。从各浏览器使用最新版本网络交易者
快速入门指南 / 网络交易者用户指南
简介:网络交易者视频
如何下单交易:网络交易者视频
登录网络交易者
移动交易者(MobileTrader)
我们的移动解决方案可供您随时随地用您的IB账户进行交易。IB TWS iOS版和IB TWS BlackBerry版是为这些型号定制设计的,而通用的移动交易者支持大多数其他智能手机。
基本描述与信息
定单类型 可用定单类型与描述 / 视频 / 课程 / 用户指南
模拟交易 基本描述与信息 / 如何获得模拟交易账户
一旦您的模拟交易账户创建成功,您便可用模拟交易账户分享您真实账户的市场数据:账户管理 > 管理账户 > 设置 > 模拟交易
4. 在全球范围进行交易
IB账户为多币种账户。您的账户可以同时持有不同的货币,可供您从一个账户交易全球范围内的多种产品。
基础货币
您的基础货币决定了您报表的转换货币以及用于确定保证金要求的货币。基础货币在您开立账户时决定。客户随时可通过账户管理改变其基础货币。
我们不会自动将货币转换为您的基础货币
货币转换必须由客户手动完成。在该视频中,您可以学习如何进行货币转换。
要开仓以您账户所不持有之货币计价的头寸,您可以有以下两种选择:
A) 货币转换。
B) IB保证金贷款。(对现金账户不可用)
请查看该课程,其解释了外汇交易方法。
5. 拓展您IB经验的五个要点
1. 合约搜索
在这里,您会找到我们的所有产品、代码与说明。
2. IB知识库
IB知识库包含了一系列术语、指导性文章、错误排查技巧以及指南,旨在帮助IB客户管理其IB账户。只需在搜索按钮输入您想要了解的内容,您便会得到答案。
3. 账户管理
我们的交易平台可供您访问市场,账户管理则可供您访问自己的IB账户。使用账户管理可管理账户相关任务,如存入或取出资金、查看您的报表、修改市场数据与新闻订阅、更改交易许可并验证或更改您的个人信息。
登录账户管理 / 账户管理快速入门指南 / 账户管理用户指南
4. 安全登录系统
为向您提供最高级别的在线安全,盈透证券推出了安全登录系统(SLS),通过安全登录系统访问账户需要进行双因素验证。双因素验证旨在于登录时采用两项安全因素确认您的身份:1)您的用户名与密码组合;和2)生成随机、一次性安全代码的安全设备。因为登录账户需要既知晓您的用户名/密码又持有实物安全设备,所以参加安全登录系统基本上可以杜绝除您之外的其他任何人访问您账户的可能性。
如何激活您的安全设备 / 如何获取安全代码卡 / 如何退还安全设备
如果忘记密码或丢失安全代码卡,请联系我们获取即时帮助。
5. 报表与报告
我们的报表与报告方便查看和进行自定义,覆盖了您盈透账户的方方面面。如何查看活动报表
IBKR Mobile Companion App for Apple Watch
Overview:
Interactive Brokers takes our intuitive and ergonomic mobile trading platform to the next level by providing you a companion app for the Apple Watch.
Background:
The companion app is designed to display information when a user has logged in to the IBKR Mobile app on their iPhone. It will work in both the Live Trading and Read Only Modes but does not support active trading. This companion app is only available for informational purpose only.
Table of contents
What does the app do?
At 'glance view' the app will display the following information; Amount of FYI Notification, Account Number, Daily P&L, Net Liquidation Value, Number of Open Orders, Number of Trades Executed, Excess Liquidity and number of Positions you currently own. It will also display the time when it has fetched the information from your iPhone.
Example:
.jpg)
Requirements
- Must have iPhone 5s or greater, using iOS 11 or later.
- Must have the IBKR Mobile app installed on your iPhone (version 11 or greater)
- Must have your Apple Watch paired to your iPhone (refer to: Set up your Apple Watch for directions)
- Must have watchOS 5 running on your Apple Watch.
Important: The Apple Watch applications are only 'companion' apps. This means they are not installed directly on the watch itself, but rather are a function of an application already installed on your iPhone.
How is the app installed?
1. Install the latest version of the IBKR Mobile app on your iPhone.
2. Pair your Apple Watch to your phone.
3. Launch the Watch app on your phone.
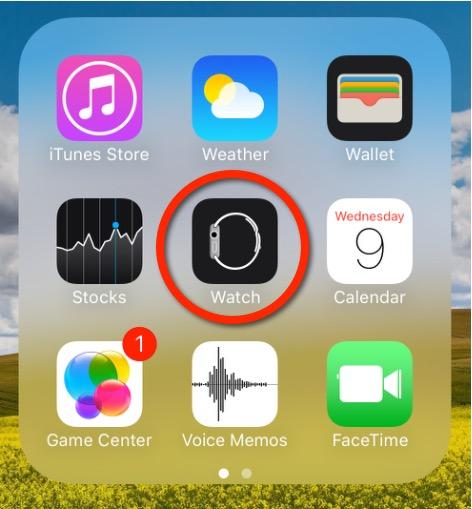
4. Scroll down on the main screen until you see your list of apps, locate the IBKR Mobile app and Tap on it.
.jpg)
5. Enable Show App on Apple Watch by swiping the slider to the right (green).
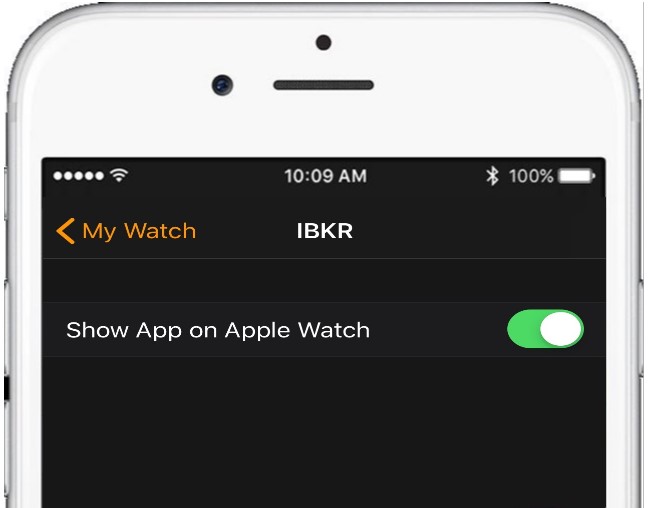
6. After the top slider is set to green, you will see a text informing you that the app is being installed. At this stage the phone is sending the application to your watch per Bluetooth. This might take a short moment (approximately 30-60 seconds.) Once completed the companion app has been installed.
Note: Once enabled it will take 24 hours before P&L shows up on the watch after activation.
How do I confirm the app is installed?
On your Apple Watch click on the crown to access your Home Screen, you should now see an icon for the IBKR Mobile App.

How to install Java on a Linux computer
Overview:
This article will walk you through the process of installing the official Oracle Java platform on your Linux machine.
Background:
There are many Linux distributions available and many of them come with one or more Java platform/s pre-installed. In the vast majority of the cases the Java platform which comes pre-installed on a Linux machine is not the official Oracle Java, but another one such as OpenJKD or IBM Java.
The Trader Workstation has been developed on the official Oracle Java platform and shows the most stable behavior and the best performances when run by the official Oracle Java process. Therefore we recommend to all the Linux users, who want to run the Trader Workstation, to install the official Oracle Java platform and set it as the preferred Java environment to be used by the operating system.
For the purpose of this guide, we will divide the Linux distributions nowadays available into three big families:
- APT based Linux distributions (Ubuntu, Mint) - those distributions use the Advanced Packaging Tool to fetch and install software packages in a semi-automatic way, resolving and taking care of dependencies.
- RPM based Linux distributions (Suse, OpenSUSE, Red Hat, CentOS, Fedora, Oracle Linux) - those distributions allow the installation of software packages (.rpm files), which contain the binary files to be installed on the system and an integrated dependency checker script. The .rpm packages allow a simplified and smooth installation of software without requiring a deep knowledge of the system.
- Other Linux distributions - those distributions may or may not use a specific package manager but all of them allow the installation of software using the source code package (.tar.gz) through a series of command to be issued on the Terminal.
How to install the official Oracle Java on APT based Linux distributions
The most simple way to install Java on Ubuntu or Mint is using the webupd8 repository. This method will install the latest version of JDK 8 and the JRE 8 browser plugin. The supported versions are: Ubuntu 15.04, 14.10, 14.04, 12.04 - Linux Mint 17.1, 17, 13
For details, please refer to: http://www.webupd8.org/2012/09/install-oracle-java-8-in-ubuntu-via-ppa.html
a. On your Linux machine, open the "Terminal". If you need help with accessing and using the Terminal, please refer to: https://help.ubuntu.com/community/UsingTheTerminal
b. Become root, by typing su on the Terminal and entering the super user password. Instead of becoming root, you can choose to use the sudo feature (which gives your user the root privileges for a single command). If you want to use sudo, just add sudo before each one of the commands you will enter in the Terminal. You will be requested to enter the sudo password.
c. Add the webupd8 repository by tiping add-apt-repository ppa:webupd8team/java Follow the instructions on the screen. You should be asked to press [ENTER] to continue. Once done, the repository will be added.
d. Type the command apt-get update
e. Enter the command: apt-get install oracle-java8-installer The process will download and install automatically the required packages along with their dependencies. Once the command has completed, the Oracle Java platform will be ready to be used.
Should you prefer to have control of all the phases of the installation, instead of relying on the APT facility, please refer to the instructions on this page: http://www.wikihow.com/Install-Oracle-Java-JRE-on-Ubuntu-Linux
How to install the official Oracle Java on RPM based Linux distributions
a. On your Linux machine, open the "Terminal". If you need help with accessing and using the Terminal, please refer to: https://help.ubuntu.com/community/UsingTheTerminal
b. Become root, by typing su on the Terminal and entering the super user password. Instead of becoming root, you can choose to use the sudo feature (which gives your user the root privileges for single commands). If you want to use sudo, just add sudo before each one of the commands you will enter in the Terminal. You will be requested to enter the sudo password.
c. Create the folder /usr/java by issuing the command mkdir /usr/java. If the directory already exists you will see a message indicating that. In this case you can proceed directly to point d.
d. Go to the page https://www.java.com/en/download/linux_manual.jsp
e. If you have a 32 bit system, download the file "Linux RPM" . If you have a 64 bit system, download the file "Linux64 RPM". In either case, please instruct your browser to save the file in the folder /usr/java or move the file to that foder once it has been downloaded.
f. Go back to the Terminal and move to the /usr/java folder by typing cd /usr/java
g. List the content of the folder by typing the command ls -la You should see the file you downloaded. It will be called jre-XuYY-linux-ARCH.rpm (where X is the Java family, YY the update number and ARCH will be i586 for 32 bit installer and x64 for 64 bit installer)
h. Launch this command to perform the installation: rpm -ivh jre-XuYY-linux-ARCH.rpm Obviously you need to use the real file name, for example jre-8u65-linux-x64.rpm
Once the installation has been performed, the Oracle Java should be ready to be used. Usually a system restart is not required on Linux machines. In case you see warning or error message/s during the installation, please check their content and search the Internet for possible solutions. Most of the time the warning/error messages maight refer to missing dependencies (this means that another package needs to be installed before you can install Java) or to unsufficient privileges (this means that you are launching the command with a regular user instead of "root"). If you cannot find the proper course of actions to overcome the issue, please refer to the support documentation or forums for your current Linux distribution.
How to install the official Oracle Java on other Linux distributions
If your Linux distribution does not support RPM or APT package managers, the installation of Oracle Java can be performed manually in this way:
a. On your Linux machine, open the "Terminal".
b. Become root, by typing su on the Terminal and entering the super user password. Instead of becoming root, you can choose to use the sudo feature (which gives your user the root privileges for single commands). If you want to use sudo, just add sudo before each one of the commands you will enter in the Terminal. You will be then required to enter the sudo password.
c. Create the folder /usr/java by issuing the command mkdir /usr/java. If the directory already exists you will see a message indicating that. In this case you can proceed directly to point d.
d. Go to the page https://www.java.com/en/download/linux_manual.jsp
e. If you have a 32 bit system, download the file "Linux" . If you have a 64 bit system, download the file "Linux x64". In either case, please instruct your browser to save the file in the folder /usr/java or move the file to that foder once it has been downloaded.
f. Go back to the Terminal and move to the /usr/java folder by typing cd /usr/java
g. List the content of the folder by typing the command ls -la You should see the file you downloaded. It will be called jre-XuYY-linux-ARCH.tar.gz (where X is the Java family, YY the update number and ARCH will be i586 for 32 bit installer and x64 for 64 bit installer)
h. Launch this command to perform the installation: tar zxvf jre-XuYY-linux-ARCH.tar.gz Obviously you need to use the real file name, for example jre-8u65-linux-x64.tar.gz
i. Once done, enter command ls -la You will see the folder /usr/java/jre1.X.0_YY (where X is the Java family, YY the update number)
l. The Java executables are now present in the folder /usr/java/jre1.X.0_YY/bin
m. Now check which is the symbolic link used by the system to access the java executables by entering the commands:
which java - you will receive an output similar to this: /usr/bin/java From now on we will refer to this path as javasympath.
which javac - you will receive an output similar to this: /usr/bin/java From now on we will refer to this path as javacsympath.
which javaws - you will receive an output similar to this: /usr/bin/java From now on we will refer to this path as javawssympath.
Unless your are launching the java applications using the full path (for example /usr/java/jre1.X.0_YY/bin/java ...), you would need to tell your system which java executables should be used when a generic java command is issued. In order to to this, you can either update your alternatives files (if your system supports them) or the symbolic links. Here below you can see the instructions, according to your system:
- If your system uses the alternatives files:
n. Issue the following commands, paying attention to make the necessary substitutions .
update-alternatives --install javasympath java /usr/java/jre1.X.0_YY/bin/java 1
update-alternatives --install javacsympath javac /usr/java/jre1.X.0_YY/bin/javac 1
update-alternatives --install javawssympath javaws /usr/java/jre1.X.0_YY/bin/javaws 1
- If your system does not use the alternatives files:
n. Issue the following commands, paying attention to make the necessary substitutions .
ln -sf /usr/java/jre1.X.0_YY/bin/java javasympath
ln -sf /usr/java/jre1.X.0_YY/bin/javac javacsympath
ln -sf /usr/java/jre1.X.0_YY/bin/javaws javawssympath
How to fix the error: "Library dbcapi.dll cannot be loaded"
Background:
TWS users may receive the following error message upon configuring TWS to use the eSignal data feed:
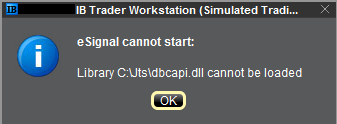
This error may appear for the following reasons:
Issue A - You are not using the 32 bit version of TWS and/or eSignal:
The 32-bit versions of both TWS and eSignal have to be installed for the integration to work. In the section below you will find the instructions for installing the 32-bit TWS. Should you need assistance with the installation of the 32-bit eSignal, we suggest you to contact the eSignal customer support.
Issue B - There is an incompatibility with the file C:\Jts\dbcapi.dll:
To use 32-bit eSignal version 12, an incompatibility with the C:\Jts\dbcapi.dll file must be fixed. This involves copying a file from the eSignal installation and renaming it to dbcapi.dll.
Note: On certain systems you will need to apply the fixes for both issue A and B. If you applied the fix for issue A (or if you are already sure you are using the 32 bit version of both platforms) and you are still receiving the error message, then please apply as well the fix for issue B.
Instructions to resolve issue A
Installing 32-bit TWS
Please open the page http://www.ibkr.com in your browser and perform the steps below:
1) Click on the Log In button at the top right corner of the page.
2) Click on Download Trader Workstation: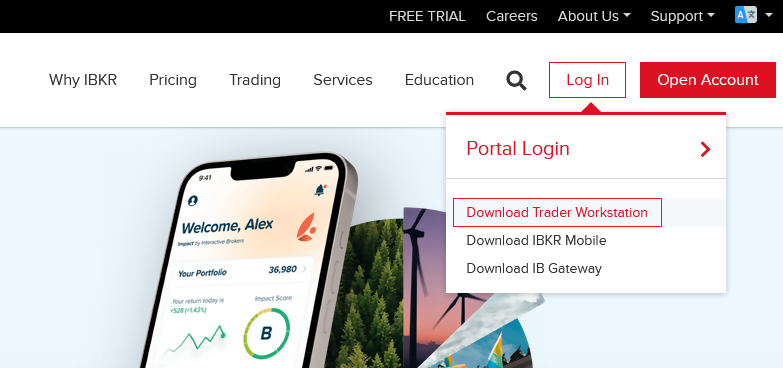
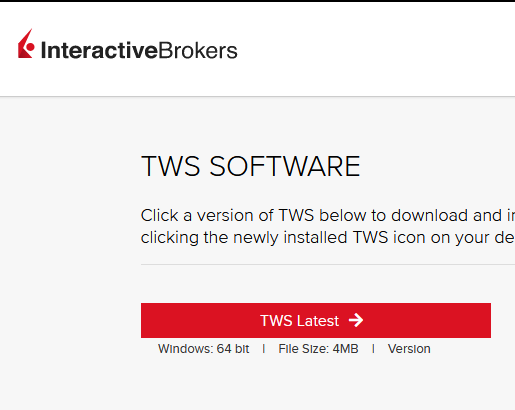
3) Click on the red button TWS Latest:
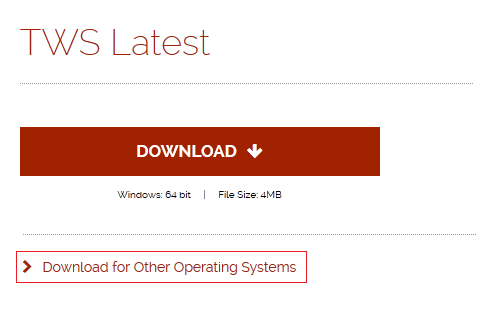
4) On the next page, click on the link Download for Other Operating Systems:
5) Click on the item Windows 32-bit:
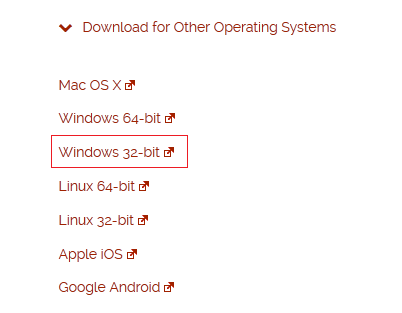
6) Make sure that the description under the DOWNLOAD button has changed to "Windows: 32 bit". Click now on DOWNLOAD:

7) Launch the downloaded file. The Trader Workstation installation will start. At this point, you may see the warning message "Trader Workstation latest is already installed...". Ignore this warning and click on the button Next > to continue the installation:
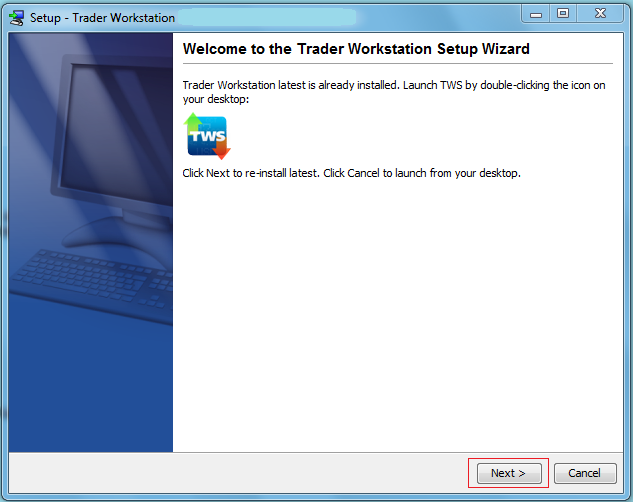
8) Your "Trader Workstation" Desktop icon will be automatically updated. You can now launch the 32-bit Trader Workstation by a double click on that icon.
If you have launched the 32-bit TWS and the 32 bit version of eSignal but you still receive the same error message, please follow as well the instructions below.
Instructions to resolve issue B
Replacing dbcapi.dll for compatibility between 32-bit TWS and 32-bit eSignal 12
To correct an incompatibility with the dbcapi.dll file, we will replace that file with another version of it taken from the eSignal installation folder. Please follow the steps below to perform the substitution:
1) Navigate to C:\Jts and rename the file dbcapi.dll to dbcapi_old.dll
2) Navigate to the directory where 32-bit eSignal 12 is installed (most commonly C:\Program Files (x86)\Common Files\Interactive Data\DM).
3) Copy dbcapi_vc8.dll from that directory into the C:\Jts directory.
4) Move to the C:\Jts directory.
5) Right click on the dbcapi_vc8.dll file (now in the C:\Jts directory) and select rename. Type dbcapi.dll as the new filename.
.jpg)
6) TWS is now ready to accept the eSignal data feed.
How to opt back into the Secure Login System
Overview:
Clients who have performed an opt-out from the Secure Login System (SLS) program expose themselves to certain risks and are therefore subject to certain restrictions (e.g. ability to trade Pink Sheet and OTCBB stocks). Considering this, along with the protection benefits afforded through a complete SLS protection, you may decide to opt back into the Secure Login System. The following article provides the step-by-step instructions for accomplishing this.
Background:
Please note that in order to modify the security settings for an account, the primary user needs to login to the Client Portal. If your user is not allowed to change the security settings, the system will show you a notice and will point you to the user which has such rights.
In order to opt back into the Secure Login System, please proceed as follows:
1. Open your browser and go to the web page ibkr.com.
2. Click on Log In > Portal Login
3. Enter your credentials and complete the authentication using your security device
4. Click the User menu (head and shoulders icon in the top right corner) followed by Settings.
5. Under the User Settings section find Security and click Secure Login System.
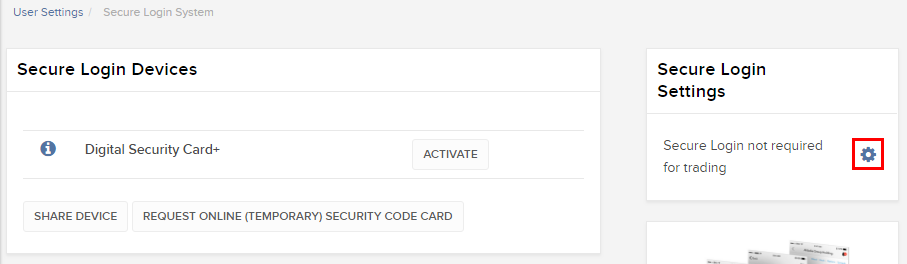
6. You will see a box titled "Secure Login Settings". Within that box, click on the Configure "gear" icon. This will take you to the settings for Secure Login not required for trading.
7. Select the radio button next to "I want to always use my Secure Login Device when logging in" and click on Continue
8. You will receive a confirmation that your settings have been updated. Click on OK to finalize the procedure
References
- See KB1131 for an overview of the Secure Login System
- See KB1943 for instructions on requesting a replacement Digital Security Card+
- See KB2636 for information and procedures related to Security Devices
- See KB2481 for instructions about sharing the Security Login Device between two or more users
- See KB975 for instructions on how to return your security device to IBKR
- See KB2260 for instructions on activating the IB Key authentication via IBKR Mobile
- See KB2895 for information about Multiple 2Factor System (M2FS)
- See KB1861 for information about charges or expenses associated with the security devices
- See KB69 for information about Temporary passcode validity