So lädt man ein diagnostisches Bündel von einer IBKR-Plattform hoch
Bei manchen unterstützungstechnischen Fragen müssen diagnostische Dateien und Logdateien zusammen mit Screenshots hochgeladen werden. Diese Informationen helfen unserem Team bei der Untersuchung und Lösung des Problems.
In diesem Artikel wird ausführlich beschrieben, wie Sie bei Interactive Brokers diagnostische Dateien und Logdateien auf verschiedenen Plattformen hochladen können.
Hinweis: Das diagnostische Bündel-Repository wird von IBKR tagsüber nicht fortlaufend kontrolliert. Sollten Sie sich ohne vorherige Anweisung von Interactive Brokers spontan dazu entscheiden, ein diagnostisches Bündel hochzuladen, melden Sie sich bitte telefonisch bei unserem Kundendienst oder erstellen Sie ein Ticket über das Nachrichtencenter. Anderenfalls bleibt Ihre Fehlermeldung unbeachtet.
Bitte klicken Sie je nach der Plattform, die Sie verwenden, unten auf den passenden Link:
-
IBKR Mobile (Android)
-
IBKR Mobile (iOS)
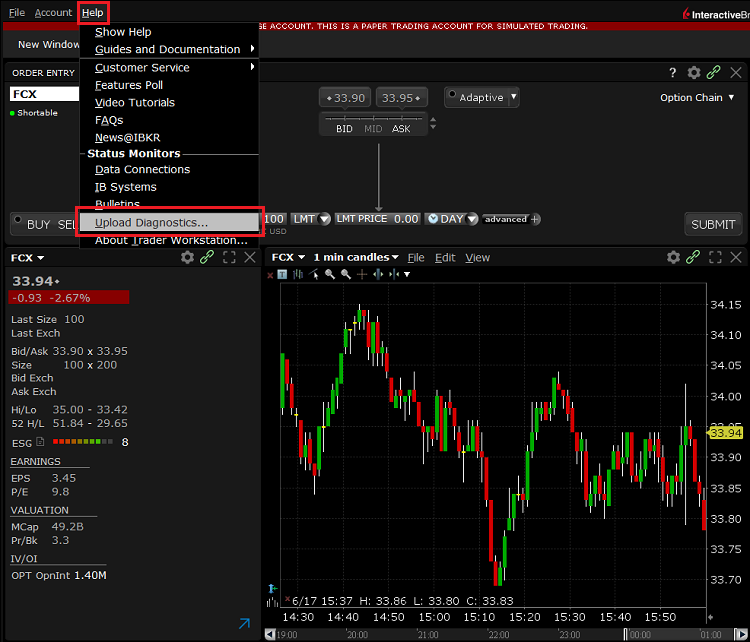
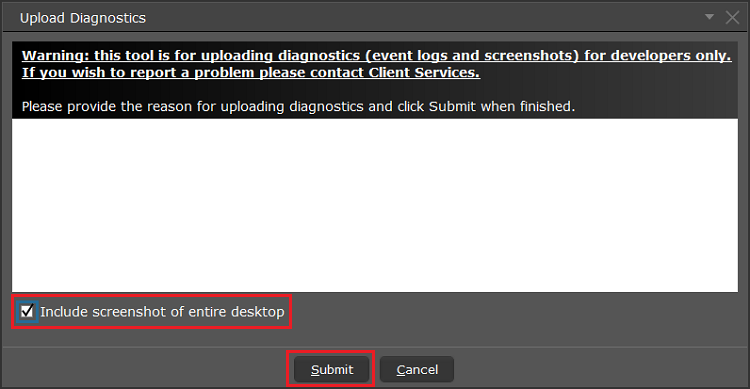
- Bei Windows- und Linux-Betriebystemen: Drücken Sie Ctrl+Alt+Q
- Bei Mac: Drücken Sie Cmd+Option+H
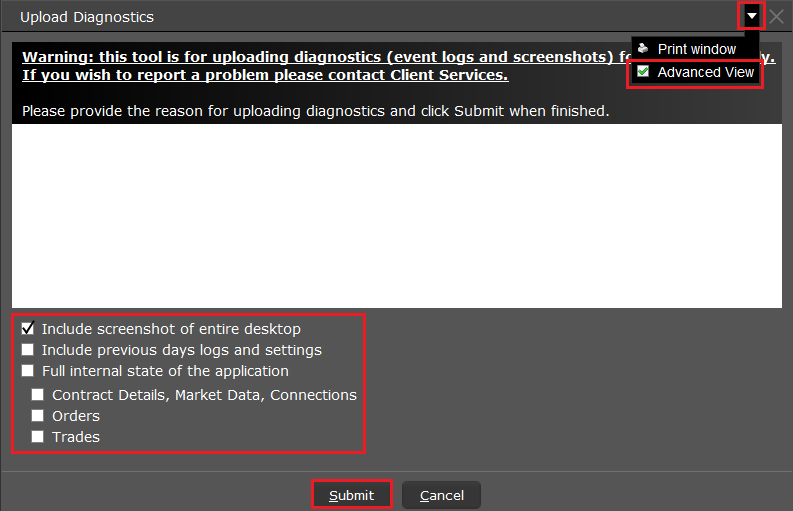

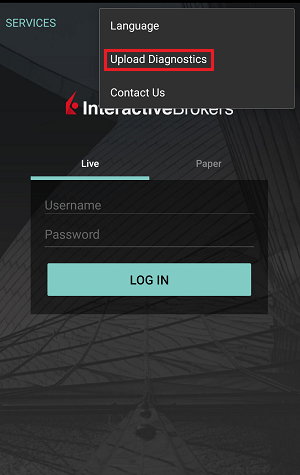
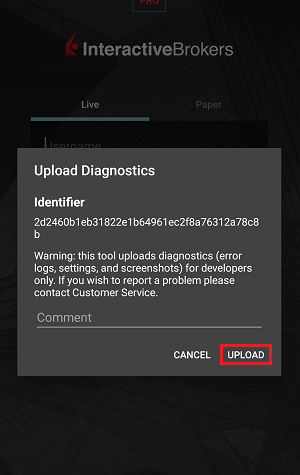
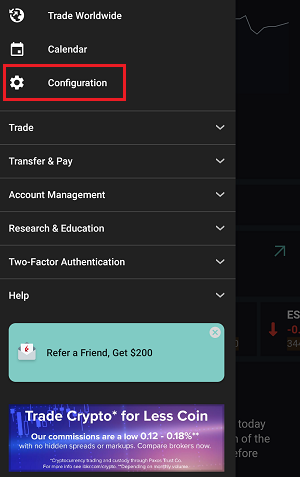
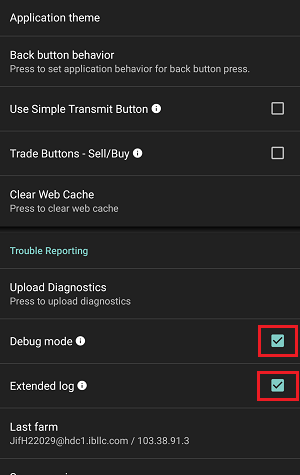
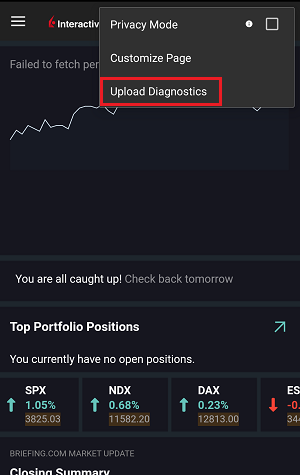
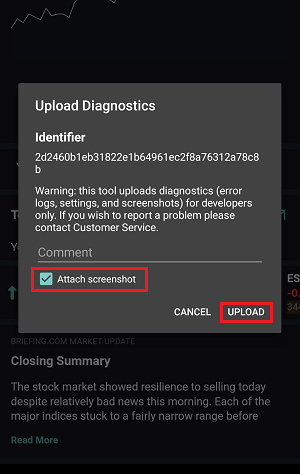
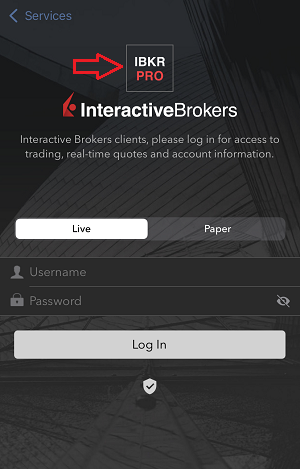
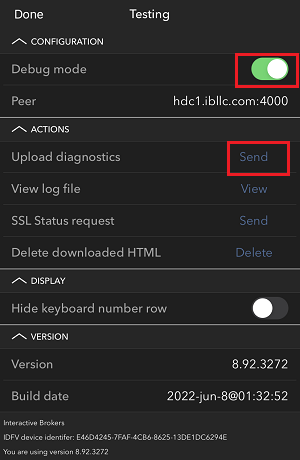
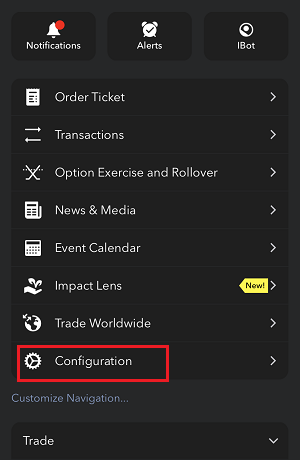
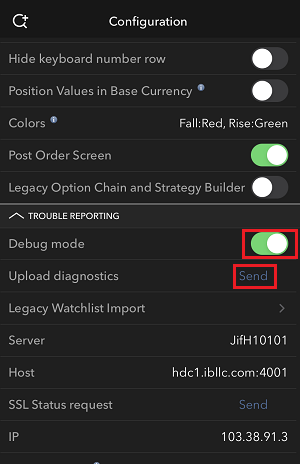
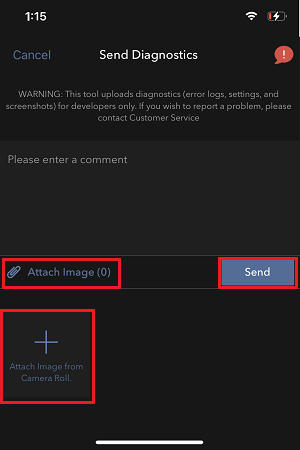
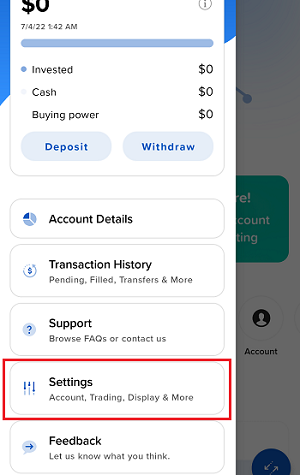
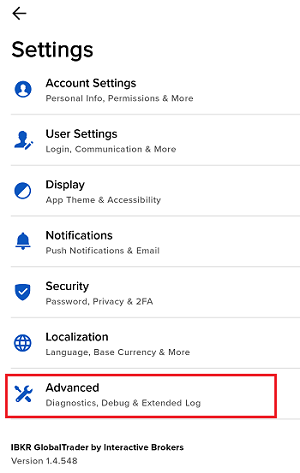
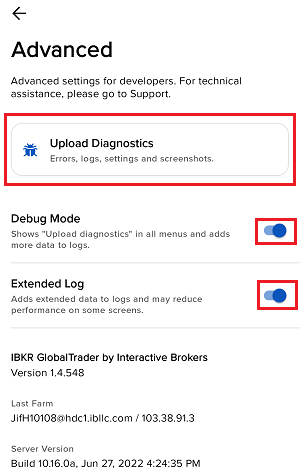
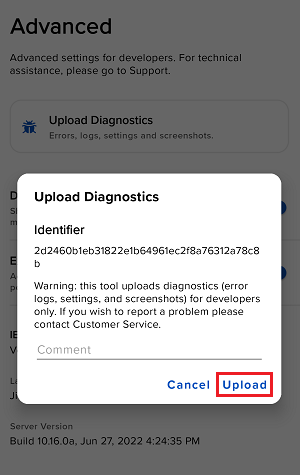
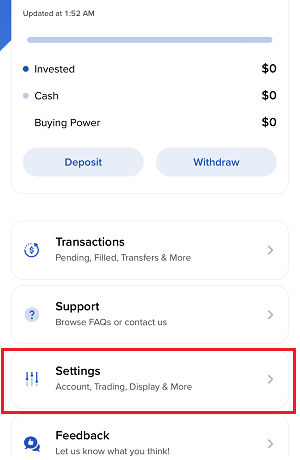
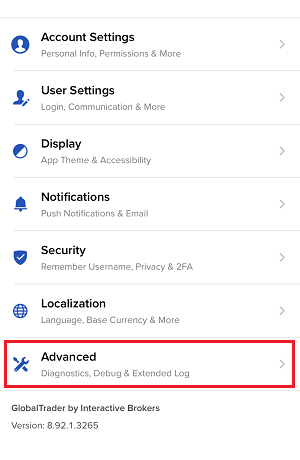
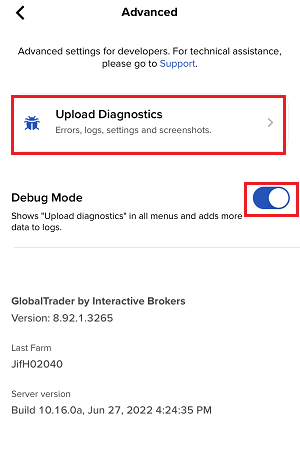
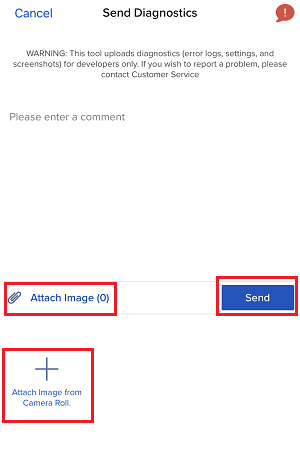
7. Geben Sie Ihre Anmerkungen in das Feld ein und tippen Sie auf ‚Bild hinzufügen‘, um den/die Screenshot/s, den/die Sie auf der Kamerarolle gespeichert haben, hinzuzufügen
Eine diagnostische Ablaufverfolgung für Client Portal kann mittels der Schritte in IBKB3512 nachverfolgt werden
How to Upload a Diagnostic Bundle from an IBKR Platform
Some support related issues require diagnostics files and logs to be uploaded along with screenshots. The information will help our team to investigate and resolve the issue that you are experiencing.
This article will help you with detailed steps on how to upload diagnostics files and logs from various Interactive Brokers’ trading platforms.
Note: IBKR does not monitor the diagnostic bundle repository throughout the day. Should you spontaneously decide to upload a diagnostic bundle, without being instructed by Interactive Brokers, please inform our Client Services via Message Center ticket or phone call otherwise your error report will go unnoticed.
Please click on one of the links below, according to the platform you are using:
-
IBKR Mobile (Android)
-
IBKR Mobile (iOS)
- For Windows and Linux Operating system: Press Ctrl+Alt+Q
- For Mac: Press Cmd+Option+H


7. Enter your comments in the field and tap ‘Attach Image’ to attach the screenshot/s you previously saved in your camera roll

A diagnostic trace for Client Portal can be captured following the steps on IBKB3512
Problembehandlung: Fehlgeschlagener Login in die Handelsplattform
Klicken Sie auf den nachstehenden Link, der Ihre Situation am besten beschreibt:
a. Wenn Sie einen vorübergehenden Code verwenden, beachten Sie bitte, dass bei den Buchstaben die Groß- und Kleinschreibung relevant ist und die Buchstaben in Großbuchstaben eingegeben werden müssen.
b. Wenn Sie eine Sicherheitskarte oder ein elektronisches Gerät verwenden, beachten Sie bitte, dass es keine Leerzeichen zwischen den jeweiligen Zeichen geben darf.
c. Ports 4000/4001 werden blockiert. Diese Ports werden häufig von öffentlichen Verbindung wie z. B. Hotels, Cafés etc. blockiert und müssen offen sein, um das eingehende/ausgehende TCP-Protokoll zu ermöglichen. Wenn ein Router mit Ihrem Computer verbunden ist, müssen diese Ports zum Router hin geöffnet sein.*
*Bitte klicken Sie hier, um Ihren Verbindungsstatus zu überprüfen: IBKR Verbindungstestseite.
Wie kann ich einen Ersatz für mein Sicherheitsgerät bzw. einen vorübergehenden Sicherheitscode beantragen?
IBKR misst dem Schutz Ihres Kontos und Ihrer Vermögenswerte vor betrügerischen Übergriffen große Bedeutung zu. Das Secure-Login-System bietet Ihrem Konto zusätzlichen Schutz. Aus Sicherheitsgründen müssen alle Anträge für den Ersatz eines Sicherheitsgerätes telefonisch gemacht werden. Dafür wird die Identität des Kontoinhabers bzw. autorisierten Benutzer mündlich überprüft. Um Hilfe beim Zugriff auf Ihr Konto sofort zu erhalten und um einen Ersatz für Ihr Sicherheitsgerät zu beantragen,kontaktieren Sie bitte den IBKR-Kundenservice per Telefon, um sich wieder einloggen zu können.
Verweise
- Siehe KB69 für Informationen zur Gültigkeit vorübergehender Passcodes.
- Siehe KB1131 für eine Übersicht über das Secure-Login-System.
- Siehe KB2661 für Informationen und Verfahren im Zusammenhang mit Sicherheitsgeräten.
- Siehe KB2481 für Anweisungen zur gemeinsamen Nutzung des Sicherheitsgeräts zwischen zwei oder mehreren Benutzern.
- Siehe KB2545 für Anweisungen dazu, wie Sie sich erneut für das Secure-Login-System anmelden können.
- Siehe KB975 für Anweisungen zu Rücksendungen von Sicherheitsgeräten an IBKR.
- Siehe KB2260 für Anweisungen zur Aktivierung der Authentifizierung mit IB Key über IBKR Mobile.
- Siehe KB2895 für Informationen zum multiplen 2-Faktor-System (M2FS).
- Siehe KB1861 für Informationen zu Gebühren bzw. Kosten im Zusammenhang mit Sicherheitsgebühren.
Wie lange ist ein vorübergehender Sicherheitscode gültig?
IBKR wird einen vorübergehenden Code an Teilnehmer des Secure-Login-Systems herausgeben, für den Fall, dass sie ihr Sicherheitsgerät verlegt, verloren oder beschädigt haben. Der vorübergehende Code gibt Ihnen 2 Tage lang vollständigen Zugang zum Client Portal und den Handelsplattformen. Nach 2 Tagen kann der vorübergehende Code nicht mehr für den Zugriff auf die Handelsplattformen verwendet werden, aber für das Client Portal ist er weitere 8 Tage lang gültig. Der Zugriff auf das Client Portal ist jedoch ausschließlich auf das Ausdrucken oder Speichern der Online-Sicherheitscodekarte beschränkt.
Die Online-Sicherheitscodekarte ist hingegen 21 Tage lang gültig, wodurch dem Kontoinhaber die Möglichkeit gegeben wird, das verlegte Gerät wiederzufinden oder um fortwährenden Zugriff zu haben, für den Fall, dass das Gerät verloren ist oder beschädigt wurde bzw. ersetzt werden muss. Kontoinhaber, die ohne ihr physisches Sicherheitsgerät bleiben und die sich weder mit dem vorübergehenden Code oder der Online-Sicherheitscodekarte einloggen können, müssen den Kundenservice (ibkr.com/support) kontaktieren, um Zugriff auf ihr Konto zu erhalten.
Die schnellste Lösung zur Wiederherstellung des dauerhaften Zugangs auf Ihr Konto ist es, IBKR Mobile zu installieren und zu aktivieren. Details zur sofortigen Aktivierung der Smartphone-App erhalten Sie hier.
WICHTIGER HINWEIS
Im Einklang mit ihren Richtlinien gibt IBKR keine weiteren, vorübergehenden Codes hintereinander für ein Konto aus, sondern hilft Kunden, ihren Kontoschutz wieder auf das höchste Niveau zu bringen, der durch ein physisches Sicherheitsgerät gegeben ist.
Verweise
- Siehe KB70 für Anweisungen zur Beantragung eines vorübergehenden Codes.
- Siehe KB1131 für eine Übersicht zum Secure-Login-System.
- Siehe KB2661 für Informationen und Verfahren im Zusammenhang mit Sicherheitsgeräten.
- Siehe KB2481 für Anweisungen zur gemeinsamen Nutzung des Sicherheitsgeräts zwischen zwei oder mehreren Benutzern.
- Siehe KB2545 für Anweisungen dazu, wie Sie sich erneut für das Secure-Login-System anmelden können.
- Siehe KB1973 für Anweisungen zu Rücksendungen von Sicherheitsgeräten an IBKR.
- Siehe KB2260 für Anweisungen zur Aktivierung der Authentifizierung mit IB Key über IBKR Mobile.
- Siehe KB2895 für Informationen zum multiplen 2-Faktor-System (M2FS).
- Siehe KB1861 für Informationen zu Gebühren bzw. Kosten im Zusammenhang mit Sicherheitsgebühren.
Disclosure Regarding Interactive Brokers Price Cap Notices
Regulators expect brokerage firms to maintain controls designed to prevent the firm from submitting orders to market centers that create a risk of disruptive trading (e.g., the risk of sudden, transient price moves).
To comply with these expectations, Interactive Brokers implements various price filters on customer orders. Those price filters may, in certain circumstances, price cap customer orders in order to avoid market disruption, and those Price Caps will generally be in a % range from a reference price range calculated by IB. (The range of the Price Cap varies depending on the type of instrument and the current price.)
Although the price caps are intended to balance the objectives of trade certainty and minimized price risk, a trade may be delayed or may not take place as a result of price capping. More information is available in Interactive Broker’s Order Routing and Payment for Order Flow Disclosure.
If a customer’s order(s) are price capped by IB’s systems, that customer will either receive (i) real-time notification of those price cap(s) in Trader Workstation or via the API or FIX tag 58 (for FIX users); and/or (ii) a daily FYI message containing a digest of the first 10 order(s) that were price capped the prior day, the initial price cap(s) for those order(s) (if applicable), and the Price Cap Range(s) for further Price Cap(s) of those order(s).
Customers may opt out from receiving future FYI Messages by clicking the relevant opt-out link within an FYI Message. By opting out from receiving these future FYI Messages, a customer:
- Agrees to waive any further notifications from Interactive Brokers about the application of the firm’s Price Caps to that customer’s order(s); and
- Acknowledges that he or she understands that his or her orders may be price-capped in the future, but that the customer does not wish to be notified again about the application of any Price Caps to any of his or her orders.
Possible Alerts during the TWS installation or update
IBKR's Trader Workstation (TWS) is a global trading system enabling clients to use a suite of online trading tools. The TWS can be installed on Windows, Mac OS X and Linux, and it requires the presence of a Java Runtime Environment (JRE). Therefore, when you install the TWS, it also downloads the necessary Java files in order to run using a Java Virtual Machine (JVM).
Sometimes, during the installation or update process of the TWS, software such as Antivirus applications will show an alert and prevent the process to complete. The warning and other messages in this case can safely be ignored, and you can complete the installation of the trading platform.
Table of content
Downloading the TWS installer and update patches
The TWS installers available in the download areas of ibkr.com or IBKR regional web sites are sealed and digitally signed using all the safety procedures required by the industry standards and do not contain any malicious code or process. The same industry standard practices have been used for the TWS update patches, which are automatically downloaded and installed when launching the TWS (if and only if there is an update available). Nevertheless, if you have received an alert, we recommend you to be cautious. Should you intend to keep the TWS installation file on your machine for future use, you should make sure that the same precautions for the protection of data from viruses and malware are applied to it.
Why do I receive a warning when I install the TWS or when the TWS automatic update runs?
You might see an alert (similar to Figure 1 but not limited to) and your security system would wait for your input on how to process the suspicious file. You usually have the option to quarantine the file, delete it, ignore it once or create a permanent exception for it.
Please note that your antivirus might autonomously quarantine or delete the TWS installer file or some of his components without asking for your confirmation and without showing you any warning. Nevertheless, this should only happen if you have preset your antivirus to specifically react in this way.
Figure 1.

What should I do when I receive a warning?
In case you receive a warning during the TWS installation or update, we recommend the following steps:
1. Delete the TWS installer and download it again from the IBKR main or regional web site
a) Delete the TWS installer file already present on your computer and then delete it as well from your Trash (empty your Trash)
b) From the table below, click on the TWS download area correspondent to your location
| Location | TWS download area |
| US | https://www.ibkr.com |
| Asia / Oceania | https://www.interactivebrokers.com.hk |
| India | https://www.interactivebrokers.co.in |
| Europe | https://www.interactivebrokers.co.uk https://www.interactivebrokers.eu |
c) Check the website certificate. Most Internet browsers will immediately alert you in case the site certificate is invalid, compromised or expired. Nevertheless, if you want to check manually the validity of the site certificate, click on the padlock close to the address (URL) and make sure the Connection is reported as secure and no security warning are present (see Figure 2 below).
Figure 2.

d) Click on the button labeled with the TWS version you wish to use and download again the TWS installer
2. Check the digital signature of the TWS installer file you have downloaded
Normally you will immediately receive a security warning in case the digital signature of a file is compromised. Nevertheless, if you wish to perform a manual check, proceed as follows, according to your Operating System:
For Windows
a) From the Windows file explorer, access your Downloads folder or the folder where you placed the TWS installer
b) Right click on the TWS installer file, select Properties and then click on the tab "Digital Signatures"
c) Click on "Details" and on "View Certificate" to check the certificate status and signer. The legitimate signer is "IB Exchange Corp." (See Figure 3 below)
Figure 3.

For Mac OS X
a) Click on the magnifier glass (Spotlight Search) on the top right of your screen and type Terminal. From the search results, launch the Terminal app
b) Type cd Downloads and press Enter
c) Type codesign -dv --verbose=4 tws-latest-macosx-x64.dmg and press Enter. Please notice that the name of the file (tws-latest-macosx-x64.dmg) may differ according to the TWS version you decided to download. If needed, replace the file name in the command with the appropriate one
d) Check the command output and make sure the "Developer ID Application" is "IB Exchange Corp." (see Figure 4 below)
Figure 4.

3. Run the TWS installer file you have downloaded
Once you have downloaded again the TWS installer and after you made sure the file is original (points 1. and 2. above), you can proceed with the installation. Should you still receive a warning from your antivirus, you can reasonably consider it as a false positive and ignore it. Should you need guidance on this step, please proceed directly to the next section.
How can I signal an Alert as false positive?
All modern security systems allow the creation of exceptions, precisely in order to address false positive cases. An exception is a rule forcing the antivirus engine not to scan a specific file or process. That specific file or process will hence be deemed safe and no further alerts will be raised for it.
The procedure for creating an exception may vary, according to the security software you are using. You may be able to create a temporary or permanent exception directly from the alert pop-up or you may have to create one manually from a specific section in the main configuration panel.
If you are unsure of the procedure, we recommend you to consult your antivirus documentation.
Once you have set an exception for the TWS installer file or for the TWS updater process, those will be no longer blocked and will be able to complete their respective tasks successfully.
What else can I do if I have doubts or if my system behaves abnormally?
If you have reasons to believe your machine may be compromised or infected, we recommend performing a full system scan. Usually you can right click on the antivirus icon present on the bottom taskbar (for Windows) or on the upper menu bar (for MacOS) and you will find the option to launch a full system scan. Alternatively, you may start that task from the main antivirus window. If you are unsure of the procedure, we recommend you to consult your antivirus documentation.
Technical Background
How does my security system scan the files I download from the Internet?
Modern antivirus and anti-malware engines base their threats recognition on:
Signature-based scanning: the antivirus scanner searches for a specific pattern of bytes that was previously catalogued as malicious or at least suspicious. The antivirus may check as well file signatures (called hash) against a database of known threats (called virus definitions).
Analysis of behavior: the antivirus engine detects specific actions which individually may not represent a threat but, when correlated together, resemble the usual activity of a malicious software (e.g. the ability of a code to replicate or hide itself, download additional files from the Internet, contact external hosts over the Internet, modify the Operating System registry) This type of scan is designed to detect previously unknown computer threats.
Heuristic detection: the scanner de-compiles the code or runs it within a virtual, restricted environment. It then classifies and weights the actions performed by the code against a predefined, behavior based, rule set.
Cloud-based protection and machine learning: those are relatively new techniques. The file that needs to be analyzed is sent to the antivirus / security system vendor cloud where sophisticated algorithms perform a deep analysis of the code authenticity and behavior.
Are those scan methods infallible?
Modern threats are very sophisticated and, like biological viruses, can mutate their code and their signatures. Moreover, new malwares and exploits are created every day and spread rapidly over the Internet. The threat recognition methods mentioned above are therefore not infallible but can guarantee a high percentage of malware recognition when combined together.
While signature based techniques are very successful in recognizing known threats and less prone to false positives, they are not so efficient in recognizing unknown malware or mutations of existing ones. In this area, the behavioral and heuristic methods perform much better although they are more prone to false positives since their detection is not based on bare code matching but on a certain degree of interpretation and hence uncertainty.
The term "false positive" is used when a security system classifies an innocuous file or process as malware.
Reference:
Alternative Streaming Quotes for US Equities
The SEC Vendor Display Rule requires that brokers give clients access to the NBBO at the point of order entry. In order to provide users with free live streaming market data, we cannot display this free stream when entering an order without the client subscribing to the paid NBBO. Please note, this does not apply to non-IBLLC clients.
Under the Rule 603(c) of Regulation NMS (Vendor Display Rule), when a broker is providing quotation information to clients that can be used to assess the current market or the quality of trade execution, reliance on non-consolidated market information as the source of that quotation would not be consistent with the Vendor Display Rule.
All clients (IBKR Lite and Pro) have access to streaming real-time US equity quotes from Cboe One and IEX at no charge. Since this data does not include all markets, we cannot show this quote when entering parameters for a US stock quote. Therefore and according to FINRA's enforcement of the SEC rule, IBKR provides IBLLC US clients a free default snapshot service, “US Snapshots VDR Required”. If clients do not sign up for an NBBO US equity data service and they are an IBLLC client, they will have access to free real-time snapshots when making trading decisions on US stocks. Order routing will not change based on what is shown on the screen. If one is subscribed to NBBO quotes or not, by default the trade will still take place with the assistance of the SMART order router designed to provide the best price for the order.
Please see the sample screenshots below from TWS Classic and TWS Mosaic for what occurs when placing an order without the NBBO streaming subscription for US equities.
TWS Classic:
1. Screenshot of quotes showing without order entry line item
2. Screenshot of quote going blank when putting in the order entry line item
TWS Mosaic:
1. Screenshot of quotes showing without order entry line item
2. Screenshot of quote going blank when putting in the order entry line item
Vereinigung der IB TWS und des IB Key in IBKR Mobile
ÜBERSICHT
Die Übertragung Ihres Benutzers hängt von den jeweiligen Apps ab, die Sie momentan verwenden:
1. Sie verwenden Ihr Smartphone ausschließlich für Handelszwecke (IB TWS ist installiert) - Klicken Sie hier
2. Sie verwenden Ihr Smartphone ausschließlich für Authentifizierungszwecke (IB Key ist installiert) - Klicken Sie hier
3. Sie verwenden Ihr Smartphone sowohl für Handels- als auch Authentifizierungszwecke (IB TWS und IB Key sind installiert) - Klicken Sie hier
4. Sie verwenden Ihr Smartphone für Transaktionen mit Ihrer Debit Card (IB Key ist installiert) - Klicken Sie hier
Sie verwenden die IB TWS
Sie haben bisher Handelsgeschäfte auf Ihrem Smartphone über die IB TWS ausgeführt und den IB Key noch nicht verwendet.
1. Beim erstmaligen Start der Anwendung werden Sie den folgenden Startbildschirm sehen.
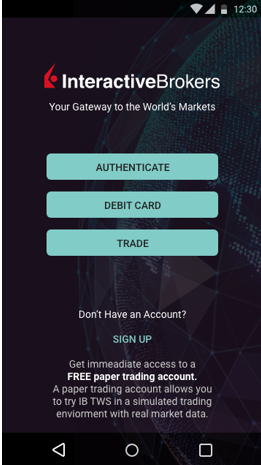
Auf Abbildung 1 ist der Startbildschirm von IBKR Mobile für iOS-Geräte zu sehen. Auf Abbildung 2 sehen Sie die entsprechende Version für Android-Geräte.
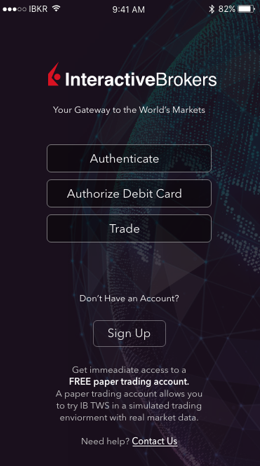
Abbildung 1 Abbildung 2
2. Tippen Sie auf die Schaltfläche „Handel”.
3. Die restlichen Anwendungsabläufe sind identisch mit den Anwendungen, die Sie in der Vergangenheit genutzt haben.
Zugang zu weiteren Funktionen vom Handelsbildschirm aus
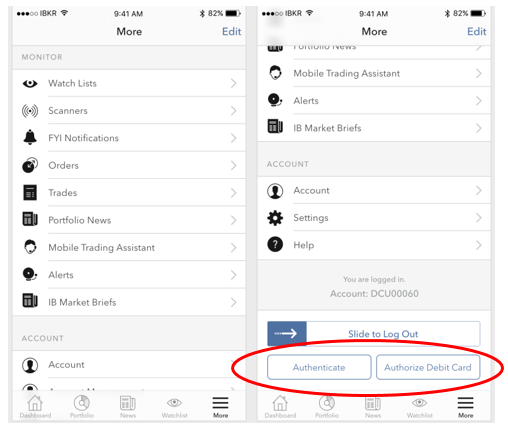
Falls Sie auf weitere Funktionen von IBKR Mobile zugreifen möchten, wie z. B. das Authentifizierungsmodul oder
Debit-Card-Funktionen:
Bei iOS-Geräten (Abbildung 3)
1. Öffnen Sie das Menü „Mehr” (unten rechts in Ihrem Bildschirm).
2. Scrollen Sie bis zum Ende der Seite herunter
Bei Android-Geräten (Abbildung 4)
1. Öffnen Sie das Anwendungsmenü
2. Scrollen Sie zum Ende der Rubrik - „App-Einstellungen”
.png)
Abbildung 3 Abbildung 4
Sie verwenden den IB Key
Aktivierung
1. Starten Sie IBKR Mobile und tippen Sie auf „Authentifizierung”.
2. Die App wird den installierten IB Key erkennen und Ihnen eine Handlungsoption anbieten - entweder eine
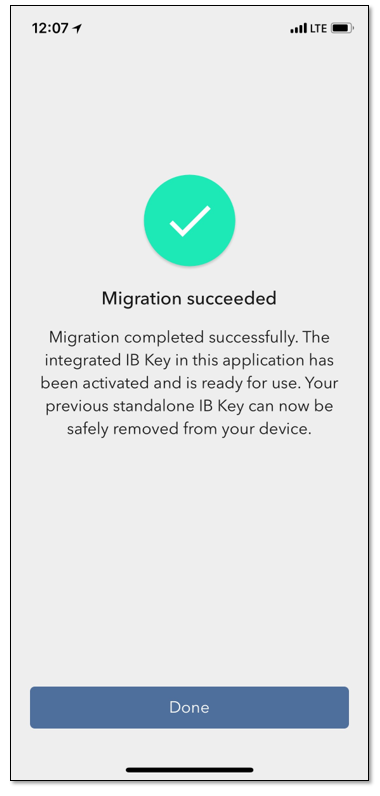
automatische Übertragung (Abbildung 5) oder eine Aktualisierung und danach eine automatische Übertragung.
Zudem haben Sie die Möglichkeit, die Übertragung manuell und zu einem späteren Zeitpunkt durchzuführen.
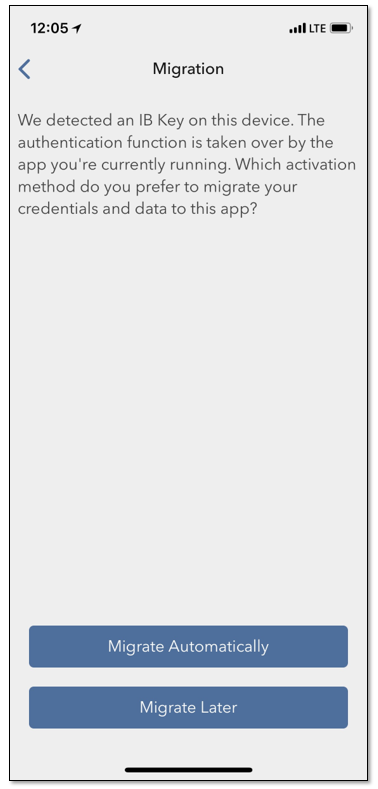
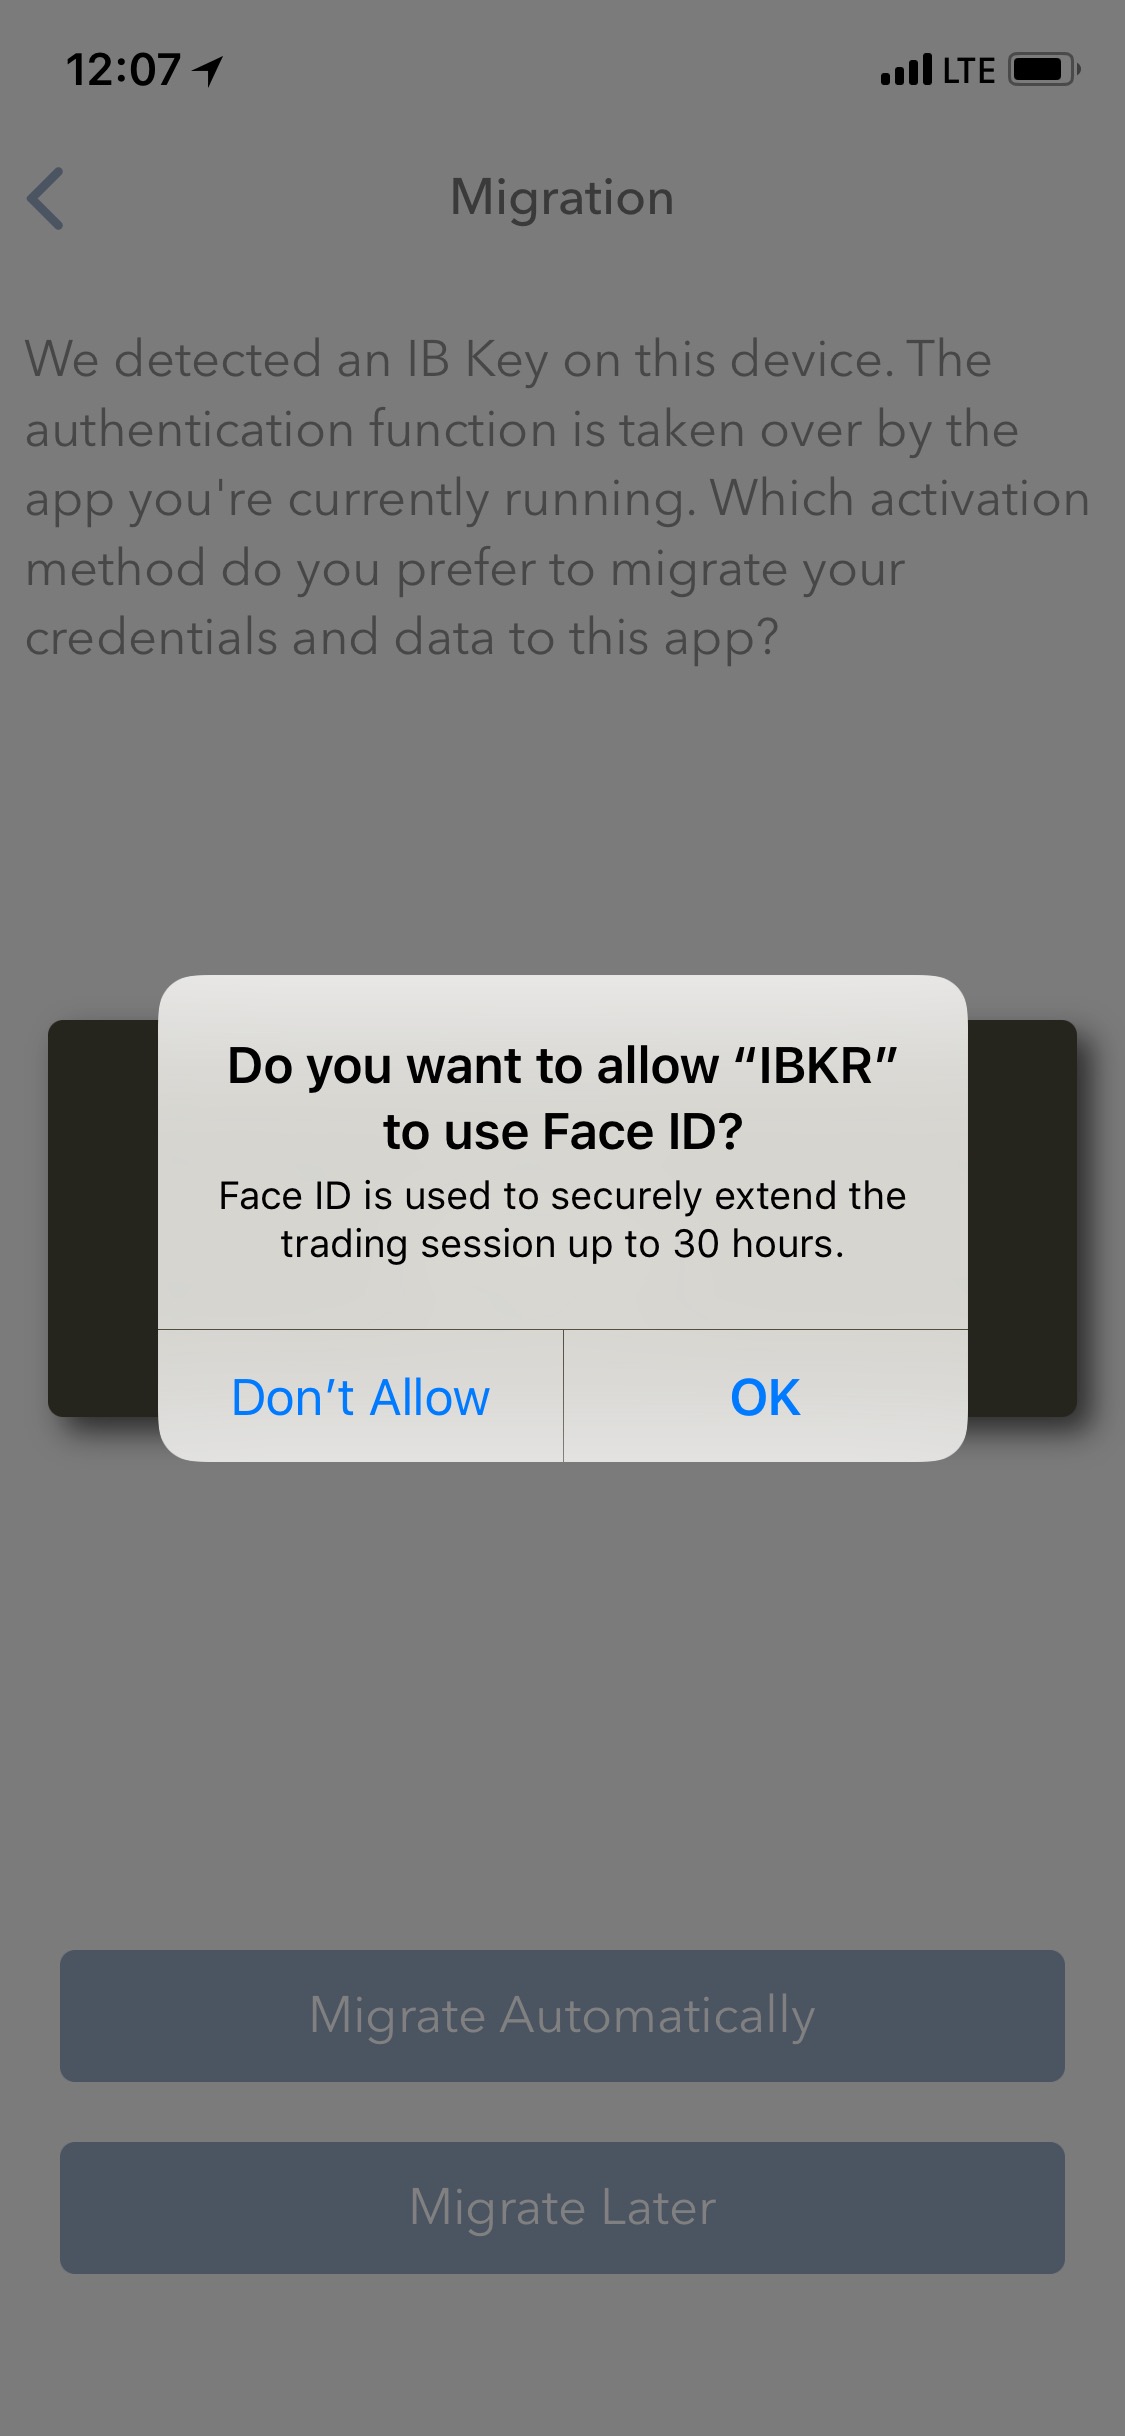
Abbildung 5 Abbildung 6 Abbildung 7
Nachdem die Übertragung abgeschlossen wurde, sollten Sie die IB-Key-Standalone-Anwendung starten - diejenige, über die Sie
sich in der Vergangenheit authentifiziert haben - und der folgende Bildschirm wird erscheinen (Abbildung 8).
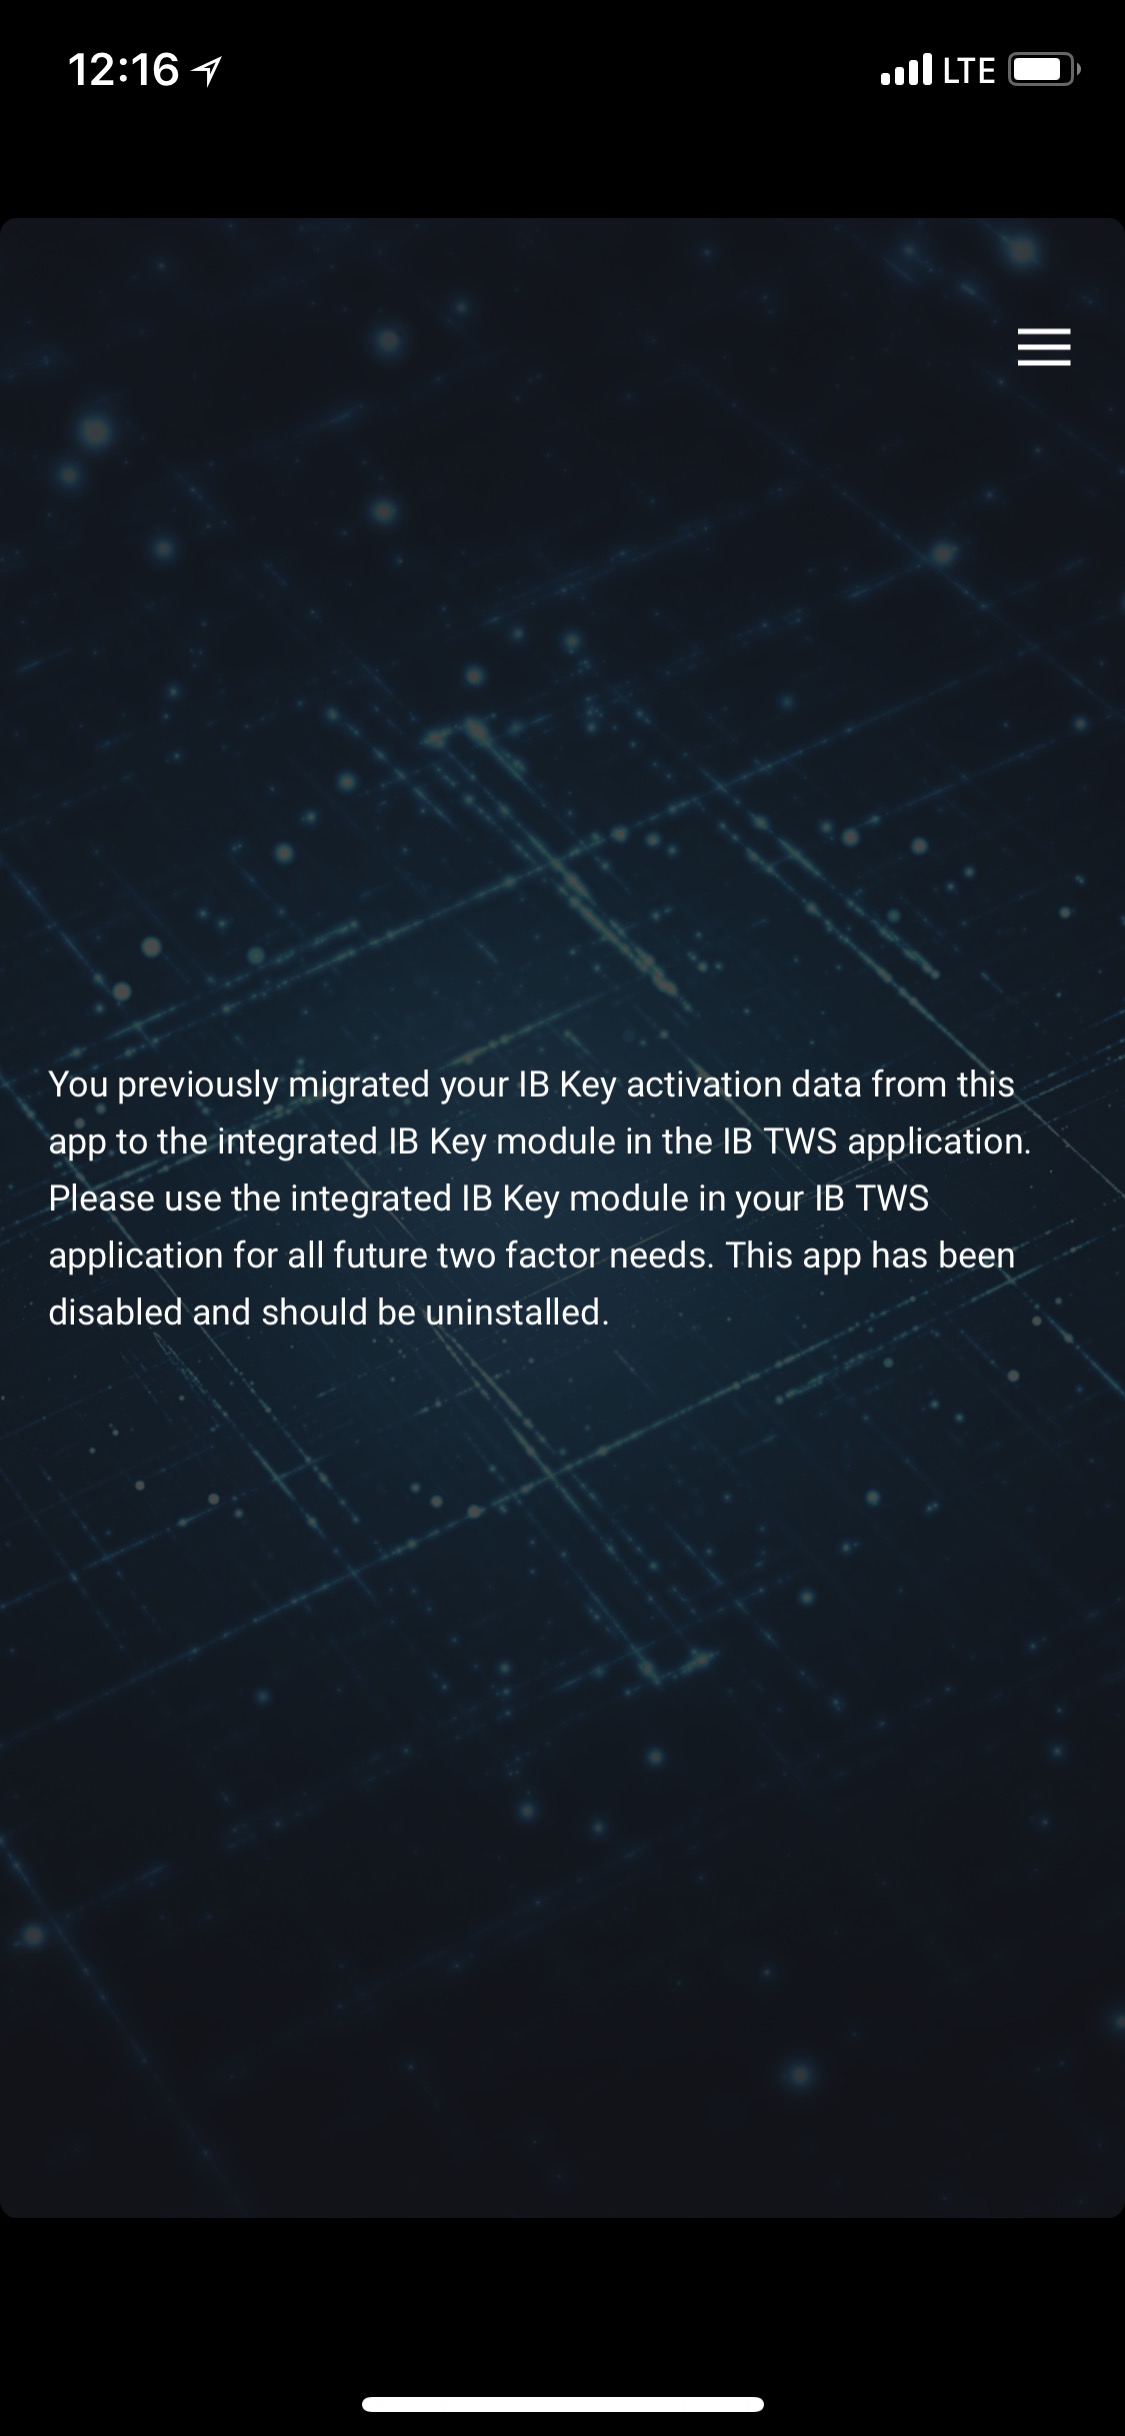
Abbildung 8
Tägliche Bedienung
A. Es ändert sich nichts am täglichen Loginablauf und falls Sie über eine Internetverbindung verfügen, läuft dies über das
nahtlose Authentifizierungsverfahren ab:
1. Geben Sie Ihre Anmeldedaten in die entsprechenden Felder ein (in der TWS, Kontoverwaltung, WebTrader oder
IBKR Mobile). Klicken Sie auf „Login”.
2. Das System wird Ihnen eine Benachrichtigung auf Ihren Smartphone-Bildschirm senden - tippen Sie darauf.
3. Je nachdem welches Gerät Sie verwenden, halten Sie Ihr Gesicht vor die Kamera bzw. Ihren Fingerabdruck auf den Sensor (iOS) oder
geben Sie Ihren PIN-Code ein (Android). Das System wird automatisch mit der Anmeldung fortfahren.
B. Falls Sie keine Internetverbindung haben, werden Sie IBKR Mobile im Prüfcode-Antwortcode-Modus verwenden müssen:
1. Geben Sie Ihre Logindaten in die entsprechenden Felder ein (in der TWS, Kontoverwaltung, WebTrader oder
IBKR Mobile). Klicken Sie auf „Login”.
2. Klicken Sie auf den Link, falls Sie keine Benachrichtigung erhalten haben.
3. Starten Sie IBKR Mobile und tippen Sie auf „Authentifizierung”.
4. Geben Sie im Feld „Prüfcode” Ihrer Smartphone-Anwendung die Zahlen ein, die auf dem Login-Bildschirm
angezeigt werden. Tippen Sie auf die Schaltfläche „Generieren”.
5. Geben Sie die von Ihrer Smartphone-App angezeigten Zahlen in das Antwortfeld an, die auf dem Login-Bildschirm
angezeigt werden. Klicken Sie auf „Login”.
Sie verwenden sowohl IB TWS als auch den IB Key
1. Bitte führen Sie zuerst die Aktivierung des Authentifizierungsmoduls der
IBKR-Mobile-App durch (Klicken Sie hier).
2. Melden Sie sich im Handelsbildschirm an, indem Sie auf die Schaltfläche „Handel” im Startbildschirm Ihrer neuen
IBKR-Mobile-App tippen (Klicken Sie hier).
Sie verwenden eine IB Debit Card
1. Bitte führen Sie zuerst die Aktivierung des Authentifizierungsmoduls der
IBKR-Mobile-App durch (Klicken Sie hier).
2. Tippen Sie auf dem Startbildschirm der IBKR-Mobile-App auf die Debit-Card-Schaltfläche. Die restlichen Anwendungsabläufe
sind identisch mit den Anwendungen, die Sie in der Vergangenheit genutzt haben.
How to overcome the "Downloading settings from server failed" error
Store settings on server allows clients the ability to store their Trader Workstation (TWS) settings/configuration on the cloud and retrieve them at anytime from another computer. This feature allows you to use the layout of a specific user on two or more machines.
In some specific circumstances, the operation which stores/downloads the settings to/from the cloud may fail and the following error message may appear shortly after the TWS has loaded on the screen:
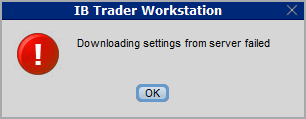
How to overcome this error message?
The underlying causes of this message are usually the following:
- ACCESS TO THE LOCAL MACHINE IS BLOCKED: A security setup, such as a firewall or antivirus, prevents the access of this computer to the cloud storage. This prevents TWS from accessing the remote server, thus disallowing the settings file upload or download. Recommended workaround: set up an exception on the firewall or antivirus in order to exclude the TWS executable file (c:\Jts\tws.exe) or the entire TWS folder (C:\Jts) from the real time security scan. The procedure to set an exclusion may vary, according to the software you are using, therefore we recommend consulting the user guide or the on-line documentation of your specific security program.
- ACCESS TO THE REMOTE SERVER IS BLOCKED: A firewall or proxy service blocks the communication with the cloud storage through the network on which this computer is. In this scenario, you (or your IT / Networking departments, in case you do not have the rights for such an operation) can modify the firewall or proxy settings to allow the computer to communicate with the cloud server s3.amazonaws.com on the TCP port 443. For additional details about the hosts/ports which needs to be allowed for the proper TWS operation, please see as well the section "DESKTOP TWS" of KB2816. Please refer to the documentation of your specific software in order to create specific rules for your firewall or proxy system.

