How to use Voice callback for receiving login authentication codes
If you have SMS enabled as two-factor authentication method, you may use Voice callback to receive your login authentication codes. This article will provide you steps on how to select voice callback when logging in to our platforms.
Client Portal
1. Click on "Didn't receive a security code?"
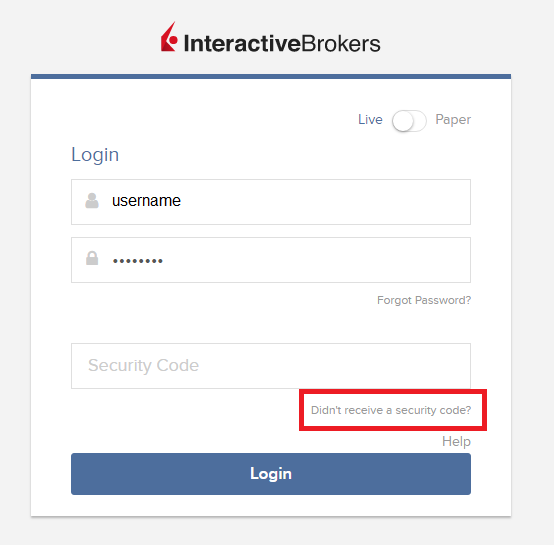
2. From the two options, select "Voice" and wait for the callback.
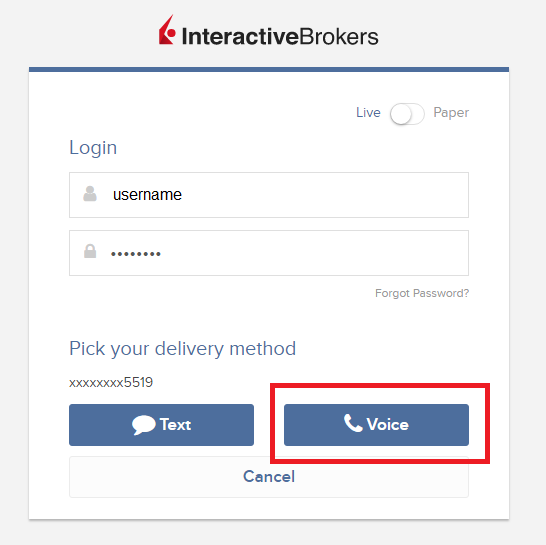
3. After selecting Voice, you should receive the callback within a minute. Please wait for the callback and be ready to write down the code that will be provided over the callback.
TWS
1. Click on "Request new Security Code"

2. From the two options, select "Voice" and click on OK. Then wait for the callback.
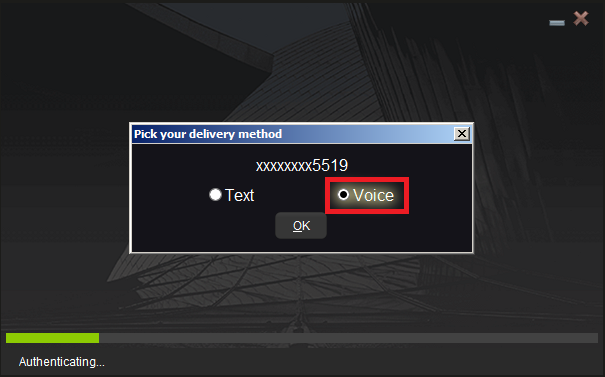
3. After selecting Voice, you should receive the callback within a minute. Please wait for the callback and be ready to write down the code that will be provided over the callback.
Note: Voice callback for the TWS is only available in the LATEST and BETA version.
IBKR Mobile - iOS
1. Click on "Request New Code"
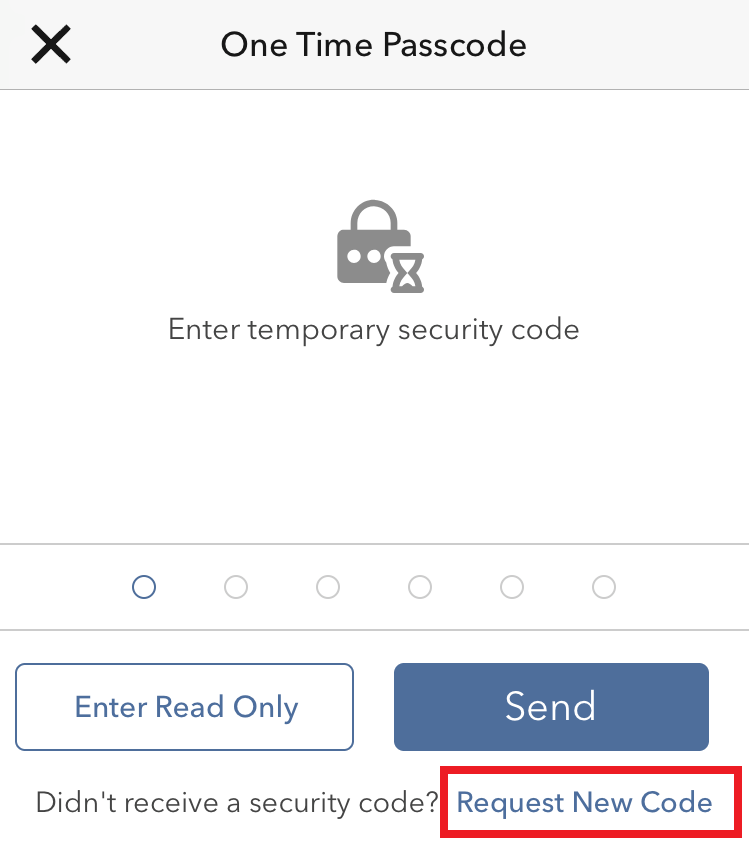
2. From the two options, select "Voice" and wait for the callback.
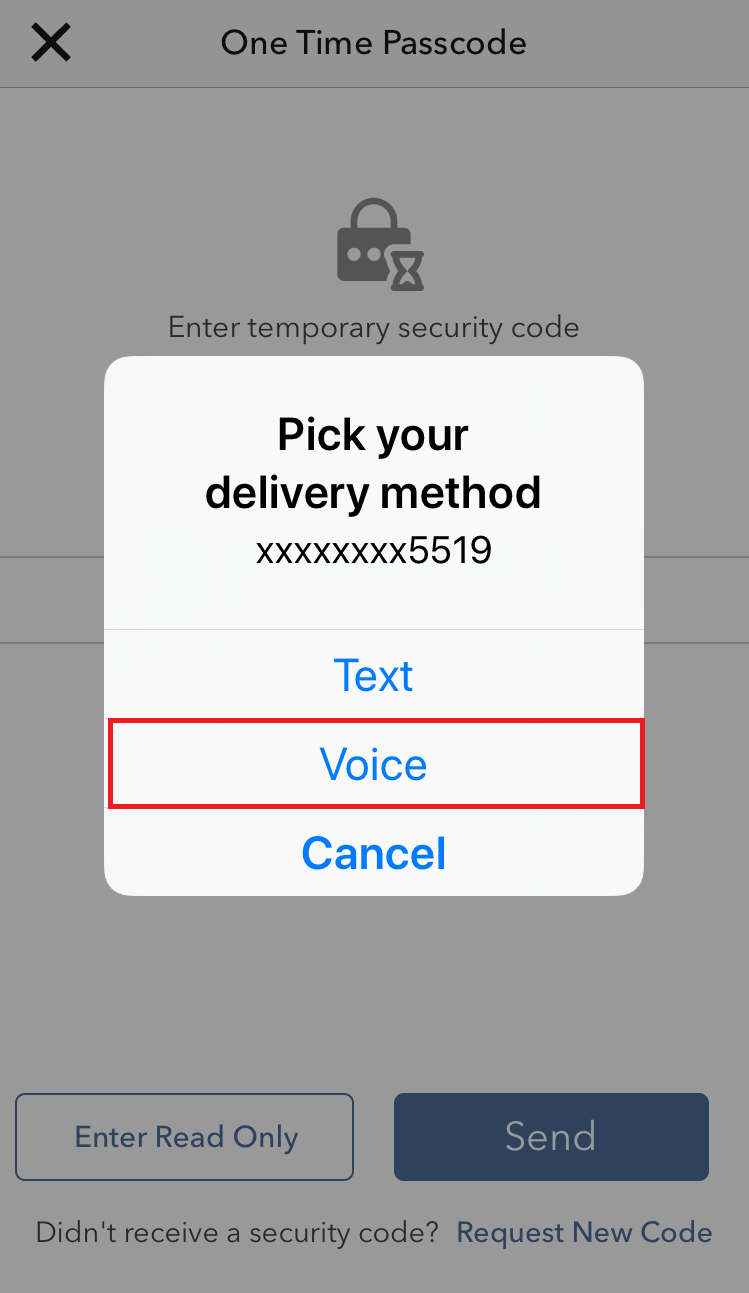
3. After selecting Voice, you should receive the callback within a minute. Please wait for the callback and be ready to write down the code that will be provided over the callback.
IBKR Mobile - Android
1. Click on "Request New Security Code"
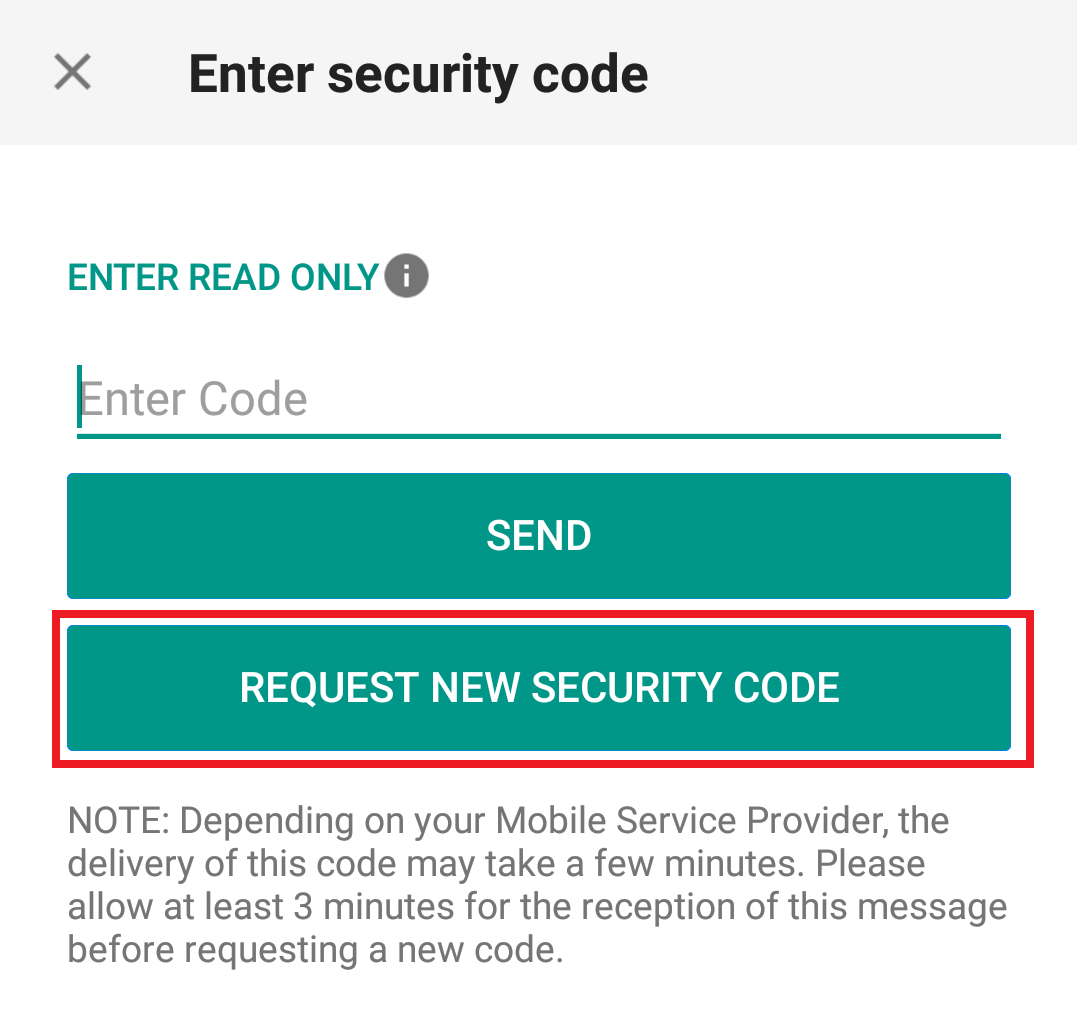
2. From the two options, select "Voice" and wait for the callback.
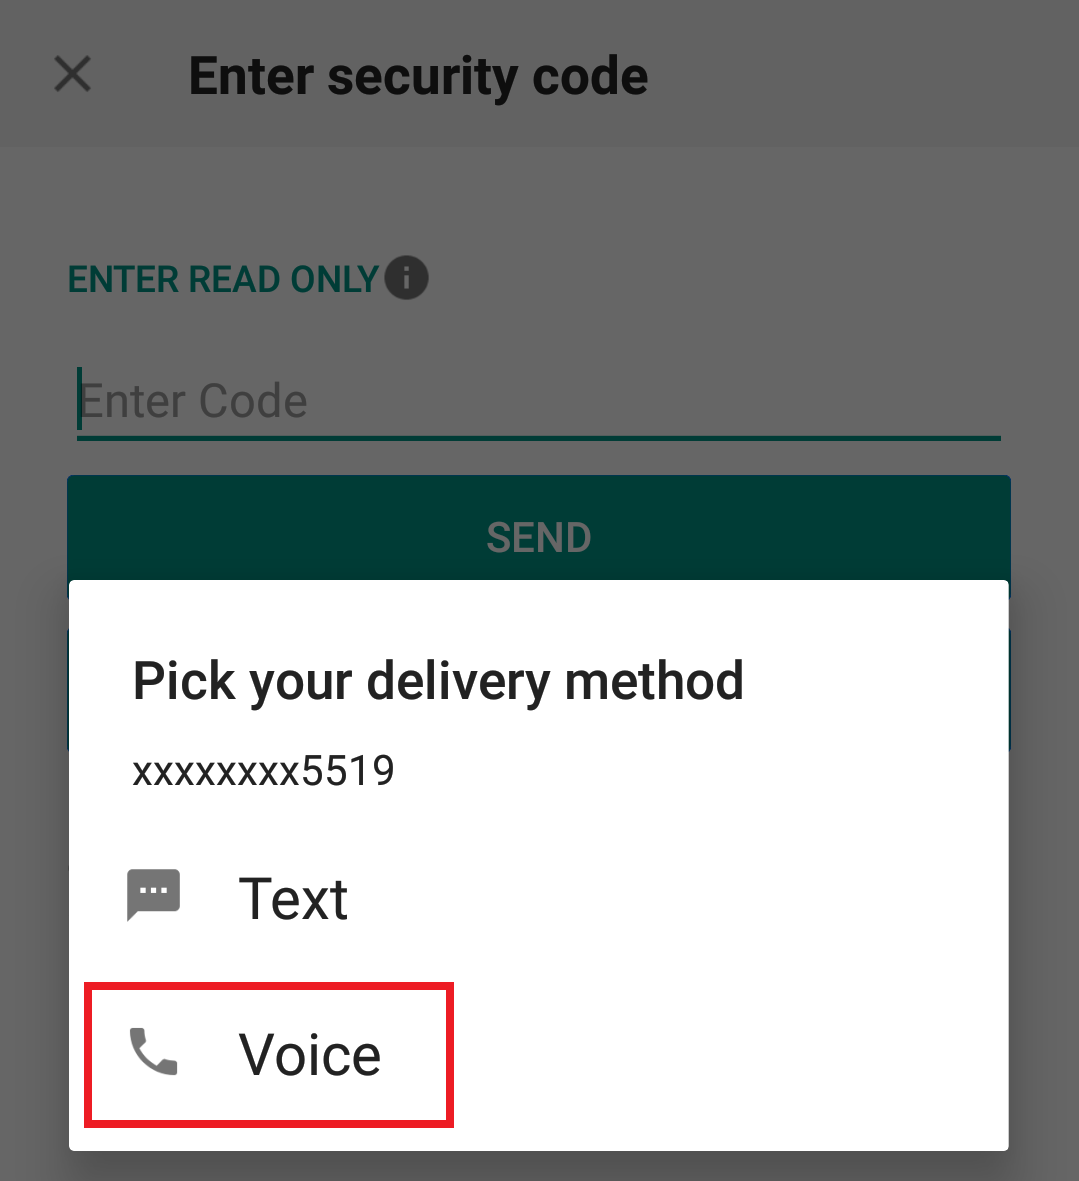
3. After selecting Voice, you should receive the callback within a minute. Please wait for the callback and be ready to write down the code that will be provided over the callback.
References:
- How to login using SMS authentication
- Overview of Secure Login System
- Information and procedures related to Security Devices
- IBKR Mobile Authentication
Trading Securities listed on Tel Aviv Stock Exchange (TASE)
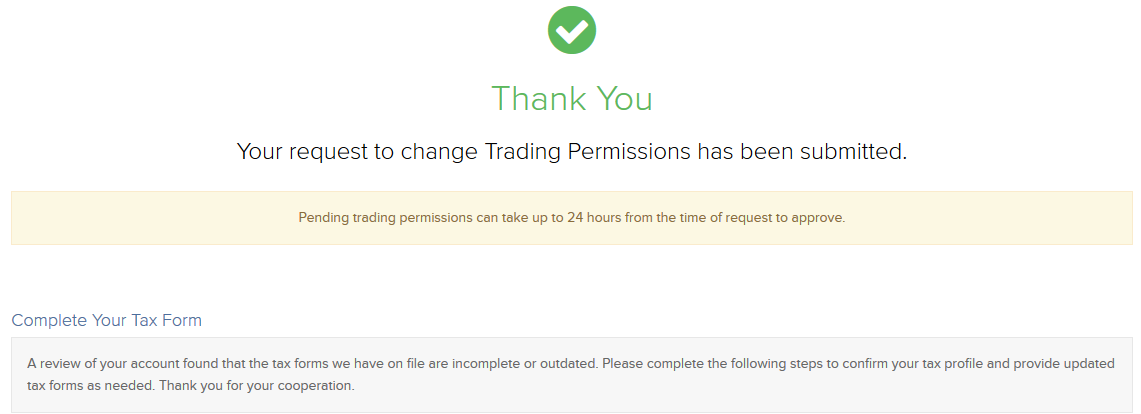
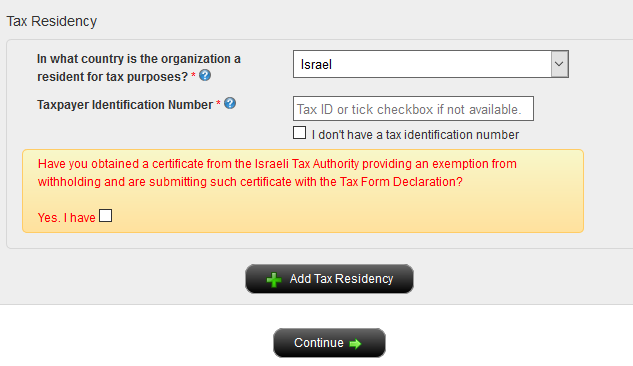
- Non-Israeli residents, retail and corporate
- Corporate clients in Israel who are tax exempt
Available Products


Links:
IBKR Securities Class Action Recovery
The Securities Class Action Recovery solution is an automated service that removes the administrative burden of participating in a securities class action lawsuit. There is no upfront fee to subscribe to this service, but all recovered amounts are subject to a 20% contingency fee, as detailed in the Terms & Conditions.
Who can participate in the IBKR Securities Class Action Recovery service?
IBLLC clients can participate in the service if they are eligible to trade US or Canadian stocks or bonds, hold an individual, joint or separate trading limit (STL) account with IBKR, or are a client of a fully disclosed introducing broker (IBroker) or a client of a Financial Advisor.
Eligible clients can quickly and easily enroll or leave the service at any time by logging in to Client Portal and clicking the User menu (head and shoulders icon in the top right corner) followed by Settings. Under Account Settings find the Account Configuration section and click Securities Class Action Recovery to review the Terms & Conditions, subscribe to or unsubscribe from the service.
Once enrolled, IBKR will notify you when a security you bought or sold is subject to a class action lawsuit and inform you of when a claim is filed. Any monetary compensation received in connection to your claim will be electronically deposited to your IBKR account. Please note that there could be a considerable amount of time between filing a claim and receiving compensation.
There is no upfront fee to subscribe to the service. However, all recovered amounts are subject to a 20% contingency fee deducted from the recovered funds. Please refer to the service's Terms & Conditions for details.
You are eligible to receive compensation for any settled claims as long as your activity and holdings for involved securities were transmitted to our service provider before you unsubscribed from the service. If you unsubscribe from the IBKR service and sign up with a third-party vendor, a duplicate claim may occur. To avoid rejected claims due to duplicate submissions please email us at proserve@ibkr.com to let us know which claim filing you would like to prevail.
ASIC OTC Derivative Transaction Rules (Reporting) (“DTR”) and LEI Information
Background
ASIC Over the Counter (“OTC”) derivatives reporting regulations are designed to make the OTC derivatives markets more transparent by requiring counterparties to these transactions to report trades, positions, collateral and valuations to a derivative trade repository (trade repositories). All counterparties with reporting obligations under the DTRs must have a Legal Entity Identifier (“LEI”) in order to report. However, only IB Australia (“IBAU”) clients who have been permitted to trading in these OTC products and are operating as non-individual entities (e.g. corporations, corporate trusts, etc) are required to have an LEI.
An OTC derivative is a derivative that is not traded:
a) on a financial market that is:
subject to ASIC supervision under Pt 7.2A of the Corporations Act (such as ASX 24);
registered by the US Commodity Futures Trading Commission as a ‘designated contract market' under s5h of the Commodity Exchange Act 1936 (US); or
a regulated market’ as defined in Article 4(1)(21) of the Markets in Financial Instrument Directive 2014/65/EU (MIFID 11); or
b) on certain regulated markets (referred to as ‘regulated foreign markets’) that ASIC has determined are subject to sufficiently equivalent requirements and supervision.
For more details please refer to:
https://asic.gov.au/regulatory-resources/markets/otc-derivatives/frequently-asked-questions/
An example of an OTC products for IBAU clients are the IBAU issued CFDs (Contracts for Difference).
All IBAU clients who are subject to the DTR regulations and who require an LEI will see the LEI Election form upon logging into Account Management. Note that you will only see the LEI Form once upon logging into Account Management; once you make your election, you will not see the form again upon subsequent Account Management logins.
Who is Subject to the DTR Regulation?
All IBAU clients operating as non-individual accounts (e.g. corporations, corporate trusts, etc.) are required to comply with DTR obligations. In this context, non-individual means any account which is owned by one or two individuals as stated in the account title. Individual accounts in the name of a single person are not subject to DTR and so will not have access to this page.
Original LEI Elections
If you are subject to the DTR regulations and are an entity or corporate client and have not already made your LEI election, when you log into Account Management, you will be prompted to do so.
If you have an IBAU account; you can elect to:
- Instruct us to apply for LEI on your behalf. You will be prompted to fill out a simple form and sign an agreement. Obtaining an LEI can take up to three days.
- Provide your LEI, which you have already obtained. You will be prompted to enter your LEI.
- Do nothing (you do not have an LEI and you are not subject to the DTR regulation).
NOTE: THE INFORMATION ABOVE IS NOT INTENDED TO BE A COMPREHENSIVE OR EXHAUSTIVE GUIDANCE AND IT IS NOT A DEFINITVE INTEPRETATION OF THE REGULATION BUT A SUMMARY OF THE ASIC DERIVATIVE TRANSACTION REPORTING.
I am not receiving text messages (SMS) from IBKR on my mobile phone
Once your mobile phone number has been verified in the Client Portal, you should immediately be able to receive text messages (SMS) from IBKR directly to your mobile phone. This article will provide you with basic troubleshooting steps in case you are unable to receive such messages.
1. Activate the IBKR Mobile Authentication (IB Key) as 2-Factor security device
In order to be independent of wireless/phone carrier-related issues and have a steady delivery of all IBKR messages we recommend to activate the IBKR Mobile Authentication (IB Key) on your smartphone.
The smartphone authentication with IB Key provided by our IBKR Mobile app serves as a 2-Factor security device, thereby eliminating the need to receive authentication codes via SMS when logging in to your IBKR account.
Our IBKR Mobile app is currently supported on smartphones running either Android or iOS operating system. The installation, activation, and operating instructions can be found here:
2. Restart your phone:
Power your device down completely and turn it back on. Usually this should be sufficient for text messages to start coming through.
Please note that in some cases, such as roaming outside of your carrier's coverage (when abroad) you might not receive all messages.
3. Use Voice callback
If you do not receive your login authentication code after restarting your phone, you may select 'Voice' instead. You will then receive your login authentication code via an automated callback. Further instructions on how to use Voice callback can be found in IBKB 3396.
4. Check whether your phone carrier is blocking the SMS from IBKR
Some phone carriers automatically block IBKR text messages, as they are wrongly recognized as spam or undesirable content. According to your region, those are the services you can contact to check if a SMS filter is in place for your phone number:
In the US:
- All carriers: Federal Trade Commission Registry
- T-Mobile: Message Blocking settings are available on T-Mobile web site or directly on the T-Mobile app
In India:
- All carriers: Telecom Regulatory Authority of India
In China:
- Call your phone carrier directly to check whether they are blocking IBKR messages
References:
- How to login using SMS authentication
- Overview of Secure Login System
- Information and procedures related to Security Devices
- IBKR Mobile Authentication
How To Request an IBKR Debit Card
IB LLC individual and joint accounts (excluding IRA accounts) are now eligible to request an IBKR Debit Card through Account Management.
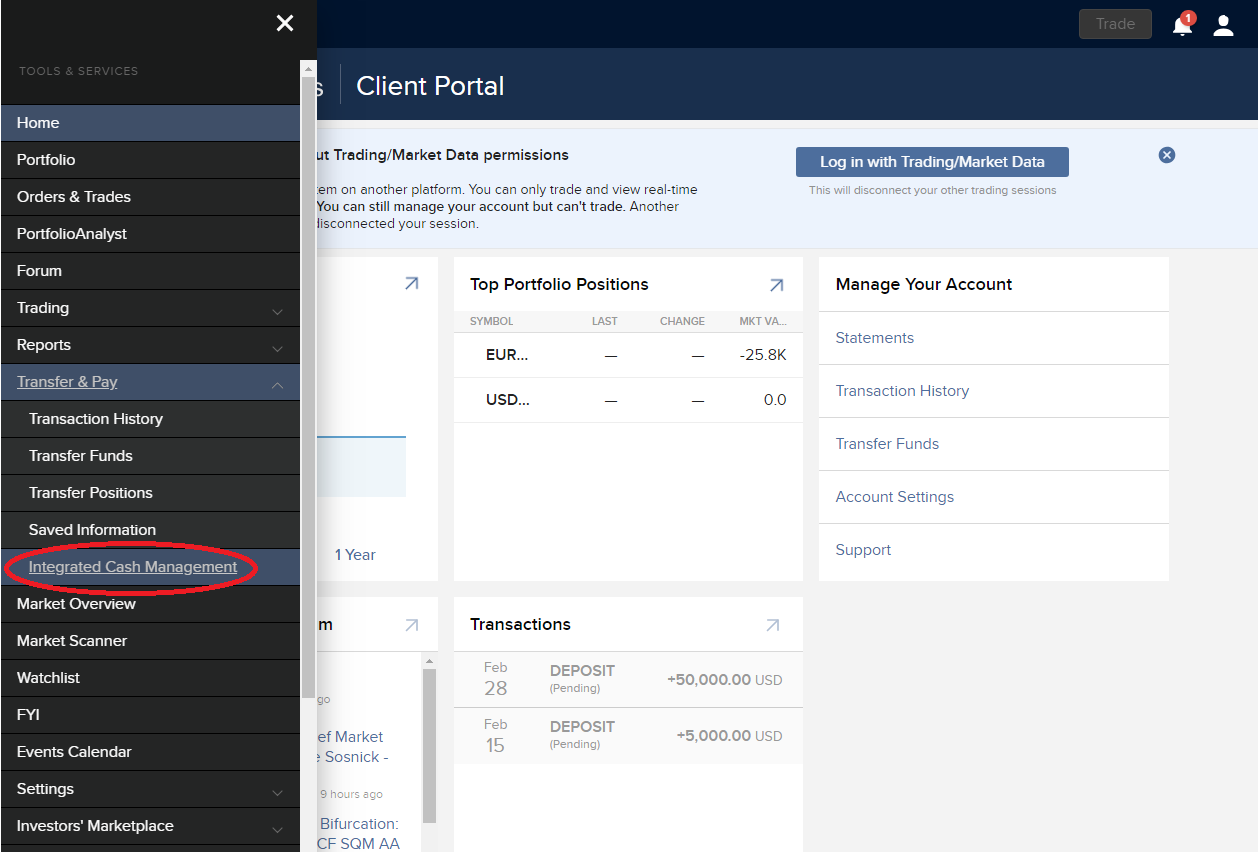
In order to request an IBKR Debit Card, first login to Client Portal/Account Management and select Transfer & Pay. Under Transfer & Pay, click the option for "Integrated Cash Management".
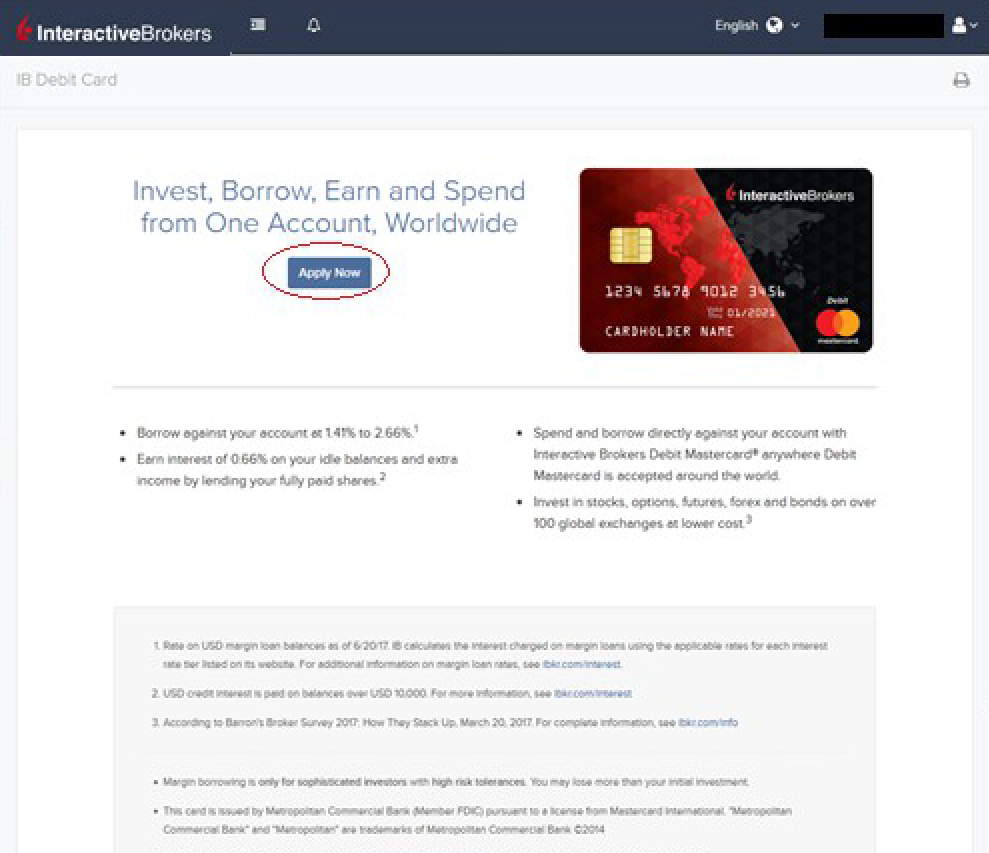
The IBKR Debit Card Summary screen will populate. At the top of the page you will see a button to "Apply Now". Click the button to start your IBKR Debit Mastercard application.
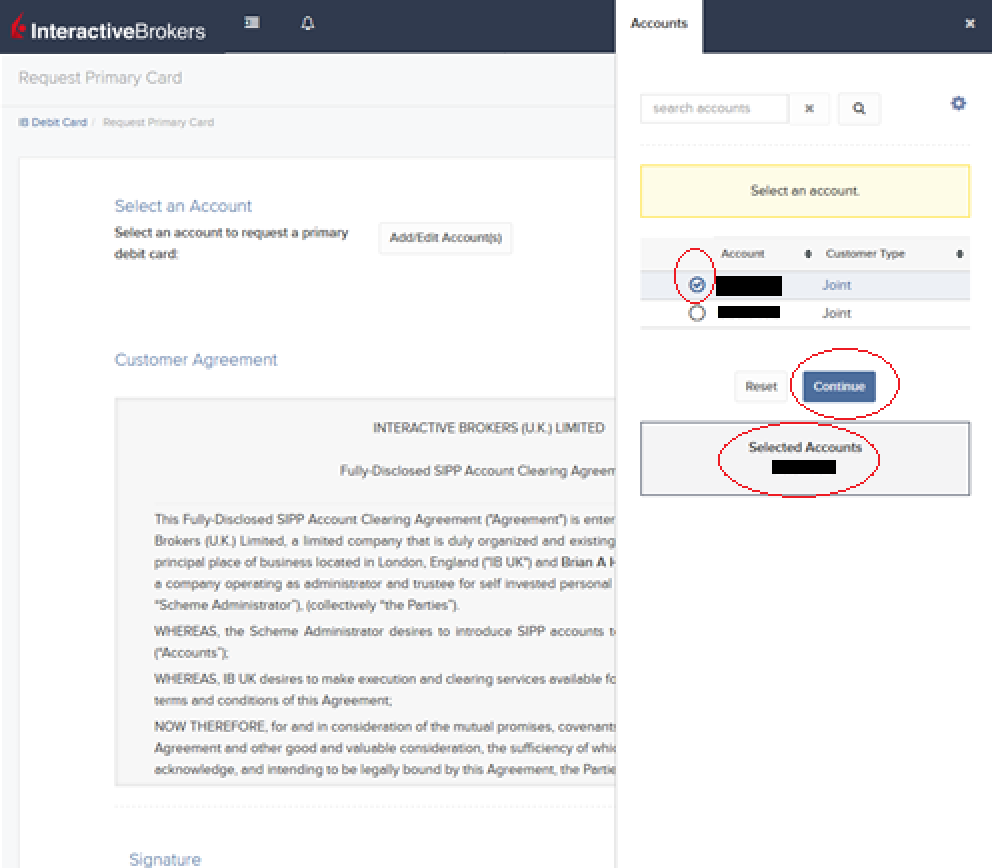
The application page will populate with the Customer Agreement along with an option to Select an Account to link to your IBKR Debit Card. Click the "Add/Edit Accounts" button to make your selection.
.png)
Your accounts will populate on the right side of the screen. Once you have made your selection, your selected account will be highlighted at the bottom of the right-hand window. Once you are ready to confirm the account, click the "Continue" button.
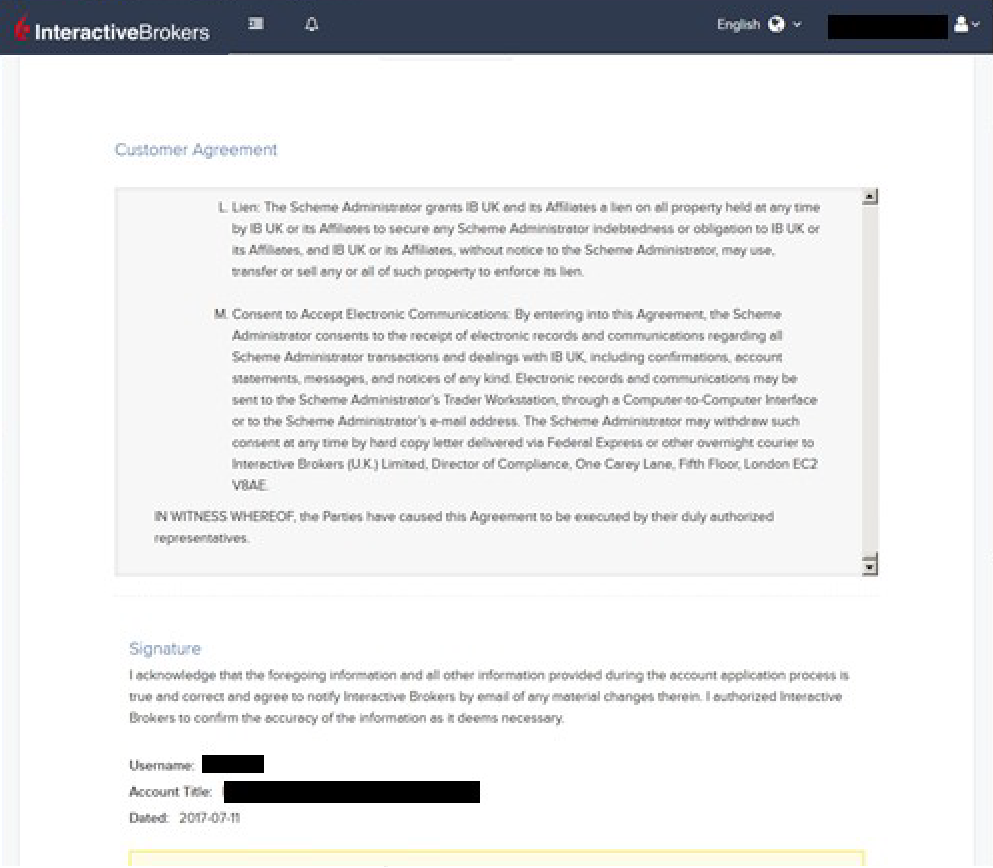
Scroll down to the bottom of the page where you will be prompted to agree to the terms set forth in the Customer Agreement by signing your name as it appears on the account. Click "Continue" to proceed.
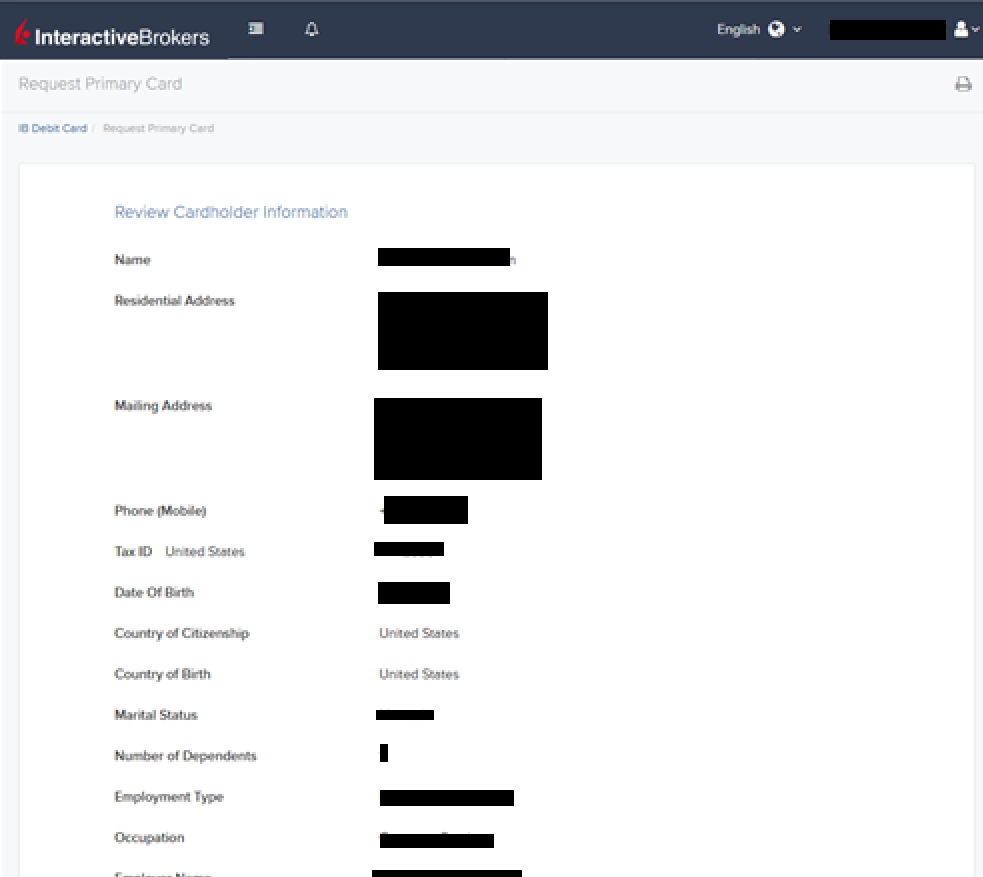
The next screen will ask you to review the Cardholder Information. The information should all be correct as it uses the information from your IBKR account. If the information is not correct, you will need to go into your account and change any incorrect information. If the information is correct, click "Continue" to proceed.
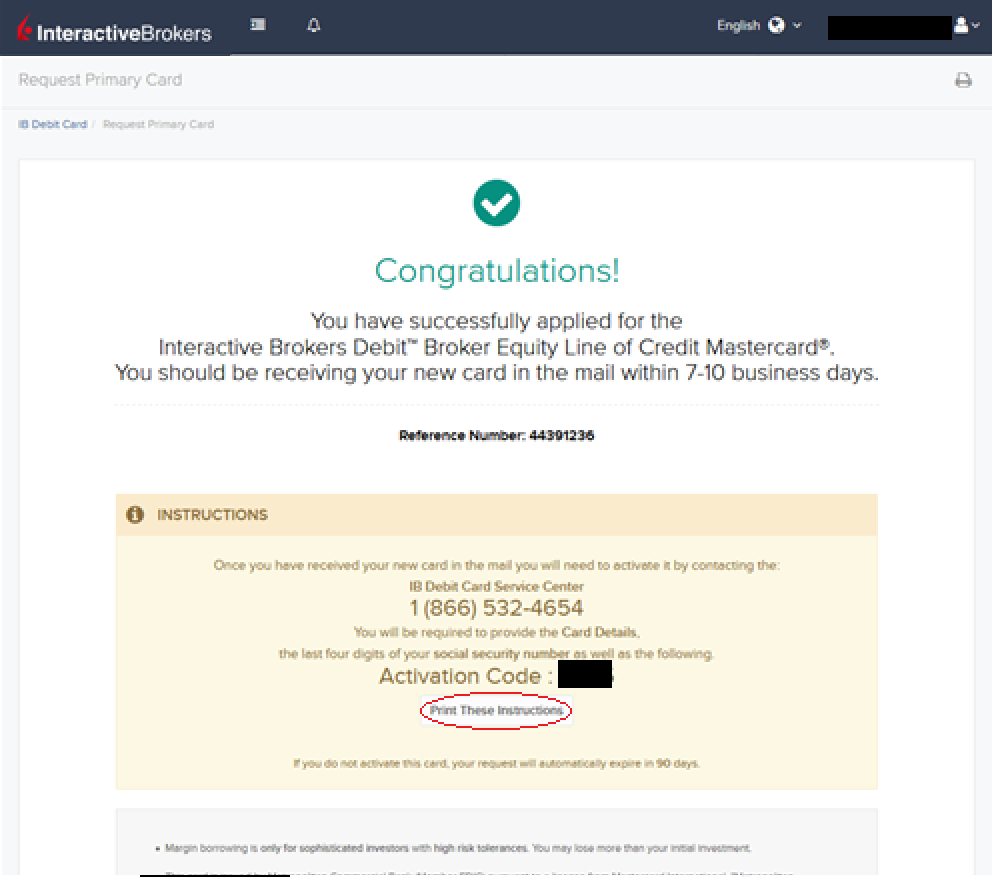
Once you confirm your Cardholder Information, your application will be submitted. You will receive a confirmation with a reference number, along with activation instructions for when you receive your IBKR Debit Card in the mail.
Forex Execution Statistics
IBKR clients can now analyze the quality of their forex executions in comparison to forex trades by other IBKR customers through the FX Browser tool in Client Portal. The tool provides transaction data for the 15 forex transactions that occur immediately before and after in the same currency pair of the client's transaction.
Note:
The number of transactions may be limited to fewer than the stated 15 as the NFA also has placed a 15 minute window on the query. Meaning, if within a 15 minute window before and after the customer's execution there are fewer than 15 executions the customer's query will return only those executions which occurred within the time window.
Accessing the FX Browser Tool
To Access the FX Browser tool, login to Client Portal using the Login button on our website. Click the Help menu (question mark icon in the top right corner) followed by Support Center. Please note, at this time only data for the live account will be provided.
.png)
From there, select "See Trades on IBKR's FX Platform" from the list of Information & Tools:

Submitting a Query
When the FX Browser is launched, you will be presented with the following screen:
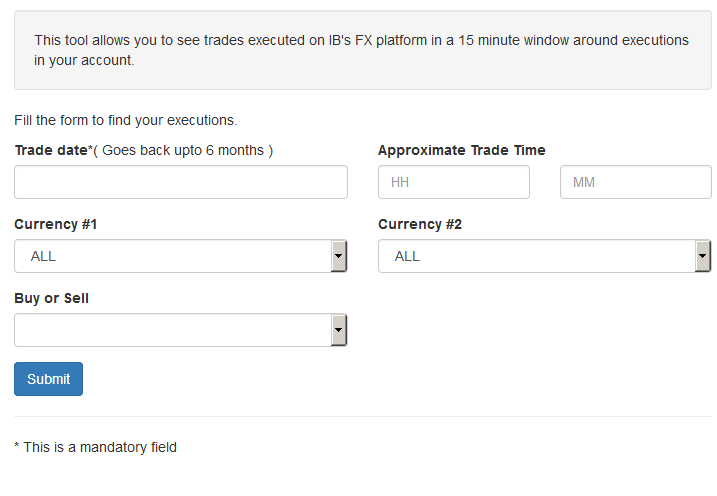
Please note that only Trade Date is a mandatory field in the query. When clicking on the Trade Date field, a calendar widget will populate and allow you to select your trade date. Only transactions from the last 6 months will be available to search.
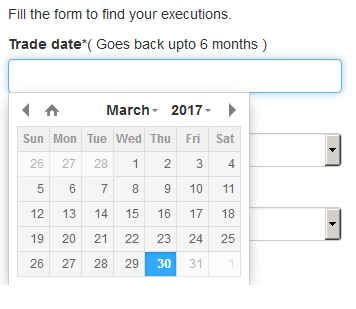
Active customers may wish to limit the results by further selecting the currency pair, side or time of the execution.
Once the desired query has been entered, click on the Submit button.
The next screen will display the list of executions for the given account on the specified day. From there, you may select the execution you wish to receive the execution statistics on.
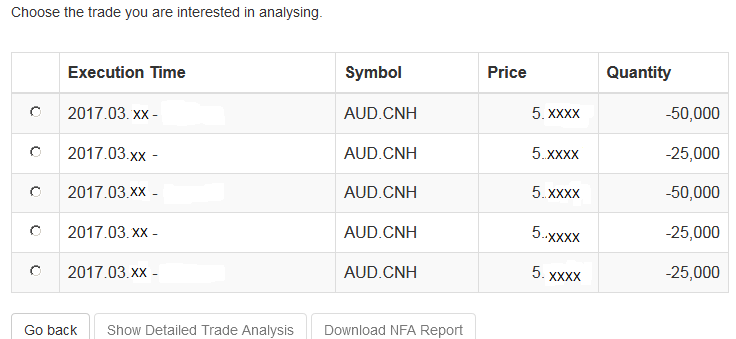
Once the execution you wish to view has been selected, click the "Download NFA Report" button.

Reading the Report
The results will be returned in a new tab and will contain the 15 executions before and 15 executions after the trade you selected on the previous screen. Per the note above, if fewer than 15 executions occurred in the 15 minute time frame only those executions will be displayed.
The query results will include the following information:
- Execution date and time, as expressed in Eastern time
- Side (buy or sell)
- Quantity (of Transaction Currency)
- Currency pair
- Execution price
- Commissions and other charges assessed by the FDM
- Currency denomination of commissions
Your trade will be marked as Trade Number "0" and the trades before and after your trade will be numbered from 1 to 15.
Error Messages
If the search criteria you enter does not bring up any trade information, you will be presented with the following error message:

How to update the US Social Security Number (SSN) or Individual Taxpayer Identification Number (ITIN) on your account
If you have been informed or believe that your account profile contains an incorrect US SSN/ITIN, you may simply log into your Account Management to update this information. Depending on your taxpayer status, you can update your US SSN/ITIN by modifying one of the following documents:
1) IRS Form W9 (if you are a US tax resident and/or US citizen holding a US SSN/ITIN)
2) IRS Form W-8BEN (if you are a Non-US tax resident holding a US SSN/ITIN)
Please note, if your SSN/ITIN has already been verified with the IRS you will be unable to update the information. If however the IRS has not yet verified the ID, you will have the ability to update through Account Management.
How to Modify Your W9/W8
1) To submit this information change request, first login to Account Management
2) Click on the Settings section followed by Account Settings
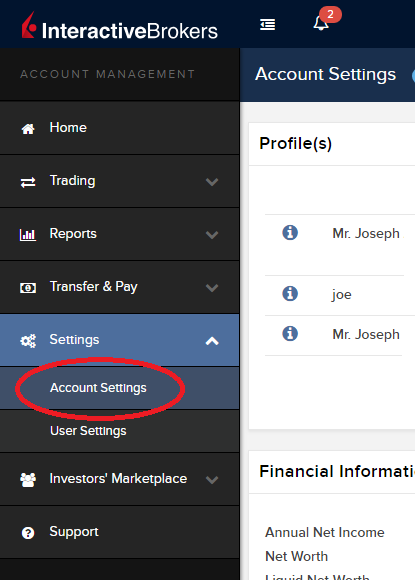
3) Find the Profile(s) section. Locate the User you wish to update and click on the Info button (the "i" icon) to the left of the User's name
.png)
4) Scroll down to the bottom where you will see the words Tax Forms. Next to it will be a link with the current tax form we have for the account. Click on this tax form to open it

5) Review the form. If your US SSN/ITIN is incorrect, click on the UPDATE button at the bottom of the page
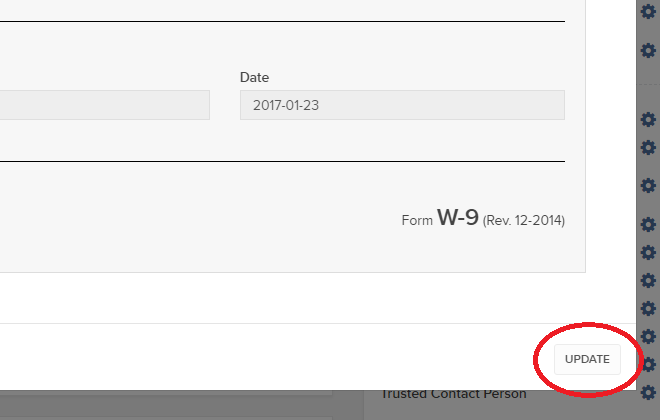
6) Make the requisite changes and click the CONTINUE button to submit your request.

7) If supporting documentation is required to approve your information change request, you will receive a message. Otherwise, your information change request should be approved within 24-48 hours.
FATCA Procedures - Grantor Trust Tax Information Submission
Interactive Brokers is required to collect certain documentation from clients to comply with U.S. Foreign Account Tax Compliance Act (“FATCA”) and other international exchange of information agreements.
This guide contains instructions for a Trust to complete the online tax information and to electronically submit a W-9 or W-8BEN.
U.S. Tax Classification
Your U.S. income tax classification determines the tax form(s) required to document the account.
You must login to Account Management with the trust's primary username to access the Tax Form Collection page.
1. Tax Form Collection
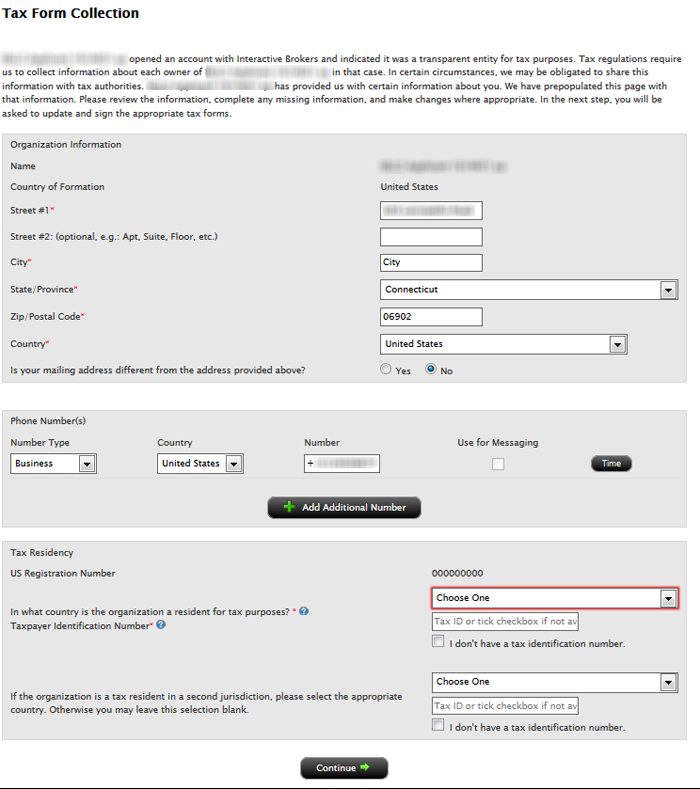
2. Classification for US Tax Purposes

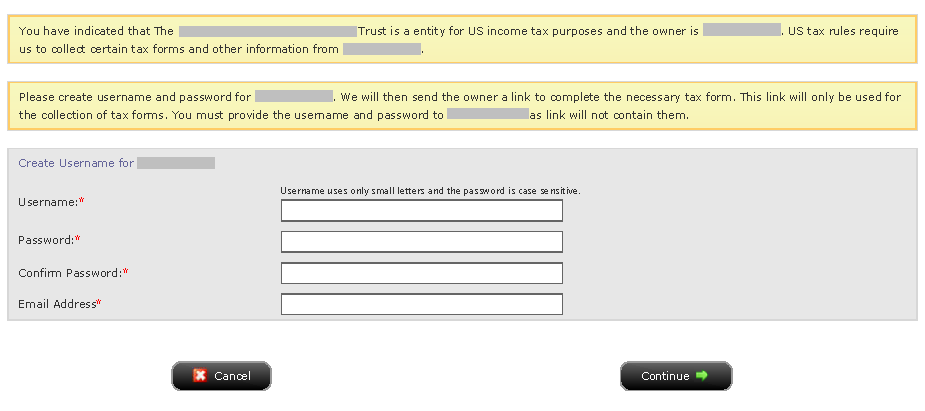
3. Identify Grantors
a. Click Manage Account > Account Information > Tax Information > Tax Forms.
.png)
Delivery Settings for Shareholder Materials
IBKR’s default setting for distributing shareholder communications (e.g., proxy materials and annual reports) from U.S. and Canadian issuers is electronic delivery. Under this method the account holder will receive an email notice when information becomes available for a security they hold from our processing agent, Mediant Communications. This notification will provide the necessary links for accessing the information and voting through the Internet in lieu of receiving these documents via postal service. The technology which you will need to secure the information includes access to the Internet and a web browser supporting secure connections. In addition, you will need to be able to read the documents online and print a copy provided your system supports documents in a PDF format.
Other items of note:
- The information above applies solely to shareholder communications associated with U.S. and Canadian issuers. The delivery of communications for securities issued outside of these two countries is typically electronic, but managed directly by the issuer or its agent (i.e., not Mediant).
See also: Non-Objecting Beneficial Owner (NOBO)
