Where can I request additional trading permissions and market data subscriptions?
Requests for trading permissions and market data subscriptions are submitted through Account Management on the IB web site. Trading permissions requests are generally applied within 48 hours of the time the request is submitted. Market data subscriptions are applied to the account in real time.
Accessing Account Management
Traders can login to Account Management in one of two ways.
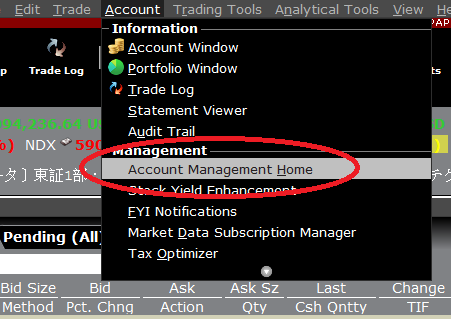
1. From the main TWS screen by clicking the Account menu at the top of the screen and then selecting Account Management Home (this will open the Account Management page without requiring that the account username / password be re-entered).

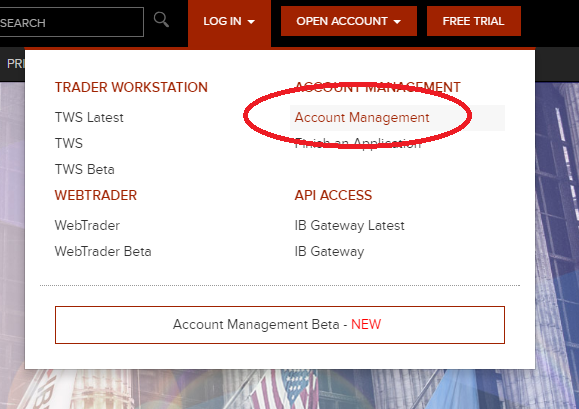
2. From the IB web site at www.interactivebrokers.com by choosing Login and then selecting Account Management.

Requesting Trading Permissions
Once logged into Account Management, select the Manage Account menu option, then click on Trade Configuration followed by Permissions. From here the account holder can select the permissions they wish to obtain. Once they have selected all pertinent permissions the account holder can submit the request at the bottom of the page.
Depending on the access being requested, subsequent pages may require the traders electronic signature. The process is complete when the page displays a message indicating that the request has been submitted.
Subscribing to market data
If the account holder also wants to subscribe for Market Data which applies to those new permissions, they can also do this from within Account Management by again selecting Manage Account from the menu, then clicking on Trade Configuration and then Market Data.
A page will be displayed that lists all available market data subscriptions. Traders may click the information icon next to each subscription to view a detailed description of what the specific subscription provides or may click the Market Data Assistant link that appears in the top right corner of this page for assistance with selecting the desired subscription.
How do I update my Trading Permissions?
To upgrade trading permissions, log in to Client Portal and click the Settings > Account Settings menu. If you manage multiple accounts, select your account within the Account Selector popup. Click the "gear" icon next to the words "Trading Permissions" and the Trading Permissions screen will open.
In the Trading Programs and Trading Permissions sections, check the box next to any trading permission or program you wish to request. Once you have made your selections, click the CONTINUE button. On the following pages, review your financial information and investment objectives and make any changes necessary. You also may be prompted to sign agreements or disclosures depending on the permission or program being requested. Continue forward until you have completed all of the prompts. Permissions are typically approved in 48 business hours.
In addition, once your request has been approved we recommend that you review your market data subscriptions through the Settings > User Settings menu to ensure that you have the proper subscriptions for the products you intend to trade.
How, under the Windows operating system, do I create a screen shot to send to IBKR?
For some support related issues, obtaining a screenshot may provide valuable information that will assist us with resolving the issue being experienced. The following page describes two different methods of creating a screenshot.
Manual Screenshot
For traders not using the TWS, the following describes the process of creating a screenshot and attaching it to a web ticket to submit to Client Service.
To provide an image of your full computer screen select and hold down the ‘Ctrl’ key and then the ’Print Screen‘ key (located in the upper right corner of the keyboard).
For an image of a single window within your screen select and hold down the ‘Alt’ key and then the ‘Print Screen’ key
Next, open a text or image editing program such as Microsoft Word to ‘paste’ and save the shot you’ve just created. Once the program has opened select and hold down the 'Ctrl' key and then hit the “V” key. Verify that this is the image you wish to send and then save the document to your computer. Log in to Advisor Portal and select the Message Center from where you can create a new web ticket and attach your document.
TWS Screenshot / Log File
Traders using the TWS software can use keyboard combinations to capture snapshots of their screen and upload them to assist with support issues.
To create a snapshot of the TWS screen and upload the log file please use the keyboard combination associated with the type of machine being used;
- All PC's except HP's: Ctrl+Alt+H
- Hewlet Packards (HP): Ctrl+Alt+Q
- Mac: Ctrl+Option+H
A window will appear allowing the trader to enter text and check the screenshot box to include an image of the computer screen.
.jpg)
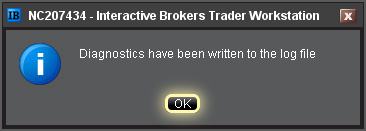
After pressing submit, the following window will appear to acknowledge that the files have been uploaded.

Notes:
- Client Service does not monitor these uploads during the day so be sure to communicate with the Client Service desk prior to uploading files relating to a current issue.
- Traders behind a firewall or proxy may be unable to upload log files and screenshots using the TWS method.
Can an advisor client account trade for himself/herself?
By default, client accounts do not have Trading Access and cannot sign into TWS or WebTrader. They are limited to Advisor Portal where they can view Statements and Trade Confirmations, as well as perform account administration tasks. However, there are occasionally requests by advisors that a client be given the ability to trade their own account.
Information:
There is a feature that allows the Advisor to give Trading Access to his Clients. This can be enabled by the Advisor in Advisor Portal in the Manage Clients section followed by Trading and Configuration. The Client would then need to subscribe to market data if they desire and would be able to trade only his/her own account.
Working orders would be accessible by either the client or the advisor.
How do I change the fees which I charge my clients?
Advisor accounts have the ability to configure the fees which they assess to their clients.
Information:
The procedure for changing fees for a client account is as follows. You must log in to Advisor Portal and select Manage Clients -> Fees -> Configure. You will need to change the fees in this section online, but you still must have the client sign the fee change form and submit to us for processing.
Please see the Advisor Client Fees page for additional information, such as the available billing methods and the fee caps currently in place.
Can I upgrade my individual account to an advisor account?
Clients often request that their individual accounts be converted to advisor accounts so they can take advantage of the advisor account structure.
Information:
Unfortunately, we cannot upgrade an Individual account to an Advisor Account. You must complete a new application, which can be accessed from our home page, by selecting Accounts -> New Accounts -> Advisor.
During the Advisor Account application, you will be given the opportunity to open a Trading Sub Account for yourself. If you do, and if you make sure that all aspects of this new Sub account (titles, tax IDs, trading permissions,e,mail addresses) match those of your existing individual account, you will be able to request a Positions and Funds move to your new account.
Please bear in mind:
- The Advisor Master account is only a shell account that is used to place trades on behalf of Advisor Client accounts.
- The Advisor Master account cannot hold positions.
- In order to trade, you must allocate trades to an Advisor Client account.
How do I move my current IBKR account underneath an advisor account?
There are two possible methods which can be used to move an existing IBKR account underneath an advisor structure, dependent upon the situation of the account being linked.
Link Account to Advisor/Broker:
Interactive Brokers allows existing accounts to request their full account be 'linked' to a Friends Advisor, Non-Professional Advisor, a Professional Financial Advisor or a Fully Disclosed Introducing Broker. These linkages include all cash and positions and are available to accounts which are not currently Advisor or Broker clients. There are a number of checks which are performed which may prevent the linking of an account, such as, but not limited to, trading permission incompatibilities between the Advisor or Broker Master and the client account, commission schedule1 differences, etc.
To use this functionality, the user on the account requesting to be linked will need to log in to Client Portal and choose the User menu (head and shoulders icon in the top right corner) option followed by Account Settings. In the Configuration section click the gear icon next to the words "Create, Move, Link or Partition an Account". You will be presented with a variety of options, one of which is "Move my entire account to an account managed by an Advisor/Broker". Check this option and click Continue.
You will be prompted to enter the account ID and the title of the Advisor or Broker which you are attempting to link to. After submitting this information, users will be presented with any applicable agreements and will need to confirm the request.
Once confirmed, the advisor or broker will receive an email notifying them of the requested link. They will need to log into Advisor Portal to either accept or reject the request. IBKR will process accepted requests at approximately 3:00 p.m. every Friday.
1 Please note, accounts which are configured with an unbundled commission schedule will not be allowed to link to an Advisor or Broker account, unless the commission schedule is changed to bundled. In the Advisor and Broker account structures, commission schedules cannot be defined for client accounts. If not properly configured at the master level, changing your commission schedule to bundled may result in higher commission charges.
Transfer of Assets to Another IBKR Advisor Managed Account
For those clients which have an attached or additional account, in order to move under an Advisor, you must first open a new account directly under the Advisor, which duplicates the existing account. It is important to ensure that all aspects of the new account (account titles, tax IDs, trading permissions, etc.) match the existing account exactly. Client accounts can be created by the Advisor through Advisor Portal (click here for detail). Once the new account has been approved, clients will be able to log into Client Portal and select the Internal Transfer option as the Transfer Method in the Transfer Positions section of Transfer & Pay. Please keep in mind the following:
- The Advisor Master account is only a shell account that is used to place trades on behalf of Advisor Client accounts.
- The Advisor Master account cannot hold positions.
- In order to trade, you must allocate trades to an Advisor Client account.
Notes
- Transfers are processed on a daily basis, with the exception of US option expiration Friday.
- The new account should be allowed to close positions on the first day of transfer but will not be allowed to open positions as the new account will not have a previous day Equity With Loan value.
- The Cost Basis cannot be manipulated for Internal transfers, only for ACATs from outside sources.
How do advisors open client or sub accounts?
There are two ways for an Advisor to open a client account. Both methods are initiated from within the Advisor Portal by navigating to Manage Clients -> Create and Link Accounts-> Create -> New.
Fully Electronic Invitation
With this method, the FA sends an invitation to the client. The client completes all information and submits for approval. The password is given to the client immediately.
Semi-Electronic Application
With this method, the FA completes the application on behalf of the client, then sends to the client for a signature. Once the account is approved, the password is mailed, via US Mail, to the client. While the application is pending, the FA can view and reprint from the Advisor Portal.
Note: If the FA Wants to open a sub account for himself
FAs are asked, when completing the FA application, if they would like to create a trading sub account for themselves. If they choose no, they may open an account at a later time, however they will be required to submit all new documents. They can submit a request to newaccounts@interactivebrokers.com to request that the documents used for the master account be applied to the sub account. To create a sub account they should complete an Electronic Invitation, accessible through the Advisor Portal. The trading sub account of the FA cannot be set up as an IRA account.
Why do certain cash deposit and withdrawal requests require that an instruction be created while others do not?
Whether or not an instruction is required is a function of both the transaction type (i.e., deposit or withdrawal) and its underlying method (i.,e. check, ACH initiated at IBKR or wire). In general, if the deposit method dictates that IBKR pull funds directly from the client’s account or if the withdrawal method dictates that IBKR push funds directly to the client’s account, an instruction will be required in order to obtain the necessary account specific information and authorization to act. Outlined in the chart below are the possible scenarios.
|
INSTRUCTION REQUIREMENTS BY TRANSACTION TYPE & METHOD (Yes/No) |
|||||
|
|
Check |
ACH – at Bank |
ACH – at IBKR |
EFT |
Wire |
|
Deposit |
No |
No |
Yes |
Yes |
No |
|
Withdrawal |
No |
N/A |
Yes, if instruction is created as Debit/Credit, no if Credit only |
Yes |
Yes |
Are there any qualification requirements in order to receive Portfolio Margining treatment on US securities positions and how does one request this form of margin?
In order to enabled for portfolio margining an account must be approved for option trading and must have at least USD 110,000 in net liquidating equity (USD 100,000 to maintain, once enabled). Account holders will also be required to acknowledge and sign the Portfolio Margin Risk Disclosure document and be bound by its terms.
Portfolio margining may be requested through the on-line application phase (in the Account Configuration step) or after the account has been approved. To apply once the account has already been approved, log into Client Portal and select the Settings and Account Settings menu options. In the Configuration section, click the gear icon next to the words "Account Type". There you may choose the portfolio margin treatment which will initiate the approval process. Please note that requests are subject to review (generally a 1-2 day process) and may be declined for various reasons including a projected increase in margin upon upgrade from Reg T to Portfolio Margining.
