How to Share a Security Device
Overview:
IBKR allows individuals to maintain multiple user names within a single account or across distinct accounts under their control. Individuals who do not wish to maintain multiple physical security devices may elect to consolidate and share a single device across their users. The prerequisites and the procedure for sharing devices are outlined below.
Note: Clients using the IBKR Mobile Authentication (IB Key) should not use the present device sharing procedure, since the IBKR Mobile Authentication (IB Key) allows multiple users to be enabled directly from the IBKR Mobile app itself (menu item: Authenticate -> Add user).
Background:
Prerequisites
The possibility of sharing a physical security device will be granted only if ALL the conditions below are respected:
a) The participant users belong either to the same entity or to different entities but with the same identification data (Date of Birth, Citizenship, Country of Legal Residence, Identification Document type and number or Social Security Number for US Citizens and residents).
b) The participant users do NOT have a temporary security device (Temporary Code, Online Security Code Card) currently assigned to them.
c) The physical device offering the highest level of protection has to be shared. In case all the devices offer the same level of protection, whichever of them can be eligible. You can check the security level of your device in the table below:
|
Security level |
Device name |
Device image |
| Highest | Digital Security Card+ (DSC+) |  |
| Lowest | Security Code Card (SLS card) | 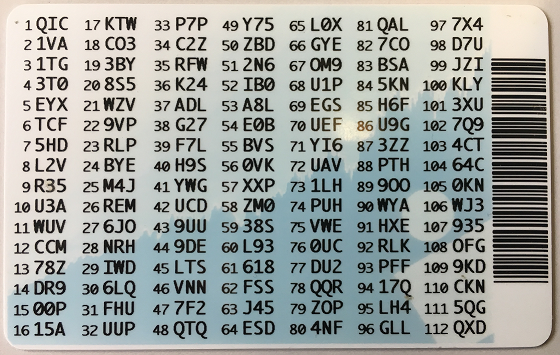 |
Procedure:
1. Among the possible candidates, identify the device offering the highest level of protection and the user that device belongs to. We will call that user the device owner
2. Log in to your Client Portal page with the requesting user (NOT the device owner)
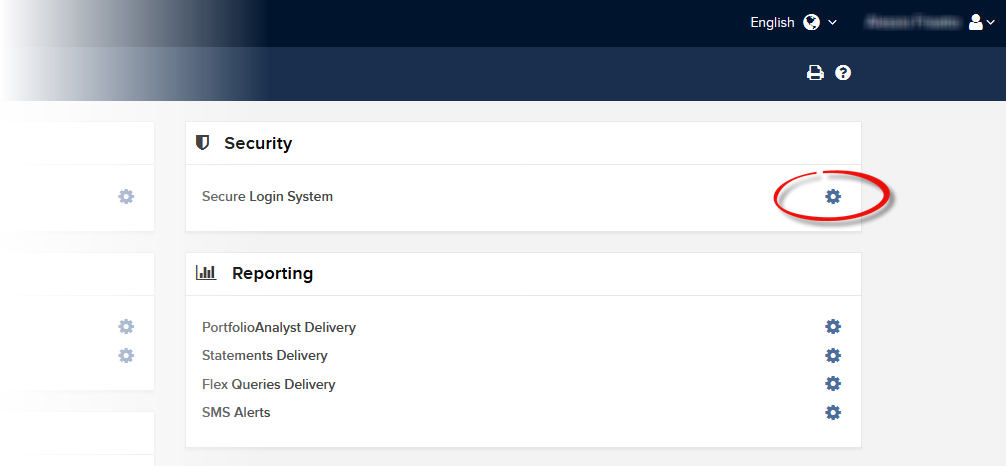
3. Click on Menu icon in the top-left then select Settings and then User Settings
(1).png)
4. Click on the wheel (Settings) close to Secure Login System
5a. In case your user does not have any active device, the system will display the SLS enrollment menu. Select the item "I already have access to a Secure Login Device under a different username" and click on Continue
.png)
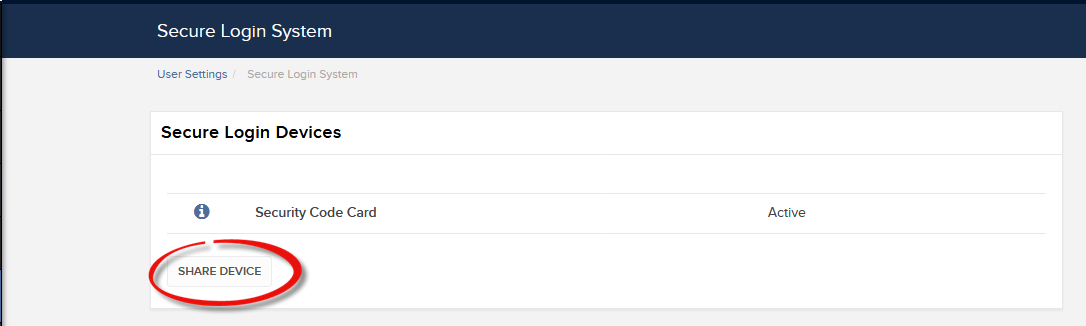
5b. In any other case, the system will display the device list. Click on Share Device to proceed further
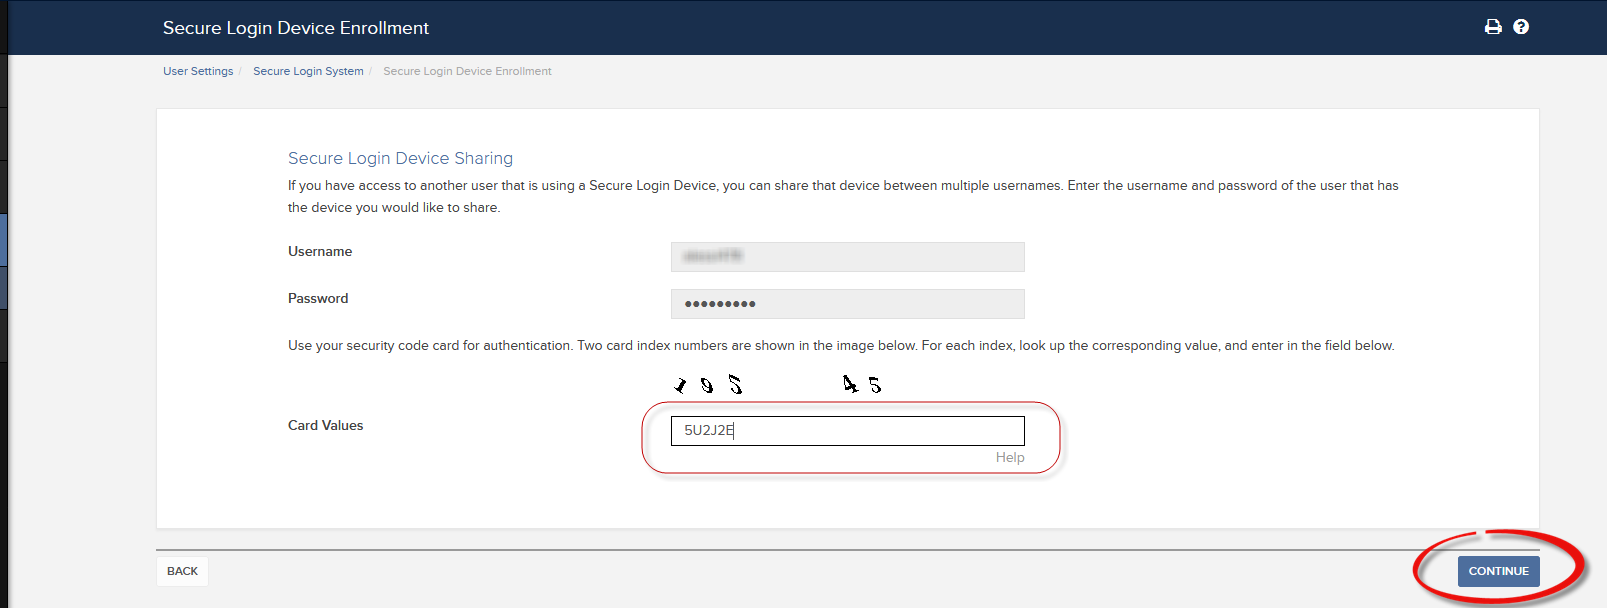
6. Enter the credentials of the device owner you identified at point 1. and click on Continue.
.png)
7. According to the SLS Device about to be shared, the system will display a security element (either Challenge Code or Index Numbers). Operate the SLS Device and, using the security element provided by the system, generate a response code. Enter the response code in the correspondent field and click on Continue.
8. Once you have reviewed the correctness of the information entered, click on Continue.
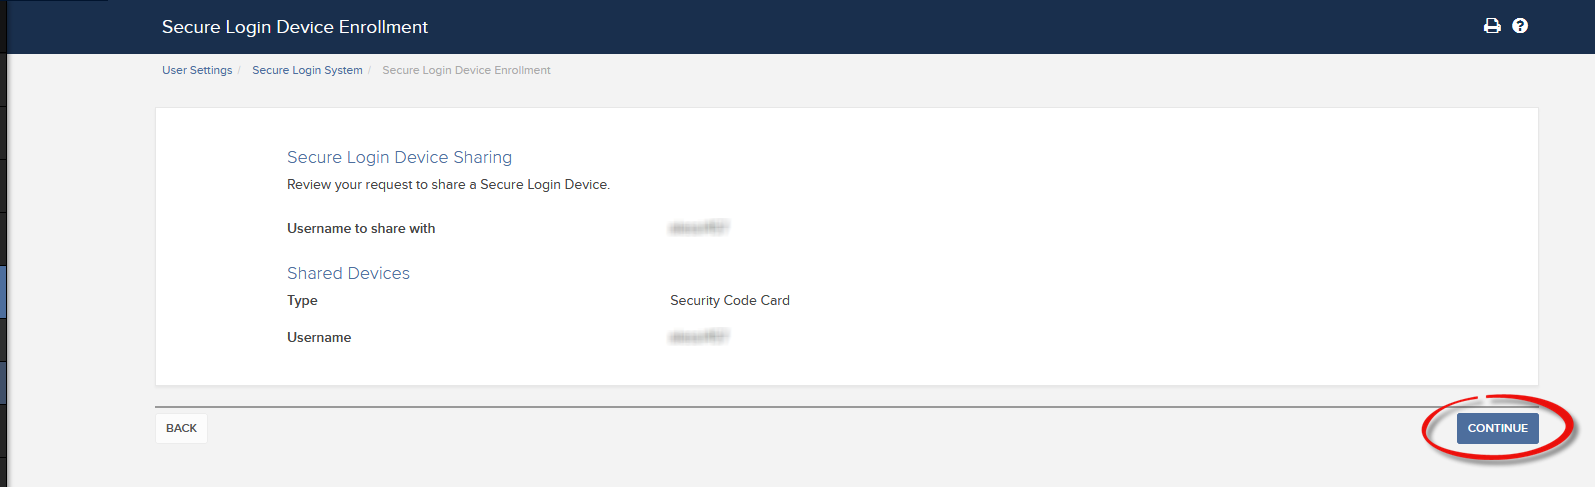
9. The system will display the status of your request (see note a. for details). Click OK to finalize the procedure.
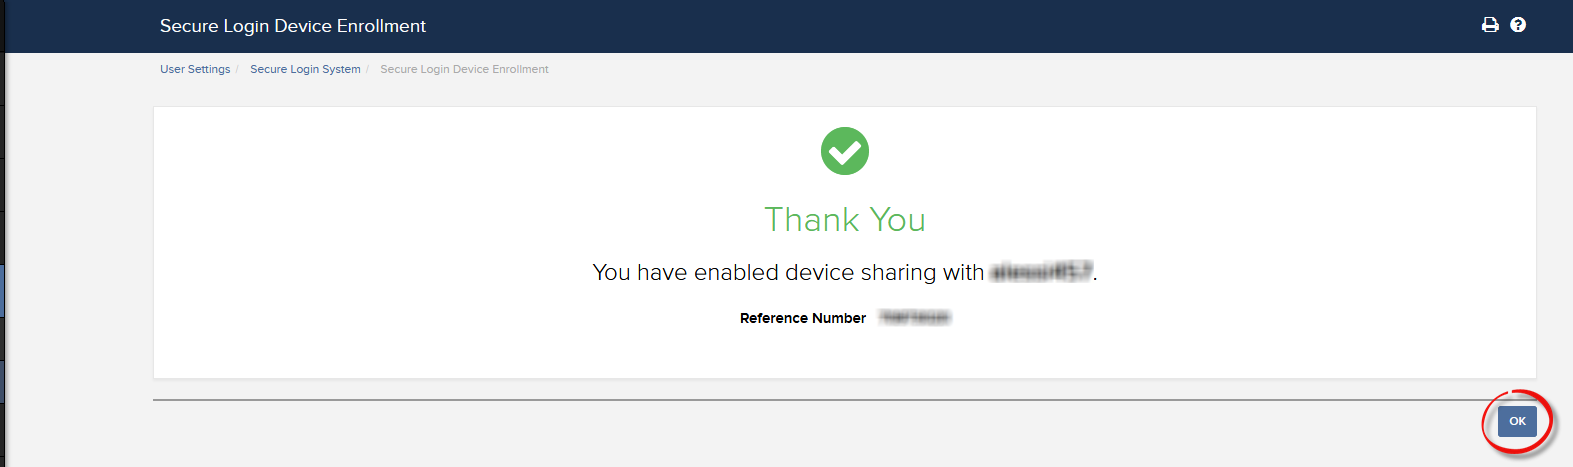
a. In the vast majority of cases your sharing request will be automatically and immediately approved, processed and enforced. In case the approval of our Compliance department is needed, your request will stay in a pending status until this step has been cleared.
b. Once the device sharing request has been processed, you could keep the redundant device/s in a safe place. In the future you might decide to cancel the device sharing and reactivate those devices instead. If you do not feel the need to store them, you can send them (only DSC+) back to us following the instructions contained on this page:
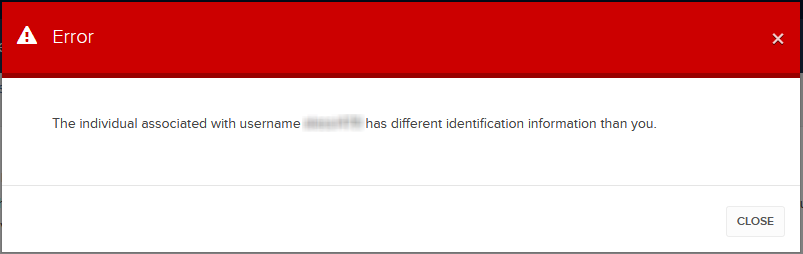
c. Here below you can see the most common error messages and their causes:
- Less secure device: This error is returned if you set up the less secure token as the one to be shared. Please identify the most secure device and share that one.

- Different identification information:
This error is returned if the identification data of the entities/individuals involved in the sharing does not match. If the users belong to different entities/individuals, please notice that the token sharing will NOT be possible by design.
If the users belong in fact to the same entity/individual, the mismatch could be due, for example, to an outdated identification document on record. In this case, you can contact our Client services to have the data rectified.
References:
- Overview of the Secure Login System: KB1131 or ibkr.com/sls
- Multiple Two-Factor Authentication System (M2FS): KB2895
- How to share the Security Login Device between two or more users: KB2481
- How to opt back into the Secure Login System: KB2545
- Security considerations following SLS opt-out: KB1198
- Are there any charges or expenses associated with the security devices? KB1861
- How to troubleshoot Client Portal Login Failures: KB1132
- How to troubleshoot Trading Platform Login Failures: KB1133
How to Transfer the TWS Layout Settings via USB or Network Drive
Overview:
The TWS layout settings can be saved on a USB or Network Drive, in order to import them from the same or from a different computer / TWS session. This article outlines the needed steps.
Please click one of the links below, according to your scenario:
B. I want to save my TWS settings on a USB or Network Drive and import them to a session with a different user
A. I want to save my TWS settings on a USB or Network Drive and import them to a session with the same user
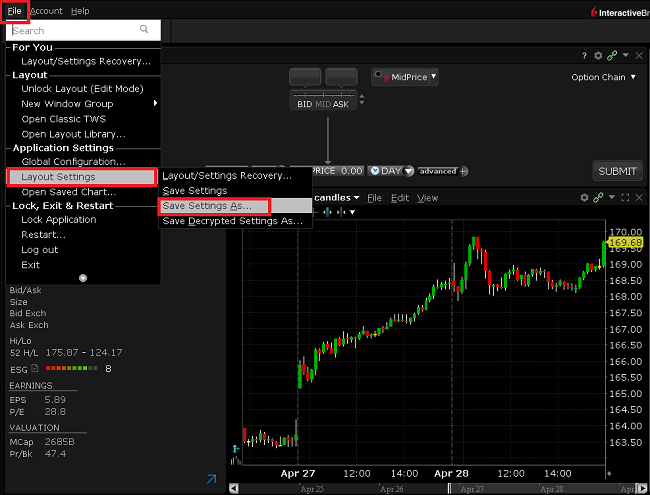
1. Log in the Trader Workstation with the user whose layout settings you would like to export.
2. Click the top menu File > Layout Settings > Save Settings As...
3. Expand the Look In drop-down and select where you want to save the file (e.g. USB or Network Drive). Use a file name which would be easy to identify (e.g. migrate) and click Save. The file will be saved with the extension '.xml'.
.png)
4. Proceed with the workflow, starting with step 5 in the following section.
B. I want to save my TWS settings on a USB or Network Drive and import them to a session with a different user
1. Log in the Trader Workstation with the user whose layout settings you would like to export.
2. Click the top menu File > Layout Settings > Save Decrypted Settings As...
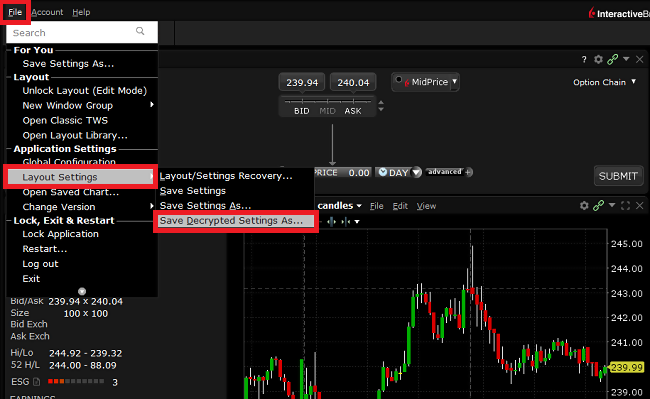
3. Take notice of the information about the file format and click Yes.

4. Expand the Look In drop-down and select where you want to save the file (e.g. USB or Network Drive). Use a file name which would be easy to identify (e.g. migrate) and click Save. The file will be saved with the extension '.xml'.
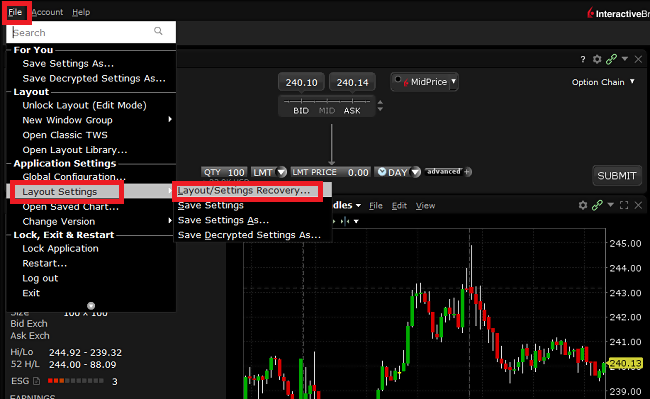
5. Close the TWS and log in again with the user which should import the layout (that can be a different computer).
6. Connect the USB or Network Drive to the computer.
7. Click on the top menu File > Layout Settings > Layout/Settings Recovery...
8. Select Custom... and click OK
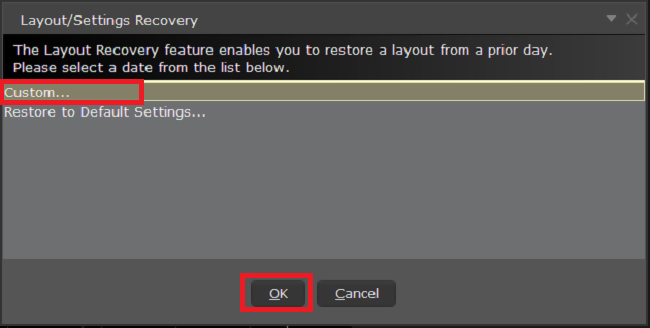
9. Expand the Look In drop-down and select the drive where you previously saved the TWS settings file (e.g. USB or Network Drive). Select the settings file (e.g. migrate.xml) and click Open.
.png)
10. Click Open without reporting problem
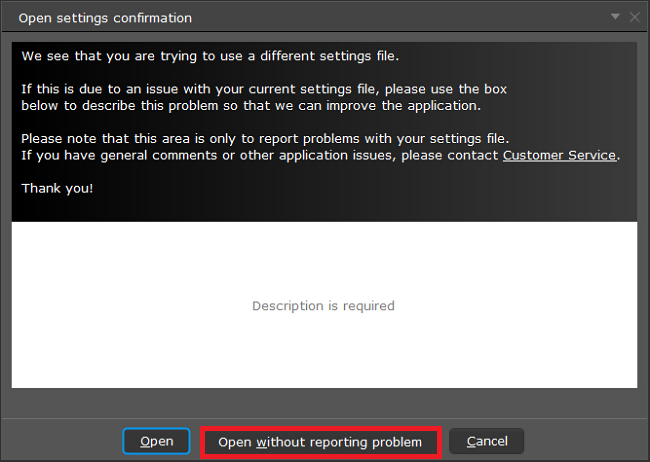
11. Your TWS will automatically restart, applying the new layout settings.
Related articles
See KB3146 for instructions on overcoming the "Downloading settings from server failed" error
See KB2320 for instructions on transferring settings from one user to another
See KB2282 for instructions on how to transfer settings from one computer to another
How to install MobileTWS on BlackBerry OS10
Background:
Currently, Interactive Brokers does not offer a native IBKR Mobile app for the Blackberry 10 Operating System. Due to a recent partnership between Amazon and Blackberry, clients who own a Blackberry device running Blackberry 10 OS can install the Android version of the IBKR Mobile app directly from the Amazon Store.
Blackberry 10 OS Devices:
- Q5, Z3, Leap, Classic, Passport, Q10, Z10, Z30, P'9982, P'9983
*Please notice that these devices have limited hardware capabilities and this could negatively affect the performance of the IBKR Mobile app.
Installation
You can download the IBKR Mobile app on your Blackberry phone directly from the Amazon Appstore.
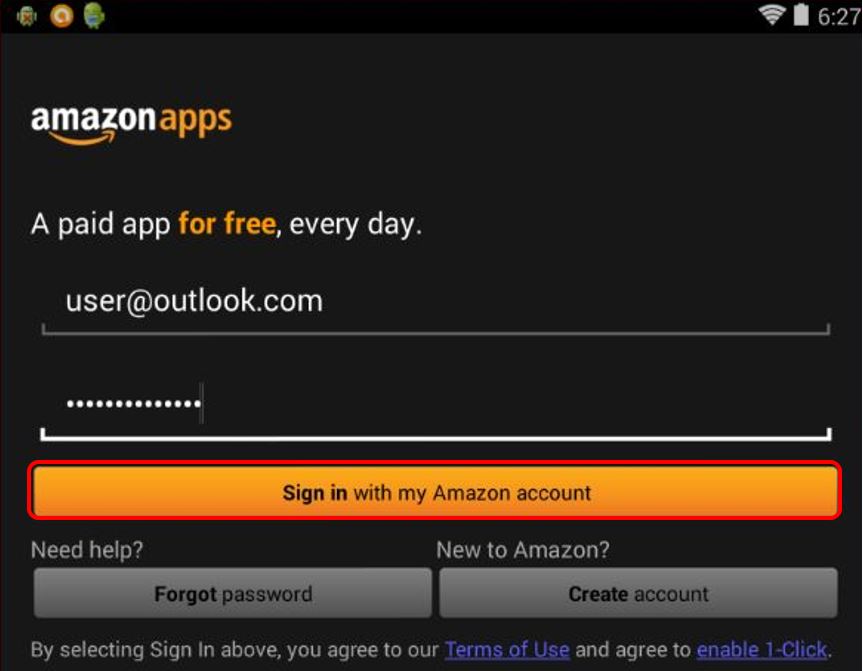
How to install IBKR Mobile from the Amazon App Store:
- On your Blackberry phone open the Amazon App Store
 app.
app. -
Enter your Amazon e-mail and password, and tap Sign in.
(If you don't have an Amazon account, tap Create a new Amazon account.)
-
Tap on the search bar at the top, type IBKR Mobile then tap Search.

-
Tap on IBKR Mobile from the search results and install.

5. Once installed, tap on the IBKR Mobile app from one of your home screens to launch it

How to transfer TWS settings from one computer to another
Overview:
This article applies to:
- Platform(s): Windows, Mac, Linux
- TWS Build(s): Build 959 and Above
Background:
The 'Store Settings on Server' feature stores the Trader Workstation (TWS) settings/configuration in the cloud and retrieve them at anytime from another computer. This allows you to transfer settings from the same user on two different machines, but not between different accounts/users.
How to upload your TWS settings to the server:
To transfer settings from one computer to another for the same username you will need to enable the option Use/store settings on server:
1. On the computer which currently has your settings, on the lower right of the login window, click on More Options >
2. Make sure the Use/store settings on server option is unchecked and login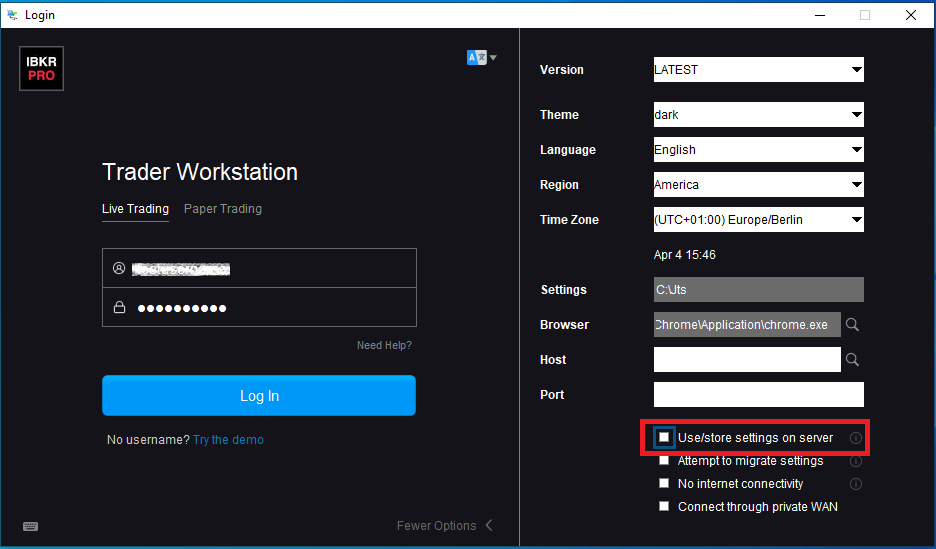
3. Once you are logged in, enable this function:
- If you are using the Classic layout, navigate to Edit >> Global Configuration >> Lock and Exit and check the box Use store settings on server
- If you are using the Mosaic layout navigate to File >> Global Configuration >> Lock and Exit and check the box Use store settings on server
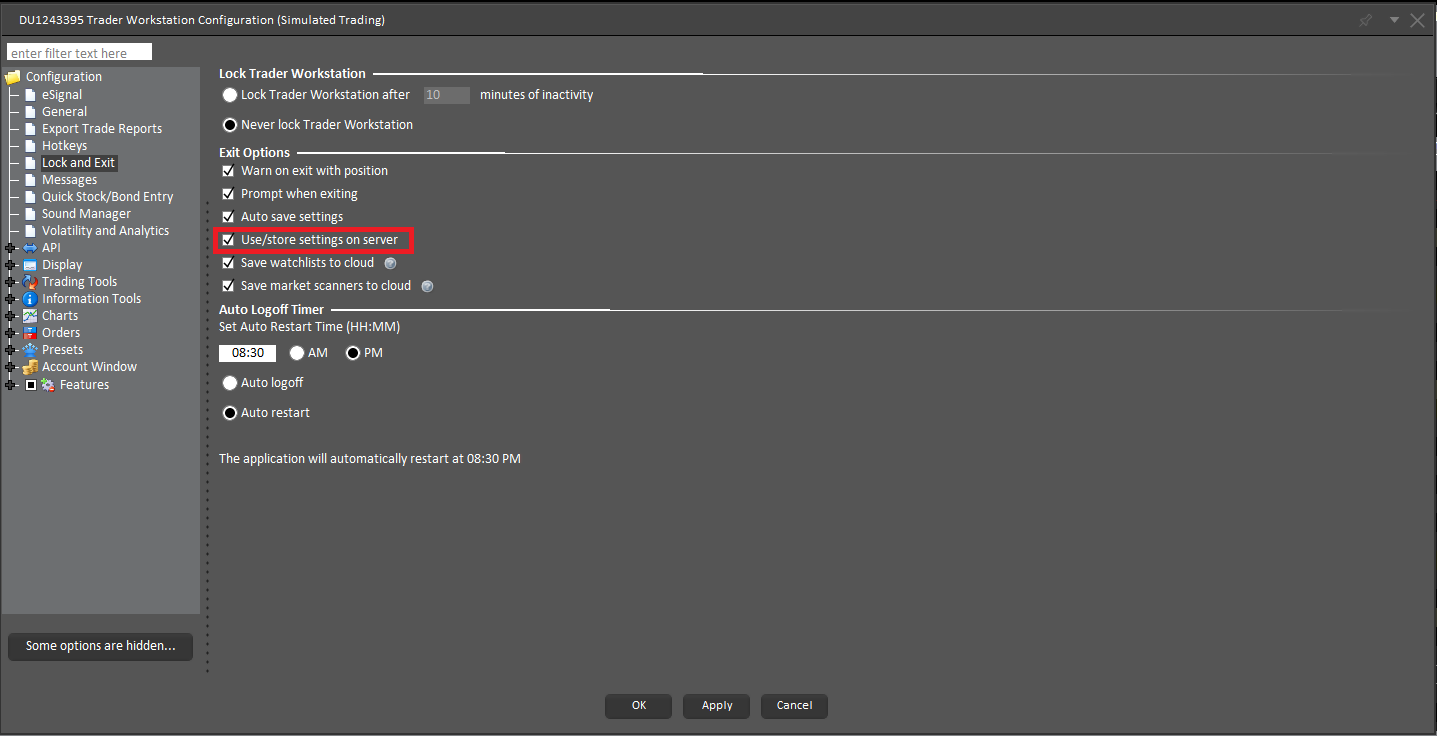
4. Select Apply and OK.
5. Click on File -> Save Settings.
6. To Exit the application navigate to File and Exit.
IMPORTANT NOTE: The above operation will only save one copy of the TWS settings on the server. The serve does not store any backup copies.
How to download your TWS settings from the server:
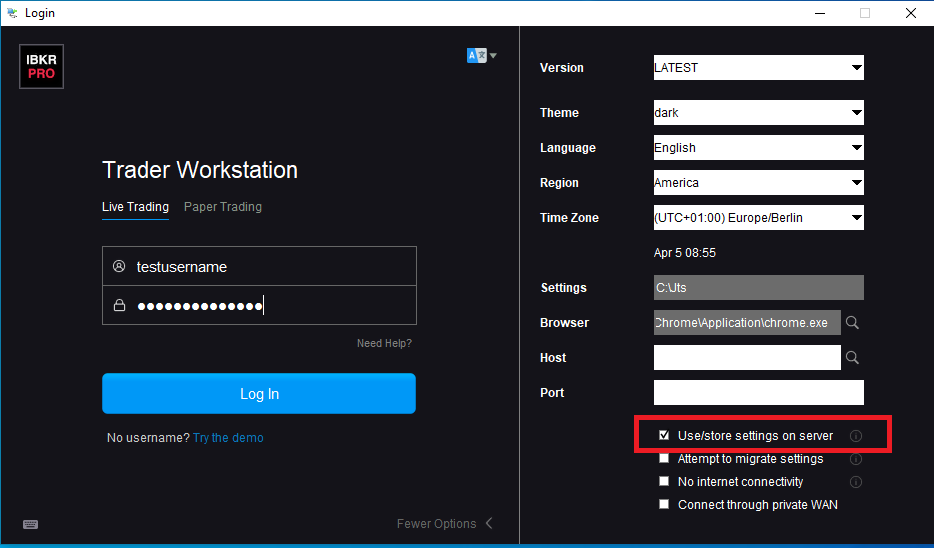
On any computer (on which you want to use the same settings as above): Login with the Use/store settings on server option checked on the login window. This will download the settings, which you previously saved on our server.
Related articles
See KB3146 for instructions on how to overcome the "Downloading settings from server failed" error
See KB2323 for instructions on how to restore TWS settings from external storage
See KB2320 for instructions on transferring settings from one user to another
Client Portal Login Failure using Safari as Browser
Background
Most recent versions of web browsers contain a feature which prompts users to save their user name and password when logging into various sites on the Internet. While convenient in practice, this feature introduces a significant security risk in that it allows anyone with access to the computer to log into those sites where the password has been saved.
Many sites that deal with highly sensitive information, including the Client Portal, have controls which do not allow this feature to be utilized. While most browsers such as Mozilla Firefox, Internet Explorer and Google Chrome allow for such controls, others such as Apple's Safari do not.
As a result, Safari users who attempt to use the password save feature may experience log in failures on future log in attempts.
Solution
Should this log in failure occur, you will need to remove the saved login credentials. To remove the login credentials, follow these steps:
1) When Safari is in the foreground, click on the menu Safari --> Preferences
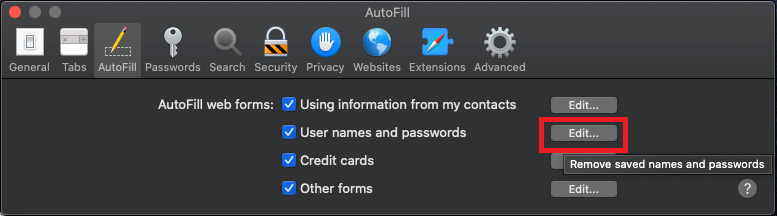
2) Click on the icon AutoFill on the toolbar
3) Click on the button Edit... next to "User names and passwords" (see Figure 1.)
Figure 1.
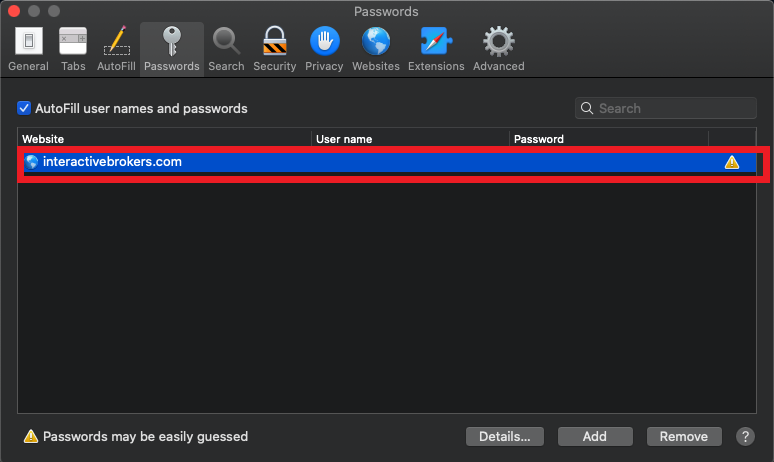
4) Locate the line related to the Client Portal web site and select it (see Figure 2.)
Figure 2.
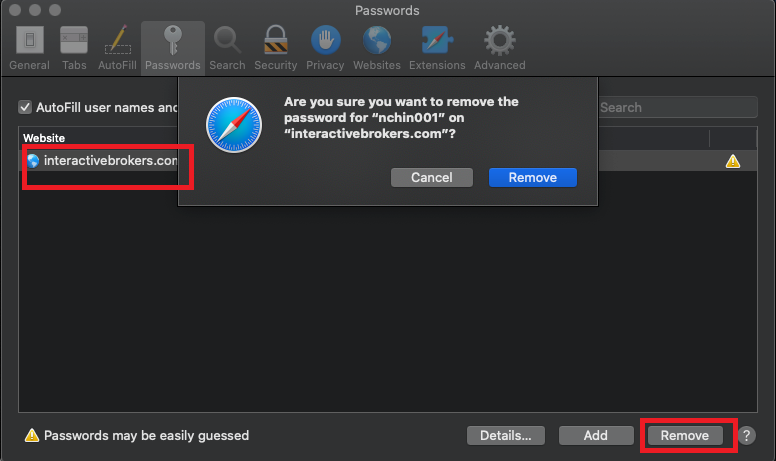
5) Click on the button Remove (see Figure 3.)
Figure 3.
6) Close and reopen Safari. You should now be able to log in . Upon log in you will be prompted whether to save user/pass again for the website. Please answer “Never for this website” or "Not now".
When and how should I increase the memory allocation for TWS?
Overview:
Java Virtual Machine memory allocation
The Trader Workstation is a Java-based application. As any other Java applications, it executes within a Java virtual machine (JVM) which manages the interactions between the program and the underlying Operating System (OS).
The memory (RAM) which is allocated by the operating system to the JVM constitutes the heap space. That is the area where all the class instances and arrays needed by the application are allocated. The heap space is created when the JVM is started and it is dynamically freed-up by the Garbage Collector (GC), the Java memory manager. When the need arises, the Garbage Collector is invoked to free up the heap space by unloading Java classes and other code structures no longer used by the application.
If the heap space is undersized, the Garbage Collector may not be able reclaim memory at the needed pace or may have to be called too often, draining the processor (CPU) resources. When this happens, the application may slow down, be unresponsive or even crash completely.
To ensure a smooth TWS run, it is therefore sometimes necessary to change the memory allocation, according to the layout complexity and the needs of the application itself.
Background:
In which case I should change the TWS memory allocation?
If your TWS layout contains a considerable number of elements (Analytical/Trading Tools, Chart windows, News panels, Watchlists, Layout tabs...) and your platform is slow or poorly responsive, you may want to increase the memory allocation in order to achieve better performances. If your TWS freezes or crashes, we also recommend increasing the heap space as the first corrective action to attempt.
How much memory should I allocate to TWS?
In general we recommend to start with a conservative memory allocation and test the TWS performances with that set up. If the performances improvement is less noticeable then expected or not yet satisfactory, you can switch gradually to higher values until you find the best fit for your platform.
Please consider the following:
Considering the above, we suggest to initially reserve 1.5 GB of system RAM the TWS, as explained in the guide below.
This amount of free memory is usually available on any modern computer and should be a good fit for most of the cases. Should you still notice slowness, freezing or crashes during the TWS execution, you can raise the value to 1792.
In any case, we do not recommend to set the value above 2048 since this will produce an unnecessary overhead and may thus even decrease the overall performances of the application.
How can I change the memory allocation for the TWS?
Please follow one of the links below for the instructions, according to the Operating System and TWS release you are using
Any Operating System
B.1 Your Operating System is Windows
B.2 Your Operating System is Mac OS
A. TWS version 972 and higher
The steps below are valid for all Operating Systems
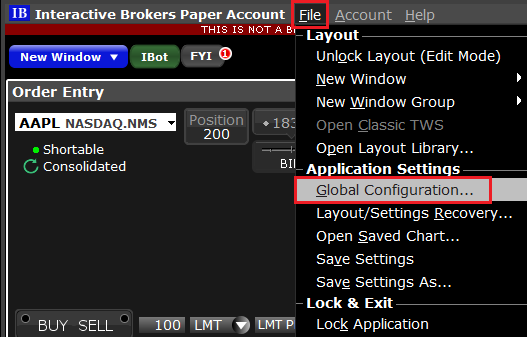
1) In the TWS, click on the top menu File (or Edit if you are using Classic TWS) and select Global Configuration...
2) On the left side menu of the Global Configuration panel, click on General
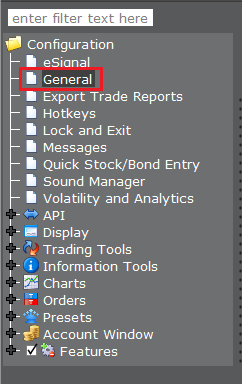
3) In the panel on the right side, in the Memory Allocation field, replace the existing value with 1536(1).png)
4) Click on Apply and then on OK
5) Shut down the TWS
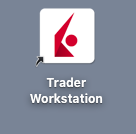
6) Launch the TWS with a double click on the Desktop shortcut Trader Workstation (Should you receive an error message, please see Note 3.

B. TWS versions previous to 972
B.1 Your Operating System is Windows
1) Close TWS in case it is running
2) On your keyboard, press WIN+R (the WIN key is the key with the windows flag located on the left side of tour keyboard, between the keys CTRL and ALT)

3) Type C:\Jts\tws.vmoptions and Click OK
.png)
4) Should the system ask you which program to use to open the file, select Notepad and click OK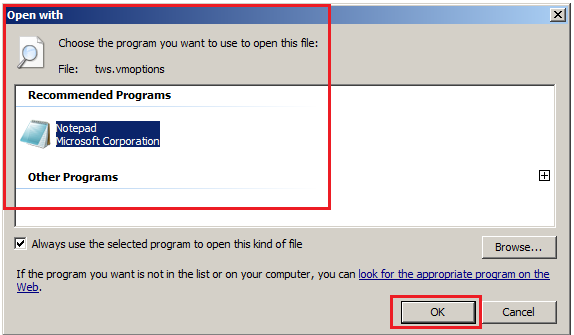
5) Cut the line -Xmx768m and paste it below the line ### Keep on update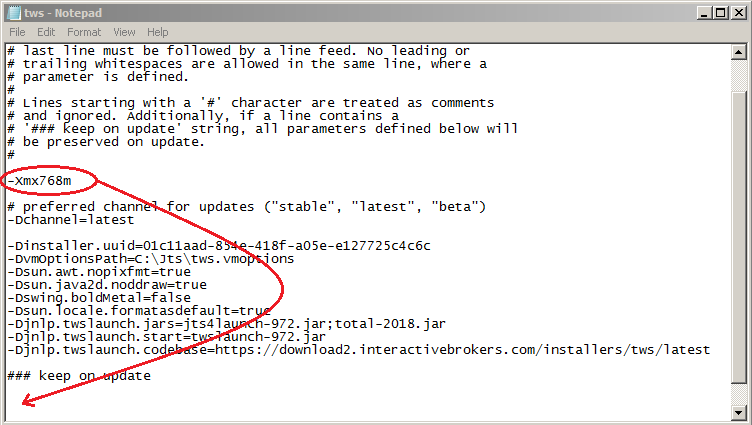
6) Change then the value of the parameter Xmx from 768 to 1536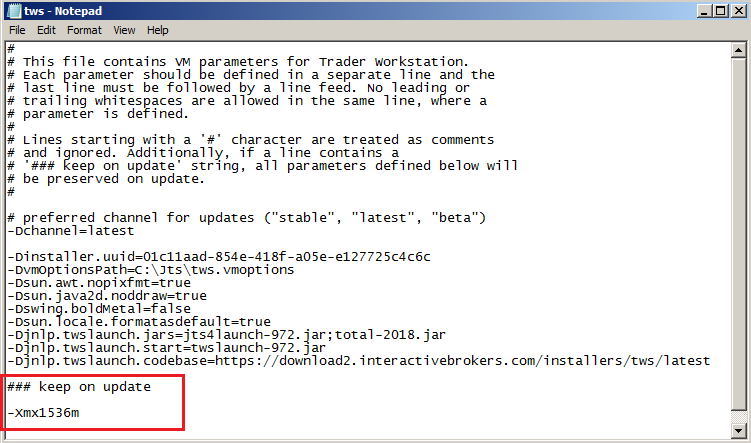
7) Save the changes by clicking on the top menu File --> Save 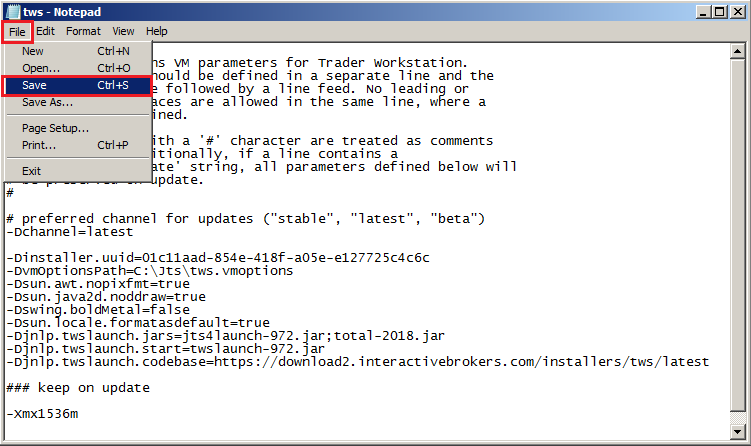
8) Close the file clicking on the X icon on the right side of the toolbar
9) Launch the TWS with a double click on the Desktop shortcut Trader Workstation (Should you receive an error message, please see Note 3.
B.2 Your Operating System is Mac OS
1) Close the TWS if it is running
2) Use the Spotlight search (the magnifier glass on the top right of your Desktop) to find the file tws.vmoptions
Normally the file is located within the Jts folder (a subfolder of your home folder)
.png)
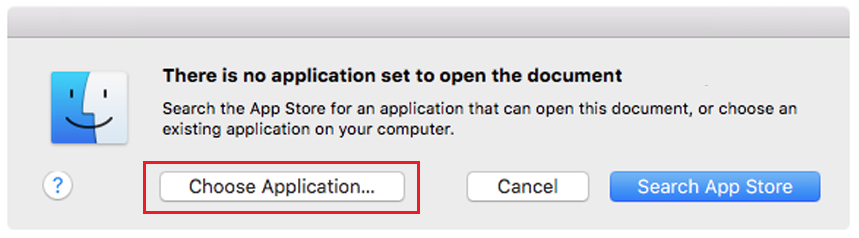
3) On the Spotlight results panel, click on tws.vmoptions to open it. Should the system ask you how to open this file, click Choose Application... select a text editor (TextEdit, Smultron, TextWrangler...) of your choice and click Open
.png)
4) Locate the line -Xmx768m. Cut it and paste it below the line ### Keep on update
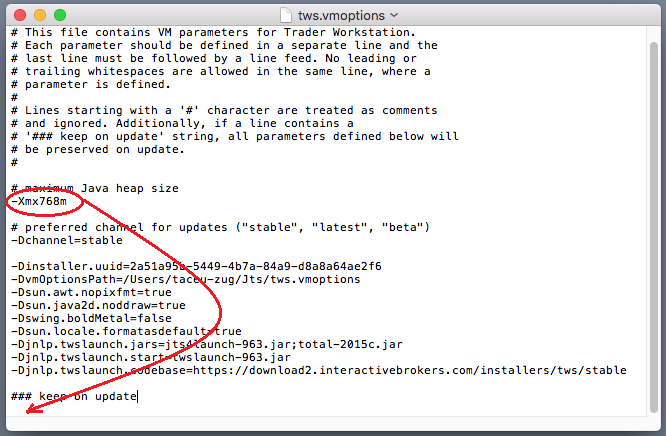
6) Modify the value 768 in to 1536

7) Save and close the file
8) Launch the TWS with a double click on the Desktop shortcut Trader Workstation (Should you receive an error message, please see Note 3.
Notes
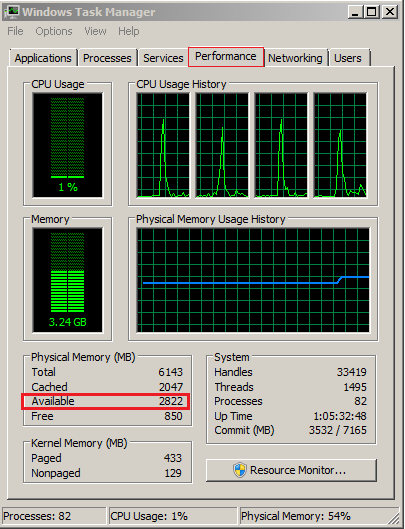
1. Available system RAM
In order to check the amount of available system RAM on your computer, you can:
- on Windows: use the key combination CTRL+SHIFT+ESC to start the Task Manager, click on the tab Performance and look for the "Available" Physical Memory. This will tell you the amount of unoccupied RAM in MB (1024 MB = 1GB)
- on Mac OS: Open Finder, go to Application --> Utilities and open Terminal. In the terminal type the command:
sudo purge
and press Enter. The system may ask you to enter your Mac user password. Enter the password. Once the command has completed, type the following command:
top -l 1| grep PhysMem
The "unused" value will tell you the amount of unoccupied RAM in MB (1024M = 1GB)
.png)
2. Limitations of 32-bit Operating Systems
Please notice that 32-bit Operating Systems can normally only address a maximum of 2 GB of RAM per process (see table below for details). Because of this OS architecture limitation, if you have a 32-bit OS, the maximum memory allocation for the TWS must not exceed 2048 Mb.

3. Error: "Could not create the Java Virtual Machine"
This error may be displayed upon TWS startup if you set the memory allocation to a value higher than the available RAM of your system or if you set it higher than 2048 on a 32-bit Opertaing System. To overcome the error, you would need to decrease the memory allocation to a lower value using this procedure
Order Management Overview
BACKGROUND
IBKR’s order management and routing systems are negatively impacted when the volume of orders submitted by clients is significant relative to those which are actually executed. Left unchecked, unproductive orders have the potential to slow system performance, adversely impact other clients and increase capacity requirements and costs. To minimize the load of such orders on internal systems and to comply with exchange policies, certain of which impose a surcharge for excessive messages, IBKR monitors order activity and may place restrictions upon clients who routinely submit a disproportionate number of unproductive orders.
MEASUREMENT & REPORTING
The Order Efficiency Ratio (OER) allows IBKR to evaluate order productivity by comparing aggregate daily order activity relative to that portion of activity which results in an execution. This ratio is as follows:
OER = (Order Submissions + Order Revisions + Order Cancellations) / (Executed Orders + 1)
An OER above 20 is generally considered excessive and indicative of inefficient order management logic. Clients who routinely report an OER above 20 will receive notification of their ratio and are advised to review and optimize their logic and those who fail to take action or who report a particularly egregious ratio may be subject to trade restrictions.1
TAKING CORRECTIVE ACTION
Clients submitting orders through an API can often realize significant declines in their OER through slight modifications to their order logic. Please review KB1765 for a list of the most common techniques for optimizing this ratio.
1 It should be noted that these actions are not aimed at the client who submits 200 orders and receives 10 executions but rather those using automated systems to submit thousands of orders with negligible interaction with the NBBO.
- « first
- ‹ previous
- 1
- 2
- 3