SEC Tick Size Pilot Program FAQs
Tick Size Pilot ("TSP" or "Pilot") Program:
Under the TSP Program, if IBKR receives any order in a Pilot Security that does not conform to the designated pricing increment (e.g., a limit price in a $0.01 increment for a security designated as trading $0.05 increments), IBKR will REJECT that order, subject to limited exceptions. IBKR strongly encourages a thorough review of your software or your vendor’s software to understand the criteria for what causes an order in a Pilot Security to be rejected to permit you or your vendor to make changes to correctly handle orders in Test Group Pilot Securities.
FREQUENTLY ASKED QUESTIONS:
Q: What is the Tick Size Pilot?
A: On May 6, 2015, the SEC approved an amended TSP NMS Plan. The Pilot will be two years in length. Data collection for the Pilot began on April 4, 2016, 6 months prior to the implementation of the trading and quoting rules for the Pilot. Implementation of the trading and quoting rules for the Pilot will begin on October 3, 2016.
The Pilot will be conducted using a Control Group and three Test Groups where variations in quoting and trading rules exist between each group. Please see the TSP NMS Plan for additional information.
Q: Will the Pilot quoting and trading rules apply during regular market hours, pre-market hours and post market hours?
A: The Pilot rules apply during all operational hours (pre-market, regular hours, and post market hours trading).
Q: Will the Pilot quoting and trading rules apply to odd-lot and mixed-lot sizes?
A: Yes, the Pilot rules to all order sizes.
Q: Will orders in Control Group Securities be accepted in price increments of less than $0.05?
A: Yes, orders submitted in price increments of less than $0.05 will continue to be accepted in Control Group securities.
Q: Will orders in a Test Group 1, 2 or 3 Pilot Securities be accepted in price increments of less than $0.05?
A: No, unless covered by an exception, orders submitted in price increments of less than $0.05 will be rejected.
Q: Which Pilot Security Orders in Test Groups will Interactive Brokers accept at other than $0.05 increments?
![]() Midpoint orders with no explicitly stated limit price or impermissible offsets will be accepted
Midpoint orders with no explicitly stated limit price or impermissible offsets will be accepted
![]() VWAP orders that do not have an explicitly stated limit price or impermissible offsets will be accepted.
VWAP orders that do not have an explicitly stated limit price or impermissible offsets will be accepted.
![]() Interactive Brokers will accept Exchange operated Retail Price Improvement orders as follows:
Interactive Brokers will accept Exchange operated Retail Price Improvement orders as follows:
![]() Test Group 1 in $0.001 price increments
Test Group 1 in $0.001 price increments
![]() Test Groups 2 and 3 in $0.005 price increments.
Test Groups 2 and 3 in $0.005 price increments.
Q: Will there be any changes to the Opening / Closing processes on Exchanges?
A: Please refer to each of the exchange rules for details but in general, there will be no changes to the Opening / Closing process. All orders entered and eligible to participate in Exchange Opening / Closing Cross will be accepted in increments of $0.05. The Exchanges will begin publishing all quotes in increments of $0.05; however, Net Order Imbalance Indicator prices may be published in increments of $0.025.
Q: What will happen to my GTC order that was placed prior to October 3rd in a Pilot Stock that was priced in impermissible tick increments?
A: Interactive Brokers will adjust outstanding limit and stop GTC orders in Pilot stocks in Test Groups that are not in permissible tick increments (e.g., a buy limit order at $5.01 will be adjusted to $5.00 and a sell limit at $5.01 adjusted to $5.05).
Q: What will happen to my GTC order placed after October 3rd that was placed and accepted in a nickel tick increment but the Pilot Stock moves from a Test Group to the Control Group that permits non-nickel increments?
A: The GTC order will automatically be able to be revised by the user in non-nickel increments on the date the Pilot stock moves from the Test Group to the Control Group. Similarly, if a stock is added to Test Group due to a corporate action, IBKR will cancel the GTC order if it is priced in impermissible increments.
Q: Where can I find out more information?
A: See KB2752 or the FINRA website for additional details regarding the Pilot Program: http://www.finra.org/industry/tick-size-pilot-program
Locating Portfolio Page
The portfolio page allows you to view and montor your current portfolio at the individual position level, including psoition quantity, market value, current bid-ask and profit/loss. Instructions for locating the page vary by trading platform and are outlined below:
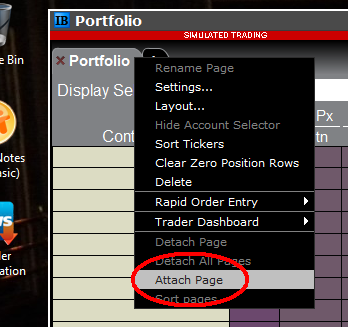
TWS Classic - First check to see if you have detached the page from the main window (an option provided by right clicking on the tab). If this is the case, the page will be open but hidden behind the main window. Minimize the main window by clicking on the minimize icon located in the upper-right hand corner of the screen. If you are able to then view the portfolio page and wish to reattach it, simply right click on the tab to open the menu and select the "Attach Page" option.
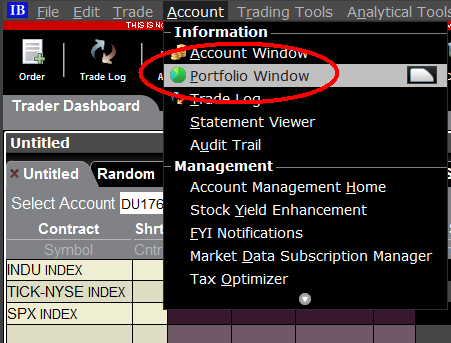
If the page is not detached, select the "Account Window" option from the top menu bar and then "Portfolio Window" menu option.
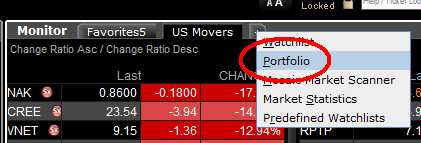
Mosiac - from the Montor window, click on the small + sign located to the right of any existing monitor tabs. Then select "Portfolio" and this page will reappear.
Additional Information Regarding the Use of Stop Orders
U.S. equity markets occasionally experience periods of extraordinary volatility and price dislocation. Sometimes these occurrences are prolonged and at other times they are of very short duration. Stop orders may play a role in contributing to downward price pressure and market volatility and may result in executions at prices very far from the trigger price.
How to start multiple TWS sessions on a Mac
By default macOS does not allow the user to run multiple sessions of the same application. The following workaround can overcome this limitation in case you need to run the Trader Workstation for more than one user.
-
In case running different versions of the TWS is suitable to your needs, please follow the instructions on Procedure 1
-
In case you need multiple sessions of the same TWS version, please follow the instructions on Procedure 2
Procedure 1
1) Open the web page ibkr.com
2) Navigate to the menu Technology > TWS Software.
3) First download and install one of the auto-updating TWS versions (TWS LATEST or TWS according to your preference).
4) Once you have completed the installation, download and install one of the offline versions (OFFLINE TWS LATEST or OFFLINE TWS according to your preference).
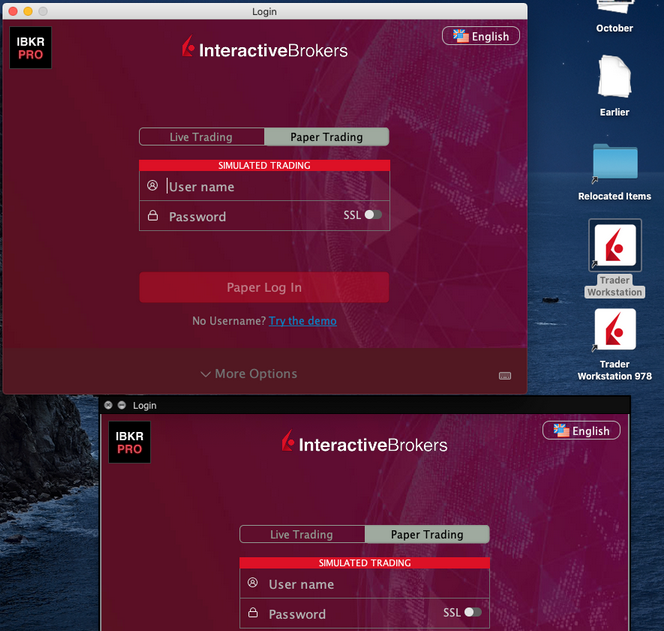
5) You will then see on your Desktop two different Trader Workstation icons. You can use the first shortcut to start the first TWS session and the second one to start the additional one (see Figure 1.). Note: the link containing the version number in the name is the OFFLINE version. This will be a version that needs periodical manual updates.
Figure 1.
Procedure 2
1) Launch the first session of the Trader Workstation using the TWS icon present on your Desktop. If you still do not have any Trader Workstation icon, please go to the web page ibkr.com and click on the menu Technology > TWS Software. Then download and install one of the TWS versions displayed.
2) Open the Finder and click on Applications on the left side menu. Then select Utilities and then launch Terminal (see Figure 2.).
Figure 2.
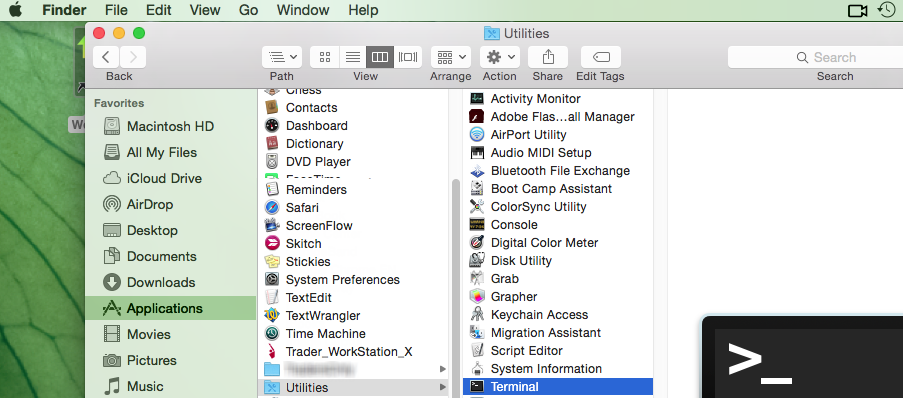
3) The Terminal will appear on the screen and will point to the home folder of your current macOS user. Then enter the commands listed below (see Figure 3.) on your Terminal. After each one, press ENTER on your keyboard.
cd Applications
cd Trader\ Workstation
open -n Trader\ Workstation.app
Figure 3.

4) The login window for your second TWS session will then appear on your Desktop. You can now close the Terminal.
Note: the procedure above presumes that the TWS executable is located in the following path: users/yourusername/home/Applications/Trader Workstation/Trader Workstation.app
If at the time you installed the TWS, you selected to install it for all the users of your system, then the TWS executable will be located here:
/Applications/Trader Workstation/Trader Workstation.app
and therefore you would need to issue the following commands in the Terminal:
cd /Applications
open -n Trader\ Workstation.app
How to overcome the warning message "The signature of the file is corrupt or invalid"
This article describes how to overcome the warning message which you might receive when you download the Trader Workstation or IB Gateway installation packages.
Since a Microsoft update has modified the signature validation mechanisms, the Trader Workstation and IB Gateway installation packages might be reported as having an invalid or corrupt signature, although their signature is indeed intact and absolutely valid.
If you are using Microsoft Edge as browser please follow all the steps below. If you are using any other browser start directly from point 3.
1. As soon as the installation package has been completely downloaded, you will notice on the bar at the bottom of your browser frame the warning message "The signature of the file tws-... is corrupt or invalid". Please click on the button View Downloads to open the DOWNLOADS panel. ![]()
2. Right click on the filename and select Run anyway.
.png)
3. Once the installer has been launched, the SmartScreen filter will display an additional warning message. Click on the link More Info.
(1).png)
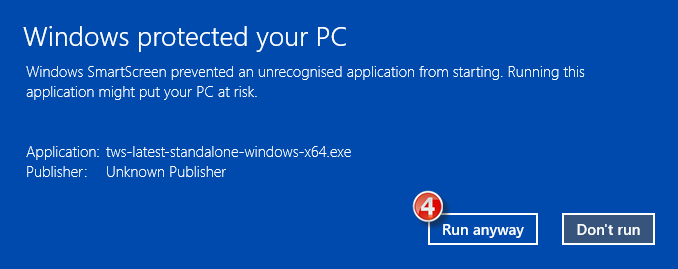
4. Now click the button Run Anyway to allow the file execution. The installation will then start.
How to install Java on a Linux computer
For the purpose of this guide, we will divide the Linux distributions nowadays available into three big families:
- APT based Linux distributions (Ubuntu, Mint) - those distributions use the Advanced Packaging Tool to fetch and install software packages in a semi-automatic way, resolving and taking care of dependencies.
- RPM based Linux distributions (Suse, OpenSUSE, Red Hat, CentOS, Fedora, Oracle Linux) - those distributions allow the installation of software packages (.rpm files), which contain the binary files to be installed on the system and an integrated dependency checker script. The .rpm packages allow a simplified and smooth installation of software without requiring a deep knowledge of the system.
- Other Linux distributions - those distributions may or may not use a specific package manager but all of them allow the installation of software using the source code package (.tar.gz) through a series of command to be issued on the Terminal.
How to install the official Oracle Java on APT based Linux distributions
The most simple way to install Java on Ubuntu or Mint is using the webupd8 repository. This method will install the latest version of JDK 8 and the JRE 8 browser plugin. The supported versions are: Ubuntu 15.04, 14.10, 14.04, 12.04 - Linux Mint 17.1, 17, 13
For details, please refer to: http://www.webupd8.org/2012/09/install-oracle-java-8-in-ubuntu-via-ppa.html
a. On your Linux machine, open the "Terminal". If you need help with accessing and using the Terminal, please refer to: https://help.ubuntu.com/community/UsingTheTerminal
b. Become root, by typing su on the Terminal and entering the super user password. Instead of becoming root, you can choose to use the sudo feature (which gives your user the root privileges for a single command). If you want to use sudo, just add sudo before each one of the commands you will enter in the Terminal. You will be requested to enter the sudo password.
c. Add the webupd8 repository by tiping add-apt-repository ppa:webupd8team/java Follow the instructions on the screen. You should be asked to press [ENTER] to continue. Once done, the repository will be added.
d. Type the command apt-get update
e. Enter the command: apt-get install oracle-java8-installer The process will download and install automatically the required packages along with their dependencies. Once the command has completed, the Oracle Java platform will be ready to be used.
Should you prefer to have control of all the phases of the installation, instead of relying on the APT facility, please refer to the instructions on this page: http://www.wikihow.com/Install-Oracle-Java-JRE-on-Ubuntu-Linux
How to install the official Oracle Java on RPM based Linux distributions
a. On your Linux machine, open the "Terminal". If you need help with accessing and using the Terminal, please refer to: https://help.ubuntu.com/community/UsingTheTerminal
b. Become root, by typing su on the Terminal and entering the super user password. Instead of becoming root, you can choose to use the sudo feature (which gives your user the root privileges for single commands). If you want to use sudo, just add sudo before each one of the commands you will enter in the Terminal. You will be requested to enter the sudo password.
c. Create the folder /usr/java by issuing the command mkdir /usr/java. If the directory already exists you will see a message indicating that. In this case you can proceed directly to point d.
d. Go to the page https://www.java.com/en/download/linux_manual.jsp
e. If you have a 32 bit system, download the file "Linux RPM" . If you have a 64 bit system, download the file "Linux64 RPM". In either case, please instruct your browser to save the file in the folder /usr/java or move the file to that foder once it has been downloaded.
f. Go back to the Terminal and move to the /usr/java folder by typing cd /usr/java
g. List the content of the folder by typing the command ls -la You should see the file you downloaded. It will be called jre-XuYY-linux-ARCH.rpm (where X is the Java family, YY the update number and ARCH will be i586 for 32 bit installer and x64 for 64 bit installer)
h. Launch this command to perform the installation: rpm -ivh jre-XuYY-linux-ARCH.rpm Obviously you need to use the real file name, for example jre-8u65-linux-x64.rpm
Once the installation has been performed, the Oracle Java should be ready to be used. Usually a system restart is not required on Linux machines. In case you see warning or error message/s during the installation, please check their content and search the Internet for possible solutions. Most of the time the warning/error messages maight refer to missing dependencies (this means that another package needs to be installed before you can install Java) or to unsufficient privileges (this means that you are launching the command with a regular user instead of "root"). If you cannot find the proper course of actions to overcome the issue, please refer to the support documentation or forums for your current Linux distribution.
How to install the official Oracle Java on other Linux distributions
If your Linux distribution does not support RPM or APT package managers, the installation of Oracle Java can be performed manually in this way:
a. On your Linux machine, open the "Terminal".
b. Become root, by typing su on the Terminal and entering the super user password. Instead of becoming root, you can choose to use the sudo feature (which gives your user the root privileges for single commands). If you want to use sudo, just add sudo before each one of the commands you will enter in the Terminal. You will be then required to enter the sudo password.
c. Create the folder /usr/java by issuing the command mkdir /usr/java. If the directory already exists you will see a message indicating that. In this case you can proceed directly to point d.
d. Go to the page https://www.java.com/en/download/linux_manual.jsp
e. If you have a 32 bit system, download the file "Linux" . If you have a 64 bit system, download the file "Linux x64". In either case, please instruct your browser to save the file in the folder /usr/java or move the file to that foder once it has been downloaded.
f. Go back to the Terminal and move to the /usr/java folder by typing cd /usr/java
g. List the content of the folder by typing the command ls -la You should see the file you downloaded. It will be called jre-XuYY-linux-ARCH.tar.gz (where X is the Java family, YY the update number and ARCH will be i586 for 32 bit installer and x64 for 64 bit installer)
h. Launch this command to perform the installation: tar zxvf jre-XuYY-linux-ARCH.tar.gz Obviously you need to use the real file name, for example jre-8u65-linux-x64.tar.gz
i. Once done, enter command ls -la You will see the folder /usr/java/jre1.X.0_YY (where X is the Java family, YY the update number)
l. The Java executables are now present in the folder /usr/java/jre1.X.0_YY/bin
m. Now check which is the symbolic link used by the system to access the java executables by entering the commands:
which java - you will receive an output similar to this: /usr/bin/java From now on we will refer to this path as javasympath.
which javac - you will receive an output similar to this: /usr/bin/java From now on we will refer to this path as javacsympath.
which javaws - you will receive an output similar to this: /usr/bin/java From now on we will refer to this path as javawssympath.
Unless your are launching the java applications using the full path (for example /usr/java/jre1.X.0_YY/bin/java ...), you would need to tell your system which java executables should be used when a generic java command is issued. In order to to this, you can either update your alternatives files (if your system supports them) or the symbolic links. Here below you can see the instructions, according to your system:
- If your system uses the alternatives files:
n. Issue the following commands, paying attention to make the necessary substitutions .
update-alternatives --install javasympath java /usr/java/jre1.X.0_YY/bin/java 1
update-alternatives --install javacsympath javac /usr/java/jre1.X.0_YY/bin/javac 1
update-alternatives --install javawssympath javaws /usr/java/jre1.X.0_YY/bin/javaws 1
- If your system does not use the alternatives files:
n. Issue the following commands, paying attention to make the necessary substitutions .
ln -sf /usr/java/jre1.X.0_YY/bin/java javasympath
ln -sf /usr/java/jre1.X.0_YY/bin/javac javacsympath
ln -sf /usr/java/jre1.X.0_YY/bin/javaws javawssympath
Market Data Non-Professional Questionnaire
Insight into completing the new Non-Professional Questionnaire.
The NYSE and most US exchanges require vendors to positively confirm the market data status of each customer before allowing them to receive market data. Going forward, the Non-Professional Questionnaire will be used to identify and positively confirm the market data status of all customer subscribers. As per exchange requirements, without positively identifying customers as non-professional, the default market data status will be professional. The process will protect and maintain the correct market data status for all new subscribers. For a short guide on non-professional definitions, please see https://ibkr.info/article/2369.
Each question on the questionnaire must be answered in order to have a non-professional designation. As exchanges require positive confirmations of proof for non-professional designations, an incomplete or unclear Non-Professional Questionnaire will result in a Professional designation until the status can be confirmed.
If the status should change, please contact the helpdesk.
Explanation of questions:
1) Commercial & Business purposes
a) Do you receive financial information (including news or price data concerning securities, commodities and other financial instruments) for your business or any other commercial entity?
Explanation: Are you receiving and using the market data for use on behalf of a company or other organization aside from using the data on this account for personal use?
b) Are you conducting trading of any securities, commodities or forex for the benefit of a corporation, partnership, professional trust, professional investment club or other entity?
Explanation: Are you trading for yourself only or are you trading on behalf of an organization (Ltd, LLC, GmbH, Co., LLP, Corp.)?
c) Have you entered into any agreement to (a) share the profit of your trading activities or (b) receive compensation for your trading activities?
Explanation: Are you being compensated to trade or are you sharing profits from your trading activities with a third party entity or individual?
d) Are you receiving office space, and equipment or other benefits in exchange for your trading or work as a financial consultant to any person, firm or business entity?
Explanation: Are you being compensated in any way for your trading activity by a third party, not necessarily by being paid in currency.
2) Act in a capacity
a) Are you currently acting in any capacity as an investment adviser or broker dealer?
Explanation: Are you being compensated to manage third party assets or compensated to advise others on how to manage their assets?
b) Are you engaged as an asset manager for securities, commodities or forex?
Explanation: Are you being compensated to manage securities, commodities, or forex?
c) Are you currently using this financial information in a business capacity or for managing your employer’s or company’s assets?
Explanation: Are you using data at all for a commercial purposes specifically to manage your employer and/or company assets?
d) Are you using the capital of any other individual or entity in the conduct of your trading?
Explanation: Are there assets of any other entity in your account other than your own?
3) Distribute, republish or provide data to any other party
a) Are you distributing, redistributing, publishing, making available or otherwise providing any financial information from the service to any third party in any manner?
Explanation: Are you sending any data you receive from us to another party in any way, shape, or form?
4) Qualified professional securities / futures trader
a) Are you currently registered or qualified as a professional securities trader with any security agency, or with any commodities or futures contract market or investment adviser with any national or state exchange, regulatory authority, professional association or recognized professional body? i, ii
YES☐ NO☐
i) Examples of Regulatory bodies include, but are not limited to,
- US Securities and Exchange Commission (SEC)
- US Commodities Futures Trading Commission (CFTC)
- UK Financial Service Authority (FSA)
- Japanese Financial Service Agency (JFSA)
ii) Examples of Self-Regulatory Organization (SROs) include, but are not limited to:
- US NYSE
- US FINRA
- Swiss VQF
How to Transfer the TWS Layout Settings via USB or Network Drive
The TWS layout settings can be saved on a USB or Network Drive, in order to import them from the same or from a different computer / TWS session. This article outlines the needed steps.
Please click one of the links below, according to your scenario:
B. I want to save my TWS settings on a USB or Network Drive and import them to a session with a different user
A. I want to save my TWS settings on a USB or Network Drive and import them to a session with the same user
1. Log in the Trader Workstation with the user whose layout settings you would like to export.
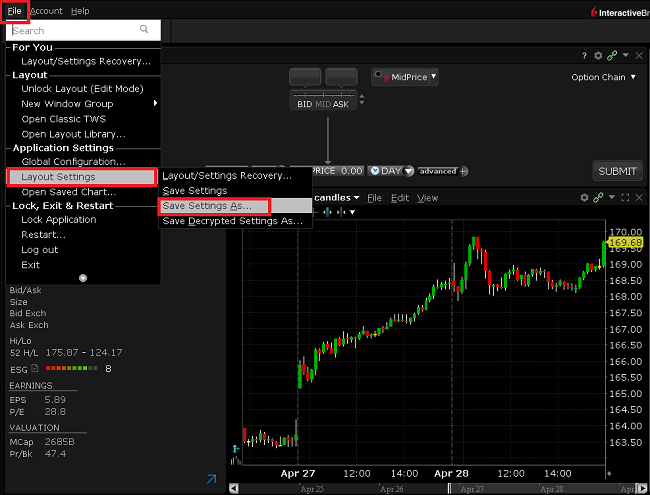
2. Click the top menu File > Layout Settings > Save Settings As...
3. Expand the Look In drop-down and select where you want to save the file (e.g. USB or Network Drive). Use a file name which would be easy to identify (e.g. migrate) and click Save. The file will be saved with the extension '.xml'.
.png)
4. Proceed with the workflow, starting with step 5 in the following section.
B. I want to save my TWS settings on a USB or Network Drive and import them to a session with a different user
1. Log in the Trader Workstation with the user whose layout settings you would like to export.
2. Click the top menu File > Layout Settings > Save Decrypted Settings As...
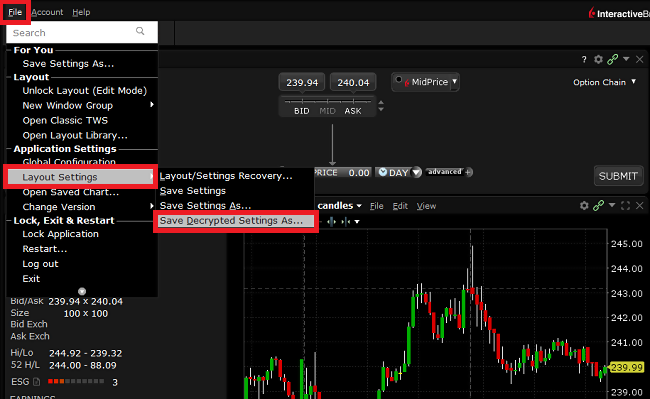
3. Take notice of the information about the file format and click Yes.

4. Expand the Look In drop-down and select where you want to save the file (e.g. USB or Network Drive). Use a file name which would be easy to identify (e.g. migrate) and click Save. The file will be saved with the extension '.xml'.
.png)
5. Close the TWS and log in again with the user which should import the layout (that can be a different computer).
6. Connect the USB or Network Drive to the computer.
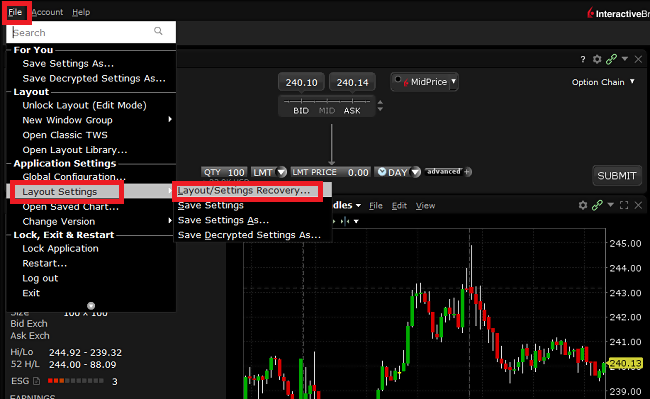
7. Click on the top menu File > Layout Settings > Layout/Settings Recovery...
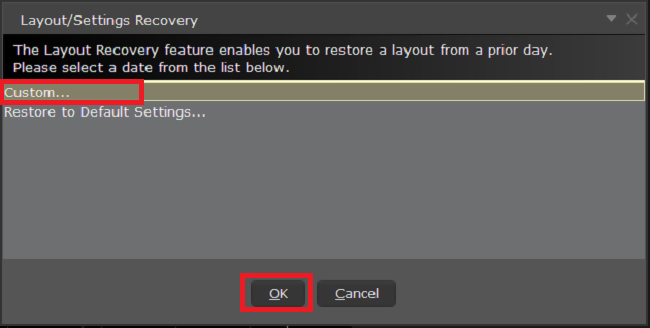
8. Select Custom... and click OK
9. Expand the Look In drop-down and select the drive where you previously saved the TWS settings file (e.g. USB or Network Drive). Select the settings file (e.g. migrate.xml) and click Open.
.png)
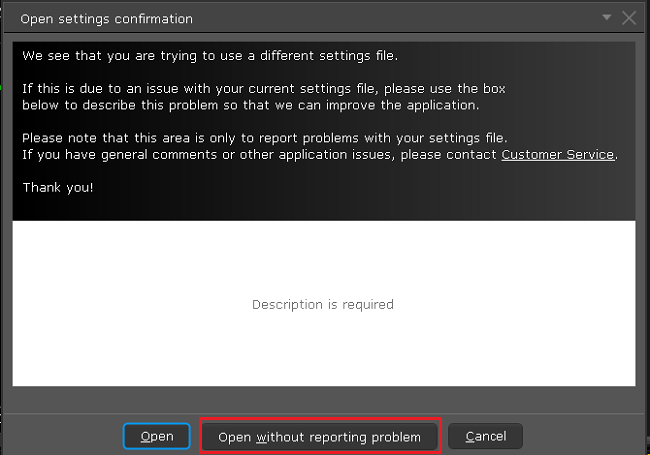
10. Click Open without reporting problem
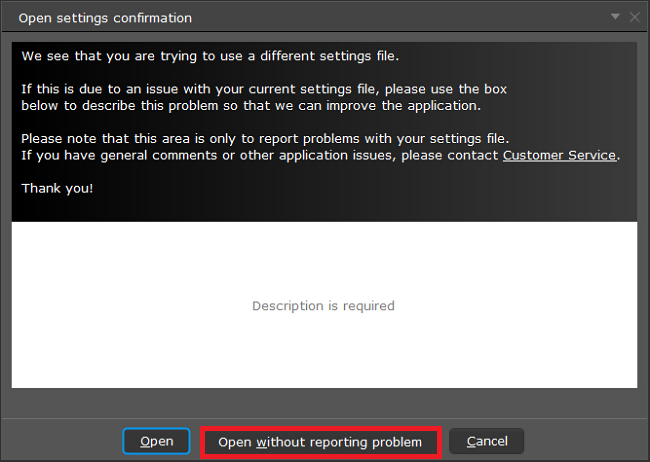
11. Your TWS will automatically restart, applying the new layout settings.
Related articles
See KB3146 for instructions on overcoming the "Downloading settings from server failed" error
See KB2320 for instructions on transferring settings from one user to another
See KB2282 for instructions on how to transfer settings from one computer to another
How to Transfer TWS Settings from One User to Another
Trader Workstation (TWS) layout settings files contains few sensitive details that are now being protected by encrypting them. Hence, you can only transfer your TWS settings from one user to another if you have a decrypted settings file from the primary user.
In this article, we will explain how to export your current TWS layout settings in decrypted format and load it on a different TWS session. You can use the same procedure to export layout settings of your Paper (Simulated) TWS and load it on your Live TWS (and vice versa).
Please follow the below steps to transfer your TWS layout settings from one user to another:
1. Log in to TWS with the user whose settings you would like to export
2. Navigate to the top menu File followed by Layout Settings > Save Decrypted Settings As...
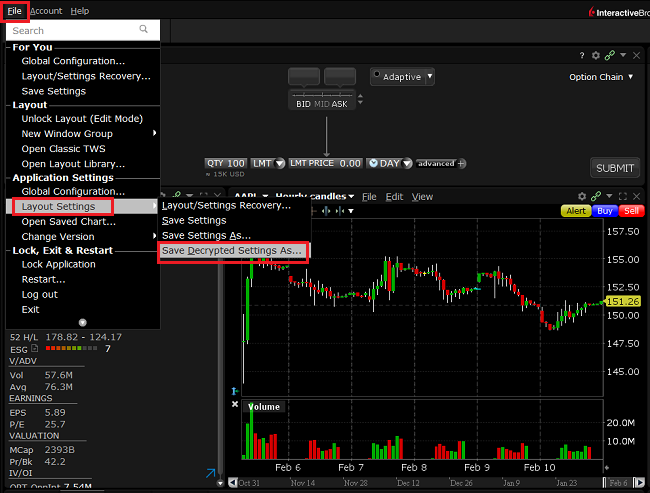
3. Click Yes on the warning pop up

4. Open the Look In drop-down and select the folder (e.g. Desktop) where you want the decrypted settings file to be saved
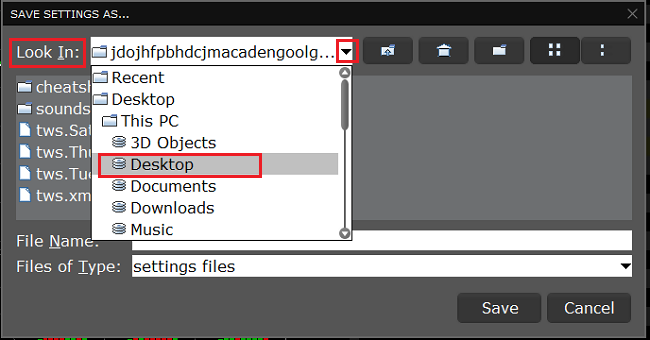
5. Choose a name of your preference (e.g., migrate) and click Save. A pop-up will flash to inform you that the file has been written
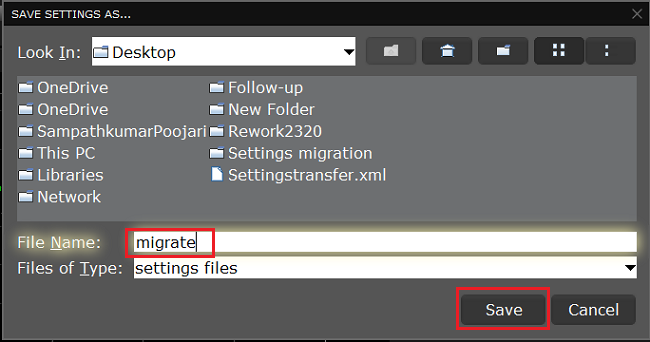
6. Restart the TWS. Log in with the user which should import the layout settings
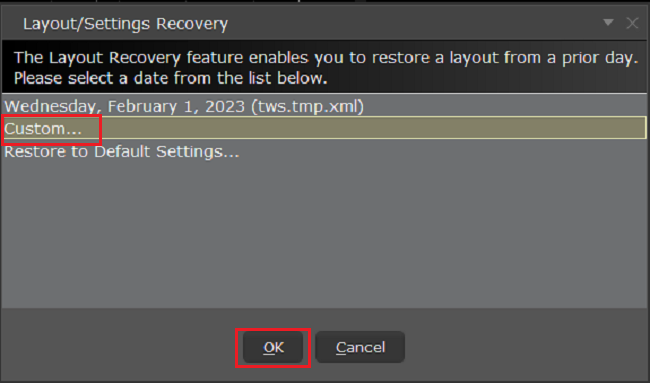
7. In the top left, click on File > Layout Settings > Layout/Settings Recovery
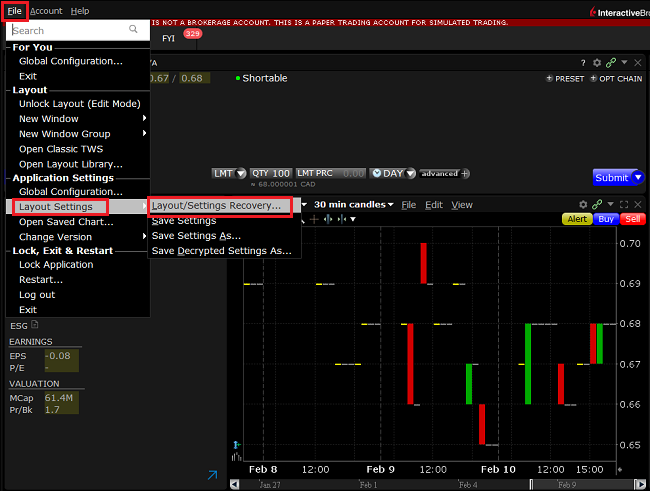
8. Select Custom and click OK
9. Open the Look In drop-down and select the location where you previously saved the decrypted settings file (step 5). Click Open
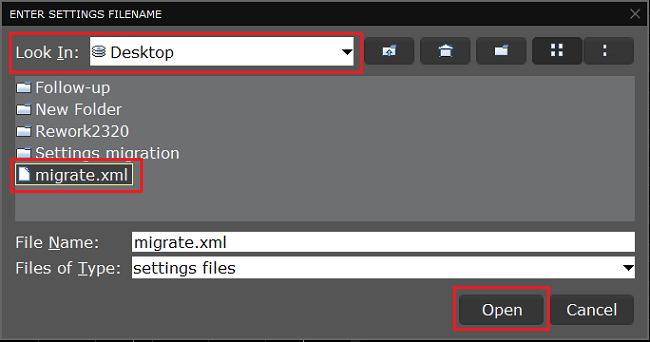
10. Click Open without reporting problem
11. Your TWS will automatically restart, loading the imported layout settings
References
See KB2323 for instructions on how to restore TWS settings from external storage
See KB2282 for instructions on how to transfer settings from one computer to another.
See KB3146 for instructions on how to overcome the "Download settings from server failed" error

