Le damos la bienvenida a Interactive Brokers
Ahora que su cuenta ya ha sido aprobada y ha recibido fondos, puede empezar a negociar. La información siguiente le ayudará a empezar como nuevo cliente de Interactive Brokers.
- Su dinero
- Configurar su cuenta para operar
- Cómo operar
- Operar en todo el mundo
- Cinco puntos para enriquecer su experiencia IB
1. Su dinero
Información general sobre depósitos y retiradas. Todas las transacciones se administran a través de Gestión de Cuenta
Depósitos
Primero, cree una notificación de depósito a través de Gestión de Cuenta > Financiación > Transferencias de fondos > Tipo de transacción: “Depósito” Cómo crear una notificación de depósito. El segundo paso es indicar a su banco que realice la transferencia con los datos bancarios proporcionados en su notificación de depósito.
Retiradas
Cree una instrucción de retirada a través de Gestión de Cuenta > Financiación > Transferencias de fondos > Tipo de transacción: "Retiradas" Cómo crear una instrucción de retirada
Si indica una retirada que esté por encima de los límites de retirada, se considerará una retirada excepcional y, por lo tanto, tendremos que comprobar al titular de la cuenta bancaria con la cuenta IB. Si la cuenta bancaria de destino se ha utilizado para un depósito, la retirada se procesará; de lo contrario, deberá contactar con atención al cliente y proporcionar los documentos necesarios.
Solución de problemas
Depósitos: Mi banco envió el dinero, pero no lo veo acreditado en mi cuenta IB. Razones posibles:
a) Una transferencia de fondos lleva entre 1 y 4 días hábiles.
b) Falta una notificación de depósito. Debe crearla en Gestión de Cuenta y enviar un tique a Atención al Cliente.
c) Corregir los detalles que faltan. En los detalles de transferencia falta su nombre o su número de cuenta IB. Debe contactar con su banco y pedir los detalles de corrección completos.
d) Una ACH iniciada por IB está limitada a 100k USD durante un período de 7 días hábiles. Si abrió una cuenta Margen de Cartera en la que el requisito inicial fuera 110k, un depósito por giro puede ser la mejor opción de depósito para reducir el tiempo de espera para su primera operación. Si selecciona ACH, un tiempo de espera de casi 2 semanas o una reducción temporal a cuenta RegT podrían ser soluciones posibles.
Retiradas: He solicitado una retirada, pero no veo mi dinero acreditado en mi cuenta bancaria. Posibles razones:
a) Una transferencia de fondos lleva 1-4 días hábiles.
b) Rechazada. Por encima del máximo que puede retirarse. Por favor, compruebe el saldo de su cuenta bancaria. Tenga en cuenta que, debido a requisitos normativos, cuando los fondos se depositan hay un período de retención de 3 días antes de que puedan retirarse.
c) Su banco ha devuelto los fondos. Posiblemente porque los nombres de la cuenta bancaria receptora y la cuenta bancaria remitente no coinciden.
2. Configurar su cuenta para operar
Diferencia entre cuentas de Efectivo y de Margen: si ha elegido la solicitud FastTrack, de forma predeterminada su tipo de cuenta será una cuenta de efectivo con permisos para acciones estadounidenses. Si quiere apalancamiento y operar con margen, aquí puede ver cómo convertirse a una cuenta Margen RegT.
Permisos de negociación
Para poder operar en una clase de activos concreta en un país concreto, necesita obtener los permisos de negociación para ello a través de Gestión de Cuenta. Tenga en cuenta que los permisos de negociación son gratuitos; sin embargo, es posible que se le pida que firme declaraciones de riesgo requeridas por las autoridades normativas locales. Cómo solicitar permisos de negociación
Datos de mercado
Si quiere datos de mercado en tiempo real para un mercado/producto concreto, deberá suscribirse a un paquete de datos de mercado cobrado por el mercado. Cómo suscribirse a datos de mercado
El asistente a datos de mercado le ayudará a elegir el paquete adecuado. Puede ver este vídeo que explica cómo funciona.
Los clientes tienen la opción de recibir datos de mercado diferidos de forma gratuita si hacen clic en el botón datos de mercado gratuitos desde una fila de ticker no suscrito.
Cuentas de asesor
Eche un vistazo a la guía de usuario Cómo empezar como asesor. Aquí verá cómo crear usuarios adicionales para su cuenta de asesor y otorgarles acceso y mucho más.
3. Cómo operar
La Academia para Operadores es el mejor lugar para aprender a utilizar nuestras plataformas. Aquí encontrará nuestros seminarios web, en directo y grabados en 10 idiomas, visitas rápidas y documentación sobre varias plataformas de negociación.
Trader Workstation (TWS)
Los operadores bursátiles que requieran herramientas de negociación más sofisticadas pueden utilizar nuestra Trader Workstation (TWS) con diseño de creador de mercado, que optimiza su velocidad y eficacia en la negociación con una interfaz tipo hoja de cálculo fácil de utilizar, ofreciendo más de 50 tipos de órdenes, herramientas de negociación específicas para todos los estilos de negociación, un saldo de cuenta en tiempo real y seguimiento de su actividad. Pruebe los dos modelos:
TWS Mosaico: para una usabilidad intuitiva, un acceso de negociación sencillo, gestión de órdenes, listas de seguimiento y gráficos desde una sola ventana o
TWS Clásica: la Gestión de Órdenes Avanzada para operadores que necesitan herramientas y algoritmos más avanzados.
Descripción general e Información / Guía de inicio rápido / Guía de usuario
Visitas interactivas: TWS Basics / Configuración de TWS / TWS Mosaico
Cómo introducir una operación: Vídeo TWS Clásica / Vídeo Mosaico
Herramientas de negociación: Descripción general e información / Guía de usuario
Requisitos: Cómo instalar Java para Windows / Cómo instalar Java para MAC / Los puertos 4000 y 4001 deben estar abiertos
Conexión a TWS / Descargar TWS
WebTrader
Los operadores que prefieran una interfaz sencilla pueden utilizar nuestra WebTrader, basada en HTML, que facilita el ver datos de mercado, enviar órdenes y monitorizar su cuenta y sus ejecuciones. Utilice el WebTrader más actual de cada navegador
Guía de inicio rápido / Guía de usuario de WebTrader
Introducción: Vídeo WebTrader
Cómo introducir una operación: Vídeo WebTrader
Conexión a WebTrader
MobileTrader
Nuestras soluciones móviles le permiten operar con su cuenta IB desde cualquier lugar. La mobileTWS para iOS y la mobileTWS para BlackBerry están diseñadas para estos populares modelos, mientras que la genérica MobileTrader es compatible con la mayoría de otros teléfonos inteligentes.
Descripción general e información
Tipos de órdenes Tipos de órdenes disponibles y descripción / Vídeos / Visitas / Guía de usuario
Negociación simulada Descripción general e información / Cómo obtener una cuenta de negociación simulada
Una vez creada su cuenta de negociación simulada, podrá compartir los datos de mercado de su cuenta real con su cuenta de negociación simulada: Gestión de Cuenta > Gestionar Cuenta > Ajustes > Negociación simulada
4. Operar en todo el mundo
Las cuentas de IB son cuentas en multidivisas. Su cuenta puede mantener varias divisas al mismo tiempo; esto le permite operar en múltiples productos de todo el mundo desde una sola cuenta.
Divisa base
Su divisa base determina la divisa de conversión de sus extractos y la divisa utilizada para determinar requisitos de margen. La divisa base se determina cuando usted abre una cuenta. Los clientes pueden cambiar su divisa base en cualquier momento desde Gestión de Cuenta.
No convertimos automáticamente las divisas a su divisa base
Las conversiones de divisas deben ser realizadas manualmente por el cliente. En este vídeo puede ver cómo realizar una conversión de divisas.
Para abrir una posición denominada en una divisa que no tiene en su cuenta, tiene dos posibilidades:
A) Conversión de divisas.
B) Préstamo de margen IB. (No disponible para cuentas en efectivo)
Consulte este curso, que explica el funcionamiento de una transacción extranjera.
5. Cinco puntos para enriquecer su experiencia IB
1. Búsqueda de contratos
Aquí encontrará todos nuestros productos, símbolos y especificaciones.
2. Fondos de Información IB
Los Fondos de Información de IB son un conjunto de elementos diseñados para ayudar a los clientes de IB a gestionar sus cuentas e incluyen glosarios, artículos explicativos, consejos de resolución de problemas y directrices generales. Simplemente introduzca en el campo de búsqueda lo que le interesa y encontrará su respuesta.
3. Gestión de Cuenta
Del mismo modo que nuestras plataformas de negociación le dan acceso a los mercados, Gestión de Cuenta le otorga acceso a su cuenta IB. Utilice Gestión de Cuenta para gestionar tareas relacionadas con su cuenta, como el depósito o la retirada de fondos, consultar extractos, modificar suscripciones a datos de mercado y noticias, cambiar sus permisos de negociación y verificar o cambiar su información personal.
Conexión a Gestión de Cuenta / Guía rápida de GC / Guía de Usuarios GC
4. Sistema de Acceso Seguro
Para proporcionarle el mayor nivel de seguridad en línea, Interactive Brokers ha implementado un Sistema de Acceso Seguro (SAS) a través del cual el acceso a su cuenta está sujeto a una autentificación en dos factores. Esta autentificación sirve para confirmar su identidad en el momento de conexión mediante dos factores de seguridad: 1) Algo que usted conoce (la combinación de su nombre de usuario y contraseña); y 2) Algo que usted posee (un dispositivo de seguridad enviado por IB que genera un código de seguridad aleatorio y de un solo uso). Como tanto el saber su combinación nombre de usuario/contraseña como la posesión física del dispositivo de seguridad son necesarios para conectarse a su cuenta, la participación en el Sistema de Acceso Seguro elimina virtualmente la posibilidad de que alguien que no sea usted acceda a su cuenta.
Cómo activar su dispositivo de seguridad / Cómo obtener una tarjeta de código de seguridad / Cómo devolver su dispositivo de seguridad
En caso de que haya olvidado su contraseña y haya perdido su tarjeta de código de seguridad, llámenos para le ayudemos de inmediato.
5. Extractos e informes
Fáciles de ver y de personalizar, nuestros extractos e informes cubren todos los aspectos de su cuenta Interactive Brokers. Cómo ver un extracto de actividad
IBKR Mobile Companion App for Apple Watch
Interactive Brokers takes our intuitive and ergonomic mobile trading platform to the next level by providing you a companion app for the Apple Watch.
The companion app is designed to display information when a user has logged in to the IBKR Mobile app on their iPhone. It will work in both the Live Trading and Read Only Modes but does not support active trading. This companion app is only available for informational purpose only.
Table of contents
What does the app do?
At 'glance view' the app will display the following information; Amount of FYI Notification, Account Number, Daily P&L, Net Liquidation Value, Number of Open Orders, Number of Trades Executed, Excess Liquidity and number of Positions you currently own. It will also display the time when it has fetched the information from your iPhone.
Example:
.jpg)
Requirements
- Must have iPhone 5s or greater, using iOS 11 or later.
- Must have the IBKR Mobile app installed on your iPhone (version 11 or greater)
- Must have your Apple Watch paired to your iPhone (refer to: Set up your Apple Watch for directions)
- Must have watchOS 5 running on your Apple Watch.
Important: The Apple Watch applications are only 'companion' apps. This means they are not installed directly on the watch itself, but rather are a function of an application already installed on your iPhone.
How is the app installed?
1. Install the latest version of the IBKR Mobile app on your iPhone.
2. Pair your Apple Watch to your phone.
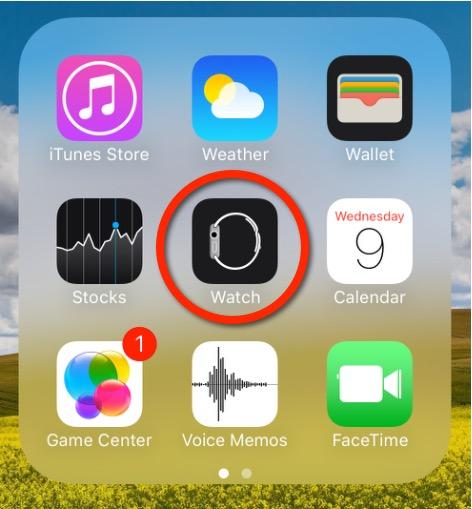
3. Launch the Watch app on your phone.
4. Scroll down on the main screen until you see your list of apps, locate the IBKR Mobile app and Tap on it.
.jpg)
5. Enable Show App on Apple Watch by swiping the slider to the right (green).
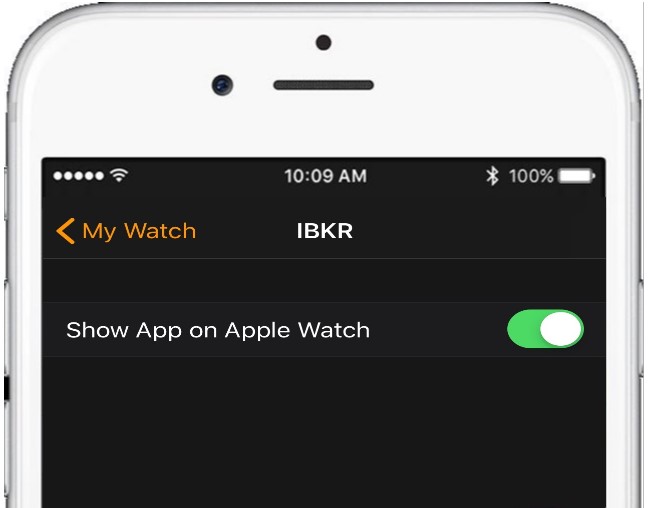
6. After the top slider is set to green, you will see a text informing you that the app is being installed. At this stage the phone is sending the application to your watch per Bluetooth. This might take a short moment (approximately 30-60 seconds.) Once completed the companion app has been installed.
Note: Once enabled it will take 24 hours before P&L shows up on the watch after activation.
.jpg)
How do I confirm the app is installed?
On your Apple Watch click on the crown to access your Home Screen, you should now see an icon for the IBKR Mobile App.

How to start multiple TWS sessions on a Mac
By default macOS does not allow the user to run multiple sessions of the same application. The following workaround can overcome this limitation in case you need to run the Trader Workstation for more than one user.
-
In case running different versions of the TWS is suitable to your needs, please follow the instructions on Procedure 1
-
In case you need multiple sessions of the same TWS version, please follow the instructions on Procedure 2
Procedure 1
1) Open the web page ibkr.com
2) Navigate to the menu Technology > TWS Software.
3) First download and install one of the auto-updating TWS versions (TWS LATEST or TWS according to your preference).
4) Once you have completed the installation, download and install one of the offline versions (OFFLINE TWS LATEST or OFFLINE TWS according to your preference).
5) You will then see on your Desktop two different Trader Workstation icons. You can use the first shortcut to start the first TWS session and the second one to start the additional one (see Figure 1.). Note: the link containing the version number in the name is the OFFLINE version. This will be a version that needs periodical manual updates.
Figure 1.
Procedure 2
1) Launch the first session of the Trader Workstation using the TWS icon present on your Desktop. If you still do not have any Trader Workstation icon, please go to the web page ibkr.com and click on the menu Technology > TWS Software. Then download and install one of the TWS versions displayed.
2) Open the Finder and click on Applications on the left side menu. Then select Utilities and then launch Terminal (see Figure 2.).
Figure 2.
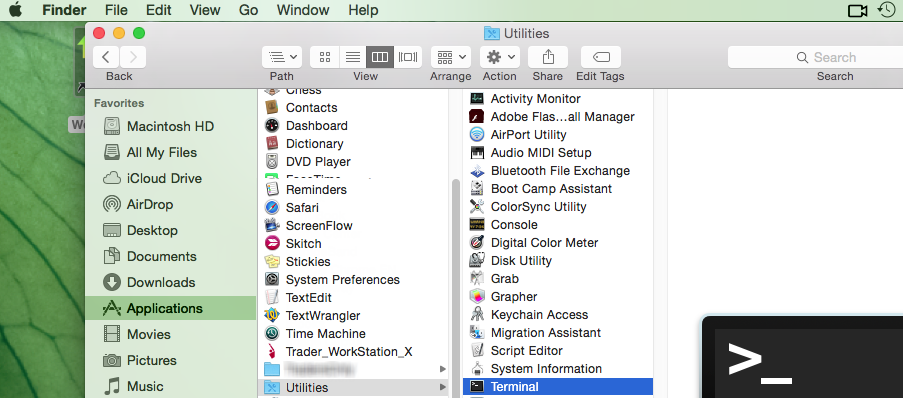
3) The Terminal will appear on the screen and will point to the home folder of your current macOS user. Then enter the commands listed below (see Figure 3.) on your Terminal. After each one, press ENTER on your keyboard.
cd Applications
cd Trader\ Workstation
open -n Trader\ Workstation.app
Figure 3.

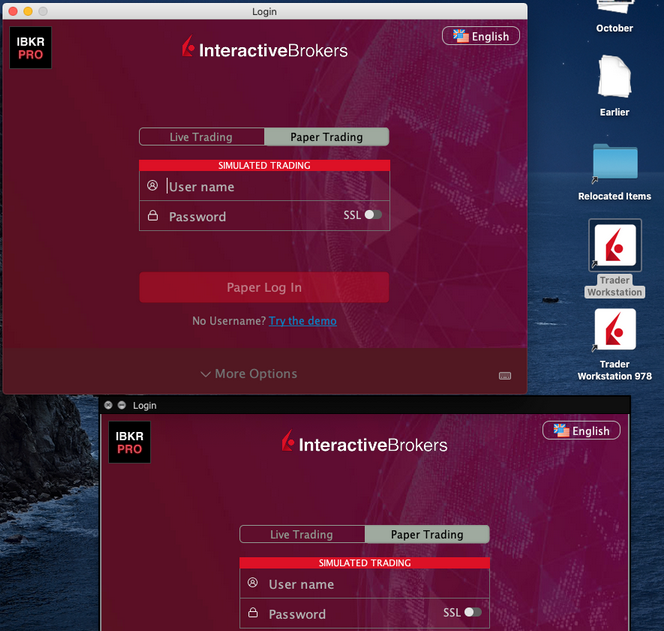
4) The login window for your second TWS session will then appear on your Desktop. You can now close the Terminal.
Note: the procedure above presumes that the TWS executable is located in the following path: users/yourusername/home/Applications/Trader Workstation/Trader Workstation.app
If at the time you installed the TWS, you selected to install it for all the users of your system, then the TWS executable will be located here:
/Applications/Trader Workstation/Trader Workstation.app
and therefore you would need to issue the following commands in the Terminal:
cd /Applications
open -n Trader\ Workstation.app
How to overcome the warning message "The signature of the file is corrupt or invalid"
This article describes how to overcome the warning message which you might receive when you download the Trader Workstation or IB Gateway installation packages.
Since a Microsoft update has modified the signature validation mechanisms, the Trader Workstation and IB Gateway installation packages might be reported as having an invalid or corrupt signature, although their signature is indeed intact and absolutely valid.
If you are using Microsoft Edge as browser please follow all the steps below. If you are using any other browser start directly from point 3.
1. As soon as the installation package has been completely downloaded, you will notice on the bar at the bottom of your browser frame the warning message "The signature of the file tws-... is corrupt or invalid". Please click on the button View Downloads to open the DOWNLOADS panel. ![]()
2. Right click on the filename and select Run anyway.
.png)
3. Once the installer has been launched, the SmartScreen filter will display an additional warning message. Click on the link More Info.
(1).png)
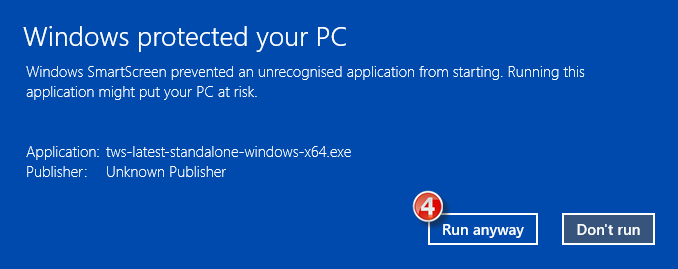
4. Now click the button Run Anyway to allow the file execution. The installation will then start.
How to install Java on a Linux computer
For the purpose of this guide, we will divide the Linux distributions nowadays available into three big families:
- APT based Linux distributions (Ubuntu, Mint) - those distributions use the Advanced Packaging Tool to fetch and install software packages in a semi-automatic way, resolving and taking care of dependencies.
- RPM based Linux distributions (Suse, OpenSUSE, Red Hat, CentOS, Fedora, Oracle Linux) - those distributions allow the installation of software packages (.rpm files), which contain the binary files to be installed on the system and an integrated dependency checker script. The .rpm packages allow a simplified and smooth installation of software without requiring a deep knowledge of the system.
- Other Linux distributions - those distributions may or may not use a specific package manager but all of them allow the installation of software using the source code package (.tar.gz) through a series of command to be issued on the Terminal.
How to install the official Oracle Java on APT based Linux distributions
The most simple way to install Java on Ubuntu or Mint is using the webupd8 repository. This method will install the latest version of JDK 8 and the JRE 8 browser plugin. The supported versions are: Ubuntu 15.04, 14.10, 14.04, 12.04 - Linux Mint 17.1, 17, 13
For details, please refer to: http://www.webupd8.org/2012/09/install-oracle-java-8-in-ubuntu-via-ppa.html
a. On your Linux machine, open the "Terminal". If you need help with accessing and using the Terminal, please refer to: https://help.ubuntu.com/community/UsingTheTerminal
b. Become root, by typing su on the Terminal and entering the super user password. Instead of becoming root, you can choose to use the sudo feature (which gives your user the root privileges for a single command). If you want to use sudo, just add sudo before each one of the commands you will enter in the Terminal. You will be requested to enter the sudo password.
c. Add the webupd8 repository by tiping add-apt-repository ppa:webupd8team/java Follow the instructions on the screen. You should be asked to press [ENTER] to continue. Once done, the repository will be added.
d. Type the command apt-get update
e. Enter the command: apt-get install oracle-java8-installer The process will download and install automatically the required packages along with their dependencies. Once the command has completed, the Oracle Java platform will be ready to be used.
Should you prefer to have control of all the phases of the installation, instead of relying on the APT facility, please refer to the instructions on this page: http://www.wikihow.com/Install-Oracle-Java-JRE-on-Ubuntu-Linux
How to install the official Oracle Java on RPM based Linux distributions
a. On your Linux machine, open the "Terminal". If you need help with accessing and using the Terminal, please refer to: https://help.ubuntu.com/community/UsingTheTerminal
b. Become root, by typing su on the Terminal and entering the super user password. Instead of becoming root, you can choose to use the sudo feature (which gives your user the root privileges for single commands). If you want to use sudo, just add sudo before each one of the commands you will enter in the Terminal. You will be requested to enter the sudo password.
c. Create the folder /usr/java by issuing the command mkdir /usr/java. If the directory already exists you will see a message indicating that. In this case you can proceed directly to point d.
d. Go to the page https://www.java.com/en/download/linux_manual.jsp
e. If you have a 32 bit system, download the file "Linux RPM" . If you have a 64 bit system, download the file "Linux64 RPM". In either case, please instruct your browser to save the file in the folder /usr/java or move the file to that foder once it has been downloaded.
f. Go back to the Terminal and move to the /usr/java folder by typing cd /usr/java
g. List the content of the folder by typing the command ls -la You should see the file you downloaded. It will be called jre-XuYY-linux-ARCH.rpm (where X is the Java family, YY the update number and ARCH will be i586 for 32 bit installer and x64 for 64 bit installer)
h. Launch this command to perform the installation: rpm -ivh jre-XuYY-linux-ARCH.rpm Obviously you need to use the real file name, for example jre-8u65-linux-x64.rpm
Once the installation has been performed, the Oracle Java should be ready to be used. Usually a system restart is not required on Linux machines. In case you see warning or error message/s during the installation, please check their content and search the Internet for possible solutions. Most of the time the warning/error messages maight refer to missing dependencies (this means that another package needs to be installed before you can install Java) or to unsufficient privileges (this means that you are launching the command with a regular user instead of "root"). If you cannot find the proper course of actions to overcome the issue, please refer to the support documentation or forums for your current Linux distribution.
How to install the official Oracle Java on other Linux distributions
If your Linux distribution does not support RPM or APT package managers, the installation of Oracle Java can be performed manually in this way:
a. On your Linux machine, open the "Terminal".
b. Become root, by typing su on the Terminal and entering the super user password. Instead of becoming root, you can choose to use the sudo feature (which gives your user the root privileges for single commands). If you want to use sudo, just add sudo before each one of the commands you will enter in the Terminal. You will be then required to enter the sudo password.
c. Create the folder /usr/java by issuing the command mkdir /usr/java. If the directory already exists you will see a message indicating that. In this case you can proceed directly to point d.
d. Go to the page https://www.java.com/en/download/linux_manual.jsp
e. If you have a 32 bit system, download the file "Linux" . If you have a 64 bit system, download the file "Linux x64". In either case, please instruct your browser to save the file in the folder /usr/java or move the file to that foder once it has been downloaded.
f. Go back to the Terminal and move to the /usr/java folder by typing cd /usr/java
g. List the content of the folder by typing the command ls -la You should see the file you downloaded. It will be called jre-XuYY-linux-ARCH.tar.gz (where X is the Java family, YY the update number and ARCH will be i586 for 32 bit installer and x64 for 64 bit installer)
h. Launch this command to perform the installation: tar zxvf jre-XuYY-linux-ARCH.tar.gz Obviously you need to use the real file name, for example jre-8u65-linux-x64.tar.gz
i. Once done, enter command ls -la You will see the folder /usr/java/jre1.X.0_YY (where X is the Java family, YY the update number)
l. The Java executables are now present in the folder /usr/java/jre1.X.0_YY/bin
m. Now check which is the symbolic link used by the system to access the java executables by entering the commands:
which java - you will receive an output similar to this: /usr/bin/java From now on we will refer to this path as javasympath.
which javac - you will receive an output similar to this: /usr/bin/java From now on we will refer to this path as javacsympath.
which javaws - you will receive an output similar to this: /usr/bin/java From now on we will refer to this path as javawssympath.
Unless your are launching the java applications using the full path (for example /usr/java/jre1.X.0_YY/bin/java ...), you would need to tell your system which java executables should be used when a generic java command is issued. In order to to this, you can either update your alternatives files (if your system supports them) or the symbolic links. Here below you can see the instructions, according to your system:
- If your system uses the alternatives files:
n. Issue the following commands, paying attention to make the necessary substitutions .
update-alternatives --install javasympath java /usr/java/jre1.X.0_YY/bin/java 1
update-alternatives --install javacsympath javac /usr/java/jre1.X.0_YY/bin/javac 1
update-alternatives --install javawssympath javaws /usr/java/jre1.X.0_YY/bin/javaws 1
- If your system does not use the alternatives files:
n. Issue the following commands, paying attention to make the necessary substitutions .
ln -sf /usr/java/jre1.X.0_YY/bin/java javasympath
ln -sf /usr/java/jre1.X.0_YY/bin/javac javacsympath
ln -sf /usr/java/jre1.X.0_YY/bin/javaws javawssympath
How to fix the error: "Library dbcapi.dll cannot be loaded"
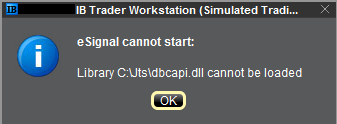
Issue A - You are not using the 32 bit version of TWS and/or eSignal:
Issue B - There is an incompatibility with the file C:\Jts\dbcapi.dll:
Instructions to resolve issue A
Installing 32-bit TWS
Please open the page http://www.ibkr.com in your browser and perform the steps below:
1) Click on the Log In button at the top right corner of the page.
2) Click on Download Trader Workstation:


5) Click on the item Windows 32-bit:

6) Make sure that the description under the DOWNLOAD button has changed to "Windows: 32 bit". Click now on DOWNLOAD:

7) Launch the downloaded file. The Trader Workstation installation will start. At this point, you may see the warning message "Trader Workstation latest is already installed...". Ignore this warning and click on the button Next > to continue the installation:

8) Your "Trader Workstation" Desktop icon will be automatically updated. You can now launch the 32-bit Trader Workstation by a double click on that icon.
If you have launched the 32-bit TWS and the 32 bit version of eSignal but you still receive the same error message, please follow as well the instructions below.
Instructions to resolve issue B
Replacing dbcapi.dll for compatibility between 32-bit TWS and 32-bit eSignal 12
To correct an incompatibility with the dbcapi.dll file, we will replace that file with another version of it taken from the eSignal installation folder. Please follow the steps below to perform the substitution:
1) Navigate to C:\Jts and rename the file dbcapi.dll to dbcapi_old.dll
2) Navigate to the directory where 32-bit eSignal 12 is installed (most commonly C:\Program Files (x86)\Common Files\Interactive Data\DM).
3) Copy dbcapi_vc8.dll from that directory into the C:\Jts directory.
4) Move to the C:\Jts directory.
5) Right click on the dbcapi_vc8.dll file (now in the C:\Jts directory) and select rename. Type dbcapi.dll as the new filename.
.jpg)
6) TWS is now ready to accept the eSignal data feed.
How to install the TWS API Components on Mac / Unix
NOTE: If you have already agreed to the API License Agreement please start at Step 3 below.
Instructions
- Click directly on the button below to access the API software download page

- This will direct you to Interactive Brokers API License Agreement, please review it
- Once you have clicked "I Agree", refer to the Mac / Unix section to download the API Software version of your preference
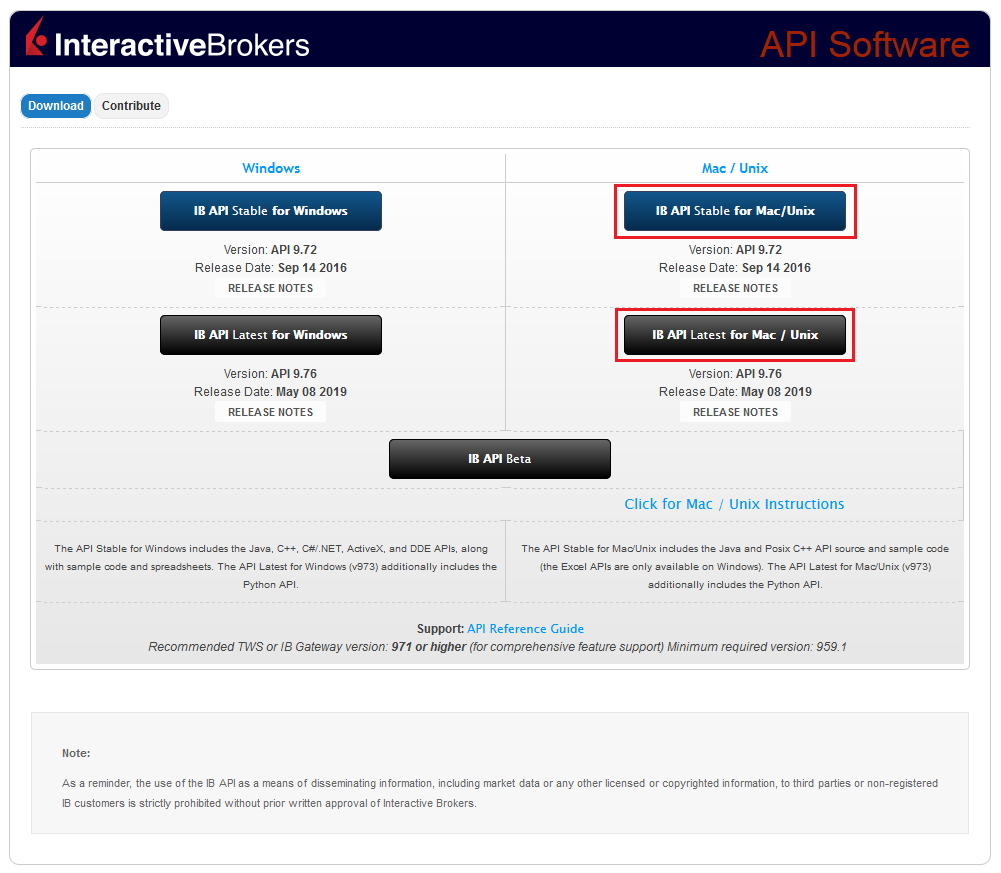
- This will download twsapi_macunix.n.m.zip to your computer
(where n and m are the major and minor version numbers respectively) - Open Terminal (Ctrl+Alt+T on most distributions)
(On Mac press Command+Space to launch Spotlight, then type terminal and press Return) -
Navigate to the directory where the installer has been downloaded (normally it should be the Download folder within your home folder) and confirm the file is present
$ cd ~/Downloads
$ ls
- Unzip the contents the installer into your home folder with the following command (if prompted, enter your password):
$ sudo unzip twsapi_macunix.n.m.zip -d $HOME/

- To access the sample and source files, navigate to the IBJts directory and confirm the subfolders samples and source are present
$ cd ~/IBJts
$ ls

Legacy Instructions - API Version ≤ 9.71
Note: IB only offers API Version 9.72+. In the event you already have an existing legacy version and need to install it, please refer to the directions below:
- locate the file twsapi_macunix.n.m.jar on your computer
(where n and m are the major and minor version numbers respectively.) - Open Terminal (Ctrl+Alt+T on most distributions)
(On Mac press Command+Space to launch Spotlight, then type terminal and press Return) - Navigate to the directory where the .jar file has been located (normally it should be the Download folder within your home folder) and confirm it is present
$ cd ~/Downloads
$ ls - Extract the contents of the .jar file into your home folder
$ jar xf twsapi_macunix.n.m.jar -d $ HOME/ - To access the sample and source files, navigate to the IBJts directory and confirm the subfolders samples and source are present
$ cd ~/IBJts
$ ls
How to install MobileTWS on BlackBerry OS10
Currently, Interactive Brokers does not offer a native IBKR Mobile app for the Blackberry 10 Operating System. Due to a recent partnership between Amazon and Blackberry, clients who own a Blackberry device running Blackberry 10 OS can install the Android version of the IBKR Mobile app directly from the Amazon Store.
Blackberry 10 OS Devices:
- Q5, Z3, Leap, Classic, Passport, Q10, Z10, Z30, P'9982, P'9983
*Please notice that these devices have limited hardware capabilities and this could negatively affect the performance of the IBKR Mobile app.
Installation
You can download the IBKR Mobile app on your Blackberry phone directly from the Amazon Appstore.
How to install IBKR Mobile from the Amazon App Store:
- On your Blackberry phone open the Amazon App Store
app.
-
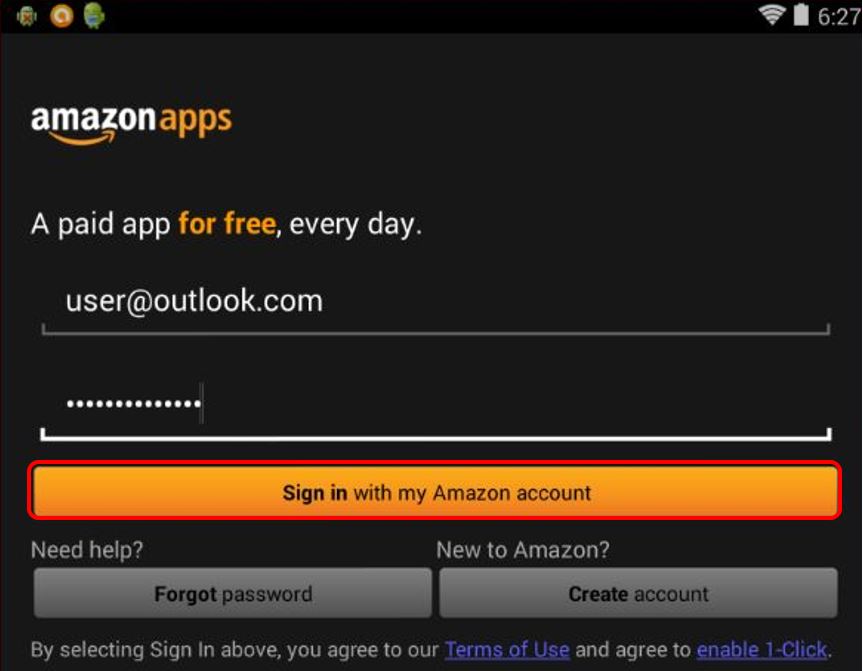
Enter your Amazon e-mail and password, and tap Sign in.
(If you don't have an Amazon account, tap Create a new Amazon account.)
-
Tap on the search bar at the top, type IBKR Mobile then tap Search.
-
Tap on IBKR Mobile from the search results and install.
Welcome to Interactive Brokers
Now that your account is funded and approved you can start trading. The information below will help you getting
started as a new customer of Interactive Brokers.
- Your Money
- Configure your account to trade
- How to trade
- Trade all over the World
- Five points to enrich your IB experience
1. Your Money
Deposits & Withdrawals General Info. All transactions are administered through your secure Account Management
Deposits
First, you create a deposit notification through your Account Management > Funding > Fund Transfers > Transaction Type: “Deposit” How to create a deposit notification. The second step is to instruct your Bank to do the wire transfer with the bank details provided in your Deposit Notification.
Withdrawals
Create a withdrawal instruction via your secure Account Management > Funding > Fund Transfers > Transaction Type: "Withdrawals" How to create a withdrawal instruction
If you instruct a withdrawal over the Withdrawal limits, it will be considered an exceptional withdrawal and we will therefore need to match bank account holder and IB account. If destination bank account has been used for a deposit, withdrawal will be processed; otherwise, you must contact customer service and provide the documents needed.
Troubleshooting
Deposits: My bank sent the money but I do not see it credited into my IB account. Possible reasons:
a) A fund transfer takes 1-4 business days
b) A Deposit Notification is missing. You have to create it via your Account Management and send a ticket to Customer Service
c) Amending details are missing. Your name or IB account number is missing in the transfer details. You have to contact your bank and ask for the full amending details.
d) ACH initiated by IB is limited to 100k USD in a 7 business period. If you opened a Portfolio Margin account where the initial requirement is 110k, a wire deposit might be the better deposit option to reduce wait time for your first trade. If selecting ACH a wait time of almost 2 weeks or a temporary downgrade to RegT can be possible solutions.
Withdrawals: I have requested a withdrawal but I do not see the money credited to my bank account. Possible reasons:
a) A fund transfer takes 1-4 business days
b) Rejected. Over the max it can be withdrawn. Please check your account cash balance. Note that for regulatory requirements, when the funds are deposited, there is a 3 day holding period before they can be withdrawn.
c) Your bank returned the funds. Probably because receiving bank account and remitting bank account names do not match.
2. Configure your account to trade
Difference between Cash and Margin accounts: If you have chosen the FastTrack application, by default your account type is a cash account with US stock permission. If you would like to get leverage and trade on margin, here how to upgrade to a RegT Margin account
Trading Permissions
In order to be able to trade a particular asset class in a particular country, you need to get the trading permission for it via your Account Management. Please note that trading permissions are free. You might however be asked to sign risk
disclosures required by local regulatory authorities. How to Request Trading Permissions
Market Data
If you want to have market data in real-time for a particular product/exchange, you need to subscribe to a market data package charged by the exchange. How to subscribe to Market data
The Market data assistant will help you choose the right package. Please watch this Video explaining how it works.
Customers have the option to receive delayed market data for free by clicking the Free Delayed Data button from a non-subscribed ticker row.
Advisor Accounts
Have a look at the user guide getting started as advisors. Here you see how to create additional users to your advisor account and grant them access and much more.
3. How to trade
The Trader's University is the place to go when you want to learn how to use our Platforms. Here you will find our webinars, live and recorded in 10 languages and tours and documentation about our various Trading Platforms.
Trader Workstation (TWS)
Traders who require more sophisticated trading tools can use our market maker-designed Trader Workstation (TWS), which optimizes your trading speed and efficiency with an easy-to-use spreadsheet interface, support for more than 60 order types, task-specific trading tools for all trading styles, and real-time account balance and activity monitoring. Try the two models
TWS Mosaic: for intuitive usability, easy trading access, order management, watchlist, charts all in one window or
TWS Classic: the Advanced Order Management for traders who need more advanced tools and algos.
General Description and Information / Quick start guide / Usersguide
Interactive Tours: TWS Basics / TWS configuration / TWS Mosaic
How to place a trade: Video Classic TWS / Video Mosaic
Trading tools: General Description and Information / Users guide
Requirements: How to install Java for Windows / How to install Java for MAC / Port 4000 and 4001 needs to be open
Login TWS / Download TWS
WebTrader
Traders who prefer a clean and simple interface can use our HTML-based WebTrader, which makes it easy to view market data, submit orders, and monitor your account and executions. Use the latest WebTrader from every browser
Quick Start Guide / WebTrader User's Guide
Introduction: Video WebTrader
How to place a Trade: Video WebTrader
Login WebTrader
MobileTrader
Our mobile solutions allow you to trade your IB account on the go. The mobileTWS for iOS and the mobileTWS for BlackBerry are custom-designed for these popular models, while the generic MobileTrader supports most other Smart phones.
General Description and Information
Order Types Order Types available and Description / Videos / Tour / Users guide
Paper Trading General Description and Information / How to get a Paper Trading Account
Once your paper account is created, you can share the market data of your real account with your paper trading account: Account Management > Manage Account > Settings > Paper trading
4. Trade all over the World
IB accounts are multi-currency accounts. Your account can hold different currencies at the same time, this allows you to trade multiple products around the world from a single account.
Base Currency
Your base currency determines the currency of translation for your statements and the currency used for determining margin requirements. Base currency is determined when you open an account. Customers may change their base currency at any time through Account Management.
We do not automatically convert currencies into your Base currency
Currency conversions must be done manually by the customer. In this video you can learn how to do a currency conversion.
In order to open a position denominated in a currency that you do not have in your account, you have two possibilities:
A) Currency conversion.
B) IB Margin Loan. (Not available for Cash Accounts)
Please see this course explaining the mechanics of a foreign transaction.
5. Five points to enrich your IB experience
1. Contract Search
Here you will find all our products, symbols and specifications.
2. IB Knowledge Base
The Knowledge Base is a repository of glossary terms, how-to articles, troubleshooting tips and guidelines designed to assist IB customers with the management of their IB accounts. Just enter in the search button what you are looking for and you will get the answer.
3. Account Management
As our trading platforms give you access to the markets, the Account Management grants you access to your IB account. Use Account Management to manage account-related tasks such as depositing or withdrawing funds, viewing your statements, modifying market data and news subscriptions, changing your trading permissions, and verifying or changing your personal information.
Log In Account Management / AM Quick Start Guide / AM Users Guide
4. Secure Login System
To provide you with the highest level of online security, Interactive Brokers has implemented a Secure Login System (SLS) through which access to your account is subject to two-factor authentication. Two-factor authentication serves to confirm your identity at the point of login using two security factors: 1) Something you know (your username and password combination); and 2) Something you have (an IB issued security device which generates a random, single-use security code). As both knowledge of your username/password and physical possession of the security device are required to login to your account, participation in the Secure Login System virtually eliminates the possibility of anyone other than you accessing your account.
How to Activate your Security Device / How to Obtain a Security Code Card / How to return Security device
In case you forgot your password or lost your security code card, please call us for immediate assistance.
5. Statements and Reports
Easy to view and customize, our statements and reports cover all aspects of your Interactive Brokers account. How to view an Activity Statement
When and how should I increase the memory allocation for TWS?
Java Virtual Machine memory allocation
The Trader Workstation is a Java-based application. As any other Java applications, it executes within a Java virtual machine (JVM) which manages the interactions between the program and the underlying Operating System (OS).
The memory (RAM) which is allocated by the operating system to the JVM constitutes the heap space. That is the area where all the class instances and arrays needed by the application are allocated. The heap space is created when the JVM is started and it is dynamically freed-up by the Garbage Collector (GC), the Java memory manager. When the need arises, the Garbage Collector is invoked to free up the heap space by unloading Java classes and other code structures no longer used by the application.
If the heap space is undersized, the Garbage Collector may not be able reclaim memory at the needed pace or may have to be called too often, draining the processor (CPU) resources. When this happens, the application may slow down, be unresponsive or even crash completely.
To ensure a smooth TWS run, it is therefore sometimes necessary to change the memory allocation, according to the layout complexity and the needs of the application itself.
In which case I should change the TWS memory allocation?
How much memory should I allocate to TWS?
How can I change the memory allocation for the TWS?
Please follow one of the links below for the instructions, according to the Operating System and TWS release you are using
A. TWS version 972 and higher
The steps below are valid for all Operating Systems


(1).png)
4) Click on Apply and then on OK
5) Shut down the TWS

B. TWS versions previous to 972
B.1 Your Operating System is Windows
1) Close TWS in case it is running
.png)
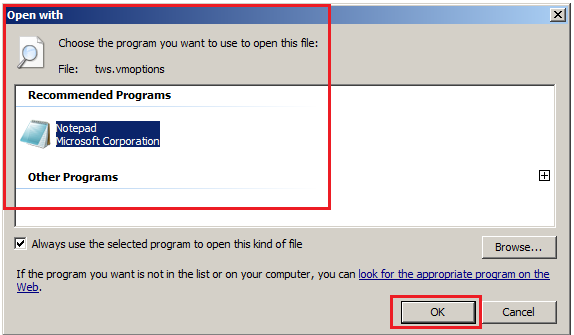


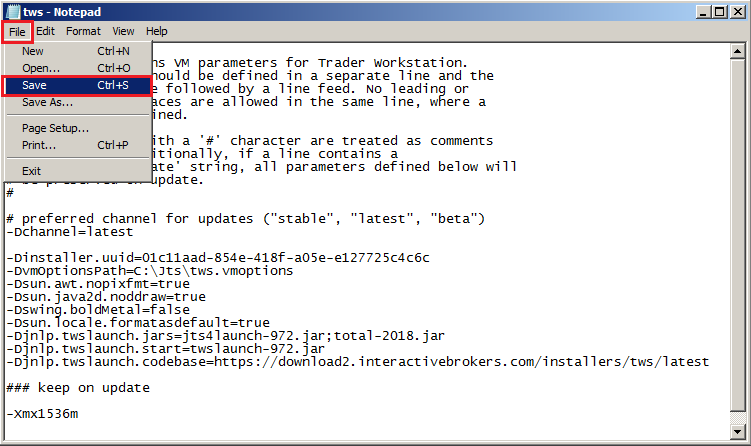


B.2 Your Operating System is Mac OS
.png)
3) On the Spotlight results panel, click on tws.vmoptions to open it. Should the system ask you how to open this file, click Choose Application... select a text editor (TextEdit, Smultron, TextWrangler...) of your choice and click Open

.png)
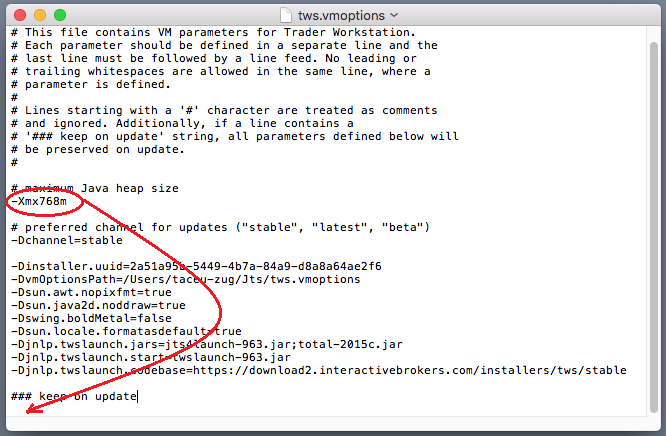
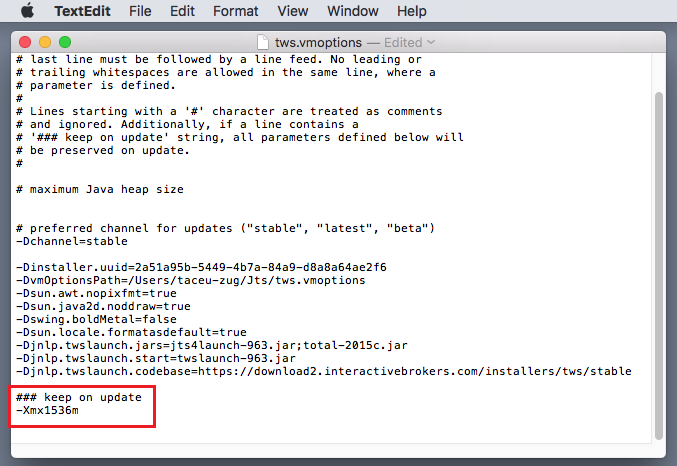
8) Launch the TWS with a double click on the Desktop shortcut Trader Workstation (Should you receive an error message, please see Note 3.
Notes
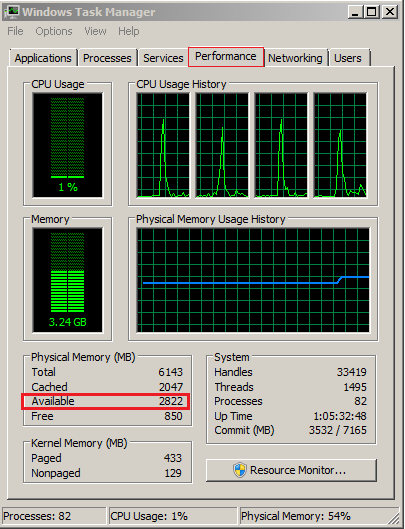
1. Available system RAM
.png)
2. Limitations of 32-bit Operating Systems

3. Error: "Could not create the Java Virtual Machine"

