How to set up sFTP for using Certificate Authentication on Linux
These instructions apply to users who are receiving their statements via sFTP. If you elected to receive your statements via sFTP, you would first need to generate an RSA Key pair.
There are many Linux distributions and there are multiple methods to access the IBKR sFTP server. sFTP clients such as Filezilla can be used. In this article we explain how to realize the connection to the IBKR FTP server using Ubuntu Linux and Filezilla.
1. On your Linux machine, click on the Applications icon in the bottom left corner of you screen.


4. Once the software installation is complete, type puttygen -t rsa -b 2048 -o privatekey.ppk in order to generate the RSA Key pair.


8. Click on the FileZilla top menu File -> Site Manager...


- Select SFTP - SSH File Transfer Protocol as Protocol
- Enter xfer.interactivebrokers.com in the Host field
- Enter 32 in the Port field
- Select Key file as Logon Type
- Enter the username provided to you by Interactive Brokers in the User field


Important Note: do NOT send us your private key. Send us only your public one
Once IBKR has configured the parameters for your connection on our servers, you will be notified. After that, you will be able to access your sFTP repository by using the Site connection you have created in FileZilla. In case you have not yet set up a Site connection, please follow the steps from 6. to 14. which are a prerequisite to the below steps:


Common issues and solutions
-
Ensure the correct login details are being used to connect to the sFTP server. The username and password you are entering should match the ones you have received from the Reporting Integration Team.
-
Confirm you have configured your sFTP Client to use the Private Key file for the logon authentication (see steps 9. and 10. of the above procedure.)
-
Try accessing the sFTP server using a different Client (CyberDuck, ect.)
-
Ensure the Private Key file being used to Authenticate the server login attempt is related to the Public Key you originally sent to the Reporting Integration Team.
-
Should the above checks be unable to resolve the issue, please generate a new RSA Public/Private Key pair and send only the Public part to the Reporting Integration Team, as per IBKB3842.
-
In case you have an antivirus or a security software installed on your machine, make sure it is not blocking the FTP connection attempt. Normally, security software allows to set up exceptions for specific connections in order to whitelist them.
-
Verify that the public IP Address of the machine running the sFTP client, is the same you have originally provided to the Reporting Integration Team for being whitelisted. You can discover your public IP Address by searching the Internet for “what is my IP”. If your current IP Address is not the same you provided to us, please send it to our Reporting Integration Team for being whitelisted.
-
Ask your network administrator/s to confirm that your firewall allows both incoming and outgoing traffic from/to xfer.interactivebrokers.com on port TCP 32.
-
Should the above steps be unable to resolve the issue, please generate a new RSA Public/Private Key pair and send only the new Public part to our Reporting Integration Team, as per IBKB3842.
KB3968 - Generate a key pair using GPG for Windows
KB4205 - Generate a key pair using GPG Suite on macOS
KB4108 - Decrypt your Reports using GPG for Windows
KB4210 - Decrypting Reports using your PGP Key pair on macOS
KB4407 - Generate RSA Key Pair on Windows
KB4410 - How to set up sFTP for using Certificate Authentication on macOS
KB4411 - How to backup your public/private Key pair
KB4323 - How to transfer your public/private key pair from one computer to another
Cryptocurrency Trading at Interactive Brokers Hong Kong
- Login into Client Portal and selecting the User menu (head and shoulders icon in the top right corner) followed by Settings
- Under Account Settings find the Trading section and click on Trading Permissions.
- Select Cryptocurrency permissions and complete the steps on screen.
What times-in-force can I use when trading cryptocurrencies with Interactive Brokers HK?
Times-in-force for BUY limit orders:
- IOC: Immediate or cancel
- Minutes: Order is canceled if not filled within five (5) minutes.
Times-in-force for SELL orders:
- IOC: Immediate or cancel
- Minutes: Order is canceled if not filled within five (5) minutes.
- Day: Order is canceled if not filled by the end of the trading day.
- GTC: Good til Canceled
Cómo cargar un paquete de diagnóstico de las plataformas de IBKR
Algunas cuestiones relacionadas con la asistencia técnica requieren que se carguen los archivos de diagnóstico y los registros junto con capturas de pantalla. La información ayudará a nuestro equipo a investigar y resolver el problema que usted está presentando.
El siguiente artículo le proporciona instrucciones detalladas acerca de cómo subir los archivos de diagnóstico y los registros desde varias plataformas de negociación de Interactive Brokers.
Nota: IBKR no monitoriza el repositorio de paquetes de diagnóstico durante el día. En caso de decidir subir un paquete de diagnóstico de manera espontánea, sin la indicación de Interactive Brokers, informe a nuestro servicio de atención al cliente al respecto mediante un tique en el Centro de mensajes o una llamada telefónica. De lo contrario, el error que ha informado pasará desapercibido.
Haga clic en uno de los siguientes enlaces, de acuerdo con la plataforma que esté utilizando:
-
IBKR Mobile (Android)
-
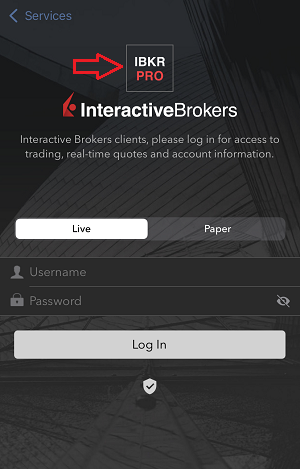
IBKR Mobile (iOS)
- para los sistemas operativos Windows y Linux: pulse Ctrl+Alt+Q
- para Mac: pulse Cmd+Option+H
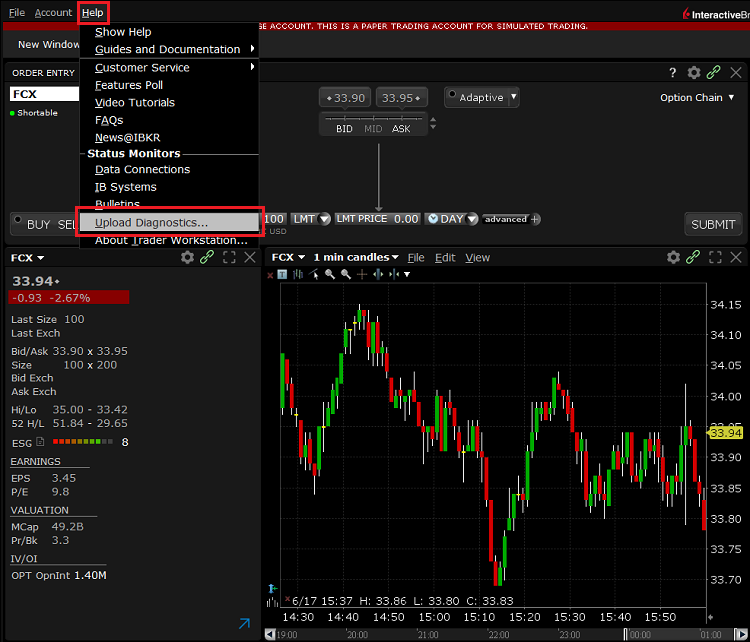
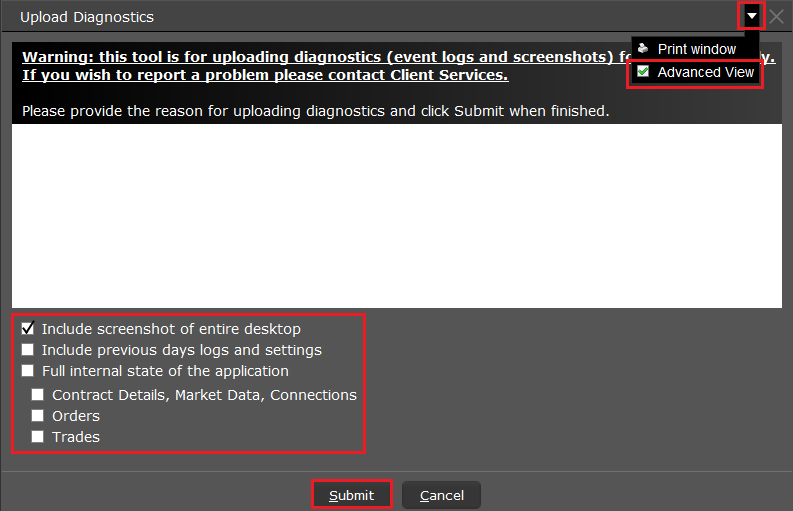
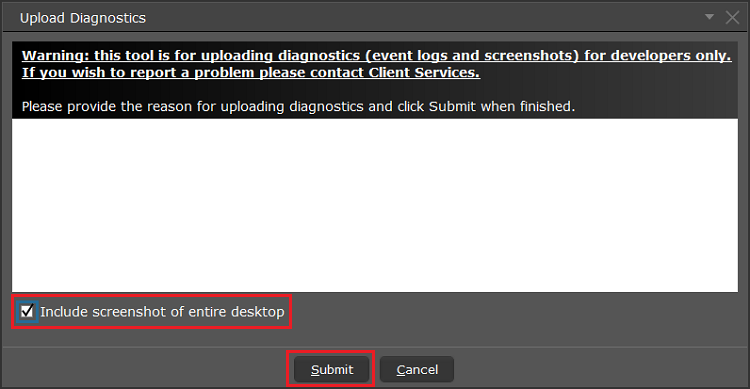

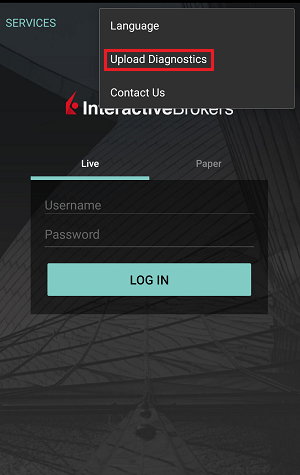
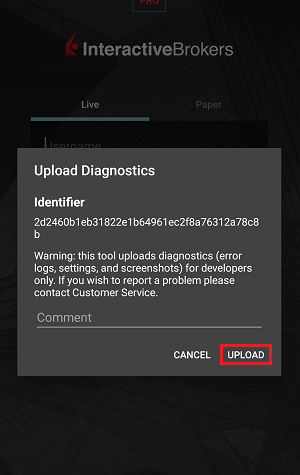
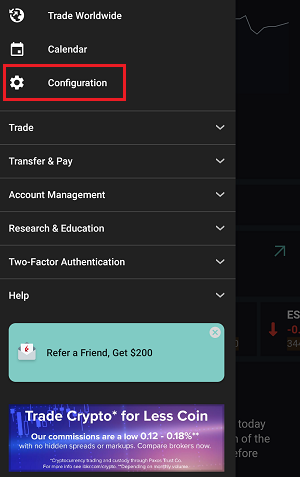
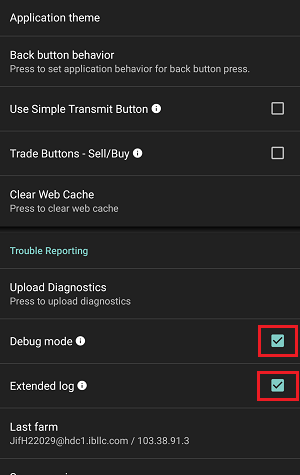
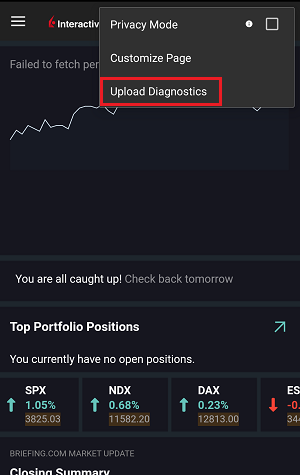
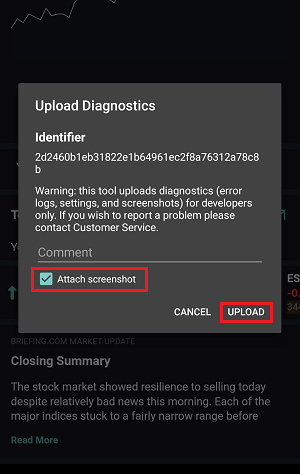
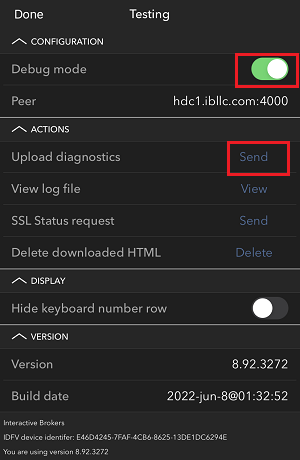
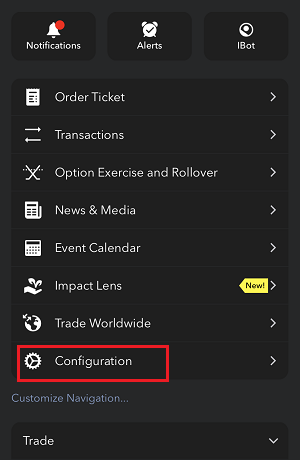
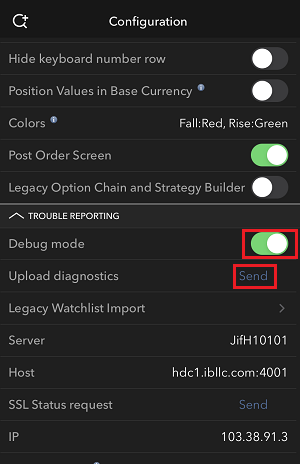
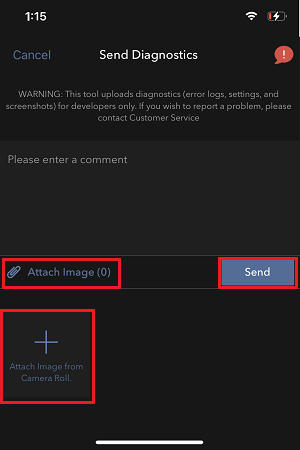
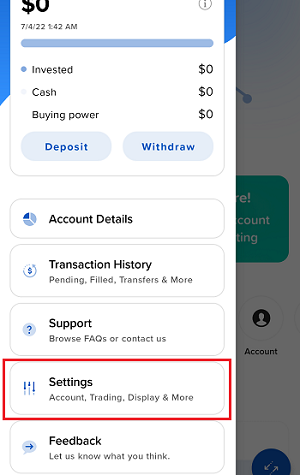
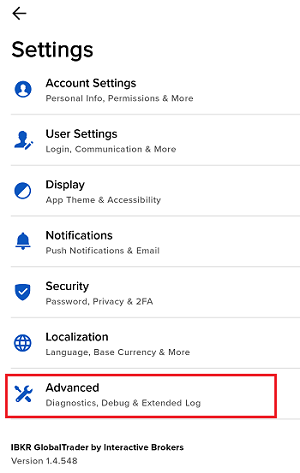
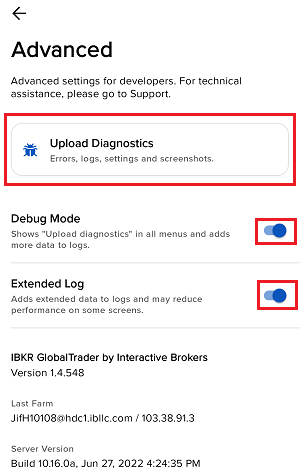
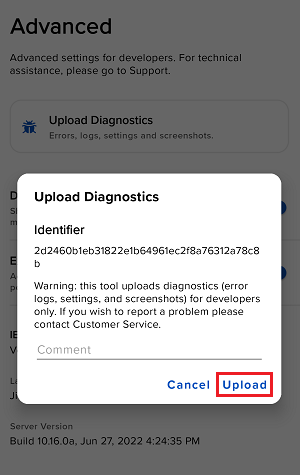
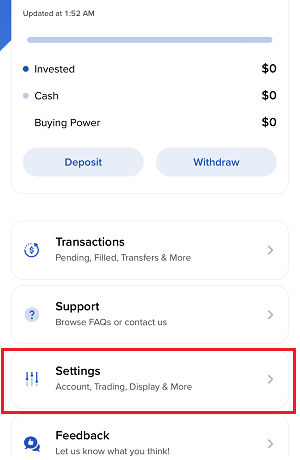
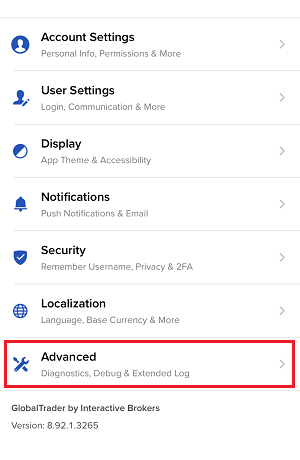
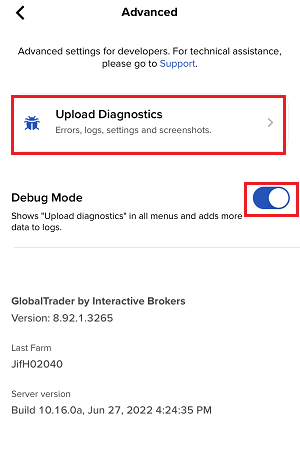
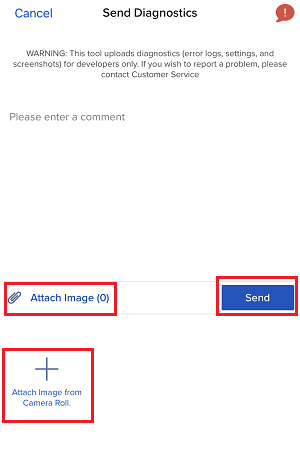
7. Ingrese sus comentarios en el campo correspondiente y pulse ‘Adjuntar imagen’ para adjuntar las capturas de pantalla que guardó anteriormente en su carrete de fotos.
Podrá capturar un seguimiento de diagnóstico para Client Portal al seguir las instrucciones que figuran en el siguiente artículo: IBKB3512.
How to Access Your Reports Using FTP on Windows
This tutorial assumes you received reports via email or via FTP that were encrypted with the public key you sent to IBKR. If you need guidance to set up the encrypted statement delivery, please refer to this article, which is a prerequisite to the instructions below.
There are multiple methods to access the IBKR FTP server. FTP clients such as Filezilla can be used or you could as well launch the command ftp ftp2.interactivebrokers.com from the Command Prompt or use the Windows Explorer. In this article, we explain how to realize the connection to the IBKR FTP server using Windows Explorer.
Important Note: You will not be able to connect using your browser.
Once you are connected to the IBKR FTP Server, you will have both read and write access to your folder. The retention policy for the files is 100 days - IBKR will automatically purge files after that.
To access your reports using Windows File Explorer:
1. Open the Windows File Explorer by either pressing Windows Key + E on the keyboard. Alternatively, you can type File Explorer into the Windows search box and click on Open

2. In the File Explorer window, type the FTP address, ftp://ftp2.interactivebrokers.com, into the file path at the top of the window and hit Enter.
.png)
3. A window prompting your for credentials will appear. Enter the FTP username and password IBKR provided you with into the correspondent fields and click Log On.
.png)
4. You now have direct access to your FTP folder. Documents and files contained in your FTP folder can now be decrypted using your PGP key, as described in IBKB4108.
.png)
Common issues and solutions
Ensure the correct login details are being used to connect to the FTP server. The username and password you are entering should match the ones you have received from the Reporting Integration Team.
-
Enable the Passive (PASV) mode for FTP connections. press Windows Key + S, type Internet Options and open the panel. Move to the Advanced tab and activate the option Use Passive FTP (for firewall and DSL modem compatibility). The passive mode is more firewall-friendly then the active one, since all the connections are initiated from the Client side. If you are using a specific FTP Client, check its connection settings or advanced settings in order to find and enable the Passive (PASV) mode switch.
-
In case you have an antivirus or a security software installed on your machine, make sure it is not blocking the FTP connection attempt. Normally, security software allows to set up exceptions for specific connections in order to whitelist them.
-
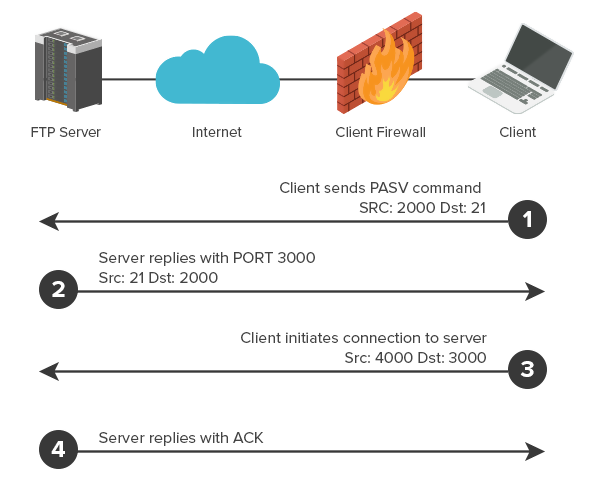
Should the above steps be unable to resolve the issue, ask your network administrator/s to confirm that your firewall allows traffic from/to ftp2.interactivebrokers.com. Note: Your network administrator should consider that every time your FTP Client attempts connecting to our FTP server with Passive mode, it establishes two connections: a command channel (outbound, from random TCP port above 1024 to TCP port 21) and a data channel (outbound, from a random TCP port above 1024 to the TCP port above 1024 which was negotiated through the command channel). Both connections are initiated by the Client side. In the picture below, you can find an example of this connections schema. Please notice that the ports 2000, 3000, 4000 are examples of randomly selected ports and may very well not correspond to the ones used within your specific FTP connection attempt.
KB3968 - Generate a key pair using GPG for Windows
KB4205 - Generate a key pair using GPG Suite on macOS
KB4108 - Decrypt your Reports using GPG for Windows
KB4210 - Decrypting Reports using your PGP Key pair on macOS
KB4407 - Generate RSA Key Pair on Windows
KB4409 - How to set up sFTP for using Certificate Authentication on Windows
KB4410 - How to set up sFTP for using Certificate Authentication on macOS
KB4411 - How to backup your public/private Key pair
KB4323 - How to transfer your public/private key pair from one computer to another
How to Upload a Diagnostic Bundle from an IBKR Platform
Some support related issues require diagnostics files and logs to be uploaded along with screenshots. The information will help our team to investigate and resolve the issue that you are experiencing.
This article will help you with detailed steps on how to upload diagnostics files and logs from various Interactive Brokers’ trading platforms.
Note: IBKR does not monitor the diagnostic bundle repository throughout the day. Should you spontaneously decide to upload a diagnostic bundle, without being instructed by Interactive Brokers, please inform our Client Services via Message Center ticket or phone call otherwise your error report will go unnoticed.
Please click on one of the links below, according to the platform you are using:
-
IBKR Mobile (Android)
-
IBKR Mobile (iOS)
- For Windows and Linux Operating system: Press Ctrl+Alt+Q
- For Mac: Press Cmd+Option+H


7. Enter your comments in the field and tap ‘Attach Image’ to attach the screenshot/s you previously saved in your camera roll

A diagnostic trace for Client Portal can be captured following the steps on IBKB3512
Cómo generar un archivo ".har"
Cuando se busca solución a un problema importante en la página web, a veces es necesario que nuestro equipo de atención al cliente obtenga información adicional sobre la comunicación de su navegador. En estos casos, se le puede solicitar que cree y proporcione un archivo .har. Este archivo contiene información adicional sobre las solicitudes de red enviadas y recibidas por su navegador. El navegador puede generar dicho archivo al grabar el contenido, la escala de tiempo y el estado de las solicitudes y respuestas HTTP/HTTPS mientras ocurre el problema.
En este artículo explicamos cómo generar un archivo .har. En la lista que aparece a continuación, haga clic en el navegador que usted utiliza:
Para generar el archivo HAR en Google Chrome:
1. Abra Google Chrome y vaya a la página donde está ocurriendo el problema.
2. Pulse CRTL +SHIFT + I en su teclado. Como alternativa, haga clic en el icono de menú de Chrome (los puntos suspensivos verticales en la parte superior derecha de la ventana de su navegador) y seleccione Más herramientas (More Tools) > Herramientas para desarrolladores (Developer Tools).
3. Las Herramientas para desarrolladores se abren en un panel anclado que se muestra en la parte lateral o inferior de Chrome. Seleccione la pestaña Network (Red) (Figura 1.).
Figura 1.
.png)
4. Busque el botón redondo Record (Grabar) en la esquina superior izquierda de la barra de herramientas en las Herramientas para desarrolladores y asegúrese de que esté rojo. Si está gris, haga clic en él una vez para empezar a grabar o simplemente pulse CTRL+E (Figura 2.).
Figura 2.

5. Active la casilla Preserve log (Conservar registro) (Figure 3.).
Figura 3.
.png)
6. Haga clic en el botón Clear (Borrar) para borrar los registros existentes. El botón Clear (Borrar) tiene un icono de parada y está ubicado a la derecha del botón Record (Grabar) (Figura 4.).
Figura 4.

7. Reproduzca el problema que está presentando mientras se graban las solicitudes de red.
8. Una vez reproducido el problema, haga clic derecho en cualquier lugar en la lista de solicitudes de red grabadas, seleccione Guardar todo como HAR con contenido y guarde el archivo en la ubicación de su preferencia en su ordenador (p. ej. en su escritorio).
9. Desde el Client Portal de IBKR, vaya al Centro de mensajes y cree un nuevo tique web (o utilice uno ya creado si procede).
10. En el tique web, adjunte el archivo .har que generó anteriormente. En caso de que el servicio de atención al cliente de IBKR le hubiere proporcionado un número de ticker de referencia o el nombre de un representante, agregue esta información al cuerpo del mensaje.
11. Envíe el tique web.
Para generar el archivo HAR en Firefox:
1. Abra Firefox y vaya a la página donde está ocurriendo el problema.
2. Pulse F12 en su teclado. Como alternativa, haga clic en el icono de menú de Firefox (las tres líneas paralelas horizontales en la parte superior derecha de la ventana de su navegador) y seleccione Desarrollador Web > Red.
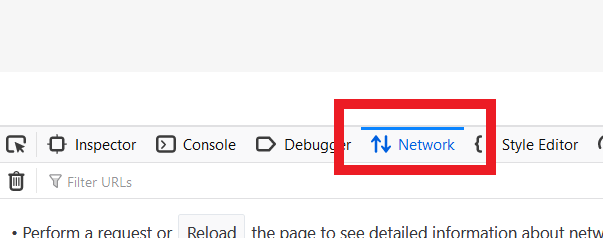
3. Las Herramientas de red para desarrolladores abren en un panel anclado que se muestra en la parte lateral o inferior de Firefox. Seleccione la pestaña Red (Network) (Figura 5.).
Figura 5.
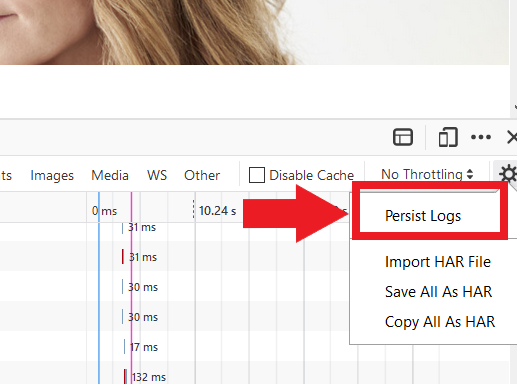
4. Active la casilla Registros persistentes (Persists log) (Figure 6.).
Figura 6.
5. Reproduzca el problema que está presentando. La grabación de la solicitud de red comienza de manera automática.
6. Una vez reproducido el problema, haga clic derecho en cualquier lugar en la lista de solicitudes de red grabadas, seleccione Guardar todo como HAR.
7. Guarde el archivo en la ubicación de su preferencia en su ordenador (p. ej. en su escritorio).
8. Desde el Client Portal de IBKR, vaya al Centro de mensajes y cree un nuevo tique web (o utilice uno ya creado si procede).
9. En el tique web, adjunte el archivo .har que generó anteriormente. En caso de que el servicio de atención al cliente de IBKR le hubiere proporcionado un número de ticker de referencia o el nombre de un representante, agregue esta información al cuerpo del mensaje.
10. Envíe el tique web.
Para generar el archivo HAR en Microsoft Edge:
1. Abra Edge y vaya a la página donde está ocurriendo el problema.
2. Pulse F12 en su teclado. Como alternativa, haga clic en el icono de menú de Edge (los puntos suspensivos horizontales en la parte superior derecha de la ventana de su navegador) y seleccione Más herramientas (More Tools) > Herramientas de desarrollo (Developers Tools).
3. Haga clic en la pestaña Red (Network) (Figura 10.).
Figura 10.
.png)
4. Reproduzca el problema que está presentando mientras se graban las solicitudes de red.
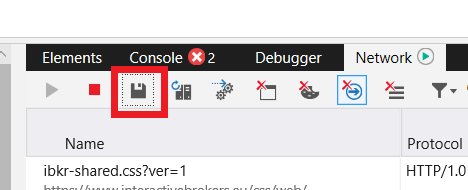
5. Al terminar, haga clic en el icono de disquete (Exportar como HAR) o pulse CTRL+S (Figura 11.).
Figura 11.
6. Proporcione un nombre de archivo y una ubicación de su preferencia en su ordenador (p. ej. el escritorio). Luego haga clic en el botón Guardar.
7. Desde el Client Portal de IBKR, vaya al "Centro de mensajes" y cree un nuevo tique web (o utilice uno ya creado si procede).
8. En el tique web, adjunte el archivo .har que generó anteriormente. En caso de que el servicio de atención al cliente de IBKR le hubiere proporcionado un número de ticker de referencia o el nombre de un representante, agregue esta información al cuerpo del mensaje.
9. Envíe el tique web.
Para generar el archivo HAR en Safari:
Nota: antes de generar el archivo HAR, asegúrese de que puede ver el menú Desarrollo (Develop) en Safari. En caso de que no vea este menú, haga clic en el menú Safari, escoja Preferencias (Preferences), vaya a la pestaña Avanzado (Advanced) y active la casilla que aparece junto a Mostrar menú Desarrollo en la barra de menús.
1. Abra el menú Desarrollo y seleccione Mostrar Web Inspector o pulse CMD+ALT+I.
2. Haga clic en la pestaña Red (Network) (Figura 12.).
Figura 12.

3. Active la casilla Conservar registro (Preserve log) (Figure 13.).
Figura 13.
.png)
4. Haga clic en el icono Exportar (o pulse CMD+S), proporcione un nombre de archivo y una ubicación de su preferencia en su ordenador (p. ej. el escritorio).
5. Desde el Client Portal de IBKR, vaya al "Centro de mensajes" y cree un nuevo tique web (o utilice uno ya creado si procede).
6. En el tique web, adjunte el archivo web que generó anteriormente. En caso de que el servicio de atención al cliente de IBKR le hubiere proporcionado un número de ticker de referencia o el nombre de un representante, agregue esta información al cuerpo del mensaje.
7. Envíe el tique web.
Productos de criptodivisas que ofrece IBKR
A continuación figura una lista con muchos de los productos de criptodivisas que ofrece IBKR*. Si no encuentra el producto que desea puede realizar una búsqueda en la base de datos de contratos de IBKR mediante la herramienta Búsqueda de contrato disponible en nuestro sitio web. Seleccione el menú Ayuda y luego su tipo de cuenta (cliente individual o institucional). Allí podrá realizar una búsqueda simple al introducir el nombre o símbolo del producto, una búsqueda avanzada que le permitirá añadir filtros o una búsqueda por tipo de producto en específico.
Criptodivisa
- BTC- Bitcoin
- ETH- Ethereum
- LTC- Litecoin
- BCH- Bitcoin Cash
Acciones y ETF
EE. UU.
- GBTC (PINK)- Grayscale Bitcoin Investment Trust
- BCHG (PINK)- Grayscale Bitcoin Cash Trust
- ETCG (PINK)- Grayscale Ethereum Classic Trust
- ETHE (PINK)- Grayscale Ethereum Trust
- GDLC (PINK)- Grayscale Digital Large Cap Fund
- LTCN (PINK)- Grayscale Litecoin Trust
No estadounidenses
- BITCOINXB (SFB)- Bitcoin Tracker One
- COINETH (SFB)- XBT Provider Ethereum
- COINETHE (SFB)- XBT Provider Ethereum
Índices
- NYXBT (NYSE)- NYSE Bitcoin Index
- GXBT (Cboe)- The Gemini Bitcoin Trace Price Index (no se ofrecen nuevos contratos para la negociación desde junio de 2019)
- BRR (CME)- CME Bitcoin Reference Rate Index
- BRTI (CME)- CME Bitcoin Real Time Index
Futuros
- GXBT (Cboe/CFE)- The Gemini Bitcoin Trace Price Futures (no se ofrecen nuevos contratos para la negociación desde junio de 2019)
- BRR (CME)- CME Bitcoin Reference Rate Futures
- ETHUSDRR (CME) – CME Ether Dollar Reference Rate Futures
- BAKKT (ICECRYPTO)- Bakkt Bitcoin Futures
*Algunos o todos los productos antes mencionados podrían no estar disponibles para clientes de IBKR ubicados en determinadas jurisdicciones.
Volver a la tabla de contenido: Bitcoin y otros productos de criptodivisas en IBKR
Bitcoin y otros productos de criptodivisas en IBKR
Productos de criptodivisas que ofrece IBKR
http://ibkr.info/es/article/3060
Datos de mercado sobre productos de criptodivisas
http://ibkr.info/es/article/3061
Negociación de futuros sobre criptodivisas con IBKR
http://ibkr.info/es/article/3049
Página de producto para futuros sobre bitcoines
https://www.interactivebrokers.com/en/index.php?f=25379
Requisitos de margen de IBKR
https://www.interactivebrokers.com/en/index.php?f=24176
Cómo enviar documentos a IBKR utilizando su smartphone
Interactive Brokers le permite enviarnos la copia de un documento incluso si no tiene actualmente acceso a un escáner. Puede tomar una fotografía del documento solicitado con su smartphone.
A continuación, encontrará las instrucciones sobre cómo tomar una fotografía y enviarla por correo electrónico a Interactive Brokers con los siguientes sistemas operativos:
Si ya sabe cómo hacer para tomar y enviar imágenes por correo electrónico utilizando su smartphone, haga clic AQUÍ - Adónde enviar el correo electrónico y qué incluir en el asunto.
iOS
1. Deslice el dedo desde abajo hacia arriba sobre la pantalla de su smartphone y pulse el icono de cámara.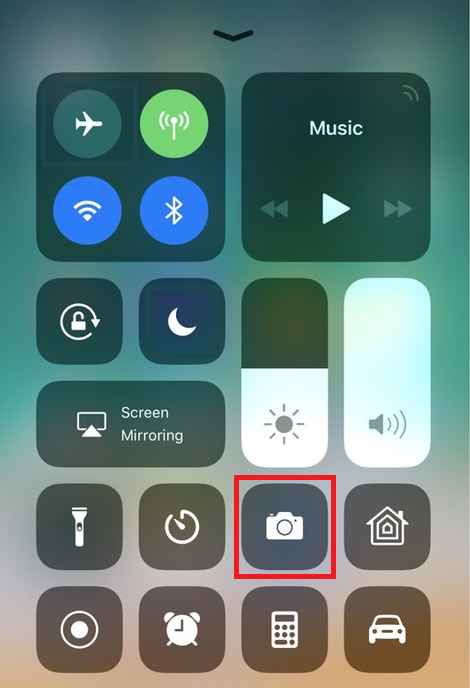
Si no tiene el icono de cámara, pulse el icono de la aplicación de la cámara desde la pantalla de inicio de su iPhone.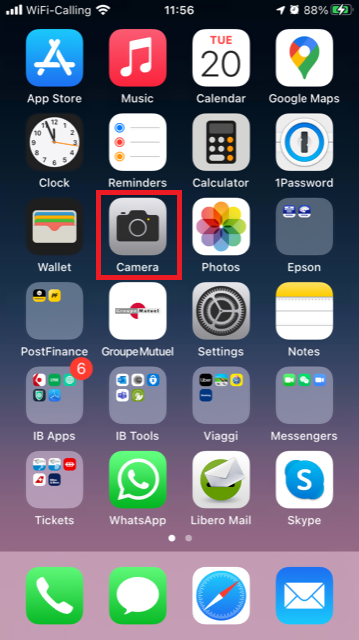
Normalmente, su móvil debería ahora activar la cámara posterior. Si activa la cámara frontal, pulse el botón para cambiar de cámara.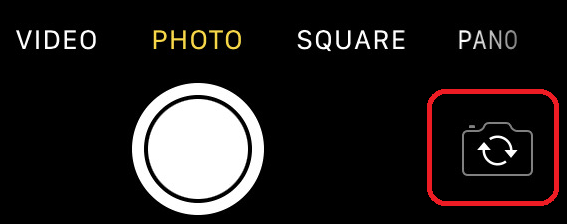
2. Coloque su iPhone sobre el documento y enmarque el segmento o la parte de la página del documento que desea capturar.

3. Asegúrese de tener una luz uniforme suficiente y de no crear sombras sobre el documento debido a su posición. Sostenga el smartphone firmemente con sus manos y evite temblar. Pulse sobre el botón de captura para tomar la fotografía.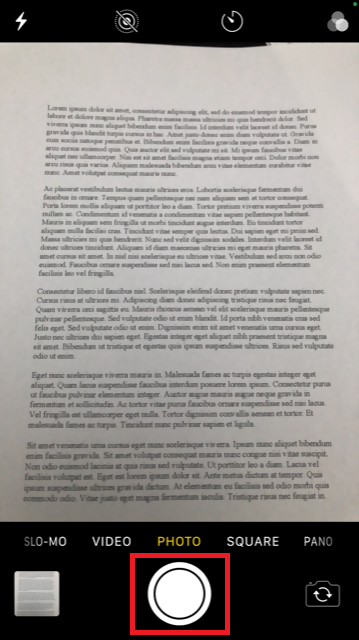
4. Pulse sobre la vista miniatura de la imagen en la esquina inferior izquierda para acceder a la imagen que acaba de capturar.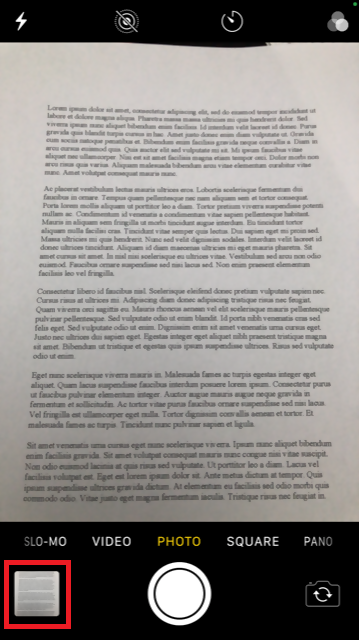
5. Asegúrese de que la imagen sea clara y que el documento pueda verse claramente. Puede agrandar la imagen y verla en detalle, mantenga pulsada una parte de la pantalla con dos dedos y sepárelos para ampliar la imagen.

Si la imagen no presenta una buena calidad o luz, repita los pasos anteriores para tomar una fotografía más nítida.
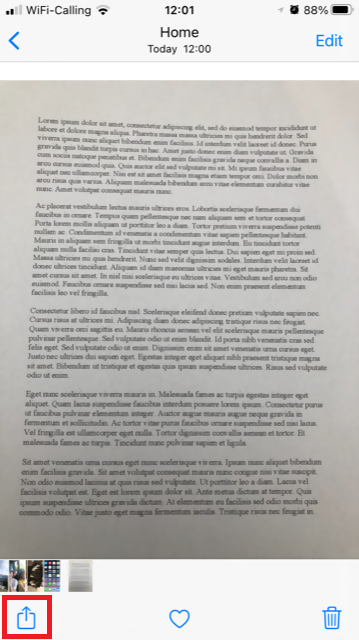
6. Pulse sobre el icono de compartir en la esquina inferior izquierda de la pantalla.
7. Pulse sobre el icono de correo.
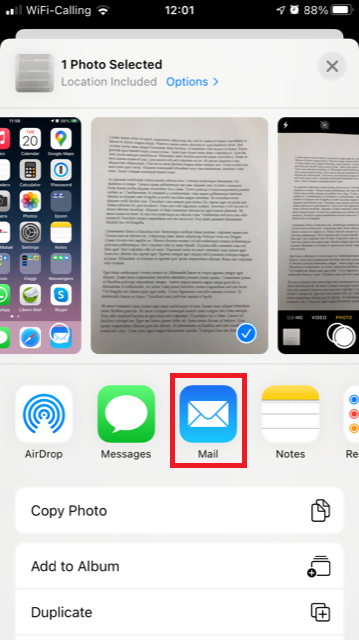
Nota: para enviar correos, su móvil debe estar configurado para eso. Contacte con su proveedor de correo electrónico si no está familiarizado con este procedimiento.
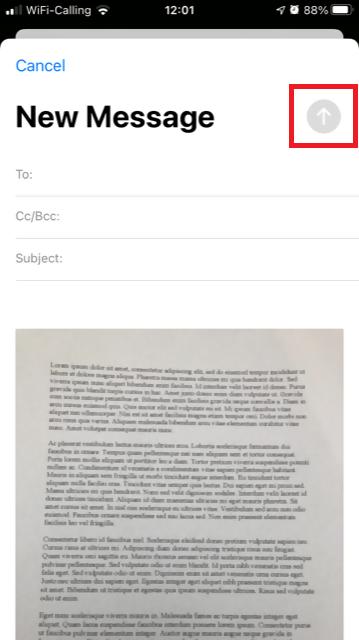
8. Consulte AQUÍ sobre cómo rellenar los campos Para: y Asunto: de su correo. Una vez que el correo esté listo, pulse el icono de flecha en la parte superior derecha para enviarlo.
Android
1. Abra su lista de aplicaciones e inicie la aplicación de la cámara. Alternativamente, iníciela desde su pantalla de inicio. Dependiendo del modelo de su móvil, fabricante o configuración, la aplicación podrá tener otro nombre.
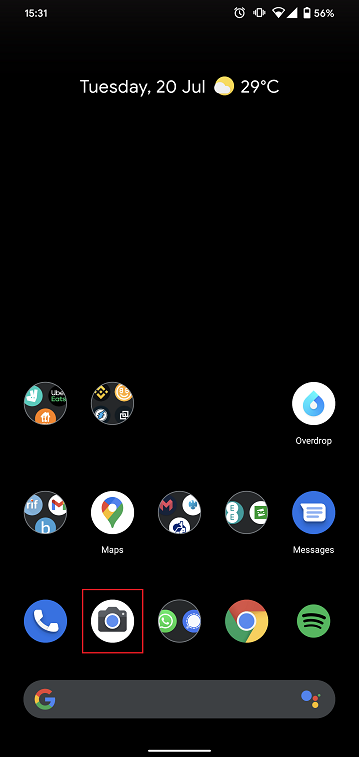
Normalmente, su móvil debería ahora activar la cámara posterior. Si activa la cámara frontal, pulse el botón para cambiar de cámara.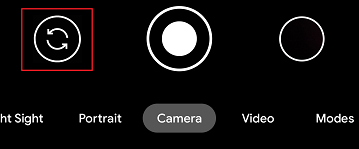
2. Coloque su Android sobre el documento y enmarque el segmento o la parte de la página del documento que desea capturar.

3. Asegúrese de tener una luz uniforme suficiente y de no crear sombras sobre el documento debido a su posición. Sostenga el smartphone firmemente con sus manos y evite temblar. Pulse sobre el botón de captura para tomar la fotografía.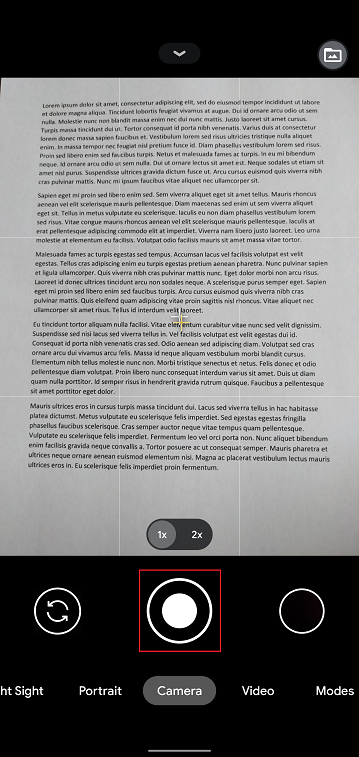
4. Asegúrese de que la imagen sea clara y que el documento pueda verse claramente. Puede agrandar la imagen y verla en detalle, mantenga pulsada una parte de la pantalla con dos dedos y sepárelos para ampliar la imagen.

Si la imagen no presenta una buena calidad o luz, repita los pasos anteriores para tomar una fotografía más nítida.
5. Pulse el icono de círculo vacío en la esquina inferior derecha de la pantalla.
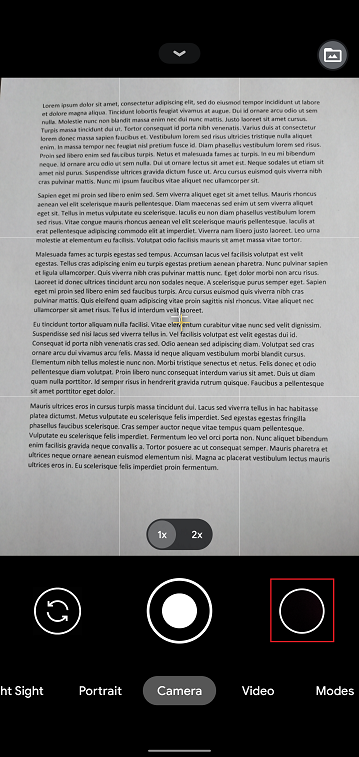
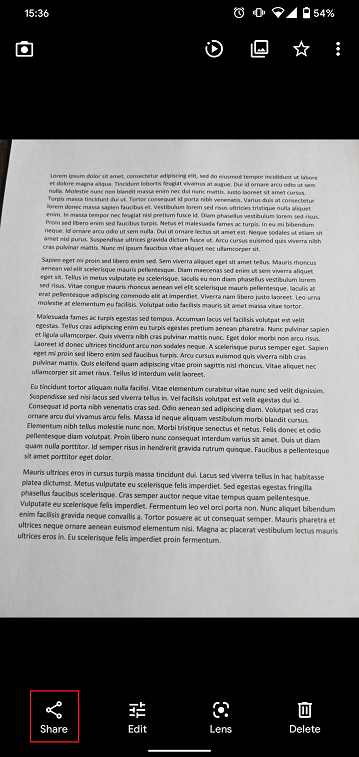
6. Pulse sobre el icono de compartir en la esquina inferior izquierda de la pantalla.
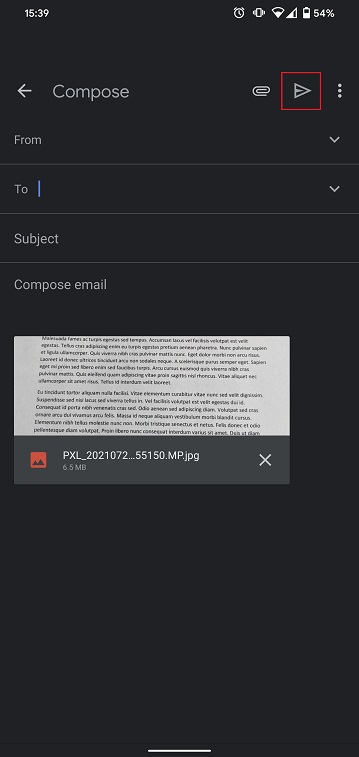
7. En el menú de compartir que se mostrará, pulse el icono del cliente de correo electrónico configurado en su móvil. En el ejemplo de la imagen debajo, se llama Gmail, pero el nombre podrá variar de acuerdo con su configuración específica.
.png)
Nota: para enviar correos, su móvil debe estar configurado para eso. Contacte con su proveedor de correo electrónico si no está familiarizado con este procedimiento.
8. Vea AQUÍ cómo rellenar los campos Para y Asunto de su correo electrónico. Una vez que el correo esté listo, pulse el icono del avión en la parte superior derecha para enviarlo.
ADÓNDE ENVIAR EL CORREO ELECTRÓNICO Y QUÉ INCLUIR EN EL ASUNTO
El correo electrónico ha de crearse siguiendo las instrucciones a continuación:
1. En el tipo de campo Para::
- newaccounts@interactivebrokers.com si es residente de un país no europeo
- newaccounts.uk@interactivebrokers.co.uk si es residente europeo
2. El campo Asunto: deberá contener toda la información siguiente:
- Su número de cuenta (normalmente tiene el formato Uxxxxxxx, en donde x son números o su nombre de usuario
- El propósito de enviar el documento. Utilice la convención siguiente:
- PoRes para prueba de dirección residencial
- PID para prueba de identidad
Cómo añadir a otro usuario a una autenticación activa con IBKR Mobile (IB Key) para iPhone
En este artículo se abordan los pasos necesarios para añadir a un usuario a la sección Autenticación en la aplicación de IBKR Mobile para dispositivos iOS.
Requisitos:
- La aplicación IBKR Mobile deberá estar instalada, y la autenticación a través de IBKR Mobile (IB Key) deberá estar ya activada en este dispositivo iOS.
- Para obtener más información acerca de la instalación y activación para dispositivos iOS, consulte el artículo KB2278.
Instrucciones:
1. En su dispositivo iOS, abra la aplicación IBKR Mobile.
1.a. Si la aplicación se abre con la pantalla de inicio de sesión (Figura 1), pulse sobre Servicios en la esquina superior izquierda (flecha roja) y siga con el paso 2)
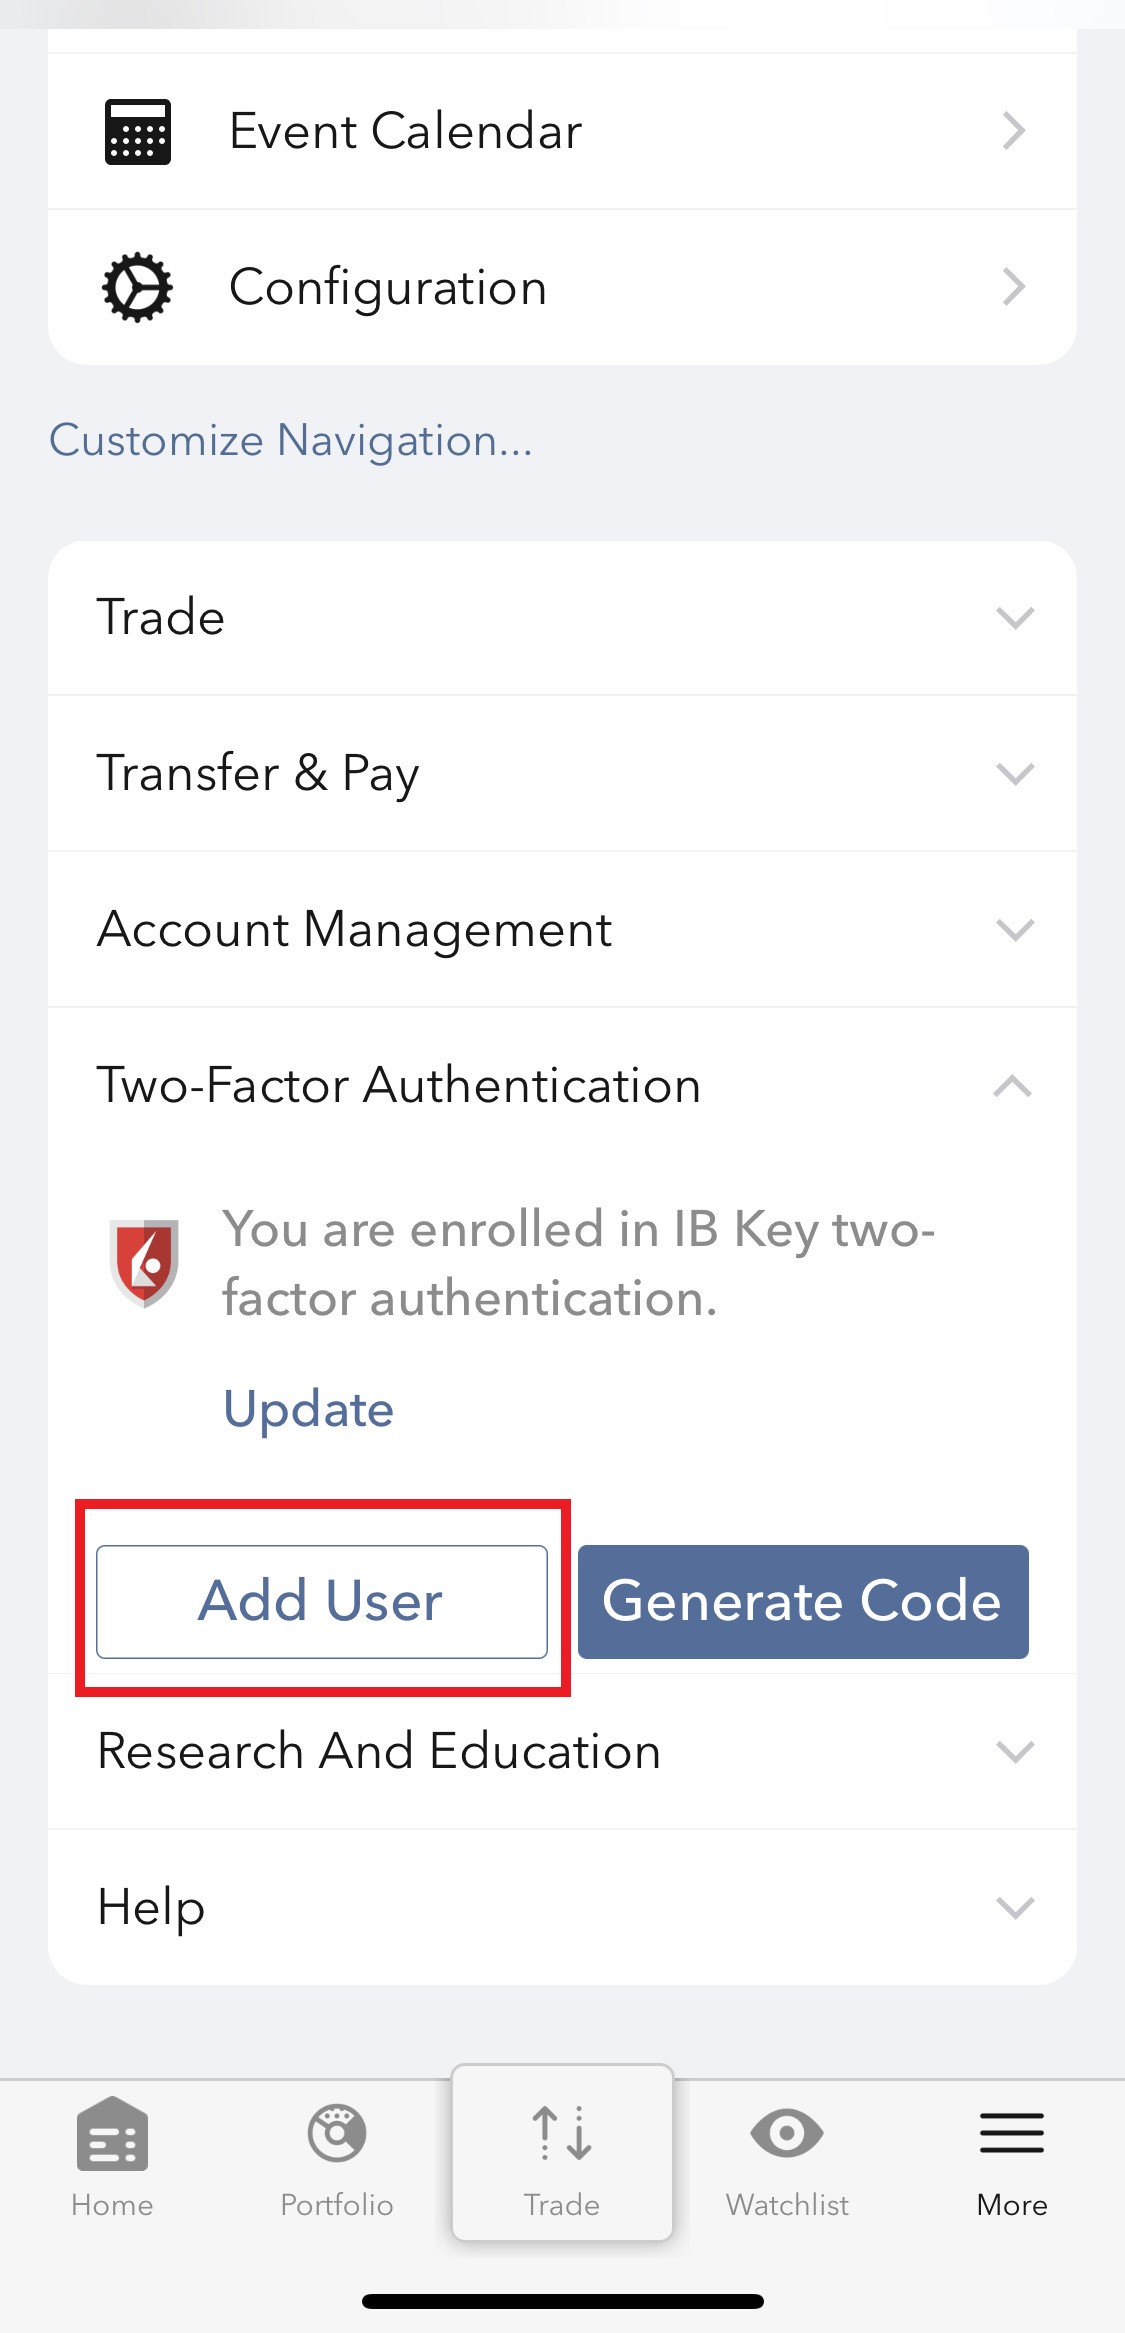
1.b. Si la aplicación se abre con su página de Inicio, Cartera, Listas de seguimiento o similar, pulse sobre Más en la esquina inferior derecha (Figura 2). Luego, pulse Autenticación en dos factores (Figura 3), seguido de Añadir usuario (Figura 4), y continúe con el paso 3).
Figura 1. Figura 2. Figura 3.
(1).jpeg)
.jpeg)
.jpeg)
Figura 4.
2. Pulse Autenticar (Figura 5) y luego Añadir usuario (Figura 6).
Figura 5. Figura 6.


3. Lea las instrucciones y, luego, pulse Continuar (Figura 7).
Figura 7.

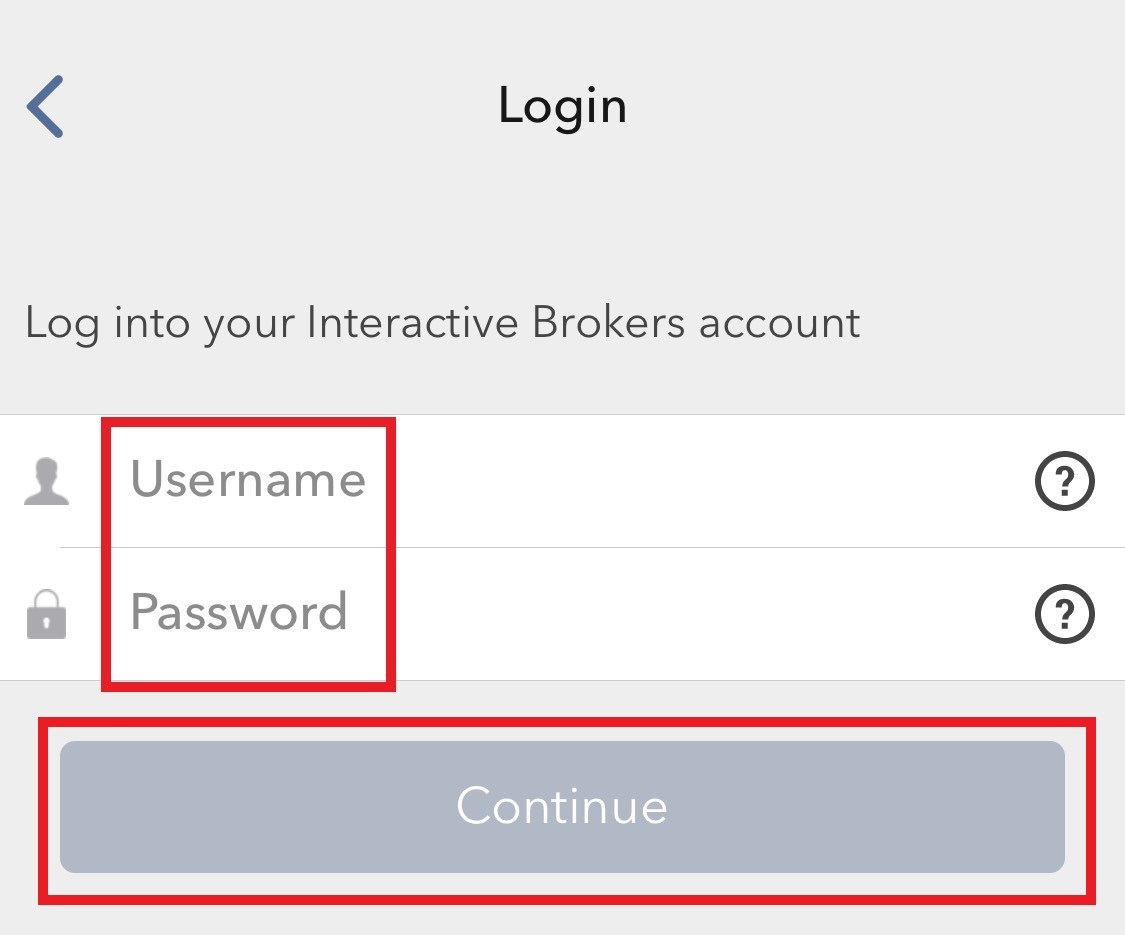
3. Introduzca su nombre de usuario y contraseña, y pulse el botón Continuar (Figura 8).
Figura 8.
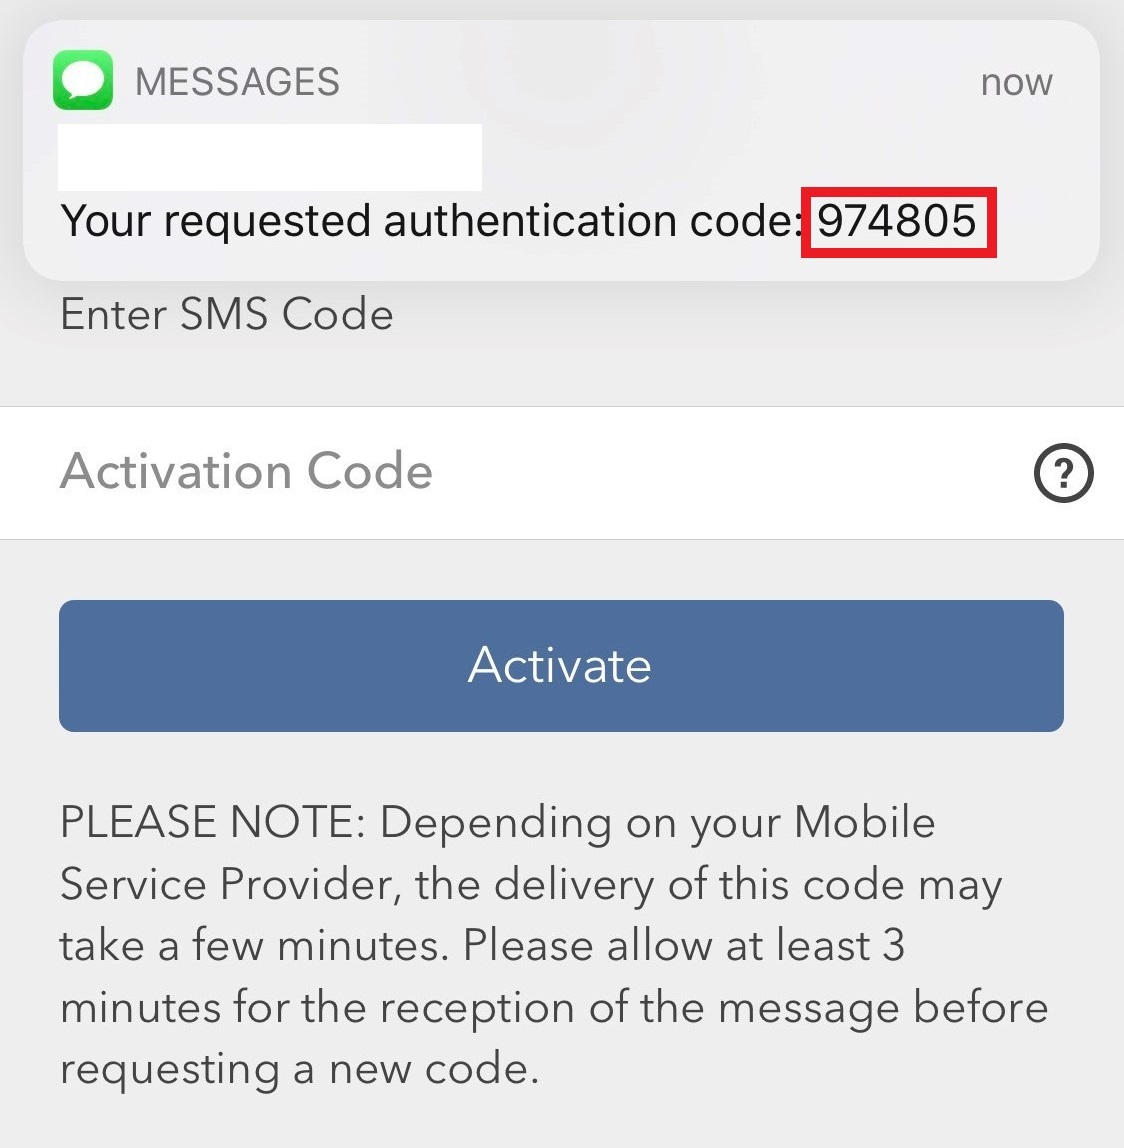
4. Se enviará un código de autenticación mediante SMS al número de móvil que se indica en su cuenta (Figura 9). Introduzca este código de autenticación en el campo de Código de activación y pulse Activar (Figura 10).
Figura 9. Figura 10.
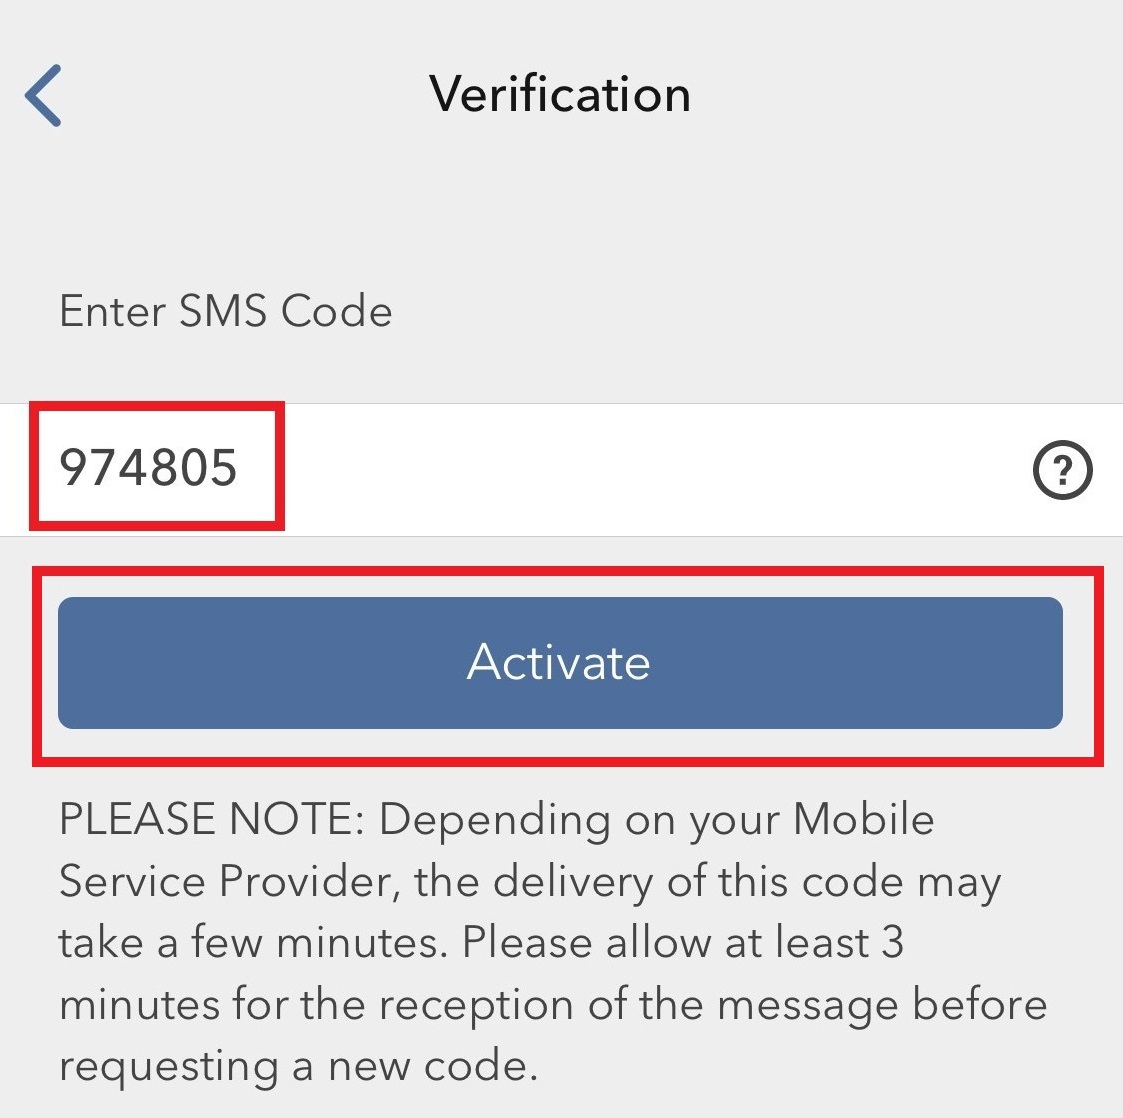
5. Dependiendo de la configuración de seguridad de su smartphone, se le pedirá su contraseña, Touch ID o Face ID (Figura 11).
Figura 11.
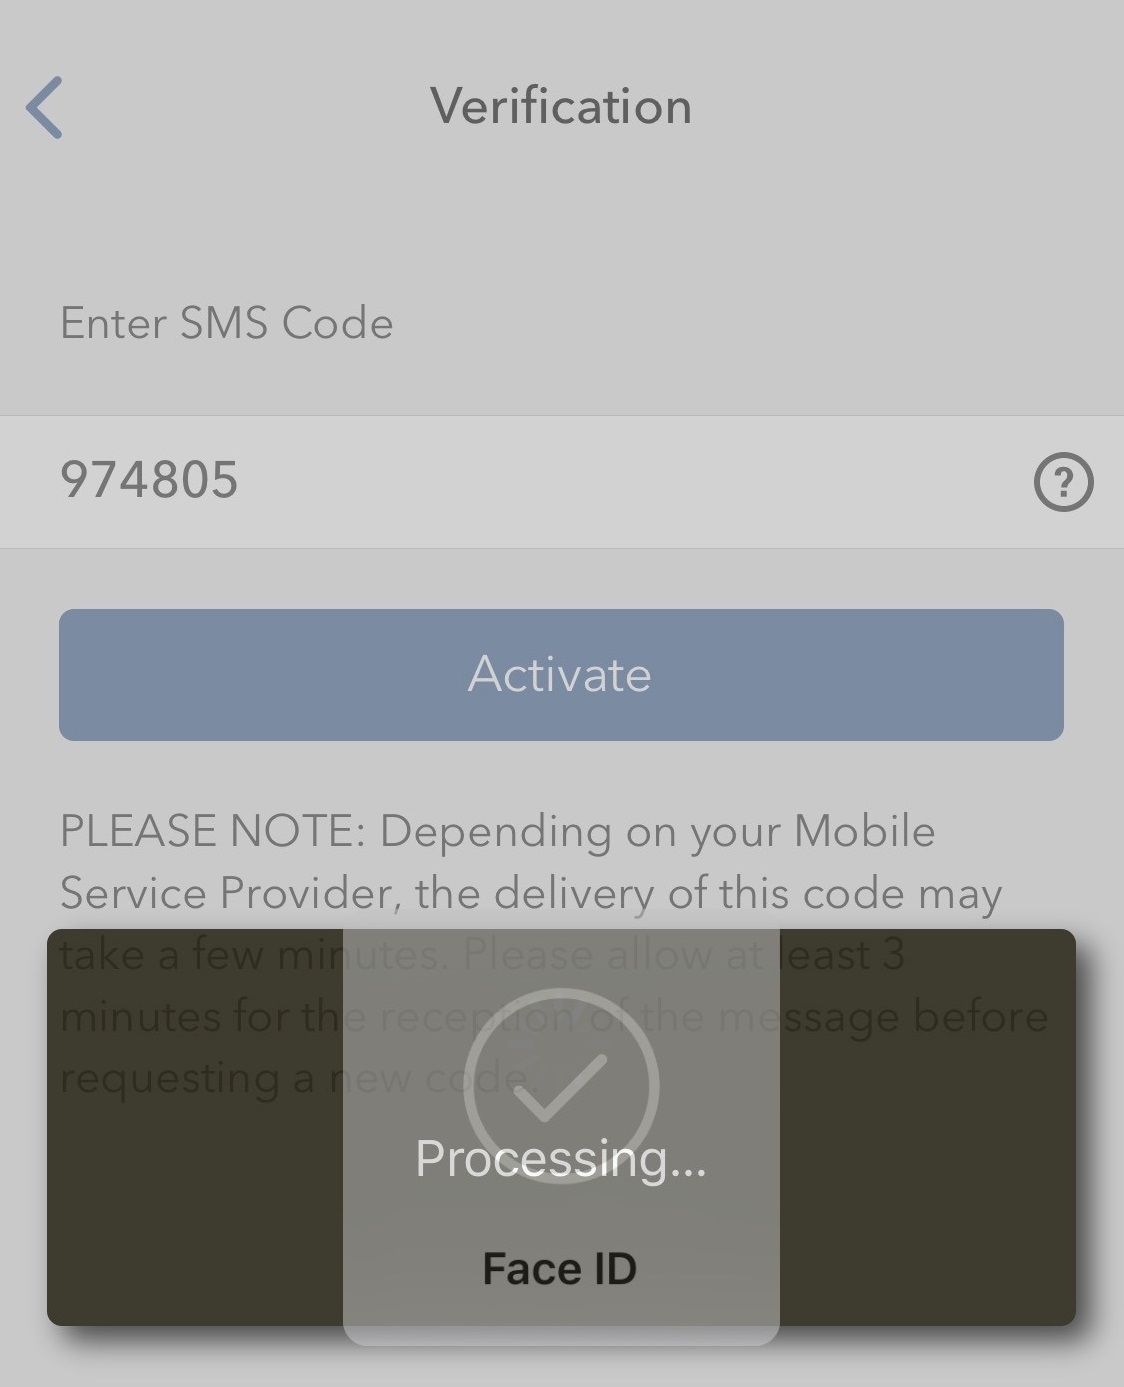
6. A continuación, aparecerá un mensaje de confirmación conforme se ha realizado el proceso de activación correctamente. Por último, pulse Hecho para completar el procedimiento (Figura 12).
Figura 12.
.jpeg)

