How to set up sFTP for using Certificate Authentication on Linux
These instructions apply to users who are receiving their statements via sFTP. If you elected to receive your statements via sFTP, you would first need to generate an RSA Key pair.
There are many Linux distributions and there are multiple methods to access the IBKR sFTP server. sFTP clients such as Filezilla can be used. In this article we explain how to realize the connection to the IBKR FTP server using Ubuntu Linux and Filezilla.
1. On your Linux machine, click on the Applications icon in the bottom left corner of you screen.
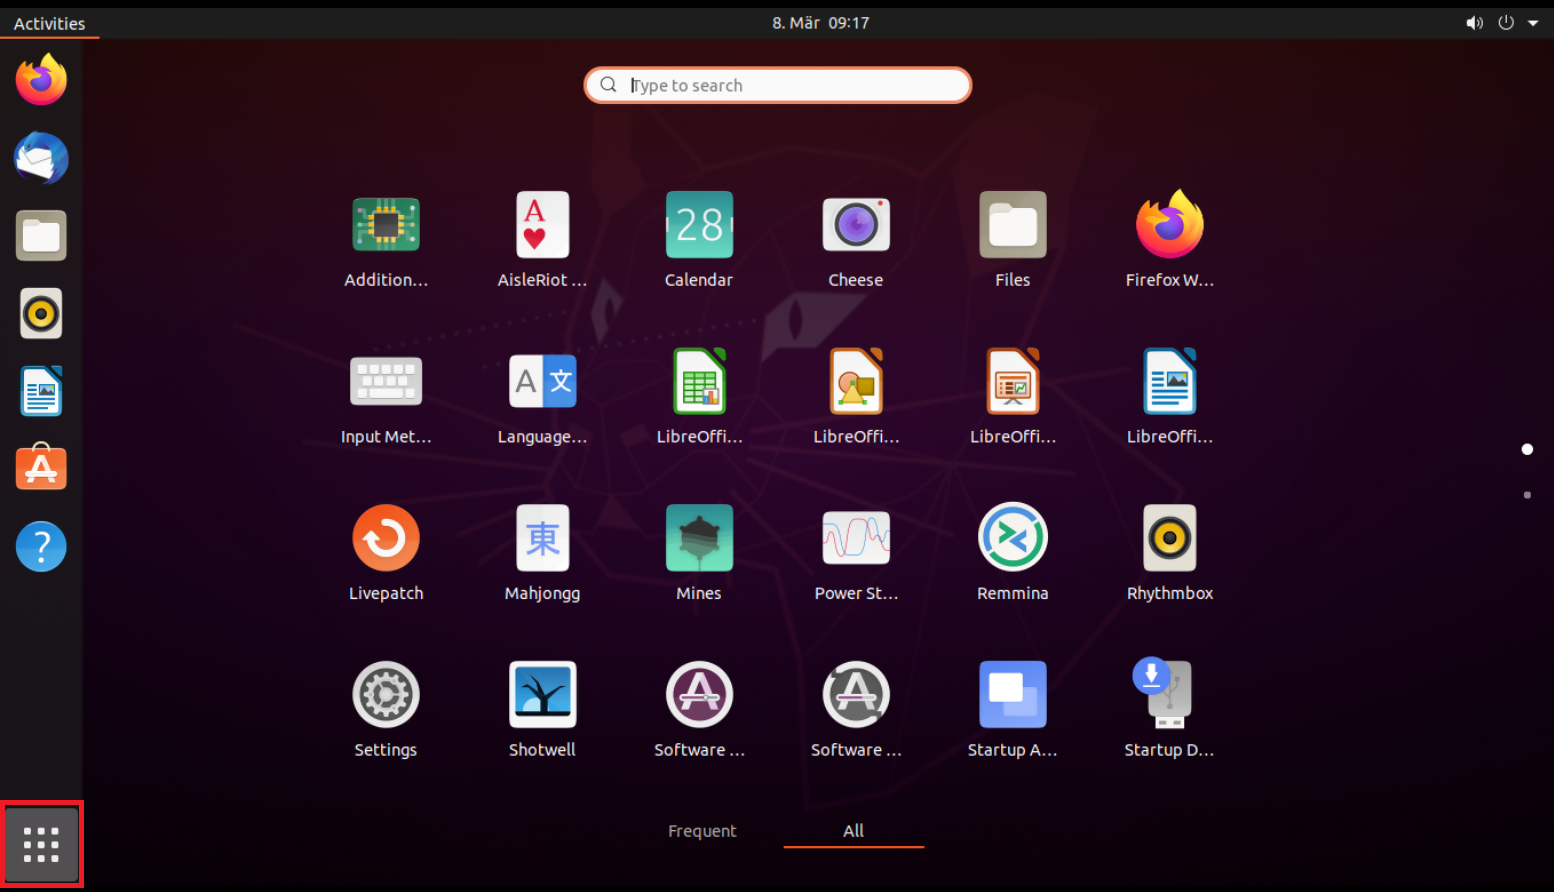
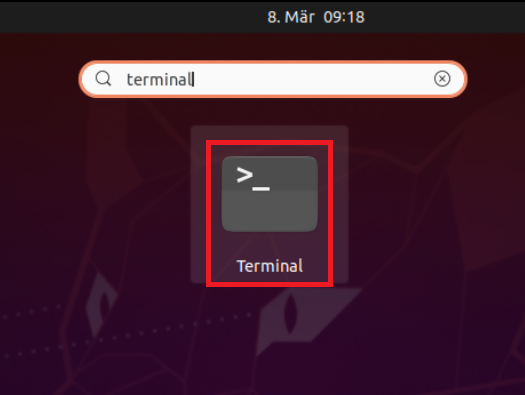
2. In the search box, type terminal and then click on the Terminal icon in the search results.
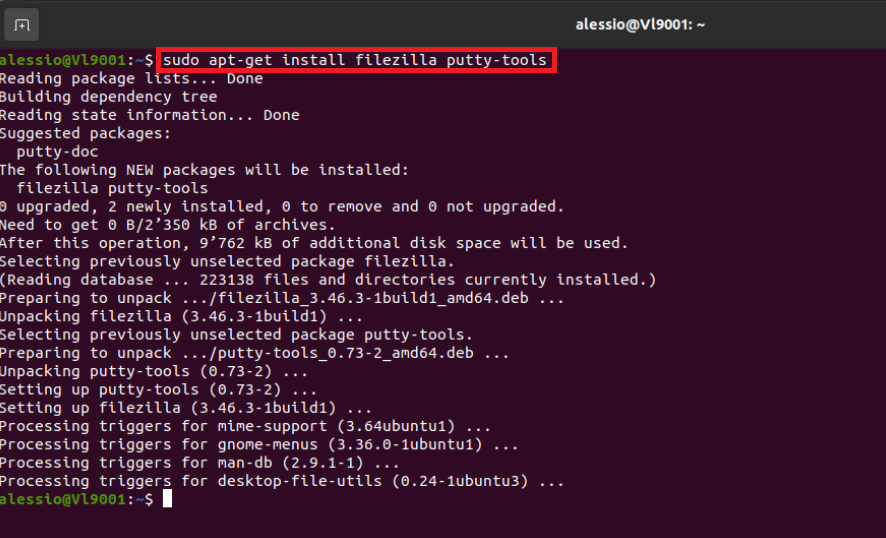
3. In the Terminal window, type sudo apt-get install filezilla putty-tools in order to install the required software. Enter your sudo password when requested.
4. Once the software installation is complete, type puttygen -t rsa -b 2048 -o privatekey.ppk in order to generate the RSA Key pair.
You will be asked to enter a passphrase and type it again to confirm.
PLEASE NOTE: Keeping a secure copy of this password is essential. Any loss of this password will require the whole process to be repeated.

5. Type puttygen -L privatekey.ppk -o public.key in order to export the public part of the Key pair to the file public.key

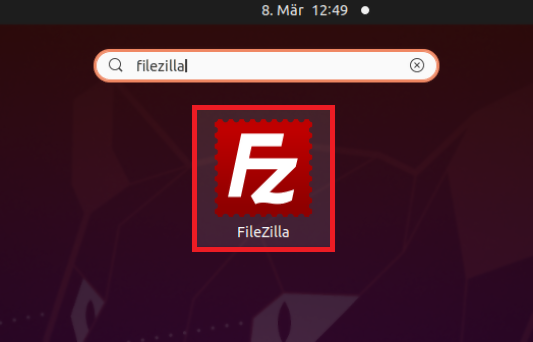
7. In the search box, type FileZilla and then click on the FileZilla icon in the search results.
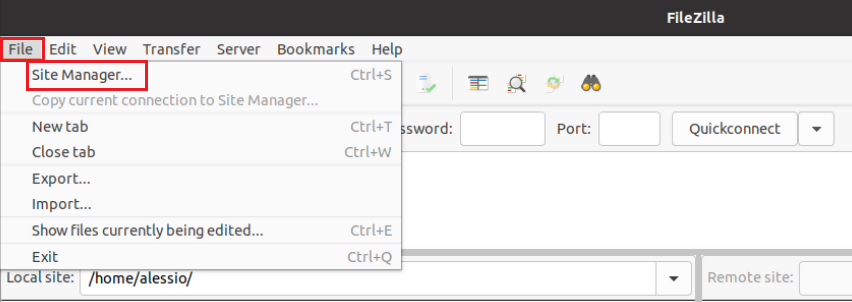
8. Click on the FileZilla top menu File -> Site Manager...
9. In the Site Manager window, click on the button New site to create a new connection.
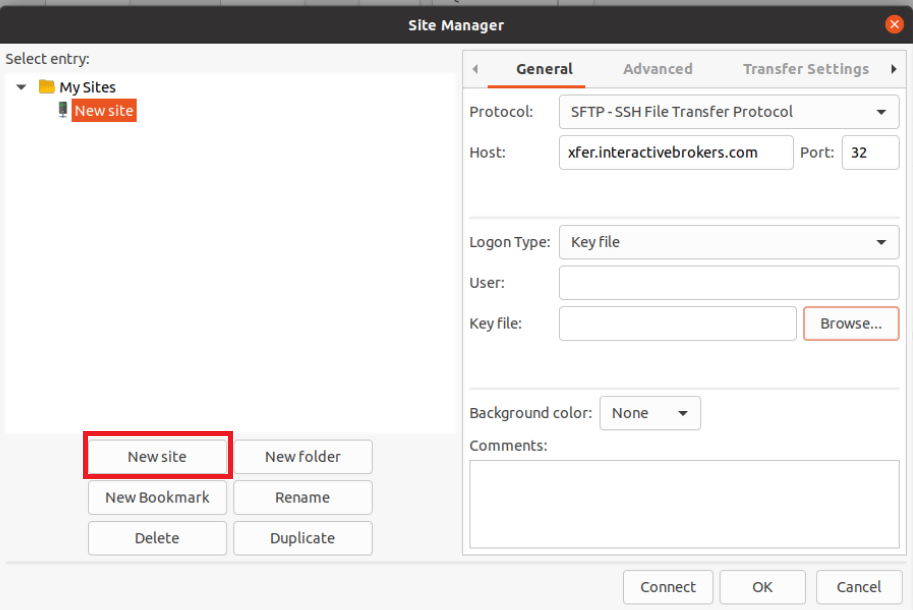
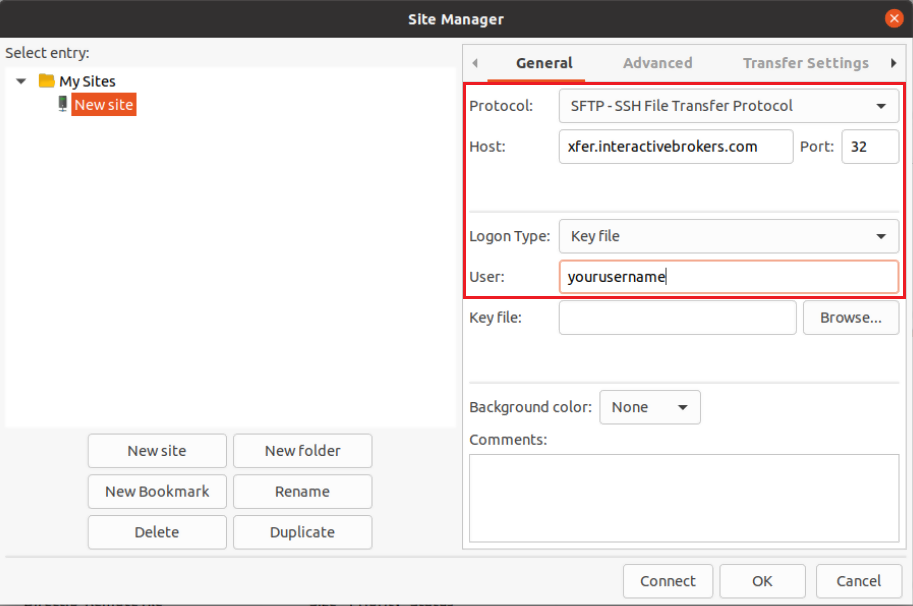
10. In the right panel (called General):
- Select SFTP - SSH File Transfer Protocol as Protocol
- Enter xfer.interactivebrokers.com in the Host field
- Enter 32 in the Port field
- Select Key file as Logon Type
- Enter the username provided to you by Interactive Brokers in the User field
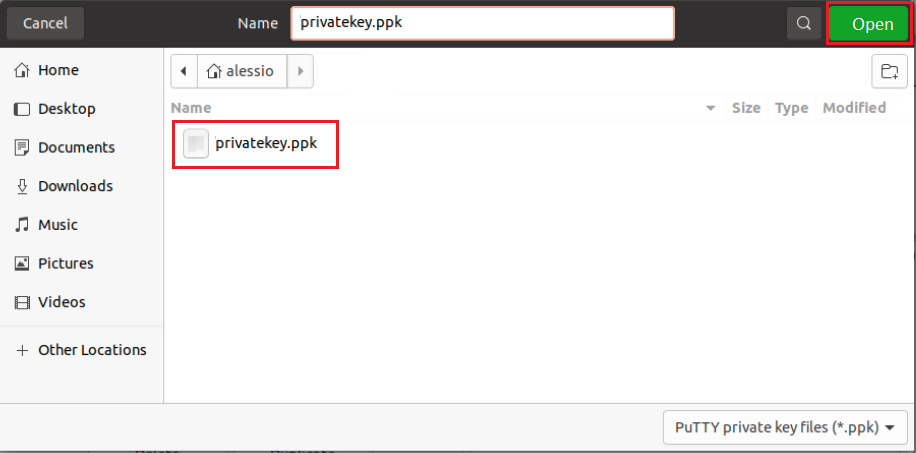
11. Click on Browse next to the Key file field.
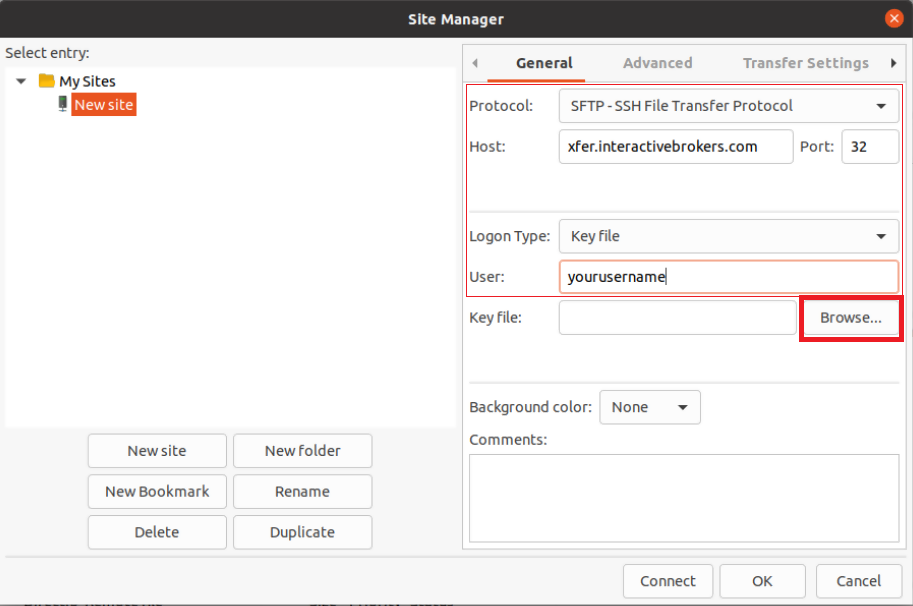
12. Move to the folder where your Key pair was created (normally your user folder: /users/yourusername/). Select the file privatekey.ppk and click on the Open button. This will set it as the Key file in your connection parameters.
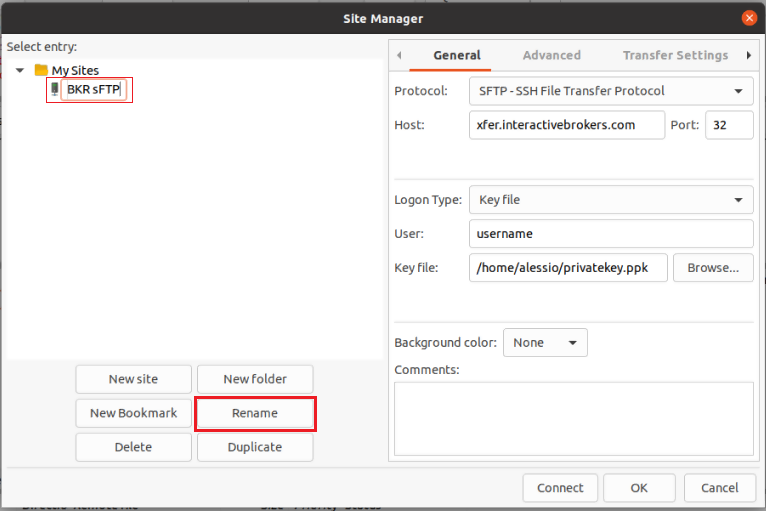
13. Click on Rename and select a name of your preference for this connection (e.g. IBKR sFTP). Press Enter to confirm the name.
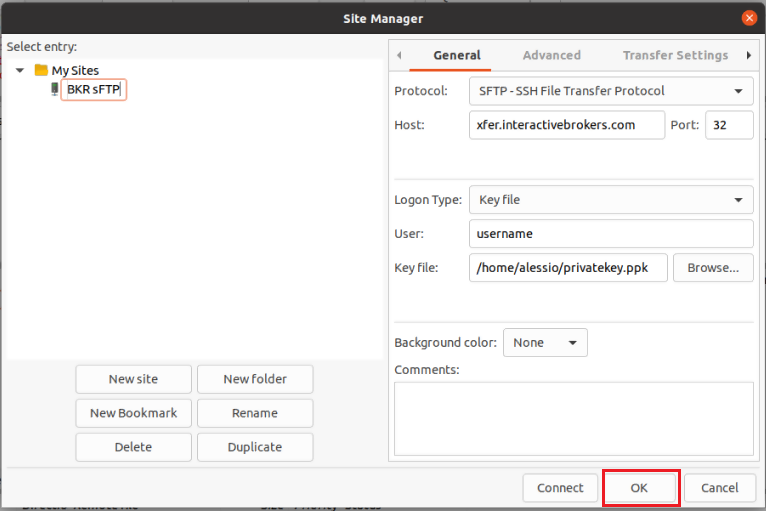
14. Click on OK to save your connection parameters.
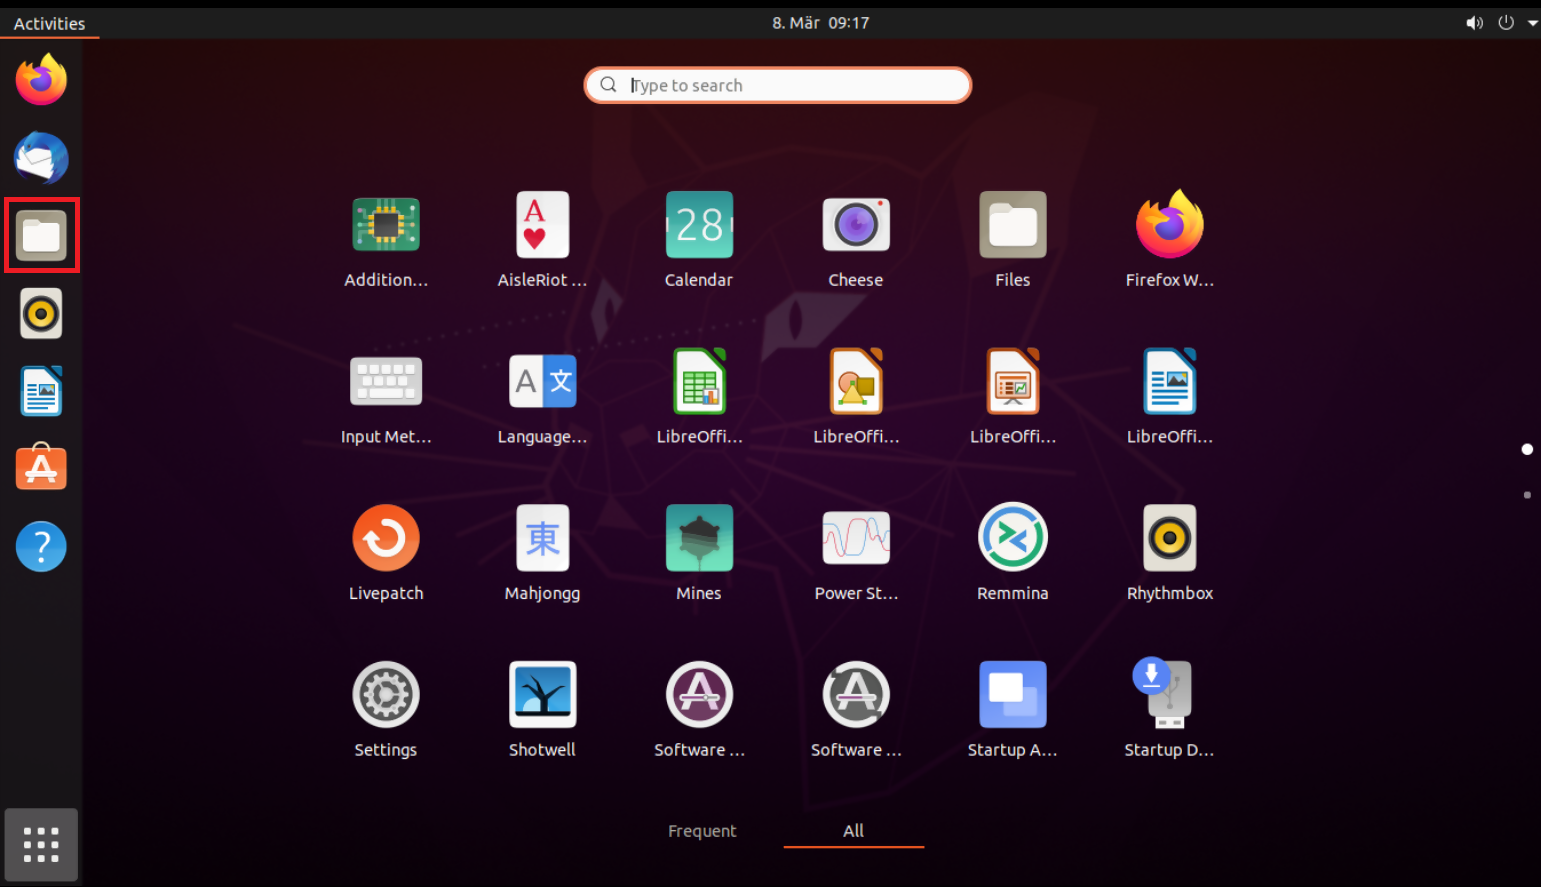
15. Click on the folder icon on the left hand toolbar of your Desktop. This will launch the File application.
16. Move to the folder where you saved your Key pair (normally your user folder: /users/yourusername/). Right click on the file public.key and select Send to...
The file will be attached to an empty email. Send the email to the Reporting Integration Team, as per IBKB3842.
Important Note: do NOT send us your private key. Send us only your public one
Once IBKR has configured the parameters for your connection on our servers, you will be notified. After that, you will be able to access your sFTP repository by using the Site connection you have created in FileZilla. In case you have not yet set up a Site connection, please follow the steps from 6. to 14. which are a prerequisite to the below steps:
1. Click on the Applications icon in the bottom left corner of you screen.

2. In the search box, type FileZilla and then click on the FileZilla icon in the search results.
3. On the FileZilla top toolbar, click the down arrow icon and select the Site connection you previously created (e.g. IBKR sFTP)

4. FileZilla will now establish a connection to our sFTP Server and show the files present in your repository.
Common issues and solutions
A. The Login Credentials Provided are Incorrect
-
Ensure the correct login details are being used to connect to the sFTP server. The username and password you are entering should match the ones you have received from the Reporting Integration Team.
-
Confirm you have configured your sFTP Client to use the Private Key file for the logon authentication (see steps 9. and 10. of the above procedure.)
B. Server Refused Our Key
-
Try accessing the sFTP server using a different Client (CyberDuck, ect.)
-
Ensure the Private Key file being used to Authenticate the server login attempt is related to the Public Key you originally sent to the Reporting Integration Team.
-
Should the above checks be unable to resolve the issue, please generate a new RSA Public/Private Key pair and send only the Public part to the Reporting Integration Team, as per IBKB3842.
C. Connection Timed Out
-
In case you have an antivirus or a security software installed on your machine, make sure it is not blocking the FTP connection attempt. Normally, security software allows to set up exceptions for specific connections in order to whitelist them.
-
Verify that the public IP Address of the machine running the sFTP client, is the same you have originally provided to the Reporting Integration Team for being whitelisted. You can discover your public IP Address by searching the Internet for “what is my IP”. If your current IP Address is not the same you provided to us, please send it to our Reporting Integration Team for being whitelisted.
-
Ask your network administrator/s to confirm that your firewall allows both incoming and outgoing traffic from/to xfer.interactivebrokers.com on port TCP 32.
-
Should the above steps be unable to resolve the issue, please generate a new RSA Public/Private Key pair and send only the new Public part to our Reporting Integration Team, as per IBKB3842.
References
KB3968 - Generate a key pair using GPG for Windows
KB4205 - Generate a key pair using GPG Suite on macOS
KB4108 - Decrypt your Reports using GPG for Windows
KB4210 - Decrypting Reports using your PGP Key pair on macOS
KB4407 - Generate RSA Key Pair on Windows
KB3968 - Generate a key pair using GPG for Windows
KB4205 - Generate a key pair using GPG Suite on macOS
KB4108 - Decrypt your Reports using GPG for Windows
KB4210 - Decrypting Reports using your PGP Key pair on macOS
KB4407 - Generate RSA Key Pair on Windows
KB4578 - How to Access your Reports using FTP on Windows
KB4580 - How to Access your Reports using FTP on MacOS
KB4409 - How to set up sFTP for using Certificate Authentication on Windows
KB4410 - How to set up sFTP for using Certificate Authentication on macOS
KB4411 - How to backup your public/private Key pair
KB4323 - How to transfer your public/private key pair from one computer to another
KB4410 - How to set up sFTP for using Certificate Authentication on macOS
KB4411 - How to backup your public/private Key pair
KB4323 - How to transfer your public/private key pair from one computer to another
Exchange name change
Overview:
Interactive Brokers is completing an effort to update and consolidate exchange names where appropriate. When this effort is complete, the following updates will be in effect:
- GLOBEX and CMECRYPTO will be consolidated to a single exchange, ‘CME’
- ECBOT will be updated to ‘CBOT’
- COMEX listed metals (previously reflected as NYMEX) will be updated to exchange ‘COMEX’
- NYMEX, no change
Given the breadth of products involved, we are migrating in four waves based on underlying products:
| Key | Effective Trade Date | Products |
| Wave 1 | October 30, 2022 | GLOBEX: ZAR, LB, DA, IXE |
| Wave 2 | November 6, 2022 | GLOBEX: EMD, BRE, CHF, SOFR3, E7, NKD CMECRYPTO: BTCEURRR, ETHEURRR, MET |
| Wave 3 | November 13, 2022 | GLOBEX: All remaining products CMECRYPTO: All remaining products ECBOT: ZO, ZR, 2YY, 30Y NYMEX: ALI, QI, QC |
| Wave 4 | December 4, 2022 | ECBOT: All remaining products NYMEX: All remaining "Metal" products |
I am trading via API, how does this impact me?
For API clients the only requirement would be to provide a new exchange name, for example: exchange=”CME”, for existing contracts for the affected exchanges.
Old exchanges names will no longer be available after the change.
More details can be found within our FAQs through the following link: Upcoming Exchange name Changes
Note: If you are using a third party software connected to TWS or IB Gateway and that software does not recognize the new contract definitions, please contact the third party vendor directly.
Cómo cargar un paquete de diagnóstico de las plataformas de IBKR
Overview:
Algunas cuestiones relacionadas con la asistencia técnica requieren que se carguen los archivos de diagnóstico y los registros junto con capturas de pantalla. La información ayudará a nuestro equipo a investigar y resolver el problema que usted está presentando.
El siguiente artículo le proporciona instrucciones detalladas acerca de cómo subir los archivos de diagnóstico y los registros desde varias plataformas de negociación de Interactive Brokers.
Nota: IBKR no monitoriza el repositorio de paquetes de diagnóstico durante el día. En caso de decidir subir un paquete de diagnóstico de manera espontánea, sin la indicación de Interactive Brokers, informe a nuestro servicio de atención al cliente al respecto mediante un tique en el Centro de mensajes o una llamada telefónica. De lo contrario, el error que ha informado pasará desapercibido.
Haga clic en uno de los siguientes enlaces, de acuerdo con la plataforma que esté utilizando:
-
IBKR Mobile (Android)
-
IBKR Mobile (iOS)
1. Inicie sesión en TWS e intente reproducir el problema que está presentando.
2. Pulse ‘Ayuda’ en la esquina superior izquierda y seleccione ‘Subir diagnósticos’. Como alternativa, en función de su sistema operativo, podrá utilizar las siguientes combinaciones de teclas:
- para los sistemas operativos Windows y Linux: pulse Ctrl+Alt+Q
- para Mac: pulse Cmd+Option+H

3. Se mostrará la ventana ‘Subir diagnósticos’. Puede ingresar el motivo por el cual desea subir los diagnósticos en el cuadro de texto.
4. En caso de que un representante de Interactive Brokers le hubiera indicado incluir los registros de días anteriores o seleccionar opciones específicas al subir los diagnósticos, haga clic en la lista desplegable en la esquina superior derecha, seleccione ‘Vista avanzada’ y marque las casillas correspondientes entre las opciones que parecerán en la parte inferior izquierda.
5. Asegúrese de que la casilla ‘Incluir captura de pantalla de todo el escritorio’ esté marcada y pulse ‘Enviar’.

6. No realice ninguna acción ni actividad en su ordenador hasta que vea la ventana emergente que figura a continuación, la cual confirma que los diagnósticos se subieron correctamente.
A) Si se encuentra en la pantalla de inicio de sesión:
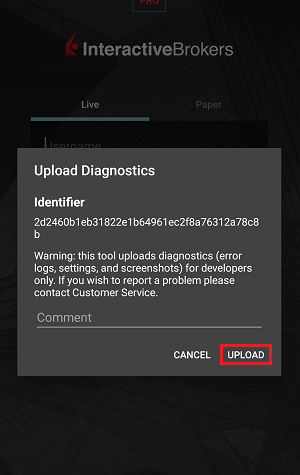
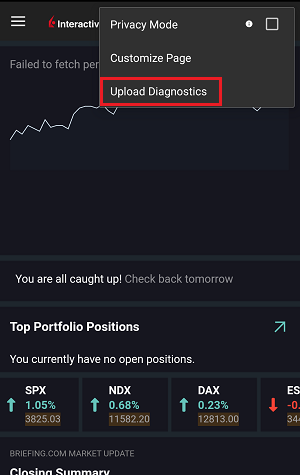
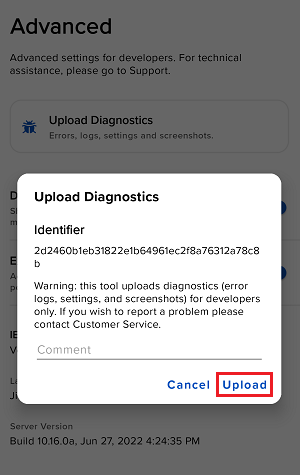
1. Pulse el icono de los tres puntos en la esquina superior derecha y seleccione ‘Subir diagnósticos’.
2. Agregue su nombre de usuario en la sección de comentarios y pulse ‘Subir’.
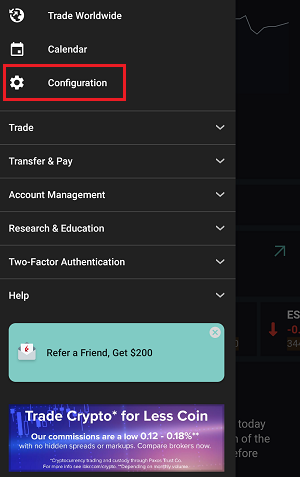
1. Pulse el icono de las tres líneas en la esquina superior izquierda para abrir el menú.
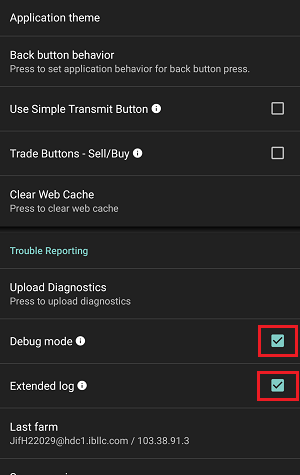
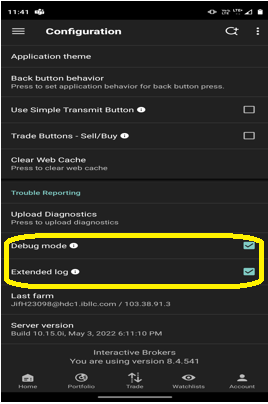
2. Pulse ‘Configuración’> ‘Notificación de errores’> active la casilla junto a ‘Modo de depuración’.
3. Si un representante de Interactive Brokers lo hubiera solicitado, active también la casilla junto a ‘Historial extendido’.
5. Pulse el icono de los tres puntos en la esquina superior derecha de la pantalla y seleccione ‘Subir diagnósticos’.
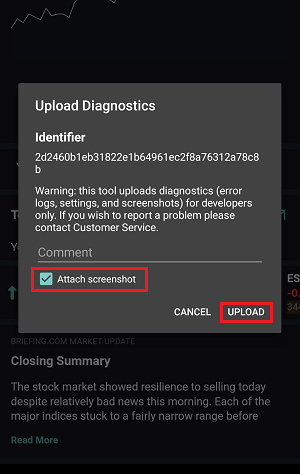
6. Introduzca sus comentarios en la sección de comentarios y active la casilla junto a ‘Adjuntar captura de pantalla’. A continuación, pulse ‘Cargar’.
A) Si se encuentra en la pantalla de inicio de sesión:
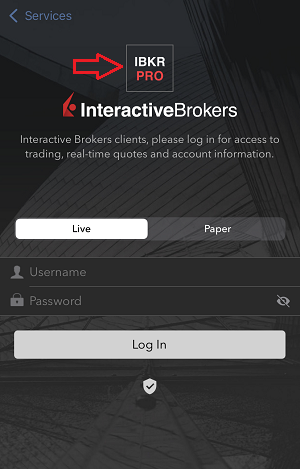
1. Pulse cinco veces en una secuencia rápida sobre el logo de IBKR para abrir el menú de prueba.
2. En Configuración, active el botón de alternar junto a ‘Modo de depuración’.
3. Pulse ‘Enviar’ junto a ‘Subir diagnósticos’.
4. Ingrese su nombre de usuario en la sección de comentarios y pulse ‘OK’.
1. Tome capturas de pantalla que muestren el problema que está presentando directamente en el teléfono (presione a la vez los botones físicos Encendido + Subir volumen).
2. Pulse la opción ‘Más’ en la esquina inferior derecha de la pantalla.
3. Pulse ‘Configuración’ y expanda la sección ‘Notificación de errores’.
4. Active el botón de alternar junto a ‘Modo de depuración’ y, al lado de ‘Subir diagnósticos’, pulse ‘Enviar’.
5. Se mostrará la página ‘Enviar diagnósticos’. Introduzca sus comentarios en la sección de comentarios.
6. Pulse el botón ‘Adjuntar imagen’ para adjuntar las capturas de pantalla del problema que guardó anteriormente en su carrete de fotos.
7. Pulse ‘Enviar’.
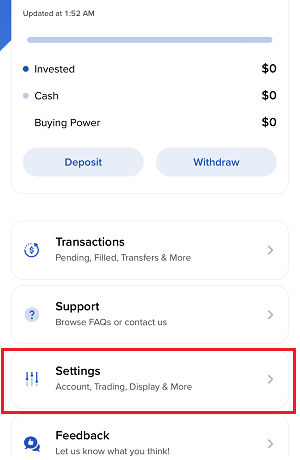
1. Inicie sesión en la aplicación.
2. Pulse el icono de usuario en la esquina superior izquierda y seleccione ‘Configuración’.
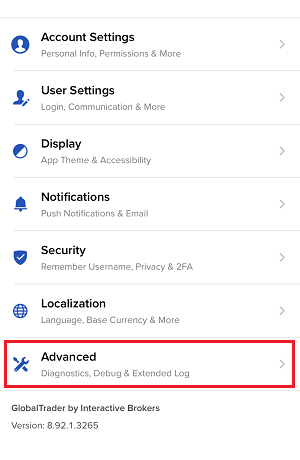
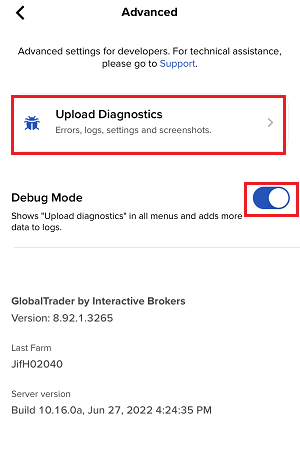
3. Pulse la opción ‘Avanzado’ y active el botón de alternar junto a ‘Modo de depuración’.
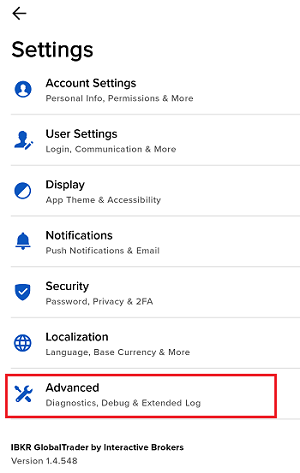
4. Si un representante de Interactive Brokers lo hubiera solicitado, active también la casilla junto a ‘Historial extendido’.

5. Verá la ventana emergente ‘Subir diagnósticos’. Ingrese sus comentarios en la sección de comentarios y pulse ‘Cargar’.
Nota: En caso de necesitar enviar capturas de pantalla de IMPACT o IBKR GlobalTrader para Android, tendrá que adjuntarlas a un tique web en el Centro de mensajes, según lo indicado en el siguiente video: IBKB1071
1. Inicie sesión en la aplicación.
2. Tome una o varias capturas de pantalla que muestren el problema que está presentando directamente en el teléfono (presione los botones físicos Encendido + Subir volumen de manera simultánea).
3. Luego pulse el icono de usuario en la esquina superior izquierda y seleccione ‘Configuración’.
4. Pulse ‘Avanzado’.
5. Active el botón de alternar junto a ‘Modo de depuración’ y pulse junto a ‘Subir diagnósticos’.
6. Se mostrará la pantalla ‘Enviar diagnósticos’
7. Ingrese sus comentarios en el campo correspondiente y pulse ‘Adjuntar imagen’ para adjuntar las capturas de pantalla que guardó anteriormente en su carrete de fotos.
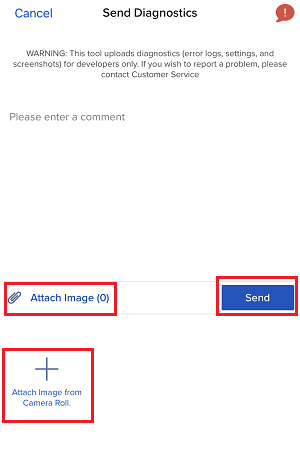
8. Pulse ‘Enviar’.
Podrá capturar un seguimiento de diagnóstico para Client Portal al seguir las instrucciones que figuran en el siguiente artículo: IBKB3512.
How to Upload a Diagnostic Bundle from an IBKR Platform
Overview:
Some support related issues require diagnostics files and logs to be uploaded along with screenshots. The information will help our team to investigate and resolve the issue that you are experiencing.
This article will help you with detailed steps on how to upload diagnostics files and logs from various Interactive Brokers’ trading platforms.
Note: IBKR does not monitor the diagnostic bundle repository throughout the day. Should you spontaneously decide to upload a diagnostic bundle, without being instructed by Interactive Brokers, please inform our Client Services via Message Center ticket or phone call otherwise your error report will go unnoticed.
Please click on one of the links below, according to the platform you are using:
-
IBKR Mobile (Android)
-
IBKR Mobile (iOS)
1. Log in to TWS and try to replicate the issue that you are experiencing
2. Press ‘Help’ at the top left corner and select ‘Upload Diagnostics’. Alternatively, depending on your Operating System, you can use the following keyboard combinations
- For Windows and Linux Operating system: Press Ctrl+Alt+Q
- For Mac: Press Cmd+Option+H
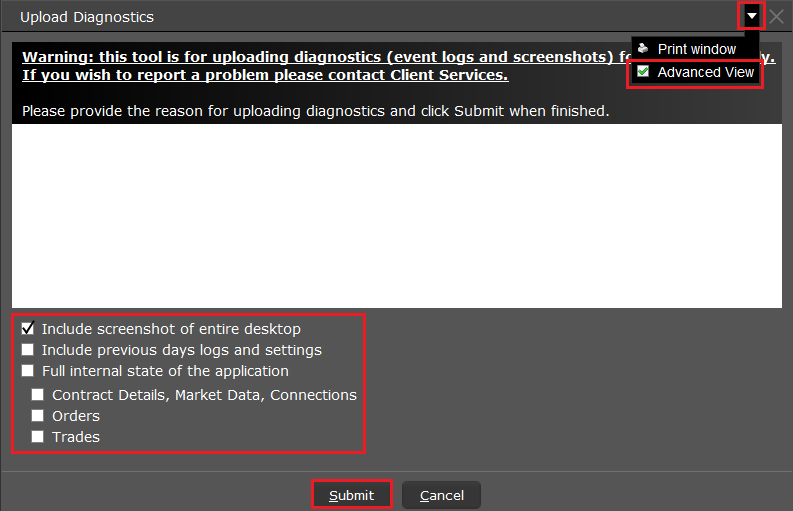
3. The ‘Upload Diagnostics’ window will appear. You may enter the reason for uploading diagnostics in the text box
4. If an Interactive Brokers representative has instructed you to include previous days logs or select specific options when uploading diagnostics, click the dropdown on the right top corner, select ‘Advanced View’ and tick the correspondent checkboxes which will appear on the bottom left part
5. Make sure the checkbox ‘Include screenshot of entire desktop’ is enabled and press ‘Submit’
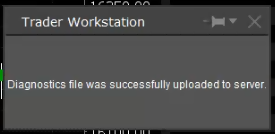
6. Do not perform any action/activity on your computer until you see the below pop-up, confirming that the diagnostics have been successfully uploaded
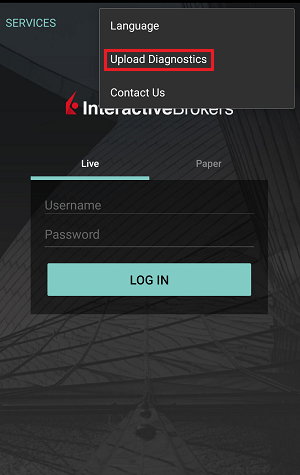
A) If you are at the login Screen:
1. Tap the three dots icon in the right top corner and select ‘Upload Diagnostics’
2. Add your username in the comment section and tap ‘Upload’
1. Tap the three lines icon in the top left corner to open the menu
2. Tap ‘Configuration’> ‘Trouble Reporting’> enable the check box next to ‘Debug mode’
3. If requested by an Interactive Brokers representative, enable the check box next to ‘Extended Log’ as well
5. Tap the three dots icon in the top right corner of the screen and select ‘Upload Diagnostics’
6. Enter your comments in comment section and enable the checkbox next to ‘Attach Screenshot’. Then tap ‘Upload’
A) If you are at the login Screen:
1. Tap five times in a quick sequence on the IBKR logo to open the testing menu
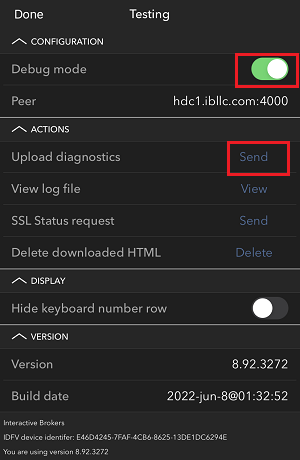
2. Under Configuration, enable the toggle button next to ‘Debug mode’
3. Tap ‘Send’ next to ‘Upload diagnostics’
4. Enter your username in the comments section and tap ‘OK’
1. Capture screenshots displaying the issue you are experiencing directly on the phone (pressing together the physical buttons Power + Volume Up)
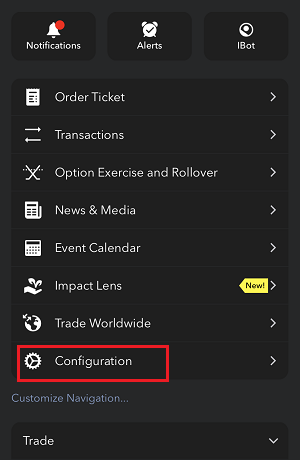
2. Tap the option ‘More’ in the right bottom corner of the screen
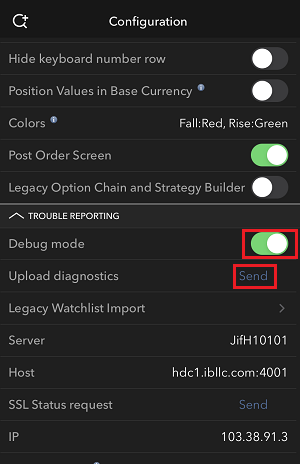
3. Tap ‘Configuration’ and expand the section ‘Trouble Reporting’
4. Enable the toggle button next to ‘Debug mode’ and, next to ‘Upload diagnostics’, tap ‘Send’
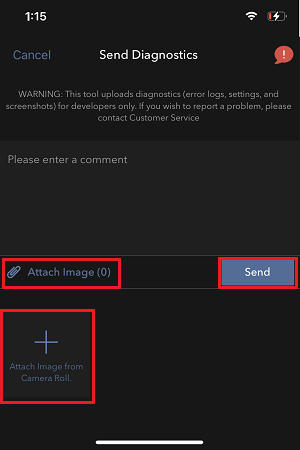
5. The ‘Send Diagnostics’ page will appear. Enter your comments in comment section
6. Tap the ‘Attach Image’ button to attach screenshots of the issue that you have previously saved in your camera roll
7. Tap ‘Send’
1. Log in to the app
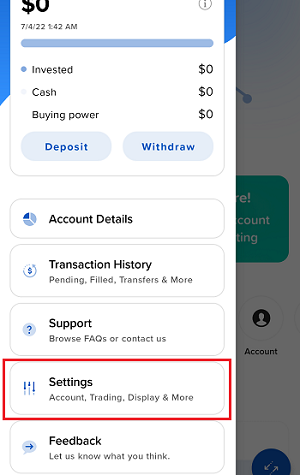
2. Tap the User icon in the top left corner and select ‘Settings’
3. Tap the option ‘Advanced’ and enable the toggle button next to ‘Debug mode’
4. If requested by an Interactive Brokers representative, enable as well the toggle button next to ‘Extended Log’
5. You will see an ‘Upload Diagnostics’ pop-up. Enter your comments in the field and tap ‘Upload’
Note: If you need to send us screenshots of IMPACT or IBKR GlobalTrader for Android, you would have to attach them to a Message Center web ticket, as explained in IBKB1071
1. Log in to the app
2. Capture one or more screenshots displaying the issue you are experiencing directly on the phone (pressing the physical buttons Power + Volume Up simultaneously)
3. Now tap the User icon in the top left corner and select ‘Settings’
4. Tap ‘Advanced’
5. Enable the toggle button next to ‘Debug mode’ and tap ‘Upload Diagnostics’
6. The ‘Send Diagnostics’ screen will appear
7. Enter your comments in the field and tap ‘Attach Image’ to attach the screenshot/s you previously saved in your camera roll
8. Tap ‘Send’
A diagnostic trace for Client Portal can be captured following the steps on IBKB3512
Cómo generar un archivo ".har"
Background:
Cuando se busca solución a un problema importante en la página web, a veces es necesario que nuestro equipo de atención al cliente obtenga información adicional sobre la comunicación de su navegador. En estos casos, se le puede solicitar que cree y proporcione un archivo .har. Este archivo contiene información adicional sobre las solicitudes de red enviadas y recibidas por su navegador. El navegador puede generar dicho archivo al grabar el contenido, la escala de tiempo y el estado de las solicitudes y respuestas HTTP/HTTPS mientras ocurre el problema.
En este artículo explicamos cómo generar un archivo .har. En la lista que aparece a continuación, haga clic en el navegador que usted utiliza:
Para generar el archivo HAR en Google Chrome:
1. Abra Google Chrome y vaya a la página donde está ocurriendo el problema.
2. Pulse CRTL +SHIFT + I en su teclado. Como alternativa, haga clic en el icono de menú de Chrome (los puntos suspensivos verticales en la parte superior derecha de la ventana de su navegador) y seleccione Más herramientas (More Tools) > Herramientas para desarrolladores (Developer Tools).
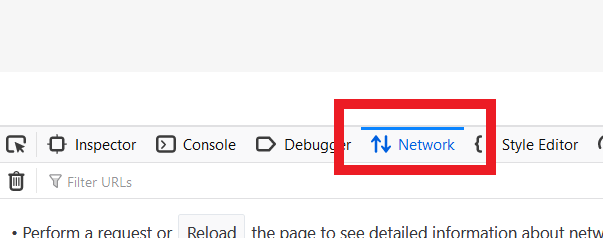
3. Las Herramientas para desarrolladores se abren en un panel anclado que se muestra en la parte lateral o inferior de Chrome. Seleccione la pestaña Network (Red) (Figura 1.).
Figura 1.
.png)
4. Busque el botón redondo Record (Grabar) en la esquina superior izquierda de la barra de herramientas en las Herramientas para desarrolladores y asegúrese de que esté rojo. Si está gris, haga clic en él una vez para empezar a grabar o simplemente pulse CTRL+E (Figura 2.).
Figura 2.

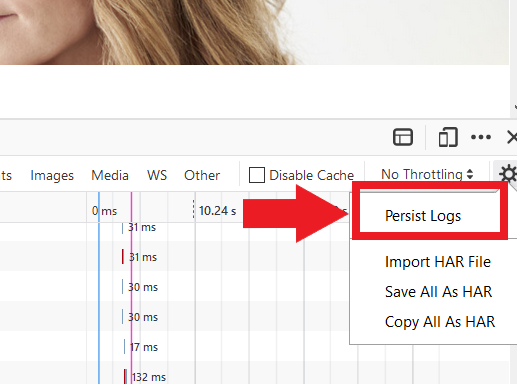
5. Active la casilla Preserve log (Conservar registro) (Figure 3.).
Figura 3.
.png)
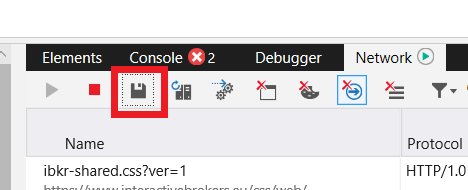
6. Haga clic en el botón Clear (Borrar) para borrar los registros existentes. El botón Clear (Borrar) tiene un icono de parada y está ubicado a la derecha del botón Record (Grabar) (Figura 4.).
Figura 4.
![]()
7. Reproduzca el problema que está presentando mientras se graban las solicitudes de red.
8. Una vez reproducido el problema, haga clic derecho en cualquier lugar en la lista de solicitudes de red grabadas, seleccione Guardar todo como HAR con contenido y guarde el archivo en la ubicación de su preferencia en su ordenador (p. ej. en su escritorio).
9. Desde el Client Portal de IBKR, vaya al Centro de mensajes y cree un nuevo tique web (o utilice uno ya creado si procede).
10. En el tique web, adjunte el archivo .har que generó anteriormente. En caso de que el servicio de atención al cliente de IBKR le hubiere proporcionado un número de ticker de referencia o el nombre de un representante, agregue esta información al cuerpo del mensaje.
11. Envíe el tique web.
Para generar el archivo HAR en Firefox:
1. Abra Firefox y vaya a la página donde está ocurriendo el problema.
2. Pulse F12 en su teclado. Como alternativa, haga clic en el icono de menú de Firefox (las tres líneas paralelas horizontales en la parte superior derecha de la ventana de su navegador) y seleccione Desarrollador Web > Red.
3. Las Herramientas de red para desarrolladores abren en un panel anclado que se muestra en la parte lateral o inferior de Firefox. Seleccione la pestaña Red (Network) (Figura 5.).
Figura 5.
4. Active la casilla Registros persistentes (Persists log) (Figure 6.).
Figura 6.
5. Reproduzca el problema que está presentando. La grabación de la solicitud de red comienza de manera automática.
6. Una vez reproducido el problema, haga clic derecho en cualquier lugar en la lista de solicitudes de red grabadas, seleccione Guardar todo como HAR.
7. Guarde el archivo en la ubicación de su preferencia en su ordenador (p. ej. en su escritorio).
8. Desde el Client Portal de IBKR, vaya al Centro de mensajes y cree un nuevo tique web (o utilice uno ya creado si procede).
9. En el tique web, adjunte el archivo .har que generó anteriormente. En caso de que el servicio de atención al cliente de IBKR le hubiere proporcionado un número de ticker de referencia o el nombre de un representante, agregue esta información al cuerpo del mensaje.
10. Envíe el tique web.
Para generar el archivo HAR en Microsoft Edge:
1. Abra Edge y vaya a la página donde está ocurriendo el problema.
2. Pulse F12 en su teclado. Como alternativa, haga clic en el icono de menú de Edge (los puntos suspensivos horizontales en la parte superior derecha de la ventana de su navegador) y seleccione Más herramientas (More Tools) > Herramientas de desarrollo (Developers Tools).
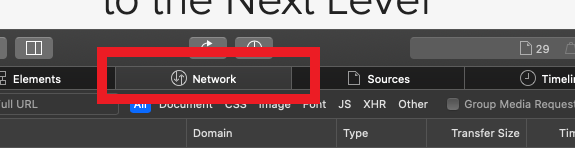
3. Haga clic en la pestaña Red (Network) (Figura 10.).
Figura 10.
.png)
4. Reproduzca el problema que está presentando mientras se graban las solicitudes de red.
5. Al terminar, haga clic en el icono de disquete (Exportar como HAR) o pulse CTRL+S (Figura 11.).
Figura 11.
6. Proporcione un nombre de archivo y una ubicación de su preferencia en su ordenador (p. ej. el escritorio). Luego haga clic en el botón Guardar.
7. Desde el Client Portal de IBKR, vaya al "Centro de mensajes" y cree un nuevo tique web (o utilice uno ya creado si procede).
8. En el tique web, adjunte el archivo .har que generó anteriormente. En caso de que el servicio de atención al cliente de IBKR le hubiere proporcionado un número de ticker de referencia o el nombre de un representante, agregue esta información al cuerpo del mensaje.
9. Envíe el tique web.
Para generar el archivo HAR en Safari:
Nota: antes de generar el archivo HAR, asegúrese de que puede ver el menú Desarrollo (Develop) en Safari. En caso de que no vea este menú, haga clic en el menú Safari, escoja Preferencias (Preferences), vaya a la pestaña Avanzado (Advanced) y active la casilla que aparece junto a Mostrar menú Desarrollo en la barra de menús.
1. Abra el menú Desarrollo y seleccione Mostrar Web Inspector o pulse CMD+ALT+I.
2. Haga clic en la pestaña Red (Network) (Figura 12.).
Figura 12.
3. Active la casilla Conservar registro (Preserve log) (Figure 13.).
Figura 13.
.png)
4. Haga clic en el icono Exportar (o pulse CMD+S), proporcione un nombre de archivo y una ubicación de su preferencia en su ordenador (p. ej. el escritorio).
5. Desde el Client Portal de IBKR, vaya al "Centro de mensajes" y cree un nuevo tique web (o utilice uno ya creado si procede).
6. En el tique web, adjunte el archivo web que generó anteriormente. En caso de que el servicio de atención al cliente de IBKR le hubiere proporcionado un número de ticker de referencia o el nombre de un representante, agregue esta información al cuerpo del mensaje.
7. Envíe el tique web.
Generate RSA Key Pair on Windows
These instructions apply to users who are receiving their statements via sFTP. If you elected to receive your statements via sFTP, you would first need to generate an RSA Key pair.
To generate an RSA Key pair:
1. Download WinSCP.
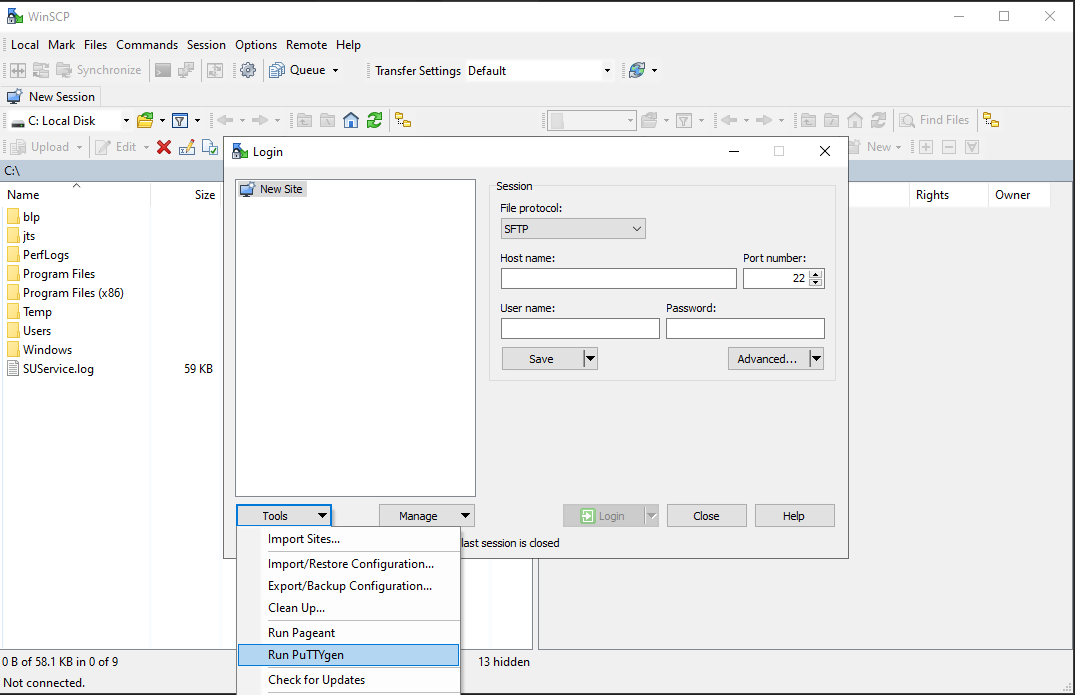
2. Run the installer and make sure to check PuTTYgen (key generator) as one of the components to install.
3. Start WinSCP and from the button Tools select Run PuTTYgen.
2. Run the installer and make sure to check PuTTYgen (key generator) as one of the components to install.
3. Start WinSCP and from the button Tools select Run PuTTYgen.
4. Once the tool PuTTYgen has been launched, click Generate. Select RSA as Type of key to generate, 2048 as Number of bits in generated key and click on the button Generate.
5. Click "Save private key" and give the file a name (like private). Leave the extension as .ppk ('ale.ppk', in the picture below is an example filename).
Important Note: do NOT save your public key yet. Save only your private one.
.png)
6. Open WinSCP, create a new connection and:
- Select SFTP as File protocol.
- Enter xfer.interactivebrokers.com in the Host name field.
- Enter 32 in the Port number field.
7. Click on the button Advanced.
8. In the Advanced Site Settings screen, left side menu, expand SSH and select Authentication. Click on the button ... at the end of the field Private Key file and open the private key you previously saved at point 5):
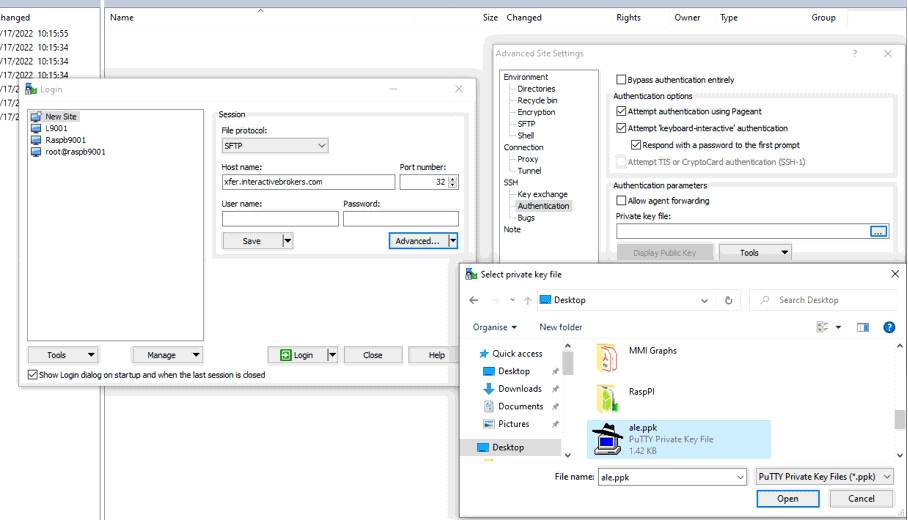
8. In the Advanced Site Settings screen, left side menu, expand SSH and select Authentication. Click on the button ... at the end of the field Private Key file and open the private key you previously saved at point 5):
9. Click on the button Display public key:
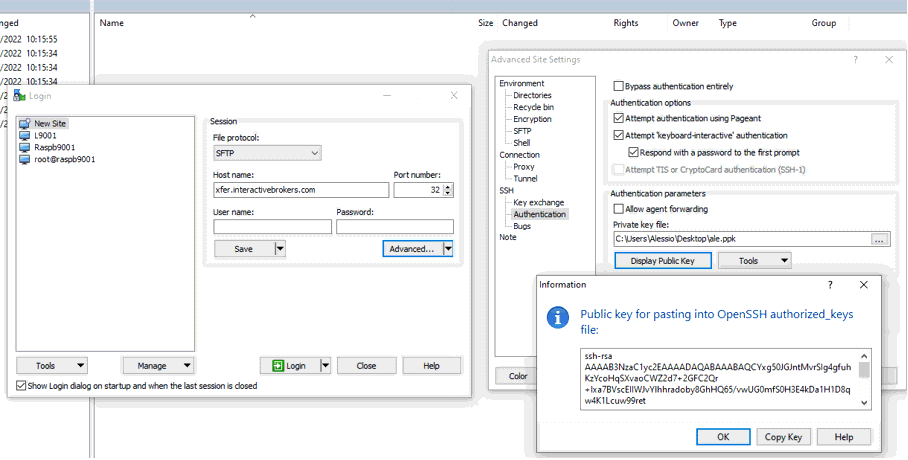
10. Click on the button Copy Key.
11. Open Notepad, press CTRL+V to paste the key string (which is one string of characters without spaces) and then save the file with the name public.key in a folder of your preference:
11. Open Notepad, press CTRL+V to paste the key string (which is one string of characters without spaces) and then save the file with the name public.key in a folder of your preference:

12. Send the file you saved at the previous step to us via Message Center ticket or email as per instructions on IBKB3842
14. Once the IBKR Sales Engineering Team has configured the parameters for your connection on our servers, you will be able to access your SFTP repository by using the connection you have created.
Related articles
KB3842 - Using GPG/RSA encryption keys to guarantee the privacy and security of your Reports
KB3968 - Generate a key pair using GPG for Windows
KB4205 - Generate a key pair using GPG Suite on macOS
KB4108 - Decrypt your Reports using GPG for Windows
KB4210 - Decrypting Reports using your PGP Key pair on macOS
KB4578 - How to Access your Reports using FTP on Windows
KB4580 - How to Access your Reports using FTP on MacOS
Transferring your Key Pair From One Computer To Another
Background:
If you need to decrypt files that were encrypted with your private Key on an additional computer, you need to copy both your private and public keys (the entire Key pair) to that computer.
Note: this tutorial assumes you have already set up a Key pair. If you need guidance to set up the Key pair please refer to this article, which is a prerequisite to the instructions below.
How to transfer your Key pair:
Please select one of the below links, according to your Operating System:
Windows
1. On the machine where the encryption keys are stored, connect a USB drive to a free USB port.
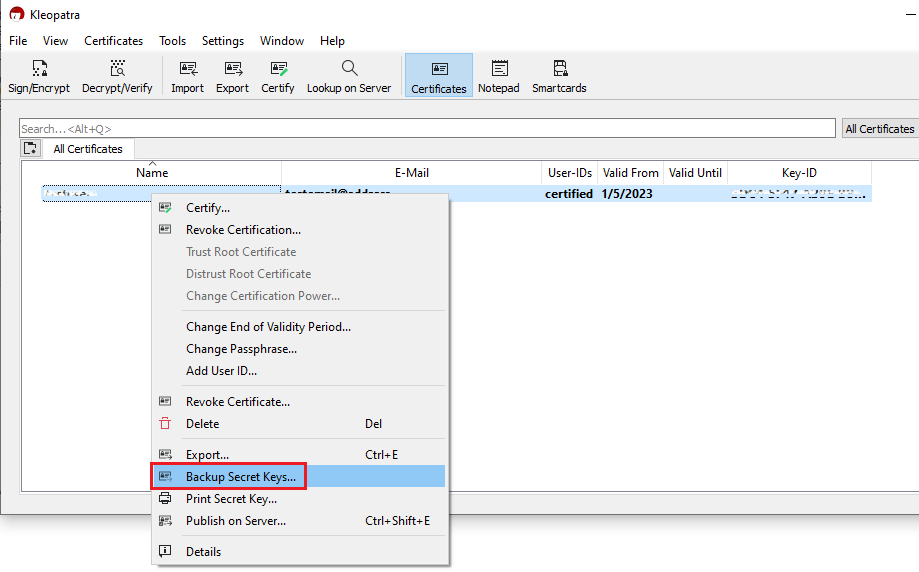
2. Launch the Kleopatra application and select the encryption key you want to transfer. Then right-click on the selection and choose Backup Secret Keys...
Note: Do NOT use Export..., as this will only export the public part of the Key while you need to have a backup of both public and private parts.
3. Select your USB drive as destination and a filename of your preference (e.g. secret-key-KEYID.asc) for your backup copy. Then click Save.

4. Enter the passphrase you have set when you created the Key and click OK.

5. A pop-up will confirm the backup has been successfully created. Click OK.
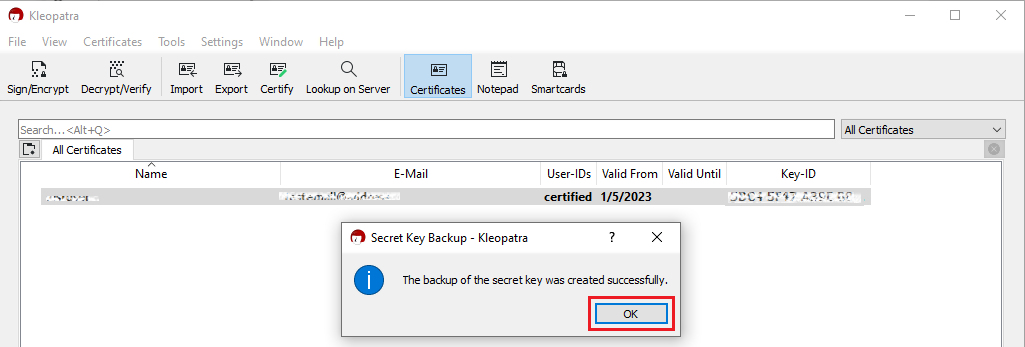
6. Eject your USB drive safely through the Windows interface to prevent data loss and connect it to a free USB port on the other computer (the one you want to transfer the key to). All the next steps have to be executed on that machine.
7. Make sure the the GPA software is installed, otherwise please install it. Make sure that the component Kleopatra is selected as one of the sub components to include in the installation.
8. Launch the Kleopatra application and click on the top menu File and select Import...
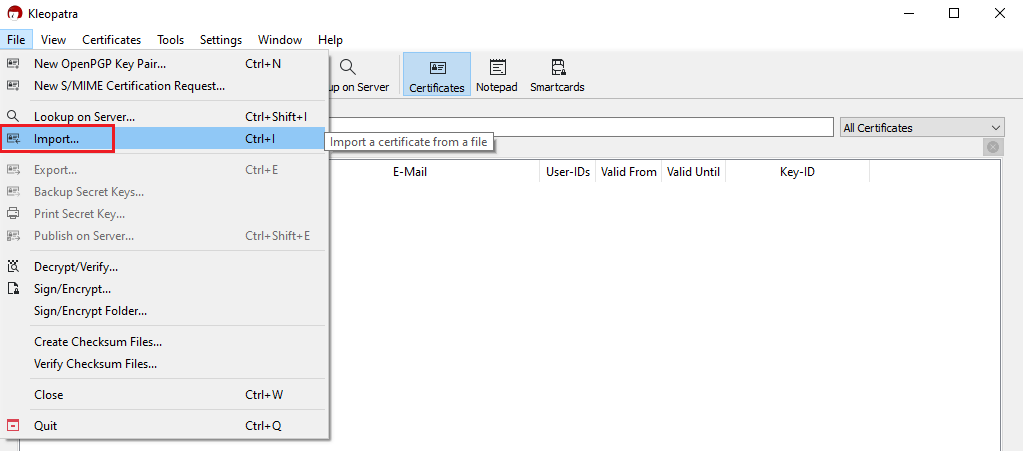
9. Click on the letter correspondent to your USB drive and select the file you have previously saved (e.g. secret-key-KEYID.asc). Then click Open.
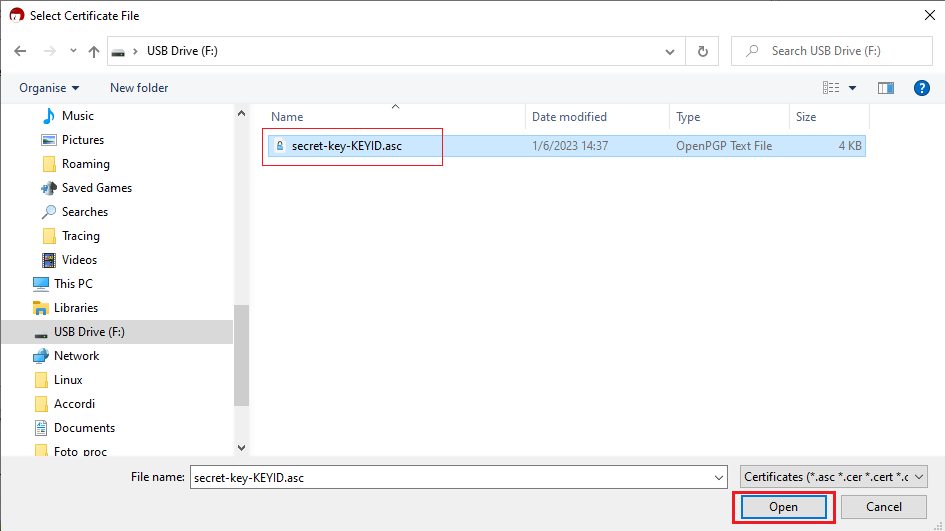
10. Click on Yes, It's Mine.
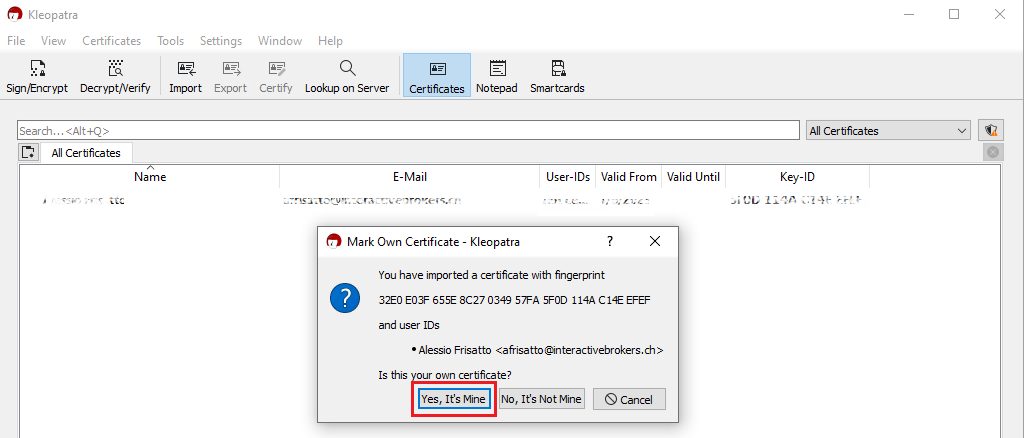
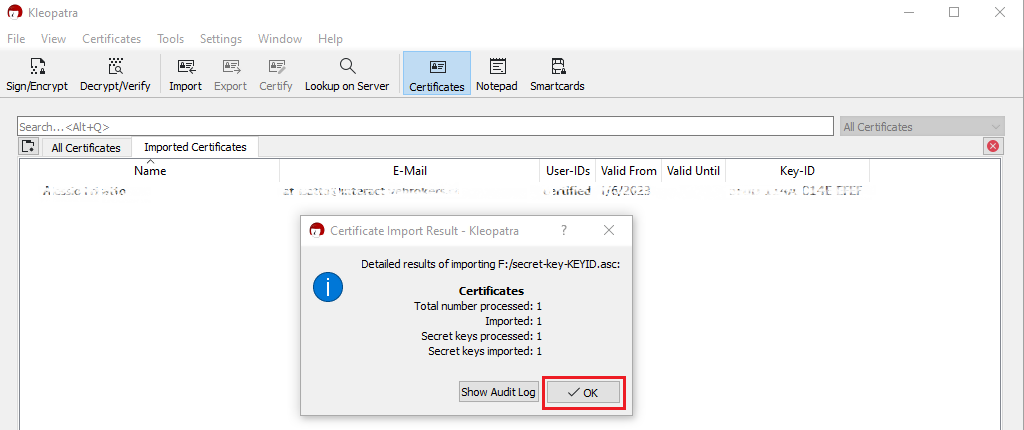
11. A pop-up will confirm the Key has been successfully imported. Click OK. You may now want to delete the key file from the USB drive and empty the Trash.
macOS
1. On the machine where the encryption keys are stored, connect a USB drive to a free USB port.
2. Launch the GPG Keychain application and select the encryption key you want to transfer. Please make sure that you see the text Type: Secrete and public key, in the Type column.
.png)
3. With the desired encryption key highlighted, click Export. Please make sure to check the box for the option Include secret key in exported file, as illustrated in the above screenshot. Save the key pair to the USB drive.
4. Eject the USB drive and connect it to a free USB port on the other computer (the one you want to transfer the key to). All the next steps have to be executed on that machine.
5. Make sure the GPG Tools suite is installed, otherwise please install it.
6. Launch the GPG Keychain application and click the icon Import on the top toolbar.
(1).png)
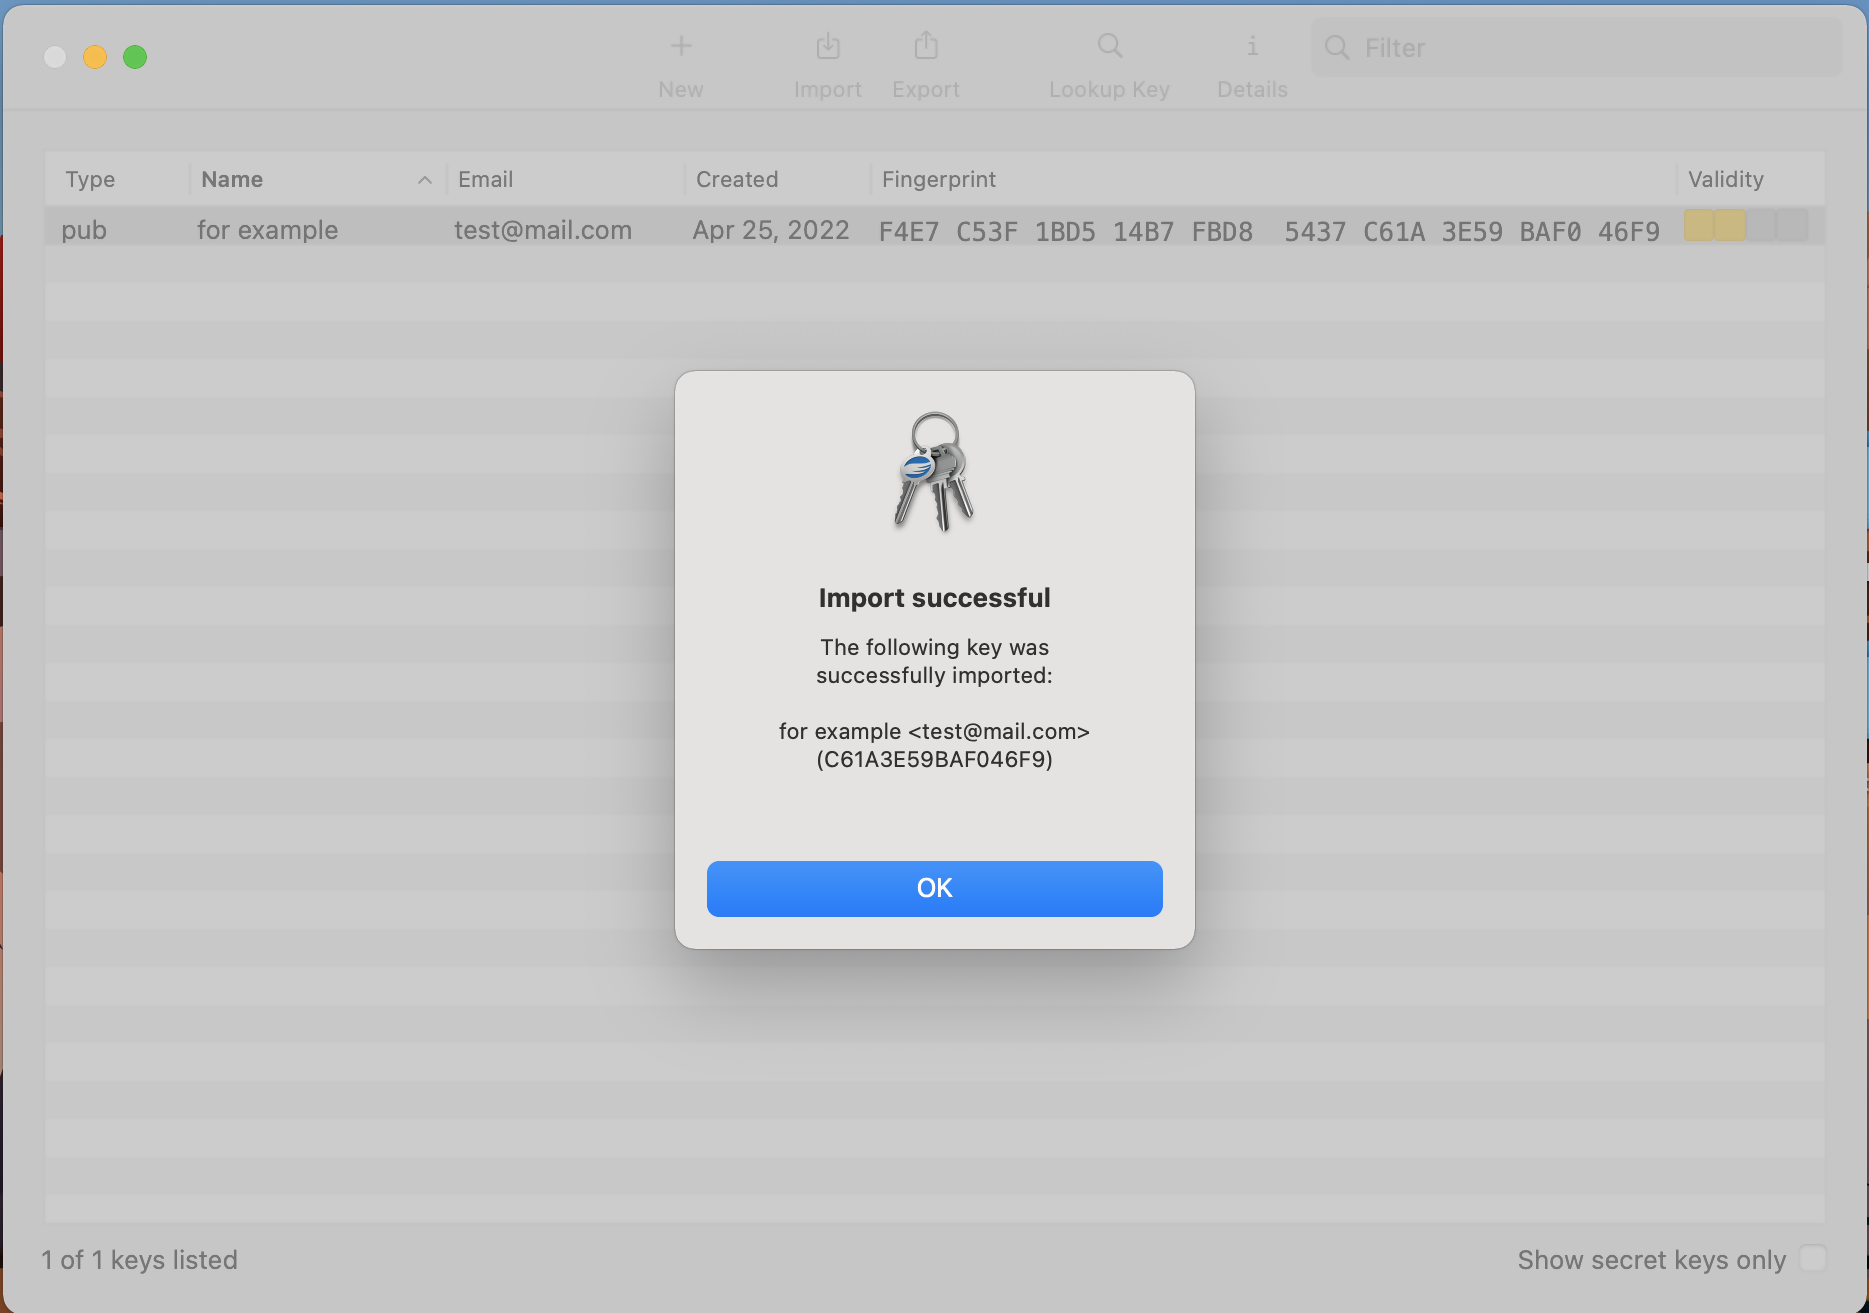
7. Click the USB Drive and select the previously saved .ASC file that contains the Public and Private key. Then click Open.
8. The confirmation should read Import successful.
9. Once the key has been successfully imported, delete the key file from the USB drive and empty the Trash.
Related articles
KB3842 - Using GPG/RSA encryption keys to guarantee the privacy and security of your Reports
KB3968 - Generate a key pair using GPG for Windows
KB4205 - Generate a key pair using GPG Suite on macOS
KB4108 - Decrypt your Reports using GPG for Windows
KB4210 - Decrypting Reports using your PGP Key pair on macOS
KB4407 - Generate RSA Key Pair on Windows
KB4578 - How to Access your Reports using FTP on Windows
KB4580 - How to Access your Reports using FTP on MacOS
Decrypting Reports Using Your PGP Key Pair on macOS
Note: This tutorial assumes you received reports via email or via FTP that were encrypted with the public key you sent to IBKR . If you need guidance to set up the encrypted statement delivery, please refer to this article, which is a prerequisite to the instructions below.
1. Open Finder
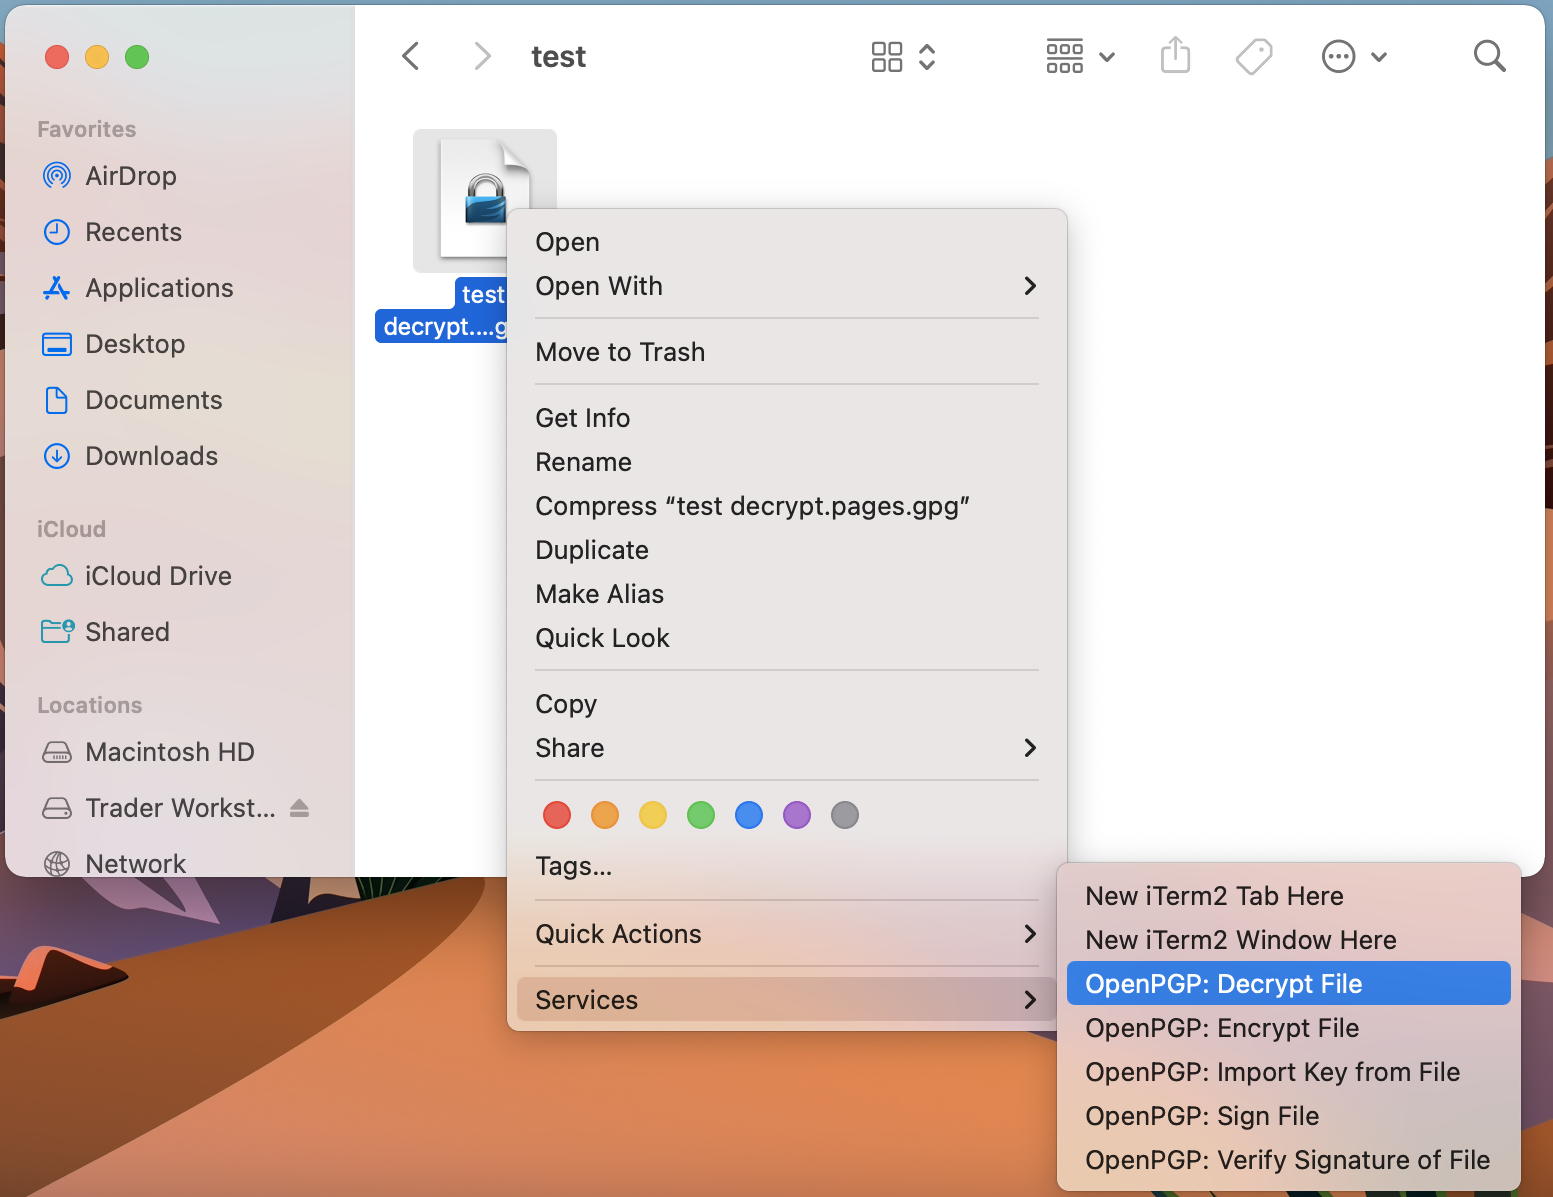
2. Right click on the .gpg file you want to decrypt
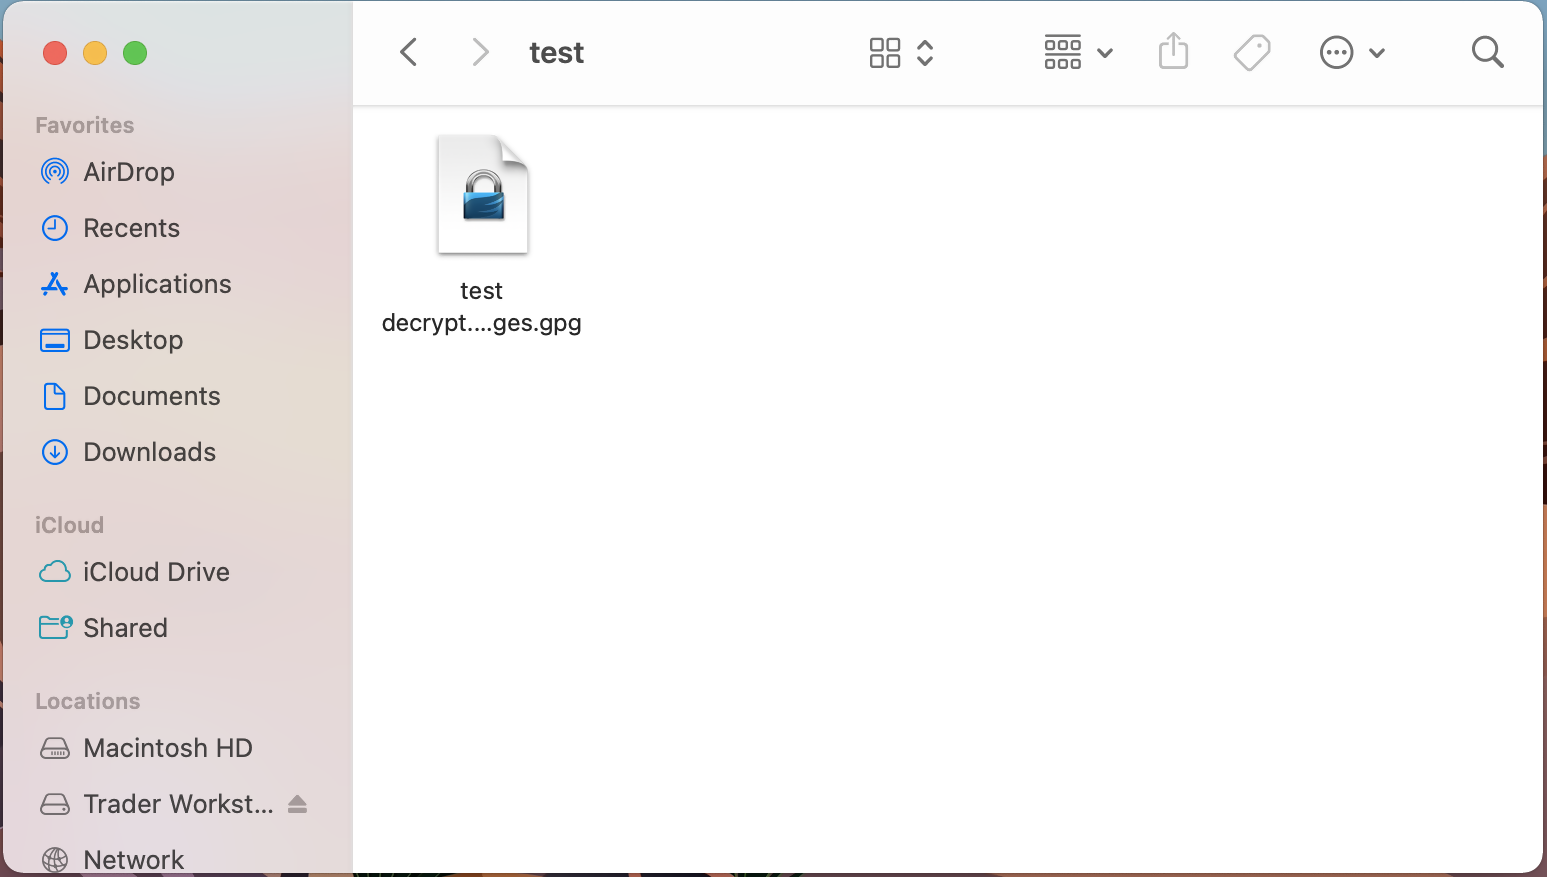
3. Select Services > OpenPGP: Decrypt File
Common Issues/Questions
- Decryption failed with error 'No Secret Key'
This is commonly caused when the wrong encryption key is used to decrypt the file. If decryption is being done on a computer other than the original computer used to create the public/private keys, the keys would have to be transferred from the original computer to the new computer.
If the above does not help, then a new public/private key pair needs to be created and sent to us.
Related articles
KB3842 - Using GPG/RSA encryption keys to guarantee the privacy and security of your Reports
KB3968 - Generate a key pair using GPG for Windows
KB4205 - Generate a key pair using GPG Suite on macOS
KB4108 - Decrypt your Reports using GPG for Windows
KB4407 - Generate RSA Key Pair on Windows
KB4578 - How to Access your Reports using FTP on Windows
KB4580 - How to Access your Reports using FTP on MacOS
Uso de la autenticación a través de IBKR Mobile (IB Key) sin avisos
En caso de que su smartphone no pueda recibir avisos de IBKR Mobile, aún podrá completar el proceso de conexión utilizando el método de desafío/respuesta de la autenticación a través de IBKR Mobile (IB Key), la cual se describe en las páginas siguientes (de acuerdo con el sistema operativo de su dispositivo):
La misma información se aplica para usted si su móvil no tiene conexión a Internet (está en modo roaming, fuera de cobertura, sin un plan de datos móviles activado, etc.)
Si su smartphone no puede recibir avisos de IBKR Mobile a pesar de estar conectado a Internet, le recomendamos seguir los pasos que se detallan en los fondos de información de IBKR.
Decrypt Your Reports Using GPG for Windows
Note: This tutorial assumes you received reports via email or via FTP that were encrypted with the public key you sent to IBKR. If you need guidance to set up the encrypted statement delivery, please refer to this article, which is a prerequisite to the instructions below.
How to decrypt files using Kleopatra:
1. Save all the encrypted Reports you received via email or FTP in a folder on your preference (e.g. Desktop)
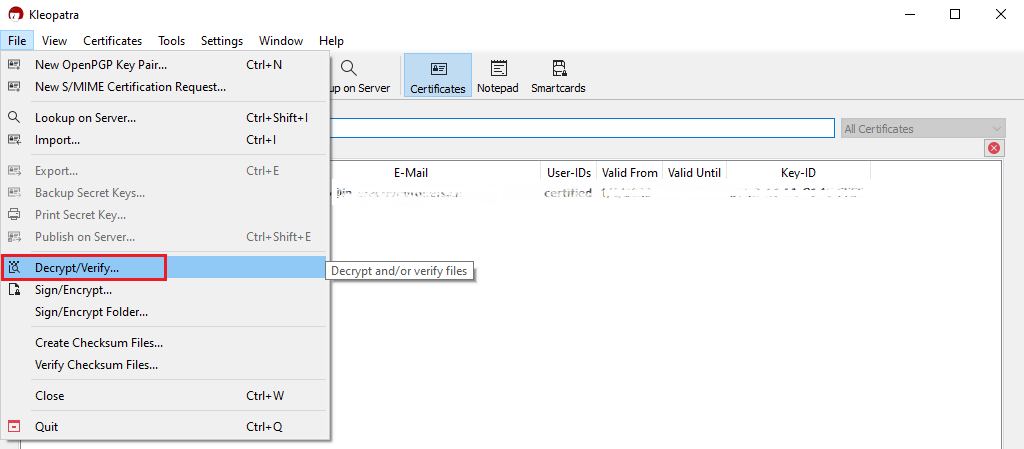
2. Start the Kleopatra application (included in Gpa4win software). The entry for your Key should be listed in the All Certificates panel. Click the top menu File and select Decrypt/Verify...
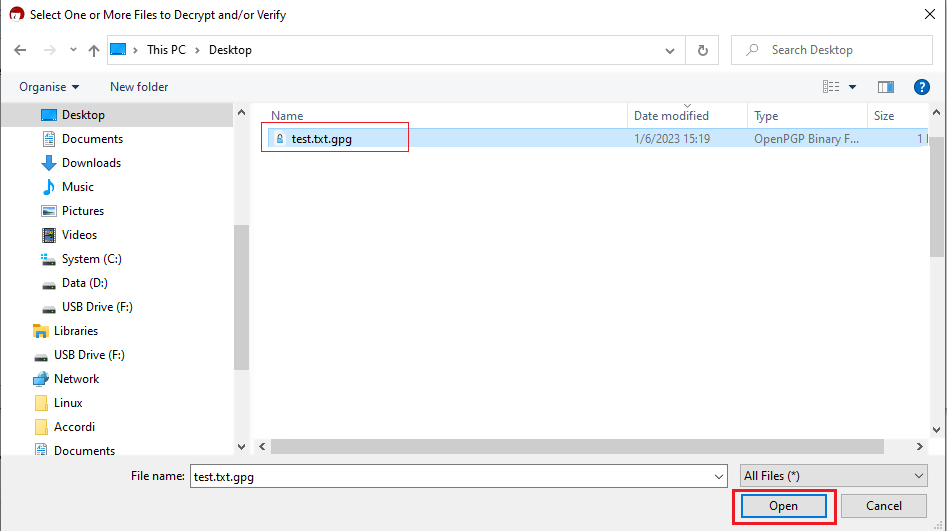
3. Open the folder containing your encrypted files and select the ones you want to decrypt.
4. Provide the passphrase you set when you create your Key.

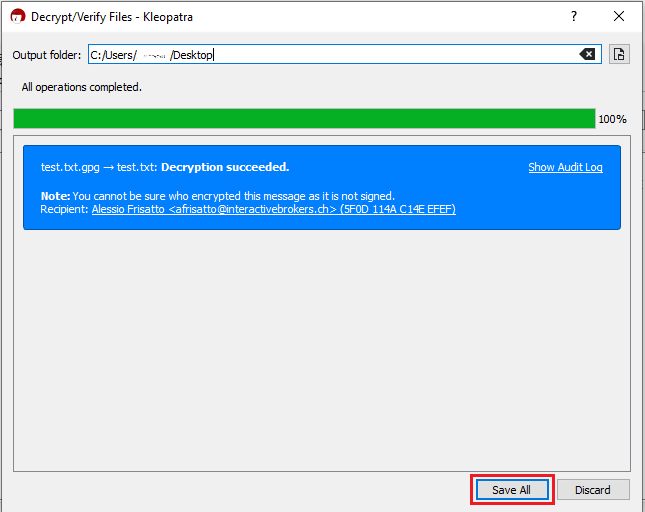
5. The files will be decrypted and the outcome of the operation will be displayed within the panel. You can change the output folder (where the decrypted files will be saved) if you wish. Click Save All to finalize the process.
Note: do NOT click Discard, otherwise the decrypted files will not be saved.
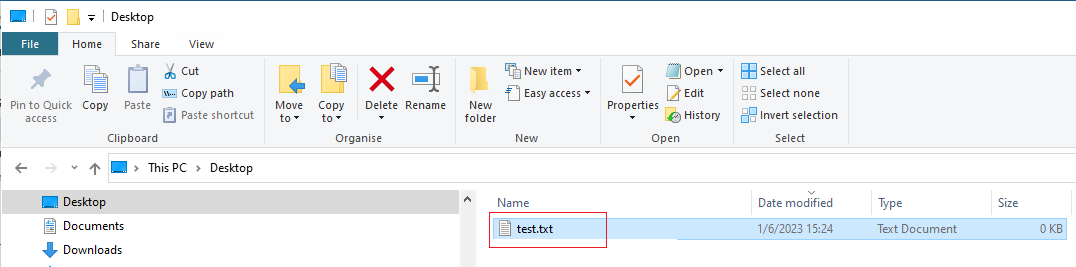
6. Open the Windows File Explorer and navigate to the output folder you selected at the previous step. From there, you can access and open your clear-text files.
Common Issues/Questions
- Decryption failed with error 'No Secret Key'
This is usually caused by the wrong encryption key being used to decrypt the file. If decryption is being done on a computer other than the original computer used to create the public/private keys, the keys would have to be transferred from the original computer to the new computer.
If the above does not help, then a new public/private key pair needs to be created and sent to us.
References
KB3842 - Using GPG/RSA encryption keys to guarantee the privacy and security of your Reports
KB3968 - Generate a key pair using GPG for Windows
KB4205 - Generate a key pair using GPG Suite on macOS
KB4210 - Decrypting Reports using your PGP Key pair on macOS
KB4407 - Generate RSA Key Pair on Windows
KB4578 - How to Access your Reports using FTP on Windows
KB4580 - How to Access your Reports using FTP on MacOS
KB4409 - How to set up sFTP for using Certificate Authentication on Windows
KB4410 - How to set up sFTP for using Certificate Authentication on macOS
KB4411 - How to backup your public/private Key pair
KB4323 - How to transfer your public/private key pair from one computer to another
KB4409 - How to set up sFTP for using Certificate Authentication on Windows
KB4410 - How to set up sFTP for using Certificate Authentication on macOS
KB4411 - How to backup your public/private Key pair
KB4323 - How to transfer your public/private key pair from one computer to another