TWS / IB Gateway and their interaction with Proxy servers
Table of contents
Configuration instructions
- Can the TWS / IB Gateway operate through a Proxy server, and how?
- If I use a SOCKS Proxy server, do I need to configure the TWS / IB Gateway?
- If I use a SOCKS Proxy server, do I need to configure the client machines where TWS / IB Gateway runs?
- If I use a Web (HTTP) Proxy server, do I need to configure the TWS / IB Gateway?
- What alternatives do I have in case I cannot implement a proxy solution on my network?
Common issues
Technical Background
Configuration instructions
1. Can the TWS / IB Gateway operate through a Proxy?
Upon start-up and during the run-time, the TWS / IB Gateway must establish and maintain direct network connections to our gateways and market data servers1. Such connections are created from random local TCP ports (above 1024) and are directed to TCP ports 4000 and TCP 4001. Since those are not HTTP connections, they cannot be serviced by a Web (HTTP) Proxy. They can only be serviced by a SOCKS Proxy.
From within the TWS interface, you can access several external services, such as IBKR Client Portal, Statements, Contract details, Bond Search, etc. Those services, being web-based, can be accessed through a Web (HTTP) Proxy (see section 6 for details and configuration) or through a SOCKS Proxy (see sections 4. and 5. for details and configuration).
2. If I use a SOCKS Proxy server, do I need to configure the TWS / IB Gateway?
The TWS / IB Gateway does not contemplate an option for SOCKS proxy forwarding. Therefore, it does not have a place where an explicit SOCKS Proxy host/port can be configured. This does not mean that the TWS / IB Gateway cannot work with a Proxy. It simply means that the TWS / IB Gateway is unaware of the underlying SOCKS proxy setup (proxy-agnostic).
Important Note: While it is impossible for us to determine whether a Proxy is enabled on your network, we assure you that all IBKR platforms, including the TWS, do not impact nor influence your network configuration.
3. If I use a SOCKS Proxy server, do I need to configure the client machines where TWS / IB Gateway runs?
The connections started by the TWS / IB Gateway can be redirected to a SOCKS (Application) Proxy through a specific client machine setup. We mention some of them below. Please note that the final decision is yours and none of the below suggestions can be recommended by us as best adapted to your setup and requirements.
3a. Using a Proxy Client software installed on the client machine where TWS / IB Gateway is running
With this setup, the Proxy client will intercept the connections (not only HTTP but for other ports as well) initiated by the TWS / IB Gateway and redirect them to a SOCKS proxy server. The typical benefits of a transparent proxy include a standard enterprise configuration where all clients routed to the Internet will always be filtered and protected no matter what the end users do, or change, on their machines and the added benefit of reduction in typical user’s client-proxy configuration troubleshooting.
3b. Using a so-called Proxifier
This configuration is very similar to the one at point 5a with the only difference that the Proxifier software can be set to redirect to a Proxy all the requests started by a specific process (e.g., C:\Jts\tws.exe; C:\JTS\ibgateway\XYZ\ibgateway.exe), hence instating a process level packet forwarding instead of a port level forwarding. This setup allows handling environments where different proxy servers are used for different applications or where you would like to address a specific application requirement without modifying/disrupting the connectivity schema for other software installed. The advantage of this solution is minimal maintenance since the connectivity schema is bound to the process and not to the hosts/ports.
3c. Using specific network routing on a client machine
With this setup, you can modify the client machine standard network routes, adding new ones in order to forward packets with specific destinations (e.g., Order routing and Market Data servers1) to a different gateway.
This gateway will then be in charge of routing those requests to the destination hosts. This solution has as well the benefit of not modifying/disrupting the connectivity schema for other software installed but usually requires more maintenance on the gateway and on the client machine in case the IP of the destination servers are changed or in case new servers are added.
4. If I use a Web (HTTP) Proxy server, do I need to configure the TWS / IB Gateway?
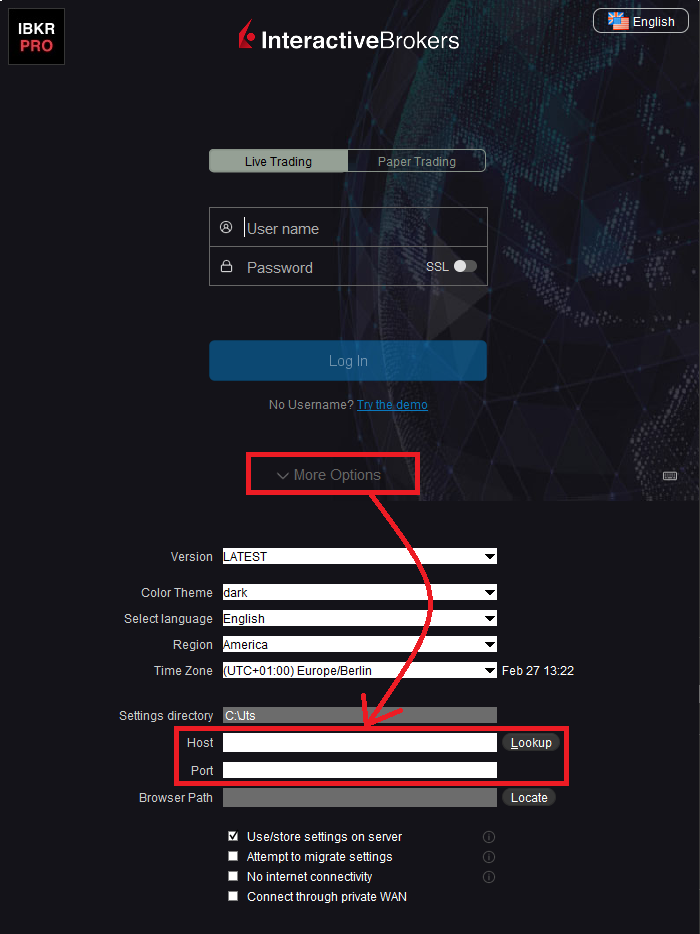
If the Workstations on your local network access the Web content through a Web (HTTP) Proxy, you need to specify the Web Proxy IP Address and port. To do this, click More Options at the bottom of the TWS Login Screen, and enter your Proxy server details in the fields Host and Port (see Figure 1 below). The same fields are present in the IB Gateway Login Screen.
Figure 1.
The Web Proxy you set there will ONLY be used to fetch the web content accessible from within the TWS (e.g., Client Portal, Statements, Product Details, etc.)
5. What alternatives do I have in case I cannot implement a proxy solution on my network?
In this case, you might orient yourself towards a different type of access to the IBKR infrastructure, which includes a special connection type and a FIX/CTCI engine setup. This setup would, on the other hand, have different requirements in terms of commissions2.
Common Issues
6. What happens if the proxy configuration on your computer is wrong or outdated?
Occasionally, third-party software, even if already uninstalled, may leave behind a SOCKS proxy configuration on your computer. This may also happen if your computer has been infected with malware. In such cases, the proxy server, although configured, is non-existent or not accessible on the network. In such scenarios, the TWS will show an error message (e.g., No Internet Connectivity) and/or start the "Connection attempt #" loop upon login. The same will happen if the Proxy server exists, but has not been correctly configured on the client machines.
6a. How can I correct the proxy configuration if wrong?
When applicable, we recommend you always consult the IT / Networking team of your company first and ask for guidance.
If you are autonomously managing your network, please follow the instructions below according to the Operating System of your machine/s:
Windows
W.1 Press CTRL+S to open the Windows search
W.2 Type Proxy Settings and press Enter
W.3 If no Proxy is present on your network, make sure the switch "Use a proxy server" is deactivated (see Figure 2 below). If a Proxy server is active on your network, make sure the Address (or hostname) and Port are correctly defined.
Figure 2.
Mac
M.1 Click on the Apple icon at the top left corner of the screen and select System Preferences
M.2 Click on Network
M.3 Select the Network connection you are using to access the Internet (e.g. Wi-Fi) and click on it
M.4 Click on the Advanced button and then on the Proxies tab
5. If no proxy is present on your network, make sure all the checkboxes (SOCKS Proxy, Web Proxy, Secure Web Proxy) are deactivated (see Figure 3 below). If a Proxy is present on your network, ensure the Protocol, Address (or hostname) and Port are correct.
Figure 3.
7. You are using Public proxies and proxy chains to hide your presence or identity
There are public proxy and proxy chain services purposed to disguise or hide the identity and the activity of the subscriber or to bypass regional restrictions. One of the most famous services is the "Tor" network.
While those services may not necessarily be used for criminal purposes, they render subscriber traceability very difficult when not impossible. Since IBKR is obliged by the financial industry regulators to maintain records of trading activities and trade initiators, we do not allow our clients to reach our systems while using an anonymizing service. If you are using such a service, your TWS connection attempts will be automatically rejected by our gateways.
Technical Background
A proxy server usually acts as a gateway and as a barrier between your local network and the Internet. The proxy listens for outgoing connection requests from the internal workstation/s and forwards them to the desired target host or service on the Internet. When the target replies to such requests, the proxy routes the incoming responses back to the internal workstation/s that initiated the process.
Being the proxy, the only machine of your network actually accessing the Internet, it prevents the other machines and the internal segment of your network (LAN) from being accessible by external actors and hence from being exposed to threats and intrusion attempts.
Additionally, a proxy server can offer a variety of other services, such as web content caching and filtering.
9. Which types of Proxy servers are commonly used and where?
Proxy servers are commonly found within enterprise-grade networks. In the vast majority of cases, proxies are not used by individuals since private broadband connections are established through consumer-grade routers that already offer built-in proxy/firewall solutions. An exception is represented by public proxy or proxy chains discussed in detail in the section You are using Public proxies and proxy chains to hide your presence or identity
There are two main types of Proxy servers:
The HTTP (Hypertext Transfer Protocol) defines the rules and the standards for fetching Web content from a Web server and rendering such content on your Web Browser.
A Web Proxy handles only the routing of HTTP requests and HTTP responses. Those requests are transparently generated and sent by your browser whenever you access a Web page. Such requests are normally sent using specific ports (TCP 80 and TCP 443). Hence a Web Proxy usually listens for outgoing HTTP requests coming from your internal network (LAN) only on the TCP ports mentioned above.
SOCKS (Socket Secure) Proxies are designed to handle any type of traffic (not only HTTP/S traffic), generated by any protocol or program (including Trader Workstation).
Notes
1. More information about the servers accessed by the TWS is available in IBKB2816.
2. For an overview of the different special connection options and related requirements, please click here.
For an overview of the FIX infrastructure, please click here.
How to fix the "Cannot create ... file" error during TWS installation on MacOS
The filesystem permissions are controlled by your machines operating system. One of their functions is to secure your files, preventing unauthorized access or undesired modifications to the system and to your personal data.
Some software on your computer may modify or override the permissions assigned by the operating system. Under certain circumstances, this prevents the TWS installer from accessing the folder where the application core files have to be created (/users/youruser/home/Applications). In such cases, the TWS installation usually displays the error "Cannot create ... file. Shall I try again?"
Procedure:



.png)

.png)
.png)
7. Once the installation has completed successfully, repeat the previous steps from 1. to 5. setting back the permissions of “everyone” to “Read Only” to revert your changes to the initial status
I am not receiving text messages (SMS) from IBKR on my mobile phone
Once your mobile phone number has been verified in the Client Portal, you should immediately be able to receive text messages (SMS) from IBKR directly to your mobile phone. This article will provide you with basic troubleshooting steps in case you are unable to receive such messages.
1. Activate the IBKR Mobile Authentication (IB Key) as 2-Factor security device
In order to be independent of wireless/phone carrier-related issues and have a steady delivery of all IBKR messages we recommend to activate the IBKR Mobile Authentication (IB Key) on your smartphone.
The smartphone authentication with IB Key provided by our IBKR Mobile app serves as a 2-Factor security device, thereby eliminating the need to receive authentication codes via SMS when logging in to your IBKR account.
Our IBKR Mobile app is currently supported on smartphones running either Android or iOS operating system. The installation, activation, and operating instructions can be found here:
2. Restart your phone:
Power your device down completely and turn it back on. Usually this should be sufficient for text messages to start coming through.
Please note that in some cases, such as roaming outside of your carrier's coverage (when abroad) you might not receive all messages.
3. Use Voice callback
If you do not receive your login authentication code after restarting your phone, you may select 'Voice' instead. You will then receive your login authentication code via an automated callback. Further instructions on how to use Voice callback can be found in IBKB 3396.
4. Check whether your phone carrier is blocking the SMS from IBKR
Some phone carriers automatically block IBKR text messages, as they are wrongly recognized as spam or undesirable content. According to your region, those are the services you can contact to check if a SMS filter is in place for your phone number:
In the US:
- All carriers: Federal Trade Commission Registry
- T-Mobile: Message Blocking settings are available on T-Mobile web site or directly on the T-Mobile app
In India:
- All carriers: Telecom Regulatory Authority of India
In China:
- Call your phone carrier directly to check whether they are blocking IBKR messages
References:
- How to login using SMS authentication
- Overview of Secure Login System
- Information and procedures related to Security Devices
- IBKR Mobile Authentication
IBKR Host and Ports Documentation
TWS connects to IBKR servers via port 4000 and 4001, if using SSL, and will not operate on any other port. If you are using a proxy server, it needs to be a transparent with both inbound and outbound ports open so that the TWS can function properly.
Below are listed all the gateways, along with the corresponding destination host that might be used by the TWS when you use our services, please allow access to those hosts.
The easiest way to test whether your connection needs any special setup or has been configured properly is to use IBKR's Dedicated Test page, which will provide a dynamic test of your network’s connection against our main trading and market data servers. If a “Success” response is returned, there is nothing more for you to do. If the response is “Failure”, we recommend adding an exception for the new hosts to your network’s configuration or review your changes.
Note: If your network uses a browser proxy, the test page can produce false positives. In this case, or if you are not sure what your network setup is, turn to your network administrators, who can perform ping and telnet tests to the hosts listed below to confirm compliance with the connectivity requirements.
Specs:
|
CLIENT PORTAL AND WEBSITE |
||||
|
REGION/PRODUCT |
SERVER (HOST) |
PORTS1 |
||
|
IBKR WEBSITE – AMERICA |
443 |
|||
|
IBKR WEBSITE – Canada |
443 |
|||
|
IBKR WEBSITE – UK |
443 |
|||
|
IBKR WEBSITE – INDIA2 |
443 |
|||
|
IBKR WEBSITE – JAPAN2 |
443 |
|||
|
IBKR WEBSITE – HONG KONG2 |
www.interactivebrokers.com.hk | 443 | ||
|
IBKR WEBSITE – CHINA2 |
www.ibkr.com.cn | 443 | ||
|
IBKR WEBSITE - AUSTRALIA |
www.interactivebrokers.com.au | 443 | ||
|
CLIENT PORTAL – EAST |
443 |
|||
|
CLIENT PORTAL – CENTRAL |
443 |
|||
1: Standard Communication: TCP Port 80 | SSL Communication: TCP Port 443.
2: This IB Server host does not support ping request.
Important Note: If you are accessing Client Portal from a corporate network where the Internet access is provided through a load balancing equipment, you may receive error messages about expired/invalid session and/or missing web content upon or after the login phase. The load-balancer cycles your outbound connections over two or more network interfaces to equalize the network workload. Because of this mechanism, your HTTP requests reach our systems from different IP addresses, invalidating your Client Portal session. In this scenario, as a solution, please ask your network administrator or IT group to configure your machine/device for bypassing the load-balancer. This will allow your session to remain valid and alive.
|
DESKTOP TWS |
|||
|
REGION/TOOL |
PRIMARY/BACKUP |
SERVER (HOST) |
PORTS |
|
|
PRIMARY |
|
|
|
BACKUP |
|||
|
|
PRIMARY |
|
|
|
BACKUP |
|||
|
|
PRIMARY |
|
|
|
BACKUP |
|||
|
TWS ASIA |
PRIMARY |
4000 / 4001 |
|
|
BACKUP |
|||
|
TWS ASIA - CHINA3 |
PRIMARY |
4000 / 4001 |
|
|
BACKUP |
mcgw1_hb1.ibllc.com.cn | ||
| TWS AUTO-UPDATE | PRIMARY | 443 | |
|
RISK NAVIGATOR |
PRIMARY |
443 |
|
|
TWS CLOUD SETTINGS |
PRIMARY |
443 |
|
|
IB CAM |
PRIMARY |
4000 / 4001 |
|
|
DIAGNOSTICS REPORTS |
PRIMARY |
443 |
|
3: Gateway dedicated to clients with accounts assigned to the Hong Kong server, but are physically connecting from Mainland China.
Operating your Digital Security Card+
The Digital Security Card (DSC) is a battery operated security device which generates a series of random codes to be entered along with your user name and password upon each log in attempt. As physical possession of the DSC is required to obtain the codes and log in, the device effectively prevents hackers who may have compromised your computer or information from accessing your account. Instructions for operating the DSC are outlined below.
Step 1 - When logging into your account, enter your user name and password as usual. If successful, a 6-digit Challenge Code will appear.
Step 2 - Turn on your device by pressing the “press” button until the 'PIN>' display appears, enter the 4-digit PIN code you specified at the time you requested the device and press the “OK” button.
Step 3 - Enter the 6-digit Challenge Code from the login screen (step A) into the device when the 'CHALLNG>' display appears, press the “OK” button and a response code will appear.
Step 4 - Enter the 8 digits of the response code (Step C) into the login Screen. Select the Login button to proceed.
Note that the buttons on your security cards are not touch sensitive and must to be pressed to operate.
Related Articles
KB1042 - Video instructions for logging in with the Secure Code Card
KB1942 - Reactivating the permanent Secure Login Device
KB1943 - Requesting a replacement Secure Login Device
KB1131 - Overview of the Secure Login System
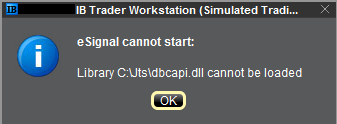
How to fix the error: "Library dbcapi.dll cannot be loaded"
Issue A - You are not using the 32 bit version of TWS and/or eSignal:
Issue B - There is an incompatibility with the file C:\Jts\dbcapi.dll:
Instructions to resolve issue A
Installing 32-bit TWS
Please open the page http://www.ibkr.com in your browser and perform the steps below:
1) Click on the Log In button at the top right corner of the page.
2) Click on Download Trader Workstation:


5) Click on the item Windows 32-bit:

6) Make sure that the description under the DOWNLOAD button has changed to "Windows: 32 bit". Click now on DOWNLOAD:

7) Launch the downloaded file. The Trader Workstation installation will start. At this point, you may see the warning message "Trader Workstation latest is already installed...". Ignore this warning and click on the button Next > to continue the installation:

8) Your "Trader Workstation" Desktop icon will be automatically updated. You can now launch the 32-bit Trader Workstation by a double click on that icon.
If you have launched the 32-bit TWS and the 32 bit version of eSignal but you still receive the same error message, please follow as well the instructions below.
Instructions to resolve issue B
Replacing dbcapi.dll for compatibility between 32-bit TWS and 32-bit eSignal 12
To correct an incompatibility with the dbcapi.dll file, we will replace that file with another version of it taken from the eSignal installation folder. Please follow the steps below to perform the substitution:
1) Navigate to C:\Jts and rename the file dbcapi.dll to dbcapi_old.dll
2) Navigate to the directory where 32-bit eSignal 12 is installed (most commonly C:\Program Files (x86)\Common Files\Interactive Data\DM).
3) Copy dbcapi_vc8.dll from that directory into the C:\Jts directory.
4) Move to the C:\Jts directory.
5) Right click on the dbcapi_vc8.dll file (now in the C:\Jts directory) and select rename. Type dbcapi.dll as the new filename.
.jpg)
6) TWS is now ready to accept the eSignal data feed.
How to install the TWS API Components on Mac / Unix
NOTE: If you have already agreed to the API License Agreement please start at Step 3 below.
Instructions
- Click directly on the button below to access the API software download page

- This will direct you to Interactive Brokers API License Agreement, please review it
- Once you have clicked "I Agree", refer to the Mac / Unix section to download the API Software version of your preference
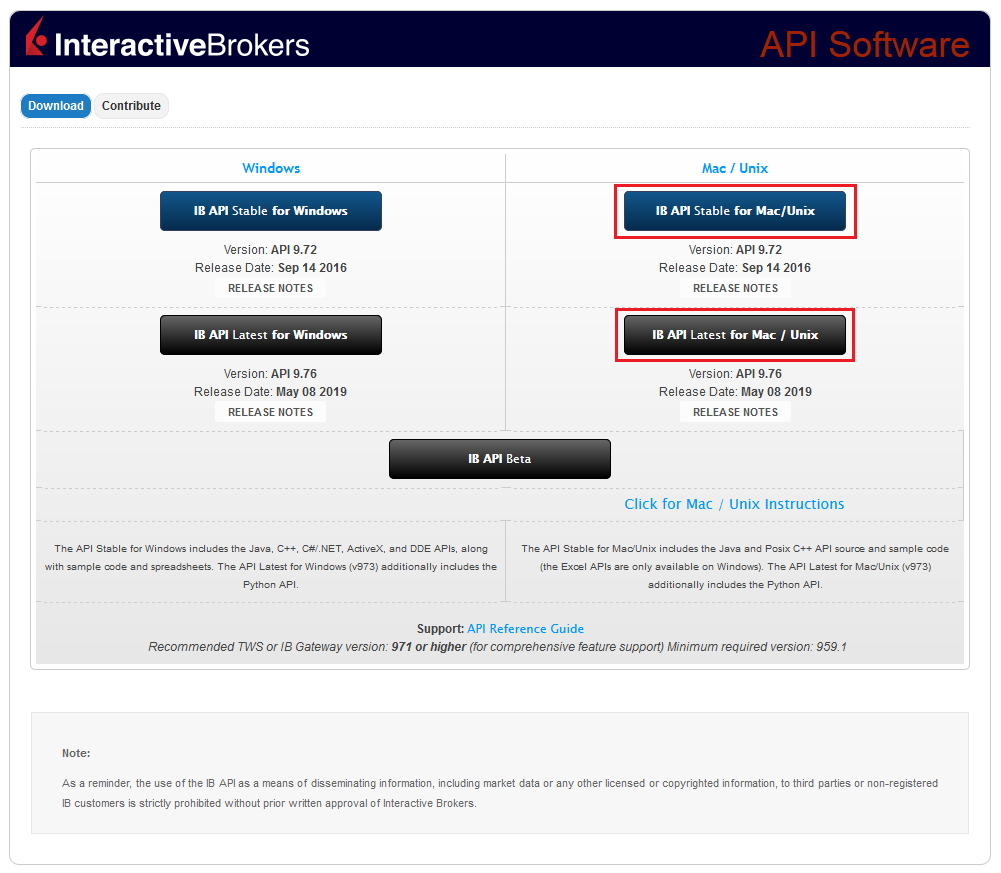
- This will download twsapi_macunix.n.m.zip to your computer
(where n and m are the major and minor version numbers respectively) - Open Terminal (Ctrl+Alt+T on most distributions)
(On Mac press Command+Space to launch Spotlight, then type terminal and press Return) -
Navigate to the directory where the installer has been downloaded (normally it should be the Download folder within your home folder) and confirm the file is present
$ cd ~/Downloads
$ ls
- Unzip the contents the installer into your home folder with the following command (if prompted, enter your password):
$ sudo unzip twsapi_macunix.n.m.zip -d $HOME/

- To access the sample and source files, navigate to the IBJts directory and confirm the subfolders samples and source are present
$ cd ~/IBJts
$ ls

Legacy Instructions - API Version ≤ 9.71
Note: IB only offers API Version 9.72+. In the event you already have an existing legacy version and need to install it, please refer to the directions below:
- locate the file twsapi_macunix.n.m.jar on your computer
(where n and m are the major and minor version numbers respectively.) - Open Terminal (Ctrl+Alt+T on most distributions)
(On Mac press Command+Space to launch Spotlight, then type terminal and press Return) - Navigate to the directory where the .jar file has been located (normally it should be the Download folder within your home folder) and confirm it is present
$ cd ~/Downloads
$ ls - Extract the contents of the .jar file into your home folder
$ jar xf twsapi_macunix.n.m.jar -d $ HOME/ - To access the sample and source files, navigate to the IBJts directory and confirm the subfolders samples and source are present
$ cd ~/IBJts
$ ls
How to Share a Security Device
IBKR allows individuals to maintain multiple user names within a single account or across distinct accounts under their control. Individuals who do not wish to maintain multiple physical security devices may elect to consolidate and share a single device across their users. The prerequisites and the procedure for sharing devices are outlined below.
Prerequisites
The possibility of sharing a physical security device will be granted only if ALL the conditions below are respected:
a) The participant users belong either to the same entity or to different entities but with the same identification data (Date of Birth, Citizenship, Country of Legal Residence, Identification Document type and number or Social Security Number for US Citizens and residents).
b) The participant users do NOT have a temporary security device (Temporary Code, Online Security Code Card) currently assigned to them.
|
Security level |
Device name |
Device image |
| Highest | Digital Security Card+ (DSC+) |  |
| Lowest | Security Code Card (SLS card) | 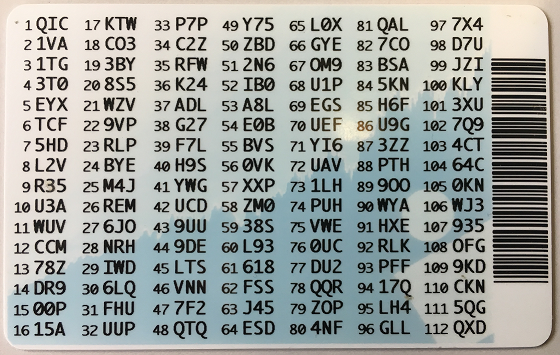 |
Procedure:
1. Among the possible candidates, identify the device offering the highest level of protection and the user that device belongs to. We will call that user the device owner
2. Log in to your Client Portal page with the requesting user (NOT the device owner)
(1).png)
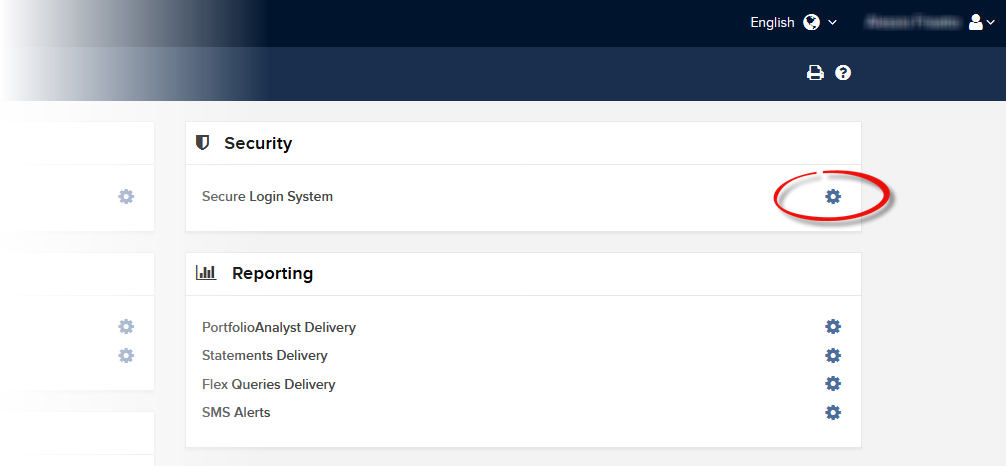
.png)

.png)
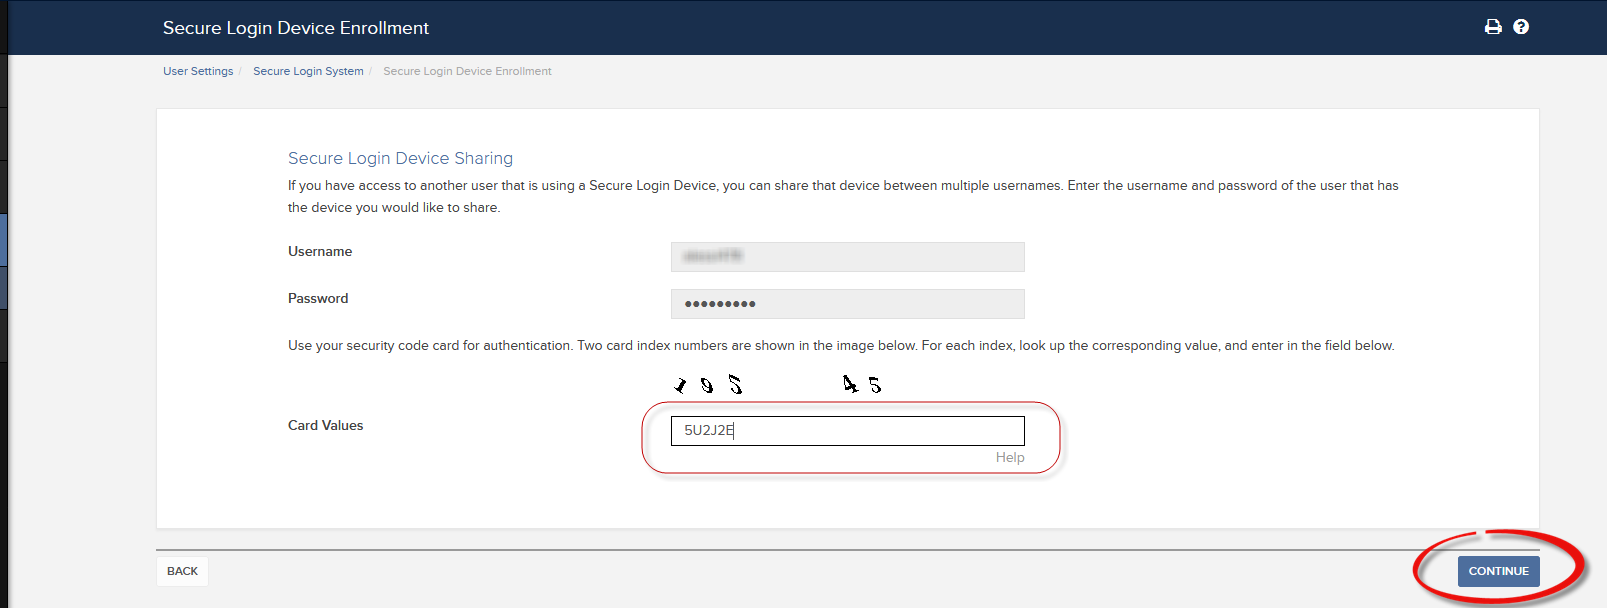


a. In the vast majority of cases your sharing request will be automatically and immediately approved, processed and enforced. In case the approval of our Compliance department is needed, your request will stay in a pending status until this step has been cleared.
c. Here below you can see the most common error messages and their causes:
- Less secure device: This error is returned if you set up the less secure token as the one to be shared. Please identify the most secure device and share that one.


References:
- Overview of the Secure Login System: KB1131 or ibkr.com/sls
- Multiple Two-Factor Authentication System (M2FS): KB2895
- How to share the Security Login Device between two or more users: KB2481
- How to opt back into the Secure Login System: KB2545
- Security considerations following SLS opt-out: KB1198
- Are there any charges or expenses associated with the security devices? KB1861
- How to troubleshoot Client Portal Login Failures: KB1132
- How to troubleshoot Trading Platform Login Failures: KB1133
How to Transfer the TWS Layout Settings via USB or Network Drive
The TWS layout settings can be saved on a USB or Network Drive, in order to import them from the same or from a different computer / TWS session. This article outlines the needed steps.
Please click one of the links below, according to your scenario:
B. I want to save my TWS settings on a USB or Network Drive and import them to a session with a different user
A. I want to save my TWS settings on a USB or Network Drive and import them to a session with the same user
1. Log in the Trader Workstation with the user whose layout settings you would like to export.
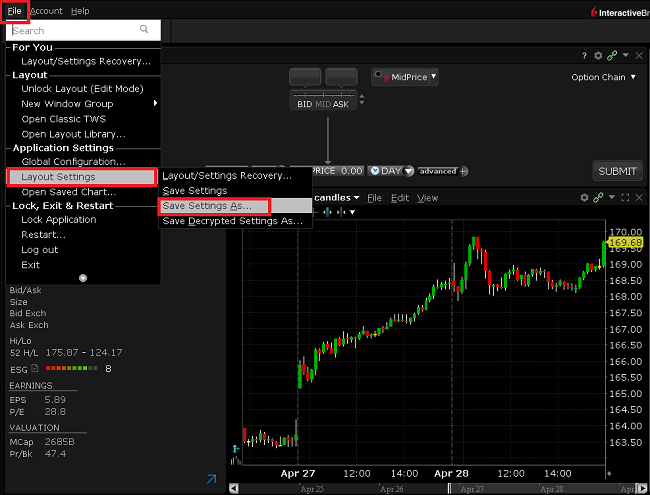
2. Click the top menu File > Layout Settings > Save Settings As...
3. Expand the Look In drop-down and select where you want to save the file (e.g. USB or Network Drive). Use a file name which would be easy to identify (e.g. migrate) and click Save. The file will be saved with the extension '.xml'.
.png)
4. Proceed with the workflow, starting with step 5 in the following section.
B. I want to save my TWS settings on a USB or Network Drive and import them to a session with a different user
1. Log in the Trader Workstation with the user whose layout settings you would like to export.
2. Click the top menu File > Layout Settings > Save Decrypted Settings As...
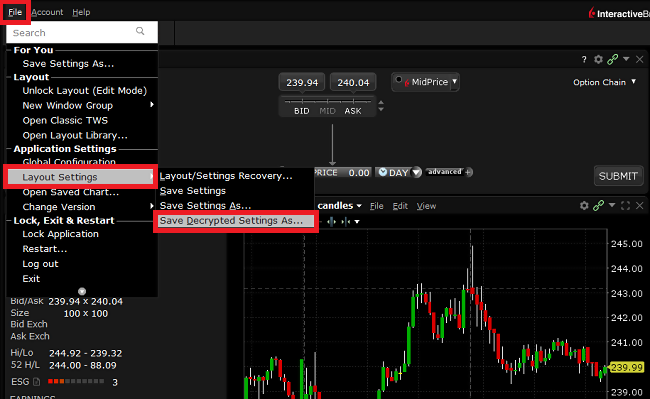
3. Take notice of the information about the file format and click Yes.

4. Expand the Look In drop-down and select where you want to save the file (e.g. USB or Network Drive). Use a file name which would be easy to identify (e.g. migrate) and click Save. The file will be saved with the extension '.xml'.
.png)
5. Close the TWS and log in again with the user which should import the layout (that can be a different computer).
6. Connect the USB or Network Drive to the computer.
7. Click on the top menu File > Layout Settings > Layout/Settings Recovery...
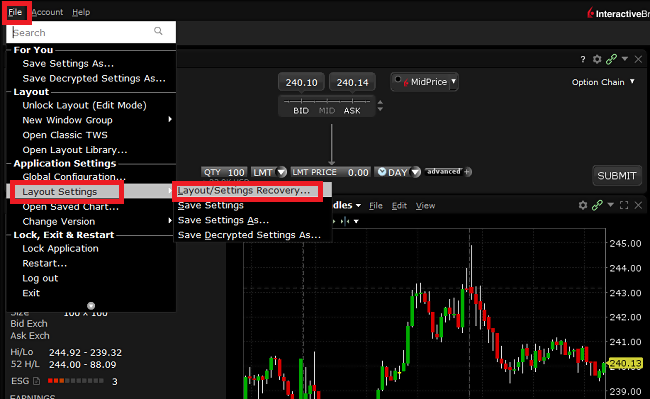
8. Select Custom... and click OK
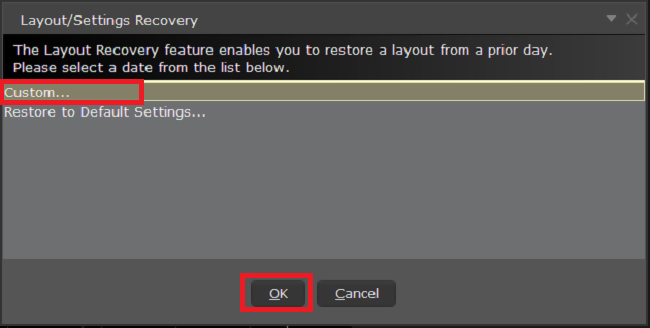
9. Expand the Look In drop-down and select the drive where you previously saved the TWS settings file (e.g. USB or Network Drive). Select the settings file (e.g. migrate.xml) and click Open.
.png)
10. Click Open without reporting problem
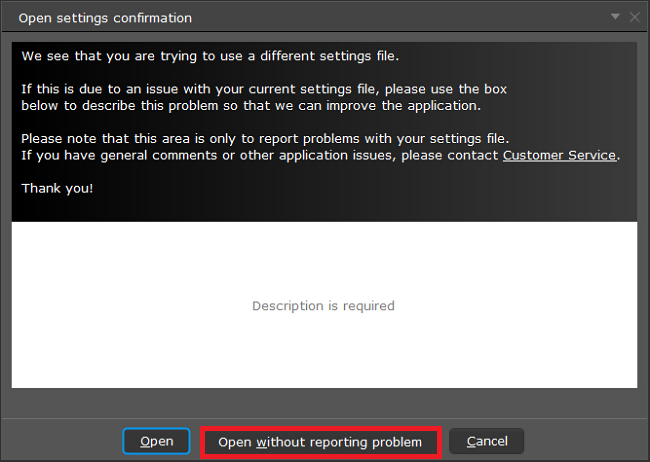
11. Your TWS will automatically restart, applying the new layout settings.
Related articles
See KB3146 for instructions on overcoming the "Downloading settings from server failed" error
See KB2320 for instructions on transferring settings from one user to another
See KB2282 for instructions on how to transfer settings from one computer to another

