如何用手機向IBKR發送文件
即使您一時無法掃描文件,盈透證券也支持您給我們發送文件副本。您可以用手機將所需文件拍下來。
下方介紹了在不同手機操作系統下如何拍照幷將照片通過電子郵件發送給盈透證券的詳細步驟:
如果您已經知道如何拍照幷通過電子郵件發送圖片,請點擊此處——電子郵件應該發送到哪裏以及郵件主題應該寫什麽。
iOS
1. 從手機屏幕的底部向上滑,然後點擊相機圖標。
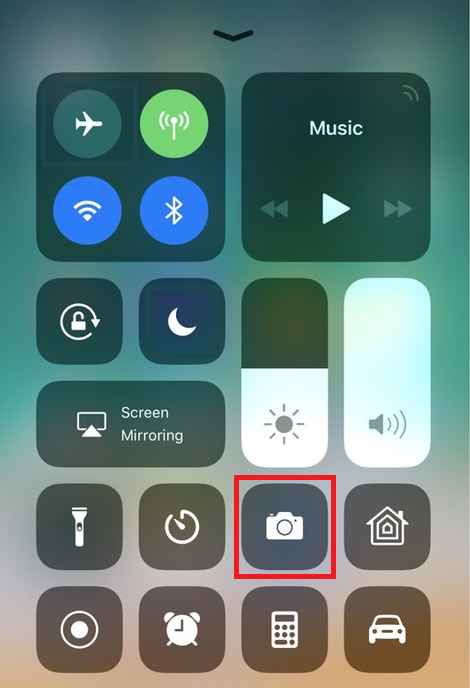
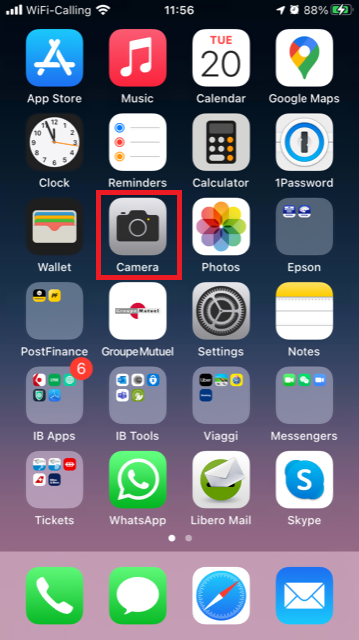
如果沒找到相機圖標,您可以從iPhone主屏幕點擊相機應用程序圖標。
通常情况下打開的應該是後置攝像頭。如果打開的是前置攝像頭,請點擊攝像頭切換按鈕。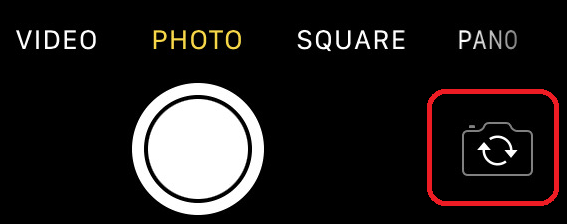
2. 將手機移到文件上方,鏡頭對準需要的位置或頁面。

3. 確保光綫均勻、充足,避免因爲拿手機的姿勢在文件上投下任何陰影。手機拿穩,防止抖動。點擊拍照按鈕拍照。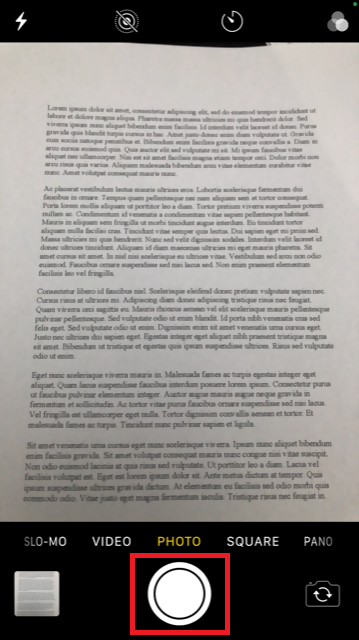
4. 點擊左下角的縮略圖查看您剛剛拍的照片。
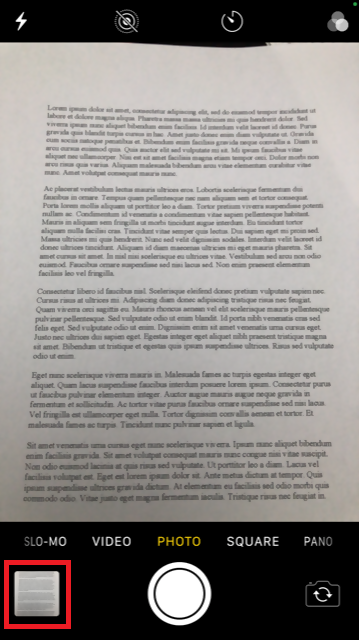
5. 確保照片清晰,文件字迹清楚。您可以用兩個手指在圖片上劃開來放大圖片查看細節。

如果圖片質量或亮度不好,請重複上述步驟重新拍照。
6. 點擊屏幕左下角的分享圖標。
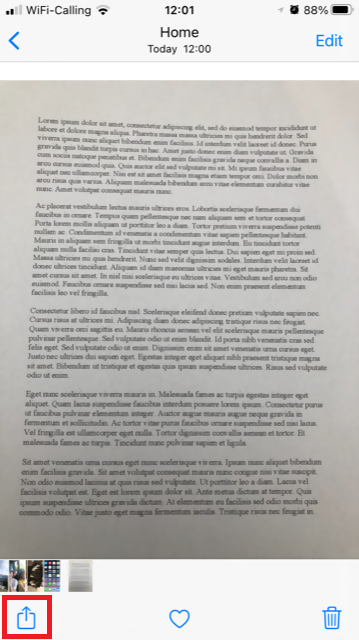
7. 點擊電子郵件圖標。
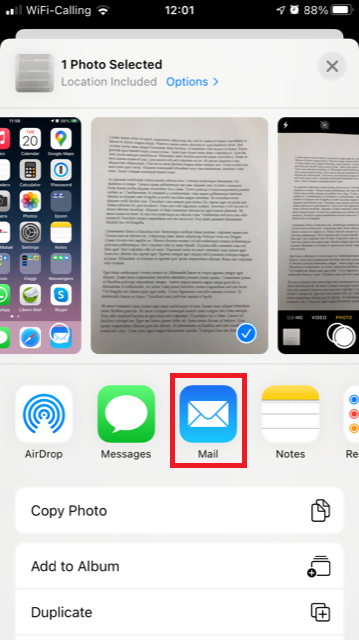
注意:要發送電子郵件,您的手機必須有相應配置。如果不知道如何配置,請聯繫您的電子郵件供應商。
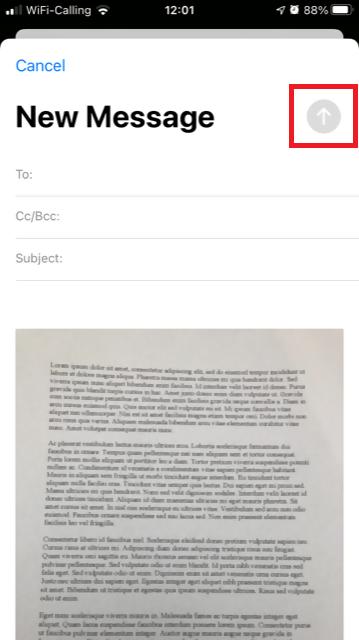
8. 請參見此處瞭解如何填寫電子郵件收件人(To:)和主題(Subject:)。填寫完畢後,點擊右上方的向上箭頭發送郵件。
安卓
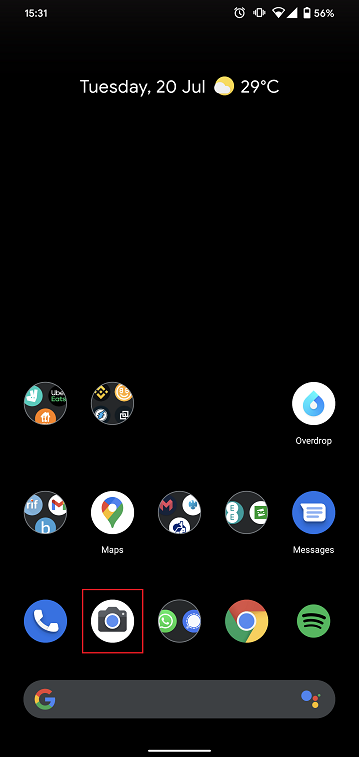
1. 打開應用程序列表,啓動相機應用程序。或者直接從手機主屏幕啓動相機。取决于您的手機型號、製造商或設置,相機應用程序的叫法可能有所不同。
通常情况下打開的應該是後置攝像頭。如果打開的是前置攝像頭,請點擊攝像頭切換按鈕。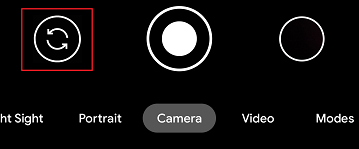
2. 將手機移到文件上方,鏡頭對準需要的位置或頁面。

3. 確保光綫均勻、充足,避免因爲拿手機的姿勢在文件上投下任何陰影。手機拿穩,防止抖動。點擊拍照按鈕拍照。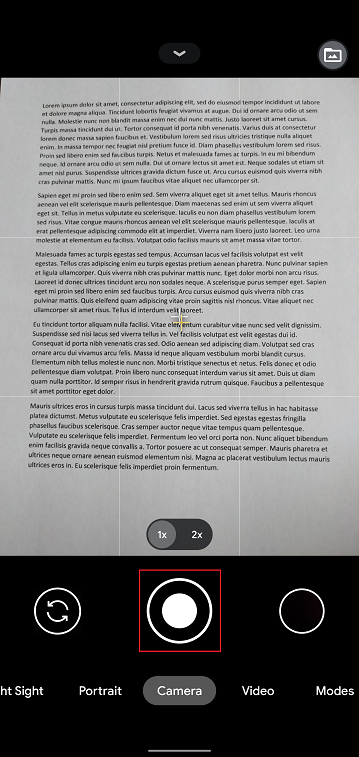
4. 確保照片清晰,文件字迹清楚。您可以用兩個手指在圖片上劃開來放大圖片查看細節。

如果圖片質量或亮度不好,請重複上述步驟重新拍照。
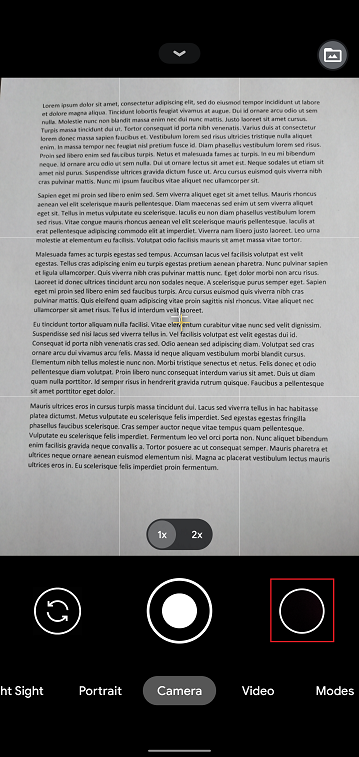
5. 點擊屏幕右下角的空白圈圈圖標。
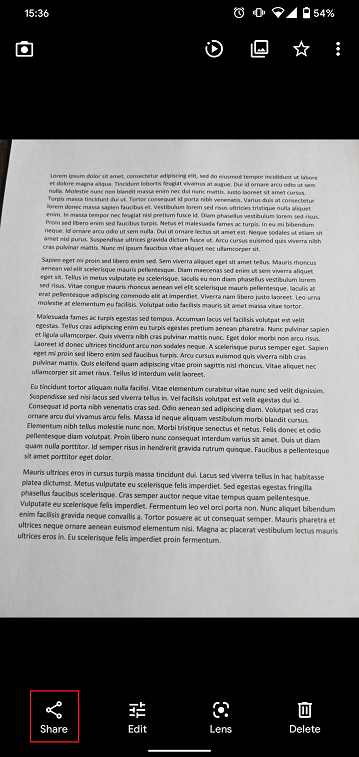
6. 點擊屏幕左下角的分享圖標。
7. 在顯示的分享菜單中點擊手機上安裝好的電子郵件客戶端的圖標。下圖顯示的是Gmail,但手機設置不同,電子郵件程序也會不同。
.png)
注意:要發送電子郵件,您的手機必須有相應配置。如果不知道如何配置,請聯繫您的電子郵件供應商。
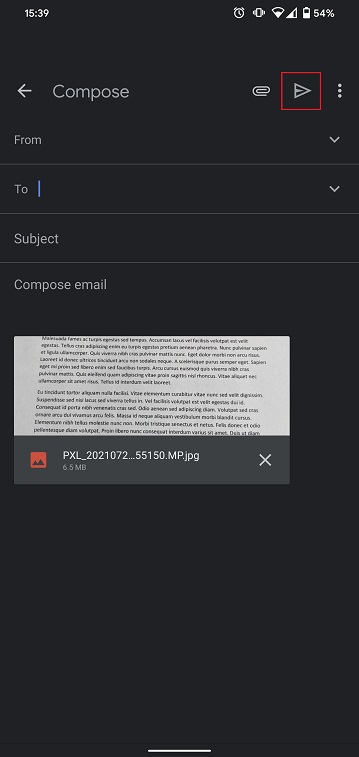
8. 請參見此處瞭解如何填寫電子郵件收件人(To:)和主題(Subject:)。填寫完畢後,點擊右上方的飛機圖標發送郵件。
電子郵件應該發送到哪裏以及郵件主題應該寫什麽
應按照以下說明發送郵件:
1. 在收件人(To:)字段,輸入:
- newaccounts@interactivebrokers.com(如果您是非歐洲國家居民)
- newaccounts.uk@interactivebrokers.co.uk(如果您是歐洲國家居民)
2. 主題(Subject:)字段必須注明所有以下信息:
- 您的賬戶號碼(通常格式爲Uxxxxxxx,其中x是數字)或您的用戶名
- 發送文件的目的。請采用以下慣例:
- 居住地證明請寫PoRes
- 身份證明請寫PID
交易平台登錄故障排除
c. 埠4000/4001被禁。在酒店、咖啡廳等公共網路環境下這些埠常常無法訪問,因此需解鎖這些埠來應用入站/出站TCP協議。此外,如果您的電腦連接了路由器,則路由器上也需打開這些埠。*
How to verify your identity using your Secure Login Device
Some tasks in Client Portal will ask you to verify your identity by using the Challenge Code/Response String method in order to proceed further.
This article will guide you in completing these tasks with the following Secure Login Devices:
-----------------------------------------------------------------------------------------------------------------------------------------------------------
Verify your identity with IB Key (iOS)
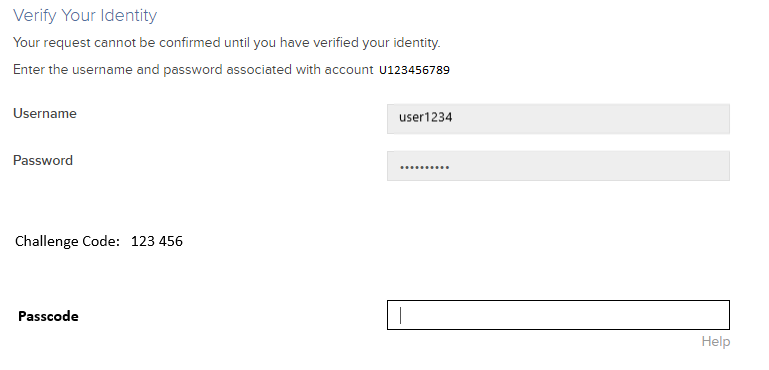
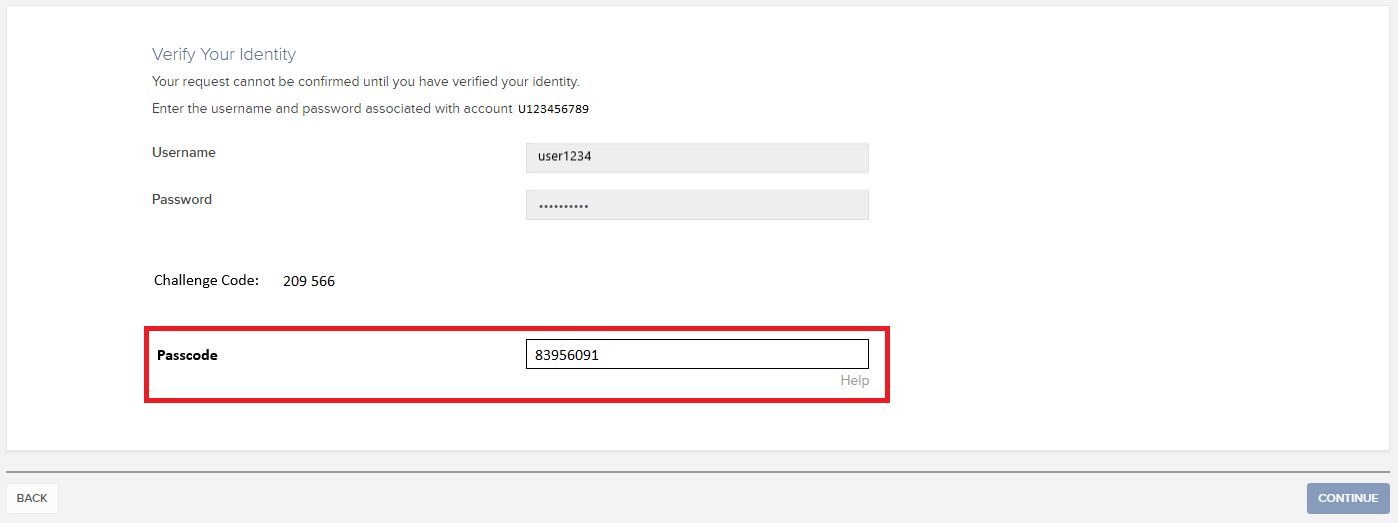
1. When you initiate a task that requires a verification, you will be prompted to enter Username and Password. Fill out the information and click on Continue (Figure 1).
Figure 1.
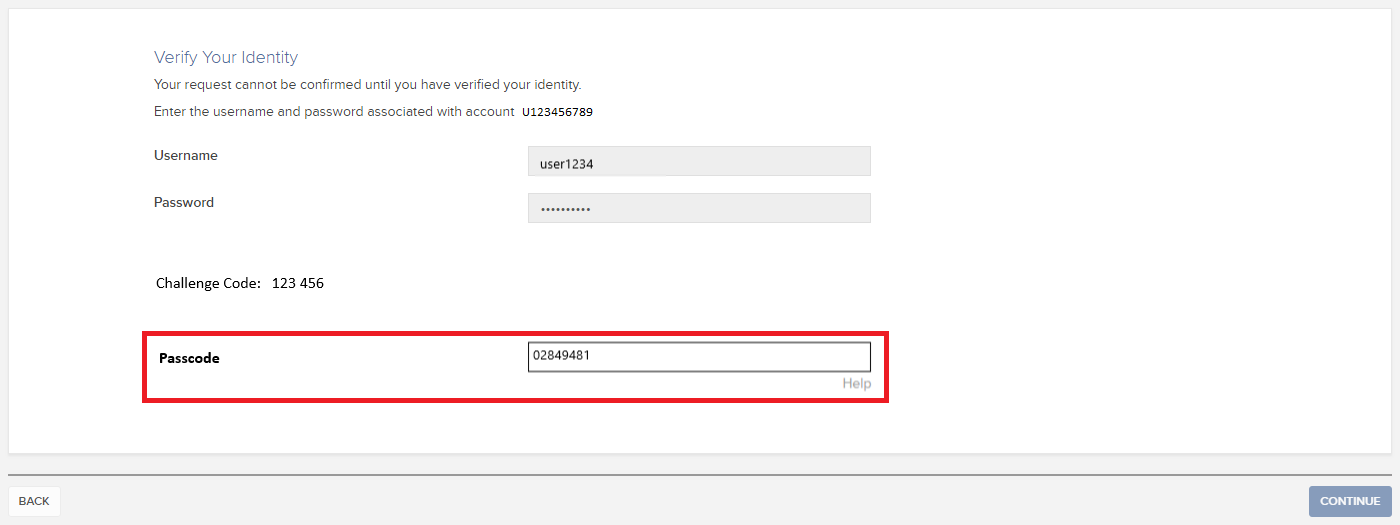
2. A Challenge Code will be displayed, along with a passcode field to enter a response (Figure 2). You will enter this Challenge Code onto your phone.
Figure 2.
3. Launch IBKR Mobile on your iOS smartphone, and...
3.a. If the app opens with the home screen (Figure 3), select Authenticate then proceed with step 4.
3.b. If the app opens with the login screen (Figure 4), tap Services on the top left (red arrow), select Authenticate (Figure 3) and proceed with step 4.
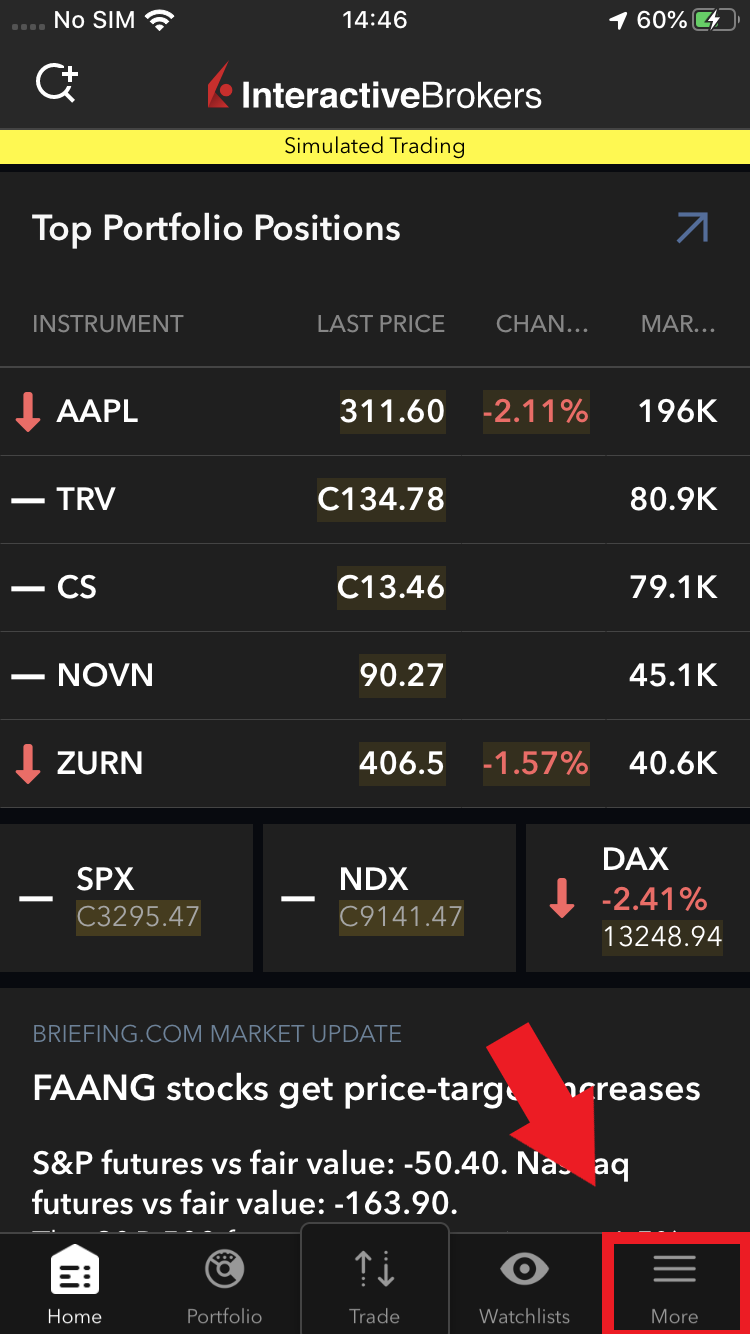
3.c. If the app opens with your Home Page, Portfolio, Watchlists, or similar (Figure 5), tap More on the bottom-right (red arrow). Then tap Two-Factor Authentication (Figure 6), tap Generate Code (Figure 7) and proceed with step 4.
Figure 3. Figure 4.
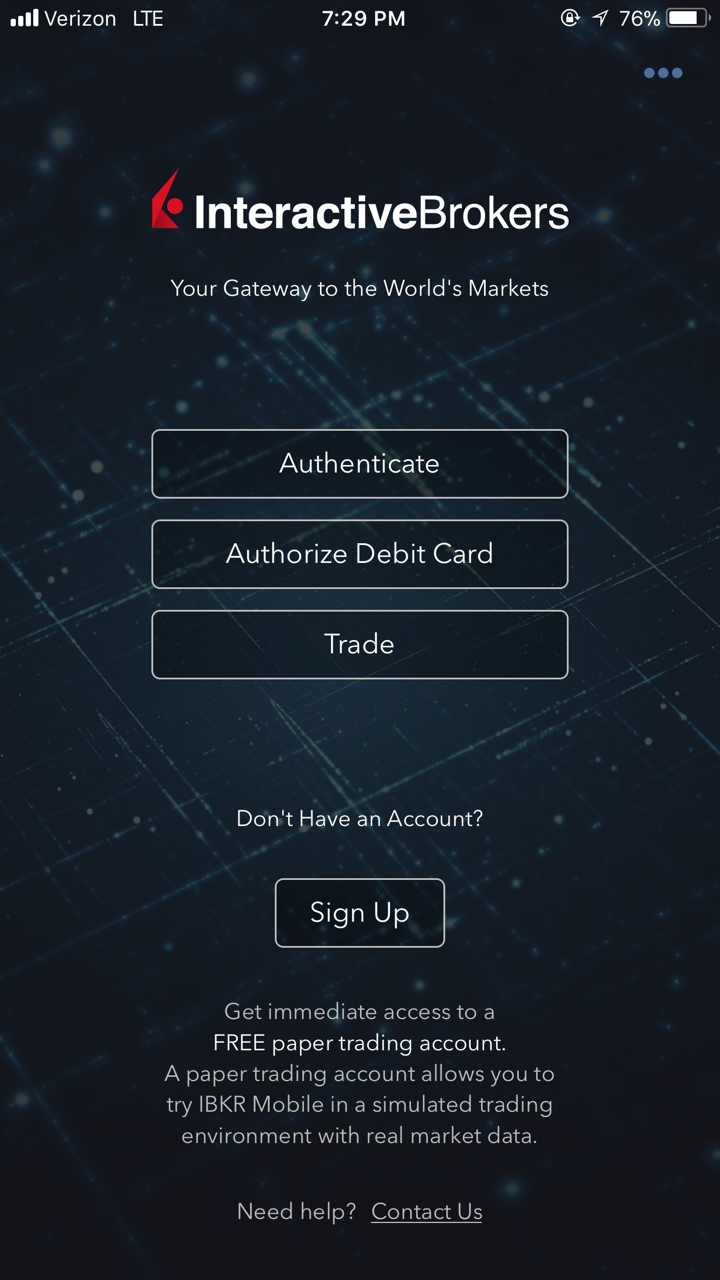
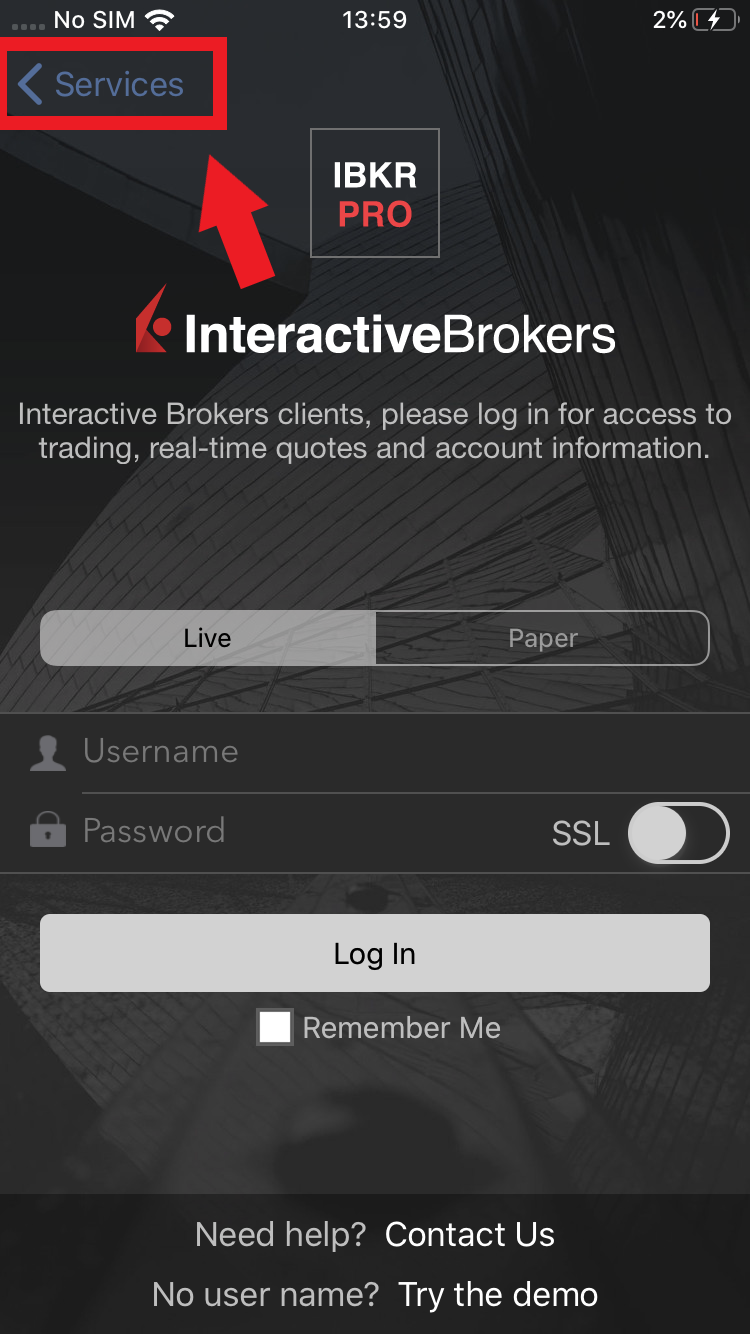
Figure 5. Figure 6. Figure 7.
.jpeg)
.jpeg)
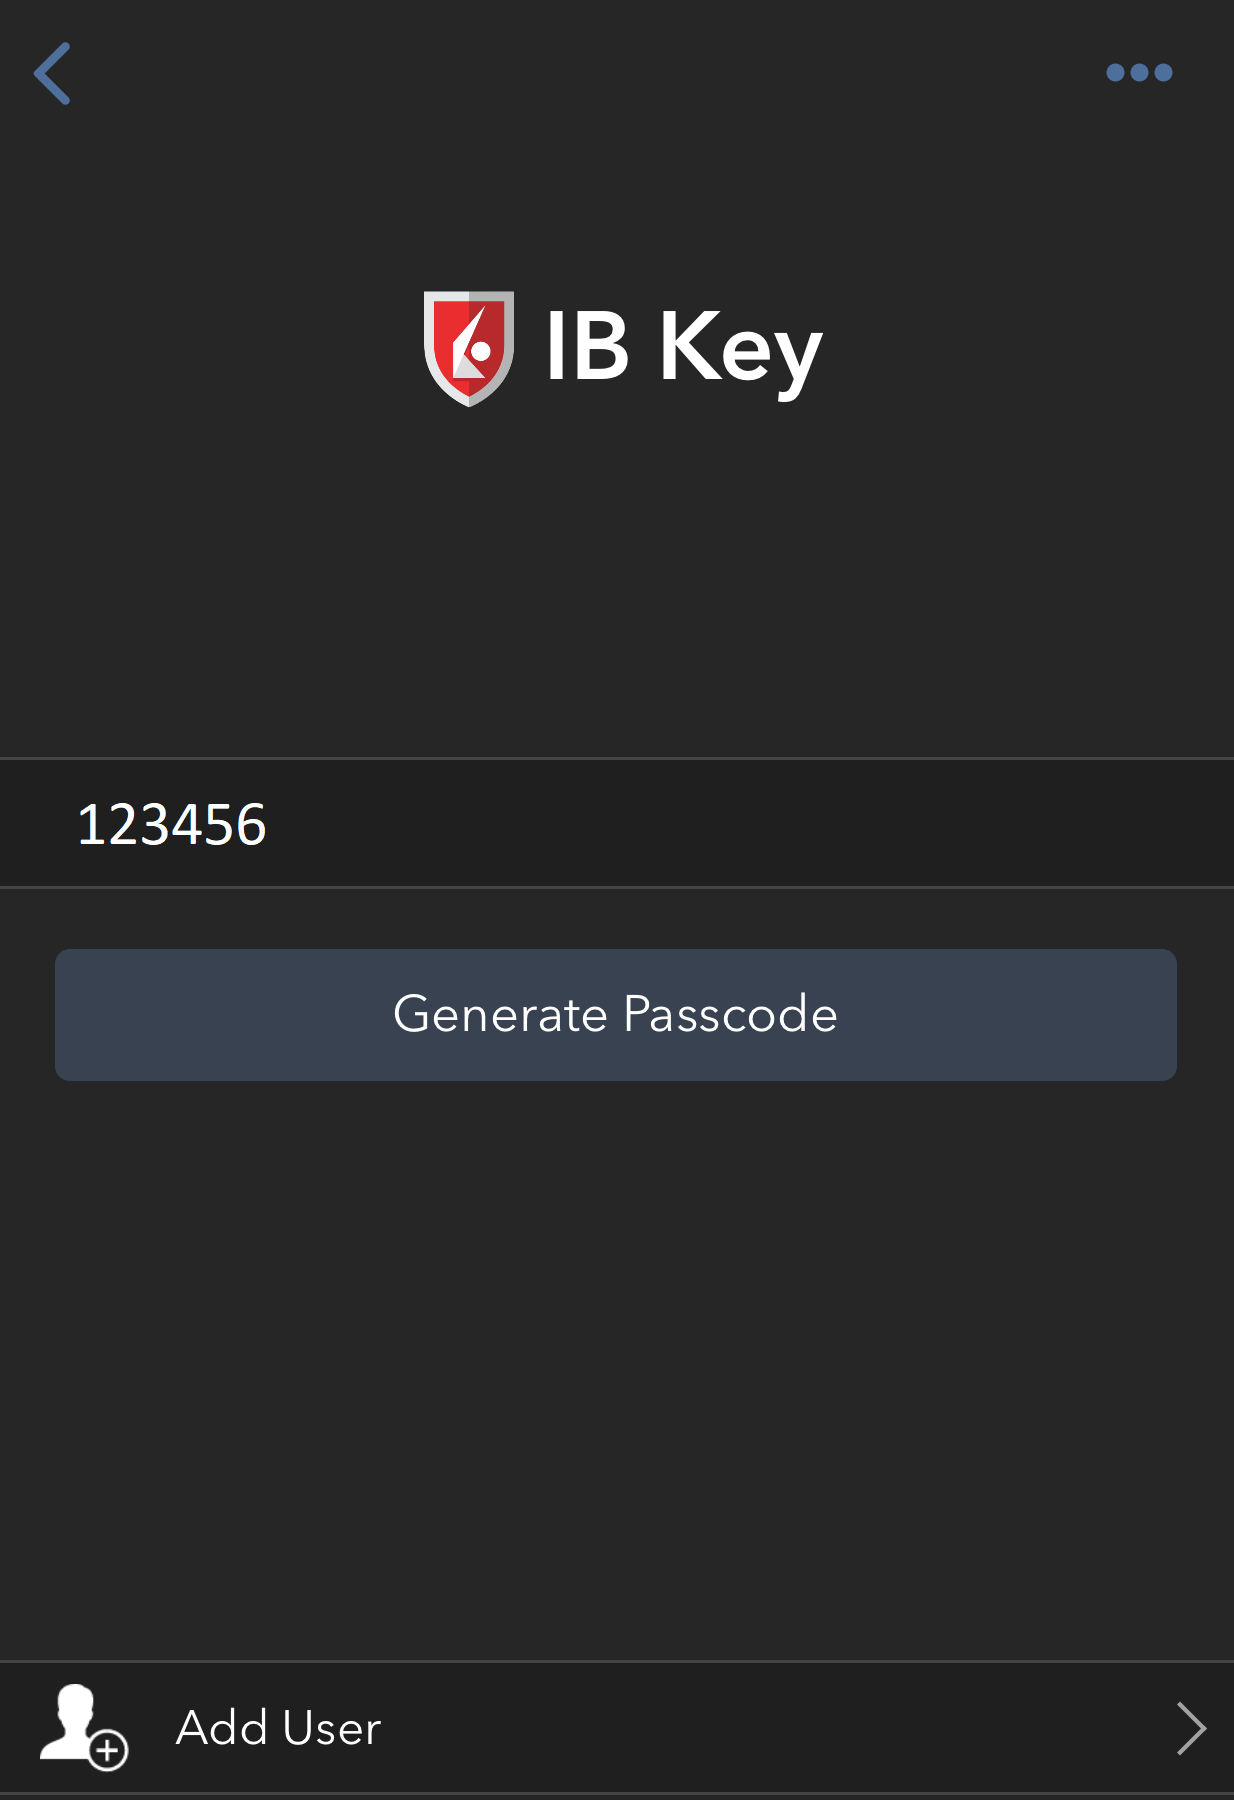
4. Type the Challenge Code from Client Portal (see step 2.) into the corresponding field and select Generate Passcode (Figure 8).
Figure 8.
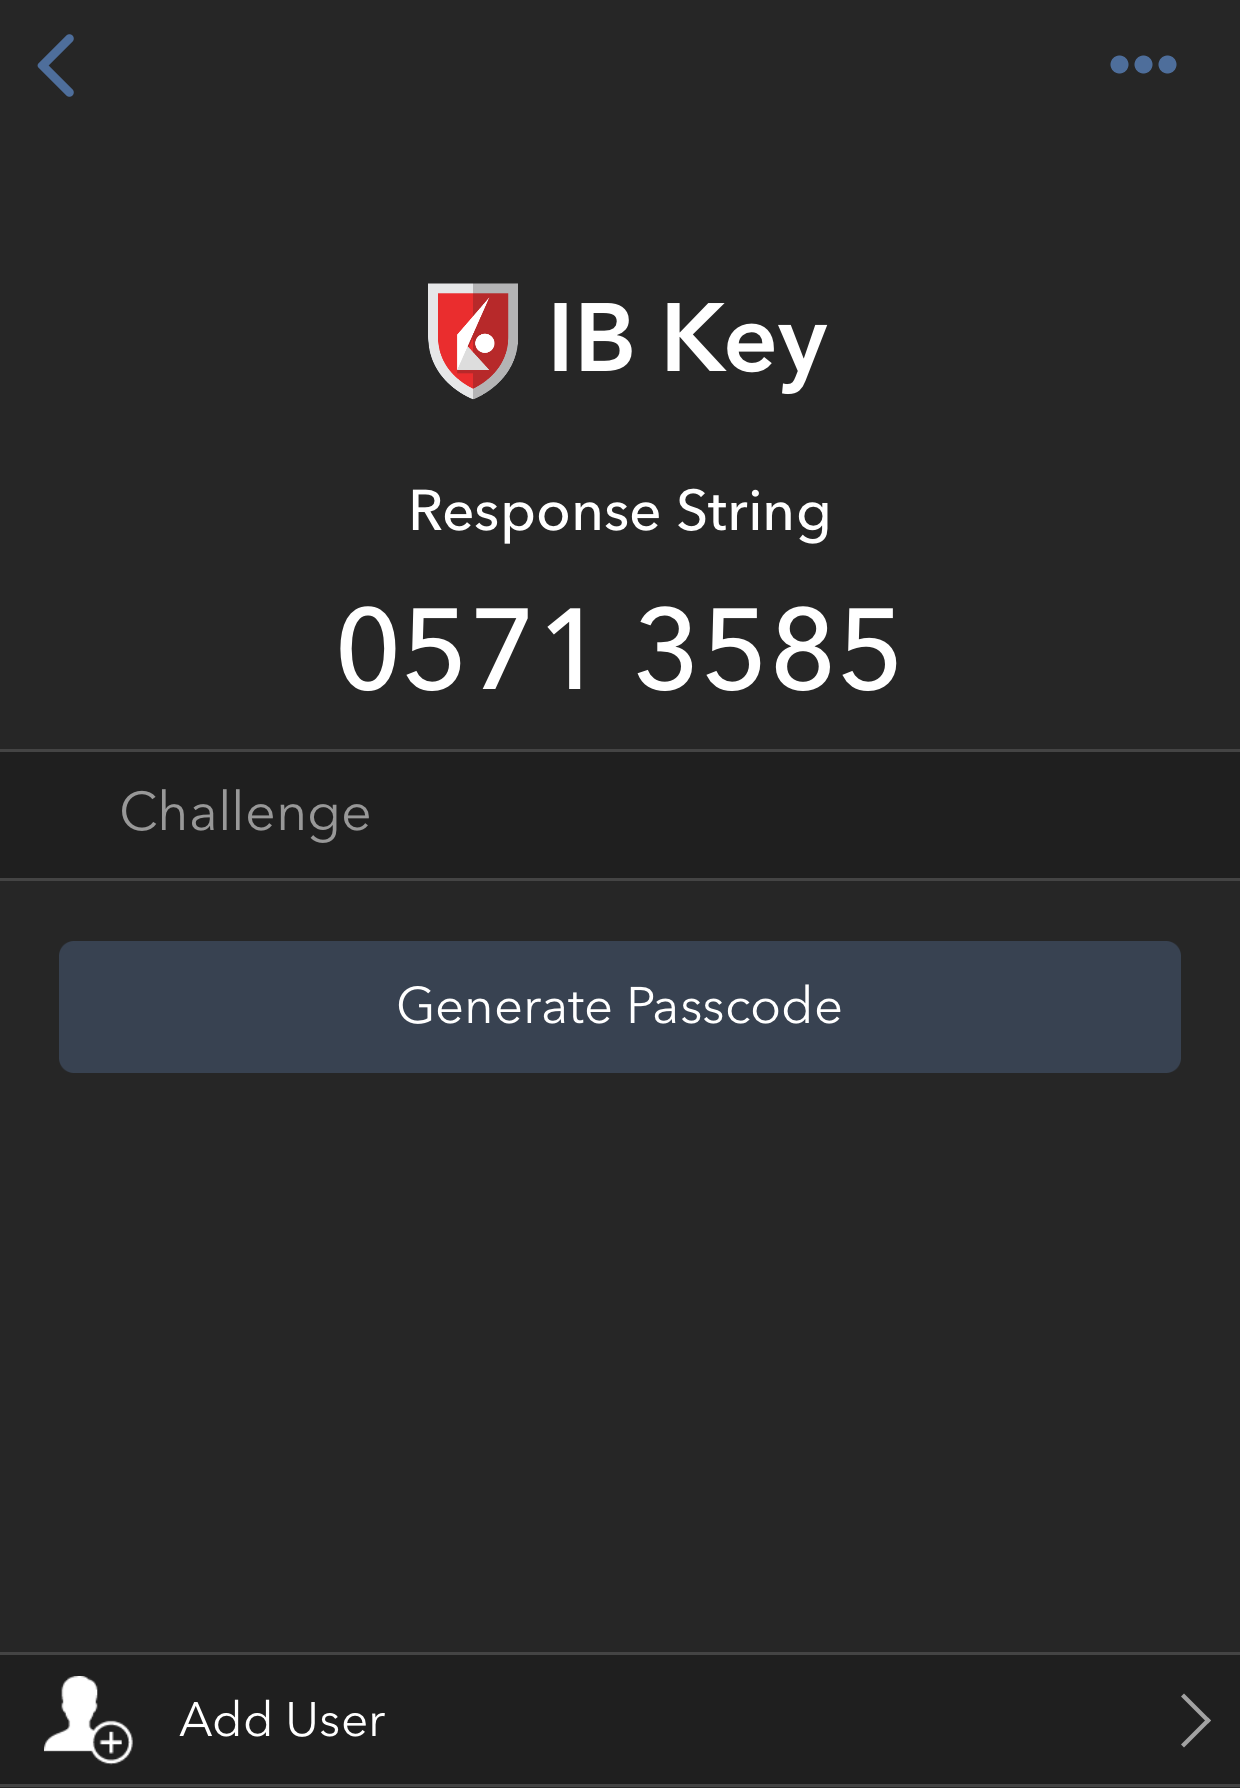
5. Use Touch ID or Face ID for two-factor authentication.
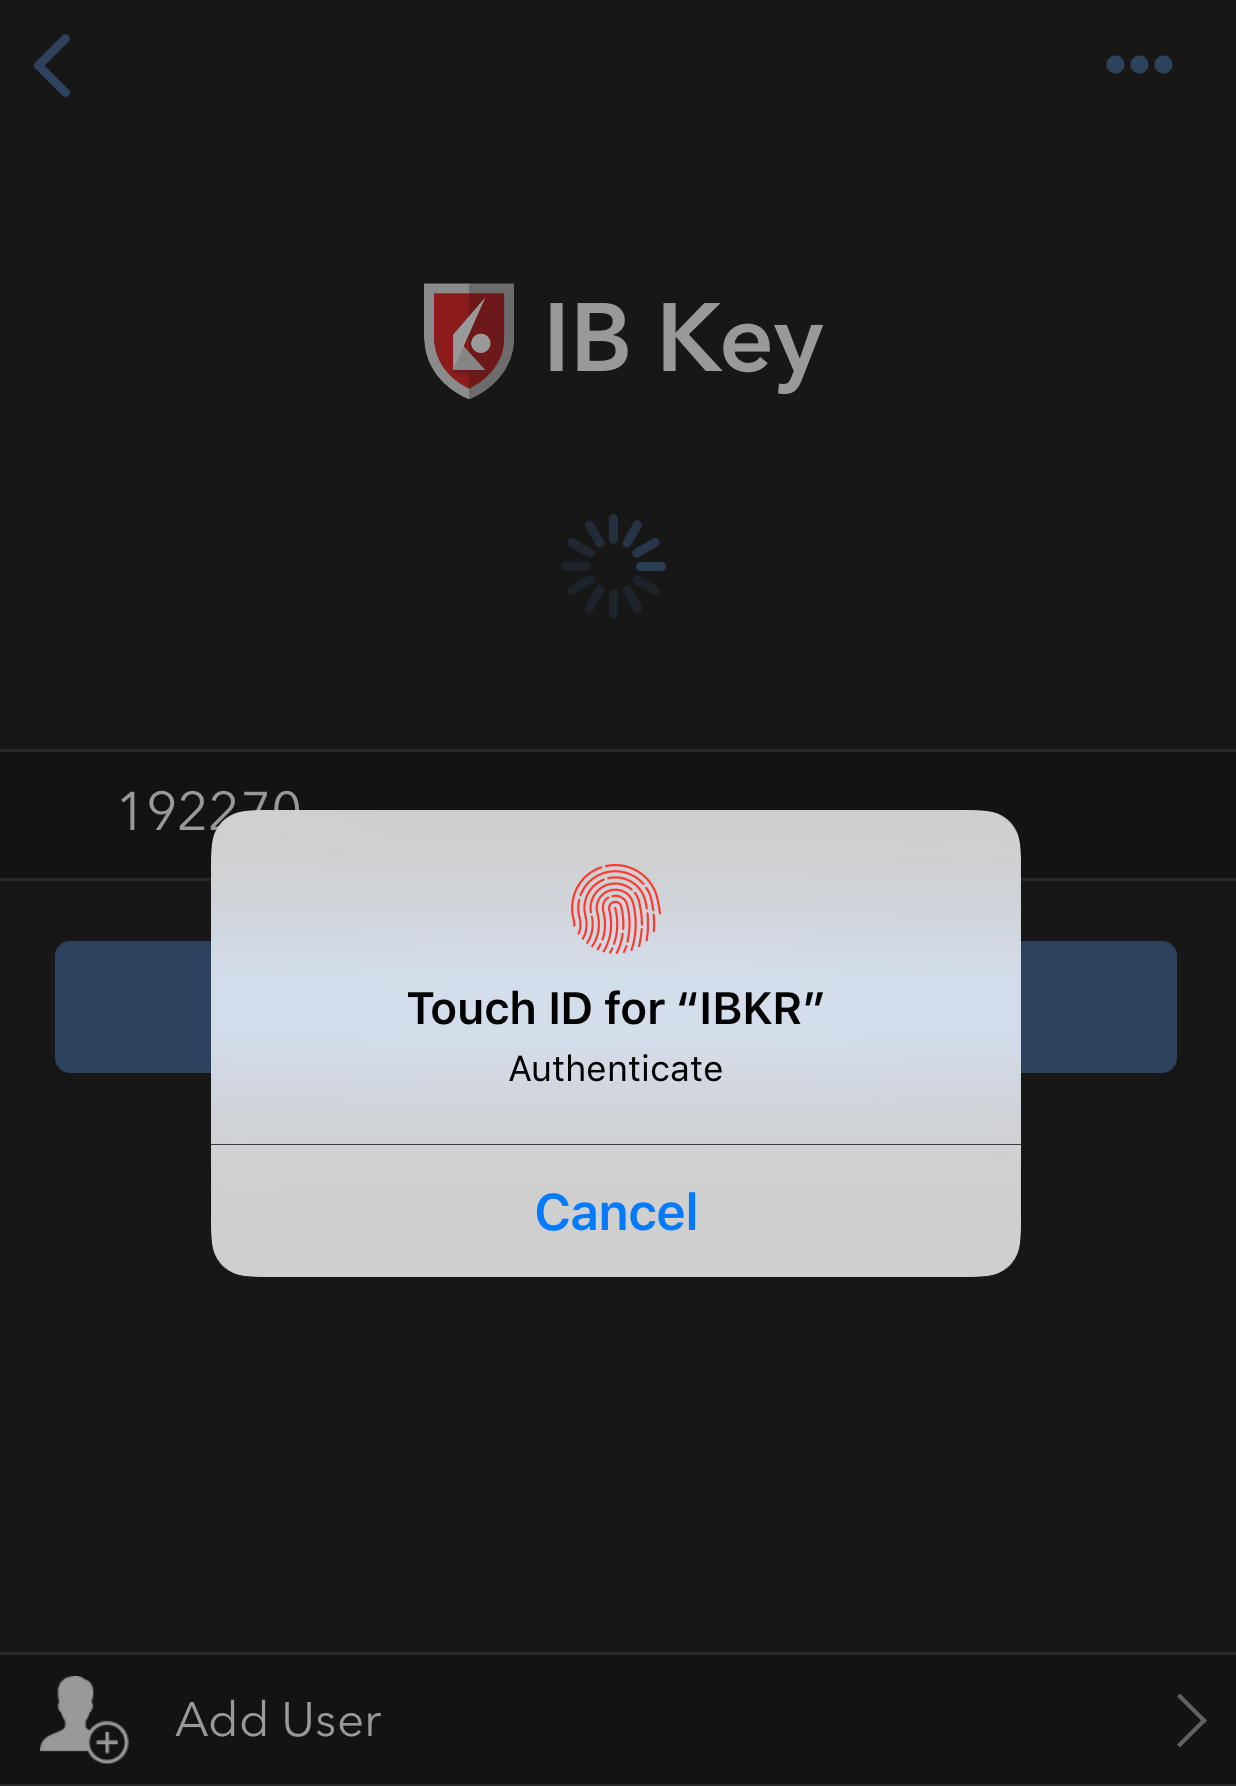
If Touch ID has not been activated, IB Key will prompt you to enter your smartphone's passcode. A response string will then be generated (Figure 9).
5.1 If you use Touch ID, place your registered finger on the Home Button (Figure 9). A response string will then be generated (Figure 10).
Figure 9. Figure 10.
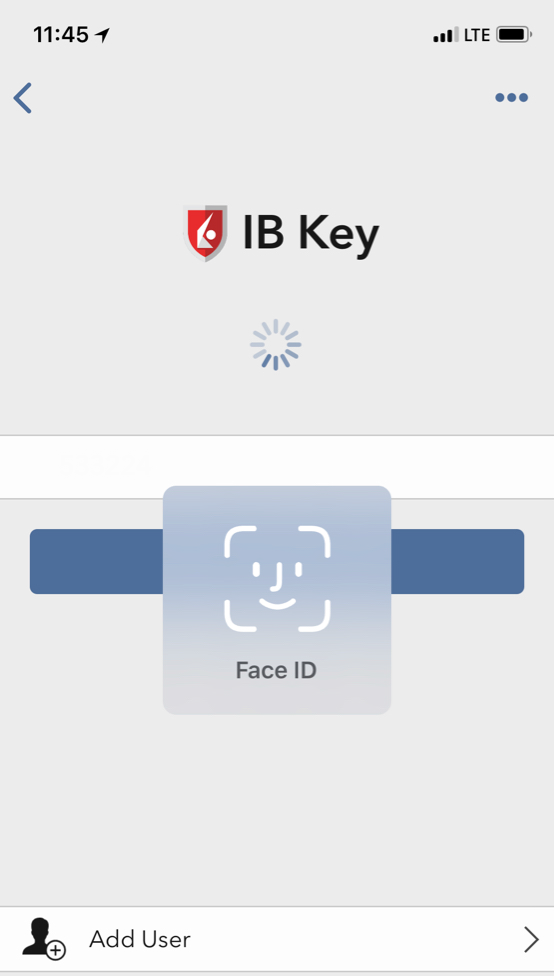
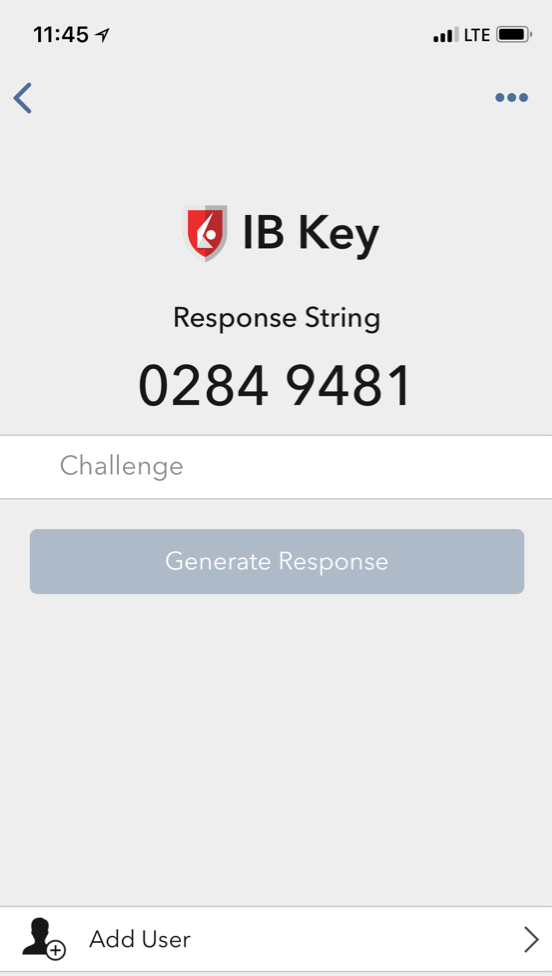
5.2 If you use Face ID, look at your iOS smartphone screen (Figure 11). A response string will then be generated (Figure 12).
Figure 11. Figure 12.
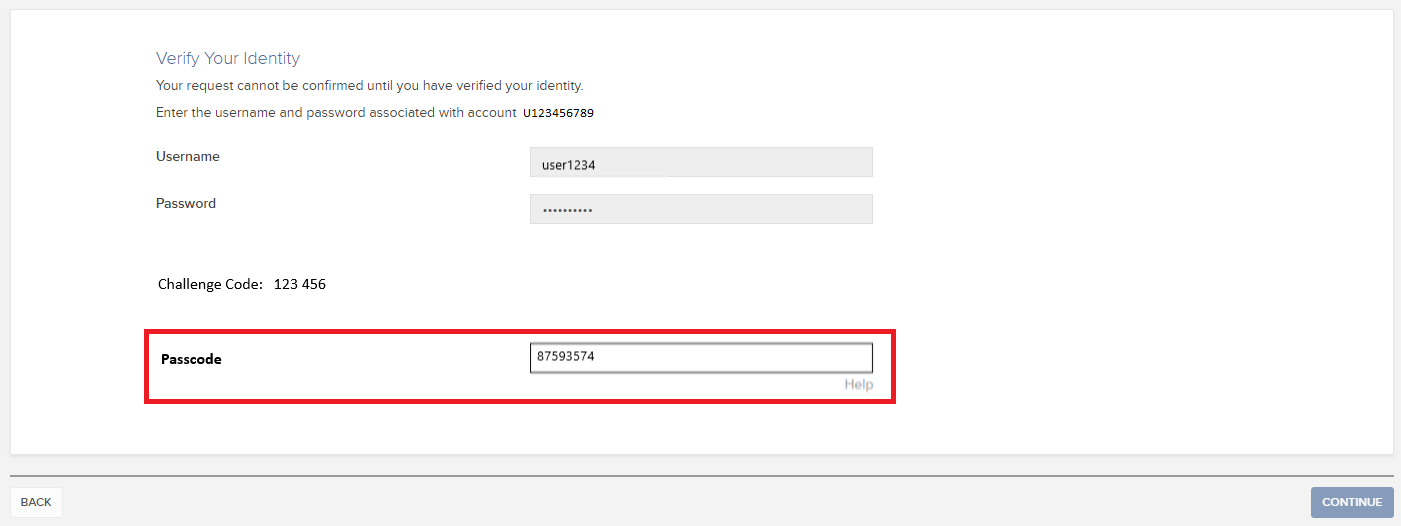
6. Enter the response string from IB Key into the passcode field of Client Portal and click Continue (Figure 13).
Figure 13.
-----------------------------------------------------------------------------------------------------------------------------------------------------------
Verify your identity with IB Key (Android)
1. When you initiate a task that requires a verification, you will be prompted to enter Username and Password. Fill out the information and click on Continue (Figure 1A).
Figure 1A.
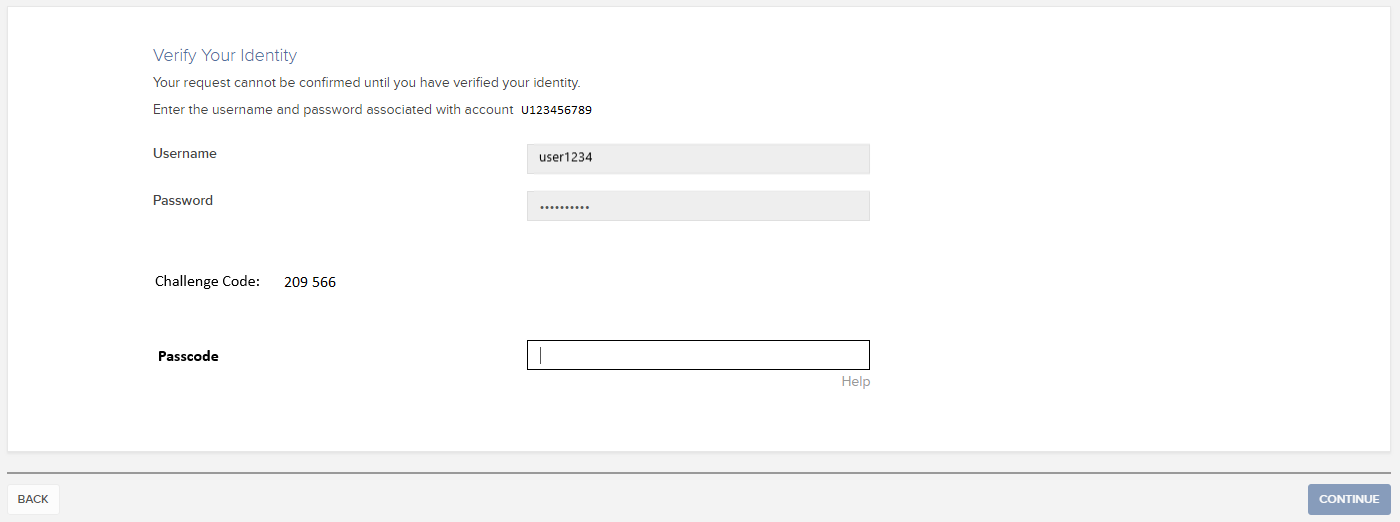
2. A Challenge Code will be displayed, along with a passcode field to enter a response (Figure 2A). You will enter this Challenge Code onto your phone.
Figure 2A.
3. Launch IBKR Mobile on your Android smartphone, and...
3.a. If the app opens with the home screen (Figure 3A), select Authenticate then proceed with step 4.
3.b. If the app opens with the login screen (Figure 4A), tap Services on the top left (red arrow), select Authenticate (Figure 3A) and proceed with step 4.
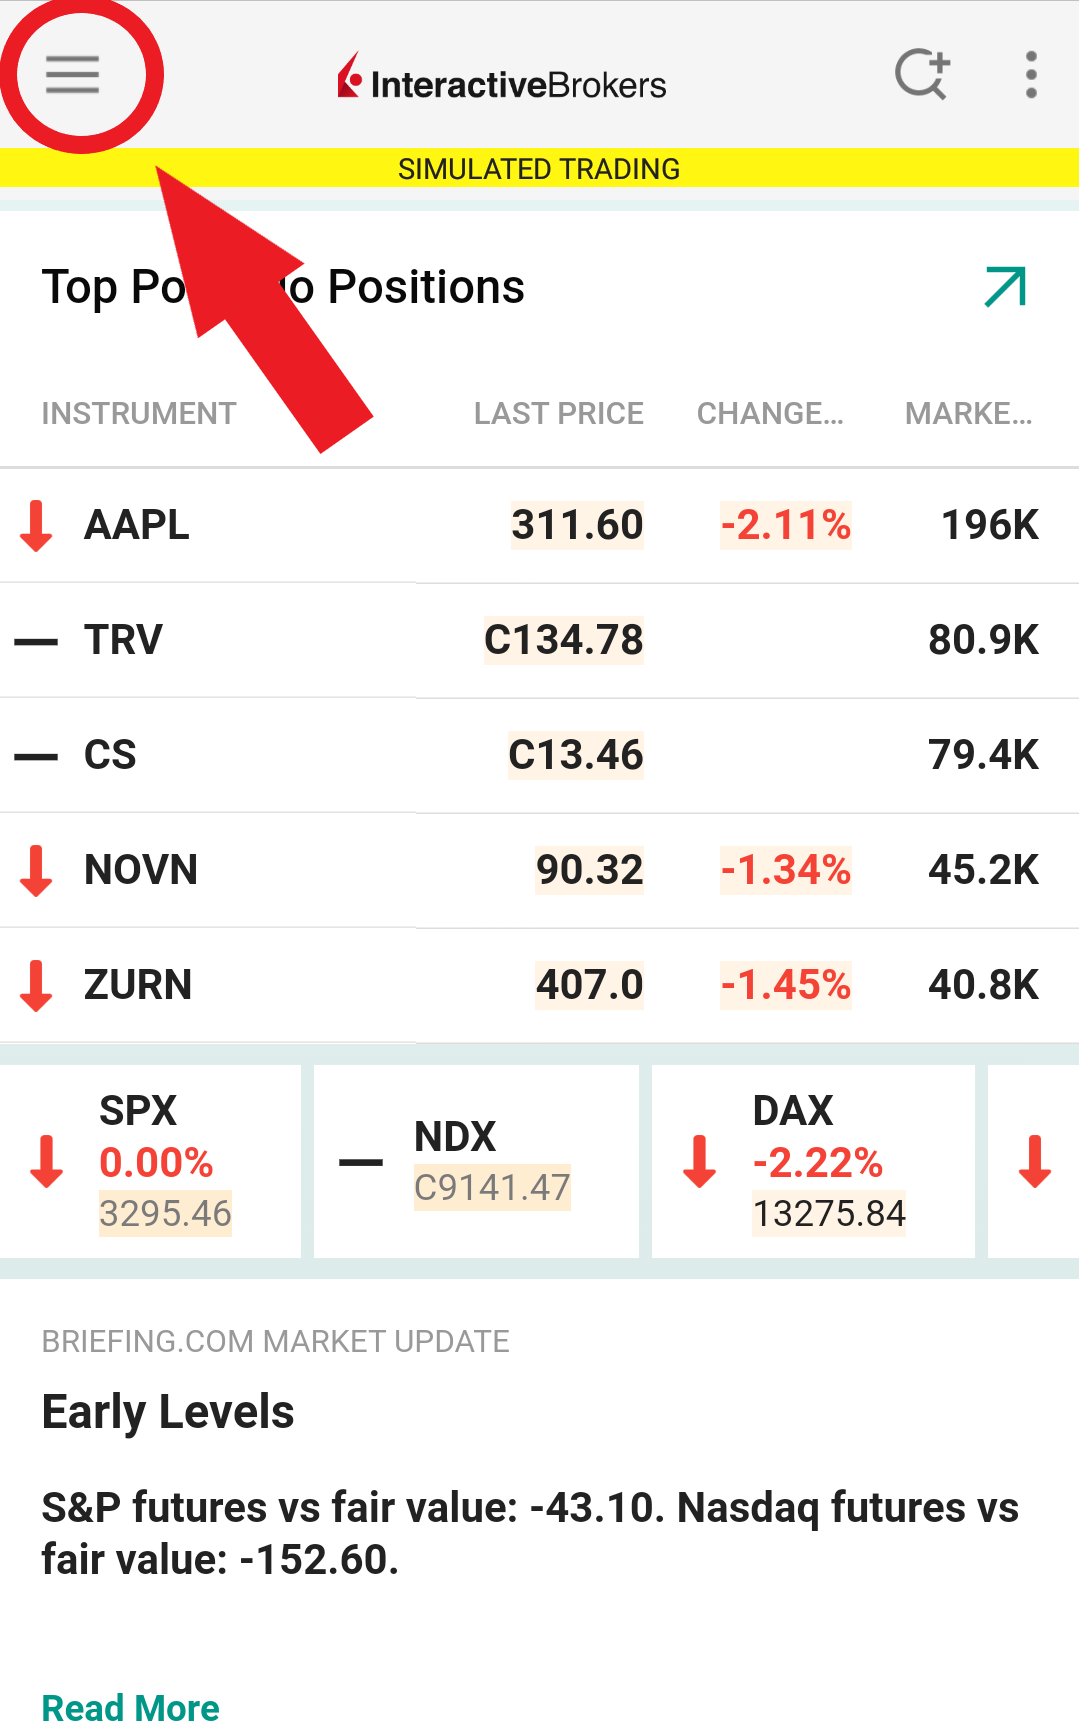
3.c. If the app opens with your Home Page, Portfolio, Watchlists, or similar (Figure 5A), tap More on the bottom-right (red arrow). Then tap Two-Factor Authentication (Figure 6A), followed by Generate Response (Figure 7A), and proceed with step 4.
Figure 3A. Figure 4A.
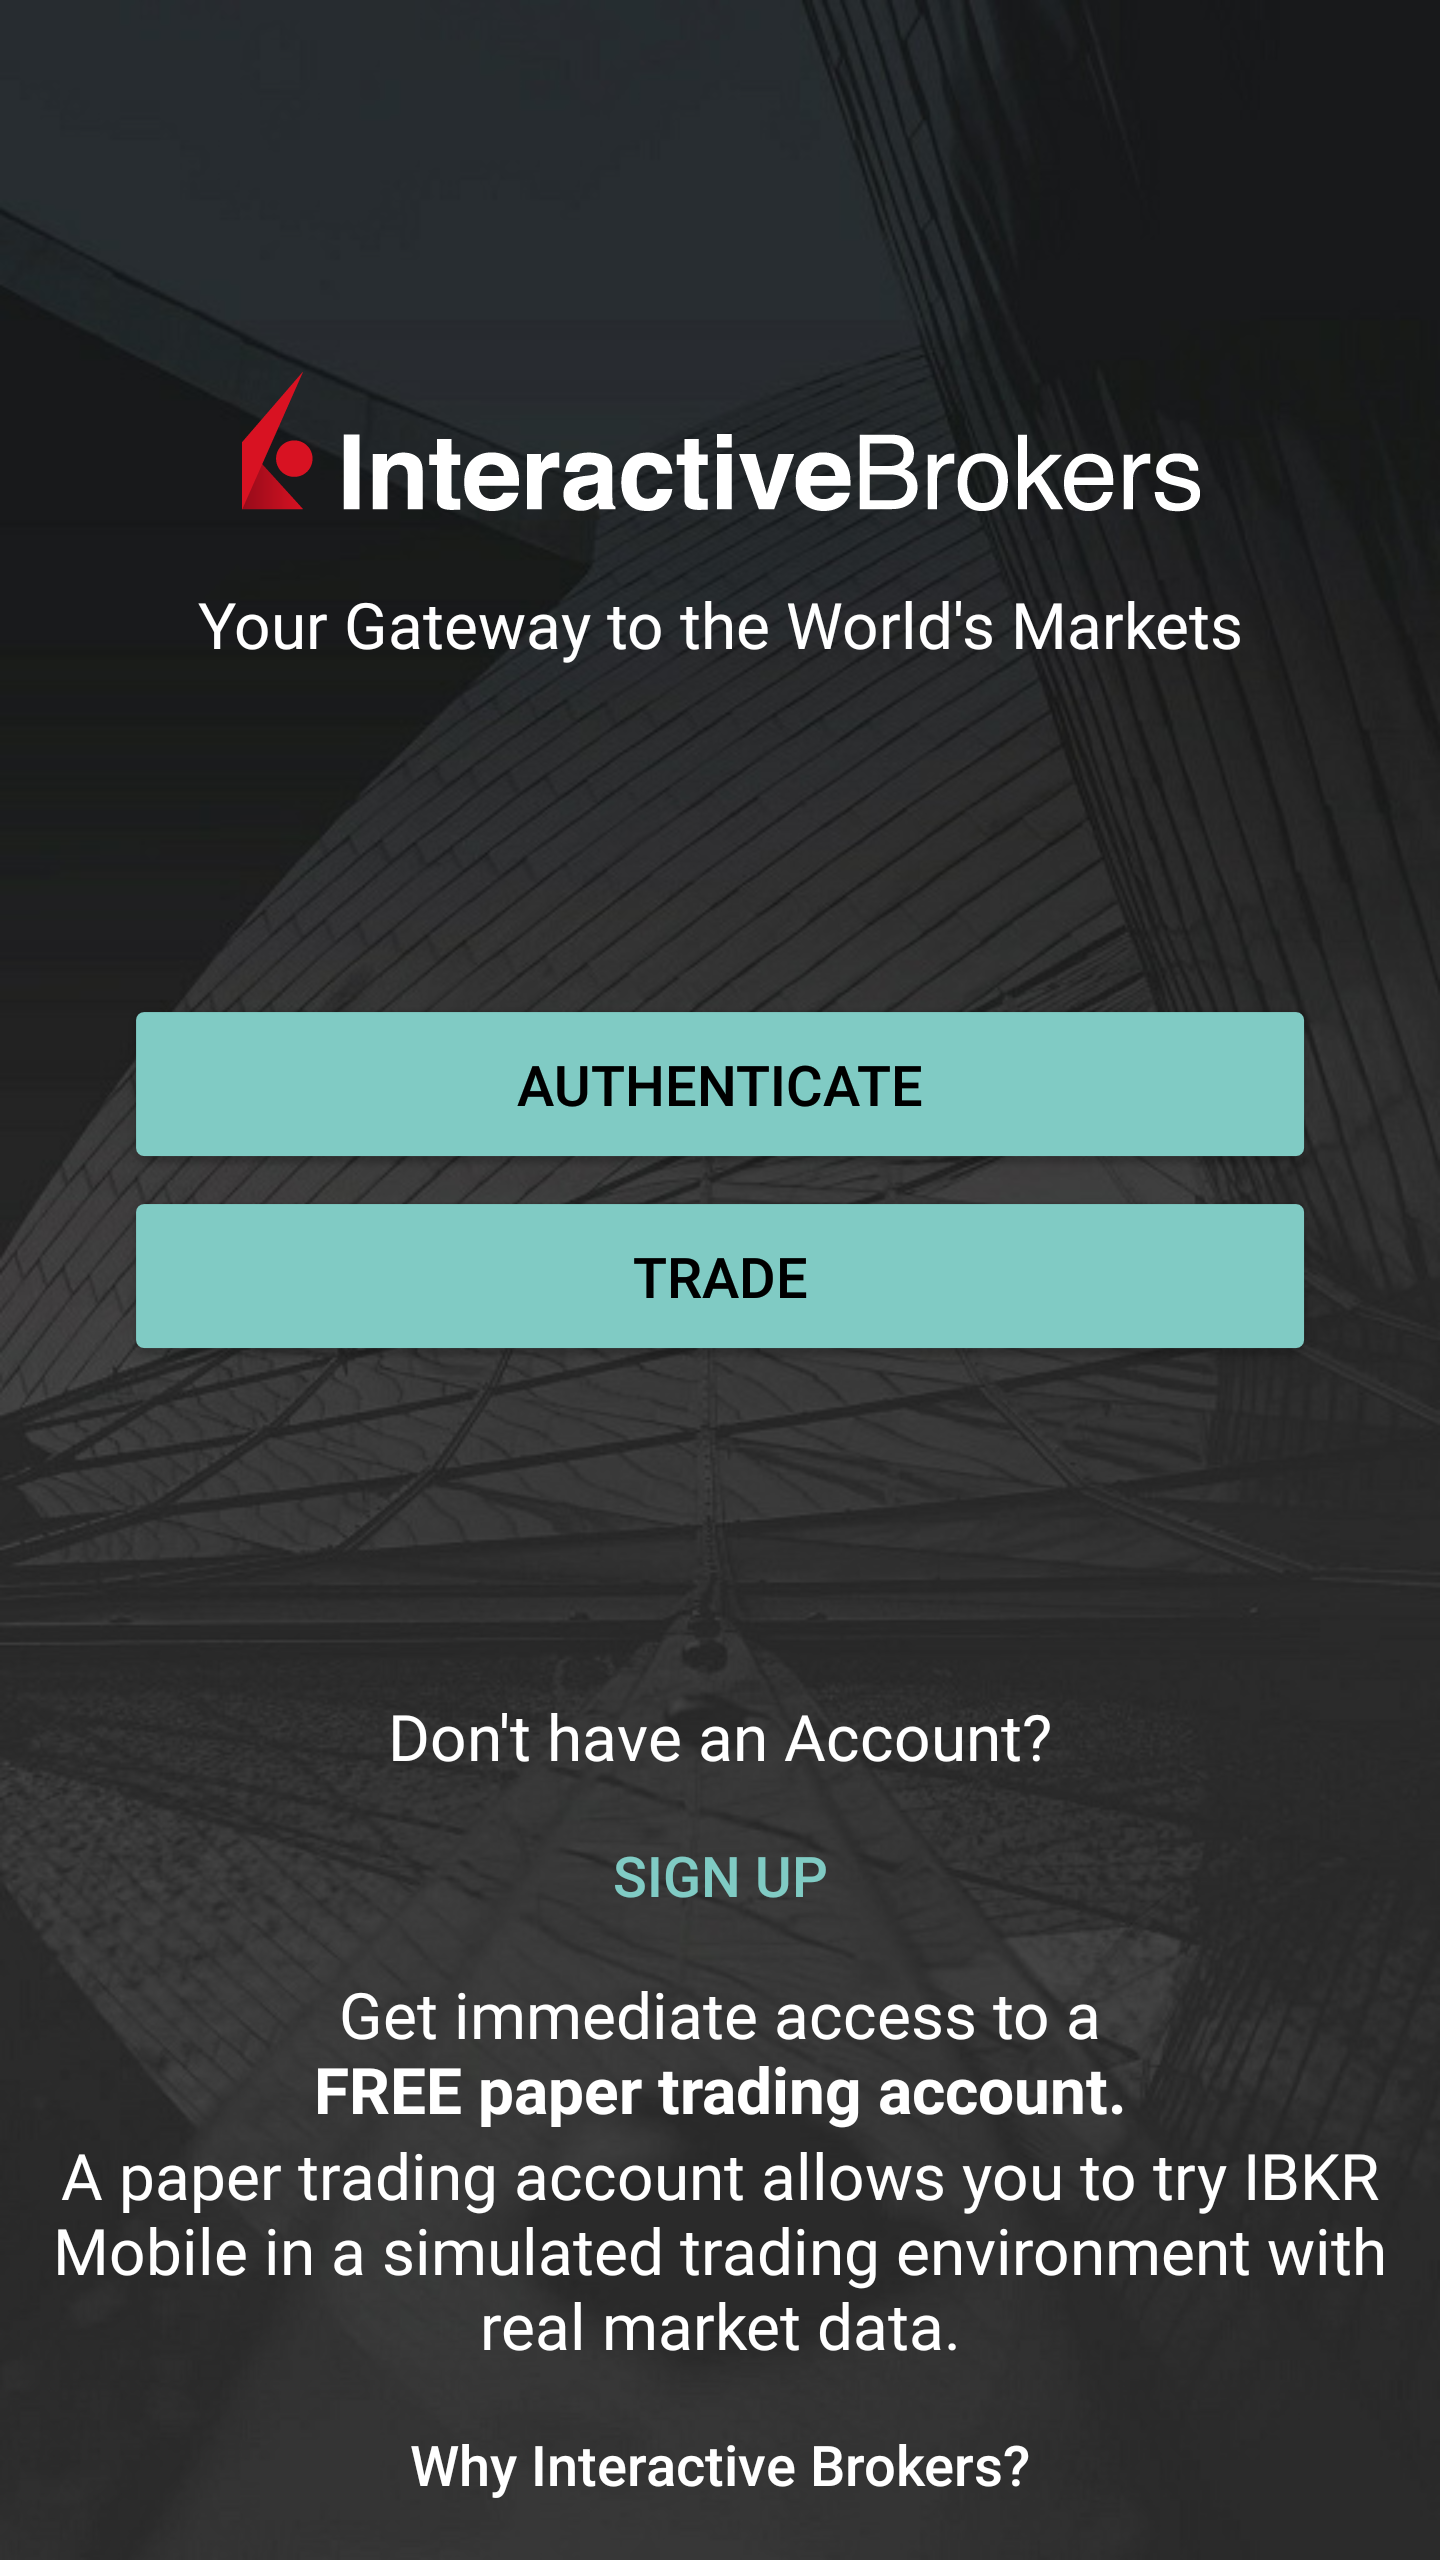
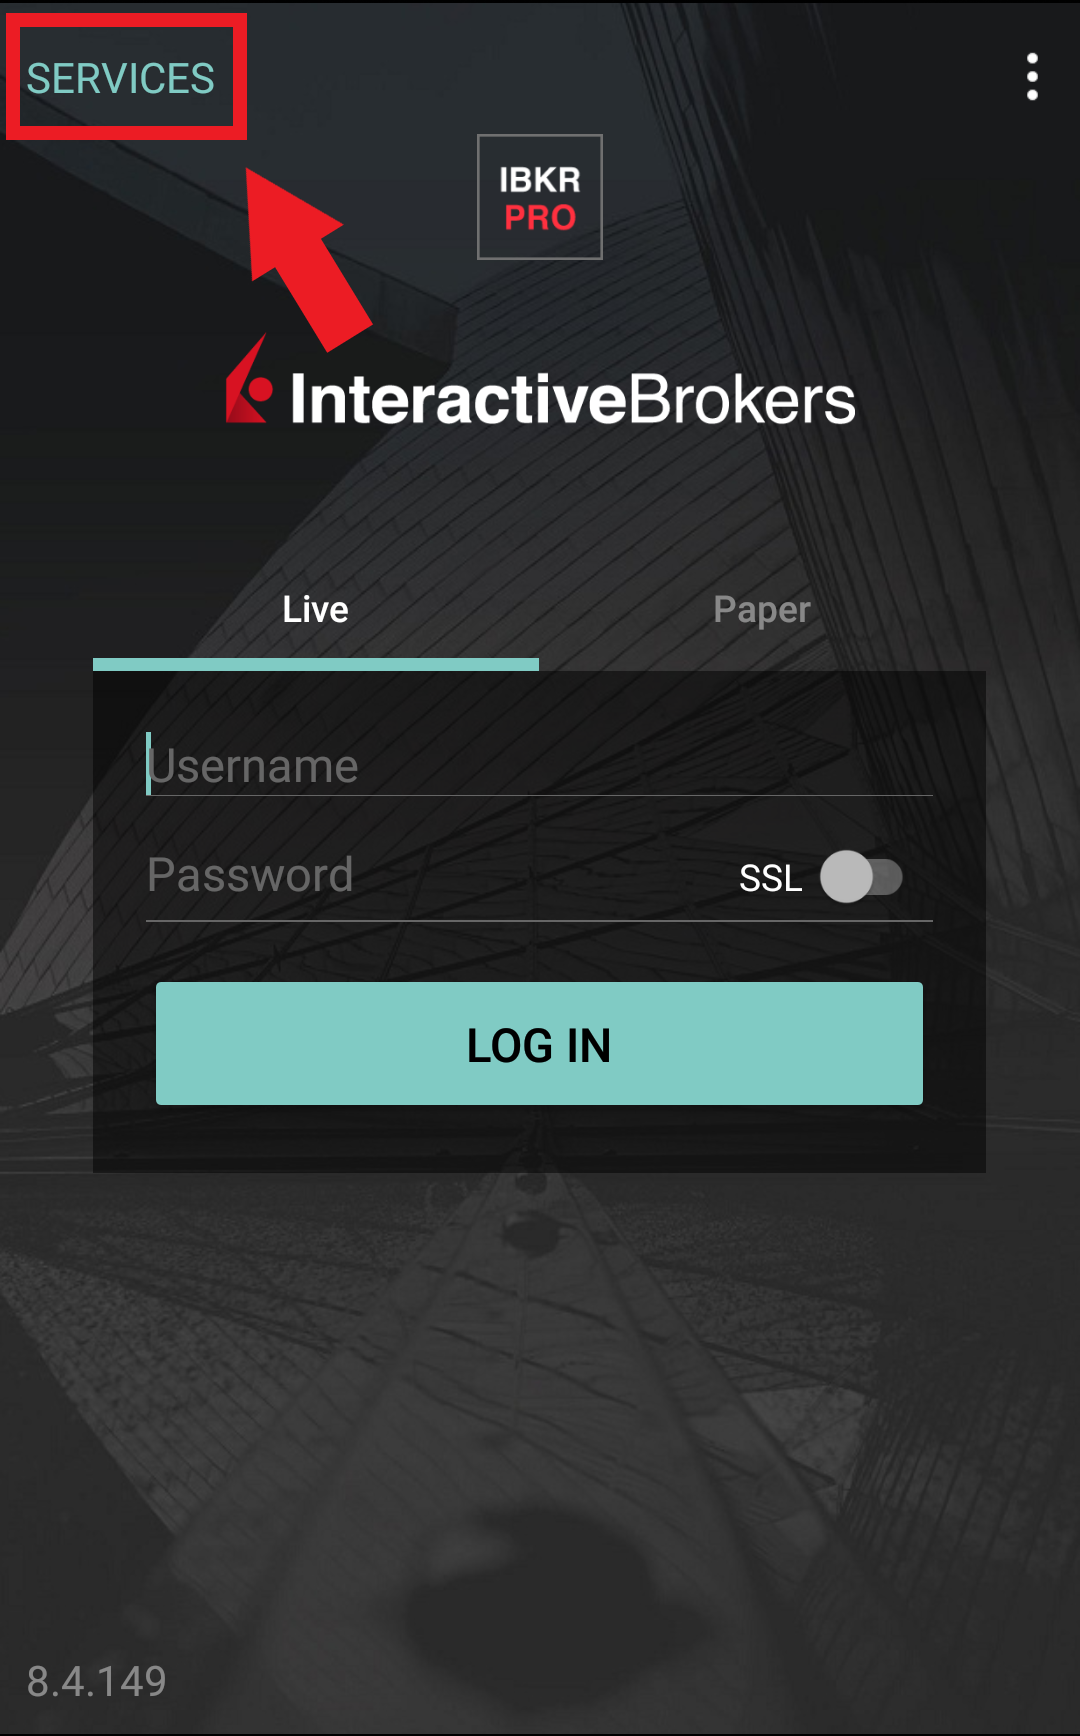
Figure 5A. Figure 6A. Figure 7A.
.jpeg)
.jpeg)
4. Type the PIN that you determined during the IB Key registration process and the Challenge Code from Client Portal into the corresponding fields, then select Generate Passcode. A response string will then be generated (Figure 8A).
Figure 8A.
.png)
5. Enter the response string from IB Key into the passcode field of Client Portal and click Continue (Figure 9A).
Figure 9A.
-----------------------------------------------------------------------------------------------------------------------------------------------------------
Verify your identity with Digital Security Card+ (DSC+)
1. When you initiate a task that requires a verification, you will be prompted to enter Username and Password. Fill out the information and click on Continue (Figure 1B).
Figure 1B.
2. A Challenge Code will be displayed, along with a passcode field to enter a response (Figure 2B). You will enter this Challenge Code onto your DSC+.
Figure 2B.
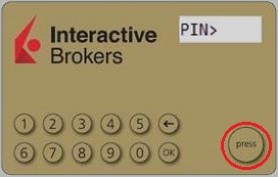
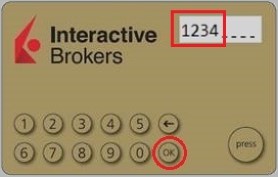
3. Turn on your DSC+ using the “press” button until 'PIN>' is displayed (Figure 3B). Enter the 4-digit PIN code you specified at the time you requested the device, then confirm with the “OK” button (Figure 4B).
Figure 3B. Figure 4B.
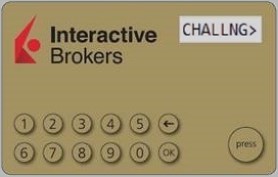
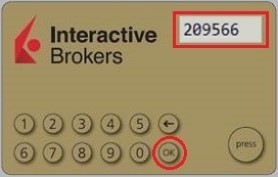
4. When 'CHALLNG>' is displayed (Figure 5B), enter the 6-digit Challenge Code from the Client Portal screen into the DSC+, then confirm with the "OK" button (Figure 6B).
Figure 5B. Figure 6B.
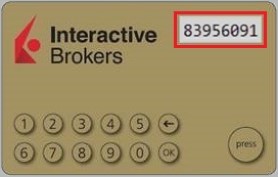
5. A response code will appear (Figure 7B).
Figure 7B.
6. Enter the response string from your DSC+ into the passcode field of Client Portal and click Continue (Figure 8B).
Figure 8B.
How to send documents to IBKR using your smartphone
Interactive Brokers allows you to send us a copy of a document even if you do not currently have access to a scanner. You can take a picture of the requested document with your smartphone.
Below you will find the instructions on how to take a picture and send it per email to Interactive Brokers with the following smartphone operating systems:
If you already know how to take and send pictures per email using your smartphone, please click HERE - Where to send the email to and what to include in the subject.
iOS
1. Swipe up from the bottom of your smartphone screen and tap the camera icon.
If you do not have the Camera icon, you can tap the Camera app icon from the home screen of your iPhone.
Normally your phone should now activate the rear camera. If it activates the front one, tap the camera switch button.
2. Place your iPhone above the document and frame the desired portion or page of the document.

3. Make sure to have uniform, sufficient lighting and not to cast any shadow on the document due to your position. Hold the smartphone firmly with your hand/s and avoid shaking. Tap on the shutter button to take the photo.
4. Tap the thumbnail image in the lower left-hand corner to access the picture you have just taken.
5. Make sure that the picture is clear and the document is well legible. You can enlarge the picture and see it in detail by swiping apart two fingers on the picture itself.

If the picture does not present a good quality or lighting, please repeat the previous steps in order to take a sharper one.
6. Tap the share icon in the lower left-hand corner of the screen.

7. Tap the Mail icon.

Note: to send emails your phone has to be configured for that. Please contact your email provider if you are not familiar with this procedure.
8. Please see HERE how to populate the To: and Subject: fields of your email. Once the email is ready, tap the up arrow icon on the top right to send it.

Android
1. Open your applications list and start the Camera app. Alternatively start it from your Home screen. Depending on your phone model, maker or setup, the app might be called differently.

Normally your phone should now activate the rear camera. If it activates the front one, tap the camera switch button.
2. Place your Android above the document and frame the desired portion or page of the document.

3. Make sure to have uniform, sufficient lighting and not to cast any shadow on the document due to your position. Hold the smartphone firmly with your hand/s and avoid shaking. Tap on the shutter button to take the photo.
4. Make sure that the picture is clear and the document is well legible. You can enlarge the picture and see it in detail by swiping apart two fingers on the picture itself.

If the picture does not present a good quality or lighting, please repeat the previous steps in order to take a sharper one.
5. Tap the empty circle icon in the lower right-hand corner of the screen.

6. Tap the share icon in the lower left-hand corner of the screen.

7. In the sharing menu that will be displayed now tap the icon of the email client set up on your phone. In the example picture below, it is called Gmail but the name may vary according to your specific setup.
.png)
Note: to send emails your phone has to be configured for that. Please contact your email provider if you are not familiar with this procedure.
8. Please see HERE how to populate the To and Subject fields of your email. Once the email is ready, tap the airplane icon on the top right to send it.

WHERE TO SEND THE EMAIL AND WHAT TO INCLUDE IN THE SUBJECT
The email has to be created observing the below instructions:
1. In the field To: type:
- newaccounts@interactivebrokers.com if you are a resident of a non-European country
- newaccounts.uk@interactivebrokers.co.uk if you are a European resident
2. The Subject: field must contain all of the below:
- Your account number (it usually has the format Uxxxxxxx, where x are numbers) or your username
- The purpose of sending the document. Please use the below convention:
- PoRes for a proof of residential address
- PID for a proof of identity
How to obtain an Online Security Code Card
The Online Security Code Card provides you temporary access to your account and trading platform for a duration of 21 days. This is an ad-interim solution usually needed in those cases:
A. You are temporarily away from your permanent security device and you are waiting to regain access to it.
B. You have lost your permanent security device and you want to either request a replacement or maintain access to your account while waiting for the delivery to happen.
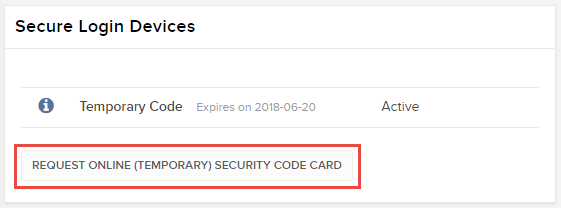
For the cases mentioned above, we assume you have already notified IBKR Client Services and obtained a Temporary Code, as explained in KB70. You can now extend the duration of your temporary access as follows:
Activation procedure
1. Open your browser and go to the web page ibkr.com
2. Click on Login
.png)
.png)
6. Your Online Security Card will be displayed. Click on Print2
(1).png)
7. Please make sure the card has been printed correctly in all its parts and it is clearly readable. Then click on Continue 
8. Two index numbers will appear on the activation screen. Locate the first index number on your card and enter the correspondent three digits code into the Card Values field. Then repeat the same operation for the second index number, leaving no spaces between the codes. Then click on Continue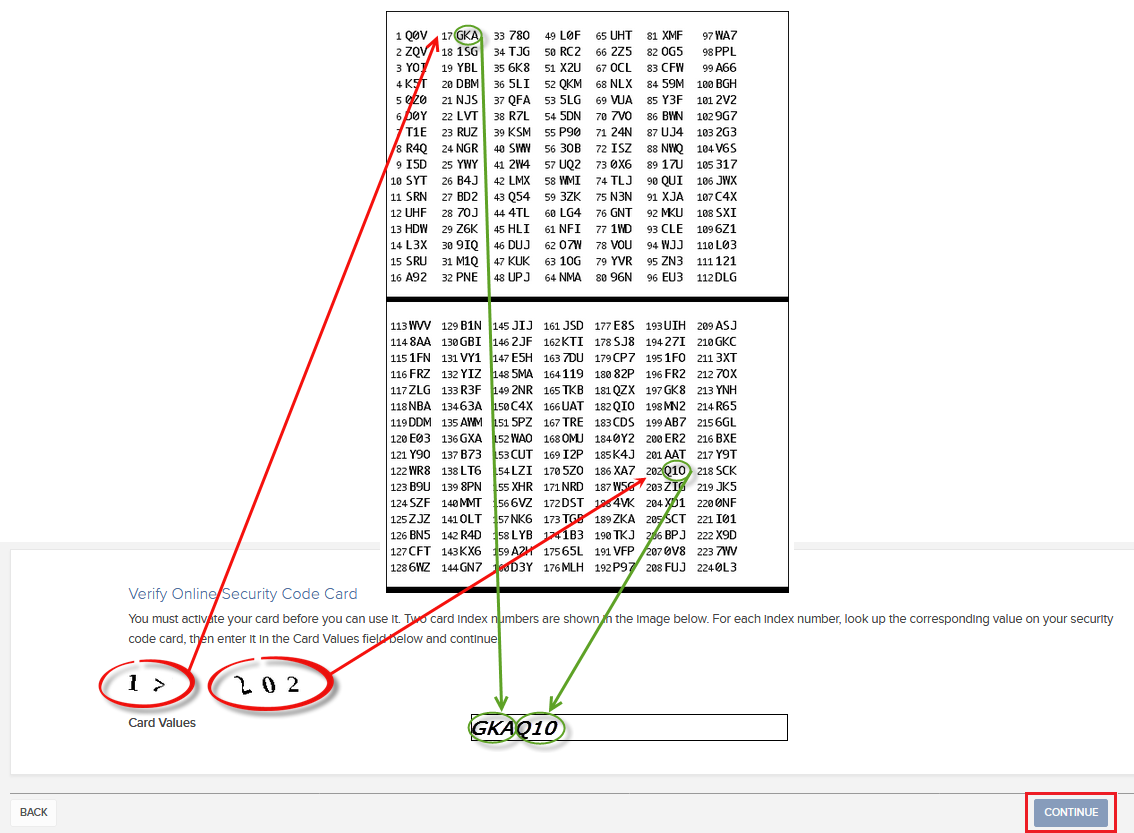
9. You will see a confirmation message stating the expiration date of the card. Click on OK to finalize the procedure.png)
Notes
1. If you use the Classic Account Management, click on the top menu Manage Account > Security > Secure Login System > Security Device

References
- See KB1131 for an overview of the Secure Login System
- See KB1943 for instructions on requesting a replacement Digital Security Card+
- See KB2636 for information and procedures related to Security Devices
- See KB2481 for instructions about sharing the Security Login Device between two or more users
- See KB2545 for instructions on how to opt back in to the Secure Login System
- See KB975 for instructions on how to return your security device to IBKR
- See KB2260 for instructions on activating the IB Key authentication via IBKR Mobile
- See KB2895 for information about Multiple Two-Factor Authentication System (M2FS)
- See KB1861 for information about charges or expenses associated with the security devices
- See KB69 for information about Temporary passcode validity
Troubleshooting Trading Platform Login Failures
Click on the link below which best describes your situation:
a. If operating with a temporary passcode, note that alpha characters are case sensitive and are required to be input in upper case format
b. If operating a security card or electronic device, note that there are no spaces between characters
c. Ports 4000/4001 are being blocked. These ports are often blocked from public connections such as hotels, cafes, etc. and required to be open to accommodate Inbound/Outbound TCP protocol. In addition, if you have a router connected to your computer, these ports must be open on the router.*
*Please click here to check your connectivity status: IBKR Dedicated Connectivity Test Page.


