Interacción entre TWS y MacOS 12 (Monterey)
Este artículo trata sobre el rendimiento de Trader Workstation (TWS) en MacOS Monterey (versión: 12), según lo observado por varios de nuestros clientes. Cuando se ejecute en MacOS 12, TWS podrá congelarse o cerrarse inesperadamente (ocasionar un fallo). Esto puede suceder inmediatamente al iniciarse TWS o podrá ocurrir posteriormente, luego de algunos minutos o incluso horas.
Implementación de la solución
Se ha publicado una solución a este problema en TWS Beta, disponible para descargar aquí
Antecedentes e información adicional sobre la solución del problema
Este comportamiento no dependía de Trader Workstation, sino que estaba siendo ocasionado por un fallo en el código de la plataforma oficial de Java de Oracle, la cual viene en el paquete de TWS y se utiliza para ejecutar nuestro software. Debido a que la plataforma Java de Oracle es propiedad de Oracle y nosotros (IBKR) no podíamos modificar su código ni sus funciones, tuvimos que investigar plataformas Java alternativas que pudiéramos utilizar (p. ej., OpenJDK, Azul), ya que consideramos que era el único modo posible de proporcionarles a nuestros clientes una solución para el problema anterior dentro de un marco de tiempo razonable.
Este proceso incluyó la realización de una gran cantidad de pruebas para ver cuál de las plataformas alternativas a Java era la mejor opción para Trader Workstation, y para evitar así introducir nuevos problemas mientras intentábamos resolver el fallo actual.
Le agradecemos sinceramente por su paciencia.
Programación de los datos de mercado en diferido
Overview:
Los proveedores de datos de mercado usualmente facilitan datos de mercado en dos categorías: en tiempo real y en diferido. Los datos de mercado en tiempo real se divulgan tan pronto como la información esté a disposición del público. Los datos de mercado en diferido tienen un desfase de usualmente 10 a 20 minutos respecto de las cotizaciones en tiempo real.
Algunos mercados permiten que los datos diferidos se muestren aún cuando no exista ninguna suscripción a los datos de mercado, sin coste adicional. La tabla que aparece a continuación muestra una lista de mercados para los cuales proporcionamos datos en diferido sin coste adicional y sin necesidad de una solicitud formal (es decir, los datos en diferido aparecerán cuando se introduzca el símbolo del producto en la plataforma de negociación). La tabla incluye además la correspondiente suscripción en tiempo real, las cuotas de suscripción se indican en la página web de IBKR.
Tenga en cuenta lo siguiente:
- De conformidad con los requisitos normativos, IBKR ya no ofrece información de cotizaciones en diferido sobre acciones estadounidense a los clientes de Interactive Brokers LLC.
- Las cotizaciones en diferido deben utilizarse con fines indicativos y no necesariamente para la negociación. Los tiempos referidos pueden estar sujetos a mayores desfases sin previo aviso.
América
| Nombre de mercado externo | Nombre de mercado de IB | Período de retraso | Suscripción en tiempo real |
| CBOT | CBOT | 10 minutos | CBOT en tiempo real |
| Mercado de futuros CBOE | CFE | 10 minutos | CFE mejorado |
| Market Data Express (MDX) | CBOE | 10 minutos | Índices CBOE Market Data Express |
| CME | CME | 10 minutos | CME en tiempo real |
| COMEX | COMEX | 10 minutos | COMEX en tiempo real |
| ICE US | NYBOT | 10 minutos | ICE Futures U.S. (NYBOT) |
| Bolsa de Derivados de México | MEXDER | 15 minutos | Bolsa de Derivados de México |
| Bolsa Mexicana de Valores | MEXI | 20 minutos | Bolsa Mexicana de Valores |
| Bolsa de Montreal | CDE | 15 minutos | Bolsa de Montreal |
| NYMEX | NYMEX | 10 minutos | NYMEX en tiempo real |
| NYSE GIF | NYSE | 15 minutos | Fuente de índice NYSE global |
| One Chicago | ONE | 10 minutos | OneChicago |
| OPRA | OPRA | 15 minutos | OPRA máximo de libro (L1) (Mercados de opciones de EE. UU.) |
| Mercados extrabursátiles | PINK | 15 minutos | Mercados extrabursátiles |
| Bolsa de Toronto | TSE | 15 minutos | Bolsa de Toronto |
| Venture Exchange | VENTURE | 15 minutos | TSX Venture Exchange |
Europa
| Nombre de mercado externo | Nombre de mercado de IB | Período de retraso | Suscripción en tiempo real |
| BATS Europa | BATE/CHIX | 15 minutos | Acciones europeas (BATS/Chi-X) |
| Boerse Stuttgart | SWB | 15 minutos | Stuttgart Boerse incl. Euwax (SWB) |
| Bolsa de Madrid | BM | 15 minutos | Bolsa de Madrid |
| Borsa Italiana | BVME/IDEM | 15 minutos | Borsa Italiana (acciones BVME / SEDEX / deriv IDEM) |
| Bolsa de Budapest | BUX | 15 minutos | Bolsa de Budapest |
| Eurex | EUREX | 15 minutos | Eurex información en tiempo real |
| Euronext | AEB/SBF/MATIF/BELFOX | 15 minutos | Euronext Cash |
| Euronext | AEB/SBF/MATIF/BELFOX | 15 minutos | Conjunto de datos de Euronext |
| Bolsa de Frankfurt y XETRA | FWB/IBIS/XETRA | 15 minutos | Mercado al contado de Alemania (Frankfurt/Xetra) |
| ICE Futures Europe (materias primas) | IPE | 10 minutos | ICE Futures E.U. - Materias primas (IPE) |
| ICE Futures Europe (valores financieros) | ICEEU | 10 minutos | ICE Futures E.U. – Estados financieros (LIFFE) |
| LSE | LSE | 15 minutos | LSE UK |
| LSEIOB | LSEIOB | 15 minutos | LSE International |
| MEFF | MEFF | 15 minutos | BME (MEFF) |
| Derivados nórdicos de NASDAQ OMX | OMS | 15 minutos | Derivados nórdicos |
| Bolsa de Praga | PRA | 15 minutos | Mercado al contado de Praga |
| Bolsa de Suiza | EBS/VIRTX | 15 minutos | SIX Swiss Exchange |
| Bolsa de Tel Aviv | TASE | 15 minutos | Bolsa de Tel Aviv |
| Turquoise ECN | TRQXCH/TRQXDE/TRQXEN | 15 minutos | Turquoise ECNs |
| Bolsa de Varsovia | WSE | 15 minutos | Bolsa de Varsovia |
Asia
| Nombre de mercado externo | Nombre de mercado de IB | Período de retraso | Suscripción en tiempo real |
| Bolsa de Valores de Australia | ASX | 20 minutos | Total ASX |
| Índices de Hang Seng | HKFE-IND | 15 minutos | Índices de Hang Seng |
| Mercado de futuros de Hong Kong | HKFE | 15 minutos | Derivados de Hong Kong (futuros y opciones) |
| Bolsa de Hong Kong | SEHK | 15 minutos | Mercado de valores de Hong Kong (acciones, warrants y bonos) |
| Bolsa de Corea | KSE | 20 minutos | Bolsa de Corea |
| Bolsa Nacional de Valores de India | NSE | 15 minutos | Bolsa Nacional de Valores de India, segmento de mercado de capitales |
| Mercado de Valores de Osaka | OSE.JPN | 20 minutos | Bolsa de Osaka |
| Derivados SGX | SGX | 10 minutos | Bolsa de Singapur (SGX) - Derivatives |
| Bolsa de Shanghái | SEHKNTL | 15 minutos | Bolsa de Shanghái |
| Mercado STAR de la bolsa de Shanghái | SEHKSTAR | 15 minutos | Bolsa de Shanghái |
| Bolsa de Shenzhen | SEHKSZSE | 15 minutos | Bolsa de Shenzhen |
| Bolsa de Singapur | SGX | 10 minutos | Bolsa de Singapur (SGX) - Stocks |
| Mercado de futuros de Sídney | SNFE | 10 minutos | ASX24 materias primas y futuros |
| Bolsa de Tokio | TSEJ | 20 minutos | Bolsa de Tokio |
Declaración relativa a los avisos sobre límites de precios de Interactive Brokers
Los reguladores esperan que las empresas de corretaje mantengan controles diseñados para evitar que la empresa envíe órdenes a centros de mercado que creen un riesgo de negociación disruptiva (p. ej., un riesgo de movimientos repentinos y rápidos en los precios).
Para cumplir con estas expectativas, Interactive Brokers implementa varios filtros en los precios sobre órdenes de clientes. Estos filtros en los precios pueden, en determinadas circunstancias, poner un límite a los precios de las órdenes de los clientes para evitar disrupciones en el mercado, y aquellos límites de precio normalmente se encontrarán dentro de un rango porcentual a partir de un precio de referencia calculado por IB. (El rango del límite de precio varía de acuerdo con el tipo de instrumento y el precio actual).
Aunque los límites de precio tienen como objetivo equilibrar los objetivos de certeza en la negociación y minimización del riesgo en los precios, una negociación podrá retrasarse o podrá no tener lugar como resultado del límite de precio. Si desea obtener más información, consulte la Declaración de enrutamiento de órdenes y flujo de pago de órdenes de Interactive Brokers.
Si los sistemas de IB colocan un límite de precio a las órdenes de un cliente, dicho cliente recibirá: i) un aviso en tiempo real de dichos límites de precio en Trader Workstation o a través de la API o de la etiqueta 58 de FIX (para usuarios de FIX); o ii) un mensaje de info diario que contenga un resumen de las primeras 10 órdenes con límite de precio del día anterior, el límite de precio inicial para dichas órdenes (si procede) y el rango del límite de precio para un mayor límite de precio para dichas órdenes.
Los clientes podrán optar por dejar de recibir mensajes Info en el futuro haciendo clic en el enlace de baja de suscripción correspondiente dentro de cualquier mensaje Info. Al optar por dejar de recibir estos mensajes Info en el futuro, el cliente:
- Acepta que estará renunciando a recibir avisos de Interactive Brokers acerca de la aplicación de límites de precio de la empresa para las órdenes de dicho cliente; y
- Acepta que sus órdenes podrán tener un límite de precio en el futuro, pero el cliente no desea que se le informe nuevamente acerca de la aplicación de límites de precio para sus órdenes.
Interaction between TWS and MacOS 12 (Monterey)
The present article addresses performance on the Trader Workstation (TWS) under MacOS Monterey (version: 12), as experienced by several clients. The TWS may experience freezes or may shut down unexpectedly (crash) when running on MacOS 12. This can happen immediately during the TWS start up phase or may occur at a later time point, after some minutes or even hours.
Fix Implementation
A fix has been released in the TWS Beta, available for download here
Background and additional details about the resolution of the issue
This behavior did not depend on the Trader Workstation, but was caused by a bug in the code of the official Oracle Java platform which is bundled with TWS and used to run our software. Since the Oracle Java platform belongs to Oracle and we (IBKR) could not modify its code or functionalities, we had to explore alternative Java platforms to use (e.g.: OpenJDK, Azul) as we saw this as the only feasible way to provide our clients with a fix for the above issue within a reasonable time.
This process included an extensive amount of testing, in order to see which of the alternative Java platforms was the best fit for the Trader Workstation and as well to avoid introducing new issues while solving the current one.
We sincerely thank you for your patience.
TWS Account Window for Retail Clients of IBKR Ireland and Central Europe
Overview:
This article describes the information provided in the TWS account window for IBKRs EU based entities.
|
CFDs are complex instruments and come with a high risk of losing money rapidly due to leverage. 61% of retail investor accounts lose money when trading CFDs with IBKR. You should consider whether you understand how CFDs work and whether you can afford to take the high risk of losing your money. |
Background:
Retail clients who are residents of the EEA and therefore maintain an account with one of IBKR’s European brokers, IBIE or IBCE, are subject to EU regulations which introduce leverage and other restrictions applicable to CFD transactions.
Notably the regulations require the use of free cash to satisfy CFD margin requirements and prohibit retail clients from using securities in the account as collateral to borrow funds to initiate or maintain a CFD position. Please see Overview of ESMA CFD Rules Implementation for Retail Clients at IBIE and IBCE for full details.
The accounts of IBKRs EU entities are universal accounts in which clients can trade all asset classes available on IBKRs platform, but unlike IBKRs US and UK entities, there are no separately funded segments.
Working examples of how this restriction is applied, along with details as to how clients can monitor free cash available for CFD transactions, are outlined below.
Account Window
IBKR enforces the restriction relating to free cash by calculating the funds available for CFD trading on a real-time basis, rejecting new orders and liquidating existing positions when the available free cash is insufficient to cover CFD initial and maintenance margin requirements.
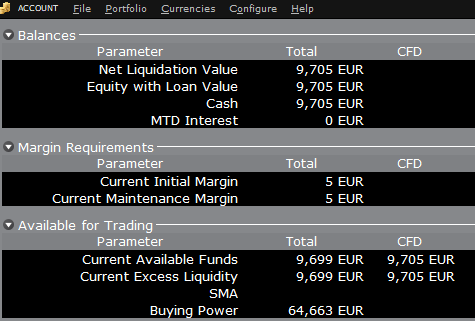
IBKR offers clients the ability to monitor free cash available for CFD transactions via an enhancement to the TWS Account Window which displays the level of free cash in the account. Importantly, the funds shown as available for CFD trading do not imply that cash is held in a separate segment. It simply indicates what proportion of total account balances is available for CFD trading.
For example, assume that an account has EUR 9,705 in cash and no positions. All the cash is available to open CFD positions, or positions in any other asset class:
If the account now purchases 10 shares of AAPL stock for an aggregate value of USD 1,383 the cash in the account is reduced by a corresponding amount in EUR, and the funds available for CFD trading are reduced by the
same amount:
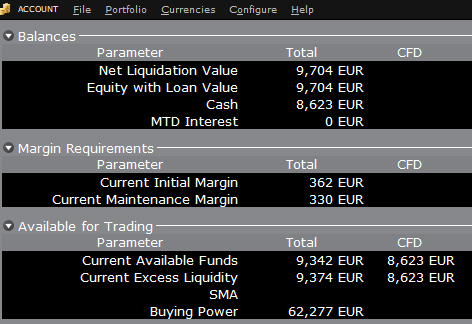
Note that Total available funds are reduced by a smaller amount, corresponding to the stock margin requirement.
If, instead of buying AAPL stock, the account buys 10 AAPL CFDs the impact will be different. As the transaction involves a derivative contract rather than the purchase of the underlying asset itself, there’s no reduction in cash but the funds available for CFDs are reduced by the CFD margin requirement to secure performance on the contract:
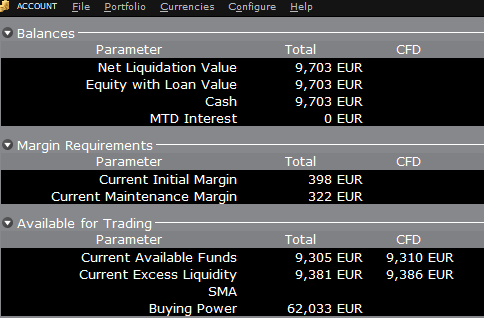
In this case Total available funds and CFD available funds are reduced by an equal amount; the CFD margin requirement.
Funding
As noted above, EU-based accounts do not have segments and therefore there is no need for internal transfers. Funds are available for trades in all asset classes in the amounts indicated in the account window, without the need for sweeps or transfers.
Note also that should an account have a margin loan, i.e. negative cash, it will not be possible to open CFD positions since the CFD margin requirement must be satisfied by free, positive cash. Should you have a margin loan and wish to trade CFDs you must first either close margin positions to eliminate the loan, or add cash to the account in an amount that covers the margin loan and creates a cash buffer sufficient for the necessary CFD margin.
Restricciones de cartera
Residentes de Luxemburgo (LU): IB Luxembourg (“IB-LUX”) no admite commodities metales (certificados de oro de Londres).
Residentes de Europa Central y del Este (HU, CZ, PO, BG, RO, HR, SK, EE, LV, LT, CY, MT): IB Central Europe (“IB-CE”) no admite commodities metales. Asimismo, IBCE solo admite actualmente las siguientes divisas: EUR, USD, CZK, HUF, PLN. Se añadirán GBP y CHF en el futuro.
Si mantiene alguna de estas divisas en su cartera, deberá cerrar las posiciones tan pronto como le sea posible para facilitar la transferencia de su cuenta. No es necesario cerrar las posiciones de efectivo en corto (préstamos) de inmediato, solo las posiciones en largo.
Portfolio Restrictions
Residents of Luxembourg (LU): IB Luxembourg (“IB-LUX”) cannot support Commodity-Metals (London Gold Certificates).
Residents of Central-Eastern Europe (HU, CZ, PO, BG, RO, HR, SK, EE, LV, LT, CY, MT): IB Central Europe (“IB-CE”) cannot support commodity metals. Furthermore, IBCE currently only supports for the following currencies: EUR, USD, CZK, HUF, PLN. GBP and CHF are expected in the near future.
If you hold any of these currencies in your portfolio, you must close the positions as soon as possible in order to facilitate transfer of your account. Short cash positions (borrowing) do not have to be close immediately, just long positions.
Risk Navigator: calculador de margen alternativo
Overview:
A modo de rutina, IB revisa los niveles de margen e implementará los cambios que sirvan para aumentar los requisitos por encima de los mínimos reglamentarios según garanticen las condiciones de mercado. Para ayudara los clientes a entender los efectos que dichos cambios tendrán sobre sus carteras, la aplicación Risk Navigator trae una función denominada 'Calculador de margen alternativo'. A continuación se detallan los pasos para crear una cartera '¿y si?' a los fines de determinar el impacto de dichos cambios en el margen.
Paso 1: abrir una nueva cartera '¿y si?'
Desde la plataforma de negociación TWS Clásica, seleccione las opciones del menú Herramientas analíticas, Risk Navigator y luego Abrir nueva cartera '¿y si?' (imagen 1).
Imagen 1
.png)
Desde la plataforma de negociación TWS Mosaico, seleccione las opciones del menú Nueva ventana, Risk Navigator y Abrir nueva cartera '¿y si?'
Paso 2: definir la cartera
Aparecerá una ventana emergente (imagen 2) desde la cual se le solicitará definir si desea crear una cartera hipotética a partir de su cartera actual o de una cartera nueva. Al hacer clic sobre el botón 'Sí' podrá descargar las posiciones existentes en la nueva cartera '¿y si?'.
Imagen 2
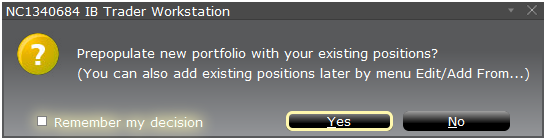
Hacer clic en el botón 'No' abrirá la cartera '¿y si?' sin posiciones.
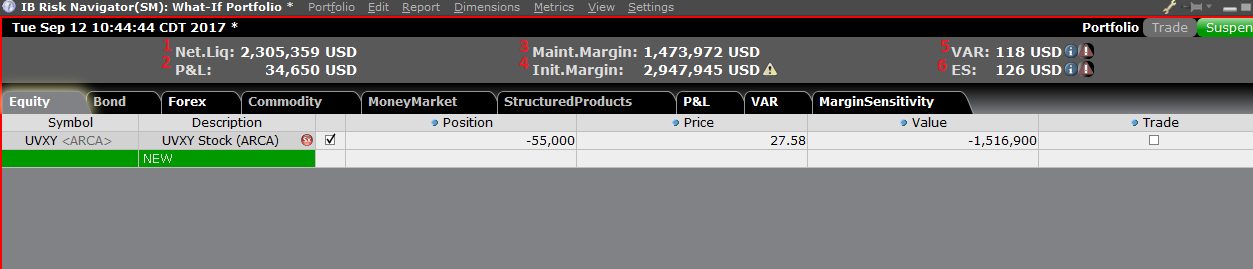
Panel de riesgos
El panel de riesgos está anclado en la parte superior del conjunto de pestañas de productos, y está disponible tanto para las carteras '¿y si?' como para las carteras activas. Los valores se calculan según la demanda de las carteras '¿y si?'. El panel ofrece información sobre la cuenta de un solo vistazo, lo que incluye:
1) Valor neto de liquidación: el valor neto de liquidación total para la cuenta
2) PyG: el total de PyG diarias para la cartera completa
3) Margen de mantenimiento: el total del margen de mantenimiento actual
4) Margen inicial: total de los requisitos de margen inicial
5) VAR: muestra el valor en riesgo para la cartera completa
6) Déficit esperado (Expected Shortfall, ES): el déficit esperado (valor medio en riesgo) es el rendimiento esperado de la cartera en el peor escenario Normal 0 false false false EN-GB X-NONE X-NONE
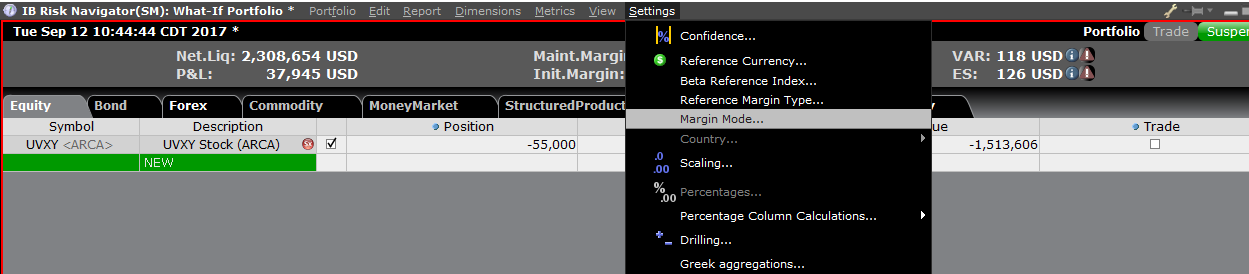
Calculador de margen alternativo
El calculador de margen alternativo, al cual se accede desde el menú Configuración al hacer clic en el Modo de margen (imagen 3), muestra de qué modo afectará el cambio en el margen los requisitos generales de margen una vez que se implementen por completo.
Imagen 3
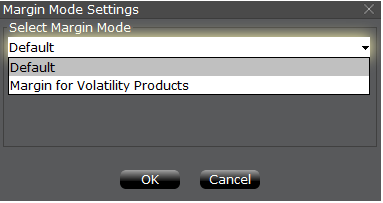
Paso 3: seleccionar la configuración de modo de margen
Aparecerá una ventana emergente (imagen 4) con el título Configuración de modo de margen. Puede utilizar el menú desplegable en esa ventana para cambiar el cálculo de margen de Predeterminado (la política actual) al nuevo título de la nueva Configuración de margen (la nueva política de margen). Una vez que haya realizado la selección, haga clic en el botón 'OK' en esa ventana.
Imagen 4
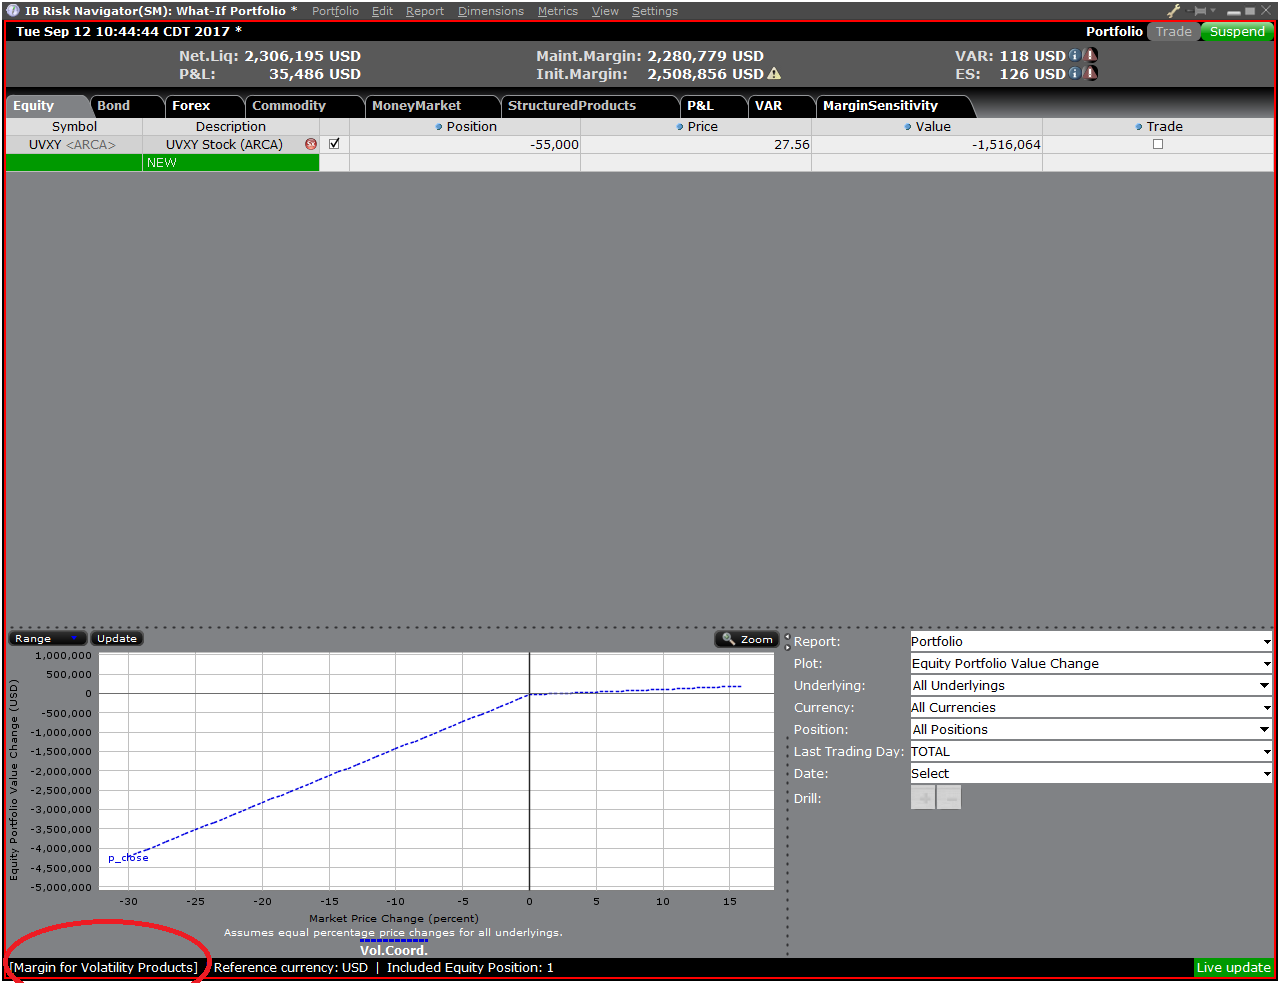
Una vez que se especifica la nueva configuración del modo de margen, el panel de Risk Navigator se actualizará automáticamente para reflejar su elección. Puede saltar de atrás hacia adelante y viceversa por los ajustes de configuración del Modo de margen. Tenga presente que el Modo de margen actual aparecerá en la esquina inferior izquierda de la ventana de Risk Navigator (imagen 5).
Imagen 5
Paso 4: añadir posiciones
Para añadir una posición a la cartera '¿y si?', haga clic sobre la fila verde con el título 'Nueva' e ingrese el símbolo subyacente (imagen 6), defina el tipo de producto (imagen 7) e ingrese la cantidad de la posición (imagen 8)
Imagen 6

Imagen 7
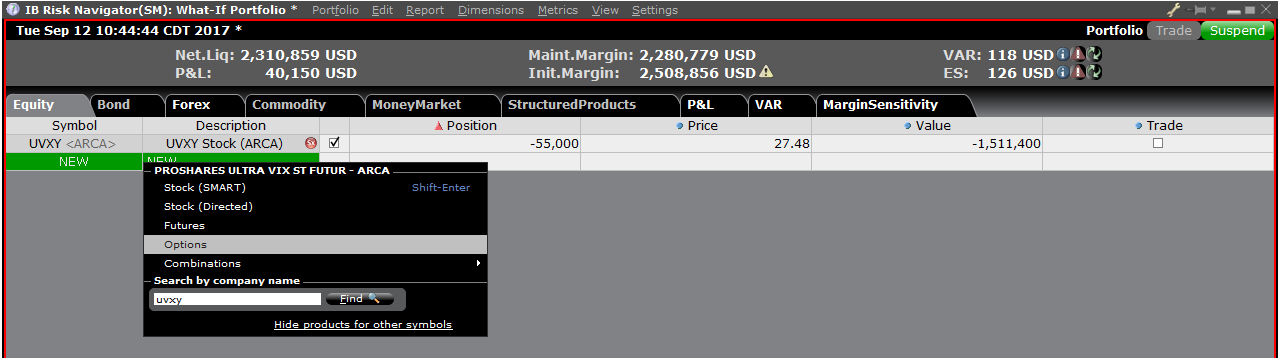
Imagen 8

Puede modificar las posiciones para ver cómo esa acción modifica el margen. Luego de alterar sus posiciones, deberá hacer clic sobre el icono de recalcular (![]() ) ubicado a la derecha de los números del margen para que se actualicen. Cuando este icono esté presente, los números del margen no están actualizados con el contenido de la cartera '¿y si?'.
) ubicado a la derecha de los números del margen para que se actualicen. Cuando este icono esté presente, los números del margen no están actualizados con el contenido de la cartera '¿y si?'.
Disclosure Regarding Interactive Brokers Price Cap Notices
Regulators expect brokerage firms to maintain controls designed to prevent the firm from submitting orders to market centers that create a risk of disruptive trading (e.g., the risk of sudden, transient price moves).
To comply with these expectations, Interactive Brokers implements various price filters on customer orders. Those price filters may, in certain circumstances, price cap customer orders in order to avoid market disruption, and those Price Caps will generally be in a % range from a reference price range calculated by IB. (The range of the Price Cap varies depending on the type of instrument and the current price.)
Although the price caps are intended to balance the objectives of trade certainty and minimized price risk, a trade may be delayed or may not take place as a result of price capping. More information is available in Interactive Broker’s Order Routing and Payment for Order Flow Disclosure.
If a customer’s order(s) are price capped by IB’s systems, that customer will either receive (i) real-time notification of those price cap(s) in Trader Workstation or via the API or FIX tag 58 (for FIX users); and/or (ii) a daily FYI message containing a digest of the first 10 order(s) that were price capped the prior day, the initial price cap(s) for those order(s) (if applicable), and the Price Cap Range(s) for further Price Cap(s) of those order(s).
Customers may opt out from receiving future FYI Messages by clicking the relevant opt-out link within an FYI Message. By opting out from receiving these future FYI Messages, a customer:
- Agrees to waive any further notifications from Interactive Brokers about the application of the firm’s Price Caps to that customer’s order(s); and
- Acknowledges that he or she understands that his or her orders may be price-capped in the future, but that the customer does not wish to be notified again about the application of any Price Caps to any of his or her orders.