Le diamo il benvenuto in Interactive Brokers
Una volta finanziato e approvato il proprio conto è possibile iniziare la propria attività di trading. Le informazioni di seguito indicate permettono di muovere i primi passi in qualità di nuovo cliente Interactive Brokers.
- Il proprio denaro
- Configurare il proprio conto per l'attività di trading
- Come effettuare trading
- Negoziare in tutto il mondo
- Cinque punti per ampliare la propria esperienza IB
1. Il proprio denaro
Versamenti e prelievi Informazioni generali. Tutte le transazioni sono amministrate tramite il sistema sicuro di Gestione conto
Versamenti
Innanzitutto, è necessario creare una notifica di versamento tramite Gestione conto > Finanziamento > Trasferimento fondi > Tipo di transazione: “Versamento” Come creare una notifica di versamento. Il secondo passaggio consiste nell'istruire la propria banca in merito al bonifico da emettere utilizzando i dettagli bancari forniti nella propria notifica di versamento.
Prelievi
È necessario creare le istruzioni di prelievo tramite il sitema sicuro di Gestione conto > Finanziamento > Trasferimento fondi > Tipo di transazione: "Prelievo" Come creare istruzioni di prelievo
Qualora si inoltrino istruzioni per un prelievo superiore ai limiti di prelievo previsti, questo verrà considerato un prelievo eccezionale e, di conseguenza, sarà necessario collegare il titolare del conto bancario al conto IB. Se il conto bancario ricevente è stato utilizzato per un versamento, il prelievo verrà processato; altrimenti, sarà necessario rivolgersi all'assistenza clienti e fornire la documentazione necessaria.
Risoluzione delle problematiche
Versamenti: se la propria banca ha inviato il denaro ma l'accredito dello stesso non è visualizzabile sul proprio conto IB. Possibili motivazioni:
a) Il trasferimento di fondi richiede circa 1-4 giorni lavorativi
b) Notifica di versamento mancante. È necessario crearla tramite il proprio sistema Gestione conto e inviare un ticket all'Assistenza clienti
c) Dettagli di modifica mancanti. Il proprio nome o il numero del conto IB non figura nei dettagli del trasferimento. È necessario contattare la propria banca per richiedere tutti i dettagli della modifica.
d) Gli ACH avviati presso IB prevedono un limite di 100K USD in un periodo di 7 giorni lavorativi. Qualora si apra un conto a margine di portafoglio con requisito iniziale di 110K, il bonifico bancario potrebbe rappresentare la soluzione di versamento migliore per ridurre i tempi di attesa relativi alla prima delle proprie transazioni. Qualora si selezioni l'opzione ACH, sarà necessario un tempo di attesa di circa due settimane oppure un declassamento temporaneo del conto a RegT.
Prelievi: se è stato richiesto un prelievo ma l'accredito del denaro non è visualizzabile sul proprio conto bancario. Possibili motivazioni:
a) Il trasferimento di fondi richiede circa 1-4 giorni lavorativi
b) Rifiutato. Oltre la soglia massima consentita per il prelievo. Si prega di controllare il saldo del proprio conto. Si prega di notare che, in base ai requisiti regolamentari, una volta versati i fondi, è previsto un periodo di attesa di tre giorni prima di poter procedere con il prelievo degli stessi.
c) La propria banca ha respinto i fondi. Probabilmente a causa della mancata corrispondenza tra il conto bancario ricevente e quello emittente.
2. Configurare il proprio conto per l'attività di trading
Differenza tra Conti cash e Conti a margine: se si sceglie l'applicazione FastTrack, il proprio conto diverrà automaticamente un conto cash con i permessi per le azioni statunitensi. Se si desidera beneficiare dell'effetto leva e negoziare a margine, si prega di consultare le presenti informazioni relative alla promozione del conto a conto a margine RegT
Permessi di trading
Per poter negoziare una particolare categoria di prodotti in un determinato Paese, è necessario ottenere i necessari permessi di trading tramite Gestione conto. Si prega di notare che i permessi di trading sono gratuiti. Tuttavia, potrebbe essere necessario dover firmare le informative sui rischi richieste dalle autorità di regolamentazione locali. Come richiedere i permessi di trading
Dati di mercato
Se si desidera disporre di dati di mercato in tempo reale per un particolare prodotto/mercato, è necessaria la sottoscrizione a un pacchetto dati di mercato addebitato dalla Borsa valori. Come effettuare la sottoscrizione ai dati di mercato
L'assistente dati di mercato fornisce assistenza nella scelta del pacchetto più adatto. Si prega di guardare questo Video che ne spiega il funzionamento.
I clienti hanno la possibilità di ricevere gratuitamente un pacchetto con dati di mercato differiti cliccando sul pulsante Dati di mercato differiti dalla riga di un ticker privo di sottoscrizione.
Conti per consulenti
Si consiglia di consultare rapidamente la guida utente primi passi per i consulenti per comprendere come aggiungere altri utenti al proprio conto consulente e assegnare loro l'accesso e molto altro ancora.
3. Come effettuare trading
Trader's University è lo spazio che permette di apprendere come utilizzare le nostre piattaforme. Qui è possibile trovare i nostri webinar dal vivo e registrati in 10 lingue diverse, oltre a tour e documentazione relativa alle nostre varie piattaforme di trading.
Trader Workstation (TWS)
I trader che necessitano di strumenti di investimento più sofisticati possono usufruire della nostra interfaccia progettata dai market maker, Trader Workstation (TWS), che permette di ottimizzare la velocità e l'efficienza di trading grazie a un'interfaccia di lavoro intuitiva, supporto su oltre 60 tipologie di ordine, strumenti di investimento specifici per tutte le strategie di trading, saldi contabili e monitoraggio della propria attività. L'offerta comprende due modelli:
TWS Mosaic: utilizzo intuitivo, facile accesso al trading, gestione degli ordini, liste prezzi e grafici, il tutto in un'unica finestra, oppure
TWS classica: gestione degli ordini avanzata per quei trader che necessitano di strumenti e algoritmi più avanzati.
Descrizione e informazioni generali / Guida rapida / Guida utente
Tour interattivi: Concetti base di TWS / Configurazione di TWS / TWS Mosaic
Come effettuare una transazione: Video su TWS classica / Video su Mosaic
Strumenti di trading: Descrizione e informazioni generali / Guida utente
Requisiti: Installazione di Java per Windows / Installazione di Java per MAC / Necessaria l'apertura delle porte 4000 e 4001
Login a TWS / Download di TWS
WebTrader
Quei trader che preferiscono un'interfaccia semplice e lineare possono utilizzare il nostro WebTrader su base HTML, che semplifica la visualizzazione dei dati di mercato, l'invio degli ordini e il monitoraggio del proprio conto e delle proprie operazioni. L'ultima versione di WebTrader è adatta a tutti i browser
Guida rapida / Guida utente di WebTrader
Introduzione: Video su WebTrader
Come effettuare una transazione: Video su WebTrader
Login a WebTrader
MobileTrader
Le nostre soluzioni mobili permettono di negoziare in mobilità con il proprio conto IB. Le applicazioni mobileTWS per iOS e mobileTWS per BlackBerry sono personalizzate per questi modelli più famosi, mentre la versione generica MobileTrader supporta la maggior parte degli altri dispositivi smartphone.
Descrizione e informazioni generali
Tipologie di ordini Tipologie di ordini disponibili e descrizione / Video / Tour / Guida utente
Paper Trading Descrizione e informazioni generali / Come ottenere un conto di Paper Trading
Una volta creato il proprio conto di paper trading, è possibile condividere i dati di mercato del proprio conto reale con il proprio conto di paper trading: Gestione conto > Gestione conto > Impostazioni > Paper trading
4. Negoziare in tutto il mondo
I conti IB sono in molteplici valute. Il proprio conto può detenere differenti valute allo stesso momento, al fine di poter negoziare molteplici prodotti in tutto il mondo da un unico conto.
Valuta di base
La propria valuta di base determina la conversione della valuta per i propri rendiconti e la valuta utilizzata per determinare i requisiti di margine. La valuta di base è determinata al momento dell'apertura del proprio conto. I clienti possono cambiare la propria valuta di base in ogni monento da Gestione conto.
Le valute non vengono automaticamente convertite nella valuta di base del cliente
La conversione valutaria deve essere effettuata manualmente dal cliente. In questo video è possibile apprendere come effettuare una conversione della valuta.
Per poter aprire una posizione denominata in una valuta non presente nel proprio conto, si hanno a disposizione due possibilità:
A) Conversione della valuta.
B) Prestito a margine IB. (Non disponibile per i conti cash)
Si prega di accedere a questo corso che illustra i meccanismi delle transazioni in valuta estera.
5. Cinque punti per ampliare la propria conoscenza IB
1. Ricerca dei contratti
Qui è possibile trovare tutti i nostri prodotti, simboli e specifiche.
2. Knowledge Base IB
Il Knowledge Base è un archivio contenente termini del glossario, articoli esplicativi, suggerimenti e linee guida circa la risoluzione delle problematiche progettato per offrire supporto ai clienti IB nella gestione dei propri conti. È sufficiente digitare un termine nel pulsante di ricerca per ottenere la risposta desiderata.
3. Gestione conto
Mentre le nostre piettaforme di trading offrono accesso ai mercati, Gestione conto garantisce l'accesso al proprio conto IB. Tramite Gestione conto è possibile gestire le operazioni relative al propprio conto come, per esempio, versamento o prelievo di fondi, visualizzare i propri rendiconti, modificare le sottoscrizioni ai dati di mercato e alle notizie, emendare i propri permessi di trading e verificare o modificare i propri dati personali.
Accedere a Gestione conto / Guida rapida di Gestione conto / Guida utente di Gestione conto
4. Sistema di accesso sicuro
Per fornire ai propri clienti il massimo livello di sicurezza online, Interactive Brokers ha messo a punto un Sistema di accesso sicuro (SLS) che sottopone l'accesso al proprio conto a un particolare tipo di autenticazione a due livelli. Il sistema di autenticazione a due livelli serve a confermare la propria identità al momento del login utilizzando due livelli di sicurezza: 1) Le informazioni in proprio possesso (la combinazione del proprio nome utente e della password); e 2) Il dispositivo in proprio possesso (un dispositivo di sicurezza creato da IB che genera un codice di sicurezza casuale monouso). Dato che la procedura di accesso al proprio conto richiede sia la conoscenza delle proprie credenziali (nome utente e password) sia il possesso fisico del dispositivo, la partecipazione al Sistema di accesso sicuro potenzialmente impedisce a qualunque persona non autorizzata di accedere al proprio conto.
Come attivare il proprio dispositivo di sicurezza / Come ottenere una carta codici di sicurezza / Come restituire il dispositivo di sicurezza
In caso di smarrimento della propria password o della propria carta codici di sicurezza, si prega di contattarci per richiedere assistenza immediata.
5. Relazioni e rendiconti
Di facile visualizzazione e personalizzazione, i nostri rendiconti e relazioni coprono tutti gli aspetti del proprio conto Interactive Brokers. Come visualizzare un Rendiconto attività
IBKR Mobile Companion App for Apple Watch
Interactive Brokers takes our intuitive and ergonomic mobile trading platform to the next level by providing you a companion app for the Apple Watch.
The companion app is designed to display information when a user has logged in to the IBKR Mobile app on their iPhone. It will work in both the Live Trading and Read Only Modes but does not support active trading. This companion app is only available for informational purpose only.
Table of contents
What does the app do?
At 'glance view' the app will display the following information; Amount of FYI Notification, Account Number, Daily P&L, Net Liquidation Value, Number of Open Orders, Number of Trades Executed, Excess Liquidity and number of Positions you currently own. It will also display the time when it has fetched the information from your iPhone.
Example:
.jpg)
Requirements
- Must have iPhone 5s or greater, using iOS 11 or later.
- Must have the IBKR Mobile app installed on your iPhone (version 11 or greater)
- Must have your Apple Watch paired to your iPhone (refer to: Set up your Apple Watch for directions)
- Must have watchOS 5 running on your Apple Watch.
Important: The Apple Watch applications are only 'companion' apps. This means they are not installed directly on the watch itself, but rather are a function of an application already installed on your iPhone.
How is the app installed?
1. Install the latest version of the IBKR Mobile app on your iPhone.
2. Pair your Apple Watch to your phone.
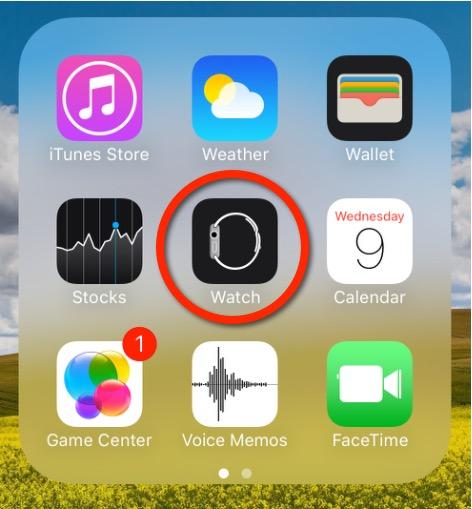
3. Launch the Watch app on your phone.
4. Scroll down on the main screen until you see your list of apps, locate the IBKR Mobile app and Tap on it.
.jpg)
5. Enable Show App on Apple Watch by swiping the slider to the right (green).
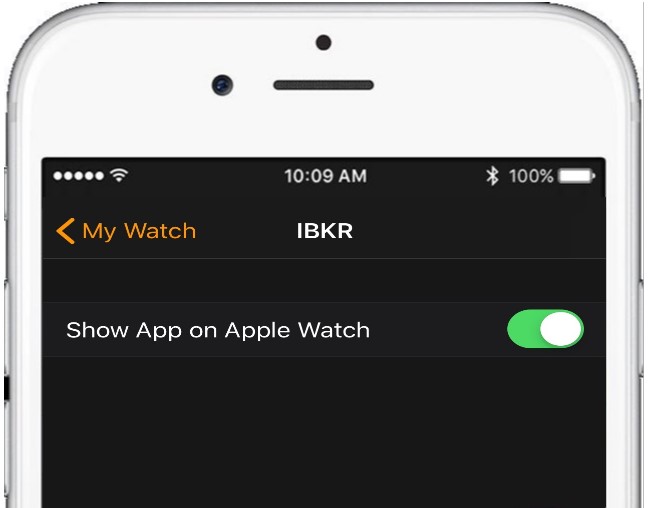
6. After the top slider is set to green, you will see a text informing you that the app is being installed. At this stage the phone is sending the application to your watch per Bluetooth. This might take a short moment (approximately 30-60 seconds.) Once completed the companion app has been installed.
Note: Once enabled it will take 24 hours before P&L shows up on the watch after activation.
.jpg)
How do I confirm the app is installed?
On your Apple Watch click on the crown to access your Home Screen, you should now see an icon for the IBKR Mobile App.

How to start multiple TWS sessions on a Mac
By default macOS does not allow the user to run multiple sessions of the same application. The following workaround can overcome this limitation in case you need to run the Trader Workstation for more than one user.
-
In case running different versions of the TWS is suitable to your needs, please follow the instructions on Procedure 1
-
In case you need multiple sessions of the same TWS version, please follow the instructions on Procedure 2
Procedure 1
1) Open the web page ibkr.com
2) Navigate to the menu Technology > TWS Software.
3) First download and install one of the auto-updating TWS versions (TWS LATEST or TWS according to your preference).
4) Once you have completed the installation, download and install one of the offline versions (OFFLINE TWS LATEST or OFFLINE TWS according to your preference).
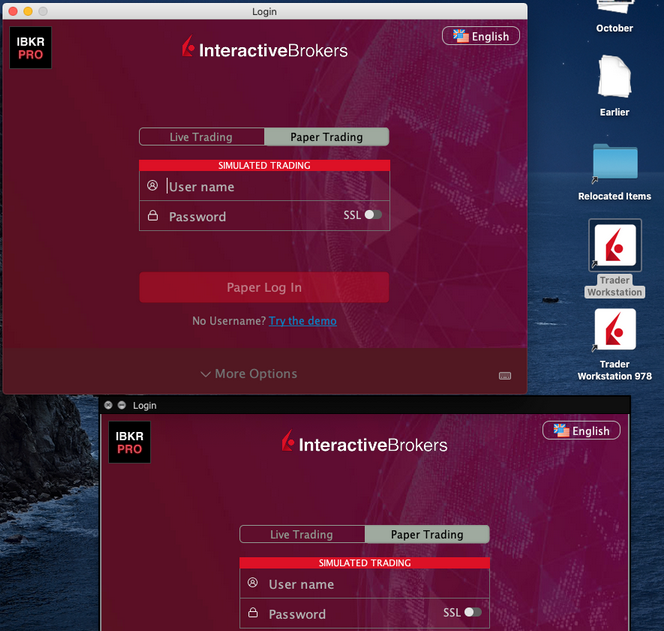
5) You will then see on your Desktop two different Trader Workstation icons. You can use the first shortcut to start the first TWS session and the second one to start the additional one (see Figure 1.). Note: the link containing the version number in the name is the OFFLINE version. This will be a version that needs periodical manual updates.
Figure 1.
Procedure 2
1) Launch the first session of the Trader Workstation using the TWS icon present on your Desktop. If you still do not have any Trader Workstation icon, please go to the web page ibkr.com and click on the menu Technology > TWS Software. Then download and install one of the TWS versions displayed.
2) Open the Finder and click on Applications on the left side menu. Then select Utilities and then launch Terminal (see Figure 2.).
Figure 2.
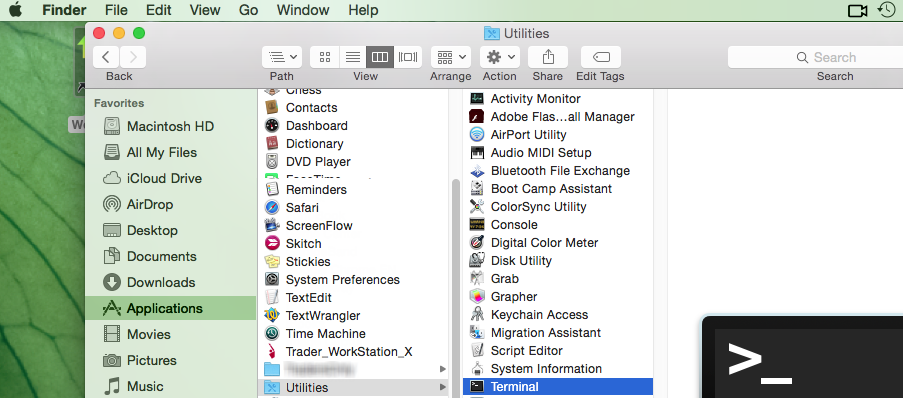
3) The Terminal will appear on the screen and will point to the home folder of your current macOS user. Then enter the commands listed below (see Figure 3.) on your Terminal. After each one, press ENTER on your keyboard.
cd Applications
cd Trader\ Workstation
open -n Trader\ Workstation.app
Figure 3.

4) The login window for your second TWS session will then appear on your Desktop. You can now close the Terminal.
Note: the procedure above presumes that the TWS executable is located in the following path: users/yourusername/home/Applications/Trader Workstation/Trader Workstation.app
If at the time you installed the TWS, you selected to install it for all the users of your system, then the TWS executable will be located here:
/Applications/Trader Workstation/Trader Workstation.app
and therefore you would need to issue the following commands in the Terminal:
cd /Applications
open -n Trader\ Workstation.app
How to overcome the warning message "The signature of the file is corrupt or invalid"
This article describes how to overcome the warning message which you might receive when you download the Trader Workstation or IB Gateway installation packages.
Since a Microsoft update has modified the signature validation mechanisms, the Trader Workstation and IB Gateway installation packages might be reported as having an invalid or corrupt signature, although their signature is indeed intact and absolutely valid.
If you are using Microsoft Edge as browser please follow all the steps below. If you are using any other browser start directly from point 3.
1. As soon as the installation package has been completely downloaded, you will notice on the bar at the bottom of your browser frame the warning message "The signature of the file tws-... is corrupt or invalid". Please click on the button View Downloads to open the DOWNLOADS panel. ![]()
2. Right click on the filename and select Run anyway.
.png)
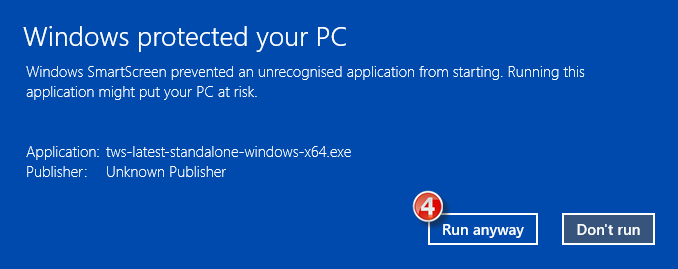
3. Once the installer has been launched, the SmartScreen filter will display an additional warning message. Click on the link More Info.
(1).png)
4. Now click the button Run Anyway to allow the file execution. The installation will then start.
How to install Java on a Linux computer
For the purpose of this guide, we will divide the Linux distributions nowadays available into three big families:
- APT based Linux distributions (Ubuntu, Mint) - those distributions use the Advanced Packaging Tool to fetch and install software packages in a semi-automatic way, resolving and taking care of dependencies.
- RPM based Linux distributions (Suse, OpenSUSE, Red Hat, CentOS, Fedora, Oracle Linux) - those distributions allow the installation of software packages (.rpm files), which contain the binary files to be installed on the system and an integrated dependency checker script. The .rpm packages allow a simplified and smooth installation of software without requiring a deep knowledge of the system.
- Other Linux distributions - those distributions may or may not use a specific package manager but all of them allow the installation of software using the source code package (.tar.gz) through a series of command to be issued on the Terminal.
How to install the official Oracle Java on APT based Linux distributions
The most simple way to install Java on Ubuntu or Mint is using the webupd8 repository. This method will install the latest version of JDK 8 and the JRE 8 browser plugin. The supported versions are: Ubuntu 15.04, 14.10, 14.04, 12.04 - Linux Mint 17.1, 17, 13
For details, please refer to: http://www.webupd8.org/2012/09/install-oracle-java-8-in-ubuntu-via-ppa.html
a. On your Linux machine, open the "Terminal". If you need help with accessing and using the Terminal, please refer to: https://help.ubuntu.com/community/UsingTheTerminal
b. Become root, by typing su on the Terminal and entering the super user password. Instead of becoming root, you can choose to use the sudo feature (which gives your user the root privileges for a single command). If you want to use sudo, just add sudo before each one of the commands you will enter in the Terminal. You will be requested to enter the sudo password.
c. Add the webupd8 repository by tiping add-apt-repository ppa:webupd8team/java Follow the instructions on the screen. You should be asked to press [ENTER] to continue. Once done, the repository will be added.
d. Type the command apt-get update
e. Enter the command: apt-get install oracle-java8-installer The process will download and install automatically the required packages along with their dependencies. Once the command has completed, the Oracle Java platform will be ready to be used.
Should you prefer to have control of all the phases of the installation, instead of relying on the APT facility, please refer to the instructions on this page: http://www.wikihow.com/Install-Oracle-Java-JRE-on-Ubuntu-Linux
How to install the official Oracle Java on RPM based Linux distributions
a. On your Linux machine, open the "Terminal". If you need help with accessing and using the Terminal, please refer to: https://help.ubuntu.com/community/UsingTheTerminal
b. Become root, by typing su on the Terminal and entering the super user password. Instead of becoming root, you can choose to use the sudo feature (which gives your user the root privileges for single commands). If you want to use sudo, just add sudo before each one of the commands you will enter in the Terminal. You will be requested to enter the sudo password.
c. Create the folder /usr/java by issuing the command mkdir /usr/java. If the directory already exists you will see a message indicating that. In this case you can proceed directly to point d.
d. Go to the page https://www.java.com/en/download/linux_manual.jsp
e. If you have a 32 bit system, download the file "Linux RPM" . If you have a 64 bit system, download the file "Linux64 RPM". In either case, please instruct your browser to save the file in the folder /usr/java or move the file to that foder once it has been downloaded.
f. Go back to the Terminal and move to the /usr/java folder by typing cd /usr/java
g. List the content of the folder by typing the command ls -la You should see the file you downloaded. It will be called jre-XuYY-linux-ARCH.rpm (where X is the Java family, YY the update number and ARCH will be i586 for 32 bit installer and x64 for 64 bit installer)
h. Launch this command to perform the installation: rpm -ivh jre-XuYY-linux-ARCH.rpm Obviously you need to use the real file name, for example jre-8u65-linux-x64.rpm
Once the installation has been performed, the Oracle Java should be ready to be used. Usually a system restart is not required on Linux machines. In case you see warning or error message/s during the installation, please check their content and search the Internet for possible solutions. Most of the time the warning/error messages maight refer to missing dependencies (this means that another package needs to be installed before you can install Java) or to unsufficient privileges (this means that you are launching the command with a regular user instead of "root"). If you cannot find the proper course of actions to overcome the issue, please refer to the support documentation or forums for your current Linux distribution.
How to install the official Oracle Java on other Linux distributions
If your Linux distribution does not support RPM or APT package managers, the installation of Oracle Java can be performed manually in this way:
a. On your Linux machine, open the "Terminal".
b. Become root, by typing su on the Terminal and entering the super user password. Instead of becoming root, you can choose to use the sudo feature (which gives your user the root privileges for single commands). If you want to use sudo, just add sudo before each one of the commands you will enter in the Terminal. You will be then required to enter the sudo password.
c. Create the folder /usr/java by issuing the command mkdir /usr/java. If the directory already exists you will see a message indicating that. In this case you can proceed directly to point d.
d. Go to the page https://www.java.com/en/download/linux_manual.jsp
e. If you have a 32 bit system, download the file "Linux" . If you have a 64 bit system, download the file "Linux x64". In either case, please instruct your browser to save the file in the folder /usr/java or move the file to that foder once it has been downloaded.
f. Go back to the Terminal and move to the /usr/java folder by typing cd /usr/java
g. List the content of the folder by typing the command ls -la You should see the file you downloaded. It will be called jre-XuYY-linux-ARCH.tar.gz (where X is the Java family, YY the update number and ARCH will be i586 for 32 bit installer and x64 for 64 bit installer)
h. Launch this command to perform the installation: tar zxvf jre-XuYY-linux-ARCH.tar.gz Obviously you need to use the real file name, for example jre-8u65-linux-x64.tar.gz
i. Once done, enter command ls -la You will see the folder /usr/java/jre1.X.0_YY (where X is the Java family, YY the update number)
l. The Java executables are now present in the folder /usr/java/jre1.X.0_YY/bin
m. Now check which is the symbolic link used by the system to access the java executables by entering the commands:
which java - you will receive an output similar to this: /usr/bin/java From now on we will refer to this path as javasympath.
which javac - you will receive an output similar to this: /usr/bin/java From now on we will refer to this path as javacsympath.
which javaws - you will receive an output similar to this: /usr/bin/java From now on we will refer to this path as javawssympath.
Unless your are launching the java applications using the full path (for example /usr/java/jre1.X.0_YY/bin/java ...), you would need to tell your system which java executables should be used when a generic java command is issued. In order to to this, you can either update your alternatives files (if your system supports them) or the symbolic links. Here below you can see the instructions, according to your system:
- If your system uses the alternatives files:
n. Issue the following commands, paying attention to make the necessary substitutions .
update-alternatives --install javasympath java /usr/java/jre1.X.0_YY/bin/java 1
update-alternatives --install javacsympath javac /usr/java/jre1.X.0_YY/bin/javac 1
update-alternatives --install javawssympath javaws /usr/java/jre1.X.0_YY/bin/javaws 1
- If your system does not use the alternatives files:
n. Issue the following commands, paying attention to make the necessary substitutions .
ln -sf /usr/java/jre1.X.0_YY/bin/java javasympath
ln -sf /usr/java/jre1.X.0_YY/bin/javac javacsympath
ln -sf /usr/java/jre1.X.0_YY/bin/javaws javawssympath
How to fix the error: "Library dbcapi.dll cannot be loaded"
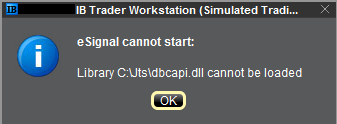
Issue A - You are not using the 32 bit version of TWS and/or eSignal:
Issue B - There is an incompatibility with the file C:\Jts\dbcapi.dll:
Instructions to resolve issue A
Installing 32-bit TWS
Please open the page http://www.ibkr.com in your browser and perform the steps below:
1) Click on the Log In button at the top right corner of the page.
2) Click on Download Trader Workstation:


5) Click on the item Windows 32-bit:

6) Make sure that the description under the DOWNLOAD button has changed to "Windows: 32 bit". Click now on DOWNLOAD:

7) Launch the downloaded file. The Trader Workstation installation will start. At this point, you may see the warning message "Trader Workstation latest is already installed...". Ignore this warning and click on the button Next > to continue the installation:

8) Your "Trader Workstation" Desktop icon will be automatically updated. You can now launch the 32-bit Trader Workstation by a double click on that icon.
If you have launched the 32-bit TWS and the 32 bit version of eSignal but you still receive the same error message, please follow as well the instructions below.
Instructions to resolve issue B
Replacing dbcapi.dll for compatibility between 32-bit TWS and 32-bit eSignal 12
To correct an incompatibility with the dbcapi.dll file, we will replace that file with another version of it taken from the eSignal installation folder. Please follow the steps below to perform the substitution:
1) Navigate to C:\Jts and rename the file dbcapi.dll to dbcapi_old.dll
2) Navigate to the directory where 32-bit eSignal 12 is installed (most commonly C:\Program Files (x86)\Common Files\Interactive Data\DM).
3) Copy dbcapi_vc8.dll from that directory into the C:\Jts directory.
4) Move to the C:\Jts directory.
5) Right click on the dbcapi_vc8.dll file (now in the C:\Jts directory) and select rename. Type dbcapi.dll as the new filename.
.jpg)
6) TWS is now ready to accept the eSignal data feed.
How to install the TWS API Components on Mac / Unix
NOTE: If you have already agreed to the API License Agreement please start at Step 3 below.
Instructions
- Click directly on the button below to access the API software download page

- This will direct you to Interactive Brokers API License Agreement, please review it
- Once you have clicked "I Agree", refer to the Mac / Unix section to download the API Software version of your preference
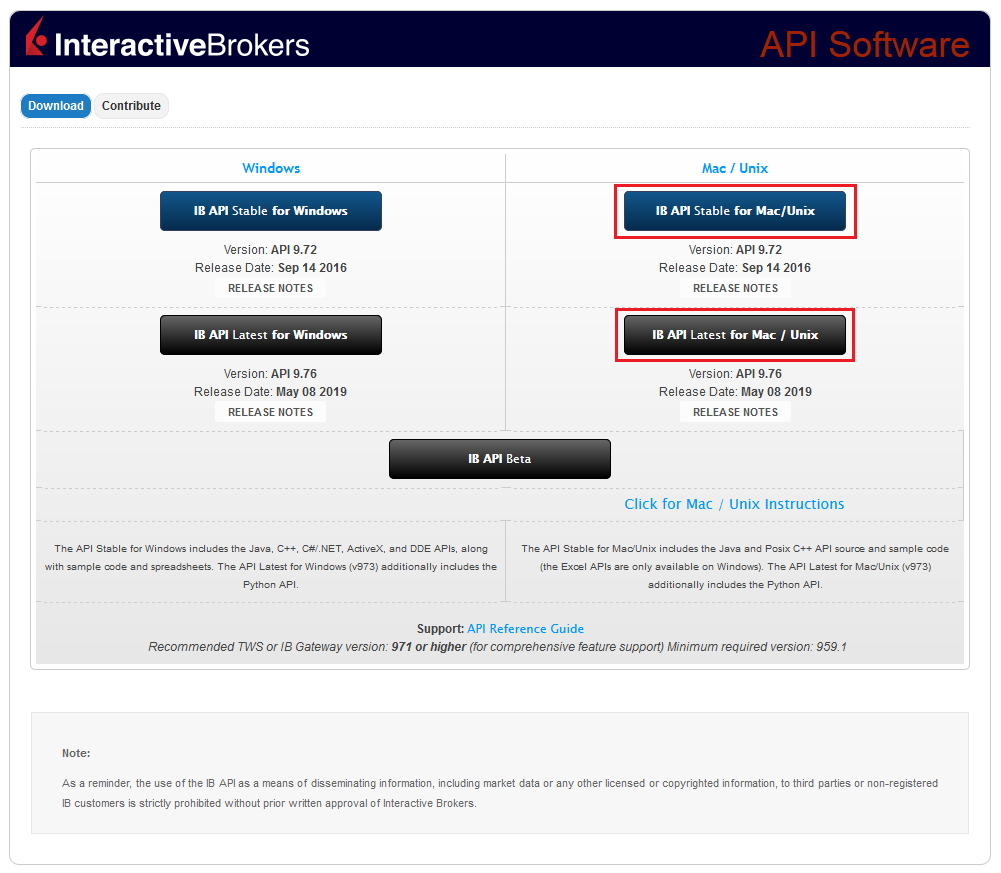
- This will download twsapi_macunix.n.m.zip to your computer
(where n and m are the major and minor version numbers respectively) - Open Terminal (Ctrl+Alt+T on most distributions)
(On Mac press Command+Space to launch Spotlight, then type terminal and press Return) -
Navigate to the directory where the installer has been downloaded (normally it should be the Download folder within your home folder) and confirm the file is present
$ cd ~/Downloads
$ ls
- Unzip the contents the installer into your home folder with the following command (if prompted, enter your password):
$ sudo unzip twsapi_macunix.n.m.zip -d $HOME/

- To access the sample and source files, navigate to the IBJts directory and confirm the subfolders samples and source are present
$ cd ~/IBJts
$ ls

Legacy Instructions - API Version ≤ 9.71
Note: IB only offers API Version 9.72+. In the event you already have an existing legacy version and need to install it, please refer to the directions below:
- locate the file twsapi_macunix.n.m.jar on your computer
(where n and m are the major and minor version numbers respectively.) - Open Terminal (Ctrl+Alt+T on most distributions)
(On Mac press Command+Space to launch Spotlight, then type terminal and press Return) - Navigate to the directory where the .jar file has been located (normally it should be the Download folder within your home folder) and confirm it is present
$ cd ~/Downloads
$ ls - Extract the contents of the .jar file into your home folder
$ jar xf twsapi_macunix.n.m.jar -d $ HOME/ - To access the sample and source files, navigate to the IBJts directory and confirm the subfolders samples and source are present
$ cd ~/IBJts
$ ls
How to install MobileTWS on BlackBerry OS10
Currently, Interactive Brokers does not offer a native IBKR Mobile app for the Blackberry 10 Operating System. Due to a recent partnership between Amazon and Blackberry, clients who own a Blackberry device running Blackberry 10 OS can install the Android version of the IBKR Mobile app directly from the Amazon Store.
Blackberry 10 OS Devices:
- Q5, Z3, Leap, Classic, Passport, Q10, Z10, Z30, P'9982, P'9983
*Please notice that these devices have limited hardware capabilities and this could negatively affect the performance of the IBKR Mobile app.
Installation
You can download the IBKR Mobile app on your Blackberry phone directly from the Amazon Appstore.
How to install IBKR Mobile from the Amazon App Store:
- On your Blackberry phone open the Amazon App Store
app.
-
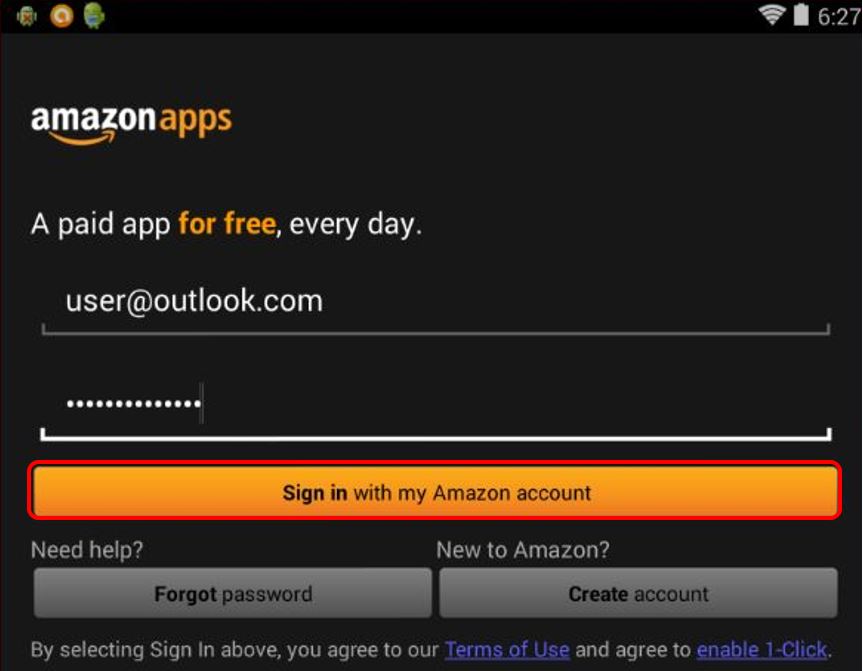
Enter your Amazon e-mail and password, and tap Sign in.
(If you don't have an Amazon account, tap Create a new Amazon account.)
-
Tap on the search bar at the top, type IBKR Mobile then tap Search.
-
Tap on IBKR Mobile from the search results and install.
Welcome to Interactive Brokers
Now that your account is funded and approved you can start trading. The information below will help you getting
started as a new customer of Interactive Brokers.
- Your Money
- Configure your account to trade
- How to trade
- Trade all over the World
- Five points to enrich your IB experience
1. Your Money
Deposits & Withdrawals General Info. All transactions are administered through your secure Account Management
Deposits
First, you create a deposit notification through your Account Management > Funding > Fund Transfers > Transaction Type: “Deposit” How to create a deposit notification. The second step is to instruct your Bank to do the wire transfer with the bank details provided in your Deposit Notification.
Withdrawals
Create a withdrawal instruction via your secure Account Management > Funding > Fund Transfers > Transaction Type: "Withdrawals" How to create a withdrawal instruction
If you instruct a withdrawal over the Withdrawal limits, it will be considered an exceptional withdrawal and we will therefore need to match bank account holder and IB account. If destination bank account has been used for a deposit, withdrawal will be processed; otherwise, you must contact customer service and provide the documents needed.
Troubleshooting
Deposits: My bank sent the money but I do not see it credited into my IB account. Possible reasons:
a) A fund transfer takes 1-4 business days
b) A Deposit Notification is missing. You have to create it via your Account Management and send a ticket to Customer Service
c) Amending details are missing. Your name or IB account number is missing in the transfer details. You have to contact your bank and ask for the full amending details.
d) ACH initiated by IB is limited to 100k USD in a 7 business period. If you opened a Portfolio Margin account where the initial requirement is 110k, a wire deposit might be the better deposit option to reduce wait time for your first trade. If selecting ACH a wait time of almost 2 weeks or a temporary downgrade to RegT can be possible solutions.
Withdrawals: I have requested a withdrawal but I do not see the money credited to my bank account. Possible reasons:
a) A fund transfer takes 1-4 business days
b) Rejected. Over the max it can be withdrawn. Please check your account cash balance. Note that for regulatory requirements, when the funds are deposited, there is a 3 day holding period before they can be withdrawn.
c) Your bank returned the funds. Probably because receiving bank account and remitting bank account names do not match.
2. Configure your account to trade
Difference between Cash and Margin accounts: If you have chosen the FastTrack application, by default your account type is a cash account with US stock permission. If you would like to get leverage and trade on margin, here how to upgrade to a RegT Margin account
Trading Permissions
In order to be able to trade a particular asset class in a particular country, you need to get the trading permission for it via your Account Management. Please note that trading permissions are free. You might however be asked to sign risk
disclosures required by local regulatory authorities. How to Request Trading Permissions
Market Data
If you want to have market data in real-time for a particular product/exchange, you need to subscribe to a market data package charged by the exchange. How to subscribe to Market data
The Market data assistant will help you choose the right package. Please watch this Video explaining how it works.
Customers have the option to receive delayed market data for free by clicking the Free Delayed Data button from a non-subscribed ticker row.
Advisor Accounts
Have a look at the user guide getting started as advisors. Here you see how to create additional users to your advisor account and grant them access and much more.
3. How to trade
The Trader's University is the place to go when you want to learn how to use our Platforms. Here you will find our webinars, live and recorded in 10 languages and tours and documentation about our various Trading Platforms.
Trader Workstation (TWS)
Traders who require more sophisticated trading tools can use our market maker-designed Trader Workstation (TWS), which optimizes your trading speed and efficiency with an easy-to-use spreadsheet interface, support for more than 60 order types, task-specific trading tools for all trading styles, and real-time account balance and activity monitoring. Try the two models
TWS Mosaic: for intuitive usability, easy trading access, order management, watchlist, charts all in one window or
TWS Classic: the Advanced Order Management for traders who need more advanced tools and algos.
General Description and Information / Quick start guide / Usersguide
Interactive Tours: TWS Basics / TWS configuration / TWS Mosaic
How to place a trade: Video Classic TWS / Video Mosaic
Trading tools: General Description and Information / Users guide
Requirements: How to install Java for Windows / How to install Java for MAC / Port 4000 and 4001 needs to be open
Login TWS / Download TWS
WebTrader
Traders who prefer a clean and simple interface can use our HTML-based WebTrader, which makes it easy to view market data, submit orders, and monitor your account and executions. Use the latest WebTrader from every browser
Quick Start Guide / WebTrader User's Guide
Introduction: Video WebTrader
How to place a Trade: Video WebTrader
Login WebTrader
MobileTrader
Our mobile solutions allow you to trade your IB account on the go. The mobileTWS for iOS and the mobileTWS for BlackBerry are custom-designed for these popular models, while the generic MobileTrader supports most other Smart phones.
General Description and Information
Order Types Order Types available and Description / Videos / Tour / Users guide
Paper Trading General Description and Information / How to get a Paper Trading Account
Once your paper account is created, you can share the market data of your real account with your paper trading account: Account Management > Manage Account > Settings > Paper trading
4. Trade all over the World
IB accounts are multi-currency accounts. Your account can hold different currencies at the same time, this allows you to trade multiple products around the world from a single account.
Base Currency
Your base currency determines the currency of translation for your statements and the currency used for determining margin requirements. Base currency is determined when you open an account. Customers may change their base currency at any time through Account Management.
We do not automatically convert currencies into your Base currency
Currency conversions must be done manually by the customer. In this video you can learn how to do a currency conversion.
In order to open a position denominated in a currency that you do not have in your account, you have two possibilities:
A) Currency conversion.
B) IB Margin Loan. (Not available for Cash Accounts)
Please see this course explaining the mechanics of a foreign transaction.
5. Five points to enrich your IB experience
1. Contract Search
Here you will find all our products, symbols and specifications.
2. IB Knowledge Base
The Knowledge Base is a repository of glossary terms, how-to articles, troubleshooting tips and guidelines designed to assist IB customers with the management of their IB accounts. Just enter in the search button what you are looking for and you will get the answer.
3. Account Management
As our trading platforms give you access to the markets, the Account Management grants you access to your IB account. Use Account Management to manage account-related tasks such as depositing or withdrawing funds, viewing your statements, modifying market data and news subscriptions, changing your trading permissions, and verifying or changing your personal information.
Log In Account Management / AM Quick Start Guide / AM Users Guide
4. Secure Login System
To provide you with the highest level of online security, Interactive Brokers has implemented a Secure Login System (SLS) through which access to your account is subject to two-factor authentication. Two-factor authentication serves to confirm your identity at the point of login using two security factors: 1) Something you know (your username and password combination); and 2) Something you have (an IB issued security device which generates a random, single-use security code). As both knowledge of your username/password and physical possession of the security device are required to login to your account, participation in the Secure Login System virtually eliminates the possibility of anyone other than you accessing your account.
How to Activate your Security Device / How to Obtain a Security Code Card / How to return Security device
In case you forgot your password or lost your security code card, please call us for immediate assistance.
5. Statements and Reports
Easy to view and customize, our statements and reports cover all aspects of your Interactive Brokers account. How to view an Activity Statement
When and how should I increase the memory allocation for TWS?
Java Virtual Machine memory allocation
The Trader Workstation is a Java-based application. As any other Java applications, it executes within a Java virtual machine (JVM) which manages the interactions between the program and the underlying Operating System (OS).
The memory (RAM) which is allocated by the operating system to the JVM constitutes the heap space. That is the area where all the class instances and arrays needed by the application are allocated. The heap space is created when the JVM is started and it is dynamically freed-up by the Garbage Collector (GC), the Java memory manager. When the need arises, the Garbage Collector is invoked to free up the heap space by unloading Java classes and other code structures no longer used by the application.
If the heap space is undersized, the Garbage Collector may not be able reclaim memory at the needed pace or may have to be called too often, draining the processor (CPU) resources. When this happens, the application may slow down, be unresponsive or even crash completely.
To ensure a smooth TWS run, it is therefore sometimes necessary to change the memory allocation, according to the layout complexity and the needs of the application itself.
In which case I should change the TWS memory allocation?
How much memory should I allocate to TWS?
How can I change the memory allocation for the TWS?
Please follow one of the links below for the instructions, according to the Operating System and TWS release you are using
A. TWS version 972 and higher
The steps below are valid for all Operating Systems


(1).png)
4) Click on Apply and then on OK
5) Shut down the TWS

B. TWS versions previous to 972
B.1 Your Operating System is Windows
1) Close TWS in case it is running
.png)
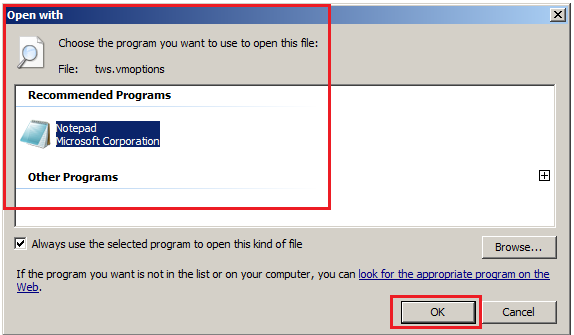


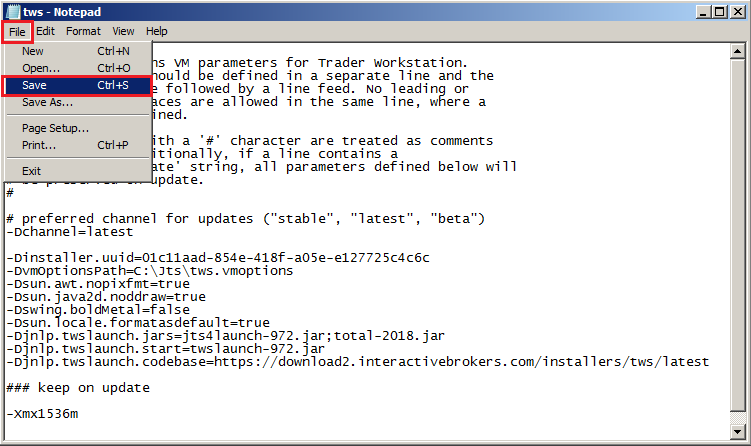


B.2 Your Operating System is Mac OS
.png)
3) On the Spotlight results panel, click on tws.vmoptions to open it. Should the system ask you how to open this file, click Choose Application... select a text editor (TextEdit, Smultron, TextWrangler...) of your choice and click Open

.png)
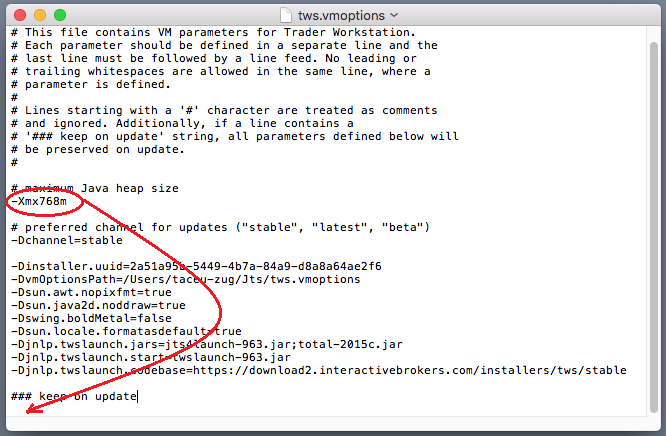
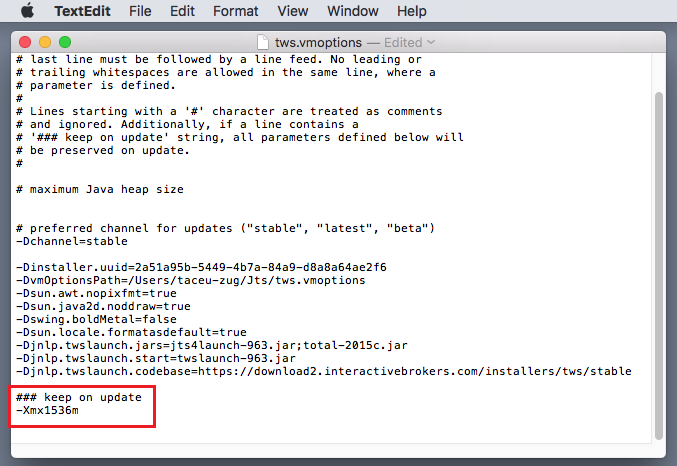
8) Launch the TWS with a double click on the Desktop shortcut Trader Workstation (Should you receive an error message, please see Note 3.
Notes
1. Available system RAM
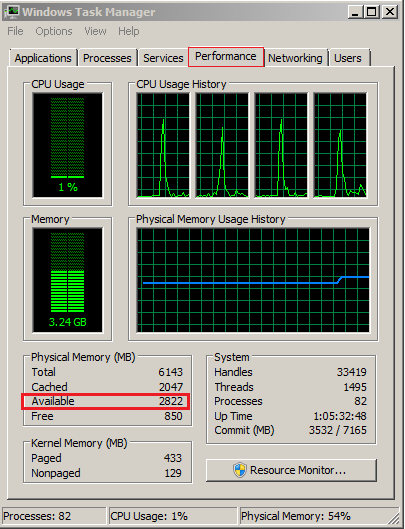
.png)
2. Limitations of 32-bit Operating Systems

3. Error: "Could not create the Java Virtual Machine"

