How to set up sFTP for using Certificate Authentication on Linux
These instructions apply to users who are receiving their statements via sFTP. If you elected to receive your statements via sFTP, you would first need to generate an RSA Key pair.
There are many Linux distributions and there are multiple methods to access the IBKR sFTP server. sFTP clients such as Filezilla can be used. In this article we explain how to realize the connection to the IBKR FTP server using Ubuntu Linux and Filezilla.
1. On your Linux machine, click on the Applications icon in the bottom left corner of you screen.


4. Once the software installation is complete, type puttygen -t rsa -b 2048 -o privatekey.ppk in order to generate the RSA Key pair.


8. Click on the FileZilla top menu File -> Site Manager...


- Select SFTP - SSH File Transfer Protocol as Protocol
- Enter xfer.interactivebrokers.com in the Host field
- Enter 32 in the Port field
- Select Key file as Logon Type
- Enter the username provided to you by Interactive Brokers in the User field


Important Note: do NOT send us your private key. Send us only your public one
Once IBKR has configured the parameters for your connection on our servers, you will be notified. After that, you will be able to access your sFTP repository by using the Site connection you have created in FileZilla. In case you have not yet set up a Site connection, please follow the steps from 6. to 14. which are a prerequisite to the below steps:


Common issues and solutions
-
Ensure the correct login details are being used to connect to the sFTP server. The username and password you are entering should match the ones you have received from the Reporting Integration Team.
-
Confirm you have configured your sFTP Client to use the Private Key file for the logon authentication (see steps 9. and 10. of the above procedure.)
-
Try accessing the sFTP server using a different Client (CyberDuck, ect.)
-
Ensure the Private Key file being used to Authenticate the server login attempt is related to the Public Key you originally sent to the Reporting Integration Team.
-
Should the above checks be unable to resolve the issue, please generate a new RSA Public/Private Key pair and send only the Public part to the Reporting Integration Team, as per IBKB3842.
-
In case you have an antivirus or a security software installed on your machine, make sure it is not blocking the FTP connection attempt. Normally, security software allows to set up exceptions for specific connections in order to whitelist them.
-
Verify that the public IP Address of the machine running the sFTP client, is the same you have originally provided to the Reporting Integration Team for being whitelisted. You can discover your public IP Address by searching the Internet for “what is my IP”. If your current IP Address is not the same you provided to us, please send it to our Reporting Integration Team for being whitelisted.
-
Ask your network administrator/s to confirm that your firewall allows both incoming and outgoing traffic from/to xfer.interactivebrokers.com on port TCP 32.
-
Should the above steps be unable to resolve the issue, please generate a new RSA Public/Private Key pair and send only the new Public part to our Reporting Integration Team, as per IBKB3842.
KB3968 - Generate a key pair using GPG for Windows
KB4205 - Generate a key pair using GPG Suite on macOS
KB4108 - Decrypt your Reports using GPG for Windows
KB4210 - Decrypting Reports using your PGP Key pair on macOS
KB4407 - Generate RSA Key Pair on Windows
KB4410 - How to set up sFTP for using Certificate Authentication on macOS
KB4411 - How to backup your public/private Key pair
KB4323 - How to transfer your public/private key pair from one computer to another
Cryptocurrency Trading at Interactive Brokers Hong Kong
- Login into Client Portal and selecting the User menu (head and shoulders icon in the top right corner) followed by Settings
- Under Account Settings find the Trading section and click on Trading Permissions.
- Select Cryptocurrency permissions and complete the steps on screen.
What times-in-force can I use when trading cryptocurrencies with Interactive Brokers HK?
Times-in-force for BUY limit orders:
- IOC: Immediate or cancel
- Minutes: Order is canceled if not filled within five (5) minutes.
Times-in-force for SELL orders:
- IOC: Immediate or cancel
- Minutes: Order is canceled if not filled within five (5) minutes.
- Day: Order is canceled if not filled by the end of the trading day.
- GTC: Good til Canceled
Come caricare un pacchetto di dati diagnostici attraverso una piattaforma di IBKR
Vi sono dei problemi di cui si occupa l’Assistenza che richiedono il ricorso a file di log e diagnostica insieme agli screenshot. Questo tipo di informazioni sarà utilissimo e aiuterà il nostro team ad analizzare e risolvere il problema che stai avendo.
Il presente articolo serve a illustrare in maniera dettagliata i passaggi da seguire per caricare i file di diagnostica e i log relativi alle varie piattaforme di trading di Interactive Brokers.
Nota bene: nel corso della giornata IBKR non monitora il repertorio relativo al pacchetto dei dati di diagnostica. Nel caso in cui tu decida spontaneamente di caricare il pacchetto diagnostico, senza aver ricevuto istruzioni da Interactive Brokers, ti preghiamo di informare il Servizio Clienti attraverso un ticket del Centro Messaggi oppure tramite una chiamata telefonica altrimenti il tuo report relativo agli errori non verrà preso in considerazione.
In base alla piattaforma che utilizzi, clicca su uno dei seguenti link:
-
IBKR Mobile (Android)
-
IBKR Mobile (iOS)
- Per i sistemi operativi Windows e Linux: premi Ctrl+Alt+Q
- Per Mac: premi Cmd+Option+H
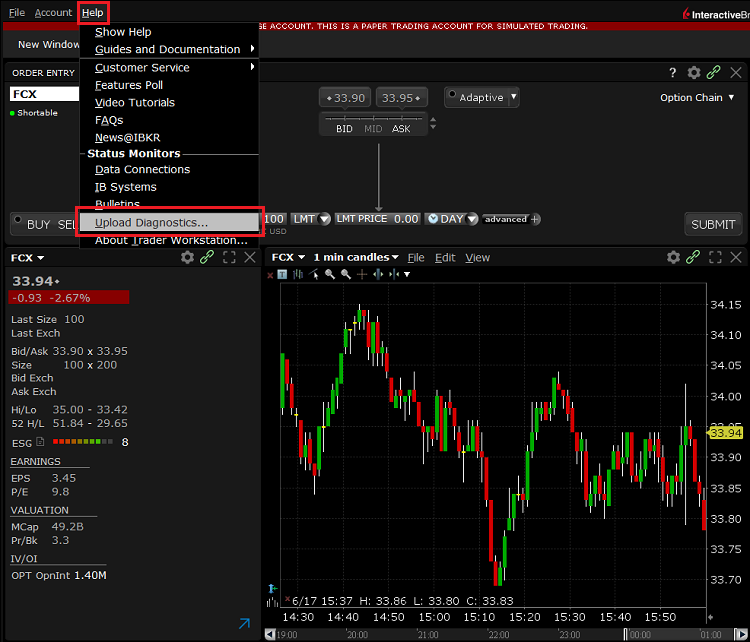
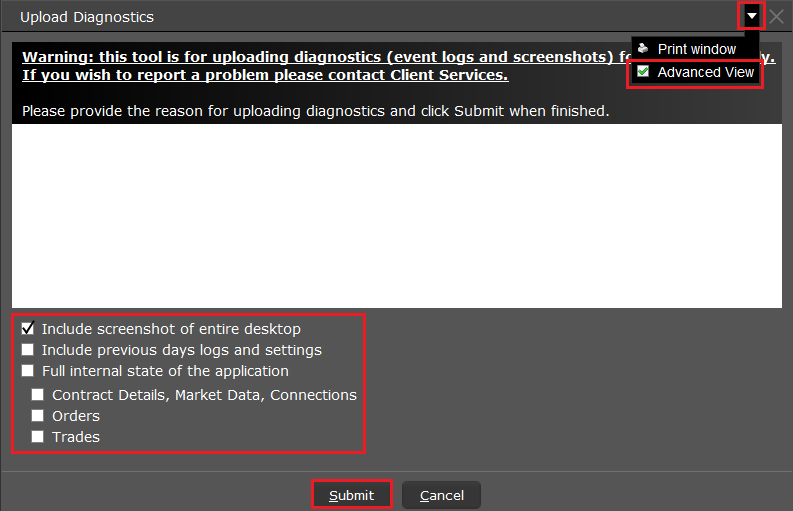
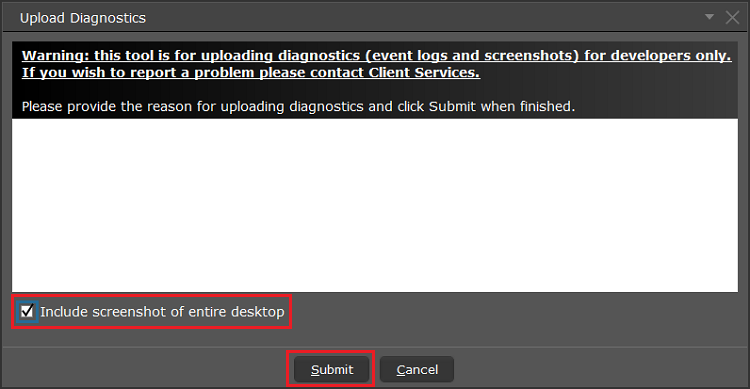

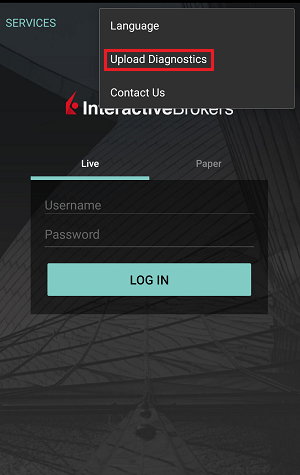
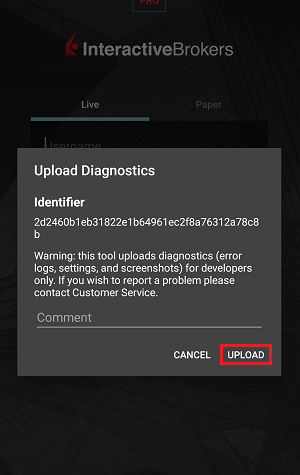
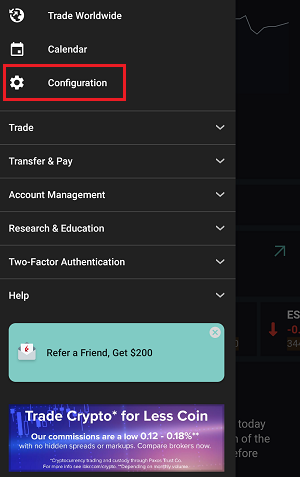
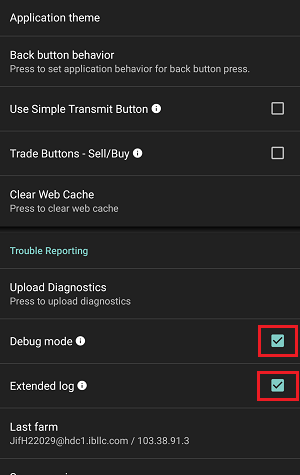
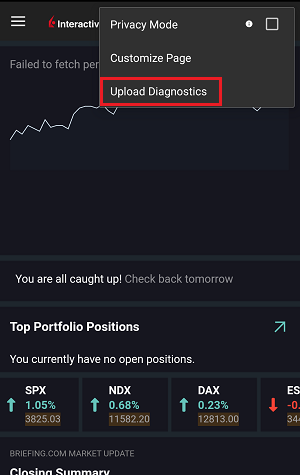
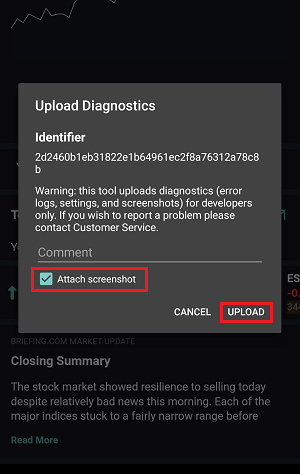
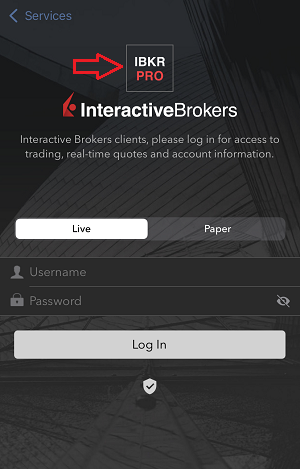
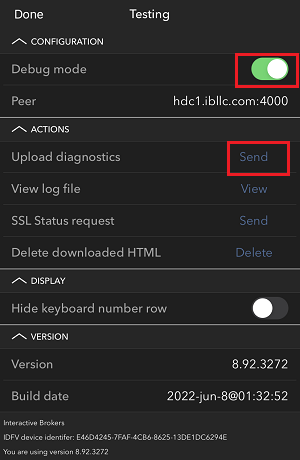
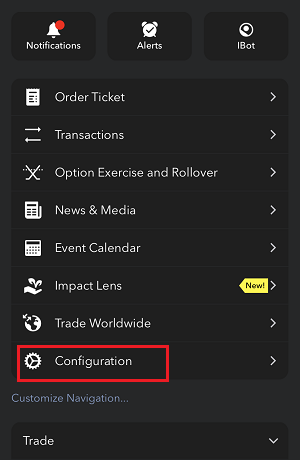
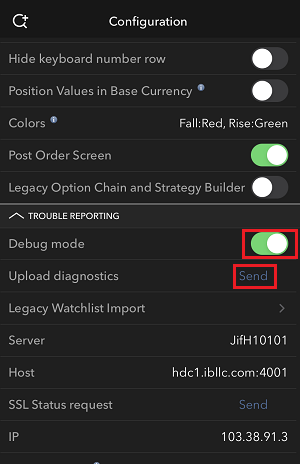
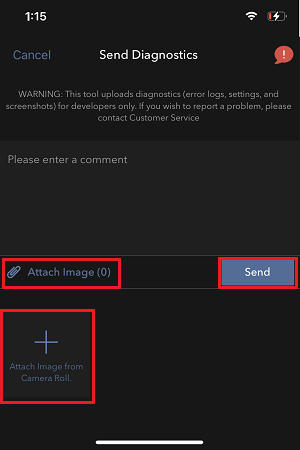
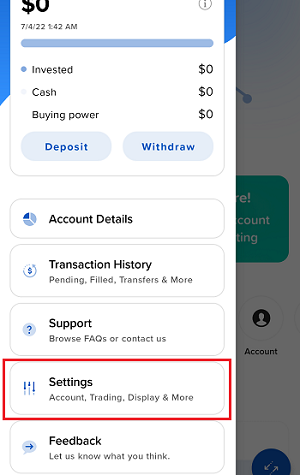
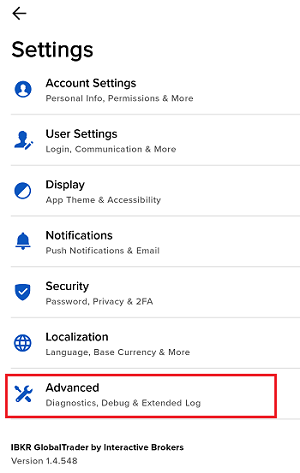
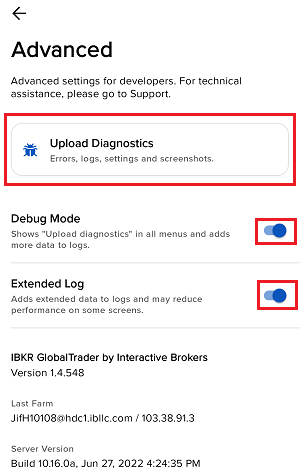
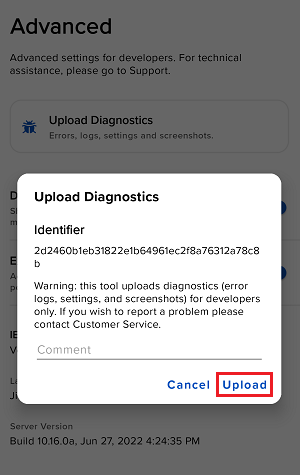
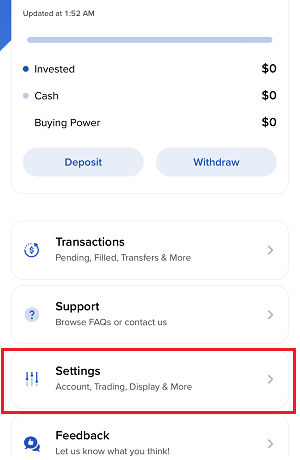
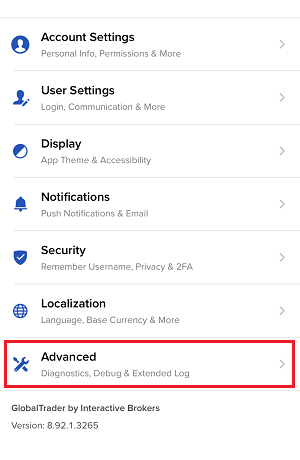
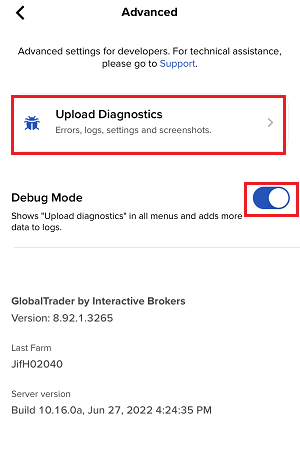
7. Inserisci i tuoi commenti nel campo e premi su “Allega immagine” per inserire gli screenshot del problema che avrai avuto cura di salvare in precedenza nella cartella della tua Fotocamera
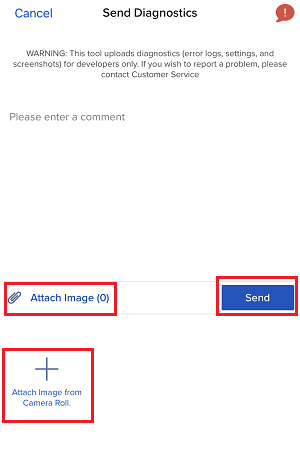
È possibile realizzare una traccia diagnostica per il Portale seguendo le istruzioni riportate nell’articolo IBKB3512
How to Access Your Reports Using FTP on Windows
This tutorial assumes you received reports via email or via FTP that were encrypted with the public key you sent to IBKR. If you need guidance to set up the encrypted statement delivery, please refer to this article, which is a prerequisite to the instructions below.
There are multiple methods to access the IBKR FTP server. FTP clients such as Filezilla can be used or you could as well launch the command ftp ftp2.interactivebrokers.com from the Command Prompt or use the Windows Explorer. In this article, we explain how to realize the connection to the IBKR FTP server using Windows Explorer.
Important Note: You will not be able to connect using your browser.
Once you are connected to the IBKR FTP Server, you will have both read and write access to your folder. The retention policy for the files is 100 days - IBKR will automatically purge files after that.
To access your reports using Windows File Explorer:
1. Open the Windows File Explorer by either pressing Windows Key + E on the keyboard. Alternatively, you can type File Explorer into the Windows search box and click on Open

2. In the File Explorer window, type the FTP address, ftp://ftp2.interactivebrokers.com, into the file path at the top of the window and hit Enter.
.png)
3. A window prompting your for credentials will appear. Enter the FTP username and password IBKR provided you with into the correspondent fields and click Log On.
.png)
4. You now have direct access to your FTP folder. Documents and files contained in your FTP folder can now be decrypted using your PGP key, as described in IBKB4108.
.png)
Common issues and solutions
Ensure the correct login details are being used to connect to the FTP server. The username and password you are entering should match the ones you have received from the Reporting Integration Team.
-
Enable the Passive (PASV) mode for FTP connections. press Windows Key + S, type Internet Options and open the panel. Move to the Advanced tab and activate the option Use Passive FTP (for firewall and DSL modem compatibility). The passive mode is more firewall-friendly then the active one, since all the connections are initiated from the Client side. If you are using a specific FTP Client, check its connection settings or advanced settings in order to find and enable the Passive (PASV) mode switch.
-
In case you have an antivirus or a security software installed on your machine, make sure it is not blocking the FTP connection attempt. Normally, security software allows to set up exceptions for specific connections in order to whitelist them.
-
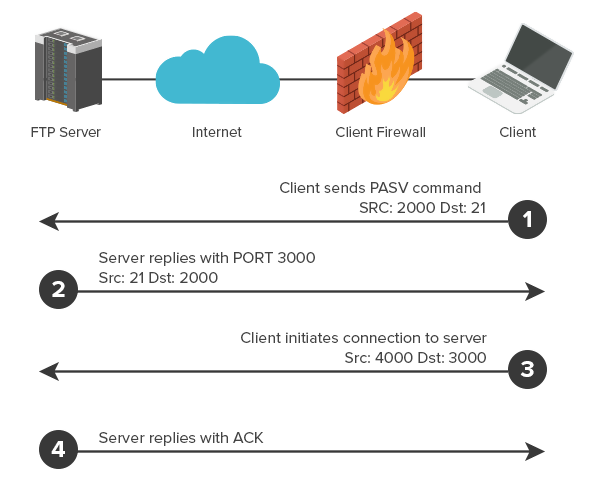
Should the above steps be unable to resolve the issue, ask your network administrator/s to confirm that your firewall allows traffic from/to ftp2.interactivebrokers.com. Note: Your network administrator should consider that every time your FTP Client attempts connecting to our FTP server with Passive mode, it establishes two connections: a command channel (outbound, from random TCP port above 1024 to TCP port 21) and a data channel (outbound, from a random TCP port above 1024 to the TCP port above 1024 which was negotiated through the command channel). Both connections are initiated by the Client side. In the picture below, you can find an example of this connections schema. Please notice that the ports 2000, 3000, 4000 are examples of randomly selected ports and may very well not correspond to the ones used within your specific FTP connection attempt.
KB3968 - Generate a key pair using GPG for Windows
KB4205 - Generate a key pair using GPG Suite on macOS
KB4108 - Decrypt your Reports using GPG for Windows
KB4210 - Decrypting Reports using your PGP Key pair on macOS
KB4407 - Generate RSA Key Pair on Windows
KB4409 - How to set up sFTP for using Certificate Authentication on Windows
KB4410 - How to set up sFTP for using Certificate Authentication on macOS
KB4411 - How to backup your public/private Key pair
KB4323 - How to transfer your public/private key pair from one computer to another
Come generare un file ".har"
Talvolta, per risolvere problemi nel caso di difficoltà gravi legate al sito web, il nostro team del Servizio Clienti potrà richiederti alcune informazioni aggiuntive relative circa le comunicazioni del tuo browser. Ti verrà richiesto di registrare e fornire un file nel formato ".har". Questo tipo di file contiene informazioni aggiuntive circa le richieste di rete che vengono inviate e ricevute dal tuo browser. Il browser può generare questo tipo di file che registra il contenuto, la timeline e lo status delle richieste e risposte http/HTTPS al momento in cui queste sono avvenute.
In questo articolo spieghiamo come generare un file nel formato ".har". Clicca su uno dei link qui in basso a seconda del browser che utilizzi di solito:
Generare un file HAR con Google Chrome:
1. Apri Google Chrome e vai alla pagina nella quale si verifica il problema.
2. Premi CRTL +SHIFT + I sulla tua tastiera. In alternativa, clicca sull’icona del menu Chrome (i tre puntini verticali nell’angolo in alto a destra nella finestra del browser) e seleziona Altri Strumenti > Strumenti per Sviluppatori
3. Selezionando gli Strumenti per Sviluppatori comparirà un pannello nella parte inferiore (o laterale) dello schermo. Seleziona la scheda Rete (Figura 1.)
Figura 1
.png)
4. Cerca il pulsante rotondo Registra nell’angolo in alto a sinistra nella barra degli strumenti disponibili fra gli Strumenti per Sviluppatori e assicurati che la luce sia rossa. Se la luce è grigia, clicca sul pulsante per avviare la registrazione oppure premi CTRL+E (Figura 2.)
Figura 2

5. Attiva la casella Conserva registro (Figura 3)
Figura 3
.png)
6. Clicca sul pulsante Cancella per cancellare i registri esistenti nella scheda. Il pulsante Cancella è quello con l'immagine del simbolo segnaletico del "divieto" e si trova a destra del pulsante Registra (Figura 4.)
Figura 4.

7. Riproduci il problema che hai riscontrato mentre le richieste della rete vengono registrate.
8. Riproduci il problema riscontrato, fai clic destro ovunque nella lista delle richieste di rete registrate, seleziona Salva tutto come HAR con contenuto. Quindi salva il file nella destinazione che preferisci sul tuo computer (ad es. sul Desktop).
9. Dal Portale Clienti di IBKR, vai nel Centro Messaggi e crea un nuovo Ticket Web (oppure potrai utilizzare un ticket esistente).
10. All'interno del Ticket Web potrai allegare il file .har che hai generato. Nel caso in cui il Servizio Clienti di IBKR ti abbia fornito un numero di riferimento oppure il nome di un responsabile, ti invitiamo a inserire queste informazioni nel testo del ticket.
11. Invia il Ticket Web.
Generare un file HAR con Firefox:
1. Apri Firefox e vai alla pagina nella quale si verifica il problema.
2. Premi F12 sulla tua tastiera. In alternativa, clicca sull’icona del menu di Firefox (tre linee orizzontali parallele nell’angolo in alto a destra nella finestra del tuo browser), quindi seleziona Sviluppo Web > Rete
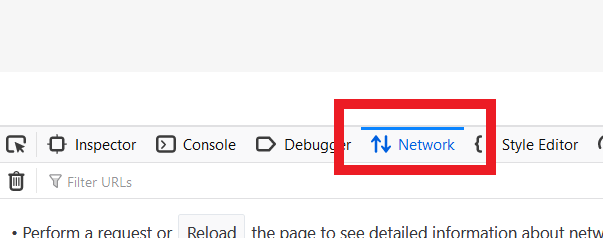
3. Selezionando gli Strumenti per Sviluppatori comparirà un pannello nella parte inferiore (o laterale) dello schermo di Firefox. Seleziona la scheda Rete (Figura 5.)
Figura 5.
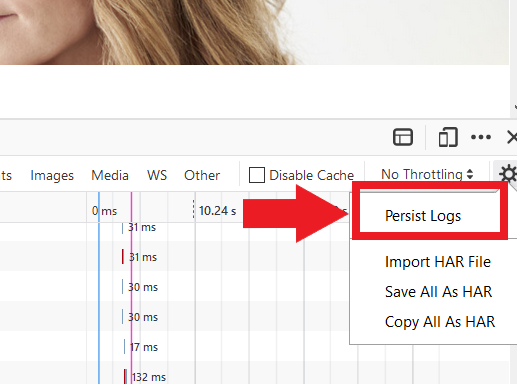
4. Attiva la casella Conserva registro (Figura 6.)
Figura 6.
5. Riproduci il problema che hai riscontrato. La registrazione delle richieste di rete si avvierà in automatico.
6. Una volta riprodotto il problema, fai clic destro ovunque nell’elenco delle richieste registrate e seleziona Salva Tutto come HAR
7. Quindi salva il file nella destinazione che preferisci sul tuo computer (ad es. sul Desktop)
8. Dal Portale Clienti di IBKR, vai nel Centro Messaggi e crea un nuovo Ticket Web (oppure potrai utilizzare un ticket esistente).
9. All'interno del Ticket Web potrai allegare il file .har che hai generato. Nel caso in cui il Servizio Clienti di IBKR ti abbia fornito un numero di riferimento oppure il nome di un responsabile, ti invitiamo a inserire queste informazioni nel testo del ticket.
10. Invia il Ticket Web.
Generare un file HAR con Microsoft Edge:
1. Apri Edge e vai alla pagina nella quale si verifica il problema.
2. Premi F12 sulla tua tastiera. In alternativa, clicca sull’icona del menu di Edge (i tre puntini orizzontali nell’angolo in alto a destra nella finestra del browser) e seleziona Altri Strumenti > Strumenti per Sviluppatori
3. Clicca sulla scheda Rete (Figura 10.)
Figura 10.
.png)
4. Riproduci il problema che hai riscontrato mentre le richieste della rete vengono registrate.
5. Una volta finito, clicca sull’icona del floppy disk (Esporta come HAR) oppure premi CTRL+S (Figura 11.)
Figura 11.
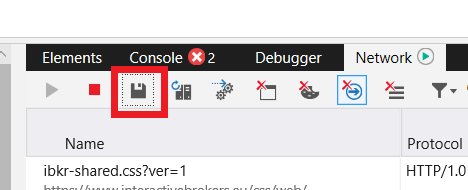
6. Indica il nome del file e quale sia la destinazione che preferisci (per esempio sul Desktop). Quindi clicca sul pulsante Salva.
7. Dal Portale Clienti di IBKR, vai nel "Centro Messaggi" e crea un nuovo Ticket Web (oppure potrai utilizzare un ticket esistente).
8. All'interno del Ticket Web potrai allegare il file .har che hai generato. Nel caso in cui il Servizio Clienti di IBKR ti abbia fornito un numero di riferimento oppure il nome di un responsabile, ti invitiamo a inserire queste informazioni nel testo del ticket.
9. Invia il Ticket Web.
Generare un file HAR con Safari:
Nota bene: Prima di generare un file HAR, assicurati di poter visualizzare il menu Sviluppo in Safari. Se non vedi questo menu, clicca sul menu di Safari, scegli Preferenze, vai sulla scheda Avanzate e attiva la casella a fianco alla dicitura Mostra menu Sviluppo nella barra dei menu
1. Apri il menu Sviluppo e seleziona Mostra Web Inspector oppure premi CMD+ALT+I
2. Clicca sulla scheda Rete (Figura 12.)
Figura 12.

3. Attiva la casella Conserva registro (Figura 13.)
Figura 13.
.png)
4. Clicca sull'icona Esporta (oppure premi CMD+S), indica il nome e la destinazione del file sul tuo computer (ad es. sul Desktop). Salva il file in formato ".har"
5. Dal Portale Clienti di IBKR, vai nel "Centro Messaggi" e crea un nuovo Ticket Web (oppure potrai utilizzare un ticket esistente).
6. All'interno del Ticket Web potrai allegare il file .har che hai generato. Nel caso in cui il Servizio Clienti di IBKR ti abbia fornito un numero di riferimento oppure il nome di un responsabile, ti invitiamo a inserire queste informazioni nel testo del ticket.
7. Invia il Ticket Web.
How to Upload a Diagnostic Bundle from an IBKR Platform
Some support related issues require diagnostics files and logs to be uploaded along with screenshots. The information will help our team to investigate and resolve the issue that you are experiencing.
This article will help you with detailed steps on how to upload diagnostics files and logs from various Interactive Brokers’ trading platforms.
Note: IBKR does not monitor the diagnostic bundle repository throughout the day. Should you spontaneously decide to upload a diagnostic bundle, without being instructed by Interactive Brokers, please inform our Client Services via Message Center ticket or phone call otherwise your error report will go unnoticed.
Please click on one of the links below, according to the platform you are using:
-
IBKR Mobile (Android)
-
IBKR Mobile (iOS)
- For Windows and Linux Operating system: Press Ctrl+Alt+Q
- For Mac: Press Cmd+Option+H


7. Enter your comments in the field and tap ‘Attach Image’ to attach the screenshot/s you previously saved in your camera roll

A diagnostic trace for Client Portal can be captured following the steps on IBKB3512
Offerta dei Prodotti legati alle criptovalute di IBKR
Qui di seguito troverai una lista dei prodotti del settore Criptovalute offerti da IBKR*. Nel caso in cui non dovessi trovare il prodotto che stai cercando potrai effettuare una ricerca nel database dei contratti di IBKR attraverso lo strumento di Ricerca Contratti disponibile sul nostro sito web. Seleziona il menu Assistenza e specifica il tuo tipo di conto (privato o istituzionale). Potrai fare una ricerca semplice inserendo il nome del prodotto o il simbolo. Oppure potrai vare una ricerca avanzata sfruttando i filtri di ricerca oppure specificare il tipo di prodotto che stai cercando.
Criptovalute
- BTC- Bitcoin
- ETH- Ethereum
- LTC- Litecoin
- BCH- Bitcoin Cash
Titoli/ETF
USA
- GBTC (PINK)- Grayscale Bitcoin Investment Trust
- BCHG (PINK)- Grayscale Bitcoin Cash Trust
- ETCG (PINK)- Grayscale Ethereum Classic Trust
- ETHE (PINK)- Grayscale Ethereum Trust
- GDLC (PINK)- Grayscale Digital Large Cap Fund
- LTCN (PINK)- Grayscale Litecoin Trust
Prodotti al di fuori del mercato USA
- BITCOINXB (SFB)- Bitcoin Tracker One
- COINETH (SFB)- XBT Provider Ethereum
- COINETHE (SFB)- XBT Provider Ethereum
Indici
- NYXBT (NYSE)- NYSE Bitcoin Index
- GXBT (Cboe)- The Gemini Bitcoin Trace Price Index (Non ci sono nuovi contratti in offerta per il trading dal giugno 2019)
- BRR (CME)- CME Bitcoin Reference Rate Index
- BRTI (CME)- CME Bitcoin Real Time Index
Future
- GXBT (Cboe/CFE)- The Gemini Bitcoin Trace Price Futures (Non ci sono nuovi contratti in offerta per il trading dal giugno 2019)
- BRR (CME)- CME Bitcoin Reference Rate Futures
- ETHUSDRR (CME) – CME Ether Dollar Reference Rate Futures
- BAKKT (ICECRYPTO)- Bakkt Bitcoin Futures
*Alcuni o tutti i prodotti indicati in questa pagina potrebbero non essere disponibili per i clienti di IBKR in determinate giurisdizioni.
Ritorna alla Tavola dei Contenuti: Bitcoin e altri prodotti del settore Criptovalute disponibili presso IBKR
Bitcoin e altri prodotti in criptovalute presso IBKR
Offerta dei Prodotti legati alle criptovalute di IBKR
Dati di mercato sui prodotti legati alle criptovalute
Fare trading con Future su Bitcoin pre
Pagina dei prodotti Future su Bitcoin
https://www.interactivebrokers.com/en/index.php?f=25379
Requisiti di margine di IBKR
https://www.interactivebrokers.com/en/index.php?f=24176
Come inviare documenti a IBKR grazie al tuo smartphone
Interactive Brokers ti consente di inviarci una copia di un documento anche se non hai al momento uno scanner. Puoi scattare una foto del documento richiesto semplicemente utilizzando il tuo smartphone.
Qui di seguito troverai le istruzioni su come scattare una foto e inviarla tramite e-mail a Interactive Brokers per i seguenti sistemi operativi su smartphone:
Se sai già come scattare e inviare foto tramite e-mail con il tuo smartphone, ti invitiamo a cliccare QUI – Dove inviare l’e-mail e cosa inserire nel campo oggetto.
iOS
1. Dal fondo dello schermo del tuo smartphone scorri verso l’alto e seleziona l’icona della fotocamera.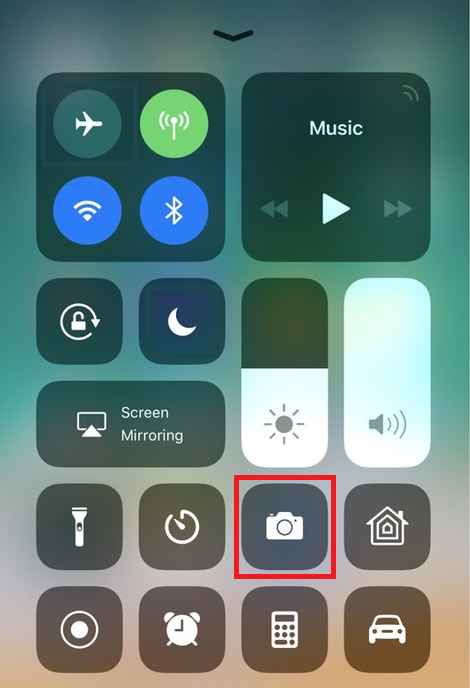
Se non hai l’icona della Fotocamera, tocca l’icona dell’app Fotocamera presente sulla schermata Home del tuo iPhone.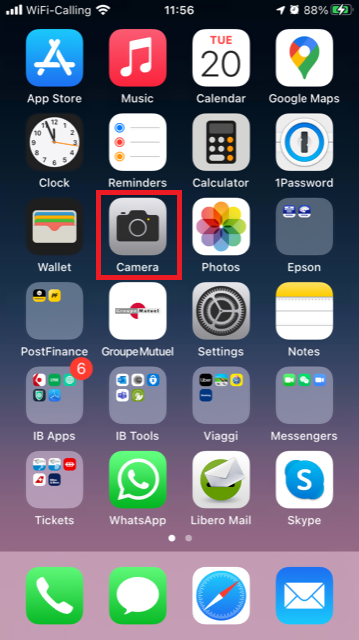
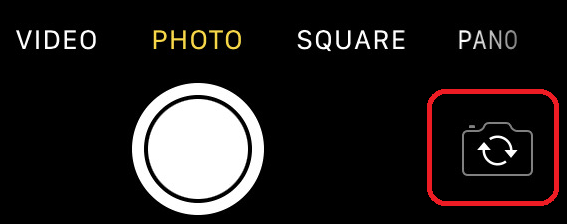
In genere il tuo telefono dovrebbe attivare la fotocamera posteriore. Se si attiva quella anteriore, ti basterà toccare il pulsante cerchiato in rosso nell’immagine qui sotto.
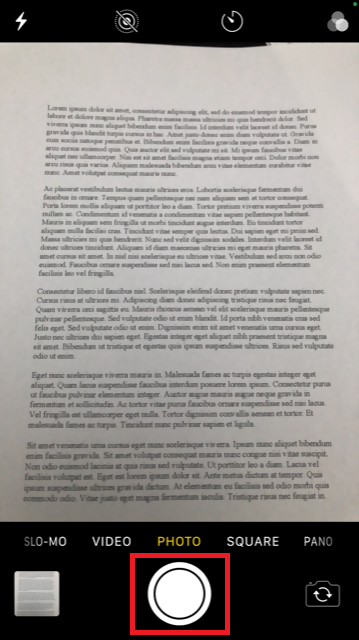
2. Disponi l’iPhone sopra il documento e inquadra una porzione o una pagina intera.

3. Assicurati che la luce sia uniforme e basti a illuminare il testo. Fai in modo che non ci siano ombre sul documento per via della tua posizione. Reggi lo smartphone in maniera decisa evitando scosse o tremolii. Tocca il pulsante dell’otturatore per scattare la foto.
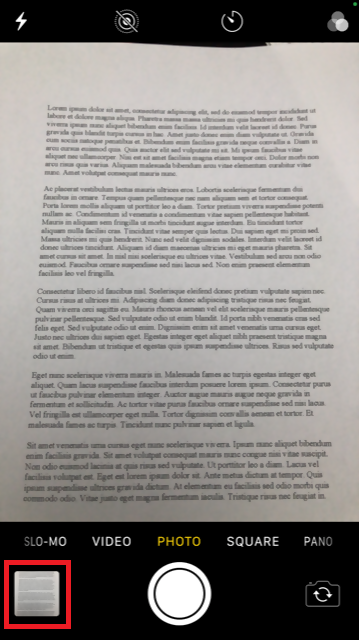
4. Tocca la miniatura della foto nell’angolo in basso a sinistra per visualizzare a schermo intero la foto che hai appena scattato.
5. Assicurati che la foto sia chiara e che il documento sia leggibile. Puoi ingrandire la foto e vedere nel dettaglio l’immagine facendo scorrere le due dita come mostrato nell’immagine qui sotto.

Se la foto non è di buona qualità oppure non c'è abbastanza luce, ripeti i passaggi precedenti per scattare una foto migliore.
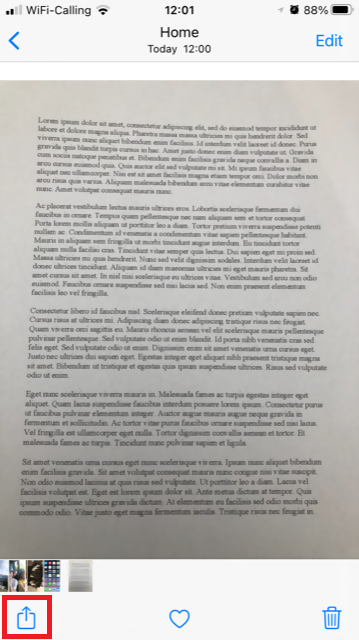
6. Tocca l’icona di condivisione nell’angolo in basso a sinistra dello schermo.
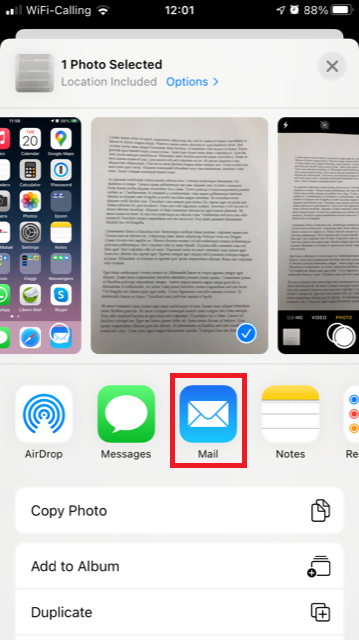
7. Tocca l’icona della posta elettronica.
Nota bene: per inviare e-mail il tuo telefono deve essere configurato per questo scopo. Ti invitiamo a contattare il tuo e-mail provider se non hai familiarità con questa procedura.
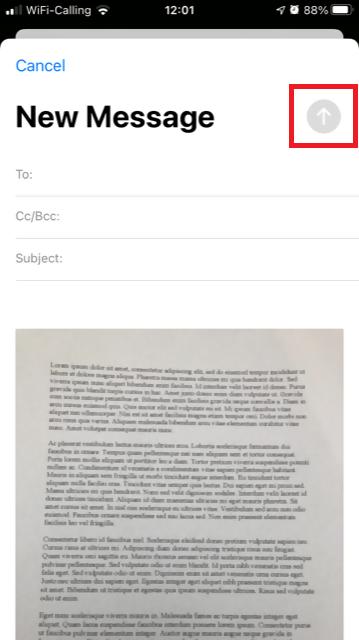
8. Ti invitiamo a leggere QUI per vedere come compilare i campi A: e Oggetto: della tua e-mail. Una volta completata l’e-mail, tocca l’icona della freccia in alto a destra per l’invio.
Android
1. Apri la lista delle applicazioni e avvia l’app Fotocamera. In alternativa puoi accedervi dalla tua schermata Home. L’applicazione potrebbe avere un nome diverso a seconda del modello di telefono, della marca o delle impostazioni.
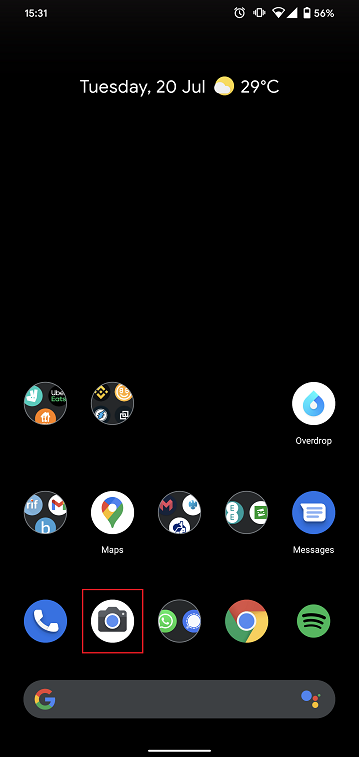
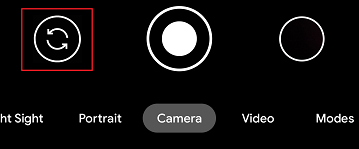
In genere il tuo telefono dovrebbe attivare la fotocamera posteriore. Se si attiva quella anteriore, ti basterà toccare il pulsante cerchiato in rosso nell’immagine qui sotto.
2. Disponi il tuo dispositivo Android sopra il documento e inquadra una porzione o una pagina intera.

3. Assicurati che la luce sia uniforme e basti a illuminare il testo. Fai in modo che non ci siano ombre sul documento per via della tua posizione. Reggi lo smartphone in maniera decisa evitando scosse o tremolii. Tocca il pulsante dell’otturatore per scattare la foto.
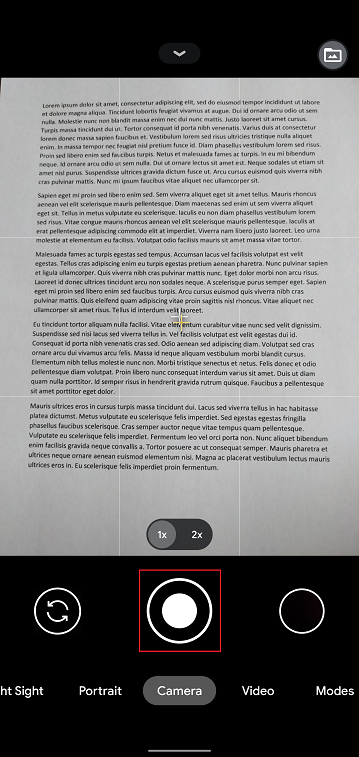
4. Assicurati che la foto sia chiara e che il documento sia leggibile. Puoi ingrandire la foto e vedere nel dettaglio l’immagine facendo scorrere le due dita come mostrato nell’immagine qui sotto.

Se la foto non è di buona qualità oppure la luce non basta, ripeti i passaggi precedenti per scattare una foto migliore.
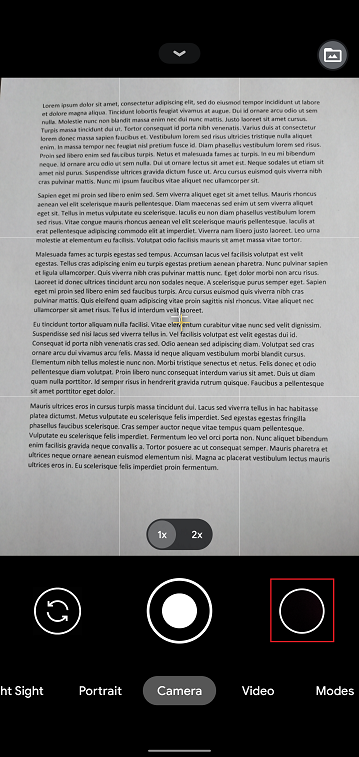
5. Tocca l’icona del cerchio vuoto nell’angolo in basso a destra dello schermo.
6. Tocca l’icona di condivisione nell’angolo in basso a sinistra dello schermo.

7. Nel menu di condivisione tocca l’icona del servizio e-mail impostato sul tuo telefono. Nell’esempio qui in basso viene selezionata Gmail, ma il nome potrebbe variare in base alle impostazioni del tuo smartphone.
.png)
Nota bene: per inviare e-mail il tuo telefono deve essere configurato per questo scopo. Ti invitiamo a contattare il tuo e-mail provider se non hai familiarità con questa procedura.
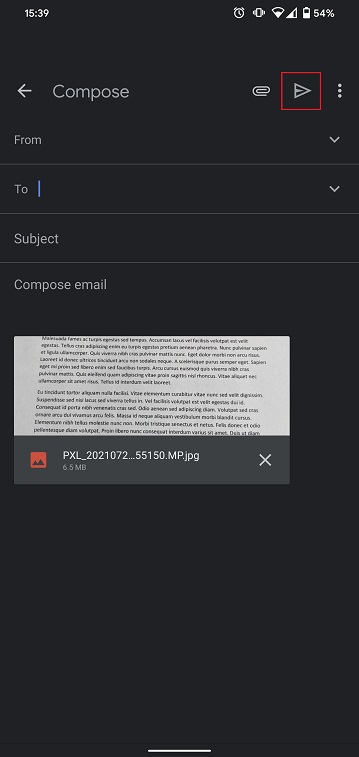
8. Ti invitiamo a leggere QUI per vedere come compilare i campi "A" e "Oggetto" della tua e-mail. Una volta completata l'e-mail, tocca l’icona della freccia in alto a destra per l’invio.
DOVE INVIARE L’E-MAIL E COSA INSERIRE NEL CAMPO OGGETTO
L’e-mail deve essere scritta rispettando le seguenti istruzioni:
1. Nel campo "A:" bisogna inserire quanto segue:
- newaccounts@interactivebrokers.com se hai la residenza in un Paese al di fuori del continente europeo
- newaccounts.uk@interactivebrokers.co.uk se hai la residenza in un Paese europeo
2. Il campo dell' Oggetto:deve contenere tutte le seguenti informazioni:
- Il tuo numero di conto (in genere nel formato Uxxxxxxx, dove a ogni x corrisponde un numero) oppure il tuo nome utente.
- Il motivo per il quale hai inviato il documento. Ti invitiamo a utilizzare i seguenti acronimi a seconda dei casi:
- PoRes per un documento comprovante il tuo indirizzo di residenza
- PID per un documento comprovante l’identità
Come aggiungere un utente ad un sistema di Autenticazione IBKR Mobile (IB Key) già attivo – iPhone
In questa pagina vengono illustrati i passaggi necessari per aggiungere un utente alla sezione di Autenticazione nell’app IBKR Mobile per dispositivi con il sistema operativo iOS.
Requisiti:
- L’app IBKR Mobile deve essere installata e il sistema di Autenticazione IBKR Mobile (IB Key) deve già essere stato attivato nel dispositivo iOS.
- Per maggiori informazioni sulle procedure di installazione e attivazione nei dispositivi iOS, ti preghiamo di consultare l'articolo KB2278.
Istruzioni:
1. Sul tuo dispositivo iOS, apri l'app IBKR Mobile.
1.a. Se l’app si apre con la schermata di accesso (Figura 1), tocca il pulsante Servizi nell’angolo in alto a destra (freccia rossa) e procedi con il passaggio 2.
1.b. Se l'app si apre con la tua Pagina Principale, il Portafoglio, la Lista prezzi o altre pagine simili, tocca il pulsante Altro nell'angolo in basso a destra (Figura 2). Quindi tocca il pulsante Autenticazione a 2 livelli (Figura 3) successivamente seleziona Aggiungi Utente (Figura 4) e vai al passaggio 3.
Figura 1 Figura 2 Figura 3
(1).jpeg)
.jpeg)
.jpeg)
Figura 4.
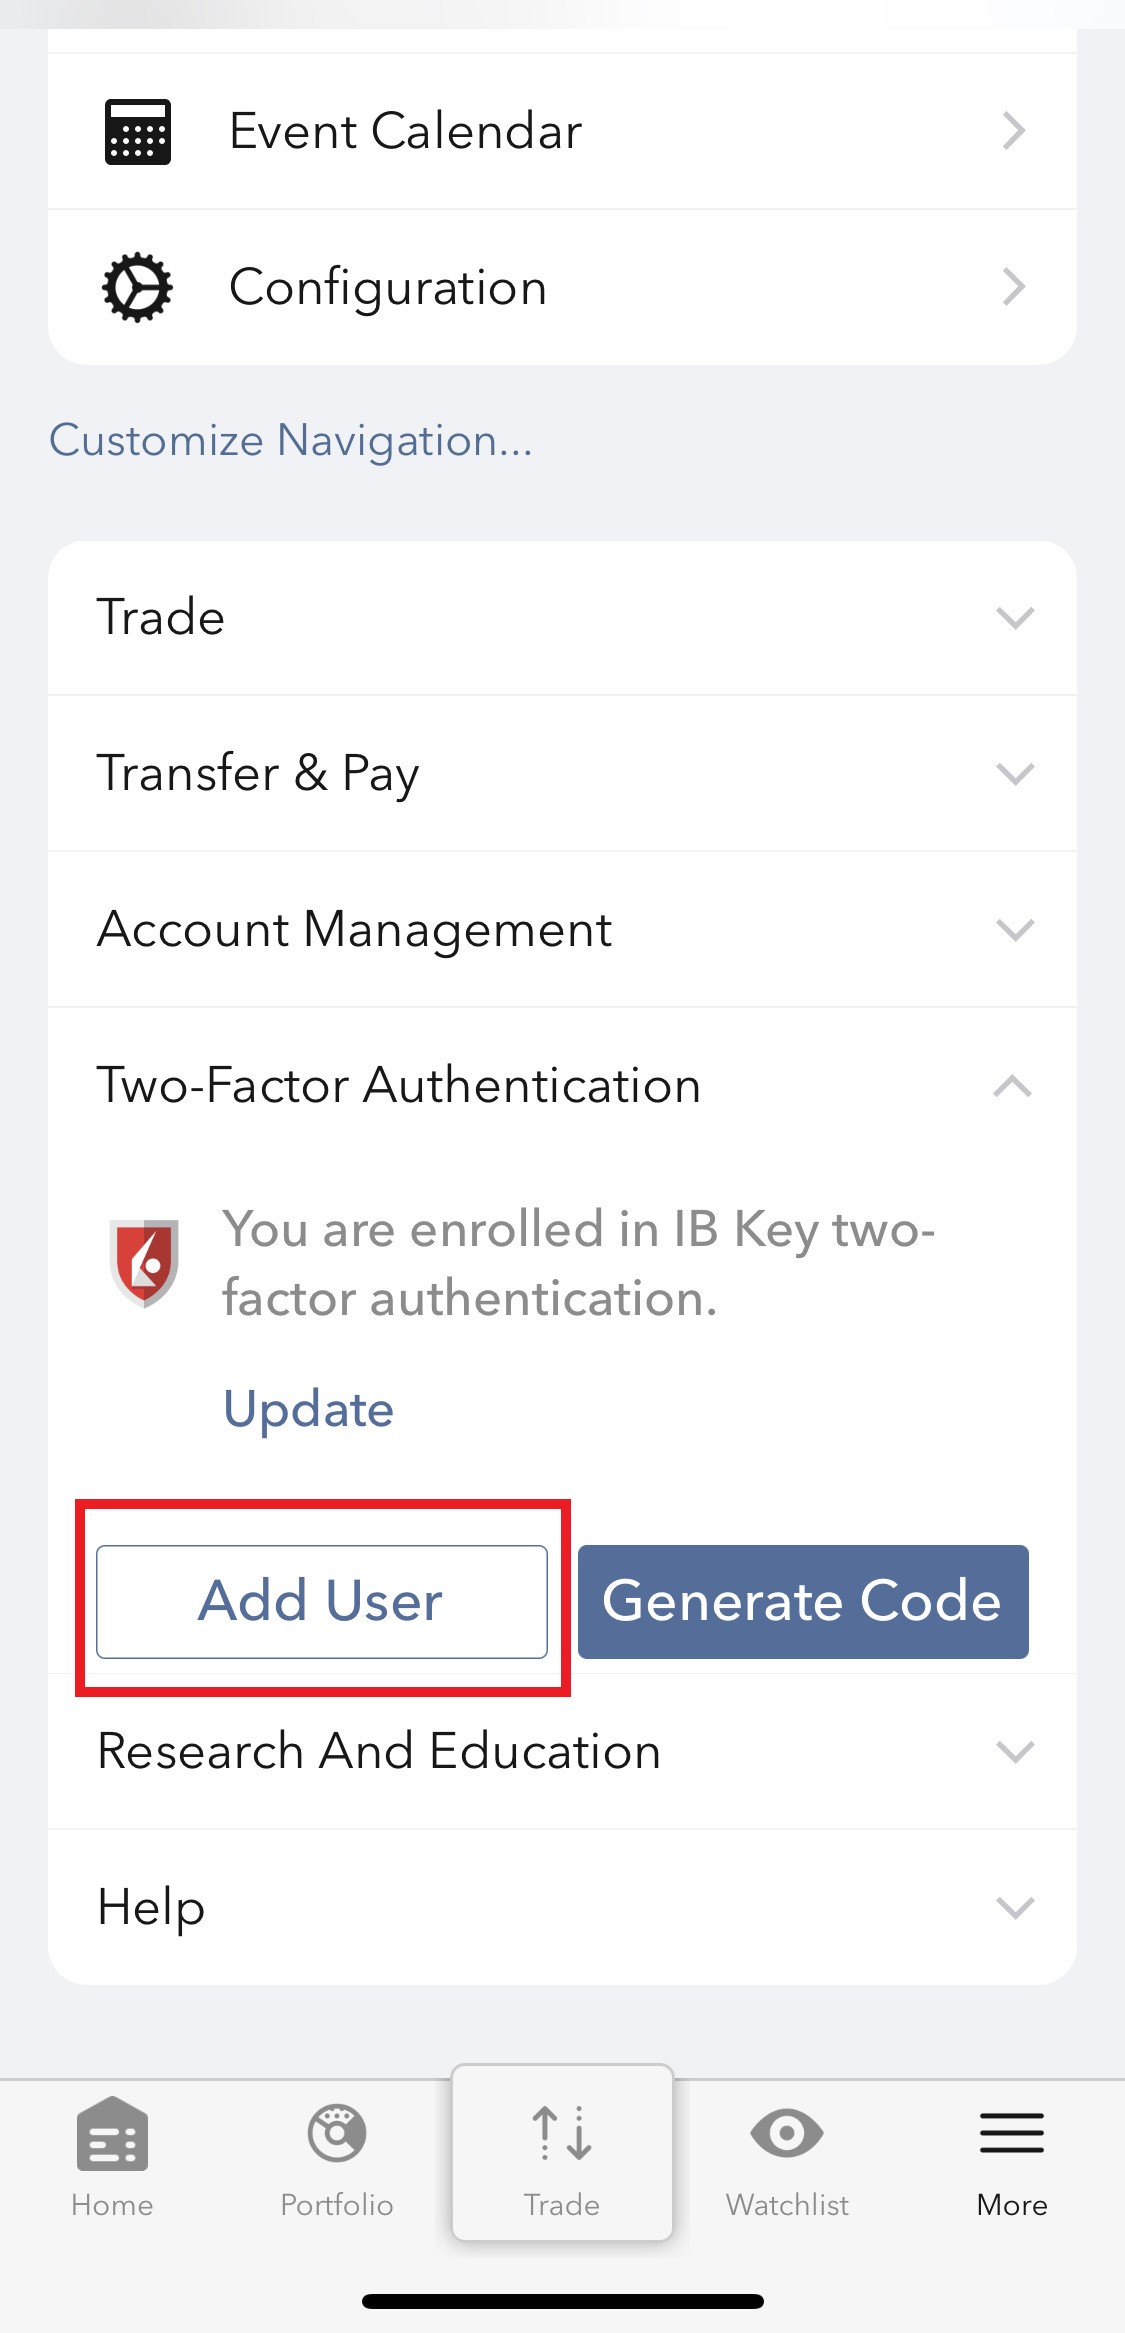
2. Tocca il pulsante Autentica (Figura 5) e quindi Aggiungi Utente (Figura 6).
Figura 5. Figura 6.


3. Leggi le istruzioni e premi su Continua (Figura 7).
Figura 7.

3. Inserisci il tuo Nome utentee la Password, quindi premi su Continua (Figura 8).
Figura 8.
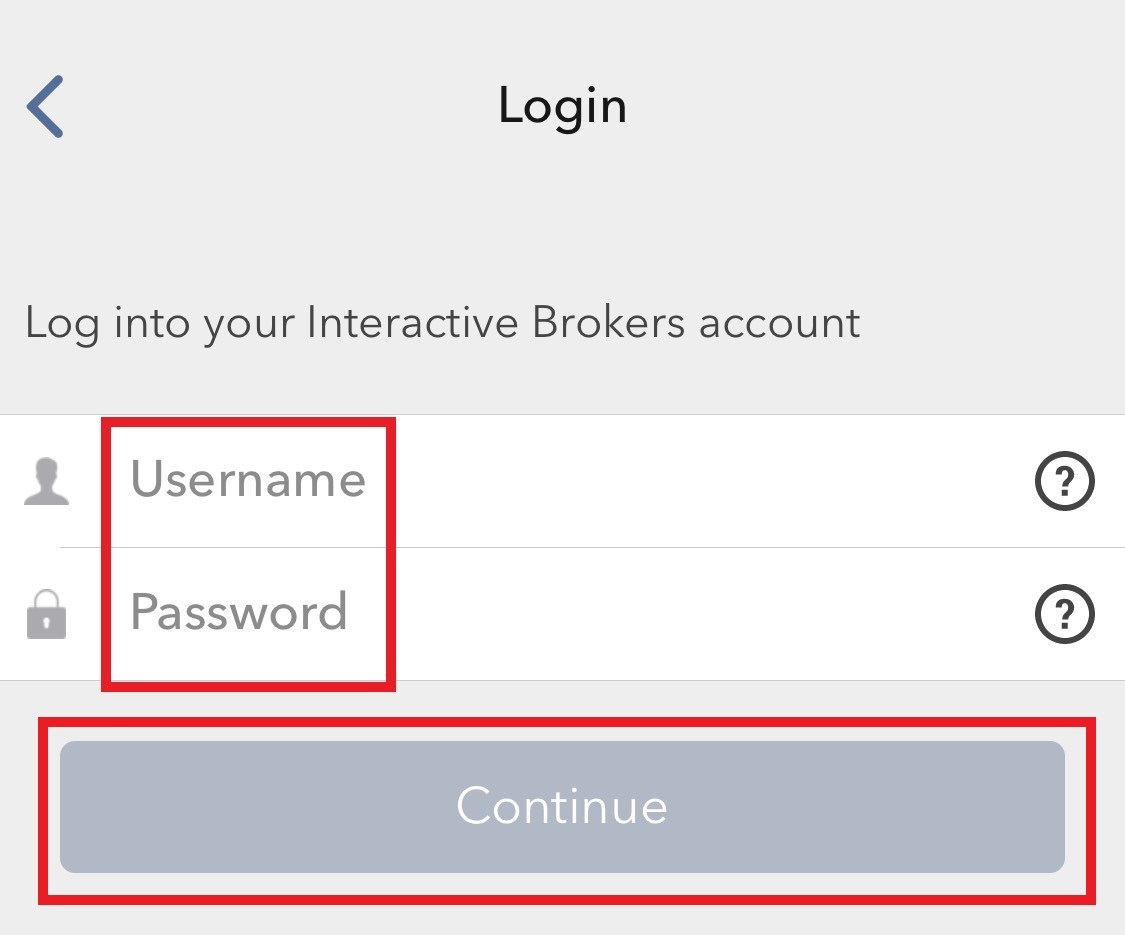
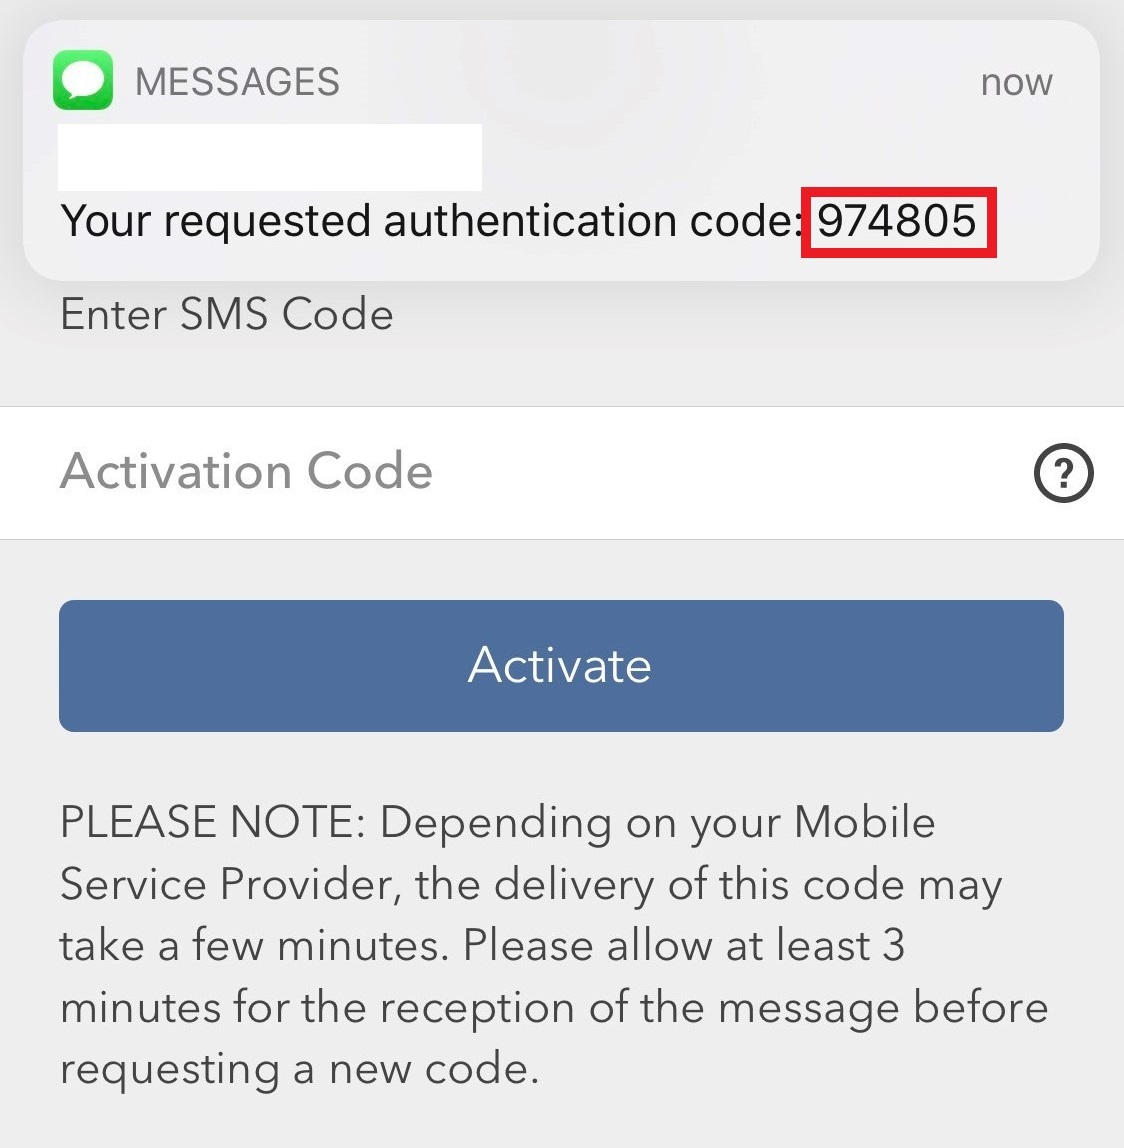
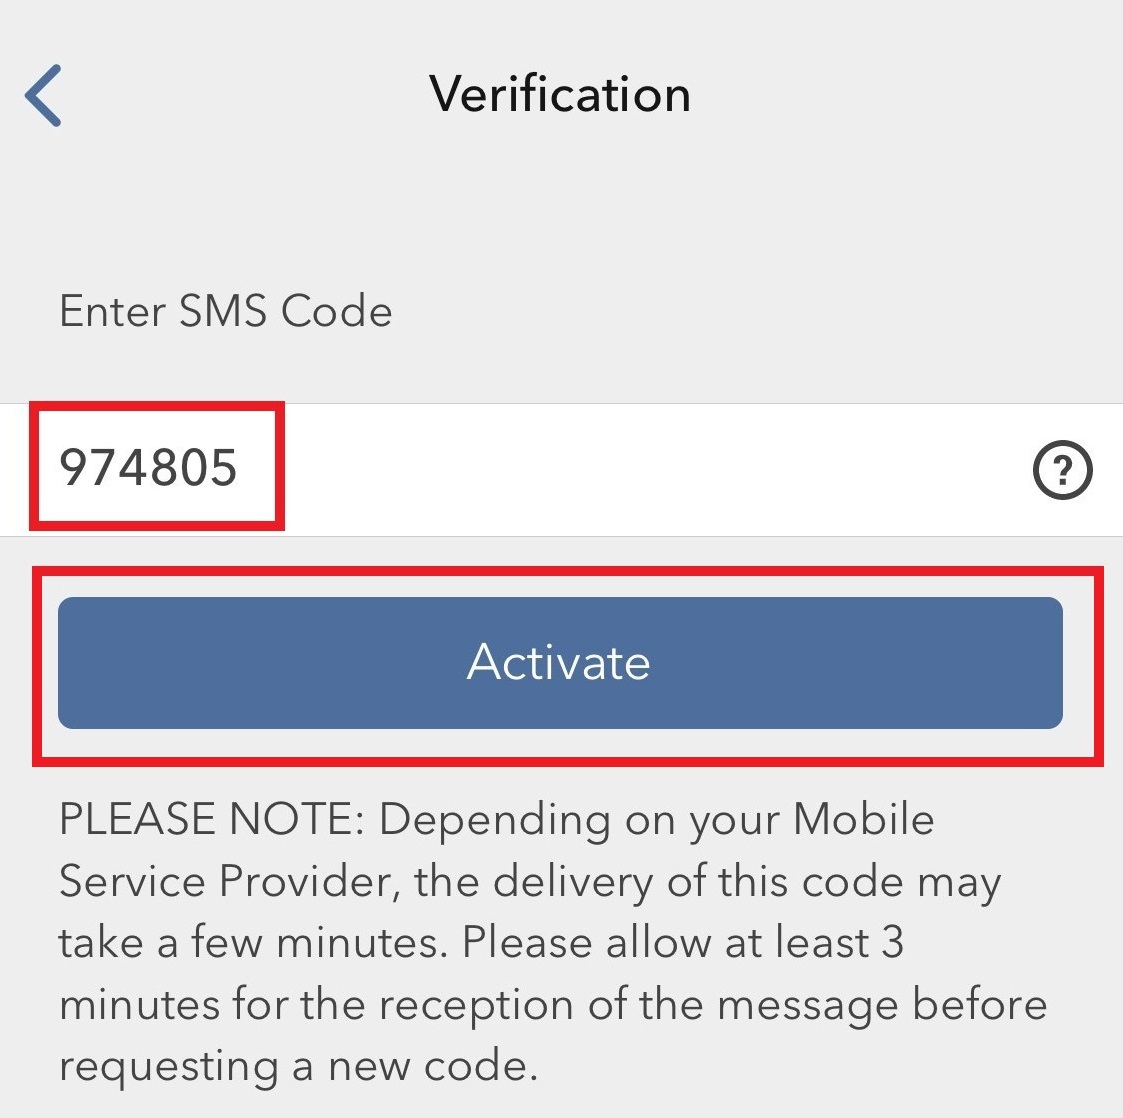
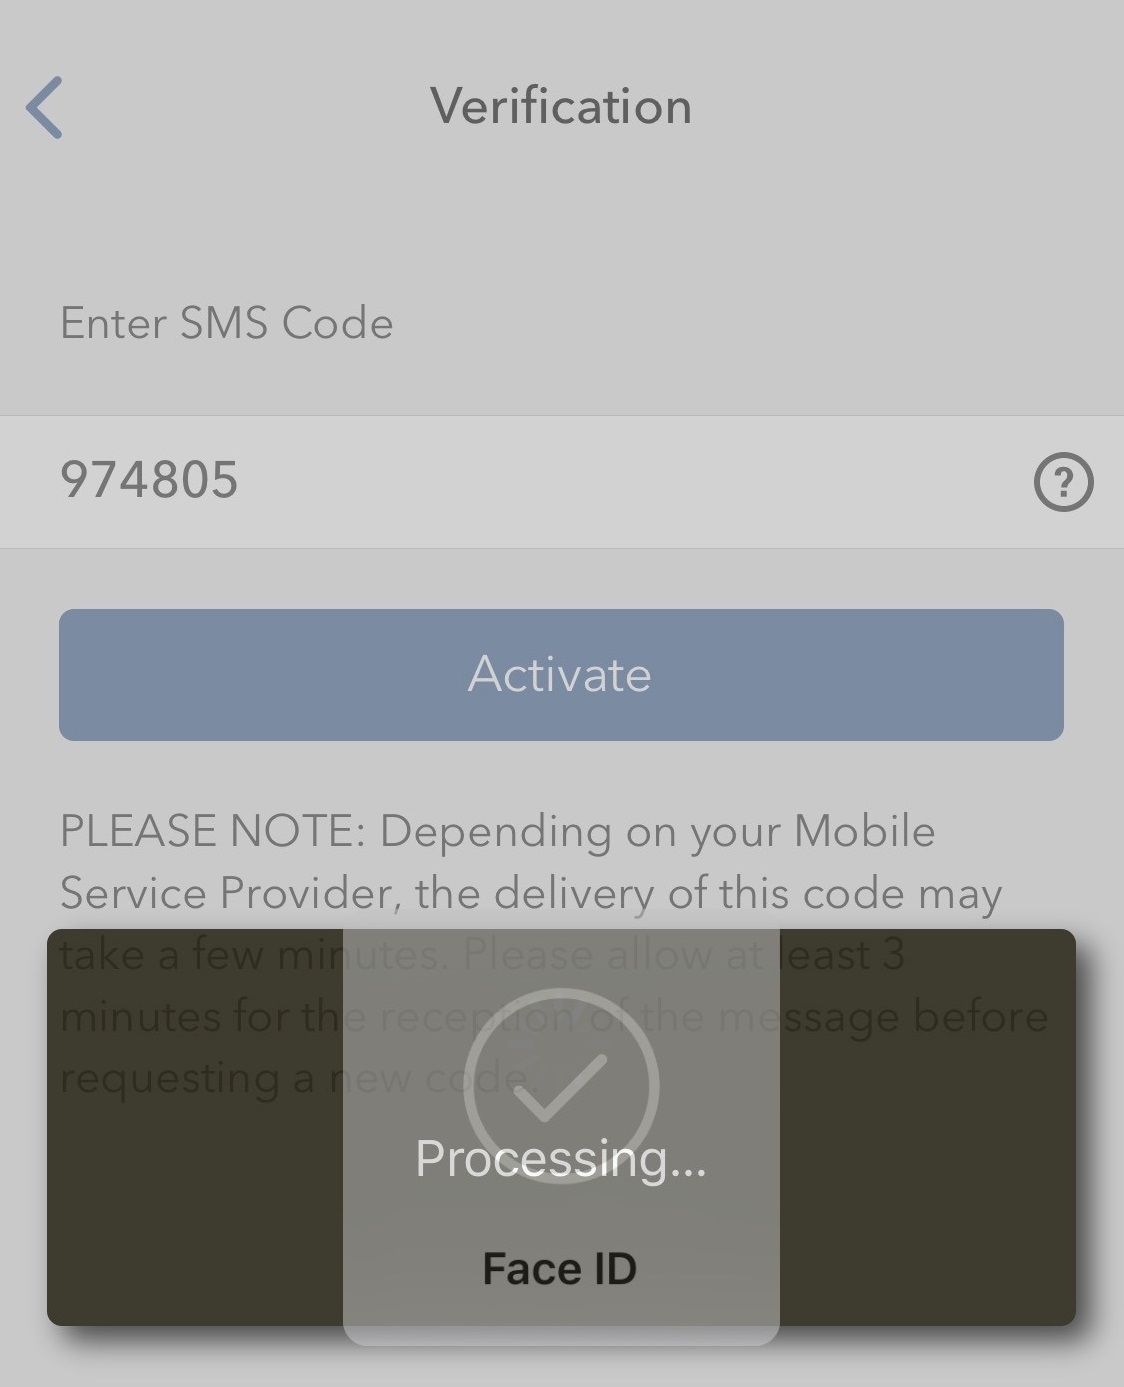
4. Un Codice di Autenticazione verrà inviato tramite SMS al numero di telefono cellulare indicato nel tuo conto (Figura 9). Inserisci questo Codice di Autenticazione nel campo del Codice di Attivazione quindi premi su Attiva (Figura 10).
Figura 9. Figura 10.
5. In base alle impostazioni di sicurezza del tuo smartphone, ti verrà chiesto di usare il tuo Passcode, Touch ID, oppure Face ID (Figura 11).
Figura 11.
6. Se l'attivazione è andata a buon fine, visualizzerai un messaggio di conferma sullo schermo. Infine premi su Fatto per completare la procedura (Figura 12).
Figura 12.
.jpeg)

