How to set up sFTP for using Certificate Authentication on Linux
These instructions apply to users who are receiving their statements via sFTP. If you elected to receive your statements via sFTP, you would first need to generate an RSA Key pair.
There are many Linux distributions and there are multiple methods to access the IBKR sFTP server. sFTP clients such as Filezilla can be used. In this article we explain how to realize the connection to the IBKR FTP server using Ubuntu Linux and Filezilla.
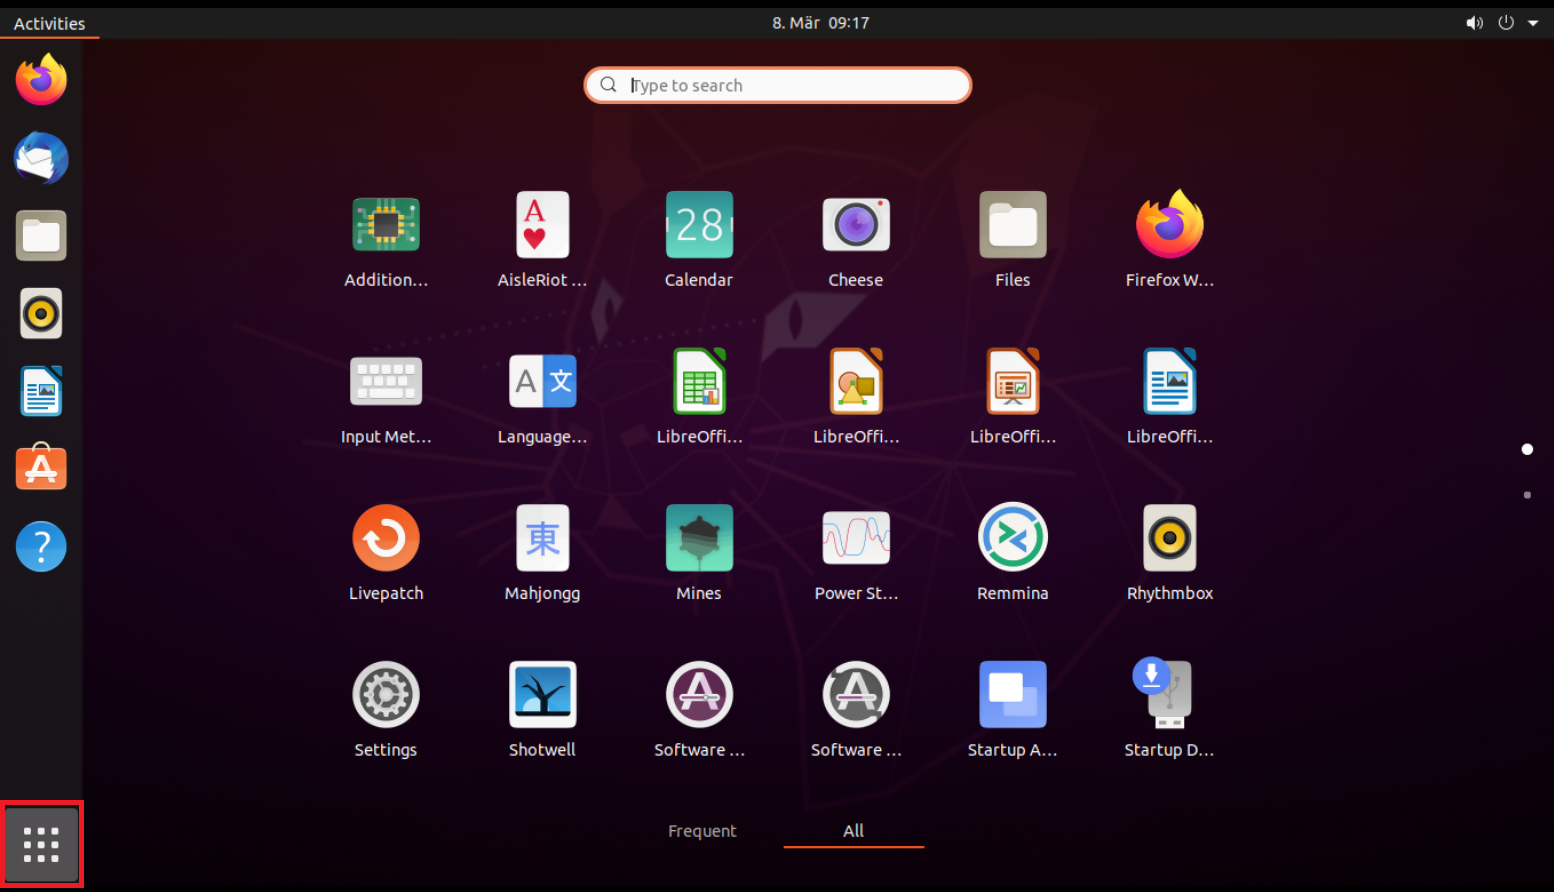
1. On your Linux machine, click on the Applications icon in the bottom left corner of you screen.
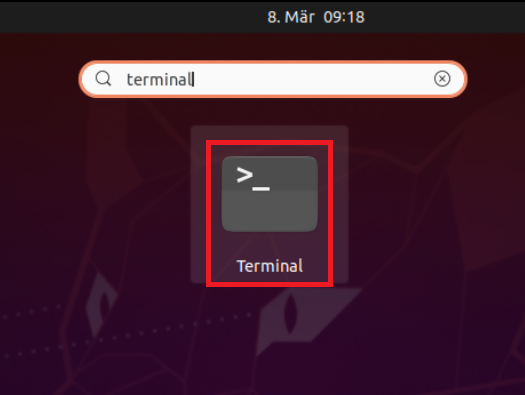
2. In the search box, type terminal and then click on the Terminal icon in the search results.
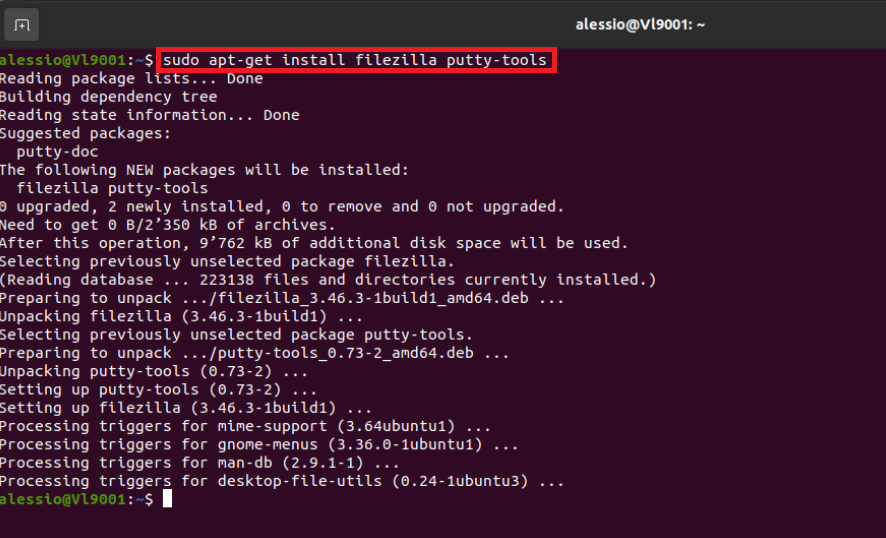
3. In the Terminal window, type sudo apt-get install filezilla putty-tools in order to install the required software. Enter your sudo password when requested.
4. Once the software installation is complete, type puttygen -t rsa -b 2048 -o privatekey.ppk in order to generate the RSA Key pair.
You will be asked to enter a passphrase and type it again to confirm.
PLEASE NOTE: Keeping a secure copy of this password is essential. Any loss of this password will require the whole process to be repeated.

5. Type puttygen -L privatekey.ppk -o public.key in order to export the public part of the Key pair to the file public.key

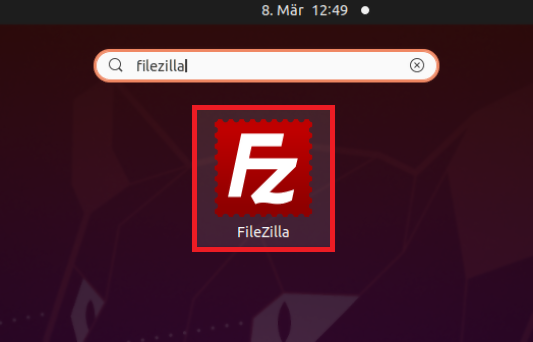
7. In the search box, type FileZilla and then click on the FileZilla icon in the search results.
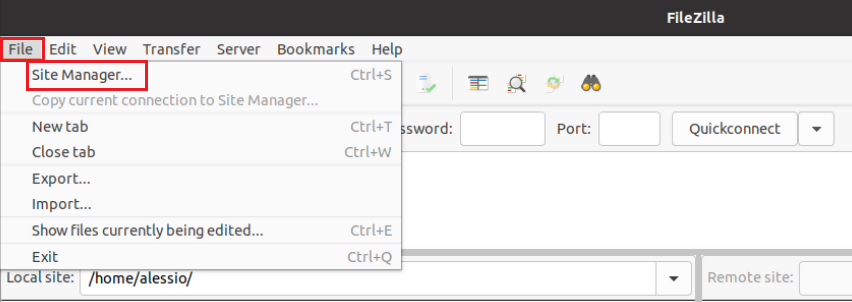
8. Click on the FileZilla top menu File -> Site Manager...
9. In the Site Manager window, click on the button New site to create a new connection.
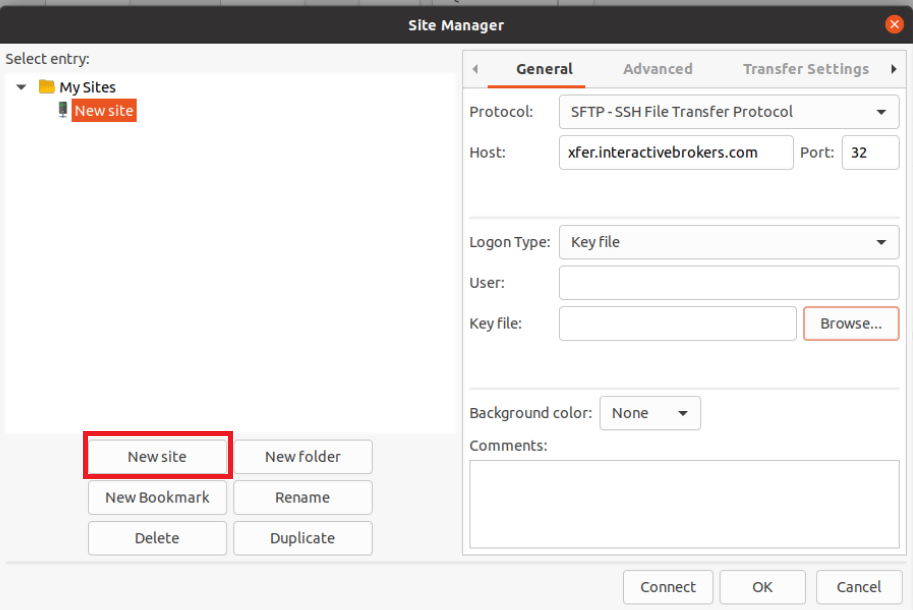
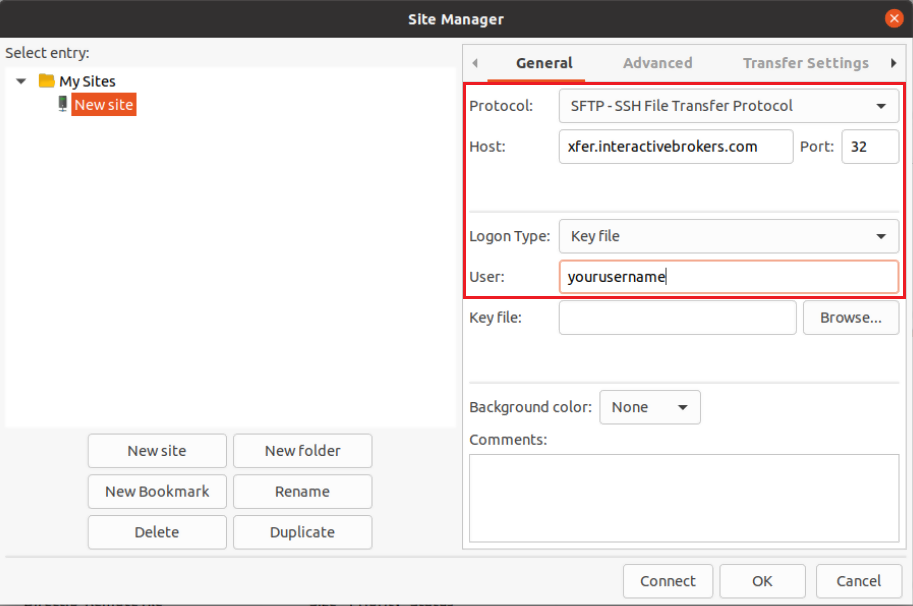
10. In the right panel (called General):
- Select SFTP - SSH File Transfer Protocol as Protocol
- Enter xfer.interactivebrokers.com in the Host field
- Enter 32 in the Port field
- Select Key file as Logon Type
- Enter the username provided to you by Interactive Brokers in the User field
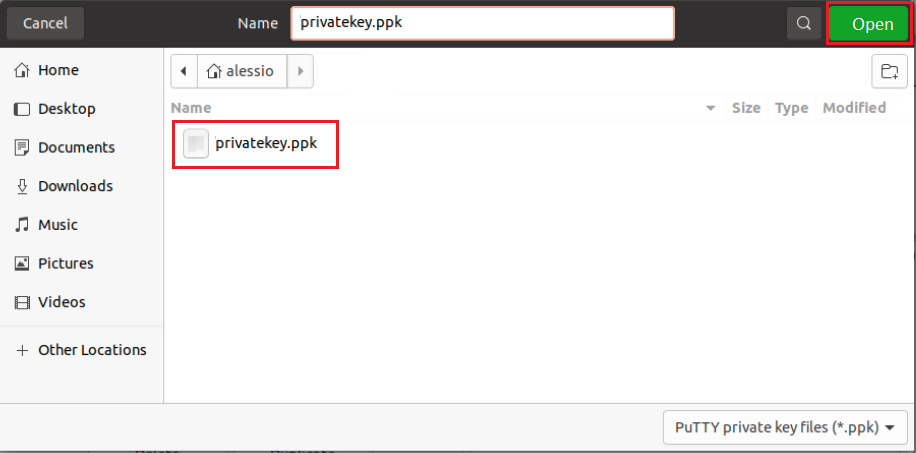
11. Click on Browse next to the Key file field.
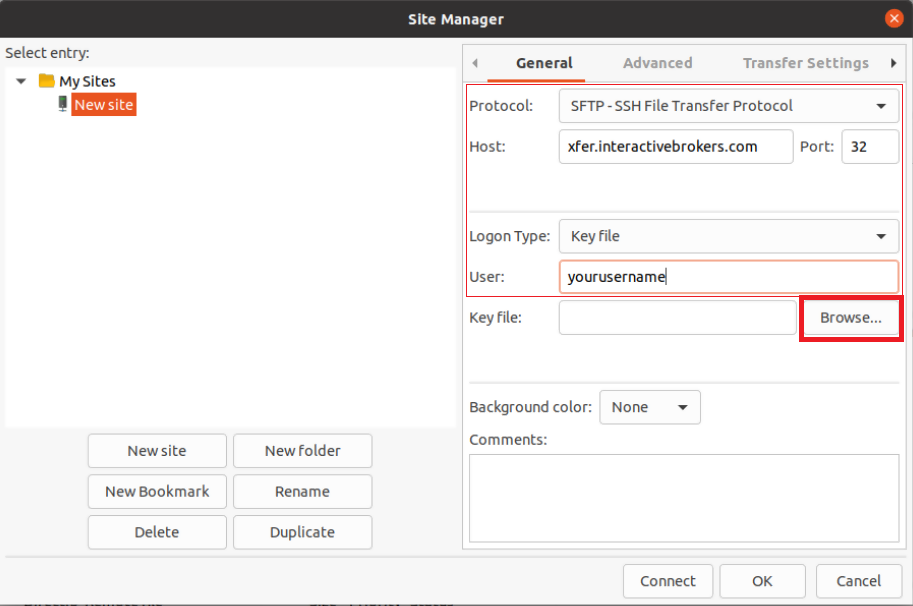
12. Move to the folder where your Key pair was created (normally your user folder: /users/yourusername/). Select the file privatekey.ppk and click on the Open button. This will set it as the Key file in your connection parameters.
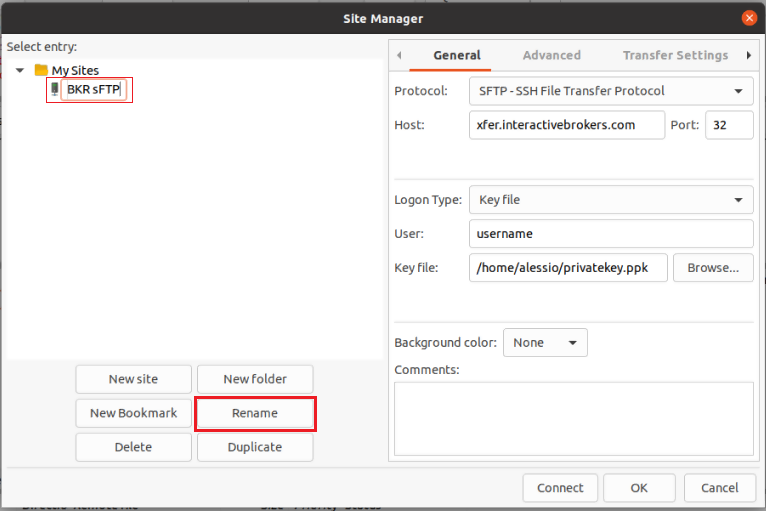
13. Click on Rename and select a name of your preference for this connection (e.g. IBKR sFTP). Press Enter to confirm the name.
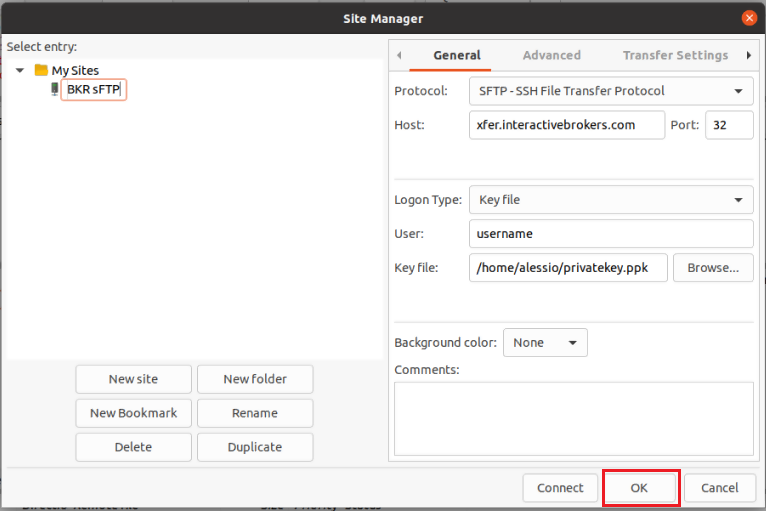
14. Click on OK to save your connection parameters.
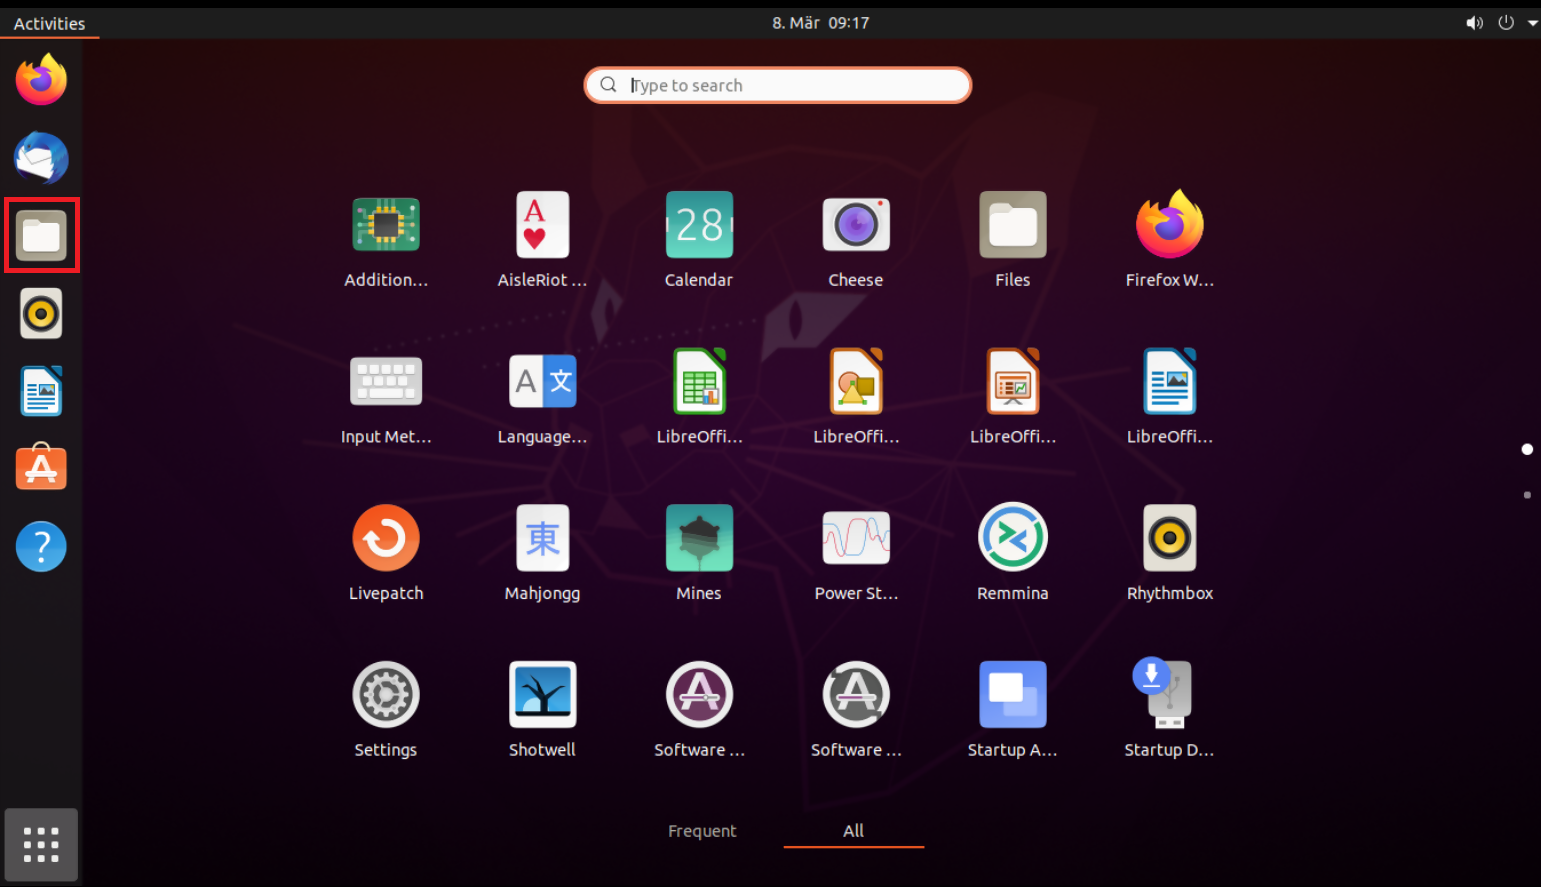
15. Click on the folder icon on the left hand toolbar of your Desktop. This will launch the File application.
16. Move to the folder where you saved your Key pair (normally your user folder: /users/yourusername/). Right click on the file public.key and select Send to...
The file will be attached to an empty email. Send the email to the Reporting Integration Team, as per IBKB3842.
Important Note: do NOT send us your private key. Send us only your public one
Once IBKR has configured the parameters for your connection on our servers, you will be notified. After that, you will be able to access your sFTP repository by using the Site connection you have created in FileZilla. In case you have not yet set up a Site connection, please follow the steps from 6. to 14. which are a prerequisite to the below steps:
1. Click on the Applications icon in the bottom left corner of you screen.

2. In the search box, type FileZilla and then click on the FileZilla icon in the search results.
3. On the FileZilla top toolbar, click the down arrow icon and select the Site connection you previously created (e.g. IBKR sFTP)

4. FileZilla will now establish a connection to our sFTP Server and show the files present in your repository.
Common issues and solutions
A. The Login Credentials Provided are Incorrect
-
Ensure the correct login details are being used to connect to the sFTP server. The username and password you are entering should match the ones you have received from the Reporting Integration Team.
-
Confirm you have configured your sFTP Client to use the Private Key file for the logon authentication (see steps 9. and 10. of the above procedure.)
B. Server Refused Our Key
-
Try accessing the sFTP server using a different Client (CyberDuck, ect.)
-
Ensure the Private Key file being used to Authenticate the server login attempt is related to the Public Key you originally sent to the Reporting Integration Team.
-
Should the above checks be unable to resolve the issue, please generate a new RSA Public/Private Key pair and send only the Public part to the Reporting Integration Team, as per IBKB3842.
C. Connection Timed Out
-
In case you have an antivirus or a security software installed on your machine, make sure it is not blocking the FTP connection attempt. Normally, security software allows to set up exceptions for specific connections in order to whitelist them.
-
Verify that the public IP Address of the machine running the sFTP client, is the same you have originally provided to the Reporting Integration Team for being whitelisted. You can discover your public IP Address by searching the Internet for “what is my IP”. If your current IP Address is not the same you provided to us, please send it to our Reporting Integration Team for being whitelisted.
-
Ask your network administrator/s to confirm that your firewall allows both incoming and outgoing traffic from/to xfer.interactivebrokers.com on port TCP 32.
-
Should the above steps be unable to resolve the issue, please generate a new RSA Public/Private Key pair and send only the new Public part to our Reporting Integration Team, as per IBKB3842.
References
KB3968 - Generate a key pair using GPG for Windows
KB4205 - Generate a key pair using GPG Suite on macOS
KB4108 - Decrypt your Reports using GPG for Windows
KB4210 - Decrypting Reports using your PGP Key pair on macOS
KB4407 - Generate RSA Key Pair on Windows
KB3968 - Generate a key pair using GPG for Windows
KB4205 - Generate a key pair using GPG Suite on macOS
KB4108 - Decrypt your Reports using GPG for Windows
KB4210 - Decrypting Reports using your PGP Key pair on macOS
KB4407 - Generate RSA Key Pair on Windows
KB4578 - How to Access your Reports using FTP on Windows
KB4580 - How to Access your Reports using FTP on MacOS
KB4409 - How to set up sFTP for using Certificate Authentication on Windows
KB4410 - How to set up sFTP for using Certificate Authentication on macOS
KB4411 - How to backup your public/private Key pair
KB4323 - How to transfer your public/private key pair from one computer to another
KB4410 - How to set up sFTP for using Certificate Authentication on macOS
KB4411 - How to backup your public/private Key pair
KB4323 - How to transfer your public/private key pair from one computer to another
Exchange name change
Overview:
Interactive Brokers is completing an effort to update and consolidate exchange names where appropriate. When this effort is complete, the following updates will be in effect:
- GLOBEX and CMECRYPTO will be consolidated to a single exchange, ‘CME’
- ECBOT will be updated to ‘CBOT’
- COMEX listed metals (previously reflected as NYMEX) will be updated to exchange ‘COMEX’
- NYMEX, no change
Given the breadth of products involved, we are migrating in four waves based on underlying products:
| Key | Effective Trade Date | Products |
| Wave 1 | October 30, 2022 | GLOBEX: ZAR, LB, DA, IXE |
| Wave 2 | November 6, 2022 | GLOBEX: EMD, BRE, CHF, SOFR3, E7, NKD CMECRYPTO: BTCEURRR, ETHEURRR, MET |
| Wave 3 | November 13, 2022 | GLOBEX: All remaining products CMECRYPTO: All remaining products ECBOT: ZO, ZR, 2YY, 30Y NYMEX: ALI, QI, QC |
| Wave 4 | December 4, 2022 | ECBOT: All remaining products NYMEX: All remaining "Metal" products |
I am trading via API, how does this impact me?
For API clients the only requirement would be to provide a new exchange name, for example: exchange=”CME”, for existing contracts for the affected exchanges.
Old exchanges names will no longer be available after the change.
More details can be found within our FAQs through the following link: Upcoming Exchange name Changes
Note: If you are using a third party software connected to TWS or IB Gateway and that software does not recognize the new contract definitions, please contact the third party vendor directly.
如何從IBKR平台上傳診斷包
Overview:
某些支持相關的問題除了需要提供截圖外還需要上傳診斷文件與日志。這些信息可幫助我們調查幷解决您遇到的問題。
本文詳細說明了如何通各盈透證券交易平臺上傳診斷文件與日志。
請注意:IBKR不會實時監控診斷包信息庫。如果您在沒有盈透證券明確要求的情况下自行决定上傳診斷包,請通過諮詢單或電話通知我們的客戶服務人員,否則我們可能會注意不到您的錯誤報告。
請根據您使用的平臺點擊對應鏈接:
-
移動IBKR(Android版)
-
移動IBKR(iOS版)
1. 登錄TWS,試著重現您遇到的問題
2. 點擊左上角的“幫助”,然後選擇“上傳診斷”。或者,您也可以根據自己的操作系統使用以下按鍵組合
- Windows和Linux操作系統:按Ctrl+Alt+Q
- Mac:按Cmd+Option+H

3. 將出現”上傳診斷“窗口。您可以在文本框內輸入上傳診斷的原因
4. 如果有盈透證券代表明確要求您在上傳診斷時將前幾天的日志也包含進來或要求您勾選特定選項,請點擊右上角的下拉框,選擇“高級視圖”,然後在左下角勾選對應複選框
5. 確保勾選了“包含整個桌面截圖”,然後點擊“提交”

6. 在看到彈框確認診斷已成功上傳之前請勿進行任何操作
A) 如果您位于登錄界面:
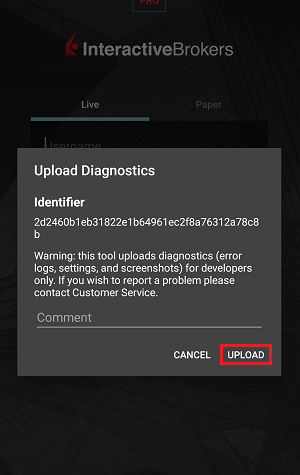
1. 點擊右上角的三個點圖標,選擇“上傳診斷”
2. 在評論區注明您的用戶名,然後點擊“上傳”
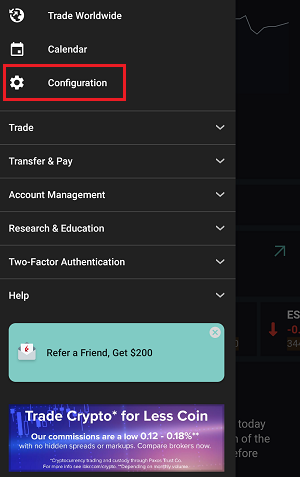
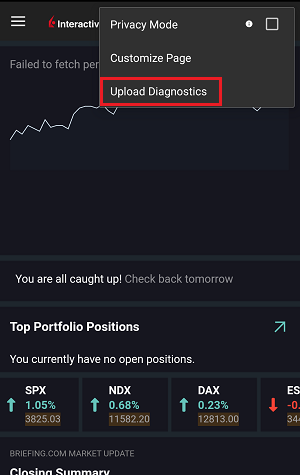
1. 點擊左上角的三個點圖標打開菜單
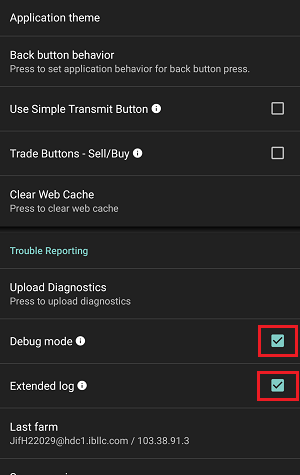
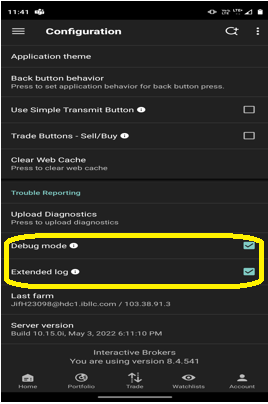
2. 點擊“配置”>“故障報告”>勾選“故障排除模式”旁邊的複選框
3. 如果有盈透證券代表明確要求,勾選“擴展日志”旁邊的複選框
5. 點擊屏幕右上角的三個點圖標,選擇“上傳診斷”
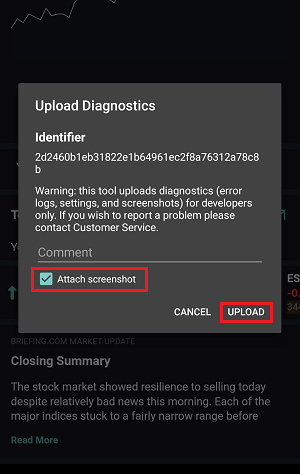
6. 在評論區輸入您的評論幷勾選“附上截圖”旁邊的複選框。然後點擊“上傳”
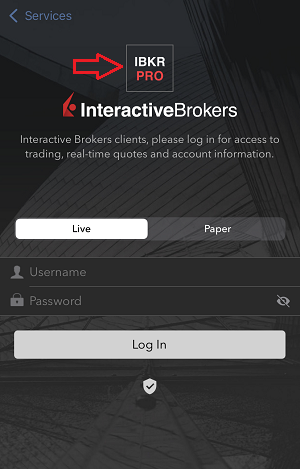
A) 如果您位于登錄界面:
1. 連續快速點擊IBKR標志五次打開測試菜單
2. 在配置下,打開“故障排除模式“旁邊的開關
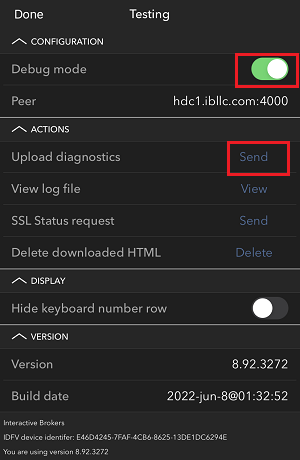
3. 點擊“上傳診斷”旁邊的“發送”
4. 在評論區輸入您的用戶名,然後點擊“確定”
1. 直接在手機上對出現問題的界面截屏(同時按住電源和音量加按鍵)
2. 點擊屏幕右下角的“更多”選項
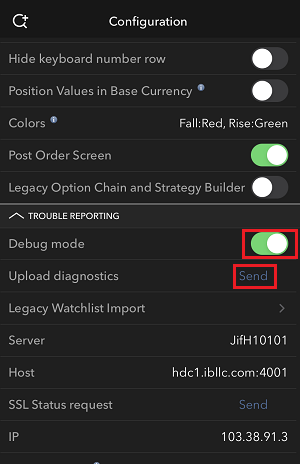
3. 點擊“配置”,展開“故障報告”
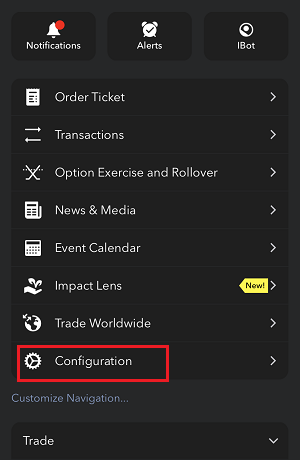
4. 打開“故障排除模式”旁邊的開關,然後點擊“上傳診斷”旁邊的“發送”
5. 將出現“發送診斷”頁面。在評論區輸入您的評論
6. 點擊“附上圖片”按鈕附上您已保存到相册的問題頁面截圖
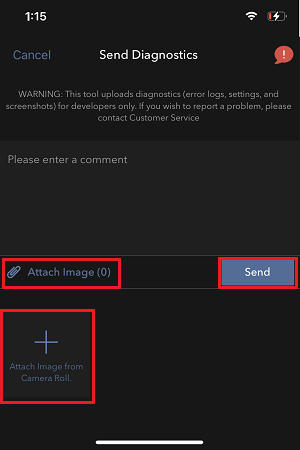
7. 點擊“發送”
1. 登錄應用程序
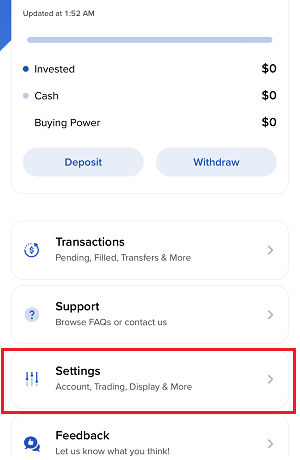
2. 點擊左上角的使用者圖標,選擇“設置”
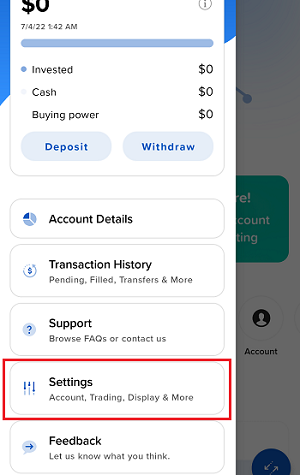
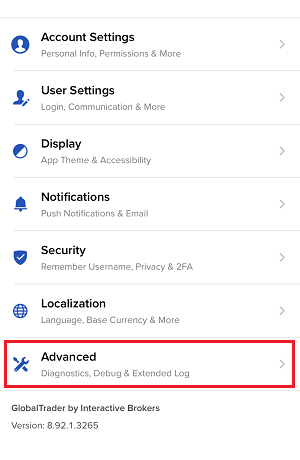
3. 點擊“高級”選項,打開“故障排除模式“旁邊的開關
4. 如果有盈透證券代表明確要求,打開“擴展日志”旁邊的開關

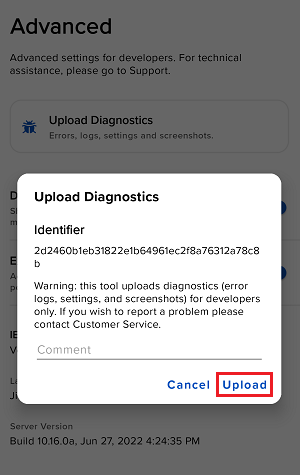
5. 您將看到“上傳診斷”彈框。輸入您的評論,點擊“上傳”
請注意:如果需要向我們發送IMPACT或IBKR GlobalTrader(Android版)的截圖,您需要在消息中心將截圖作爲附件添加到諮詢單發送,具體步驟請參見IBKB1071
1. 登錄應用程序
2. 直接在手機上對出現問題的界面截屏(同時按住電源和音量加按鍵)
3. 點擊左上角的使用者圖標,選擇“設置”
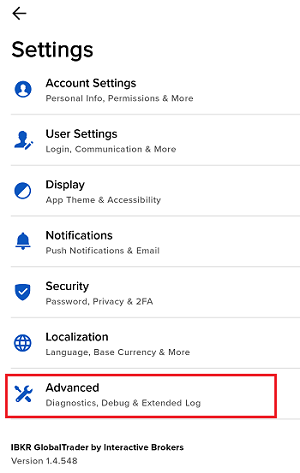
4. 點擊“高級”
5. 打開“故障排除模式”旁邊的開關,點擊“上傳診斷”
6. 將出現“發送診斷”界面
7. 輸入您的評論,點擊“附上圖片”按鈕附上您已保存到相册的問題頁面截圖
8. 點擊“發送”
客戶端的診斷上傳請參見IBKB3512
How to Upload a Diagnostic Bundle from an IBKR Platform
Overview:
Some support related issues require diagnostics files and logs to be uploaded along with screenshots. The information will help our team to investigate and resolve the issue that you are experiencing.
This article will help you with detailed steps on how to upload diagnostics files and logs from various Interactive Brokers’ trading platforms.
Note: IBKR does not monitor the diagnostic bundle repository throughout the day. Should you spontaneously decide to upload a diagnostic bundle, without being instructed by Interactive Brokers, please inform our Client Services via Message Center ticket or phone call otherwise your error report will go unnoticed.
Please click on one of the links below, according to the platform you are using:
-
IBKR Mobile (Android)
-
IBKR Mobile (iOS)
1. Log in to TWS and try to replicate the issue that you are experiencing
2. Press ‘Help’ at the top left corner and select ‘Upload Diagnostics’. Alternatively, depending on your Operating System, you can use the following keyboard combinations
- For Windows and Linux Operating system: Press Ctrl+Alt+Q
- For Mac: Press Cmd+Option+H
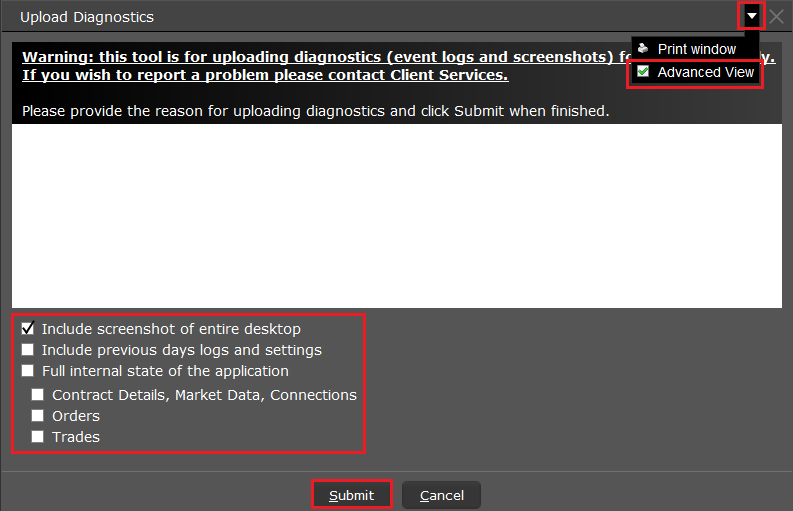
3. The ‘Upload Diagnostics’ window will appear. You may enter the reason for uploading diagnostics in the text box
4. If an Interactive Brokers representative has instructed you to include previous days logs or select specific options when uploading diagnostics, click the dropdown on the right top corner, select ‘Advanced View’ and tick the correspondent checkboxes which will appear on the bottom left part
5. Make sure the checkbox ‘Include screenshot of entire desktop’ is enabled and press ‘Submit’
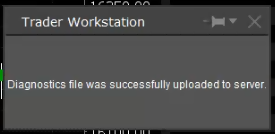
6. Do not perform any action/activity on your computer until you see the below pop-up, confirming that the diagnostics have been successfully uploaded
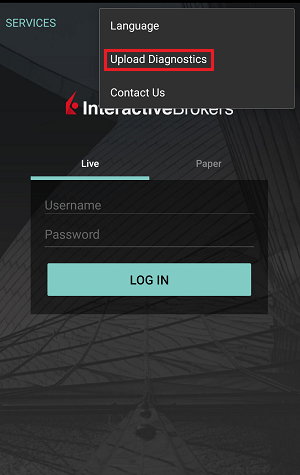
A) If you are at the login Screen:
1. Tap the three dots icon in the right top corner and select ‘Upload Diagnostics’
2. Add your username in the comment section and tap ‘Upload’
1. Tap the three lines icon in the top left corner to open the menu
2. Tap ‘Configuration’> ‘Trouble Reporting’> enable the check box next to ‘Debug mode’
3. If requested by an Interactive Brokers representative, enable the check box next to ‘Extended Log’ as well
5. Tap the three dots icon in the top right corner of the screen and select ‘Upload Diagnostics’
6. Enter your comments in comment section and enable the checkbox next to ‘Attach Screenshot’. Then tap ‘Upload’
A) If you are at the login Screen:
1. Tap five times in a quick sequence on the IBKR logo to open the testing menu
2. Under Configuration, enable the toggle button next to ‘Debug mode’
3. Tap ‘Send’ next to ‘Upload diagnostics’
4. Enter your username in the comments section and tap ‘OK’
1. Capture screenshots displaying the issue you are experiencing directly on the phone (pressing together the physical buttons Power + Volume Up)
2. Tap the option ‘More’ in the right bottom corner of the screen
3. Tap ‘Configuration’ and expand the section ‘Trouble Reporting’
4. Enable the toggle button next to ‘Debug mode’ and, next to ‘Upload diagnostics’, tap ‘Send’
5. The ‘Send Diagnostics’ page will appear. Enter your comments in comment section
6. Tap the ‘Attach Image’ button to attach screenshots of the issue that you have previously saved in your camera roll
7. Tap ‘Send’
1. Log in to the app
2. Tap the User icon in the top left corner and select ‘Settings’
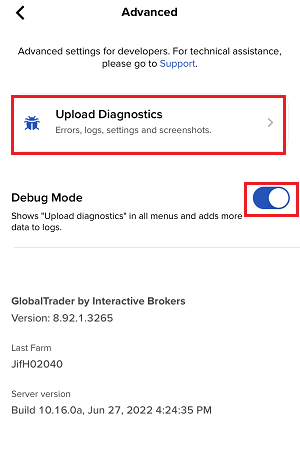
3. Tap the option ‘Advanced’ and enable the toggle button next to ‘Debug mode’
4. If requested by an Interactive Brokers representative, enable as well the toggle button next to ‘Extended Log’
5. You will see an ‘Upload Diagnostics’ pop-up. Enter your comments in the field and tap ‘Upload’
Note: If you need to send us screenshots of IMPACT or IBKR GlobalTrader for Android, you would have to attach them to a Message Center web ticket, as explained in IBKB1071
1. Log in to the app
2. Capture one or more screenshots displaying the issue you are experiencing directly on the phone (pressing the physical buttons Power + Volume Up simultaneously)
3. Now tap the User icon in the top left corner and select ‘Settings’
4. Tap ‘Advanced’
5. Enable the toggle button next to ‘Debug mode’ and tap ‘Upload Diagnostics’
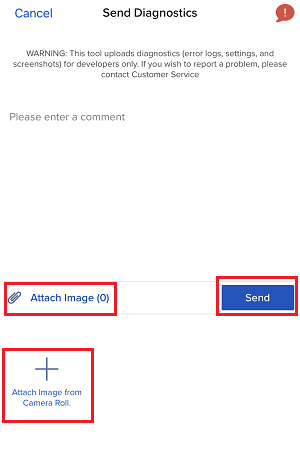
6. The ‘Send Diagnostics’ screen will appear
7. Enter your comments in the field and tap ‘Attach Image’ to attach the screenshot/s you previously saved in your camera roll
8. Tap ‘Send’
A diagnostic trace for Client Portal can be captured following the steps on IBKB3512
如何生成".har"文件
Background:
在解決重大的網站問題時,有時我們的客服團隊需要您提供有關您的瀏覽器的更多信息。我們可能會要求您錄製並提供.har文件。該文件包含有關您的瀏覽器發送及收到的網絡請求的更多信息。您的瀏覽器可在問題發生時記錄HTTP/HTPS請求和響應的內容、時間軸及狀態,從而生成此類文件。
我們將在本文中解釋如何生成.Har文件。請在下方點擊您正在使用的瀏覽器:
1. 打開Google Chrome並前往發生問題的頁面。
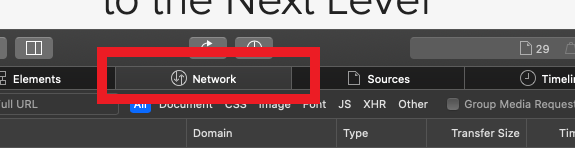
2. 點擊鍵盤上的 CRTL +SHIFT + I 。或者,點擊Chrome菜單圖標(瀏覽器窗口右上角的三個垂直點),然後選擇 “更多工具” > “開發者工具”
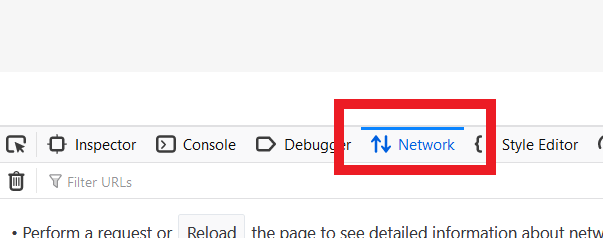
3. “開發者工具”會以停靠面板的形式在Chrome側面或底部打開。選擇 “網絡”選項卡(如圖1)
圖1
.png)
4. 在 “開發者工具” 工具欄左上角找到圓形的“錄製”按鈕並確保它是紅色的。如果它是灰色的,點擊一次開始錄製或點擊 CTRL+E (如圖2)
圖2

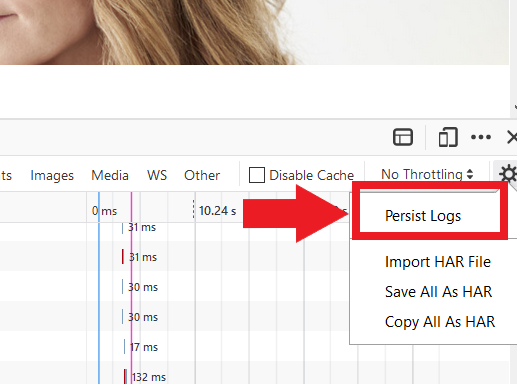
5. 激活 “保留日誌”選項框(如圖3)
圖3
.png)
6. 點擊 “清除” 按鈕清除已有的日誌。“清除” 按鈕顯示為停止圖標,位於 “錄製” 按鈕的右側 (如圖4)
圖4
![]()
7. 再現您遇到的問題並錄製網絡請求。
8. 當您完成問題再現後,右擊已記錄的網絡請求列表上的任意地方,選擇 “以HAR格式保存所有內容”, 並將文件保存在您計算機上任意您想保存的位置(如桌面)。
9. 在IBKR客戶端中, 前往消息中心並創建 一個新的網絡諮詢單(或使用已有的諮詢單)
10. 在網絡諮詢單內,將之前生成的.har文件作為附件添加。 如果IBKR客服向您提供過諮詢單號或客服代表的名字,請在諮詢單中加上這些信息。
11. 提交網絡諮詢單
1. 打開Firefox並前往發生問題的頁面
2. 點擊鍵盤上發 F12 。或者,點擊Firefox菜單按鈕(瀏覽器窗口右上角的三條平行線),然後選擇 Web 開發者工具 > 網絡
3. 開發者網絡工具會以停靠面板的形式在Firefox底部打開。選擇 “網絡”選項卡(如圖5)
圖5
4. 激活 “保存日誌”選項框(圖6)
圖6
5. 再現您遇到的問題。系統會自動開始錄製網絡請求。
6. 再現問題後,右擊已錄製的請求列表並選擇“所有內容另存為HAR”
7. 將文件保存在計算機上的任意位置(如桌面)
8. 在IBKR客戶端中, 前往消息中心並創建 一個新的網絡諮詢單(或使用已有的諮詢單)
9. 在網絡諮詢單內,將之前生成的.har文件作為附件添加。 如果IBKR客服向您提供過諮詢單號或客服代表的名字,請在諮詢單中加上這些信息。
10. 提交網絡諮詢單
1. 打開Edge並前往發生問題的頁面。
2. 點擊鍵盤上發 F12 。或者點擊Edge菜單圖標(瀏覽器窗口右上角的三個平行點),然後選擇 “更多工具” > “開發者工具”
3. 點擊“網絡” 圖標 (如圖10)
圖10
.png)
4. 再現您遇到的問題並錄製網絡請求。
5. 完成後,點擊軟盤圖標(導出為HAR) 或按 CTRL+S (如圖11)
圖11
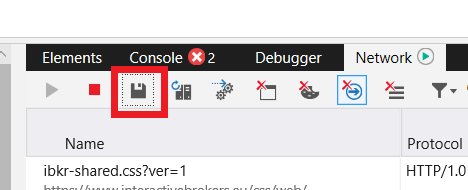
6. 為文件命名並將文件保存在您計算機上的任意位置(如桌面)。然後點擊 “保存” 按鈕
7. 在IBKR客戶端中,前往消息中心並創建一個新的網絡諮詢單(或使用已有的諮詢單)
8. 在網絡諮詢單內,將之前生成的.har文件作為附件添加。 如果IBKR客服向您提供過諮詢單號或客服代表的名字,請在諮詢單中加上這些信息。
9. 提交網絡諮詢單
注:在生成HAR文件前,請確保您可在Safari中看到 “開發者” 菜單。如果您看不到這個菜單,請點擊Safari瀏覽器,選擇 “偏好設置”, 前往 “高級” 選項卡並激活菜單欄 “顯示開發”菜單旁的選項框。
1. 打開 “開發” 菜單並選擇 “顯示網頁檢查器” 或點擊 CMD+ALT+I
2. 點擊 “網絡” 選項卡 (如圖12)
圖12
3. 激活 “保留日誌”選項卡(圖13)
圖13
.png)
4. 點擊 “導出” 圖標(或按CMD+S), 為文件命名並將其保存在計算機上的任意位置(如桌面)並保存.har文件
5. 在IBKR客戶端中,前往消息中心並創建一個新的網絡諮詢單(或使用已有的諮詢單)
6. 在網絡諮詢單內,將之前生成的.har文件作為附件添加。 如果IBKR客服向您提供過諮詢單號或客服代表的名字,請在諮詢單中加上這些信息。
7. 提交網絡諮詢單
Generate RSA Key Pair on Windows
These instructions apply to users who are receiving their statements via sFTP. If you elected to receive your statements via sFTP, you would first need to generate an RSA Key pair.
To generate an RSA Key pair:
1. Download WinSCP.
2. Run the installer and make sure to check PuTTYgen (key generator) as one of the components to install.
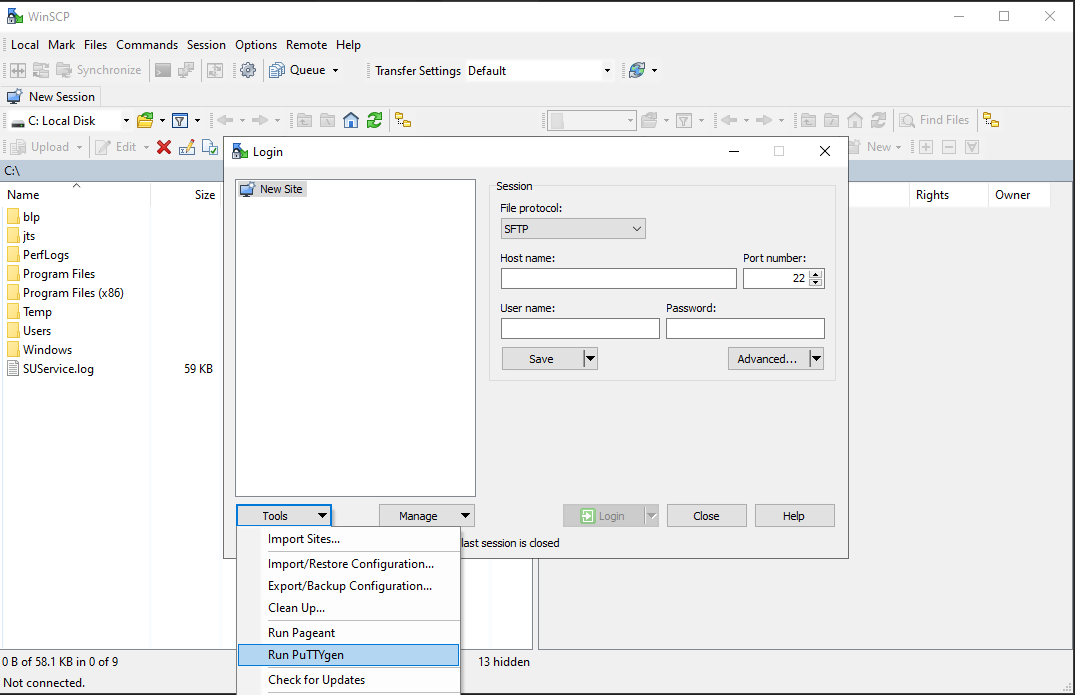
3. Start WinSCP and from the button Tools select Run PuTTYgen.
2. Run the installer and make sure to check PuTTYgen (key generator) as one of the components to install.
3. Start WinSCP and from the button Tools select Run PuTTYgen.
4. Once the tool PuTTYgen has been launched, click Generate. Select RSA as Type of key to generate, 2048 as Number of bits in generated key and click on the button Generate.
5. Click "Save private key" and give the file a name (like private). Leave the extension as .ppk ('ale.ppk', in the picture below is an example filename).
Important Note: do NOT save your public key yet. Save only your private one.
.png)
6. Open WinSCP, create a new connection and:
- Select SFTP as File protocol.
- Enter xfer.interactivebrokers.com in the Host name field.
- Enter 32 in the Port number field.
7. Click on the button Advanced.
8. In the Advanced Site Settings screen, left side menu, expand SSH and select Authentication. Click on the button ... at the end of the field Private Key file and open the private key you previously saved at point 5):
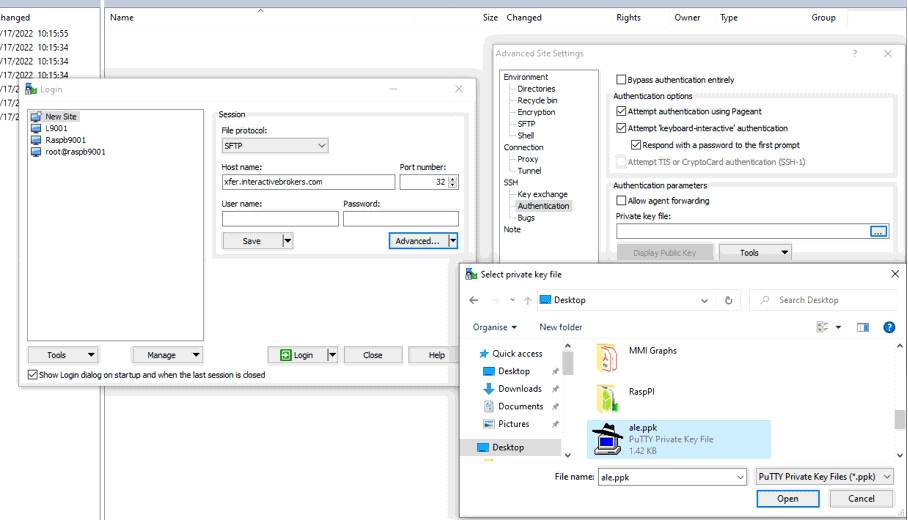
8. In the Advanced Site Settings screen, left side menu, expand SSH and select Authentication. Click on the button ... at the end of the field Private Key file and open the private key you previously saved at point 5):
9. Click on the button Display public key:
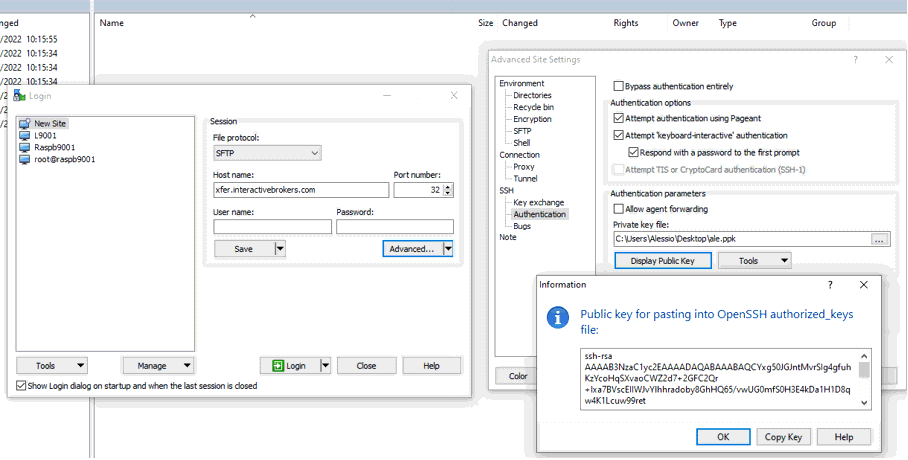
10. Click on the button Copy Key.
11. Open Notepad, press CTRL+V to paste the key string (which is one string of characters without spaces) and then save the file with the name public.key in a folder of your preference:
11. Open Notepad, press CTRL+V to paste the key string (which is one string of characters without spaces) and then save the file with the name public.key in a folder of your preference:

12. Send the file you saved at the previous step to us via Message Center ticket or email as per instructions on IBKB3842
14. Once the IBKR Sales Engineering Team has configured the parameters for your connection on our servers, you will be able to access your SFTP repository by using the connection you have created.
Related articles
KB3842 - Using GPG/RSA encryption keys to guarantee the privacy and security of your Reports
KB3968 - Generate a key pair using GPG for Windows
KB4205 - Generate a key pair using GPG Suite on macOS
KB4108 - Decrypt your Reports using GPG for Windows
KB4210 - Decrypting Reports using your PGP Key pair on macOS
KB4578 - How to Access your Reports using FTP on Windows
KB4580 - How to Access your Reports using FTP on MacOS
Transferring your Key Pair From One Computer To Another
Background:
If you need to decrypt files that were encrypted with your private Key on an additional computer, you need to copy both your private and public keys (the entire Key pair) to that computer.
Note: this tutorial assumes you have already set up a Key pair. If you need guidance to set up the Key pair please refer to this article, which is a prerequisite to the instructions below.
How to transfer your Key pair:
Please select one of the below links, according to your Operating System:
Windows
1. On the machine where the encryption keys are stored, connect a USB drive to a free USB port.
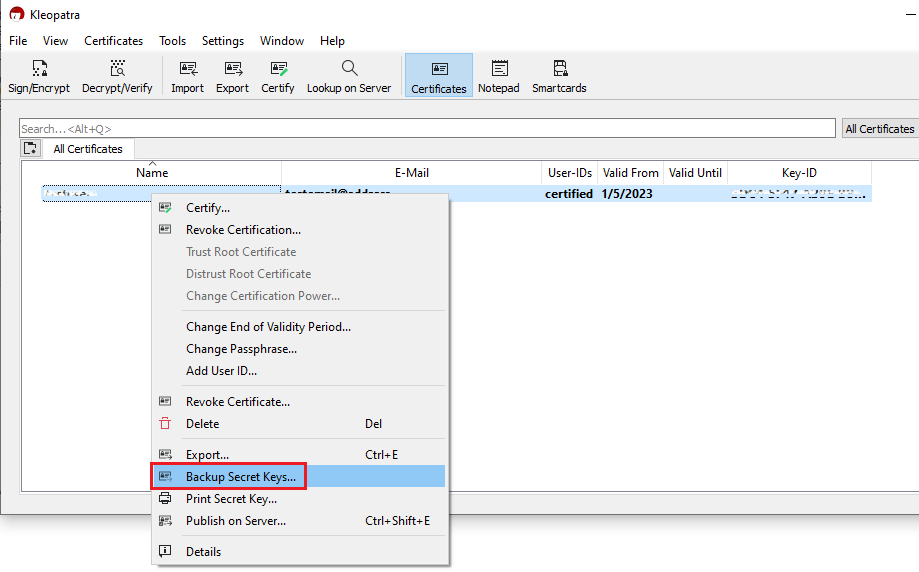
2. Launch the Kleopatra application and select the encryption key you want to transfer. Then right-click on the selection and choose Backup Secret Keys...
Note: Do NOT use Export..., as this will only export the public part of the Key while you need to have a backup of both public and private parts.
3. Select your USB drive as destination and a filename of your preference (e.g. secret-key-KEYID.asc) for your backup copy. Then click Save.

4. Enter the passphrase you have set when you created the Key and click OK.

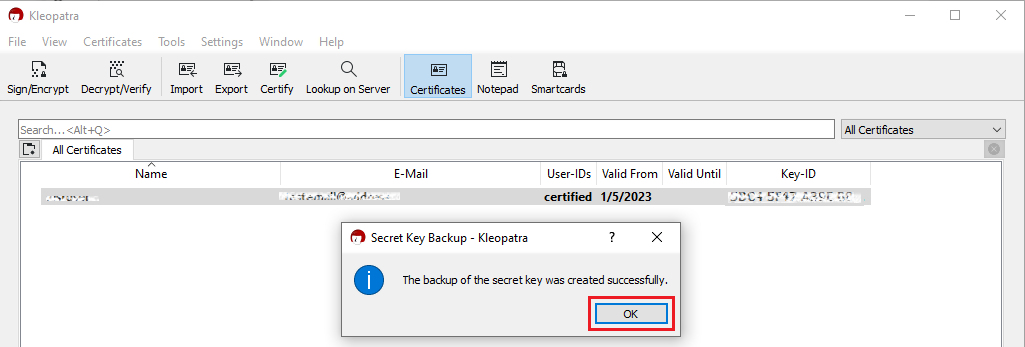
5. A pop-up will confirm the backup has been successfully created. Click OK.
6. Eject your USB drive safely through the Windows interface to prevent data loss and connect it to a free USB port on the other computer (the one you want to transfer the key to). All the next steps have to be executed on that machine.
7. Make sure the the GPA software is installed, otherwise please install it. Make sure that the component Kleopatra is selected as one of the sub components to include in the installation.
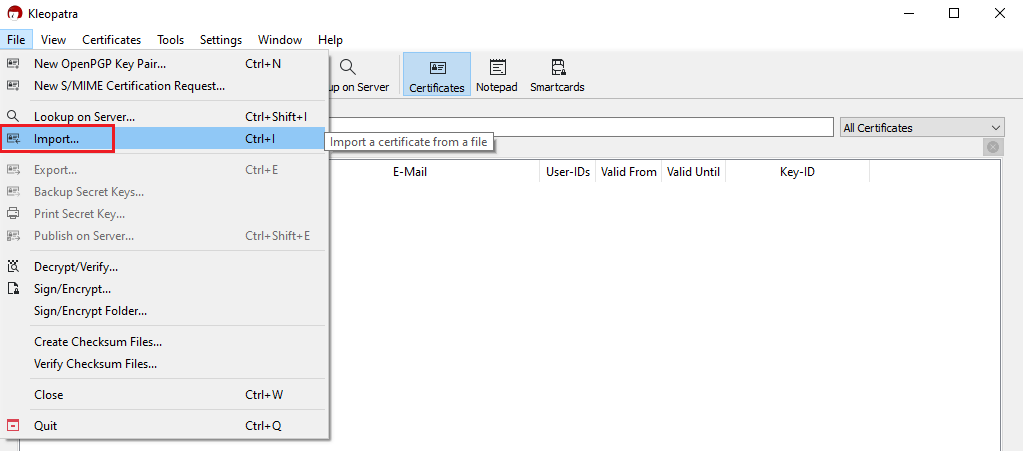
8. Launch the Kleopatra application and click on the top menu File and select Import...
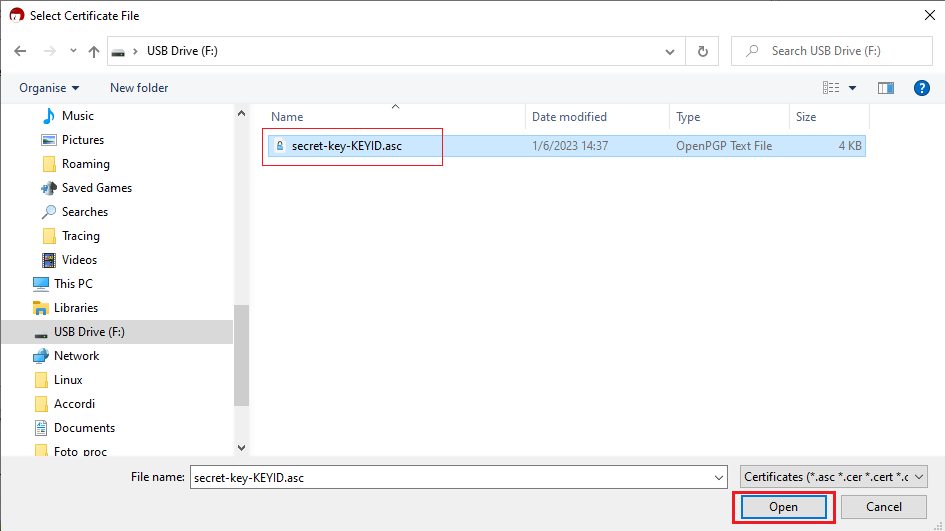
9. Click on the letter correspondent to your USB drive and select the file you have previously saved (e.g. secret-key-KEYID.asc). Then click Open.
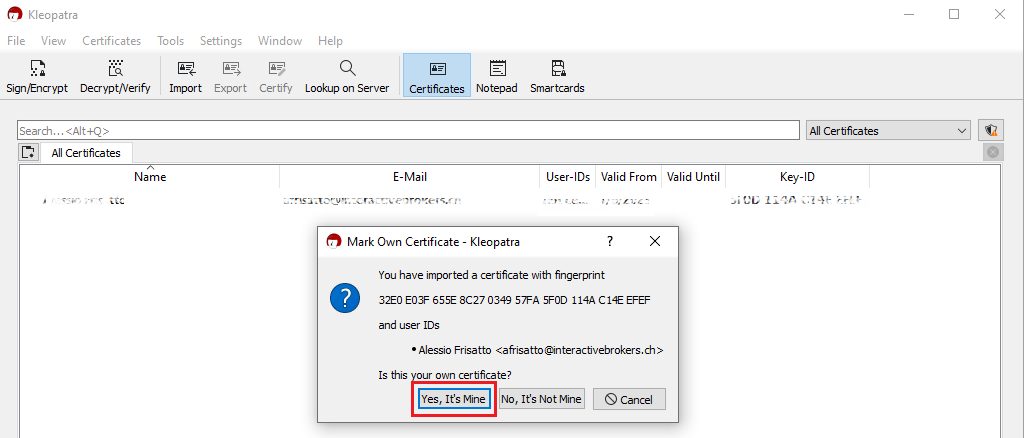
10. Click on Yes, It's Mine.
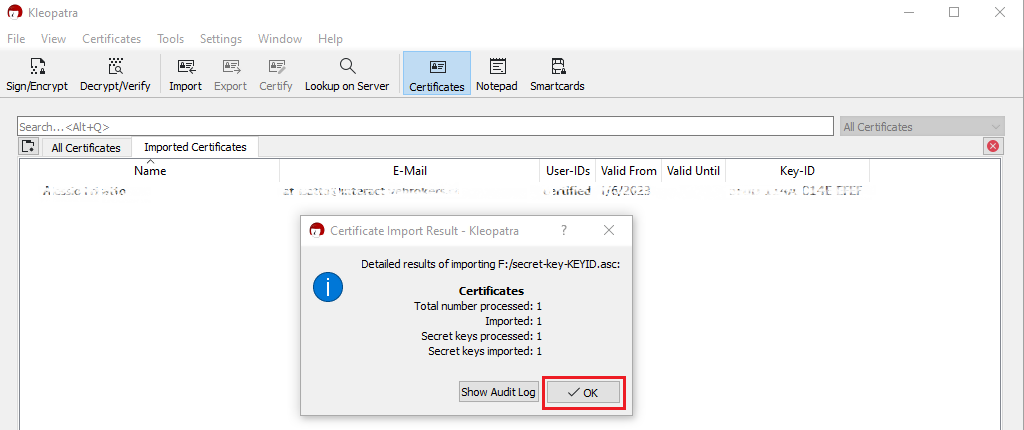
11. A pop-up will confirm the Key has been successfully imported. Click OK. You may now want to delete the key file from the USB drive and empty the Trash.
macOS
1. On the machine where the encryption keys are stored, connect a USB drive to a free USB port.
2. Launch the GPG Keychain application and select the encryption key you want to transfer. Please make sure that you see the text Type: Secrete and public key, in the Type column.
.png)
3. With the desired encryption key highlighted, click Export. Please make sure to check the box for the option Include secret key in exported file, as illustrated in the above screenshot. Save the key pair to the USB drive.
4. Eject the USB drive and connect it to a free USB port on the other computer (the one you want to transfer the key to). All the next steps have to be executed on that machine.
5. Make sure the GPG Tools suite is installed, otherwise please install it.
6. Launch the GPG Keychain application and click the icon Import on the top toolbar.
(1).png)
7. Click the USB Drive and select the previously saved .ASC file that contains the Public and Private key. Then click Open.
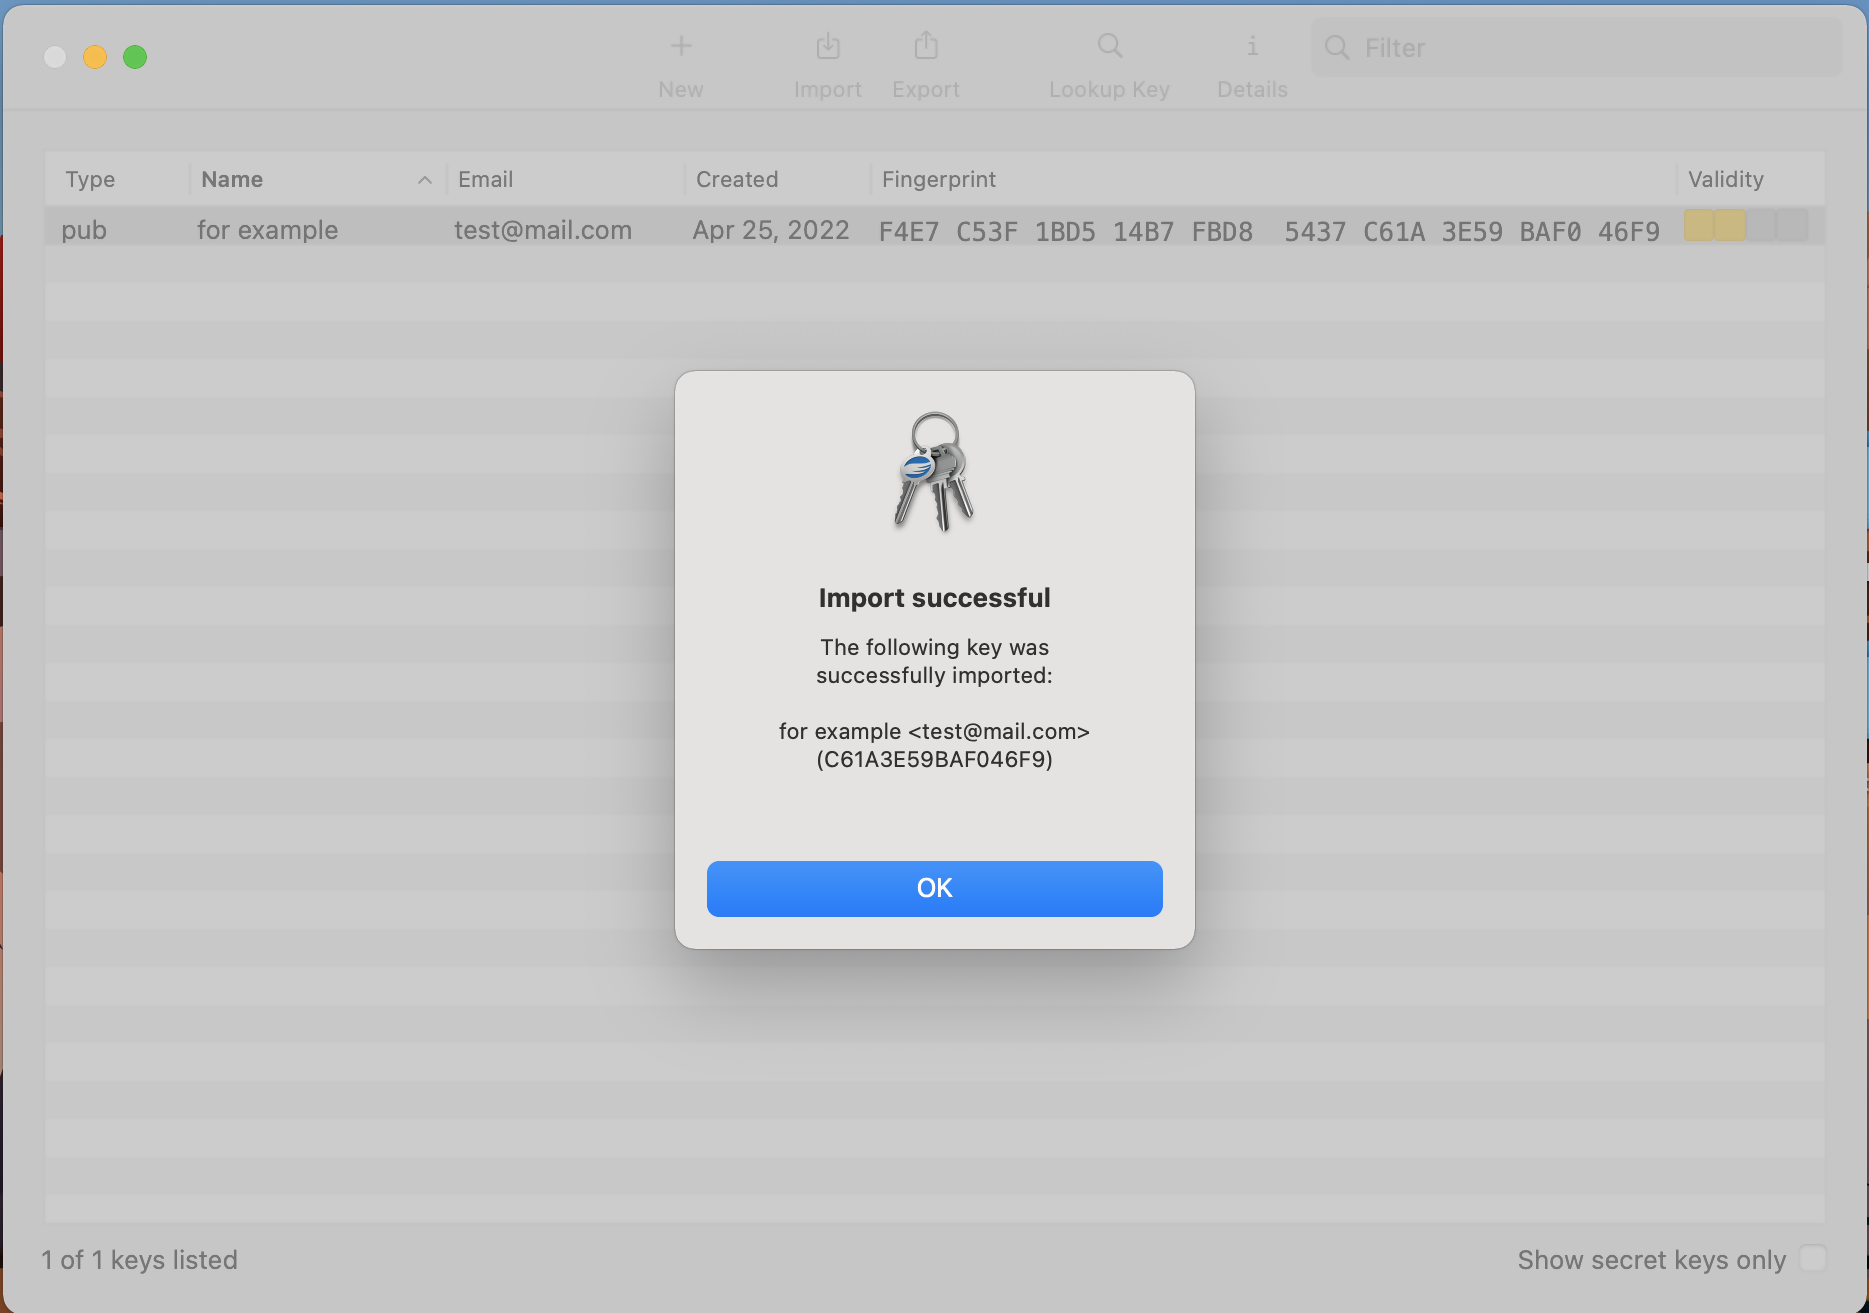
8. The confirmation should read Import successful.
9. Once the key has been successfully imported, delete the key file from the USB drive and empty the Trash.
Related articles
KB3842 - Using GPG/RSA encryption keys to guarantee the privacy and security of your Reports
KB3968 - Generate a key pair using GPG for Windows
KB4205 - Generate a key pair using GPG Suite on macOS
KB4108 - Decrypt your Reports using GPG for Windows
KB4210 - Decrypting Reports using your PGP Key pair on macOS
KB4407 - Generate RSA Key Pair on Windows
KB4578 - How to Access your Reports using FTP on Windows
KB4580 - How to Access your Reports using FTP on MacOS
Decrypting Reports Using Your PGP Key Pair on macOS
Note: This tutorial assumes you received reports via email or via FTP that were encrypted with the public key you sent to IBKR . If you need guidance to set up the encrypted statement delivery, please refer to this article, which is a prerequisite to the instructions below.
1. Open Finder
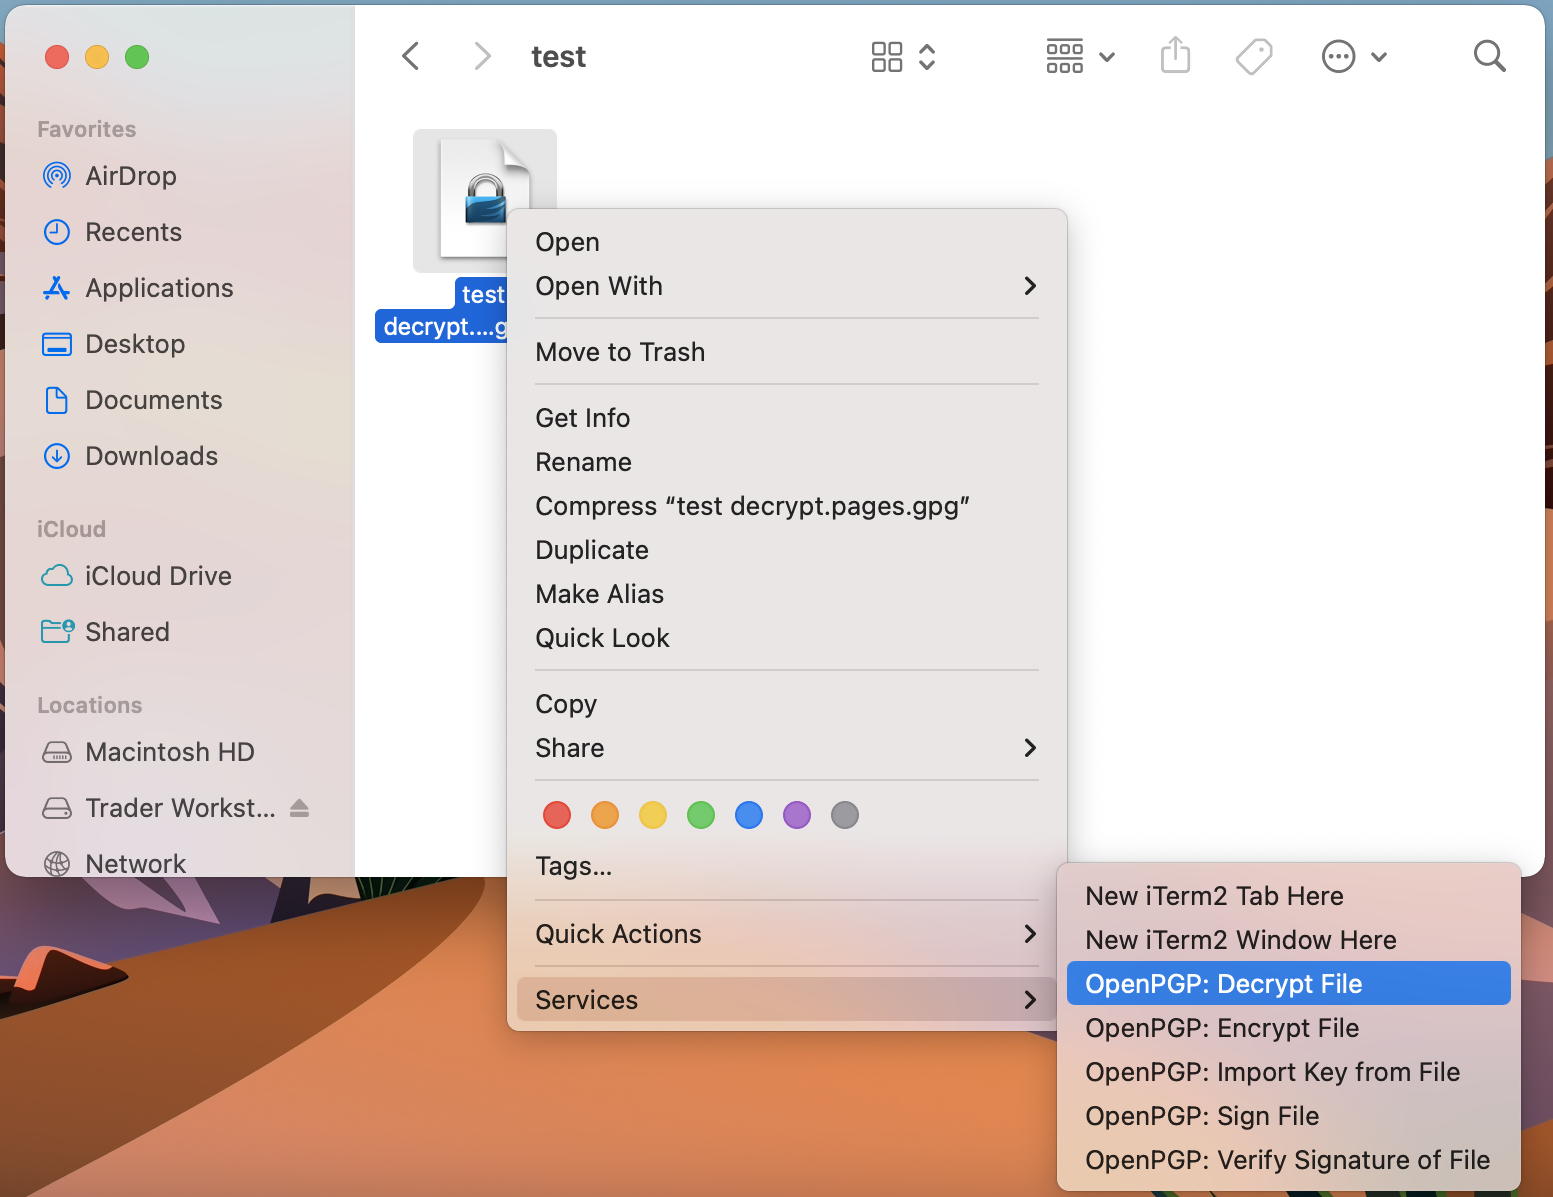
2. Right click on the .gpg file you want to decrypt
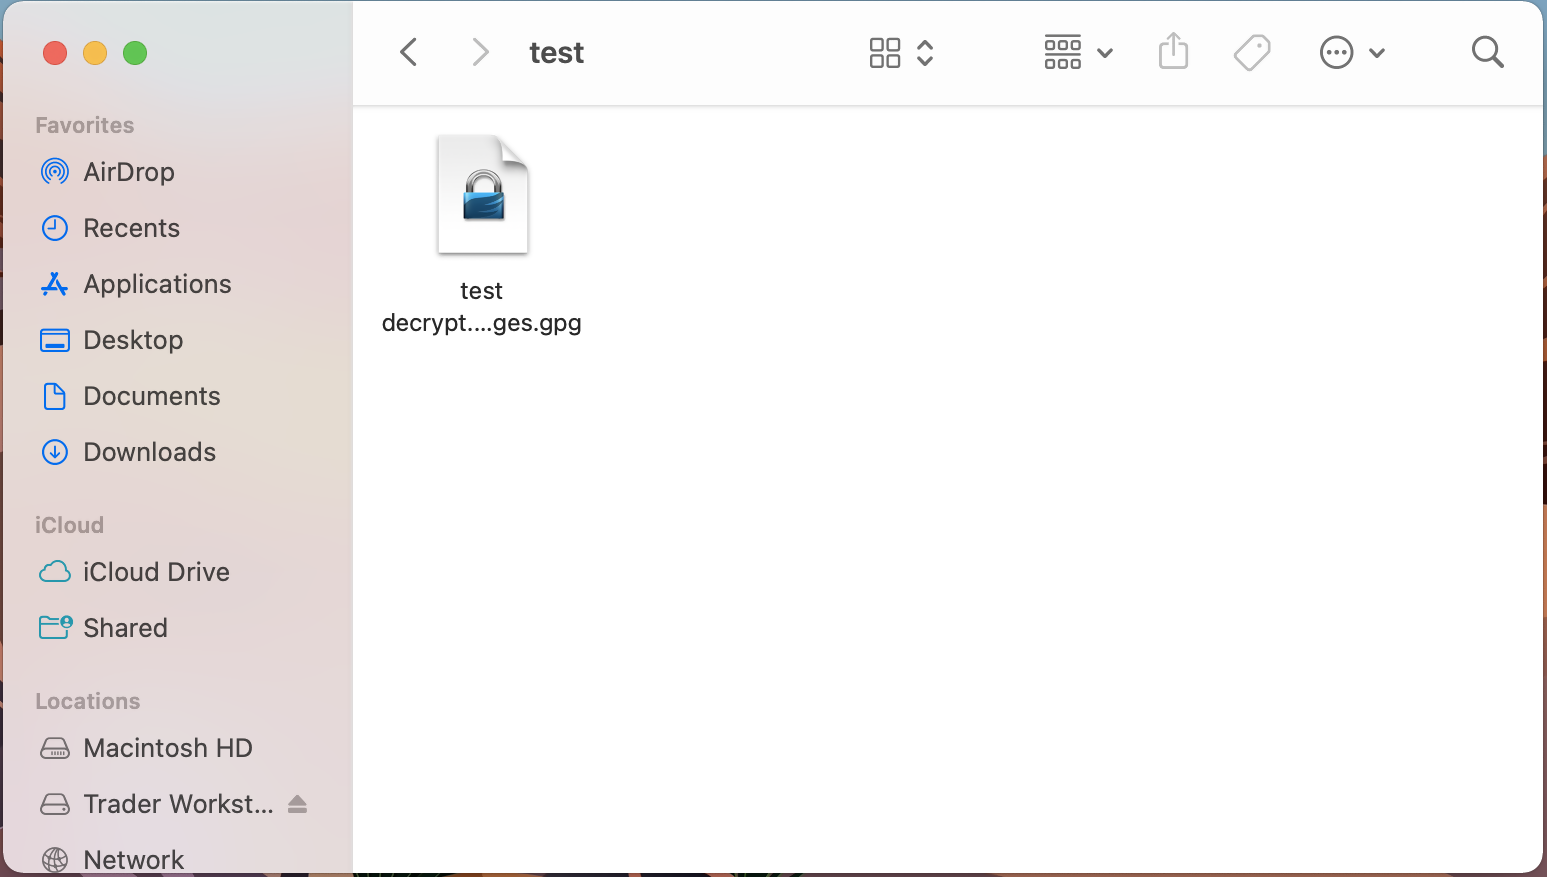
3. Select Services > OpenPGP: Decrypt File
Common Issues/Questions
- Decryption failed with error 'No Secret Key'
This is commonly caused when the wrong encryption key is used to decrypt the file. If decryption is being done on a computer other than the original computer used to create the public/private keys, the keys would have to be transferred from the original computer to the new computer.
If the above does not help, then a new public/private key pair needs to be created and sent to us.
Related articles
KB3842 - Using GPG/RSA encryption keys to guarantee the privacy and security of your Reports
KB3968 - Generate a key pair using GPG for Windows
KB4205 - Generate a key pair using GPG Suite on macOS
KB4108 - Decrypt your Reports using GPG for Windows
KB4407 - Generate RSA Key Pair on Windows
KB4578 - How to Access your Reports using FTP on Windows
KB4580 - How to Access your Reports using FTP on MacOS
Decrypt Your Reports Using GPG for Windows
Note: This tutorial assumes you received reports via email or via FTP that were encrypted with the public key you sent to IBKR. If you need guidance to set up the encrypted statement delivery, please refer to this article, which is a prerequisite to the instructions below.
How to decrypt files using Kleopatra:
1. Save all the encrypted Reports you received via email or FTP in a folder on your preference (e.g. Desktop)
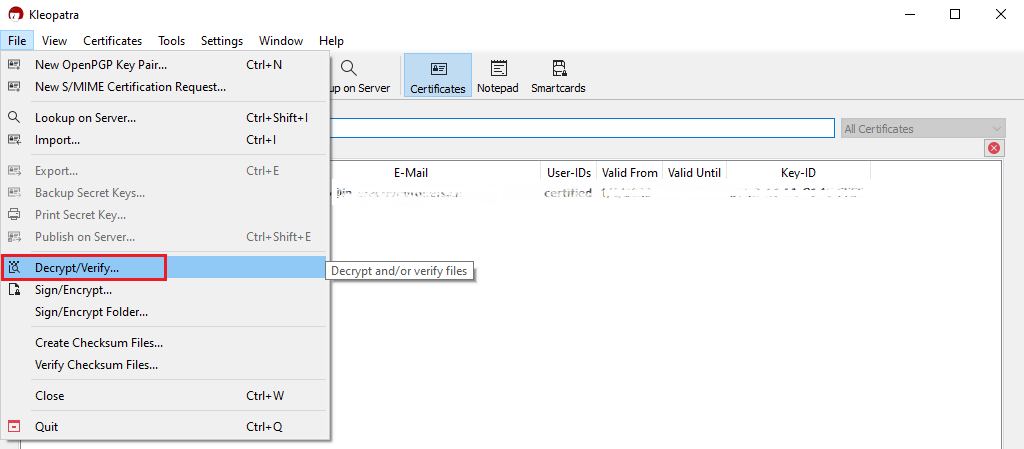
2. Start the Kleopatra application (included in Gpa4win software). The entry for your Key should be listed in the All Certificates panel. Click the top menu File and select Decrypt/Verify...
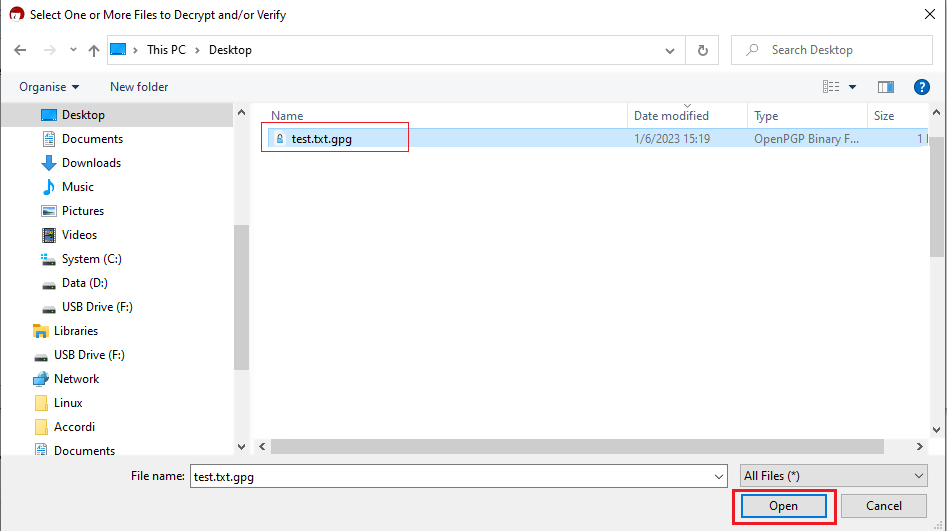
3. Open the folder containing your encrypted files and select the ones you want to decrypt.
4. Provide the passphrase you set when you create your Key.

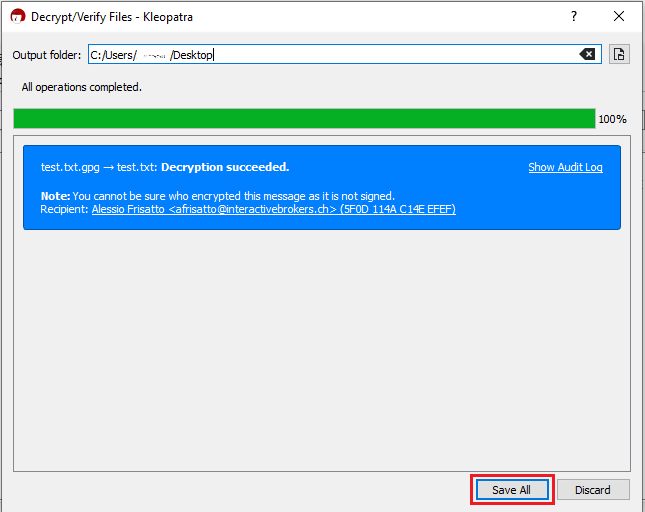
5. The files will be decrypted and the outcome of the operation will be displayed within the panel. You can change the output folder (where the decrypted files will be saved) if you wish. Click Save All to finalize the process.
Note: do NOT click Discard, otherwise the decrypted files will not be saved.
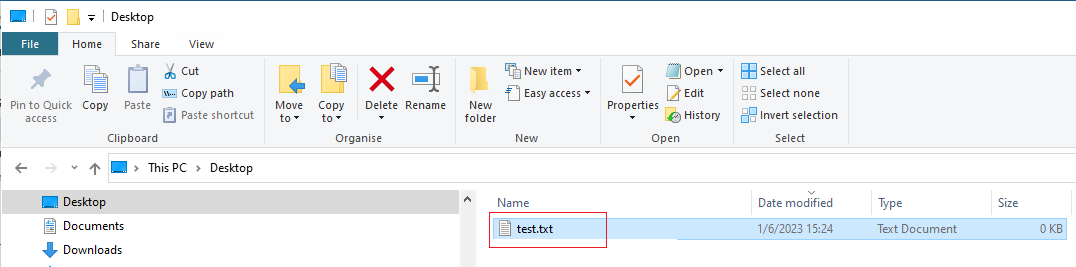
6. Open the Windows File Explorer and navigate to the output folder you selected at the previous step. From there, you can access and open your clear-text files.
Common Issues/Questions
- Decryption failed with error 'No Secret Key'
This is usually caused by the wrong encryption key being used to decrypt the file. If decryption is being done on a computer other than the original computer used to create the public/private keys, the keys would have to be transferred from the original computer to the new computer.
If the above does not help, then a new public/private key pair needs to be created and sent to us.
References
KB3842 - Using GPG/RSA encryption keys to guarantee the privacy and security of your Reports
KB3968 - Generate a key pair using GPG for Windows
KB4205 - Generate a key pair using GPG Suite on macOS
KB4210 - Decrypting Reports using your PGP Key pair on macOS
KB4407 - Generate RSA Key Pair on Windows
KB4578 - How to Access your Reports using FTP on Windows
KB4580 - How to Access your Reports using FTP on MacOS
KB4409 - How to set up sFTP for using Certificate Authentication on Windows
KB4410 - How to set up sFTP for using Certificate Authentication on macOS
KB4411 - How to backup your public/private Key pair
KB4323 - How to transfer your public/private key pair from one computer to another
KB4409 - How to set up sFTP for using Certificate Authentication on Windows
KB4410 - How to set up sFTP for using Certificate Authentication on macOS
KB4411 - How to backup your public/private Key pair
KB4323 - How to transfer your public/private key pair from one computer to another