Verwendung der IBKR-Mobile-Authentifizierung (IB Key) ohne Benachrichtigung
Falls Ihr Smartphone keine Benachrichtigungen von IBKR Mobile empfangen kann, können Sie den Anmeldevorgang trotzdem mithilfe der IBKR-Mobile-Authentifizierung (IB Key) durchführen, die auf den folgenden Seiten für das jeweilige Betriebssystem beschrieben ist:
Das Gleiche gilt auch, wenn Sie mit Ihrem Smartphone keine Verbindung zum Internet herstellen können (Roaming, kein Empfang, keine Daten usw.)
Falls Ihr Smartphone keine Benachrichtigungen von IBKR Mobile empfangen kann, empfehlen wir Ihnen die in der IBKR-Wissensdatenbank beschriebenen Schritte zu befolgen.
How to set up sFTP for using Certificate Authentication on Linux
These instructions apply to users who are receiving their statements via sFTP. If you elected to receive your statements via sFTP, you would first need to generate an RSA Key pair.
There are many Linux distributions and there are multiple methods to access the IBKR sFTP server. sFTP clients such as Filezilla can be used. In this article we explain how to realize the connection to the IBKR FTP server using Ubuntu Linux and Filezilla.
1. On your Linux machine, click on the Applications icon in the bottom left corner of you screen.


4. Once the software installation is complete, type puttygen -t rsa -b 2048 -o privatekey.ppk in order to generate the RSA Key pair.


8. Click on the FileZilla top menu File -> Site Manager...


- Select SFTP - SSH File Transfer Protocol as Protocol
- Enter xfer.interactivebrokers.com in the Host field
- Enter 32 in the Port field
- Select Key file as Logon Type
- Enter the username provided to you by Interactive Brokers in the User field


Important Note: do NOT send us your private key. Send us only your public one
Once IBKR has configured the parameters for your connection on our servers, you will be notified. After that, you will be able to access your sFTP repository by using the Site connection you have created in FileZilla. In case you have not yet set up a Site connection, please follow the steps from 6. to 14. which are a prerequisite to the below steps:


Common issues and solutions
-
Ensure the correct login details are being used to connect to the sFTP server. The username and password you are entering should match the ones you have received from the Reporting Integration Team.
-
Confirm you have configured your sFTP Client to use the Private Key file for the logon authentication (see steps 9. and 10. of the above procedure.)
-
Try accessing the sFTP server using a different Client (CyberDuck, ect.)
-
Ensure the Private Key file being used to Authenticate the server login attempt is related to the Public Key you originally sent to the Reporting Integration Team.
-
Should the above checks be unable to resolve the issue, please generate a new RSA Public/Private Key pair and send only the Public part to the Reporting Integration Team, as per IBKB3842.
-
In case you have an antivirus or a security software installed on your machine, make sure it is not blocking the FTP connection attempt. Normally, security software allows to set up exceptions for specific connections in order to whitelist them.
-
Verify that the public IP Address of the machine running the sFTP client, is the same you have originally provided to the Reporting Integration Team for being whitelisted. You can discover your public IP Address by searching the Internet for “what is my IP”. If your current IP Address is not the same you provided to us, please send it to our Reporting Integration Team for being whitelisted.
-
Ask your network administrator/s to confirm that your firewall allows both incoming and outgoing traffic from/to xfer.interactivebrokers.com on port TCP 32.
-
Should the above steps be unable to resolve the issue, please generate a new RSA Public/Private Key pair and send only the new Public part to our Reporting Integration Team, as per IBKB3842.
KB3968 - Generate a key pair using GPG for Windows
KB4205 - Generate a key pair using GPG Suite on macOS
KB4108 - Decrypt your Reports using GPG for Windows
KB4210 - Decrypting Reports using your PGP Key pair on macOS
KB4407 - Generate RSA Key Pair on Windows
KB4410 - How to set up sFTP for using Certificate Authentication on macOS
KB4411 - How to backup your public/private Key pair
KB4323 - How to transfer your public/private key pair from one computer to another
Exchange name change
Overview:
Interactive Brokers is completing an effort to update and consolidate exchange names where appropriate. When this effort is complete, the following updates will be in effect:
- GLOBEX and CMECRYPTO will be consolidated to a single exchange, ‘CME’
- ECBOT will be updated to ‘CBOT’
- COMEX listed metals (previously reflected as NYMEX) will be updated to exchange ‘COMEX’
- NYMEX, no change
Given the breadth of products involved, we are migrating in four waves based on underlying products:
| Key | Effective Trade Date | Products |
| Wave 1 | October 30, 2022 | GLOBEX: ZAR, LB, DA, IXE |
| Wave 2 | November 6, 2022 | GLOBEX: EMD, BRE, CHF, SOFR3, E7, NKD CMECRYPTO: BTCEURRR, ETHEURRR, MET |
| Wave 3 | November 13, 2022 | GLOBEX: All remaining products CMECRYPTO: All remaining products ECBOT: ZO, ZR, 2YY, 30Y NYMEX: ALI, QI, QC |
| Wave 4 | December 4, 2022 | ECBOT: All remaining products NYMEX: All remaining "Metal" products |
I am trading via API, how does this impact me?
For API clients the only requirement would be to provide a new exchange name, for example: exchange=”CME”, for existing contracts for the affected exchanges.
Old exchanges names will no longer be available after the change.
More details can be found within our FAQs through the following link: Upcoming Exchange name Changes
Note: If you are using a third party software connected to TWS or IB Gateway and that software does not recognize the new contract definitions, please contact the third party vendor directly.
So lädt man ein diagnostisches Bündel von einer IBKR-Plattform hoch
Bei manchen unterstützungstechnischen Fragen müssen diagnostische Dateien und Logdateien zusammen mit Screenshots hochgeladen werden. Diese Informationen helfen unserem Team bei der Untersuchung und Lösung des Problems.
In diesem Artikel wird ausführlich beschrieben, wie Sie bei Interactive Brokers diagnostische Dateien und Logdateien auf verschiedenen Plattformen hochladen können.
Hinweis: Das diagnostische Bündel-Repository wird von IBKR tagsüber nicht fortlaufend kontrolliert. Sollten Sie sich ohne vorherige Anweisung von Interactive Brokers spontan dazu entscheiden, ein diagnostisches Bündel hochzuladen, melden Sie sich bitte telefonisch bei unserem Kundendienst oder erstellen Sie ein Ticket über das Nachrichtencenter. Anderenfalls bleibt Ihre Fehlermeldung unbeachtet.
Bitte klicken Sie je nach der Plattform, die Sie verwenden, unten auf den passenden Link:
-
IBKR Mobile (Android)
-
IBKR Mobile (iOS)
- Bei Windows- und Linux-Betriebystemen: Drücken Sie Ctrl+Alt+Q
- Bei Mac: Drücken Sie Cmd+Option+H
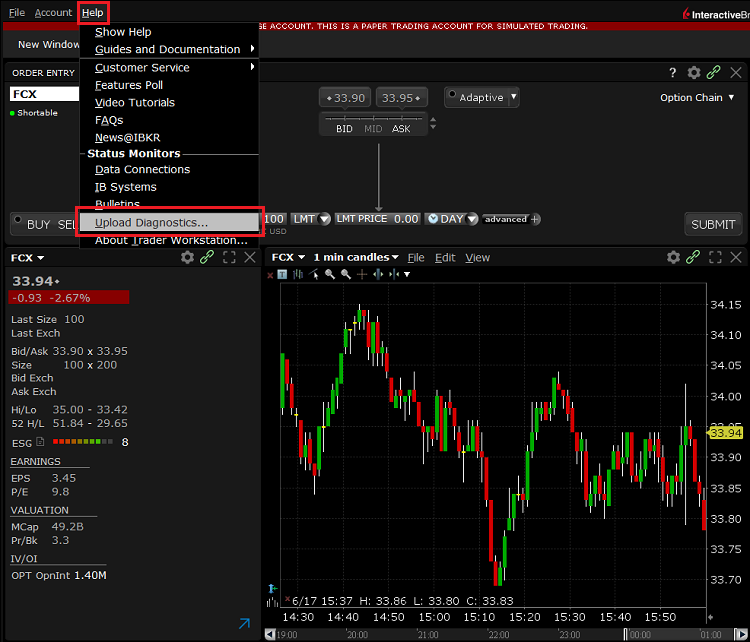
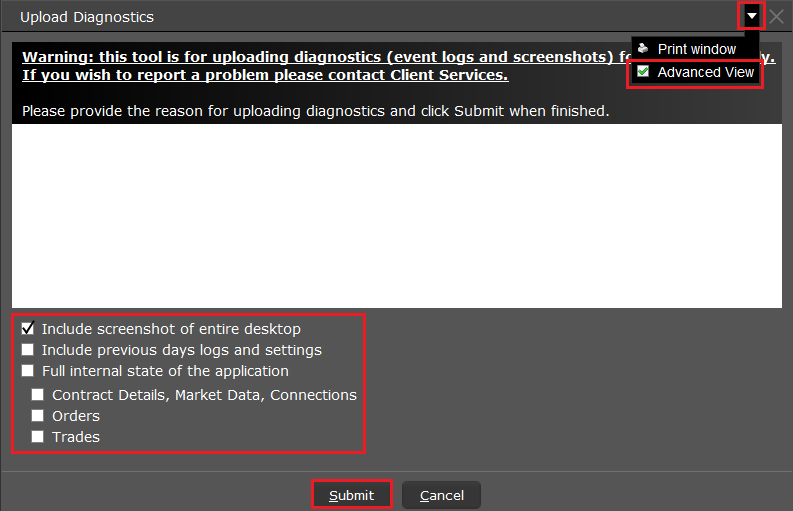
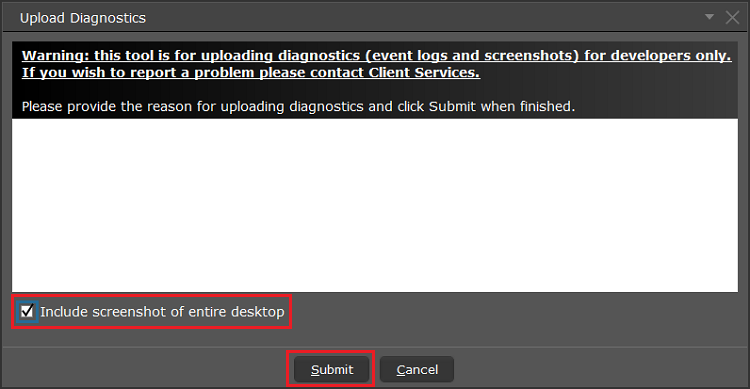

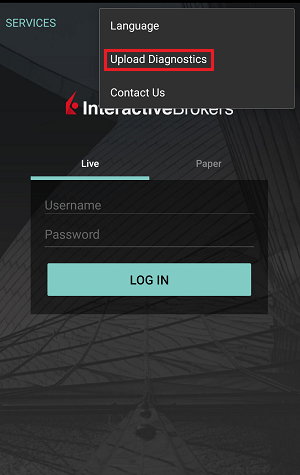
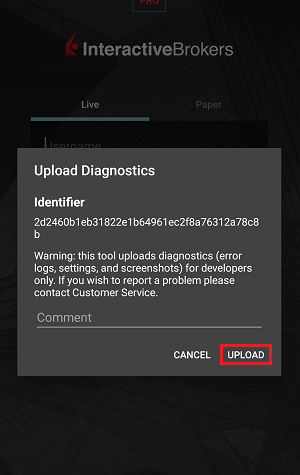
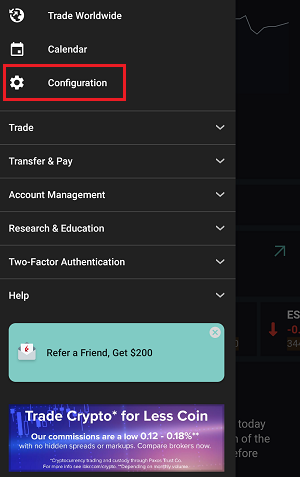
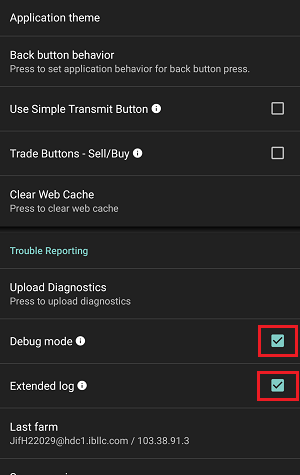
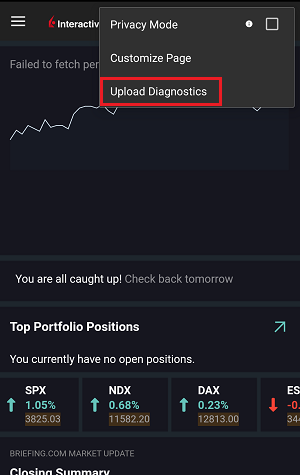
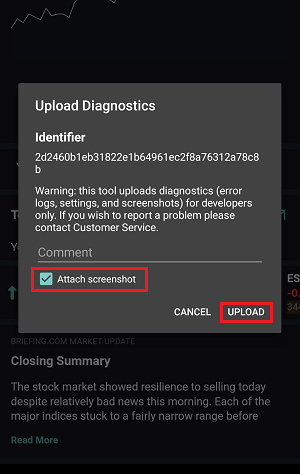
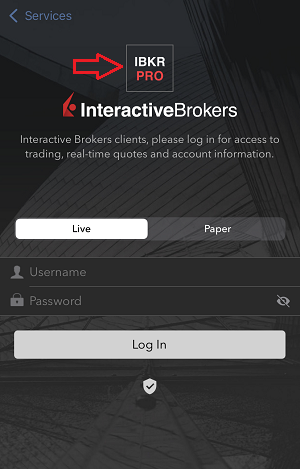
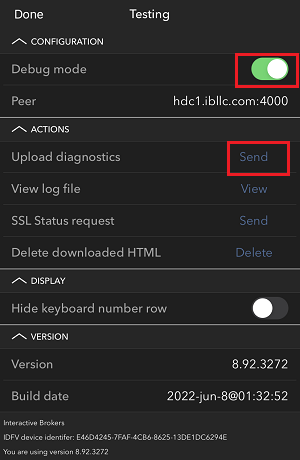
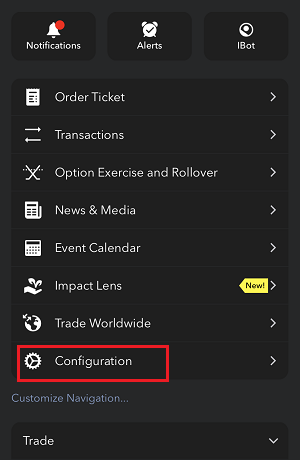
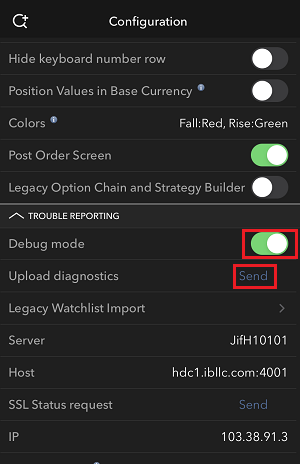
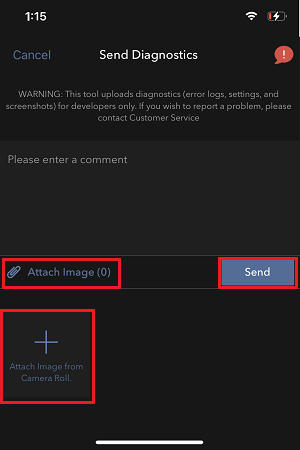
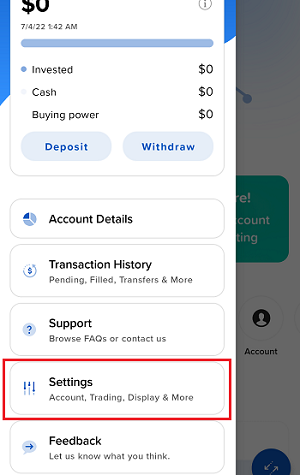
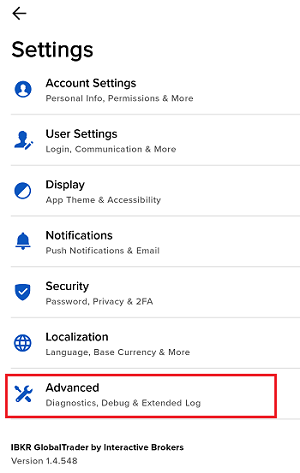
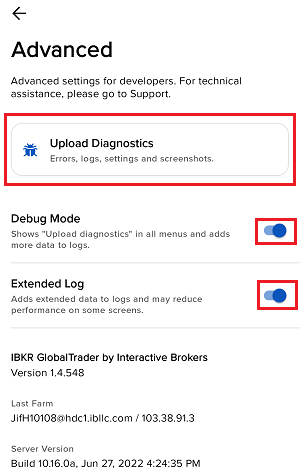
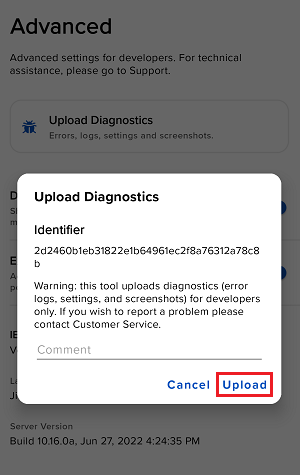
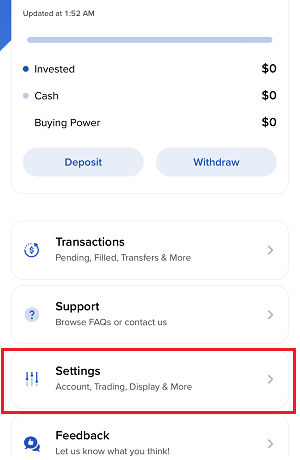
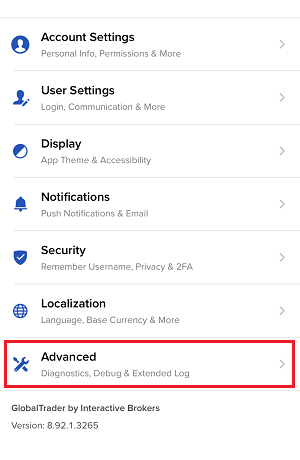
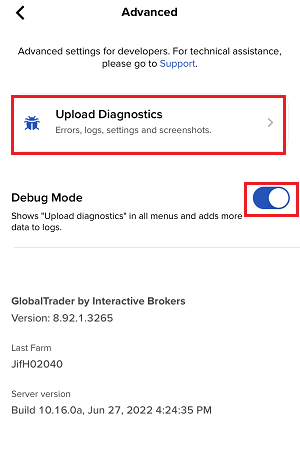
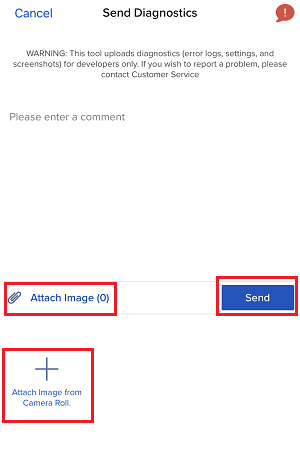
7. Geben Sie Ihre Anmerkungen in das Feld ein und tippen Sie auf ‚Bild hinzufügen‘, um den/die Screenshot/s, den/die Sie auf der Kamerarolle gespeichert haben, hinzuzufügen
Eine diagnostische Ablaufverfolgung für Client Portal kann mittels der Schritte in IBKB3512 nachverfolgt werden
So erstellt man eine ".har"-Datei
Bei der Behebung von nicht-trivialen Websiteproblemen benötigt unser Kundenteam gelegentlich zusätzliche Informationen über die Browserkommunikation. Es ist nicht auszuschließen, dass Sie einmal gebeten werden, eine .har -Datei zu erstellen und bereitzustellen. Eine solche Datei enthält zusätzliche Informationen über die Netzwerkanfragen, die von Ihrem Browser gesendet und empfangen werden. Die entsprechende Datei wird von Ihrem Browser bei der Speicherung des Inhalts, des Zeitrahmens und des Status der HTTP/HTTPS-Anfragen zum Zeitpunkt des Fehlerauftritts erstellt.
In diesem Artikel erläutern wir, wie Sie eine .har-Datei erstellen können. Bitte klicken Sie auf der Liste unten auf den von Ihnen verwendeten Browser:
So erstellen Sie die HAR-Datei in Google Chrome:
1. Öffnen Sie Google Chrome und wechseln Sie zu der Seite, wo das Problem auftritt.
2. Drücken Sie auf Ihrer Tastatur auf CRTL +SHIFT + I. Klicken Sie als Alternative auf das Chrome-Menüsymbol (drei vertikale Punkte oben rechts im Browserfenster) und wählen Sie Mehr Tools > Entwickler-Tools aus.
3. Durch Entwickler-Tools wird ein angedocktes Panel an der Seite oder am unteren Rand von Chrome geöffnet. Wählen Sie den Reiter Network (Abbildung 1.) aus.
Abbildung 1.
.png)
4. Suchen Sie den runden Button Aufzeichnen in der oberen linken Ecke der Symbolleiste der Entwicklertools und vergewissern Sie sich, dass er aktiviert ist. Wenn er grau ist, drücken Sie einmal darauf, um die Aufzeichnung zu starten oder drücken Sie auf CTRL+E (Abbildung 2.)
Abbildung 2.

5. Markieren Sie das Ankreuzfeld Log aufbewahren (Abbildung 3.)
Abbildung 3.
.png)
6. Klicken Sie auf den Button Löschen, um alle vorhandenen Logs zu löschen. Der Button Löschen hat ein Stopp-Symbol und befindet sich rechts neben dem Button Aufzeichnen (Abbildung 4.)
Abbildung 4.

7. Replizieren Sie das Problem, das während der Aufzeichnung der Netzwerkanfragen auftritt.
8. Wenn Sie das Problem repliziert haben, klicken Sie mit der rechten Maustaste auf eine beliebige Stelle in der Liste der aufgezeichneten Netzwerkanfragen, wählen Sie Alle als HAR mit Inhalt speichern aus, und speichern Sie die Datei an einem beliebigen Ort auf Ihrem Computer (z.B. auf Ihrem Desktop).
9. Wechseln Sie vom IBKR-Kundenportal zum Nachrichtencenter; erstellen Sie ein neues Webticket (oder verwenden Sie ein bereits vorhandenes Ticket).
10. Hängen Sie die zuvor erstellte .har-Datei an das Webticket an. Falls der IBKR-Kundendienst Ihnen eine Ticketnummer als Referenz oder den Namen eines Sachbearbeiters mitgeteilt hat, fügen Sie diese Informationen bitte dem Ticket hinzu.
11. Webticket absenden
So erstellen Sie die HAR-Datei in Firefox :
1. Öffnen Sie Firefox und wechseln Sie zu der Seite, wo das Problem auftritt.
2. Drücken Sie auf Ihrer Tastatur auf F12. Klicken Sie als Alternative auf das Firefox-Menüsymbol (drei horizontale parallele Linien oben rechts im Browserfenster) und wählen Sie Web Entwickler > Netzwerk
aus.
3. Durch Entwickler-Netzwerk-Tools wird ein angedocktes Panel an der Seite oder am unteren Rand von Firefox geöffnet. Wählen Sie den Reiter Netzwerk (Abbildung 5.) aus.
Abbildung 5.
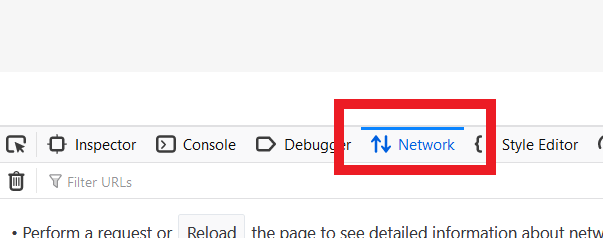
4. Markieren Sie das Ankreuzfeld Persist-Logs (Abbildung 6.)
Abbildung 6.
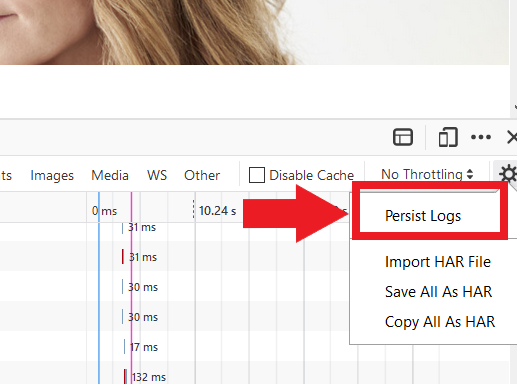
5. Replizieren Sie das bei Ihnen auftretende Problem. Die Aufzeichnung der Netzwerkanfrage startet automatisch.
6. Wenn Sie das Problem repliziert haben, klicken Sie mit der rechten Maustaste auf eine beliebige Stelle in der Liste der aufgezeichneten Netzwerkanfragen und wählen Sie Alle als HAR speichern aus.
7. Speichern Sie die Datei an einem beliebigen Ort auf Ihrem Computer (z.B. auf Ihrem Desktop).
8. Wechseln Sie vom IBKR-Kundenportal zum Nachrichtencenter; erstellen Sie ein neues Webticket (oder verwenden Sie ein bereits vorhandenes Ticket).
9. Hängen Sie die zuvor erstellte .har-Datei an das Webticket an. Falls der IBKR-Kundendienst Ihnen eine Ticketnummer als Referenz oder den Namen eines Sachbearbeiters mitgeteilt hat, fügen Sie diese Informationen bitte dem Ticket hinzu.
10. Webticket absenden
So erstellen Sie die HAR-Datei in Microsoft Edge:
1. Öffnen Sie Edge und wechseln Sie zu der Seite, wo das Problem auftritt.
2. Drücken Sie auf Ihrer Tastatur auf F12. Klicken Sie als Alternative auf das Edge-Menüsymbol (drei vertikale Punkte oben rechts im Browserfenster) und wählen Sie Mehr Tools > Entwickler-Tools aus.
3. Wählen Sie den Reiter Netzwerk aus (Abbildung 10.)
Abbildung 10.
.png)
4. Replizieren Sie das vorher aufgetretene Problem während der Aufzeichnung der Netzwerkanfragen.
5. Klicken Sie anschließend auf das Diskettensymbol (Als HAR exportieren) oder drücken Sie auf CTRL+S (Abbildung 11.)
.
Abbildung 11.
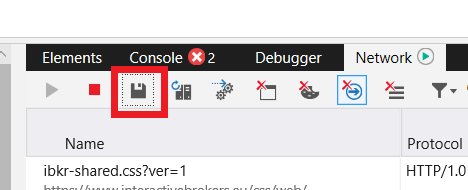
6. Geben Sie einen Dateinamen und einen beliebigen Ort auf Ihrem Computer an (z.B. auf Ihrem Desktop). Klicken Sie dann auf den Button Speichern.
7. Wechseln Sie vom IBKR-Kundenportal zum „Nachrichtencenter"; erstellen Sie ein Webticket (oder verwenden Sie ein bereits vorhandenes Ticket).
8. Hängen Sie die zuvor erstellte .har-Datei an das Webticket an. Falls der IBKR-Kundendienst Ihnen eine Ticketnummer als Referenz oder den Namen eines Sachbearbeiters mitgeteilt hat, fügen Sie diese Informationen bitte dem Ticket hinzu.
9. Webticket absenden
So erstellen Sie die HAR-Datei in Safari:
Wichtig: Bevor Sie die HAR-Datei erstellen, vergewissern Sie sich, dass Sie das Menü Entwickeln in Safari sehen können. Wenn Sie dieses Menü nicht sehen, klicken Sie auf das Menü Safari, wählen Sie Präferenzen aus, wechseln Sie zum Reiter Fortgeschritten und markieren Sie das Ankreuzfeld neben Menü Entwickeln in der Menüleiste anzeigen.
1. Öffnen Sie das Menü Entwickeln und wählen Sie Webinspektor anzeigen aus oder drücken Sie auf CMD+ALT+I.
2. Klicken Sie auf den Reiter Netzwerk (Abbildung 12.).
Abbildung 12.

3. Markieren Sie das Ankreuzfeld Log aufbewahren (Abbildung 13.)
.
Abbildung 13.
.png)
4. Klicken Sie auf das Symbol Export (oder drücken Sie auf CMD+S); geben Sie einen Dateinamen und einen Ort Ihrer Wahl auf Ihrem Computer an (z.B. auf Ihrem Desktop) und speichern Sie die .har-Datei.
5. Wechseln sie vom IBKR-Kundenportal zum „Nachrichtencenter"; erstellen Sie ein Webticket (oder verwenden Sie ein bereits vorhandenes Ticket).
6. Hängen Sie die zuvor erstellte Archivdatei an das Webticket an. Falls der IBKR-Kundendienst Ihnen eine Ticketnummer als Referenz oder den Namen eines Sachbearbeiters mitgeteilt hat, fügen Sie diese Informationen bitte dem Ticket hinzu.
7. Webticket absenden
How to Upload a Diagnostic Bundle from an IBKR Platform
Some support related issues require diagnostics files and logs to be uploaded along with screenshots. The information will help our team to investigate and resolve the issue that you are experiencing.
This article will help you with detailed steps on how to upload diagnostics files and logs from various Interactive Brokers’ trading platforms.
Note: IBKR does not monitor the diagnostic bundle repository throughout the day. Should you spontaneously decide to upload a diagnostic bundle, without being instructed by Interactive Brokers, please inform our Client Services via Message Center ticket or phone call otherwise your error report will go unnoticed.
Please click on one of the links below, according to the platform you are using:
-
IBKR Mobile (Android)
-
IBKR Mobile (iOS)
- For Windows and Linux Operating system: Press Ctrl+Alt+Q
- For Mac: Press Cmd+Option+H


7. Enter your comments in the field and tap ‘Attach Image’ to attach the screenshot/s you previously saved in your camera roll

A diagnostic trace for Client Portal can be captured following the steps on IBKB3512
Generate RSA Key Pair on Windows
These instructions apply to users who are receiving their statements via sFTP. If you elected to receive your statements via sFTP, you would first need to generate an RSA Key pair.
To generate an RSA Key pair:
2. Run the installer and make sure to check PuTTYgen (key generator) as one of the components to install.
3. Start WinSCP and from the button Tools select Run PuTTYgen.
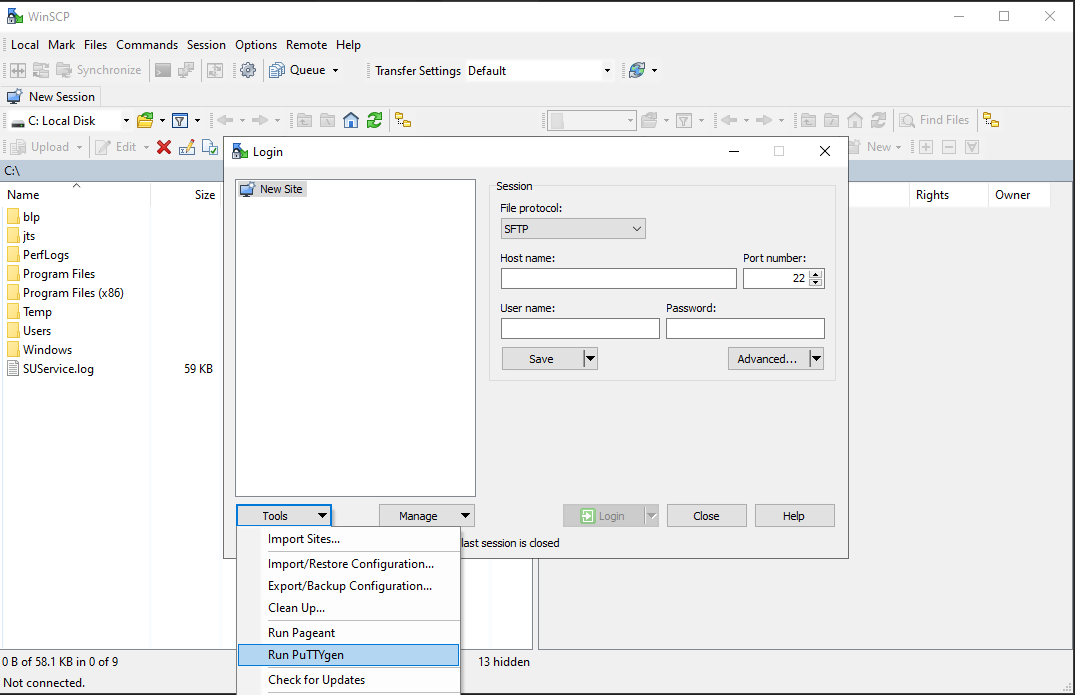
4. Once the tool PuTTYgen has been launched, click Generate. Select RSA as Type of key to generate, 2048 as Number of bits in generated key and click on the button Generate.
5. Click "Save private key" and give the file a name (like private). Leave the extension as .ppk ('ale.ppk', in the picture below is an example filename).
Important Note: do NOT save your public key yet. Save only your private one.
.png)
6. Open WinSCP, create a new connection and:
- Select SFTP as File protocol.
- Enter xfer.interactivebrokers.com in the Host name field.
- Enter 32 in the Port number field.
8. In the Advanced Site Settings screen, left side menu, expand SSH and select Authentication. Click on the button ... at the end of the field Private Key file and open the private key you previously saved at point 5):
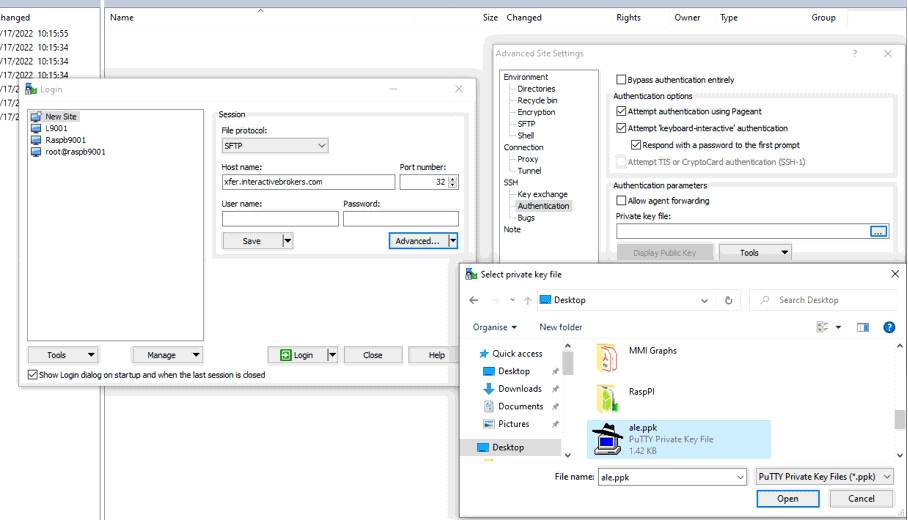
9. Click on the button Display public key:
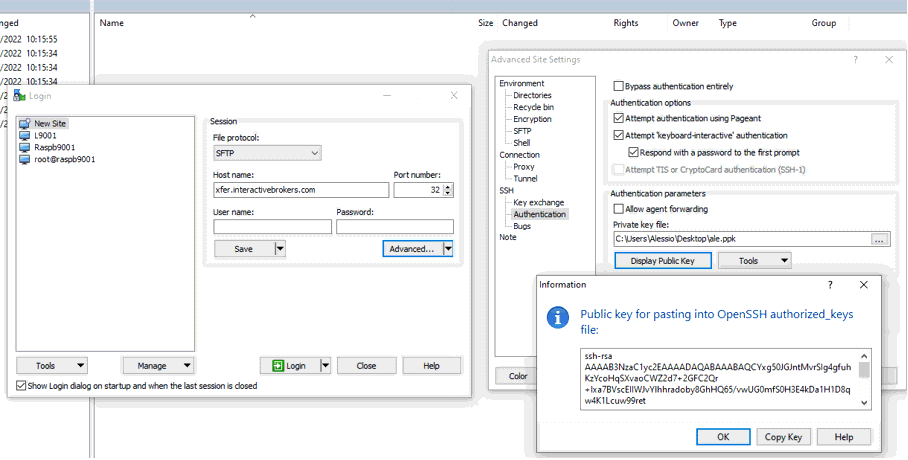
11. Open Notepad, press CTRL+V to paste the key string (which is one string of characters without spaces) and then save the file with the name public.key in a folder of your preference:

12. Send the file you saved at the previous step to us via Message Center ticket or email as per instructions on IBKB3842
KB3842 - Using GPG/RSA encryption keys to guarantee the privacy and security of your Reports
KB3968 - Generate a key pair using GPG for Windows
KB4205 - Generate a key pair using GPG Suite on macOS
KB4108 - Decrypt your Reports using GPG for Windows
KB4210 - Decrypting Reports using your PGP Key pair on macOS
Transferring your Key Pair From One Computer To Another
If you need to decrypt files that were encrypted with your private Key on an additional computer, you need to copy both your private and public keys (the entire Key pair) to that computer.
Note: this tutorial assumes you have already set up a Key pair. If you need guidance to set up the Key pair please refer to this article, which is a prerequisite to the instructions below.
How to transfer your Key pair:
Please select one of the below links, according to your Operating System:
Windows
1. On the machine where the encryption keys are stored, connect a USB drive to a free USB port.
2. Launch the Kleopatra application and select the encryption key you want to transfer. Then right-click on the selection and choose Backup Secret Keys...
Note: Do NOT use Export..., as this will only export the public part of the Key while you need to have a backup of both public and private parts.
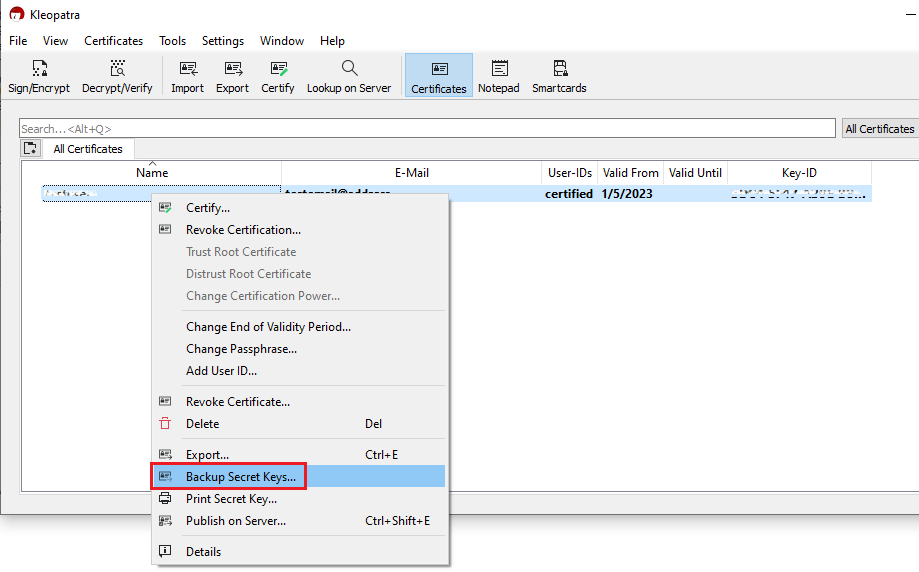
3. Select your USB drive as destination and a filename of your preference (e.g. secret-key-KEYID.asc) for your backup copy. Then click Save.

4. Enter the passphrase you have set when you created the Key and click OK.
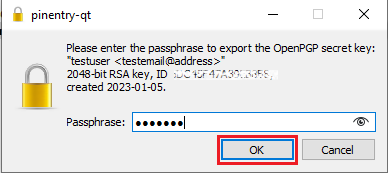
5. A pop-up will confirm the backup has been successfully created. Click OK.
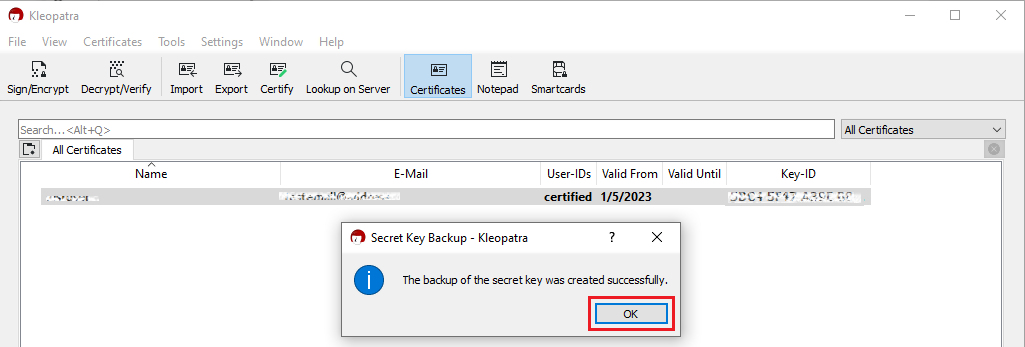
6. Eject your USB drive safely through the Windows interface to prevent data loss and connect it to a free USB port on the other computer (the one you want to transfer the key to). All the next steps have to be executed on that machine.
7. Make sure the the GPA software is installed, otherwise please install it. Make sure that the component Kleopatra is selected as one of the sub components to include in the installation.
8. Launch the Kleopatra application and click on the top menu File and select Import...

9. Click on the letter correspondent to your USB drive and select the file you have previously saved (e.g. secret-key-KEYID.asc). Then click Open.

10. Click on Yes, It's Mine.

11. A pop-up will confirm the Key has been successfully imported. Click OK. You may now want to delete the key file from the USB drive and empty the Trash.

macOS
1. On the machine where the encryption keys are stored, connect a USB drive to a free USB port.
2. Launch the GPG Keychain application and select the encryption key you want to transfer. Please make sure that you see the text Type: Secrete and public key, in the Type column.
.png)
3. With the desired encryption key highlighted, click Export. Please make sure to check the box for the option Include secret key in exported file, as illustrated in the above screenshot. Save the key pair to the USB drive.
4. Eject the USB drive and connect it to a free USB port on the other computer (the one you want to transfer the key to). All the next steps have to be executed on that machine.
5. Make sure the GPG Tools suite is installed, otherwise please install it.
6. Launch the GPG Keychain application and click the icon Import on the top toolbar.
(1).png)
7. Click the USB Drive and select the previously saved .ASC file that contains the Public and Private key. Then click Open.
8. The confirmation should read Import successful.
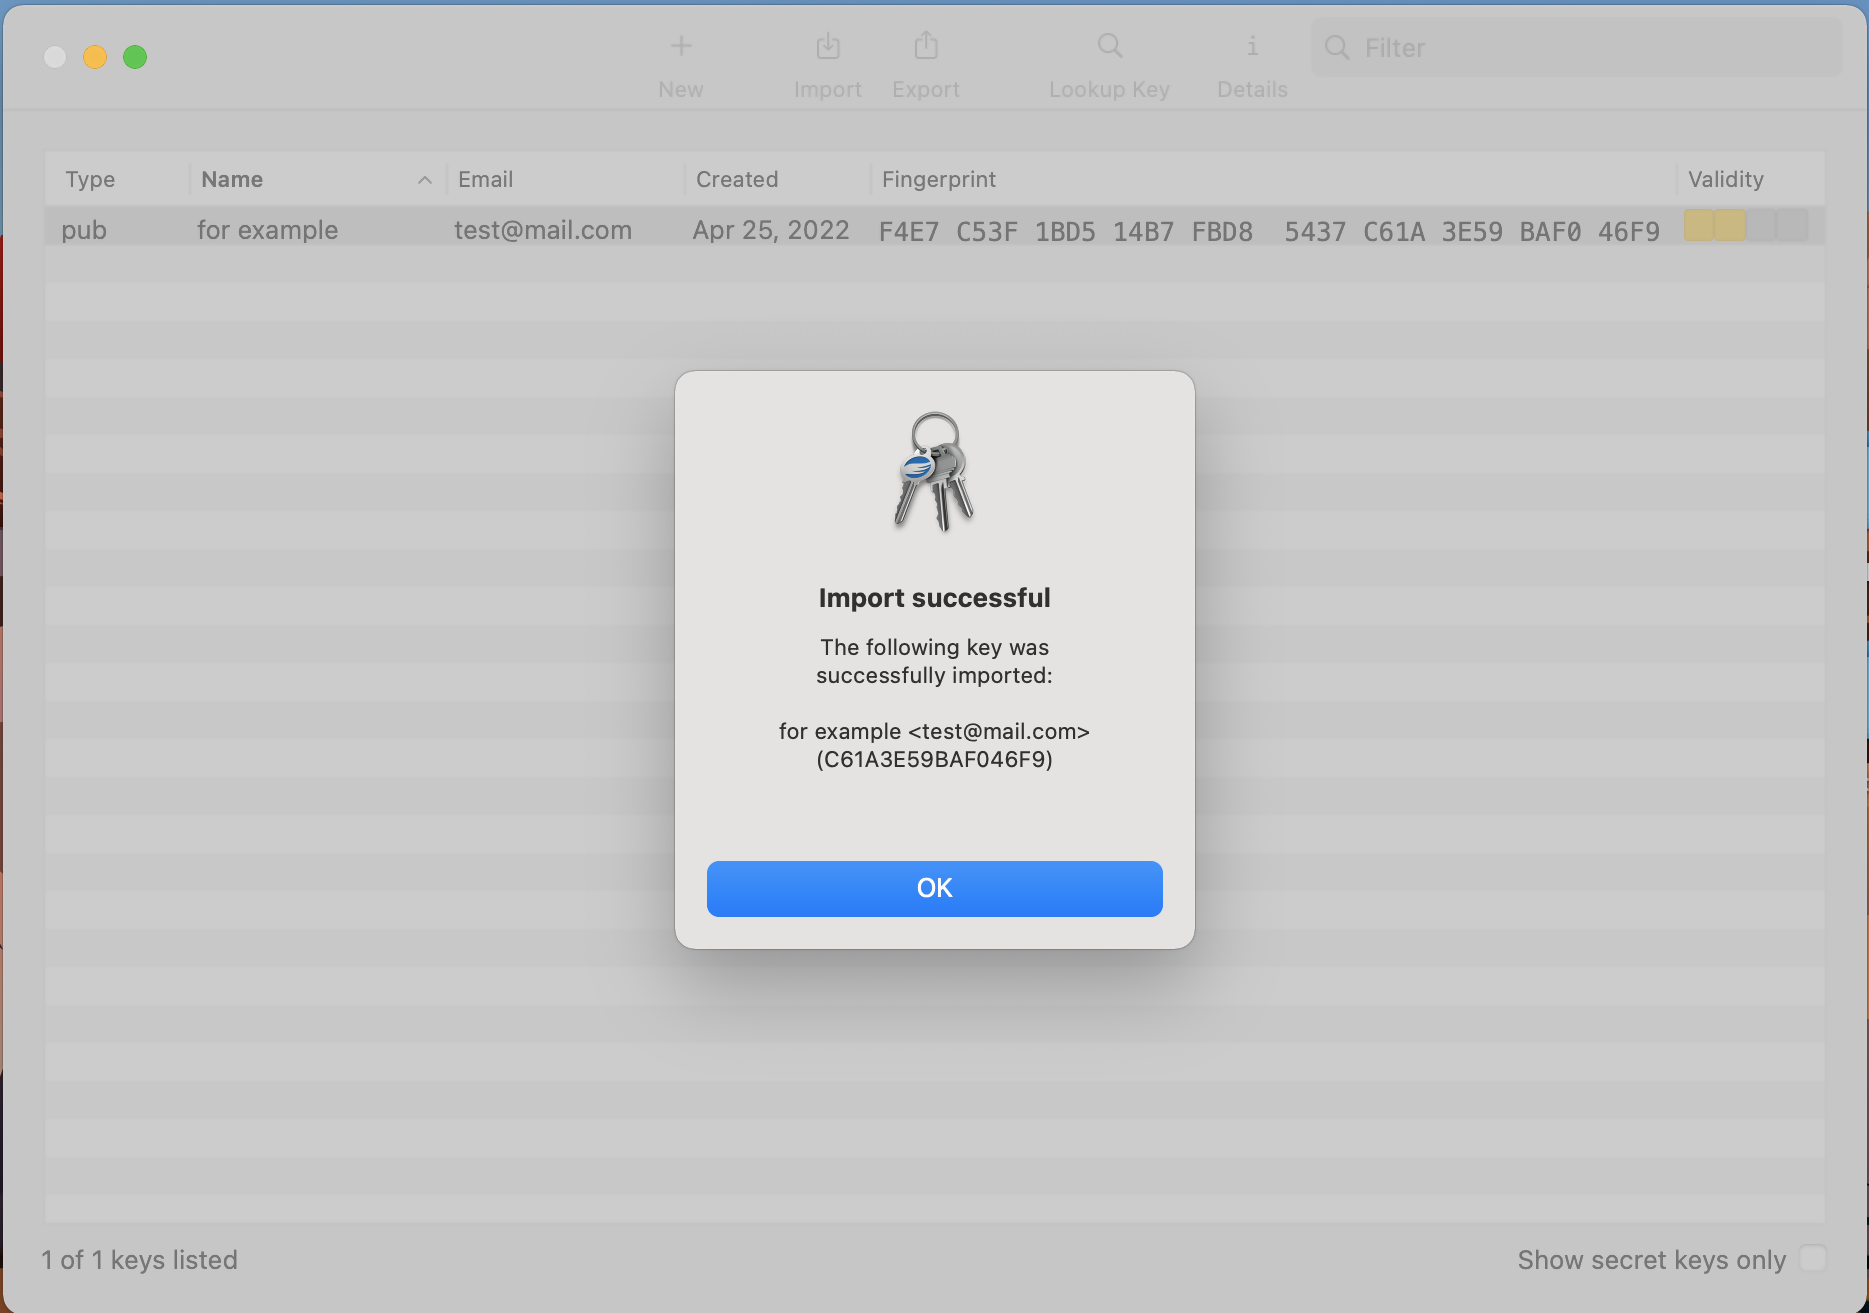
9. Once the key has been successfully imported, delete the key file from the USB drive and empty the Trash.
KB3842 - Using GPG/RSA encryption keys to guarantee the privacy and security of your Reports
KB3968 - Generate a key pair using GPG for Windows
KB4205 - Generate a key pair using GPG Suite on macOS
KB4108 - Decrypt your Reports using GPG for Windows
KB4210 - Decrypting Reports using your PGP Key pair on macOS
KB4407 - Generate RSA Key Pair on Windows
Decrypting Reports Using Your PGP Key Pair on macOS
Note: This tutorial assumes you received reports via email or via FTP that were encrypted with the public key you sent to IBKR . If you need guidance to set up the encrypted statement delivery, please refer to this article, which is a prerequisite to the instructions below.
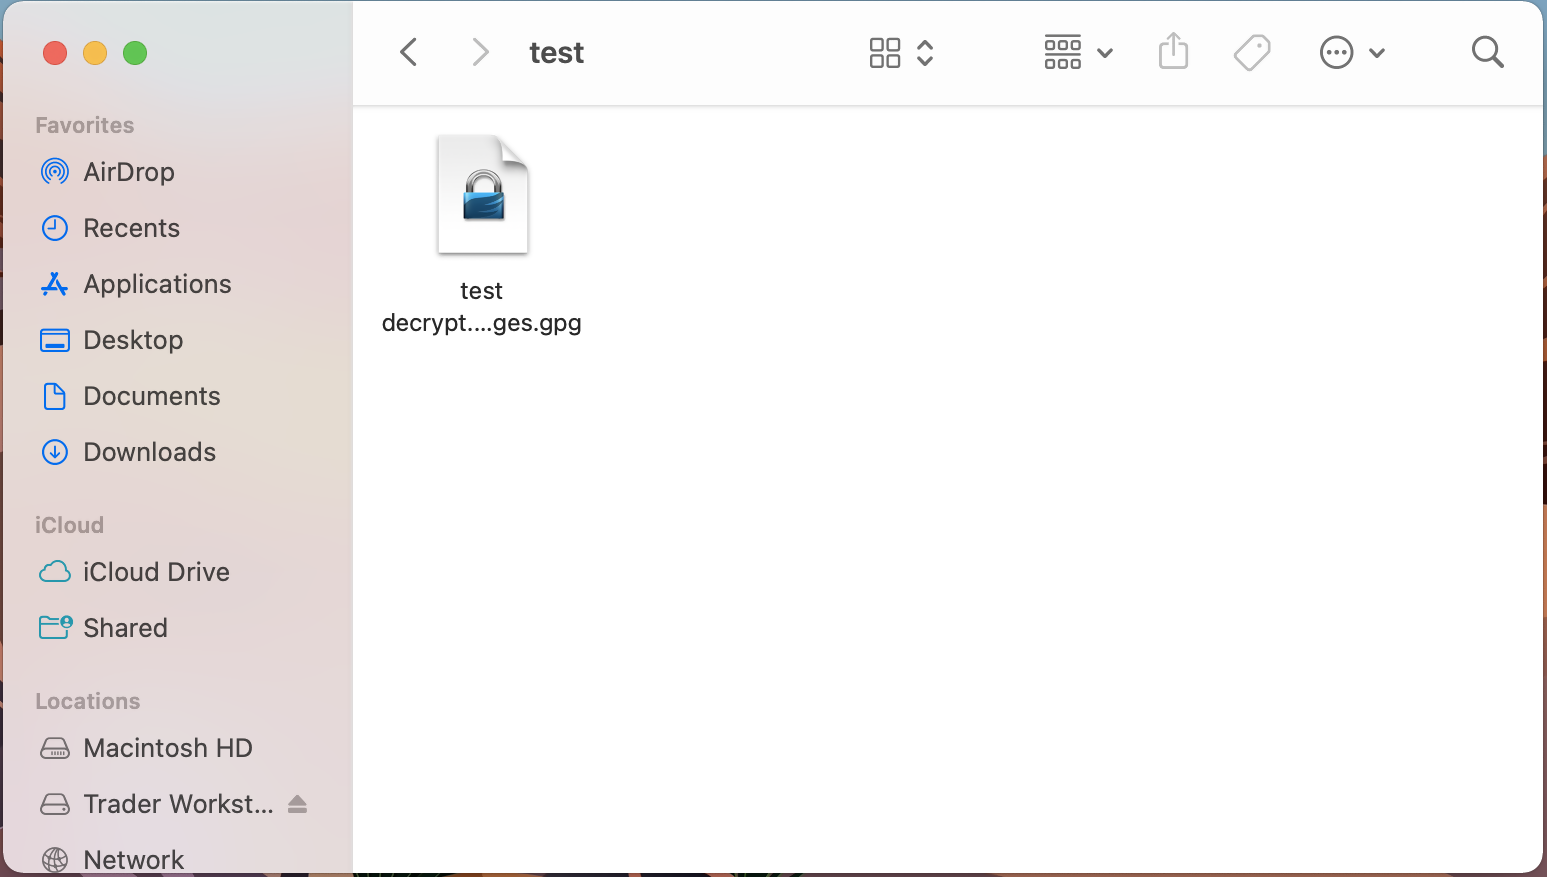
1. Open Finder
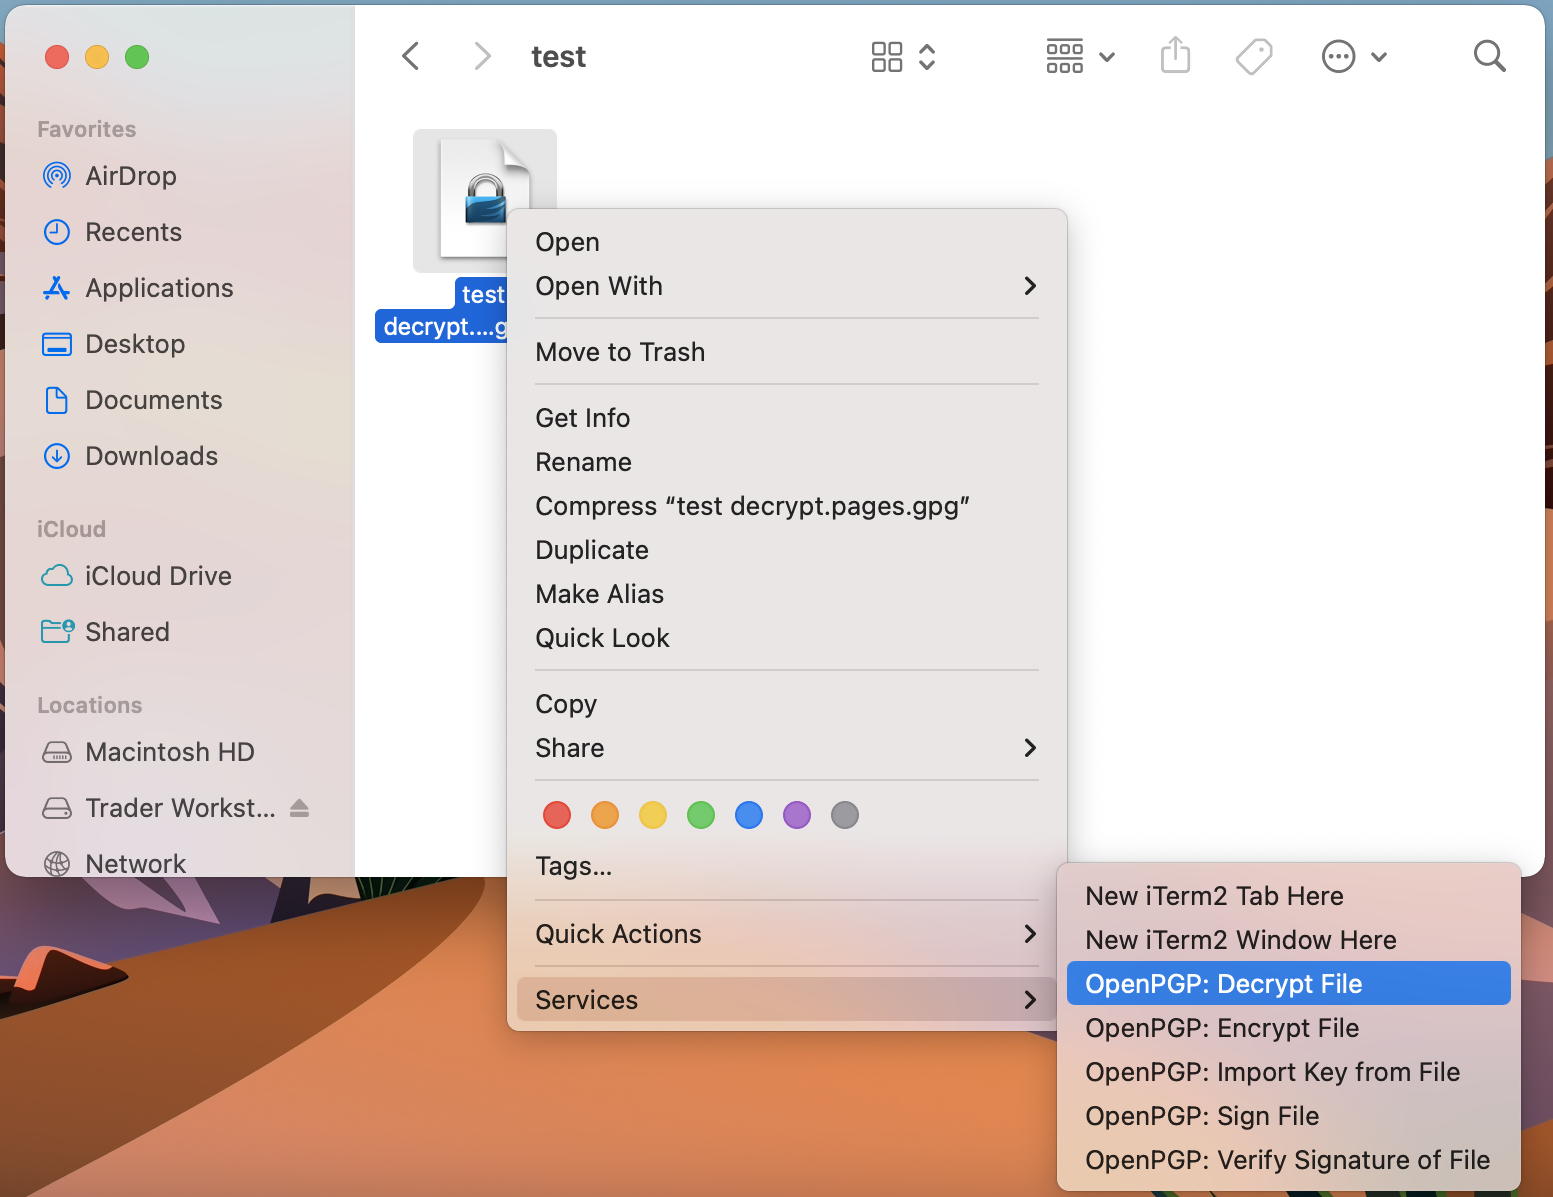
2. Right click on the .gpg file you want to decrypt
3. Select Services > OpenPGP: Decrypt File
Common Issues/Questions
- Decryption failed with error 'No Secret Key'
This is commonly caused when the wrong encryption key is used to decrypt the file. If decryption is being done on a computer other than the original computer used to create the public/private keys, the keys would have to be transferred from the original computer to the new computer.
If the above does not help, then a new public/private key pair needs to be created and sent to us.
KB3842 - Using GPG/RSA encryption keys to guarantee the privacy and security of your Reports
KB3968 - Generate a key pair using GPG for Windows
KB4205 - Generate a key pair using GPG Suite on macOS
KB4108 - Decrypt your Reports using GPG for Windows
KB4407 - Generate RSA Key Pair on Windows
Decrypt Your Reports Using GPG for Windows
Note: This tutorial assumes you received reports via email or via FTP that were encrypted with the public key you sent to IBKR. If you need guidance to set up the encrypted statement delivery, please refer to this article, which is a prerequisite to the instructions below.
How to decrypt files using Kleopatra:
1. Save all the encrypted Reports you received via email or FTP in a folder on your preference (e.g. Desktop)
2. Start the Kleopatra application (included in Gpa4win software). The entry for your Key should be listed in the All Certificates panel. Click the top menu File and select Decrypt/Verify...


Common Issues/Questions
- Decryption failed with error 'No Secret Key'
This is usually caused by the wrong encryption key being used to decrypt the file. If decryption is being done on a computer other than the original computer used to create the public/private keys, the keys would have to be transferred from the original computer to the new computer.
If the above does not help, then a new public/private key pair needs to be created and sent to us.
KB3842 - Using GPG/RSA encryption keys to guarantee the privacy and security of your Reports
KB3968 - Generate a key pair using GPG for Windows
KB4205 - Generate a key pair using GPG Suite on macOS
KB4210 - Decrypting Reports using your PGP Key pair on macOS
KB4407 - Generate RSA Key Pair on Windows
KB4409 - How to set up sFTP for using Certificate Authentication on Windows
KB4410 - How to set up sFTP for using Certificate Authentication on macOS
KB4411 - How to backup your public/private Key pair
KB4323 - How to transfer your public/private key pair from one computer to another

