IBKR Host and Ports Documentation
Background:
TWS connects to IBKR servers via port 4000 and 4001, if using SSL, and will not operate on any other port. If you are using a proxy server, it needs to be a transparent with both inbound and outbound ports open so that the TWS can function properly.
Below are listed all the gateways, along with the corresponding destination host that might be used by the TWS when you use our services, please allow access to those hosts.
The easiest way to test whether your connection needs any special setup or has been configured properly is to use IBKR's Dedicated Test page, which will provide a dynamic test of your network’s connection against our main trading and market data servers. If a “Success” response is returned, there is nothing more for you to do. If the response is “Failure”, we recommend adding an exception for the new hosts to your network’s configuration or review your changes.
Note: If your network uses a browser proxy, the test page can produce false positives. In this case, or if you are not sure what your network setup is, turn to your network administrators, who can perform ping and telnet tests to the hosts listed below to confirm compliance with the connectivity requirements.
Specs:
|
CLIENT PORTAL AND WEBSITE |
||||
|
REGION/PRODUCT |
SERVER (HOST) |
PORTS1 |
||
|
IBKR WEBSITE – AMERICA |
443 |
|||
|
IBKR WEBSITE – Canada |
443 |
|||
|
IBKR WEBSITE – UK |
443 |
|||
|
IBKR WEBSITE – INDIA2 |
443 |
|||
|
IBKR WEBSITE – JAPAN2 |
443 |
|||
|
IBKR WEBSITE – HONG KONG2 |
www.interactivebrokers.com.hk | 443 | ||
|
IBKR WEBSITE – CHINA2 |
www.ibkr.com.cn | 443 | ||
|
IBKR WEBSITE - AUSTRALIA |
www.interactivebrokers.com.au | 443 | ||
|
CLIENT PORTAL – EAST |
443 |
|||
|
CLIENT PORTAL – CENTRAL |
443 |
|||
1: Standard Communication: TCP Port 80 | SSL Communication: TCP Port 443.
2: This IB Server host does not support ping request.
Important Note: If you are accessing Client Portal from a corporate network where the Internet access is provided through a load balancing equipment, you may receive error messages about expired/invalid session and/or missing web content upon or after the login phase. The load-balancer cycles your outbound connections over two or more network interfaces to equalize the network workload. Because of this mechanism, your HTTP requests reach our systems from different IP addresses, invalidating your Client Portal session. In this scenario, as a solution, please ask your network administrator or IT group to configure your machine/device for bypassing the load-balancer. This will allow your session to remain valid and alive.
|
DESKTOP TWS |
|||
|
REGION/TOOL |
PRIMARY/BACKUP |
SERVER (HOST) |
PORTS |
|
|
PRIMARY |
|
|
|
BACKUP |
|||
|
|
PRIMARY |
|
|
|
BACKUP |
|||
|
|
PRIMARY |
|
|
|
BACKUP |
|||
|
TWS ASIA |
PRIMARY |
4000 / 4001 |
|
|
BACKUP |
|||
|
TWS ASIA - CHINA3 |
PRIMARY |
4000 / 4001 |
|
|
BACKUP |
mcgw1_hb1.ibllc.com.cn | ||
| TWS AUTO-UPDATE | PRIMARY | 443 | |
|
RISK NAVIGATOR |
PRIMARY |
443 |
|
|
TWS CLOUD SETTINGS |
PRIMARY |
443 |
|
|
IB CAM |
PRIMARY |
4000 / 4001 |
|
|
DIAGNOSTICS REPORTS |
PRIMARY |
443 |
|
3: Gateway dedicated to clients with accounts assigned to the Hong Kong server, but are physically connecting from Mainland China.
Funzionamento della propria Carta di sicurezza digitale+
La Carta di sicurezza digitale (DSC) è un dispositivo di sicurezza alimentato a batteria progettato per generare una serie di codici casuali da inserire a ogni tentativo di accesso insieme al proprio nome utente e alla password. Dato che è necessario disporre fisicamente della DSC per ottenere i codici ed effettuare l'accesso, il dispositivo impedisce efficacemente a eventuali hacker di accedere al proprio conto dopo aver compromesso il proprio computer e/o le proprie informazioni. Le istruzioni per il funzionamento della DSC sono illustrate di seguito.
I passaggio: effettuare l'accesso al proprio conto inserendo il nome utente e la password, come d'abitudine. Una volta completato l'accesso, comparirà un codice di autenticazione a 6 cifre.
II passaggio: accendere il proprio dispositivo tenendo premuto il pulsante “press” fino a quando apparirà sul display la scritta 'PIN>'; digitare il codice PIN a 4 cifre specificato al momento della richiesta del dispositivo e premere il pulsante "OK".
III passaggio: quando la scritta 'CHALLNG>' apparirà sul display, digitare nel dispositivo il codice di autenticazione a 6 cifre visualizzato nella schermata di accesso (I passaggio) e premere il pulsante "OK". Comparirà un codice di risposta.
IV passaggio: digitare il codice di risposta a 8 cifre (III passaggio) nella schermata di accesso. Selezionare il pulsante Login per procedere.
Si prega di notare che i pulsanti delle proprie carte di sicurezza non sono sensibili al tatto, pertanto dovranno essere premuti per poter funzionare.
Articoli correlati
KB1042: Video istruzioni per l'accesso con la Carta codici di sicurezza
KB1942: Come riattivare il Dispositivo di accesso sicuro permanente
KB1943: Come richiedere un dispositivo di sicurezza sostitutivo
KB1131: Panoramica sul Sistema di accesso sicuro
Operating your Digital Security Card+
The Digital Security Card (DSC) is a battery operated security device which generates a series of random codes to be entered along with your user name and password upon each log in attempt. As physical possession of the DSC is required to obtain the codes and log in, the device effectively prevents hackers who may have compromised your computer or information from accessing your account. Instructions for operating the DSC are outlined below.
Step 1 - When logging into your account, enter your user name and password as usual. If successful, a 6-digit Challenge Code will appear.
Step 2 - Turn on your device by pressing the “press” button until the 'PIN>' display appears, enter the 4-digit PIN code you specified at the time you requested the device and press the “OK” button.
Step 3 - Enter the 6-digit Challenge Code from the login screen (step A) into the device when the 'CHALLNG>' display appears, press the “OK” button and a response code will appear.
Step 4 - Enter the 8 digits of the response code (Step C) into the login Screen. Select the Login button to proceed.
Note that the buttons on your security cards are not touch sensitive and must to be pressed to operate.
Related Articles
KB1042 - Video instructions for logging in with the Secure Code Card
KB1942 - Reactivating the permanent Secure Login Device
KB1943 - Requesting a replacement Secure Login Device
KB1131 - Overview of the Secure Login System
How to fix the error: "Library dbcapi.dll cannot be loaded"
Background:
TWS users may receive the following error message upon configuring TWS to use the eSignal data feed:
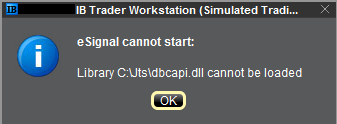
This error may appear for the following reasons:
Issue A - You are not using the 32 bit version of TWS and/or eSignal:
The 32-bit versions of both TWS and eSignal have to be installed for the integration to work. In the section below you will find the instructions for installing the 32-bit TWS. Should you need assistance with the installation of the 32-bit eSignal, we suggest you to contact the eSignal customer support.
Issue B - There is an incompatibility with the file C:\Jts\dbcapi.dll:
To use 32-bit eSignal version 12, an incompatibility with the C:\Jts\dbcapi.dll file must be fixed. This involves copying a file from the eSignal installation and renaming it to dbcapi.dll.
Note: On certain systems you will need to apply the fixes for both issue A and B. If you applied the fix for issue A (or if you are already sure you are using the 32 bit version of both platforms) and you are still receiving the error message, then please apply as well the fix for issue B.
Instructions to resolve issue A
Installing 32-bit TWS
Please open the page http://www.ibkr.com in your browser and perform the steps below:
1) Click on the Log In button at the top right corner of the page.
2) Click on Download Trader Workstation: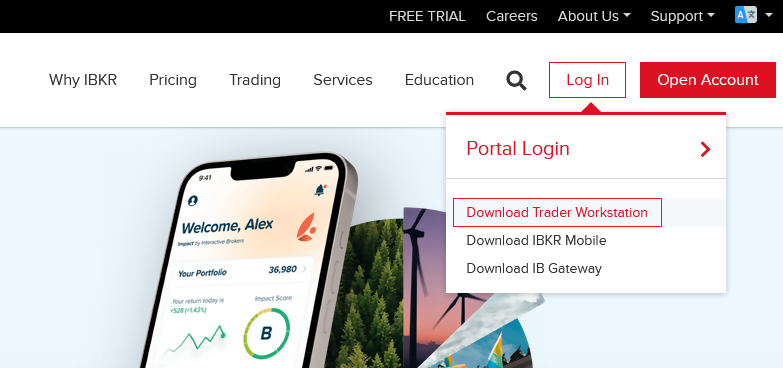
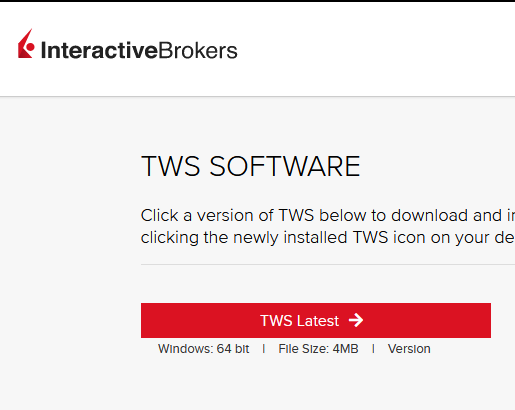
3) Click on the red button TWS Latest:
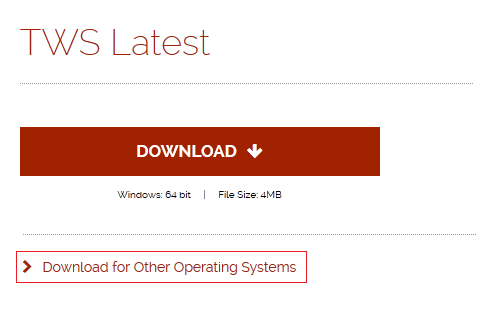
4) On the next page, click on the link Download for Other Operating Systems:
5) Click on the item Windows 32-bit:
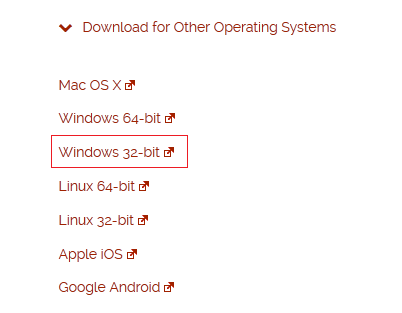
6) Make sure that the description under the DOWNLOAD button has changed to "Windows: 32 bit". Click now on DOWNLOAD:

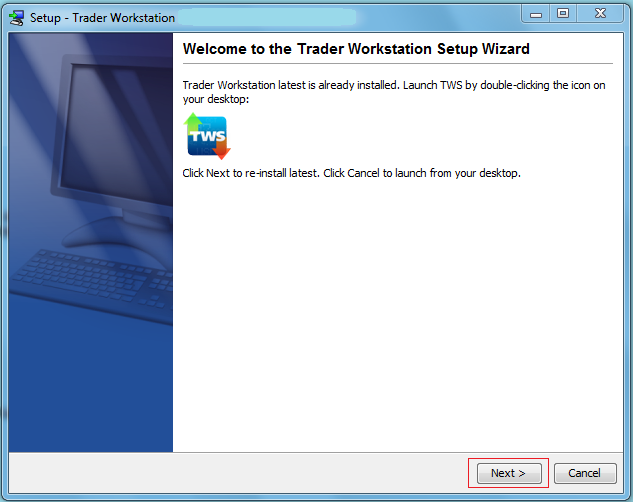
7) Launch the downloaded file. The Trader Workstation installation will start. At this point, you may see the warning message "Trader Workstation latest is already installed...". Ignore this warning and click on the button Next > to continue the installation:
8) Your "Trader Workstation" Desktop icon will be automatically updated. You can now launch the 32-bit Trader Workstation by a double click on that icon.
If you have launched the 32-bit TWS and the 32 bit version of eSignal but you still receive the same error message, please follow as well the instructions below.
Instructions to resolve issue B
Replacing dbcapi.dll for compatibility between 32-bit TWS and 32-bit eSignal 12
To correct an incompatibility with the dbcapi.dll file, we will replace that file with another version of it taken from the eSignal installation folder. Please follow the steps below to perform the substitution:
1) Navigate to C:\Jts and rename the file dbcapi.dll to dbcapi_old.dll
2) Navigate to the directory where 32-bit eSignal 12 is installed (most commonly C:\Program Files (x86)\Common Files\Interactive Data\DM).
3) Copy dbcapi_vc8.dll from that directory into the C:\Jts directory.
4) Move to the C:\Jts directory.
5) Right click on the dbcapi_vc8.dll file (now in the C:\Jts directory) and select rename. Type dbcapi.dll as the new filename.
.jpg)
6) TWS is now ready to accept the eSignal data feed.
How to install the TWS API Components on Mac / Unix
NOTE: If you have already agreed to the API License Agreement please start at Step 3 below.
Instructions
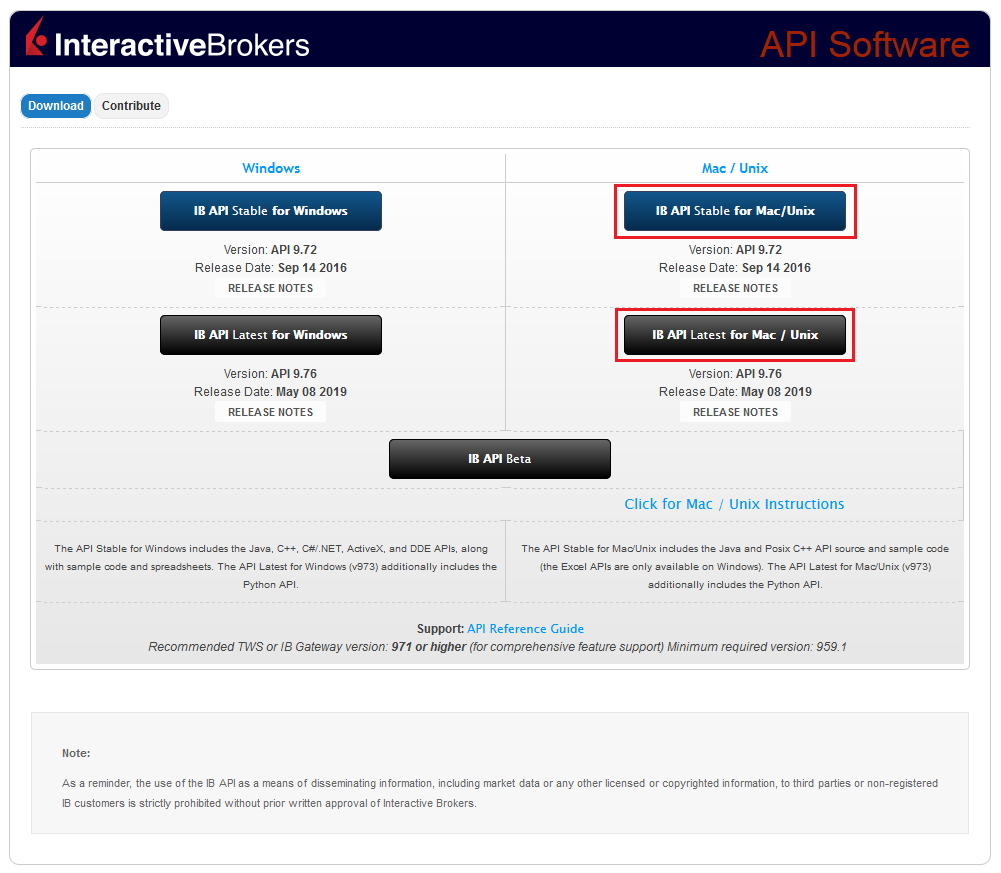
- Click directly on the button below to access the API software download page

- This will direct you to Interactive Brokers API License Agreement, please review it
- Once you have clicked "I Agree", refer to the Mac / Unix section to download the API Software version of your preference
- This will download twsapi_macunix.n.m.zip to your computer
(where n and m are the major and minor version numbers respectively) - Open Terminal (Ctrl+Alt+T on most distributions)
(On Mac press Command+Space to launch Spotlight, then type terminal and press Return) -
Navigate to the directory where the installer has been downloaded (normally it should be the Download folder within your home folder) and confirm the file is present
$ cd ~/Downloads
$ ls
- Unzip the contents the installer into your home folder with the following command (if prompted, enter your password):
$ sudo unzip twsapi_macunix.n.m.zip -d $HOME/

- To access the sample and source files, navigate to the IBJts directory and confirm the subfolders samples and source are present
$ cd ~/IBJts
$ ls

Legacy Instructions - API Version ≤ 9.71
Note: IB only offers API Version 9.72+. In the event you already have an existing legacy version and need to install it, please refer to the directions below:
- locate the file twsapi_macunix.n.m.jar on your computer
(where n and m are the major and minor version numbers respectively.) - Open Terminal (Ctrl+Alt+T on most distributions)
(On Mac press Command+Space to launch Spotlight, then type terminal and press Return) - Navigate to the directory where the .jar file has been located (normally it should be the Download folder within your home folder) and confirm it is present
$ cd ~/Downloads
$ ls - Extract the contents of the .jar file into your home folder
$ jar xf twsapi_macunix.n.m.jar -d $ HOME/ - To access the sample and source files, navigate to the IBJts directory and confirm the subfolders samples and source are present
$ cd ~/IBJts
$ ls
How to Share a Security Device
Overview:
IBKR allows individuals to maintain multiple user names within a single account or across distinct accounts under their control. Individuals who do not wish to maintain multiple physical security devices may elect to consolidate and share a single device across their users. The prerequisites and the procedure for sharing devices are outlined below.
Note: Clients using the IBKR Mobile Authentication (IB Key) should not use the present device sharing procedure, since the IBKR Mobile Authentication (IB Key) allows multiple users to be enabled directly from the IBKR Mobile app itself (menu item: Authenticate -> Add user).
Background:
Prerequisites
The possibility of sharing a physical security device will be granted only if ALL the conditions below are respected:
a) The participant users belong either to the same entity or to different entities but with the same identification data (Date of Birth, Citizenship, Country of Legal Residence, Identification Document type and number or Social Security Number for US Citizens and residents).
b) The participant users do NOT have a temporary security device (Temporary Code, Online Security Code Card) currently assigned to them.
c) The physical device offering the highest level of protection has to be shared. In case all the devices offer the same level of protection, whichever of them can be eligible. You can check the security level of your device in the table below:
|
Security level |
Device name |
Device image |
| Highest | Digital Security Card+ (DSC+) | 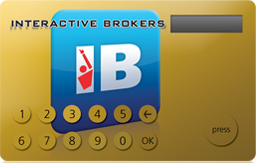 |
| Lowest | Security Code Card (SLS card) | 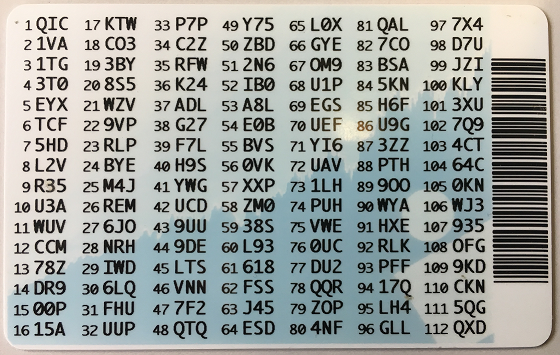 |
Procedure:
1. Among the possible candidates, identify the device offering the highest level of protection and the user that device belongs to. We will call that user the device owner
2. Log in to your Client Portal page with the requesting user (NOT the device owner)
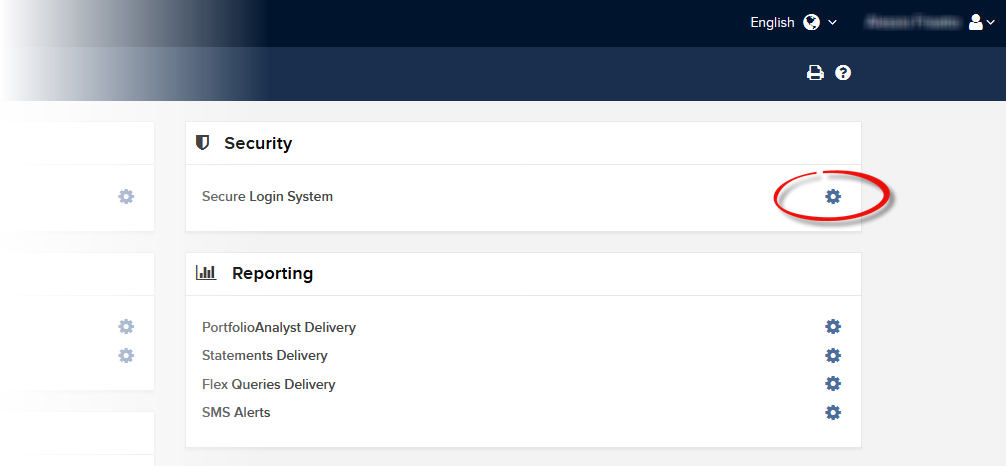
3. Click on Menu icon in the top-left then select Settings and then User Settings
(1).png)
4. Click on the wheel (Settings) close to Secure Login System
5a. In case your user does not have any active device, the system will display the SLS enrollment menu. Select the item "I already have access to a Secure Login Device under a different username" and click on Continue
.png)
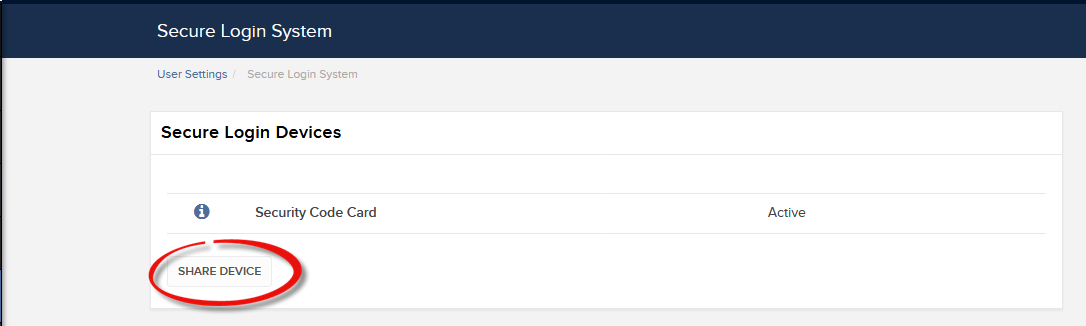
5b. In any other case, the system will display the device list. Click on Share Device to proceed further
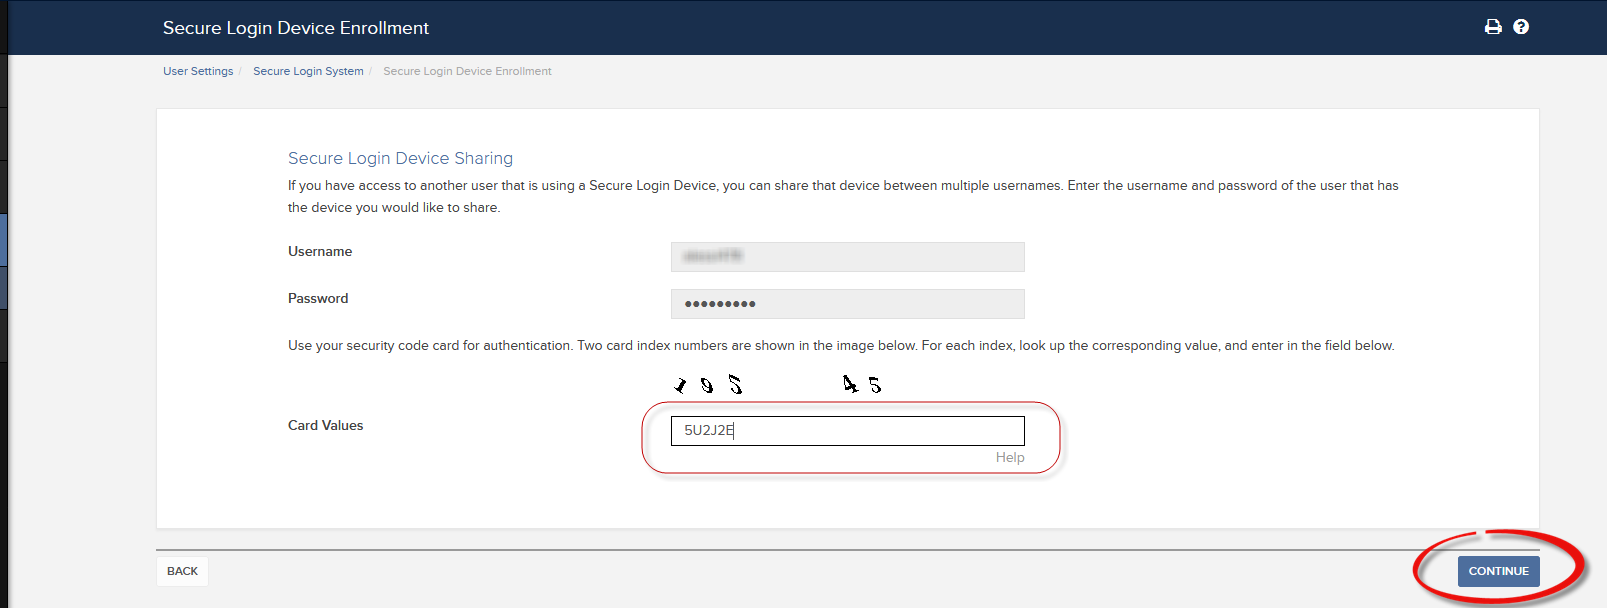
6. Enter the credentials of the device owner you identified at point 1. and click on Continue.
.png)
7. According to the SLS Device about to be shared, the system will display a security element (either Challenge Code or Index Numbers). Operate the SLS Device and, using the security element provided by the system, generate a response code. Enter the response code in the correspondent field and click on Continue.
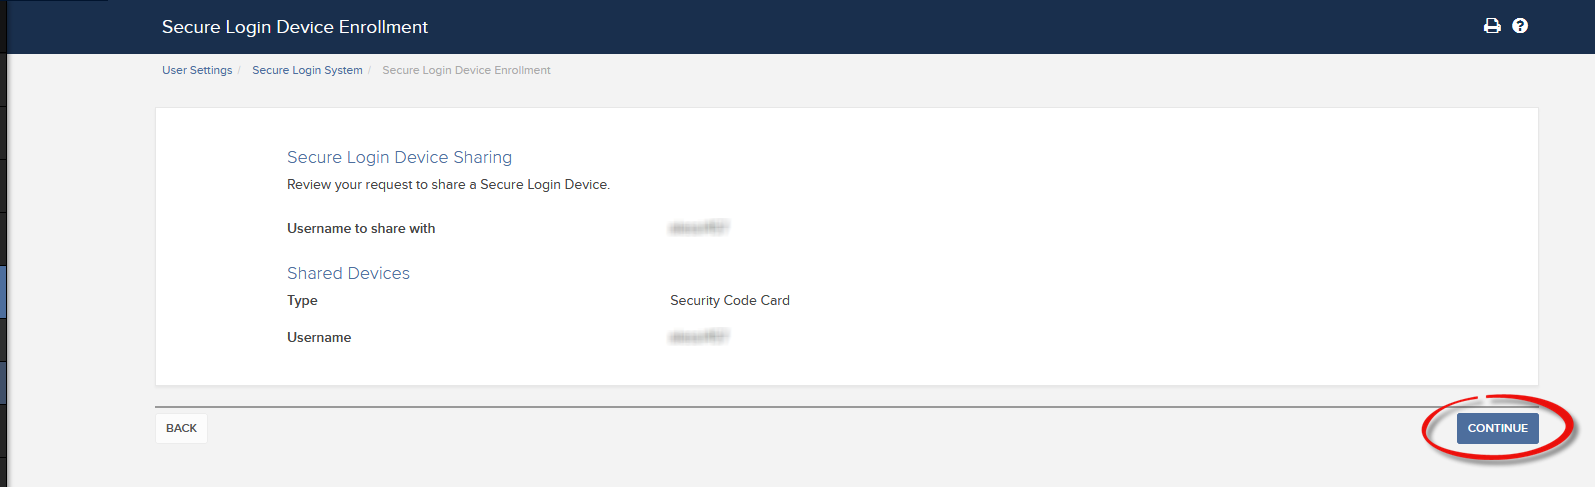
8. Once you have reviewed the correctness of the information entered, click on Continue.
9. The system will display the status of your request (see note a. for details). Click OK to finalize the procedure.
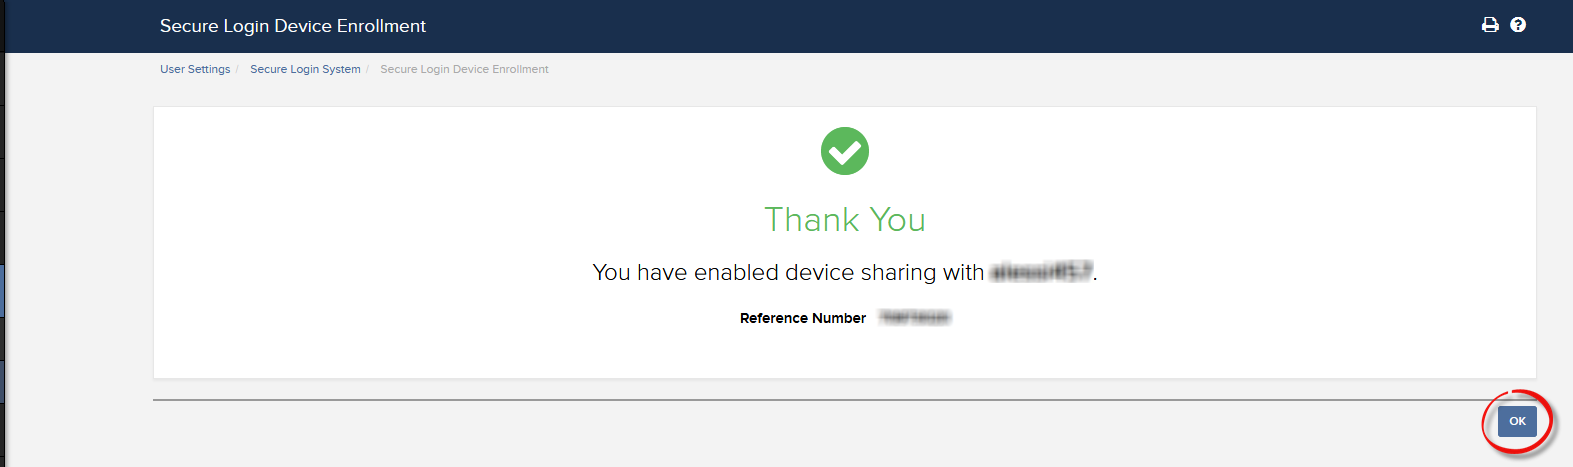
a. In the vast majority of cases your sharing request will be automatically and immediately approved, processed and enforced. In case the approval of our Compliance department is needed, your request will stay in a pending status until this step has been cleared.
b. Once the device sharing request has been processed, you could keep the redundant device/s in a safe place. In the future you might decide to cancel the device sharing and reactivate those devices instead. If you do not feel the need to store them, you can send them (only DSC+) back to us following the instructions contained on this page:
c. Here below you can see the most common error messages and their causes:
- Less secure device: This error is returned if you set up the less secure token as the one to be shared. Please identify the most secure device and share that one.

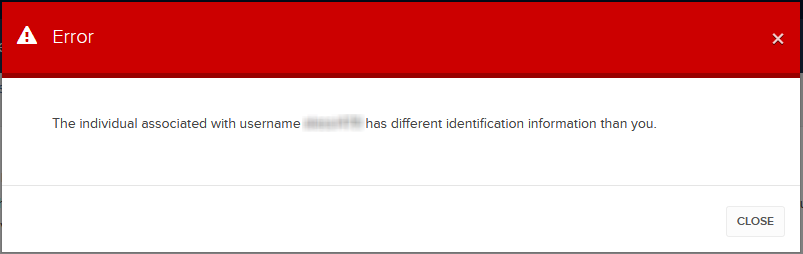
- Different identification information:
This error is returned if the identification data of the entities/individuals involved in the sharing does not match. If the users belong to different entities/individuals, please notice that the token sharing will NOT be possible by design.
If the users belong in fact to the same entity/individual, the mismatch could be due, for example, to an outdated identification document on record. In this case, you can contact our Client services to have the data rectified.
References:
- Overview of the Secure Login System: KB1131 or ibkr.com/sls
- Multiple Two-Factor Authentication System (M2FS): KB2895
- How to share the Security Login Device between two or more users: KB2481
- How to opt back into the Secure Login System: KB2545
- Security considerations following SLS opt-out: KB1198
- Are there any charges or expenses associated with the security devices? KB1861
- How to troubleshoot Client Portal Login Failures: KB1132
- How to troubleshoot Trading Platform Login Failures: KB1133
How to Transfer the TWS Layout Settings via USB or Network Drive
Overview:
The TWS layout settings can be saved on a USB or Network Drive, in order to import them from the same or from a different computer / TWS session. This article outlines the needed steps.
Please click one of the links below, according to your scenario:
B. I want to save my TWS settings on a USB or Network Drive and import them to a session with a different user
A. I want to save my TWS settings on a USB or Network Drive and import them to a session with the same user
1. Log in the Trader Workstation with the user whose layout settings you would like to export.
2. Click the top menu File > Layout Settings > Save Settings As...
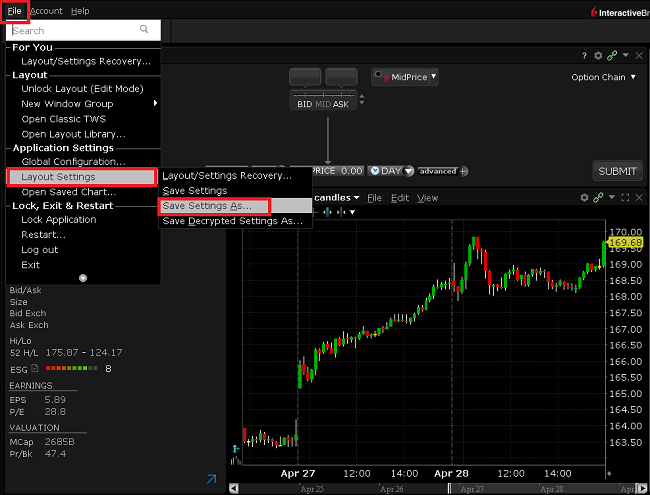
3. Expand the Look In drop-down and select where you want to save the file (e.g. USB or Network Drive). Use a file name which would be easy to identify (e.g. migrate) and click Save. The file will be saved with the extension '.xml'.
.png)
4. Proceed with the workflow, starting with step 5 in the following section.
B. I want to save my TWS settings on a USB or Network Drive and import them to a session with a different user
1. Log in the Trader Workstation with the user whose layout settings you would like to export.
2. Click the top menu File > Layout Settings > Save Decrypted Settings As...
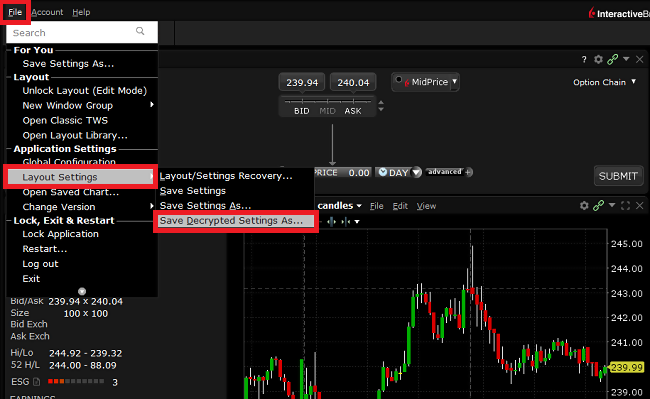
3. Take notice of the information about the file format and click Yes.

4. Expand the Look In drop-down and select where you want to save the file (e.g. USB or Network Drive). Use a file name which would be easy to identify (e.g. migrate) and click Save. The file will be saved with the extension '.xml'.
5. Close the TWS and log in again with the user which should import the layout (that can be a different computer).
6. Connect the USB or Network Drive to the computer.
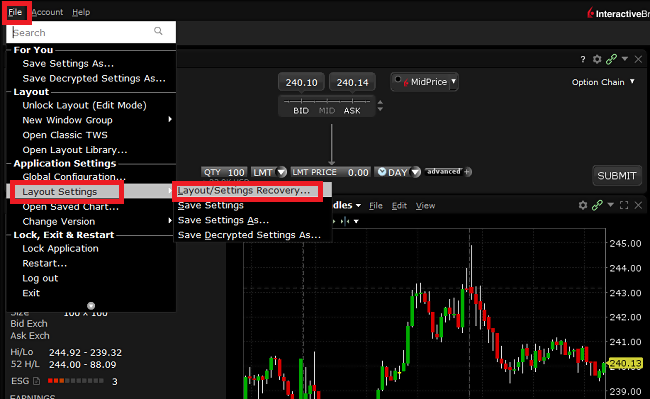
7. Click on the top menu File > Layout Settings > Layout/Settings Recovery...
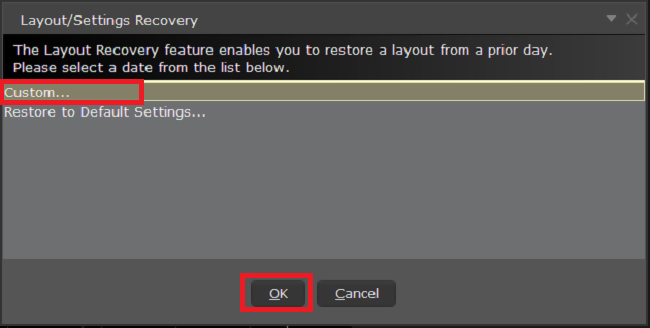
8. Select Custom... and click OK
9. Expand the Look In drop-down and select the drive where you previously saved the TWS settings file (e.g. USB or Network Drive). Select the settings file (e.g. migrate.xml) and click Open.
.png)
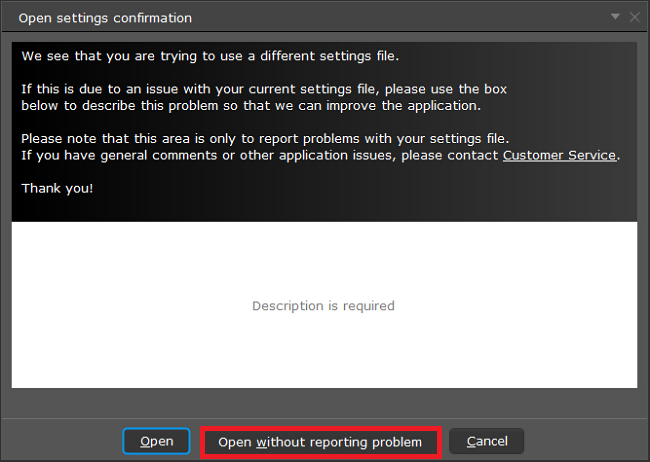
10. Click Open without reporting problem
11. Your TWS will automatically restart, applying the new layout settings.
Related articles
See KB3146 for instructions on overcoming the "Downloading settings from server failed" error
See KB2320 for instructions on transferring settings from one user to another
See KB2282 for instructions on how to transfer settings from one computer to another
How to install MobileTWS on BlackBerry OS10
Background:
Currently, Interactive Brokers does not offer a native IBKR Mobile app for the Blackberry 10 Operating System. Due to a recent partnership between Amazon and Blackberry, clients who own a Blackberry device running Blackberry 10 OS can install the Android version of the IBKR Mobile app directly from the Amazon Store.
Blackberry 10 OS Devices:
- Q5, Z3, Leap, Classic, Passport, Q10, Z10, Z30, P'9982, P'9983
*Please notice that these devices have limited hardware capabilities and this could negatively affect the performance of the IBKR Mobile app.
Installation
You can download the IBKR Mobile app on your Blackberry phone directly from the Amazon Appstore.
How to install IBKR Mobile from the Amazon App Store:
- On your Blackberry phone open the Amazon App Store
 app.
app. -
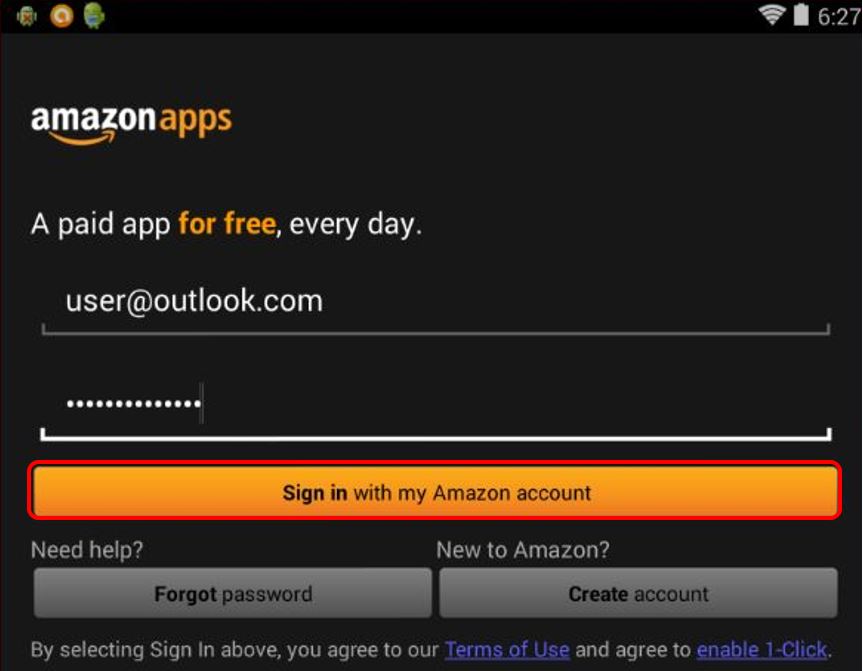
Enter your Amazon e-mail and password, and tap Sign in.
(If you don't have an Amazon account, tap Create a new Amazon account.)
-
Tap on the search bar at the top, type IBKR Mobile then tap Search.

-
Tap on IBKR Mobile from the search results and install.

5. Once installed, tap on the IBKR Mobile app from one of your home screens to launch it

How to transfer TWS settings from one computer to another
Overview:
This article applies to:
- Platform(s): Windows, Mac, Linux
- TWS Build(s): Build 959 and Above
Background:
The 'Store Settings on Server' feature stores the Trader Workstation (TWS) settings/configuration in the cloud and retrieve them at anytime from another computer. This allows you to transfer settings from the same user on two different machines, but not between different accounts/users.
How to upload your TWS settings to the server:
To transfer settings from one computer to another for the same username you will need to enable the option Use/store settings on server:
1. On the computer which currently has your settings, on the lower right of the login window, click on More Options >
2. Make sure the Use/store settings on server option is unchecked and login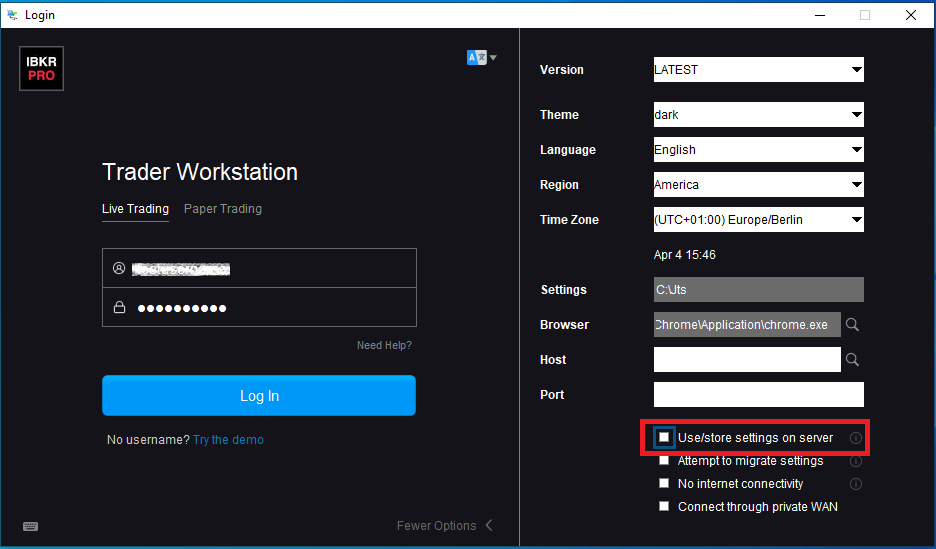
3. Once you are logged in, enable this function:
- If you are using the Classic layout, navigate to Edit >> Global Configuration >> Lock and Exit and check the box Use store settings on server
- If you are using the Mosaic layout navigate to File >> Global Configuration >> Lock and Exit and check the box Use store settings on server
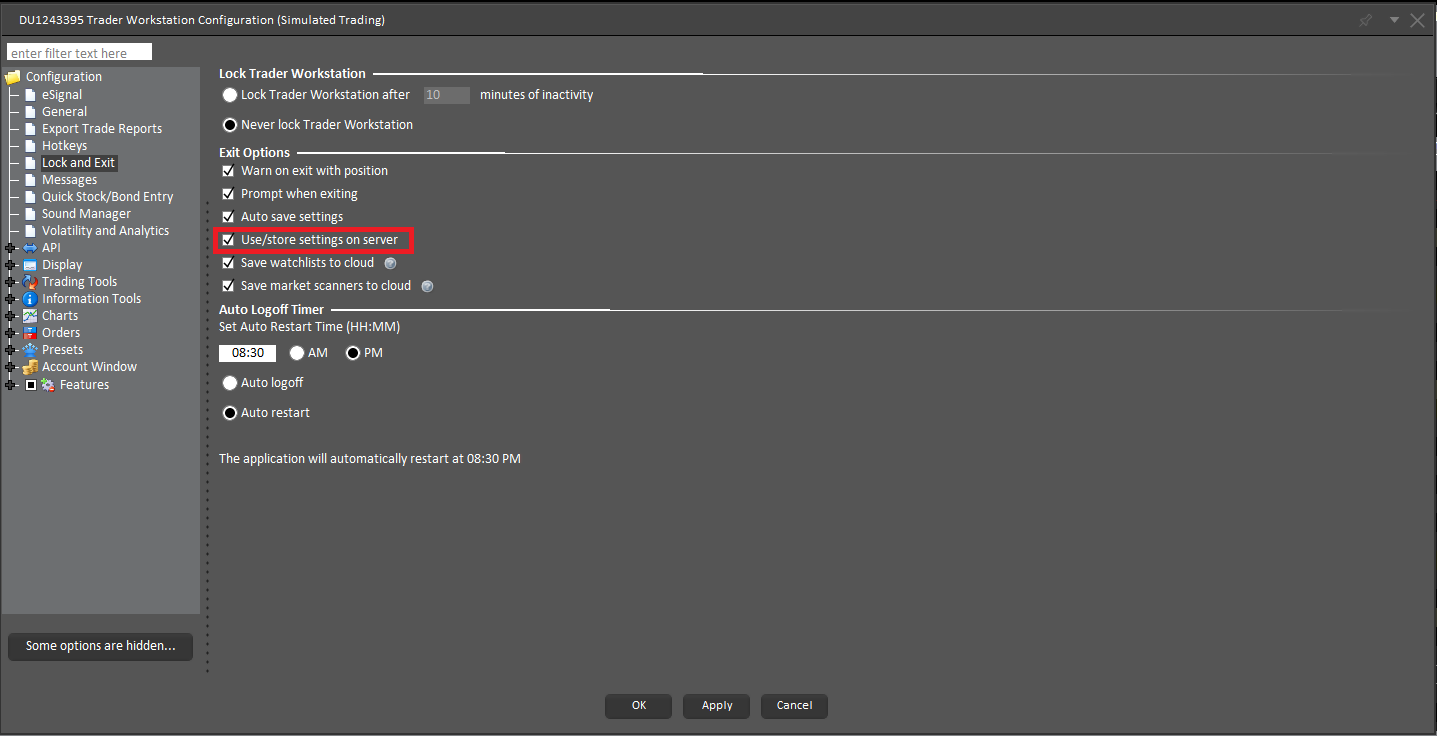
4. Select Apply and OK.
5. Click on File -> Save Settings.
6. To Exit the application navigate to File and Exit.
IMPORTANT NOTE: The above operation will only save one copy of the TWS settings on the server. The serve does not store any backup copies.
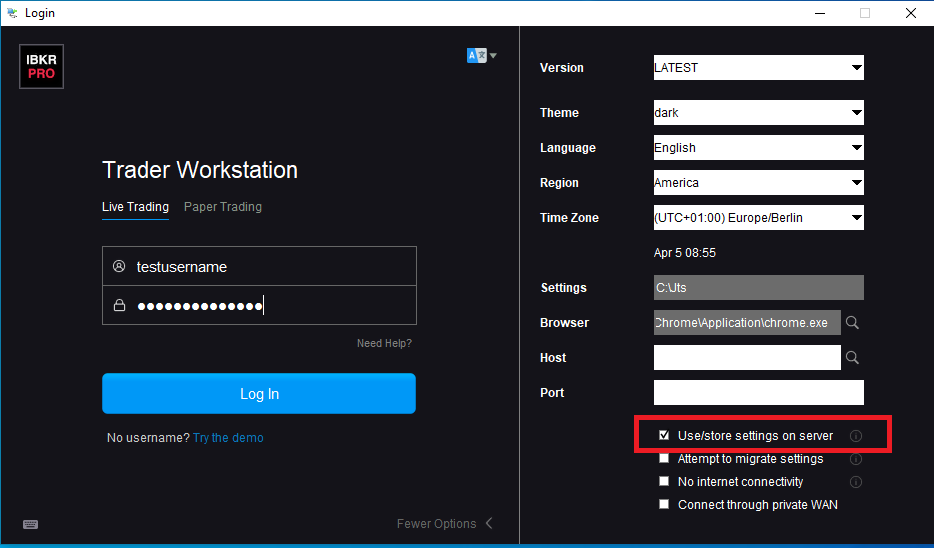
How to download your TWS settings from the server:
On any computer (on which you want to use the same settings as above): Login with the Use/store settings on server option checked on the login window. This will download the settings, which you previously saved on our server.
Related articles
See KB3146 for instructions on how to overcome the "Downloading settings from server failed" error
See KB2323 for instructions on how to restore TWS settings from external storage
See KB2320 for instructions on transferring settings from one user to another