Non ricevo i messaggi di testo (SMS) inviati da IBKR sul mio telefono cellulare
Background:
Una volta che il numero del tuo telefono cellulare sarà stato verificato nel Portale Clienti, dovresti essere subito in grado di ricevere messaggi di testo (SMS) inviati da IBKR direttamente sul tuo telefono. Questo articolo fornisce alcuni passi semplici per rilevare possibili errori nel caso in cui non sia possibile ricevere questi messaggi.
1. Attiva l’Autenticazione di IBKR Mobile (IB-KEY) tramite il dispositivo di sicurezza a 2 livelli.
Per evitare di avere problemi legati al telefono oppure agli operatori di rete mobile e allo scopo di ricevere messaggi da IBKR in maniera regolare, ti consigliamo di attivare il sistema di Autenticazione di IBKR Mobile (IB Key) sul tuo smartphone.
L’autenticazione dello smartphone tramite la IB Key fornita dalla nostra app IBKR Mobile funziona come dispositivo di sicurezza a 2 livelli, eliminando quindi il bisogno di ricevere codici di autenticazione tramite SMS quando accedi al tuo conto IBKR.
La nostra app IBKR Mobile è attualmente supportata dagli smartphone che hanno i sistemi operativi Android e iOS L’installazione, l’attivazione e le istruzioni per il funzionamento sono disponibili qui:
2. Riavvia il tuo telefono:
Spegni completamente il tuo telefono portatile per poi accenderlo nuovamente. Di solito questo basterà per iniziare a ricevere i messaggi di testo.
Ti segnaliamo che in alcuni casi, ad esempio nel caso in cui la copertura dell’operatore di telefonia mobile non sia quella tradizionale (quando si è all’estero), potresti non ricevere tutti i messaggi.
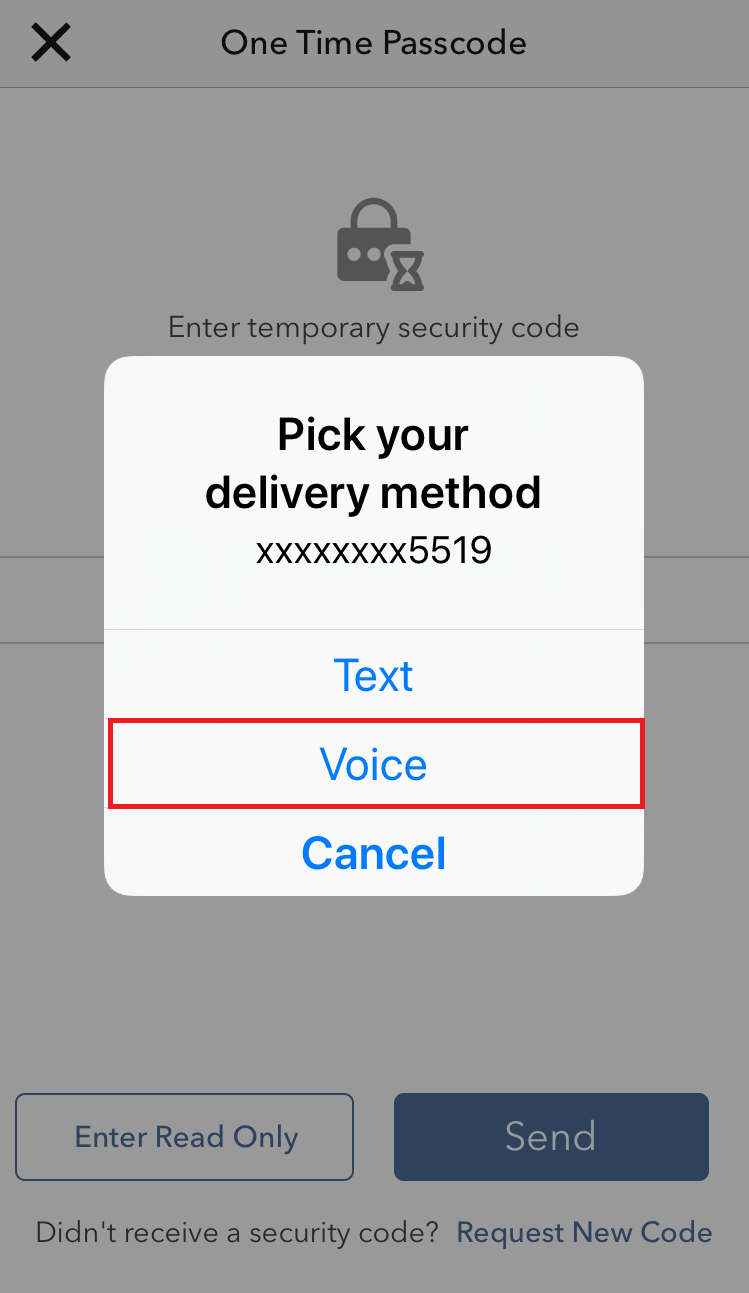
3. Usa l’opzione Chiamata vocale
Se non hai ricevuto il codice di accesso per l’autenticazione dopo aver riavviato il tuo telefono, potrai selezionare l’opzione “Voce”. Quindi riceverai il codice di autenticazione per l'accesso attraverso una chiamata automatica. Per maggiori istruzioni su come usare l’opzione Chiamata vocale sono contenute nel seguente articolo: IBKB 3396.
4. Verifica che il tuo operatore di telefonia mobile non stia bloccando la ricezione di SMS inviati da IBKR
Alcuni gestori di telefonia mobile bloccano automaticamente i messaggi di testo di IBKR in quanto li considerano erroneamente come messaggi spam o contenuti non richiesti. In base alla tua area geografica, in questa sezione troverai i servizi ai quali potrai rivolgerti per verificare se è stato applicato un filtro SMS al tuo numero di telefono:
Negli Stati Uniti:
- Tutti i gestori: Federal Trade Commission Registry
- T-Mobile: Le impostazioni per il blocco dei messaggi sono disponibili sul sito web di T-Mobile oppure direttamente sull’app T-Mobile.
In India:
- Tutti i gestori: Telecom Regulatory Authority of India
In China:
- Chiama direttamente il tuo gestore di telefonia mobile per sapere se utilizzano dei filtri per bloccare i messaggi di IBKR.
Riferimenti:
- Come accedere utilizzando l'autenticazione tramite SMS
- Panoramica del Sistema di Accesso Sicuro
- Informazioni e procedure relative ai dispositivi di sicurezza
- Autenticazione con IBKR Mobile
How to use Voice callback for receiving login authentication codes
Background:
Se hai attivato l'SMS come metodo di autenticazione a due livelli, potrai usare l'opzione detta "Voce" per ricevere i tuoi codici di autenticazione per l'accesso. Queso articolo illustra i passi necessari da compiere per selezionare l'opzione della chiamata vocale quando accedi alle nostre piattaforme.
Come utilizzare l'opzione chiamata vocale ("Voce")
Puoi selezionare l'opzione Voce se non ricevi il codice di autenticazione per l'accesso. Quindi riceverai il codice di autenticazione per l'accesso attraverso una chiamata automatica. Segui le istruzioni qui descritte in base alla piattaforma con la quale stai tentando di accedere.
Client Portal
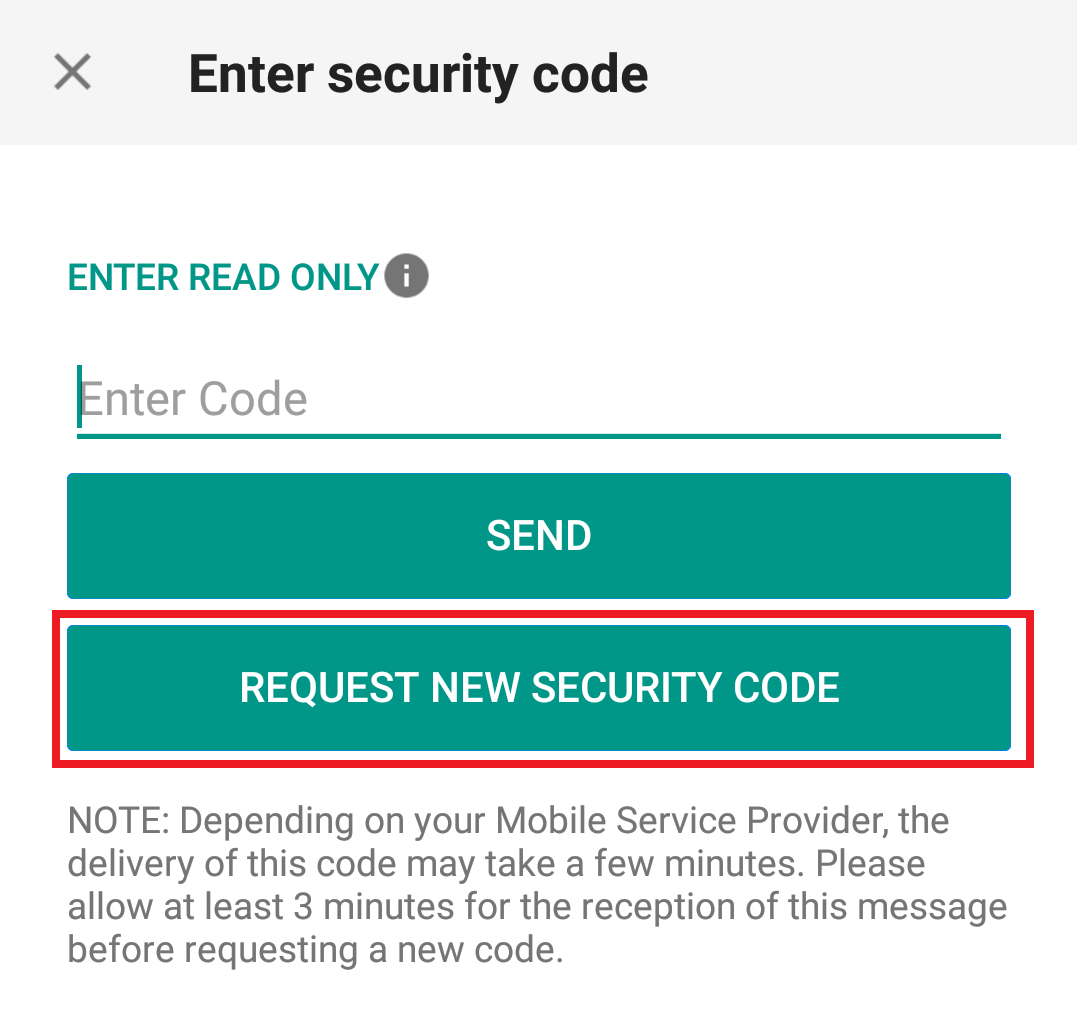
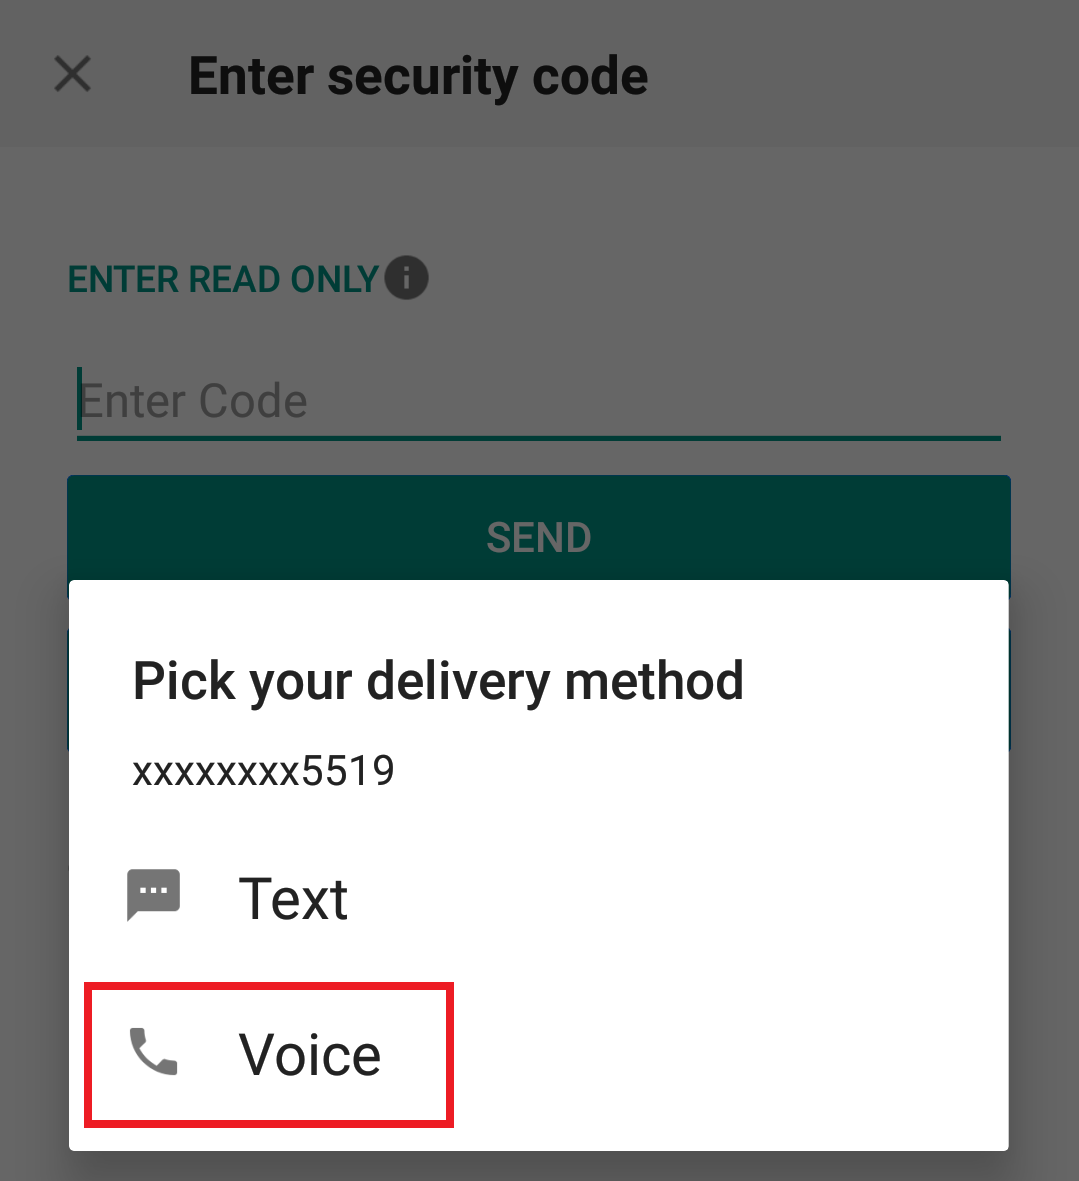
1. Clicca su "Non hai ricevuto il codice di sicurezza?"
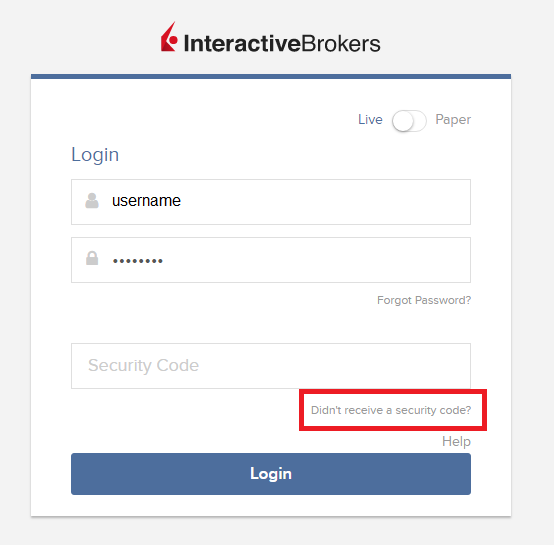
2. Tra le due opzioni, seleziona "Voce" e attendi la chiamata.
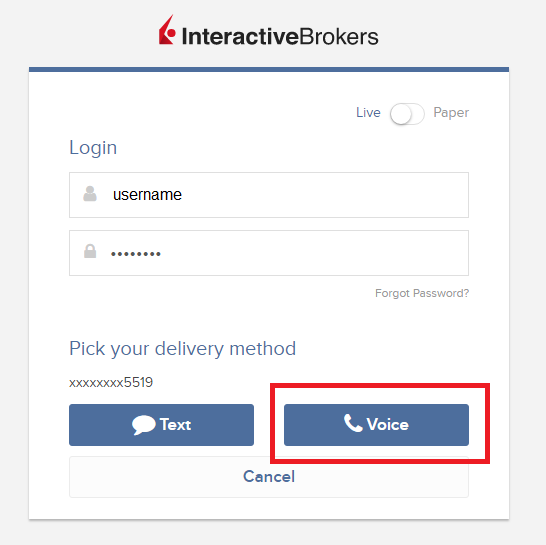
3. Dopo aver selezionato "Voce", dovresti ricevere una chiamata entro un minuto. Attendi la chiamata e cerca di avere il necessario per trascrivere il codice che ti verrà fornito durante la chiamata.
TWS
1. Clicca su "Richiedi un nuovo codice di sicurezza

2. Tra le due opzioni, seleziona "Voce" e clicca su OK. Quindi attendi la chiamata.
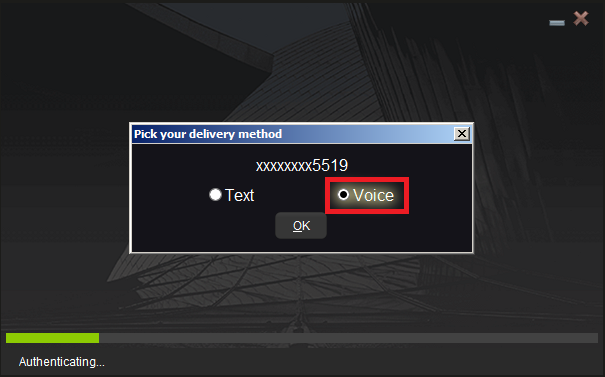
3. Dopo aver selezionato "Voce", dovresti ricevere la chiamata entro un minuto. Ti invitiamo ad attendere la chiamata e avere il necessario per trascrivere il codice che ti verrà fornito durante la chiamata.
Nota: La chiamata tramite "Voice" per TWS è disponibile solo per la versione BETA più recente.
IBKR Mobile - iOS
1. Clicca su "Richiedi un nuovo codice"
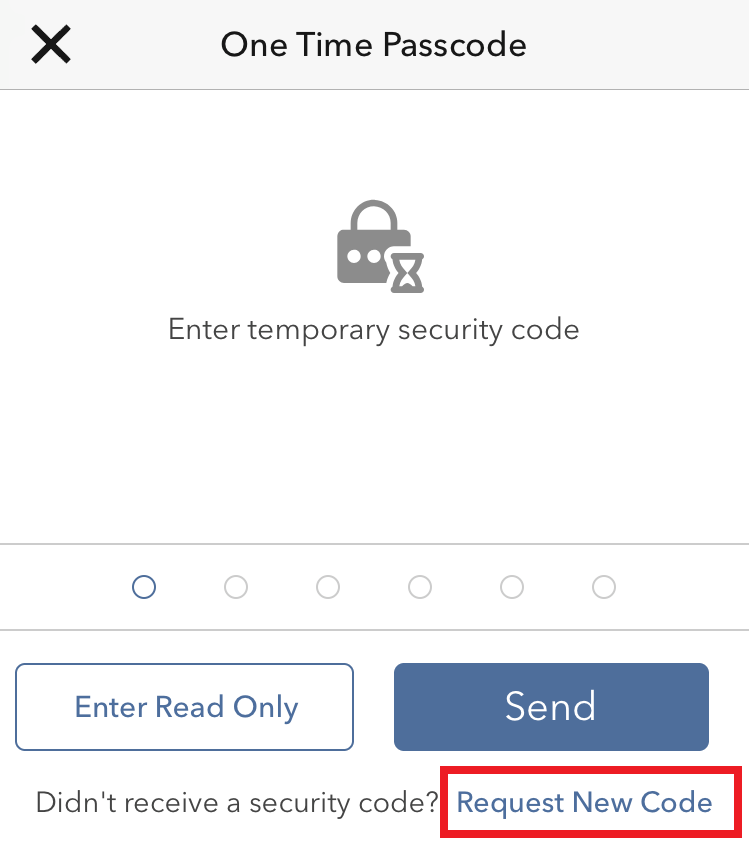
2. Tra le due opzioni, seleziona "Voice" e attendi la chiamata.
3. Dopo aver selezionato "Voce", dovresti ricevere la chiamata entro un minuto. Ti invitiamo ad attendere la chiamata e avere il necessario per trascrivere il codice che ti verrà fornito durante la chiamata.
IBKR Mobile - Android
1. Clicca su "Richiedi un nuovo codice"
2. Tra le due opzioni, seleziona "Voice" e attendi la chiamata.
3. Dopo aver selezionato "Voce", dovresti ricevere la chiamata entro un minuto. Ti invitiamo ad attendere la chiamata e avere il necessario per trascrivere il codice che ti verrà fornito durante la chiamata.
Riferimenti:
- Come accedere utilizzando l'autenticazione tramite SMS
- Panoramica del Sistema di Accesso Sicuro
- Informazioni e procedure relative ai dispositivi di sicurezza
- Autenticazione con IBKR Mobile
Come condividire un dispositivo di sicurezza
Overview:
IBKR consente agli individui di usare più nomi utente per un singolo conto o per conti distinti sotto la gestione di una persona. I clienti che non desiderano avere più dispositivi di sicurezza possono scegliere di confermare e condividere un solo dispositivo per tutti gli utenti collegati. I prerequisiti e la procedura per condividere i dispositivi sono elencati qui di seguito.
Nota: I clienti che utilizzano il sistema di Autenticazione IBKR Mobile (IB Key) non devono usare questa procedura di condivisione, in quanto il sistema di Autenticazione IBKR Mobile (IB Key) consente di abilitare più utenti direttamente dalla app IBKR Mobile (vedi il percorso menu: Autenticare -> Aggiungi utente).
Background:
Prerequisiti
La possibilità di condividere un dispositivo di sicurezza verrà garantita solo se tutti requisiti indicati qui di seguito verranno rispettati:
a) Gli utenti partecipanti appartengono alla stessa entità oppure a differenti entità ma con gli stessi dati di identificazione (data di nascita, cittadinanza, paese di residenza, tipo e numero di documento d’identificazione oppure numero della previdenza sociale per cittadini e residenti negli Stati Uniti).
b) Gli utenti partecipanti attualmente NON hanno un dispositivo di sicurezza temporaneo assegnato a loro (codice temporaneo, codice della Security Card online).
c) Il dispositivo di sicurezza offre il livello più alto di protezione deve essere condiviso. In caso i dispositivi, offrano lo stesso livello di protezione indipendentemente dal tipo specifico di strumento ritenuto idoneo. Puoi verificare il livello di sicurezza del tuo dispositivo nella tabella seguente:
|
Livello di sicurezza |
Nome del dispositivo |
Immagine del dispositivo |
| Livello massimo | Digital Security Card+ (DSC+) |  |
| Livello minimo | Security Code Card (SLS card) | 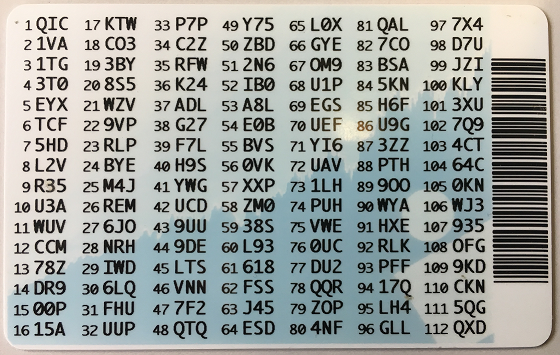 |
Procedimento:
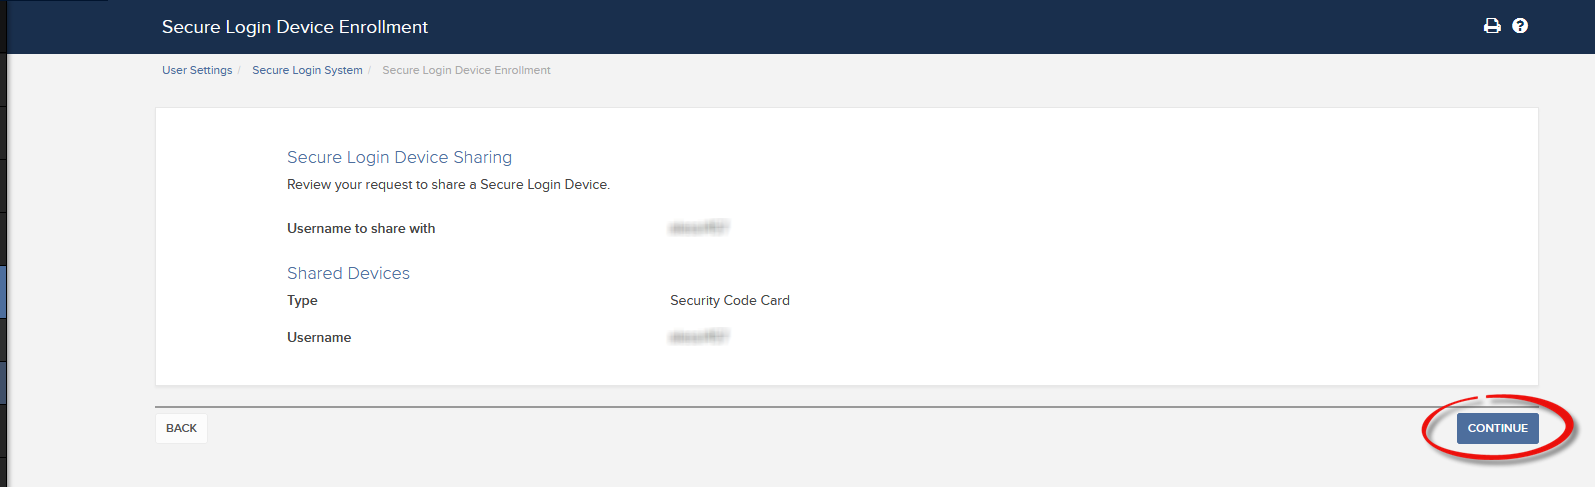
1. Fra i possibili candidati, identifica il dispositivo che offre il livello massimo di protezione e l’utente a cui appartiene. Chiameremo questo utente il proprietario del dispositivo
2.Accedi alla pagina del Portal Client con l’utente che deve fare la richiesta (NON il proprietario del dispositivo)
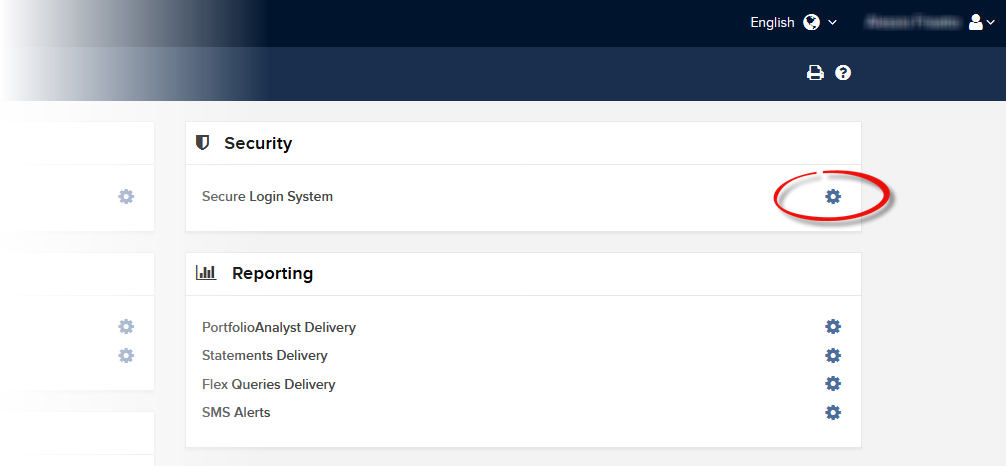
3. Clicca sull’icona del Menu in alto a sinistra e seleziona Impostazioni e poi Impostazioni Utente
(1).png)
4. Clicca sulla rotellina (Impostazioni) vicina a Sistema di Accesso Sicuro
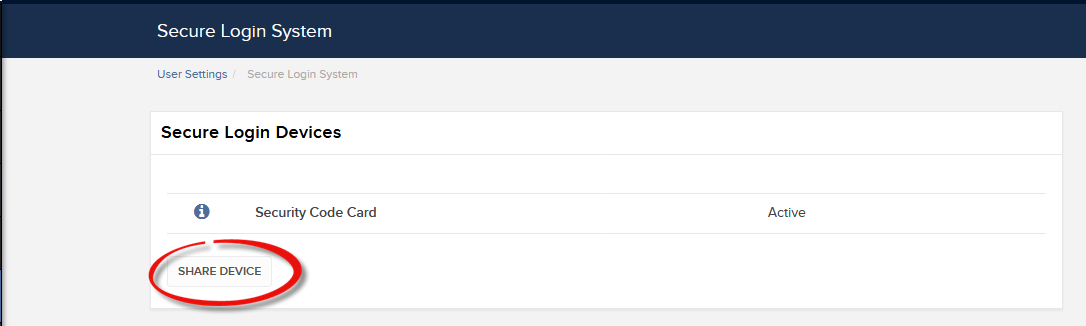
5a. Nel caso il tuo utente non abbia alcun dispositivo attivo, il sistema mostrerà il menu per l’iscrizione SAS. Seleziona l'elemento "Ho già accesso ad un Dispositivo per l’Accesso Sicuro con un nome utente diverso" e clicca su Continua
.png)
5b. Per qualunque altro caso il sistema mostrerà la lista dei dispositivi. Clicca su Condividi il Dispositivo per proseguire
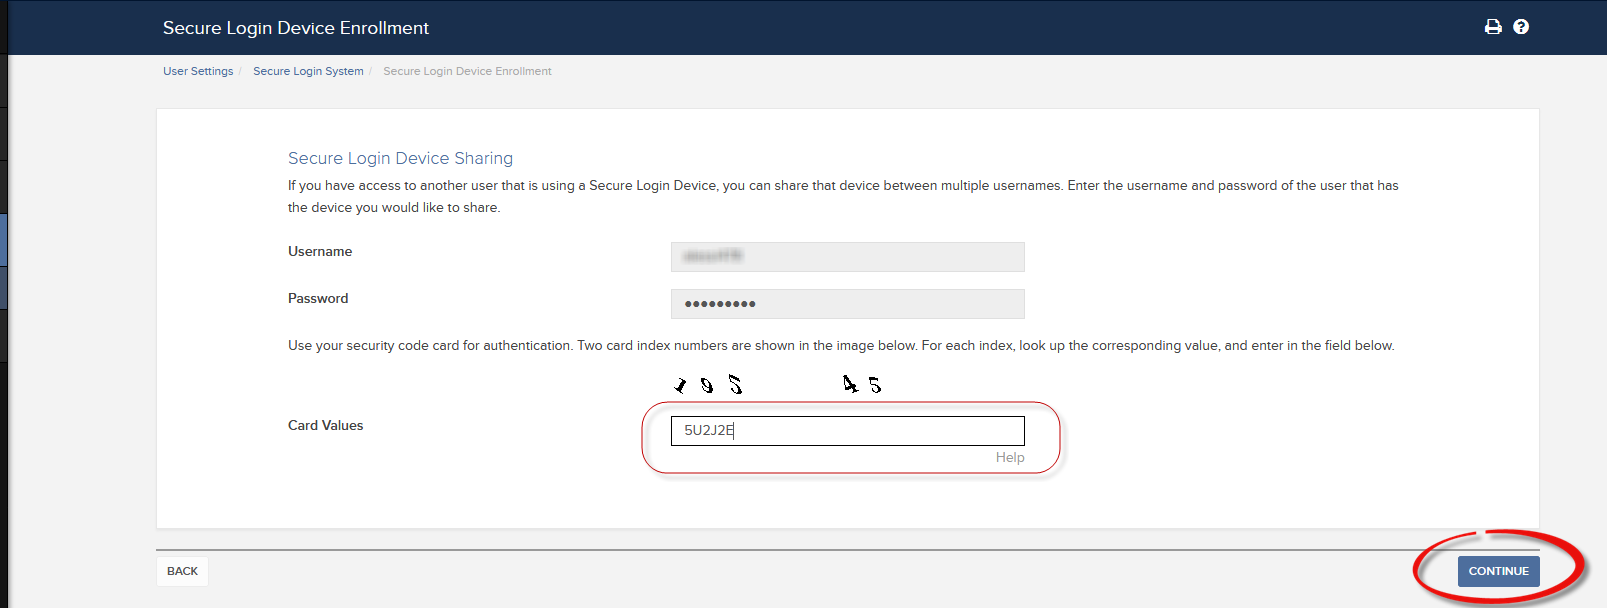
6. Inserisci le credenziali del proprietario del dispositivo identificato al punto 1. e clicca su Continua.
.png)
7. In base al dispositivo SAS da condividere, il sistema mostrerà un elemento di sicurezza (un codice Challenge oppure dei Numeri indice). Utilizzando il dispositivo SAS e, tramite l’elemento di sicurezza fornito dal sistema, puoi generare un codice di risposta. Inserisci il codice di risposta nel rispettivo corrispondente e clicca su Continua.
8. Una volta verificata la correttezza delle informazioni inserite, clicca su Continua.
9. Il sistema mostrerà lo status della tua richiesta (vedi la nota a. per maggiori dettagli). Clicca OK per completare la procedura.
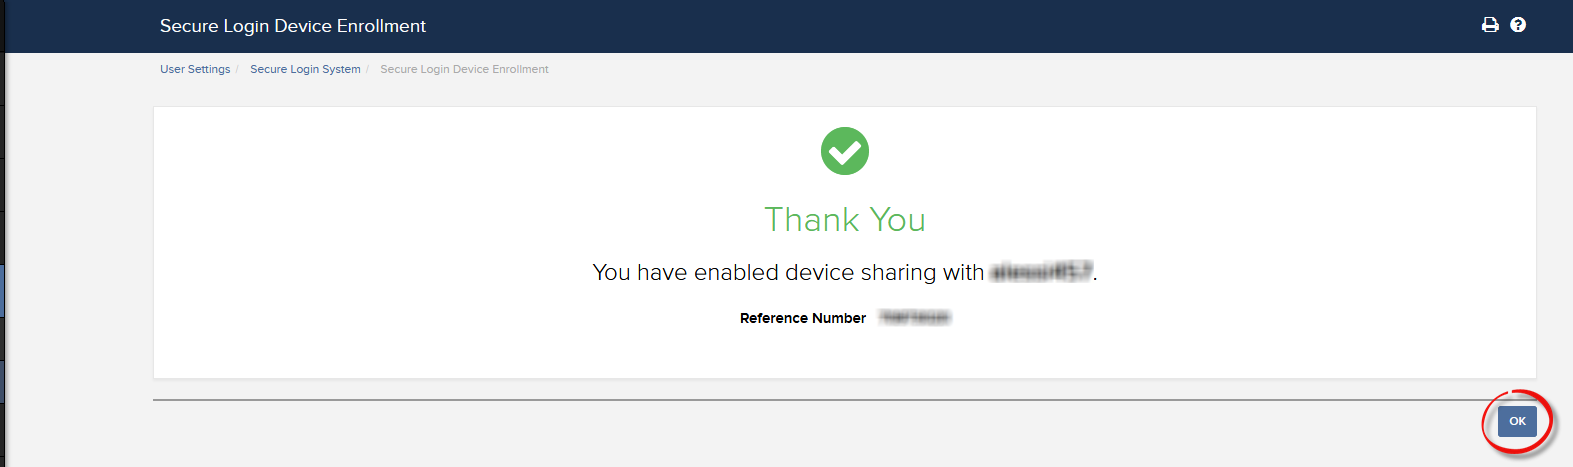
a. Nella maggior parte dei casi la tua richiesta di condivisione verrà approvata, processata ed eseguita in modo automatico e immediato. Nel caso in cui sia necessaria l’approvazione del nostro dipartimento di Conformità, la tua richiesta rimarrà in sospeso finché questo passaggio non verrà completato.
b. Una volta che la richiesta di condivisione del dispositivo sia stata processata, potrai il dispositivo/i che già hai in un posto al sicuro. In futuro potresti decidere di annullare la condivisione del dispositivo e riattivare i dispositivi che già hai. Se non senti il bisogno di conservarli puoi inviarli a noi (solo la DSC+) seguendo le istruzioni contenute in questa pagina:
c. Qui di seguito sono elencati alcuni dei messaggi di errore più comuni e le relative cause:
- Dispositivo meno sicuro: Questo errore compare se hai impostato il token meno sicuro come quello da condividere con gli altri. Ti preghiamo di identificare il dispositivo più sicuro e scegliere quello per la condivisione.

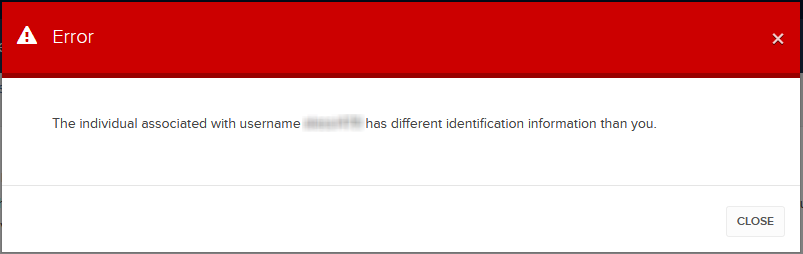
- Informazioni per l’identificazione differenti:
Questo errore compare se i dati per l’identificazione delle entità o delle persone singole coinvolte nella condivisione non coincidono con quanto presente. Se gli utenti appartengono a più entità/individui, ti ricordiamo che NON sarà possibile condividere il token.
Se gli utenti appartengono alla stessa entità/individuo, la mancata corrispondenza dei dati potrebbe essere dovuta, per esempio, ad un documento d’identificazione scaduto nei nostri registri. In questo caso potrai contattare Servizio Clienti e chiedere una rettifica dei dati.
Riferimenti:
- Panoramica del Sistema di Accesso Sicuro: KB1131 oppure ibkr.com/sls
- Sistema di Autenticazione multipla a due livelli: KB2895
- Come condividere un dispositivo per Accesso Sicuro tra 2 o più utenti: KB2481
- Come riattivare il sistema di accesso sicuro: KB2545
- Suggerimenti in materia di sicurezza per i clienti che scelgono di disattivare il sistema di accesso sicuro: KB1198
- Quali sono i costi legati ai dispositivi di sicurezza? KB1861
- Risoluzione dei problemi legati all'accesso a Client Portal: KB1132
- Risoluzione dei problemi legati all'accesso alle piattaforme di trading: KB1133
How to generate a ".har" file
Background:
When troubleshooting a non-trivial website issue, it is sometimes necessary for our Client Services team to obtain additional information about your browser communication. You may be asked record and provide a .har file. This file contains additional information about the network requests that are sent and received by your browser. Your browser can generate such file by recording content, timeline and status of HTTP/HTTPS requests and responses while the issue occurs.
In this article we explain how to generate a .har file. Please click on the browser that you use in the list below:
To generate the HAR file for Google Chrome:
1. Open Google Chrome and go to the page where the issue is occurring.
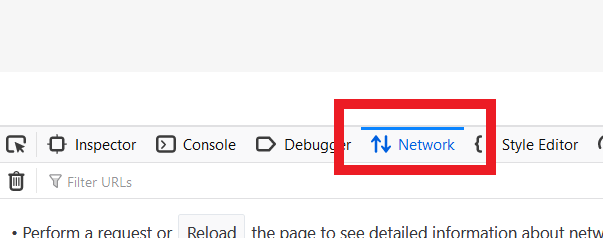
2. Press CRTL +SHIFT + I on your keyboard. Alternatively, click on the Chrome menu icon (three vertical dots at the top-right of your browser window) and select More Tools > Developer Tools
3. The Developers Tools opens as a docked panel at the side or bottom of Chrome. Select the tab Network (Figure 1.)
Figure 1.
.png)
4. Look for a round Record button in the upper left corner of the Developer Tools toolbar and make sure it is red. If it is grey, click it once to start recording or just press CTRL+E (Figure 2.)
Figure 2.

5. Activate the checkbox Preserve log (Figure 3.)
Figure 3.
.png)
6. Click the Clear button to clear out any existing logs. The Clear button has a stop icon and is located on the right of the Record button (Figure 4.)
Figure 4.
![]()
7. Reproduce the issue you are experiencing while the network requests are being recorded.
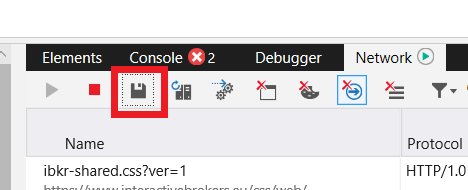
8. Once you have reproduced the issue, right-click anywhere on the list of recorded network requests, select Save all as HAR with Content, and save the file to a location of your preference on your computer (e.g. on your Desktop).
9. From the IBKR Client Portal, go to the Message Center and create a new Web Ticket (or use an existing one when applicable)
10. Within the Web Ticket, attach the .har file previously generated. In case the IBKR Client Services has provided you with a reference ticker number or representative name, please add this information to the ticket body.
11. Submit the Web Ticket
To generate the HAR file for Firefox:
1. Open Firefox and go to the page where the issue is occurring
2. Press F12 on your keyboard. Alternatively click the Firefox menu icon (three horizontal parallel lines at the top-right of your browser window), then select Web Developer > Network
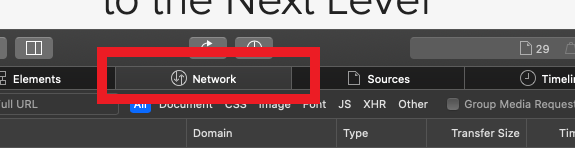
3. The Developers Network Tools opens as a docked panel at the side or bottom of Firefox. Select the tab Network (Figure 5.)
Figure 5.
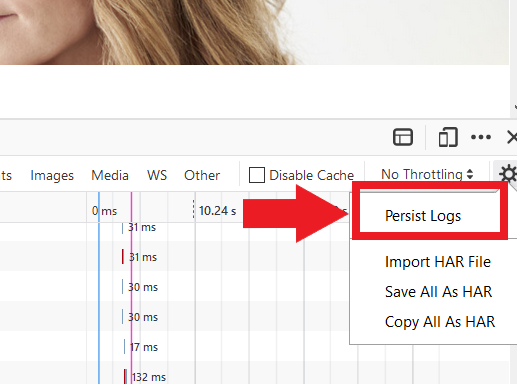
4. Activate the checkbox Persists logs (Figure 6.)
Figure 6.
5. Reproduce the issue you are experiencing. The recording of the network request starts automatically.
6. Once you have reproduced the issue, right-click anywhere on the list of recorded requests and select Save All As HAR
7. Save the file to a location of your preference on your computer (e.g. on your Desktop)
8. From the IBKR Client Portal, go to the Message Center and create a Web Ticket (or use an existing one when applicable)
9. Within the Web Ticket, attach the .har file previously generated. In case the IBKR Client Services has provided you with a reference ticker number or representative name, please add this information to the ticket body
10. Submit the Web Ticket
To generate the HAR file for Microsoft Edge:
1. Open Edge and go to the page where the issue is occurring.
2. Press F12 on your keyboard. Alternatively click the Edge menu icon (three horizontal dots at the top-right of your browser window), then select More Tools > Developers Tools
3. Click the Network tab (Figure 10.)
Figure 10.
.png)
4. Reproduce the issue that you were experiencing before, while the network requests are being recorded.
5. Once done click the floppy disk icon (Export as HAR) or press CTRL+S (Figure 11.)
Figure 11.
6. Provide a filename and a location of your preference on your computer (e.g. on the Desktop). Then click the Save button
7. From the IBKR Client Portal, go to the "Message Center" and create a Web Ticket (or use an existing one when applicable)
8. Within the Web Ticket, attach the .har file previously generated. In case the IBKR Client Services has provided you with a reference ticker number or representative name, please add this information to the ticket body.
9. Submit the Web Ticket
To generate the HAR file for Safari:
Note: Before generating the HAR file, make sure you can see the Develop menu in Safari. If you do not see this menu, click on the menu Safari, choose Preferences, go to the tab Advanced and activate the checkbox next to Show Develop menu in menu bar
1. Open the Develop menu and select Show Web Inspector or press CMD+ALT+I
2. Click the Network tab (Figure 12.)
Figure 12.
3. Activate the checkbox Preserve log (Figure 13.)
Figure 13.
.png)
4. Click on the icon Export (or press CMD+S), provide a filename and a location of your preference on your computer (e.g. on the Desktop) and save the .har file
5. From the IBKR Client Portal, go to the "Message Center" and create a Web Ticket (or use an existing one when applicable)
6. Within the Web Ticket, attach the web archive file previously generated. In case the IBKR Client Services has provided you with a reference ticker number or representative name, please add this information to the ticket body.
7. Submit the Web Ticket
How to use Voice callback for receiving login authentication codes
Background:
If you have SMS enabled as two-factor authentication method, you may use Voice callback to receive your login authentication codes. This article will provide you steps on how to select voice callback when logging in to our platforms.
How to use Voice callback
You may select Voice if you do not receive your login authentication code. You will then receive your login authentication code via an automated callback. Follow the instructions below, depending on which platform you are trying to login to.
Client Portal
1. Click on "Didn't receive a security code?"
2. From the two options, select "Voice" and wait for the callback.
3. After selecting Voice, you should receive the callback within a minute. Please wait for the callback and be ready to write down the code that will be provided over the callback.
TWS
1. Click on "Request new Security Code"
2. From the two options, select "Voice" and click on OK. Then wait for the callback.
3. After selecting Voice, you should receive the callback within a minute. Please wait for the callback and be ready to write down the code that will be provided over the callback.
Note: Voice callback for the TWS is only available in the LATEST and BETA version.
IBKR Mobile - iOS
1. Click on "Request New Code"
2. From the two options, select "Voice" and wait for the callback.
3. After selecting Voice, you should receive the callback within a minute. Please wait for the callback and be ready to write down the code that will be provided over the callback.
IBKR Mobile - Android
1. Click on "Request New Security Code"
2. From the two options, select "Voice" and wait for the callback.
3. After selecting Voice, you should receive the callback within a minute. Please wait for the callback and be ready to write down the code that will be provided over the callback.
References:
- How to login using SMS authentication
- Overview of Secure Login System
- Information and procedures related to Security Devices
- IBKR Mobile Authentication
IBKR Mobile Authentication (IB Key) Use Without Notifications
In case your smartphone is unable to receive IBKR Mobile notifications, you can still complete the login process using the IBKR Mobile Authentication (IB Key) Challenge/Response method, described on the following pages (according to your device operating system):
The same information applies to you if your phone has no Internet connectivity (you are in roaming, out of coverage, without an active mobile data plan, etc.)
If your smartphone is unable to receive IBKR Mobile notifications despite having Internet connectivity, we recommend you to perform the steps outlined in the IBKR Knowledge Base.
TWS / IB Gateway and their interaction with Proxy servers
Table of contents
Configuration instructions
- Can the TWS / IB Gateway operate through a Proxy server, and how?
- If I use a SOCKS Proxy server, do I need to configure the TWS / IB Gateway?
- If I use a SOCKS Proxy server, do I need to configure the client machines where TWS / IB Gateway runs?
- If I use a Web (HTTP) Proxy server, do I need to configure the TWS / IB Gateway?
- What alternatives do I have in case I cannot implement a proxy solution on my network?
Common issues
Technical Background
Configuration instructions
1. Can the TWS / IB Gateway operate through a Proxy?
Upon start-up and during the run-time, the TWS / IB Gateway must establish and maintain direct network connections to our gateways and market data servers1. Such connections are created from random local TCP ports (above 1024) and are directed to TCP ports 4000 and TCP 4001. Since those are not HTTP connections, they cannot be serviced by a Web (HTTP) Proxy. They can only be serviced by a SOCKS Proxy.
From within the TWS interface, you can access several external services, such as IBKR Client Portal, Statements, Contract details, Bond Search, etc. Those services, being web-based, can be accessed through a Web (HTTP) Proxy (see section 6 for details and configuration) or through a SOCKS Proxy (see sections 4. and 5. for details and configuration).
2. If I use a SOCKS Proxy server, do I need to configure the TWS / IB Gateway?
The TWS / IB Gateway does not contemplate an option for SOCKS proxy forwarding. Therefore, it does not have a place where an explicit SOCKS Proxy host/port can be configured. This does not mean that the TWS / IB Gateway cannot work with a Proxy. It simply means that the TWS / IB Gateway is unaware of the underlying SOCKS proxy setup (proxy-agnostic).
Important Note: While it is impossible for us to determine whether a Proxy is enabled on your network, we assure you that all IBKR platforms, including the TWS, do not impact nor influence your network configuration.
3. If I use a SOCKS Proxy server, do I need to configure the client machines where TWS / IB Gateway runs?
The connections started by the TWS / IB Gateway can be redirected to a SOCKS (Application) Proxy through a specific client machine setup. We mention some of them below. Please note that the final decision is yours and none of the below suggestions can be recommended by us as best adapted to your setup and requirements.
3a. Using a Proxy Client software installed on the client machine where TWS / IB Gateway is running
With this setup, the Proxy client will intercept the connections (not only HTTP but for other ports as well) initiated by the TWS / IB Gateway and redirect them to a SOCKS proxy server. The typical benefits of a transparent proxy include a standard enterprise configuration where all clients routed to the Internet will always be filtered and protected no matter what the end users do, or change, on their machines and the added benefit of reduction in typical user’s client-proxy configuration troubleshooting.
3b. Using a so-called Proxifier
This configuration is very similar to the one at point 5a with the only difference that the Proxifier software can be set to redirect to a Proxy all the requests started by a specific process (e.g., C:\Jts\tws.exe; C:\JTS\ibgateway\XYZ\ibgateway.exe), hence instating a process level packet forwarding instead of a port level forwarding. This setup allows handling environments where different proxy servers are used for different applications or where you would like to address a specific application requirement without modifying/disrupting the connectivity schema for other software installed. The advantage of this solution is minimal maintenance since the connectivity schema is bound to the process and not to the hosts/ports.
3c. Using specific network routing on a client machine
With this setup, you can modify the client machine standard network routes, adding new ones in order to forward packets with specific destinations (e.g., Order routing and Market Data servers1) to a different gateway.
This gateway will then be in charge of routing those requests to the destination hosts. This solution has as well the benefit of not modifying/disrupting the connectivity schema for other software installed but usually requires more maintenance on the gateway and on the client machine in case the IP of the destination servers are changed or in case new servers are added.
4. If I use a Web (HTTP) Proxy server, do I need to configure the TWS / IB Gateway?
If the Workstations on your local network access the Web content through a Web (HTTP) Proxy, you need to specify the Web Proxy IP Address and port. To do this, click More Options at the bottom of the TWS Login Screen, and enter your Proxy server details in the fields Host and Port (see Figure 1 below). The same fields are present in the IB Gateway Login Screen.
Figure 1.
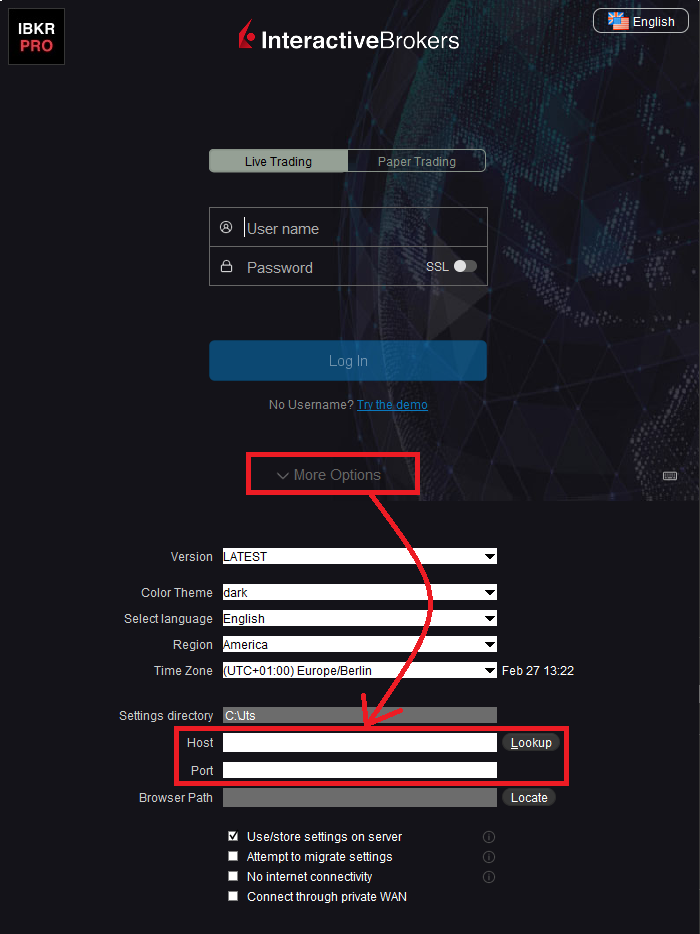
The Web Proxy you set there will ONLY be used to fetch the web content accessible from within the TWS (e.g., Client Portal, Statements, Product Details, etc.)
5. What alternatives do I have in case I cannot implement a proxy solution on my network?
In this case, you might orient yourself towards a different type of access to the IBKR infrastructure, which includes a special connection type and a FIX/CTCI engine setup. This setup would, on the other hand, have different requirements in terms of commissions2.
Common Issues
6. What happens if the proxy configuration on your computer is wrong or outdated?
Occasionally, third-party software, even if already uninstalled, may leave behind a SOCKS proxy configuration on your computer. This may also happen if your computer has been infected with malware. In such cases, the proxy server, although configured, is non-existent or not accessible on the network. In such scenarios, the TWS will show an error message (e.g., No Internet Connectivity) and/or start the "Connection attempt #" loop upon login. The same will happen if the Proxy server exists, but has not been correctly configured on the client machines.
6a. How can I correct the proxy configuration if wrong?
When applicable, we recommend you always consult the IT / Networking team of your company first and ask for guidance.
If you are autonomously managing your network, please follow the instructions below according to the Operating System of your machine/s:
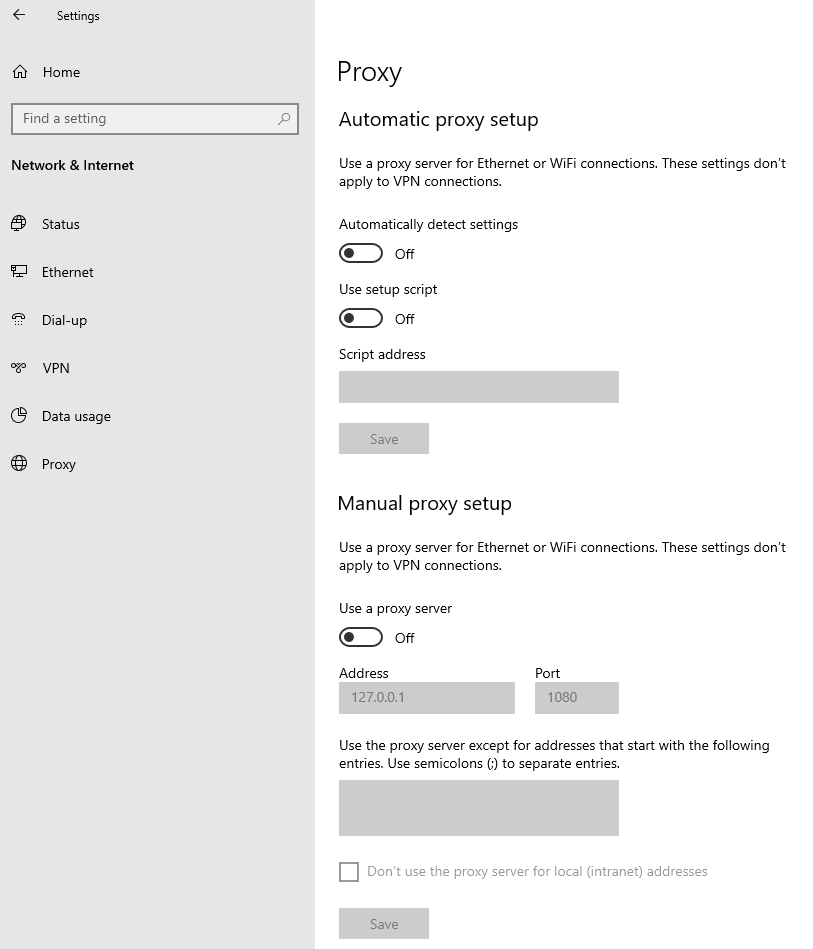
Windows
W.1 Press CTRL+S to open the Windows search
W.2 Type Proxy Settings and press Enter
W.3 If no Proxy is present on your network, make sure the switch "Use a proxy server" is deactivated (see Figure 2 below). If a Proxy server is active on your network, make sure the Address (or hostname) and Port are correctly defined.
Figure 2.
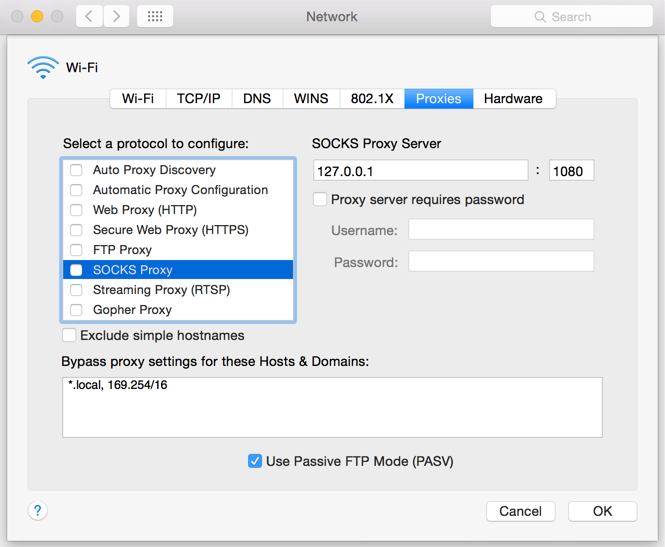
Mac
M.1 Click on the Apple icon at the top left corner of the screen and select System Preferences
M.2 Click on Network
M.3 Select the Network connection you are using to access the Internet (e.g. Wi-Fi) and click on it
M.4 Click on the Advanced button and then on the Proxies tab
5. If no proxy is present on your network, make sure all the checkboxes (SOCKS Proxy, Web Proxy, Secure Web Proxy) are deactivated (see Figure 3 below). If a Proxy is present on your network, ensure the Protocol, Address (or hostname) and Port are correct.
Figure 3.
7. You are using Public proxies and proxy chains to hide your presence or identity
There are public proxy and proxy chain services purposed to disguise or hide the identity and the activity of the subscriber or to bypass regional restrictions. One of the most famous services is the "Tor" network.
While those services may not necessarily be used for criminal purposes, they render subscriber traceability very difficult when not impossible. Since IBKR is obliged by the financial industry regulators to maintain records of trading activities and trade initiators, we do not allow our clients to reach our systems while using an anonymizing service. If you are using such a service, your TWS connection attempts will be automatically rejected by our gateways.
Technical Background
A proxy server usually acts as a gateway and as a barrier between your local network and the Internet. The proxy listens for outgoing connection requests from the internal workstation/s and forwards them to the desired target host or service on the Internet. When the target replies to such requests, the proxy routes the incoming responses back to the internal workstation/s that initiated the process.
Being the proxy, the only machine of your network actually accessing the Internet, it prevents the other machines and the internal segment of your network (LAN) from being accessible by external actors and hence from being exposed to threats and intrusion attempts.
Additionally, a proxy server can offer a variety of other services, such as web content caching and filtering.
9. Which types of Proxy servers are commonly used and where?
Proxy servers are commonly found within enterprise-grade networks. In the vast majority of cases, proxies are not used by individuals since private broadband connections are established through consumer-grade routers that already offer built-in proxy/firewall solutions. An exception is represented by public proxy or proxy chains discussed in detail in the section You are using Public proxies and proxy chains to hide your presence or identity
There are two main types of Proxy servers:
The HTTP (Hypertext Transfer Protocol) defines the rules and the standards for fetching Web content from a Web server and rendering such content on your Web Browser.
A Web Proxy handles only the routing of HTTP requests and HTTP responses. Those requests are transparently generated and sent by your browser whenever you access a Web page. Such requests are normally sent using specific ports (TCP 80 and TCP 443). Hence a Web Proxy usually listens for outgoing HTTP requests coming from your internal network (LAN) only on the TCP ports mentioned above.
SOCKS (Socket Secure) Proxies are designed to handle any type of traffic (not only HTTP/S traffic), generated by any protocol or program (including Trader Workstation).
Notes
1. More information about the servers accessed by the TWS is available in IBKB2816.
2. For an overview of the different special connection options and related requirements, please click here.
For an overview of the FIX infrastructure, please click here.
How to fix the "Cannot create ... file" error during TWS installation on MacOS
Background:
The filesystem permissions are controlled by your machines operating system. One of their functions is to secure your files, preventing unauthorized access or undesired modifications to the system and to your personal data.
Some software on your computer may modify or override the permissions assigned by the operating system. Under certain circumstances, this prevents the TWS installer from accessing the folder where the application core files have to be created (/users/youruser/home/Applications). In such cases, the TWS installation usually displays the error "Cannot create ... file. Shall I try again?"
In this article we explain how to reset the filesystem permission of the "Applications" folder located under your user home folder in order to allow a smooth run of the TWS installation.
Procedure:
1. On your keyboard, press ⌘CMD + ⇧Shift +H to open your home folder
Figure 1

2. Select the folder "Applications" within your home folder and press ⌘CMD + I to open the Info panel
Figure 2

2. At the bottom right of the panel, click on the padlock
Figure 3
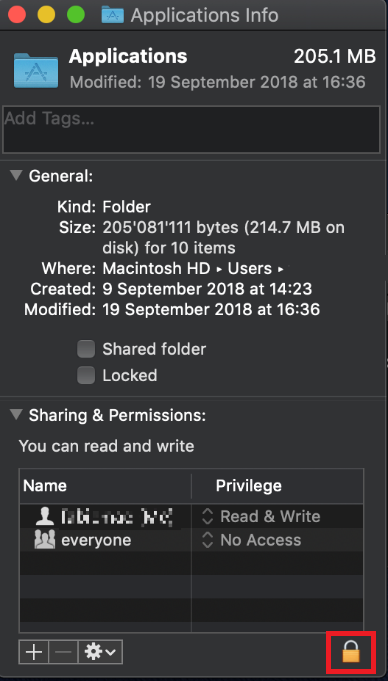
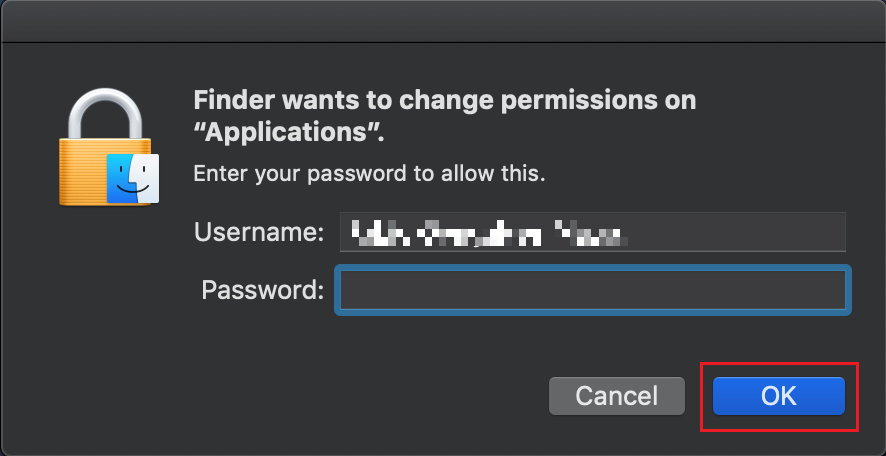
3. To unlock the permissions panel, enter your MacOS credentials and click OK
Figure 4
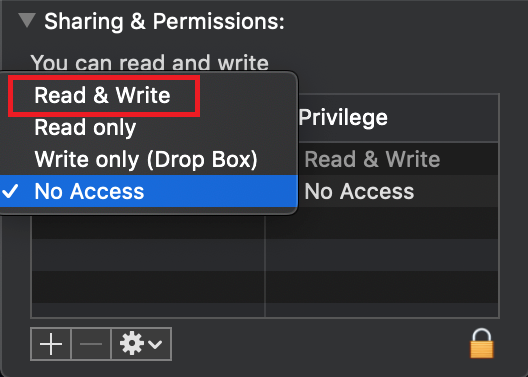
4. In the line correspondent to "everyone", click on "No Access" (Figure 5) and then select "Read & Write" (Figure 6)
Figure 5 Figure 6
.png)
5. Click on the icon bellow the permissions panel and select “Apply to enclosed items..."
Figure 7
.png)
6. Now run the TWS installer and click on Next> until you complete the installation
Figure 8
.png)
7. Once the installation has completed successfully, repeat the previous steps from 1. to 5. setting back the permissions of “everyone” to “Read Only” to revert your changes to the initial status
I am not receiving text messages (SMS) from IBKR on my mobile phone
Background:
Once your mobile phone number has been verified in the Client Portal, you should immediately be able to receive text messages (SMS) from IBKR directly to your mobile phone. This article will provide you with basic troubleshooting steps in case you are unable to receive such messages.
1. Activate the IBKR Mobile Authentication (IB Key) as 2-Factor security device
In order to be independent of wireless/phone carrier-related issues and have a steady delivery of all IBKR messages we recommend to activate the IBKR Mobile Authentication (IB Key) on your smartphone.
The smartphone authentication with IB Key provided by our IBKR Mobile app serves as a 2-Factor security device, thereby eliminating the need to receive authentication codes via SMS when logging in to your IBKR account.
Our IBKR Mobile app is currently supported on smartphones running either Android or iOS operating system. The installation, activation, and operating instructions can be found here:
2. Restart your phone:
Power your device down completely and turn it back on. Usually this should be sufficient for text messages to start coming through.
Please note that in some cases, such as roaming outside of your carrier's coverage (when abroad) you might not receive all messages.
3. Use Voice callback
If you do not receive your login authentication code after restarting your phone, you may select 'Voice' instead. You will then receive your login authentication code via an automated callback. Further instructions on how to use Voice callback can be found in IBKB 3396.
4. Check whether your phone carrier is blocking the SMS from IBKR
Some phone carriers automatically block IBKR text messages, as they are wrongly recognized as spam or undesirable content. According to your region, those are the services you can contact to check if a SMS filter is in place for your phone number:
In the US:
- All carriers: Federal Trade Commission Registry
- T-Mobile: Message Blocking settings are available on T-Mobile web site or directly on the T-Mobile app
In India:
- All carriers: Telecom Regulatory Authority of India
In China:
- Call your phone carrier directly to check whether they are blocking IBKR messages
References:
- How to login using SMS authentication
- Overview of Secure Login System
- Information and procedures related to Security Devices
- IBKR Mobile Authentication
Documentazione relativa agli host e alle porte di IBKR
Background:
TWS si connette ai server di IBKR tramite le porte 4000 e 4001, se viene utilizzato il protocollo SSL. Non verranno usate altre porte. Se stai usando un server proxy, deve essere un sistema trasparente con entrambe le porte di ingresso e uscita (inbound e outbound) aperte. In questo modo TWS potrà funzionare correttamente.
Di seguito sono elencati tutti i nostri gateway, insieme agli indirizzi host che potrebbero essere utilizzati da TWS quando utilizzi i nostri servizi. Ti invitiamo a consentire l'accesso a tali host.
Il metodo più semplice per verificare se la tua connessione necessita di una configurazione particolare, o è stata configurata correttamente, è quello di consultare la pagina di IBKR dedicata al Test, che fornisce un test dinamico della tua connessione di rete a fronte dei nostri server dei dati di mercato e trading. Se l'esito ricevuto è "Success" ("operazione riuscita"), non sarà necessario fare altre operazioni. Se l'esito è "Failure" ("operazione non riuscita"), suggeriamo di aggiungere un'eccezione per i nuovi host alla configurazione della tua rete oppure controllare le tue modifiche.
Nota: Se il tuo network utilizza un browser proxy, la pagina del test potrebbe produrre dei falsi positivi. In questo caso oppure se non si è certi della configurazione della propria rete, è necessario rivolversi agli amministratori di rete, i quali hanno la possibilità di effettuare le verifiche ping e telnet degli host indicati di seguito per confermare la conformità ai requisiti di connettività.
Specs:
|
PORTALE CLIENTI e SITO WEB |
||||
|
AREA/PRODOTTO |
SERVER (HOST) |
PORTE1 |
||
|
SITO WEB IBKR – AMERICA |
443 |
|||
|
SITO WEB IBKR – Canada |
443 |
|||
|
SITO WEB IBKR – UK |
443 |
|||
|
SITO WEB IBKR – INDIA2 |
443 |
|||
|
SITO WEB IBKR – GIAPPONE2 |
443 |
|||
|
SITO WEB IBKR – HONG KONG2 |
www.interactivebrokers.com.hk | 443 | ||
|
SITO WEB IBKR – CINA2 |
www.ibkr.com.cn | 443 | ||
|
SITO WEB IBKR - AUSTRALIA |
www.interactivebrokers.com.au | 443 | ||
|
CLIENT PORTAL – EST |
443 |
|||
|
PORTALE CLIENTI – CENTRAL |
443 |
|||
1: Comunicazione Standard: TCP Port 80 | Comunicazione SSL: TCP Port 443.
2: Questo server host di IB non supporta richieste ping.
Importante: Se stai accedendo al Client Portal da una rete aziendale dove l'accesso Internet viene fornito attraverso un dispositivo per il "load balancing" (ossia un dispositivo per il bilanciamento del carico di rete) potresti ricevere dei messaggi di errore riguardo la sessione (scaduta o non valida) e potrebbero mancare dei contenuti web al momento dell'accesso o subito dopo averlo completato. Il dispositivo per il "load-balancing" gestisce le tue connessioni in uscita verso due o più interfacce di rete per equalizzare il carico di lavoro della rete. Come conseguenza di questo meccanismo, le richieste HTTP che raggiungono i nostri sistemi provengono da indirizzi IP differenti ed invalidano la tua sessione del Portale Clienti. In questo scenario, ti suggeriamo di richiedere al tuo amministratore di rete o dipartimento IT di configurare il tuo dispositivo in modo da bypassare il dispositivo per il "load-balancing". Questo permetterà alla tua sessione di rimanere valida e attiva.
|
TWS PER DESKTOP |
|||
|
AREA/STRUMENTO |
PRINCIPALE/BACKUP |
SERVER (HOST) |
PORTE |
|
TWS AMERICA – EST |
PRINCIPALE |
4000 / 4001 |
|
|
BACKUP |
|||
|
TWS AMERICA – CENTRALE |
PRINCIPALE |
4000 / 4001 |
|
|
BACKUP |
|||
|
TWS EUROPA |
PRINCIPALE |
4000 / 4001 |
|
|
BACKUP |
|||
|
TWS ASIA |
PRINCIPALE |
4000 / 4001 |
|
|
BACKUP |
|||
|
TWS ASIA - CINA3 |
PRINCIPALE |
4000 / 4001 |
|
|
BACKUP |
mcgw1_hb1.ibllc.com.cn | ||
| AGGIORNAMENTO AUTOMATICO DI TWS | PRINCIPALE | 443 | |
|
RISK NAVIGATOR |
PRINCIPALE |
443 |
|
|
IMPOSTAZIONI CLOUD DI TWS |
PRINCIPALE |
443 |
|
|
IB CAM |
PRINCIPALE |
4000 / 4001 |
|
|
RAPPORTI DI DIAGNOSTICA |
PRINCIPALE |
443 |
|
3: Questo Gateway è riservato ai clienti che hanno un account basato sul server di Hong Kong, ma si collegano fisicamente dalla Cina Continentale.