I want to activate IBKR Mobile Authentication (IB Key) for iPhone with the QR Code from Client Portal
You may have seen a QR code when you logged into Client Portal. In this article we will cover the steps for activating IBKR Mobile Authentication (IB Key) using that code.
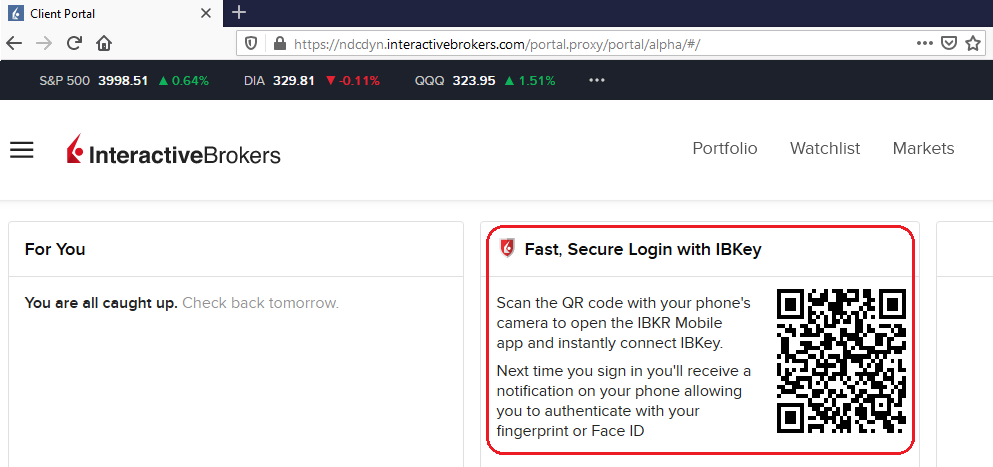
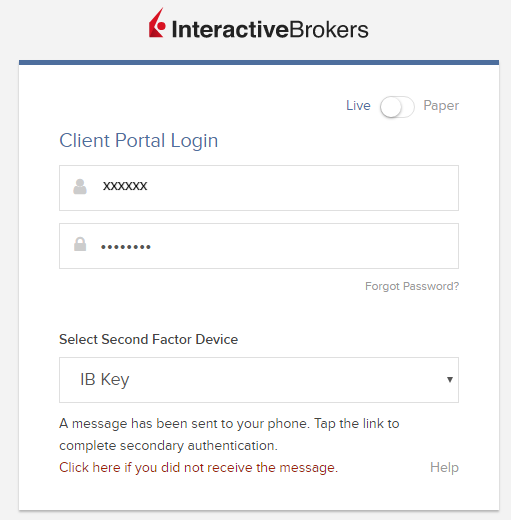
1) Log into Client Portal. You will see a banner recommending that you activate IBKR Mobile Authentication (IB Key) by scanning the accompanying QR Code:
Figure 1
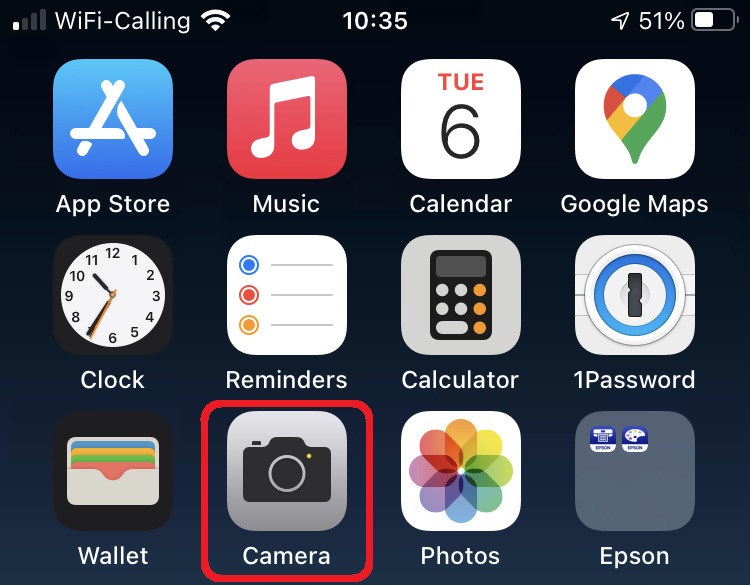
2) On your smartphone, launch the "Camera" app.
Figure 2
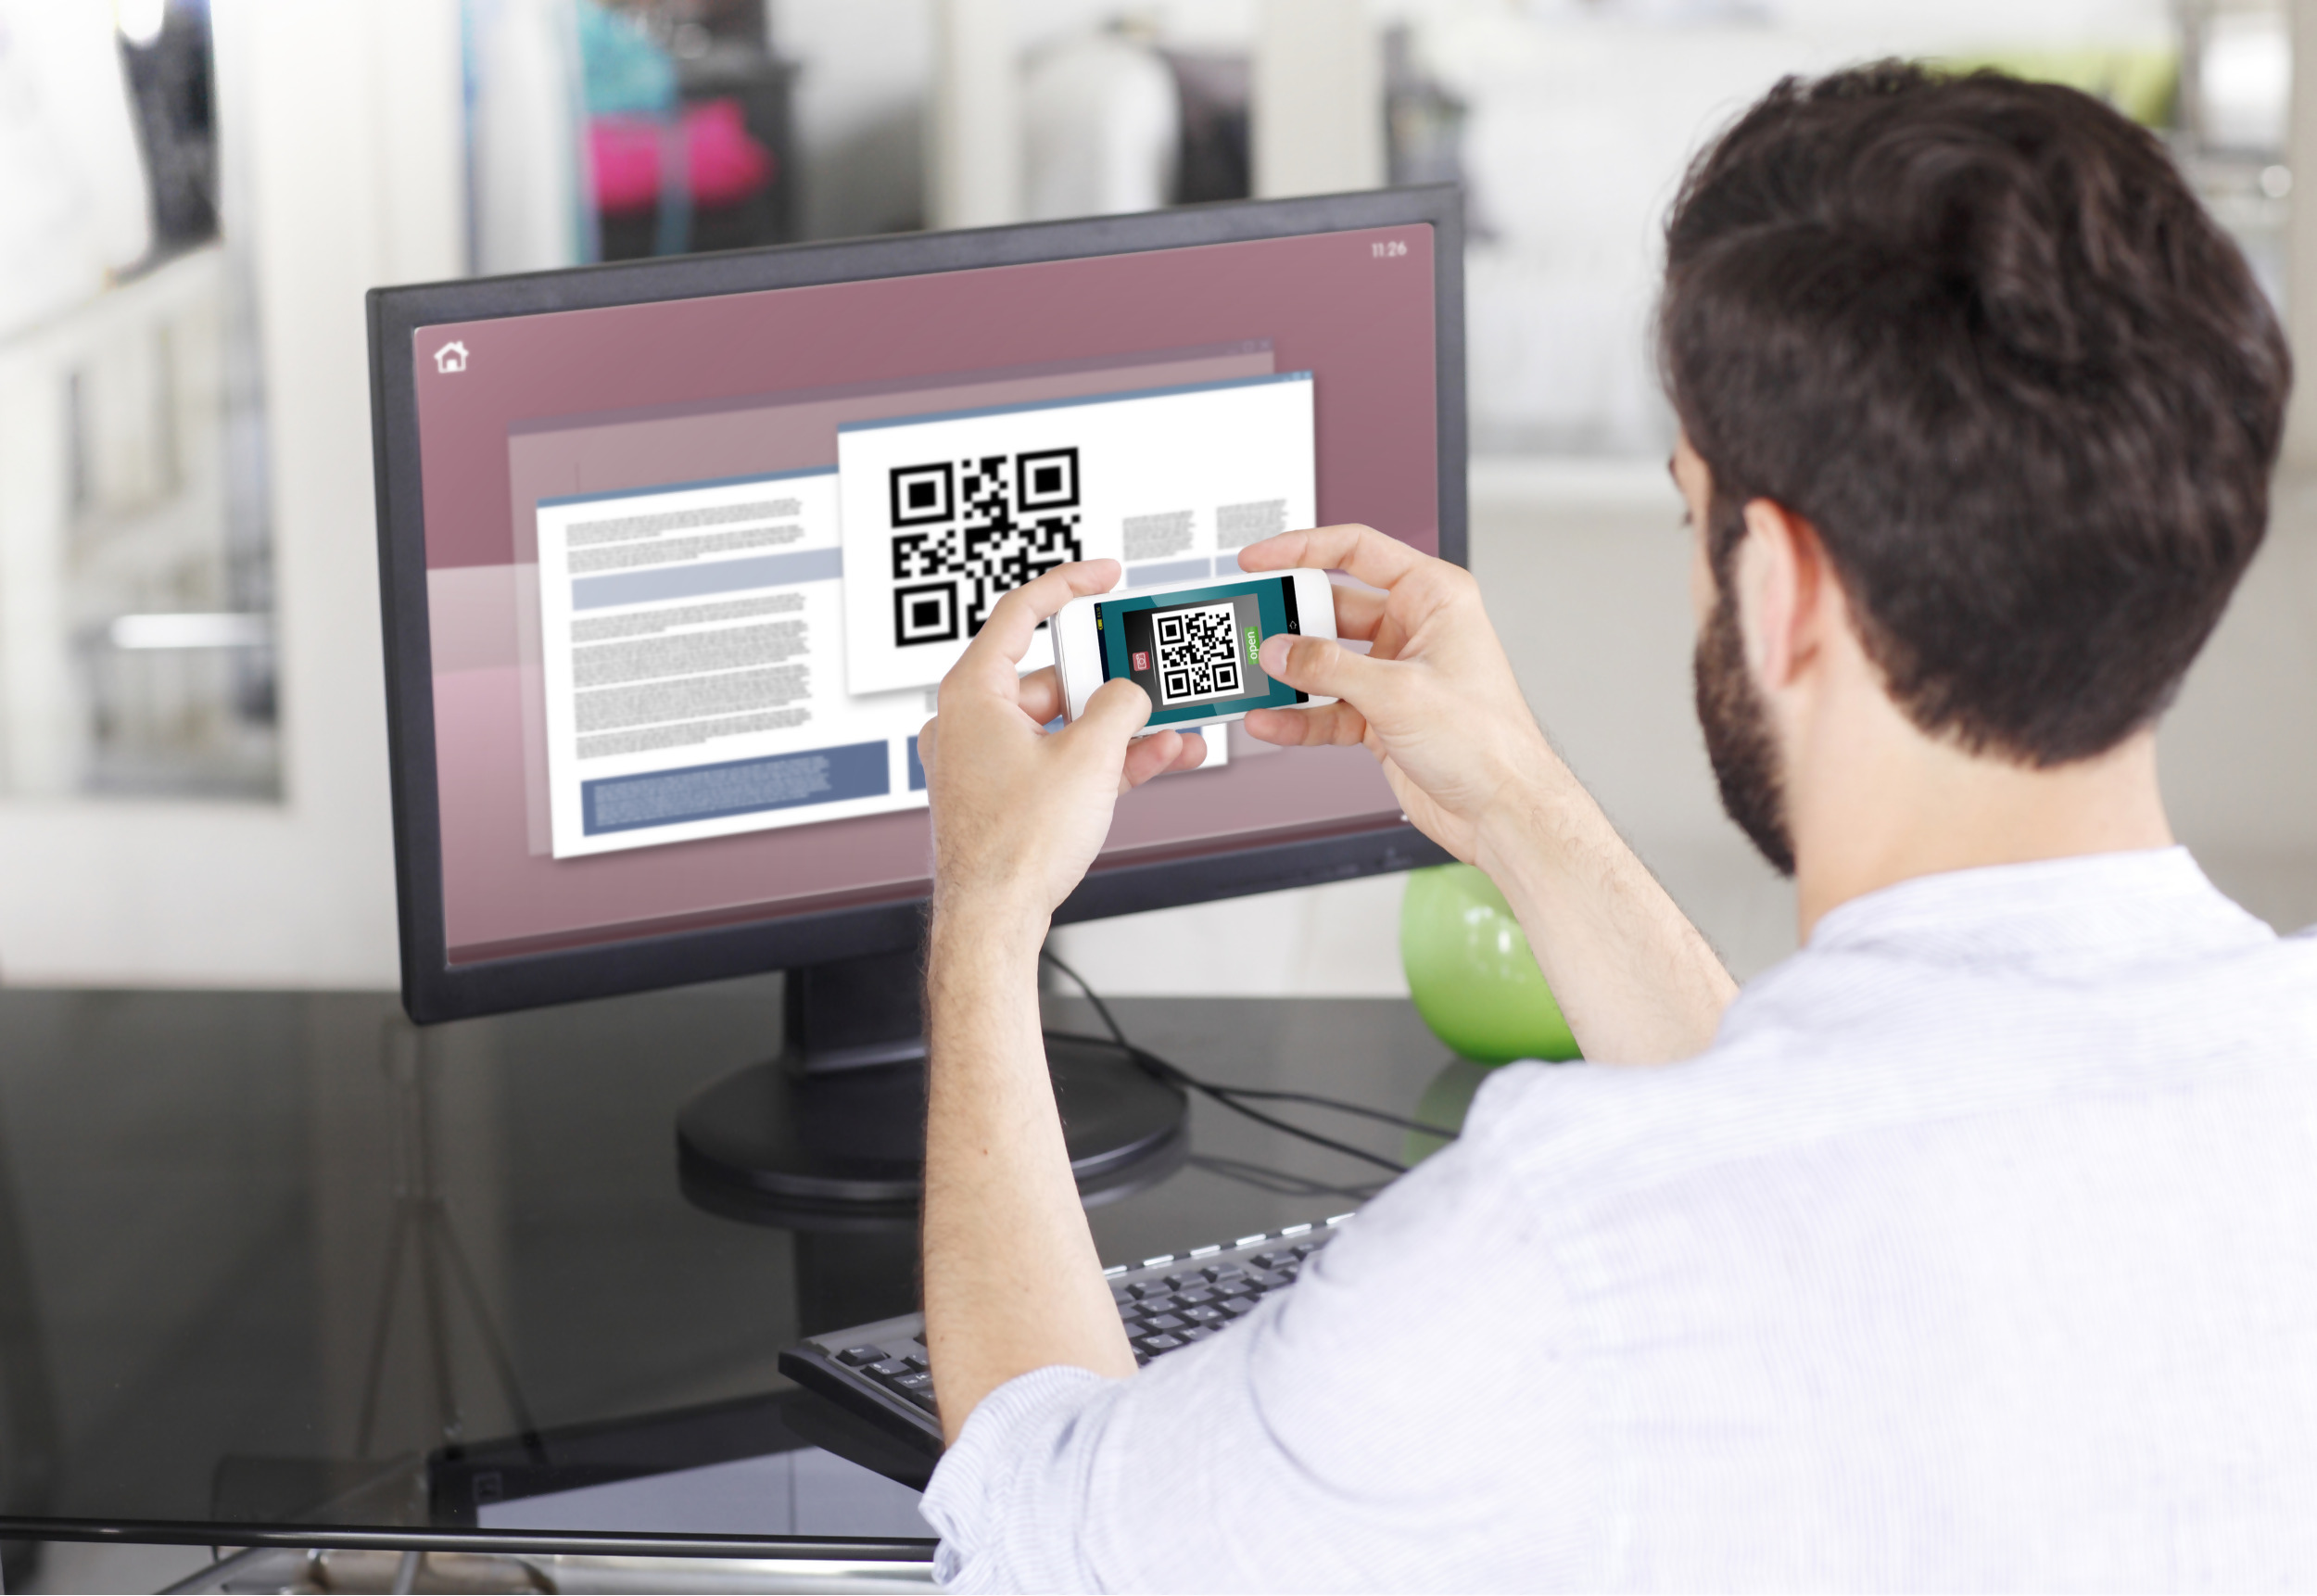
3) Point the lens of your smartphone camera towards the QR code. You don't need to "take a picture." When the code is in focus it is automatically captured. If your phone does not seem to recognize the QR code try to move your phone closer or farther away to the QR code in order to gain focus. If your phone does not recognize the QR code, please see the section Possible Issues and solutions at the bottom of this article.
Figure 3
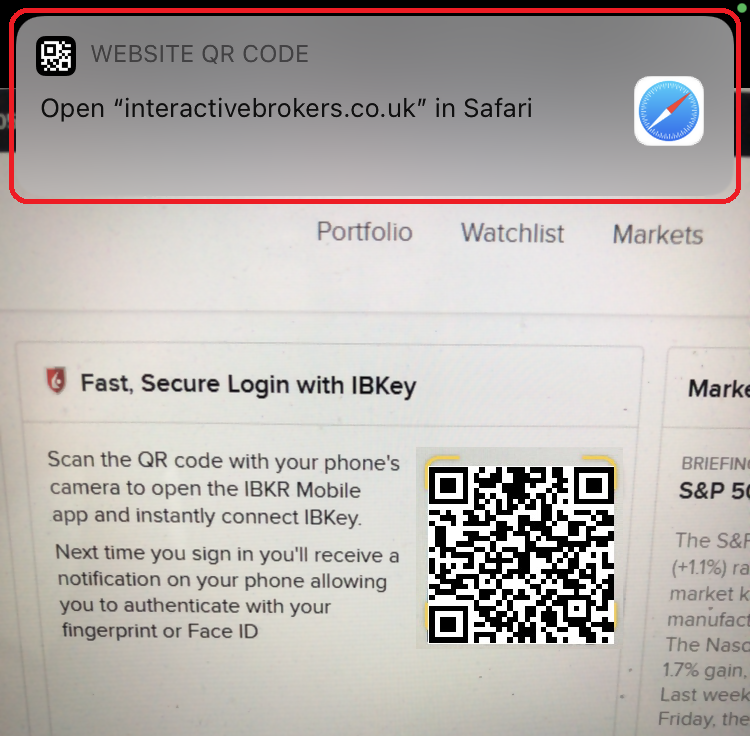
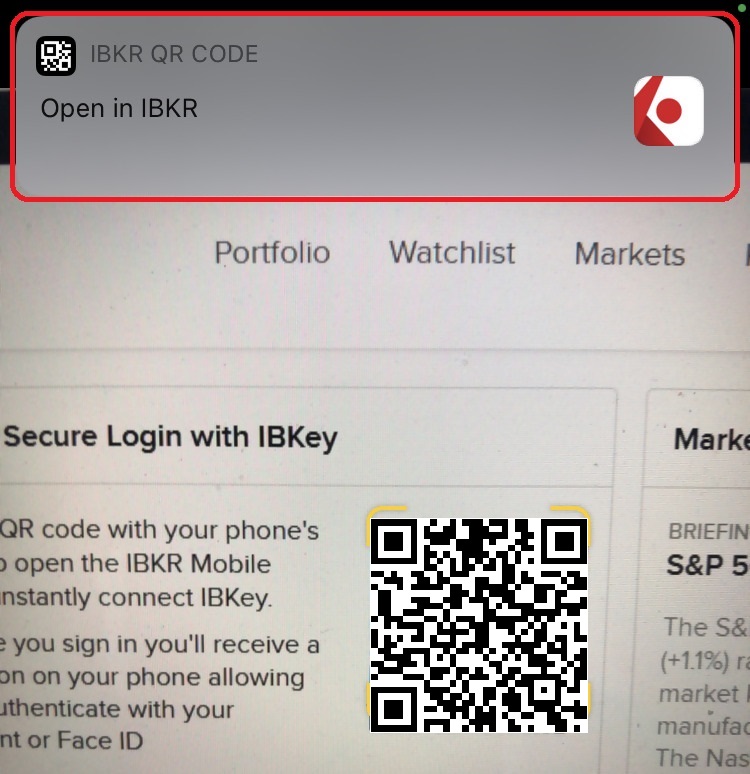
4) If your device was able to read the QR code successfully, you will see a banner on the top of your smartphone screen.
- If the banner asks you to open the IBKR web site on your smartphone browser (as in Figure 4.1), please proceed directly to next step, 5)
- If the banner asks you to open the IBKR Mobile app (as in Figure 4.2), please jump to step 8)
Figure 4.1 Figure 4.2
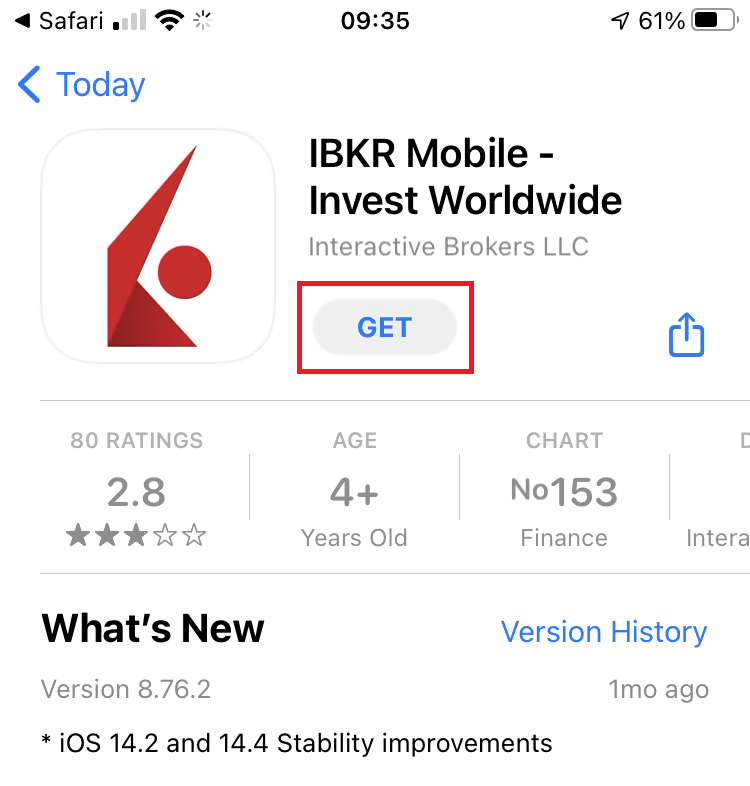
5) Tap on the banner on the top of your smartphone screen, asking you to open the IBKR Web site. You will be redirected to the AppStore.
Figure 5
6) Tap the download icon GET to install IBKR Mobile on your phone.
Figure 6
7) Once the installation is complete, do not launch the IBKR Mobile app. Open your camera and again focus on the QR code displayed in Client Portal.
Figure 7
8) Tap on the banner on the top of your screen, asking you to open the IBKR Mobile app.
Figure 8
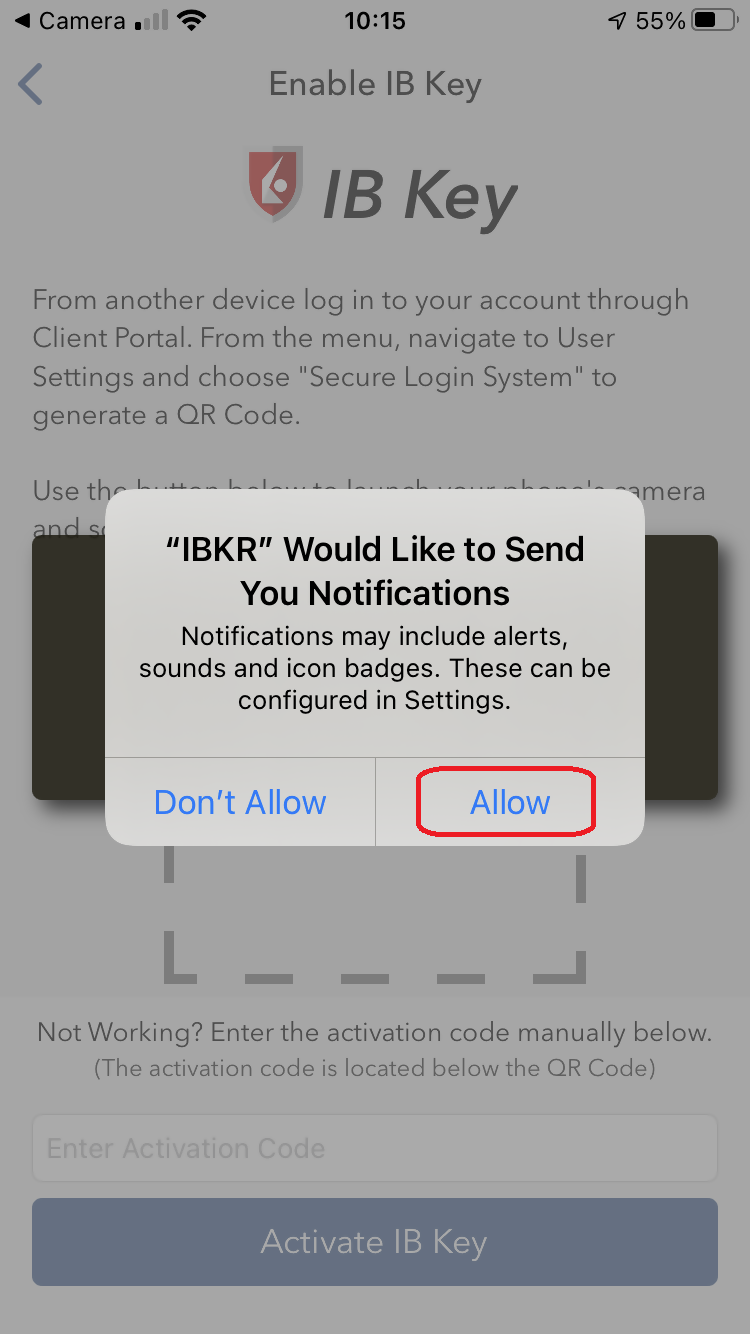
9) Tap Allow if asked whether to allow or disallow notifications for IBKR Mobile.
Figure 9
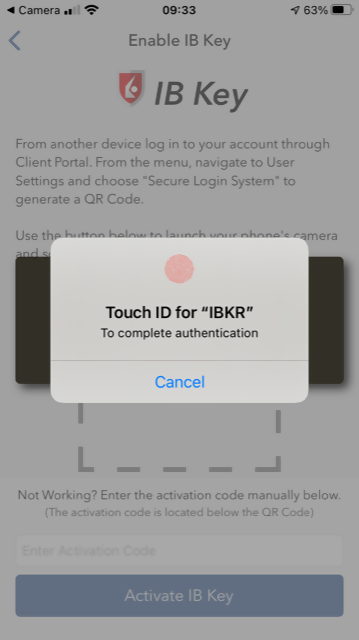
10) You will be asked to provide the security element you use to unlock your phone (FaceID, Fingerprint or Passcode).
Figure 10
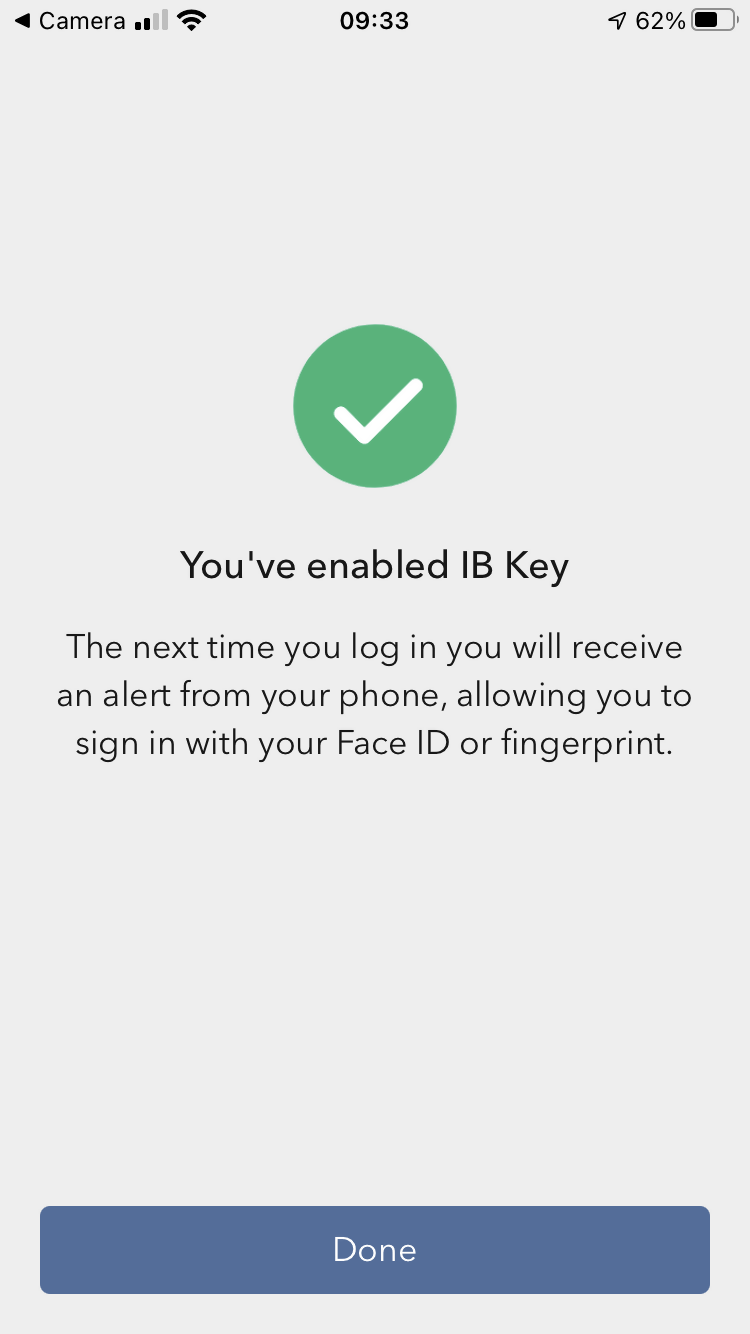
11) You will receive a message confirming the successful activation of IBKR Mobile Authentication (IB Key). Tap Done to complete the procedure
Figure 11
Possible issues and solutions
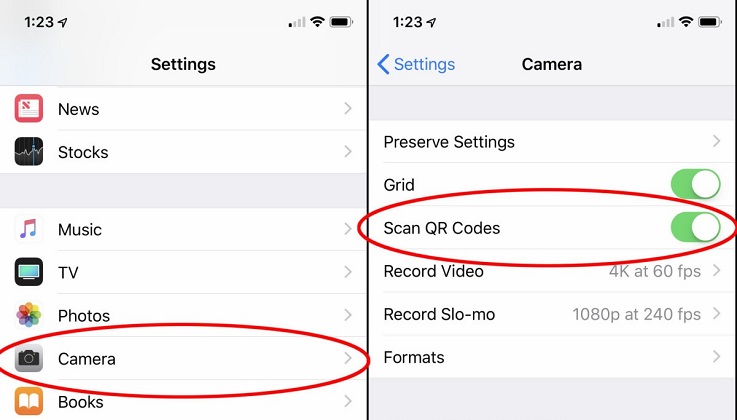
- My smartphone did not manage to read the QR code. What should I do?
Make sure you have activated the switch "Scan QR codes" from the Camera Settings of your smartphone.
Figure 12
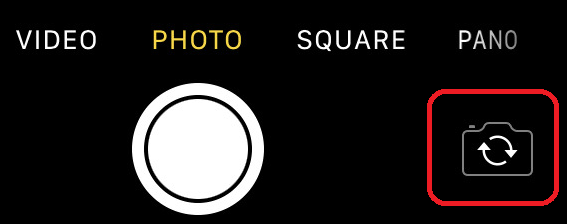
- My phone activates the front camera. How can I switch to the rear one?
Usually there is a specific button in the camera view to switch from front to rear lenses.
Figure 13
- During the IBKR Mobile Authentication (IB Key) activation, I receive an error message "An error has occurred. Please try again."
Figure 14
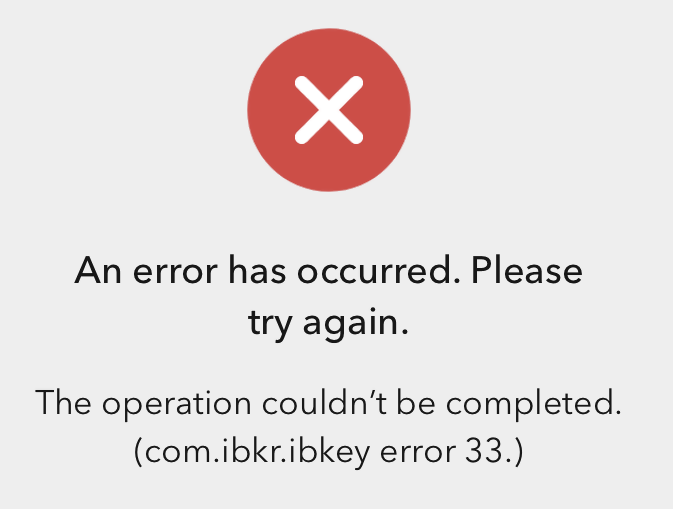
This error message may indicate you are attempting to activate an IBKR Mobile Authentication (IB key) instance that is already activated. Please try to log in to the Client Portal again. If you receive a notification on your smartphone once you have entered the credentials and you are able to complete the authentication once you tap on that notification, then your IBKR Mobile Authentication (IB Key) instance is already activated and you no longer need to follow the steps on this article.
Alternatively, the error message may be displayed when the QR code shown in the Client Portal was already used to attempt an activation and is expired. In this case, please log out of the Client Portal and log back in to obtain a fresh QR code.
References:
- See KB2260 for instruction on how to activate and operate IBKR Mobile Authentication (IB Key).
- See KB2748 for instructions on how to recover IBKR Mobile Authentication (IB Key).
- See KB3236 for instructions on how to enable notifications for the IBKR Mobile app.
- See KB3234 for troubleshooting missing IBKR Mobile notifications.
- See KB3073 for instructions on how to migrate the IBKR Mobile Authentication (IB Key) to a new smartphone.
Cómo activar las notificaciones para la aplicación IBKR Mobile
Overview:
¿Qué es una notificación?
Una notificación "push" (forzada) es un mensaje breve enviado ("forzado") desde un servidor back-end a su dispositivo a través de Internet. Los desarrolladores de aplicaciones utilizan estos mensajes que captan la atención para llegar de forma rápida y efectiva a los receptores, incluso si no están utilizando la aplicación en ese momento. Las notificaciones pueden entregarles información a los usuarios o avisarles acerca de una acción específica que se les invita a realizar o que deben realizar.
Background:
¿Por qué la aplicación IBKR Mobile utiliza notificaciones?
La aplicación IBKR Mobile utiliza notificaciones con fines informativos, así como la autenticación en dos factores. En el segundo caso, se le invita al usuario a pulsar en la notificación, la cual abrirá automáticamente la aplicación IBKR Mobile y comenzará el proceso de autenticación.
Este procedimiento explica cómo activar manualmente notificaciones para la aplicación IBKR Mobile. Haga clic en el enlace a continuación que coincida con el sistema operativo de su smartphone.
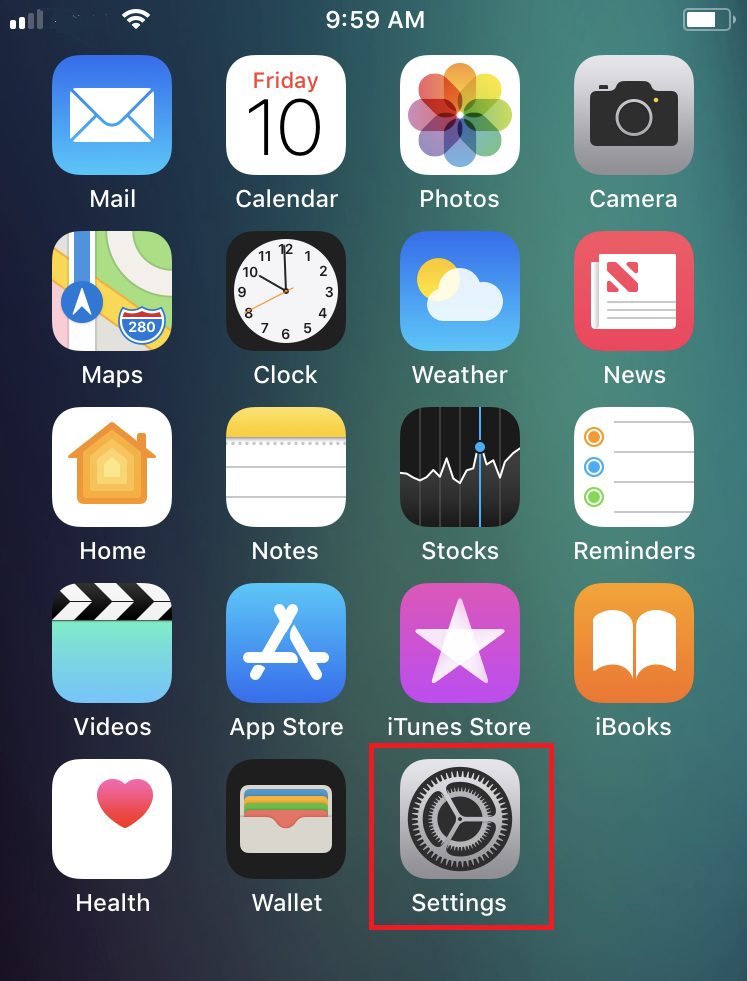
1. En la pantalla de inicio, pulse Configuración (Figura 1), luego Notificaciones (Figura 2) y, por último, IBKR (Figura 3)
Figura 1 Figura 2 Figura 3
(1).png)
(1).png)
2. En la configuración de la aplicación de IBKR, verá varias opciones. Recomendamos configurarlas del siguiente modo (Figura 4):
-
Permitir notificaciones: activado
-
Bloquear la pantalla, Centro de notificaciones, Banners: seleccionado
-
Estilo de banner: Permanente
-
Insignias: activado
-
Mostrar vista previa: siempre
Figura 4
.png)
1. En Configuración en su móvil, pulse Aplicaciones y notificaciones1 (Figura 1), luego IBKR Mobile (Figura 2) y, por último, Notificaciones de aplicaciones (Figura 3)
Figura 1 Figura 2 Figura 3


Figura 1 Figura 2 Figura 3
2. Asegúrese de que las notificaciones para esta aplicación estén activadas globalmente, y que los botones Permitir puntos de notificaciones, Permitir interrupciones, En la pantalla de bloqueo estén todas activadas (Figura 4). De acuerdo con sus preferencias personales, es probable que desee activar también el botón Deshabilitar la función no molestar
Figura 4
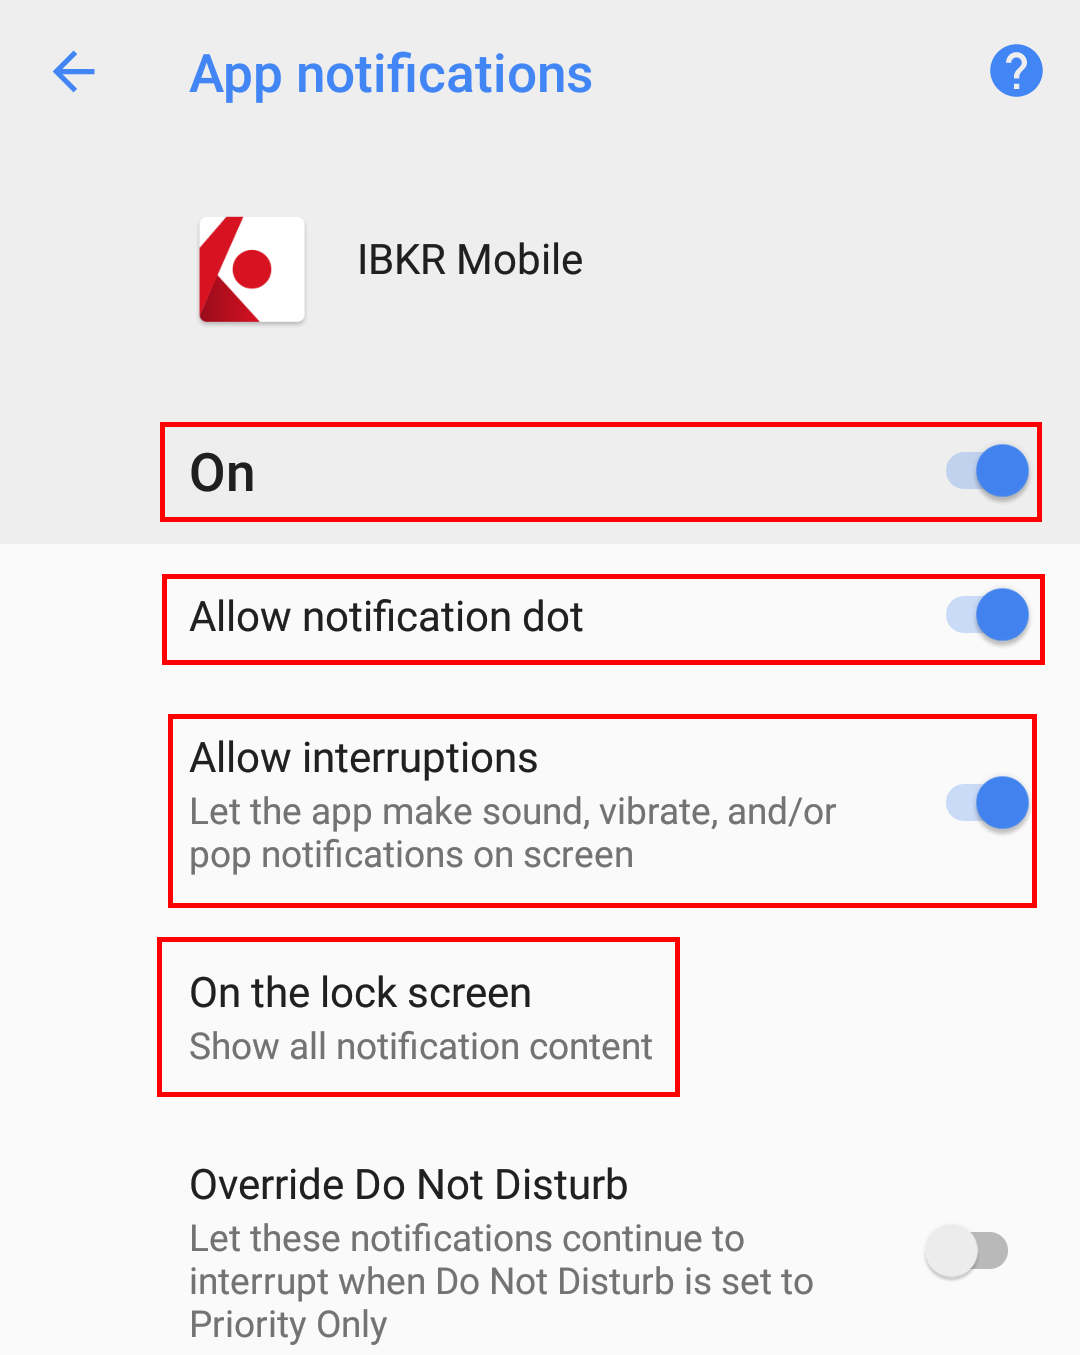
Figura 4
Tenga en cuenta que las etiquetas de los elementos del menú y las posiciones podrán variar de acuerdo con el proveedor de su dispositivo y la versión del software.
1. El elemento Aplicaciones y notificaciones podrá aparecer como Sonidos y notificaciones en algunos dispositivos
Referencias:
- Consulte el artículo KB2260 para obtener las instrucciones acerca de cómo activar y operar la autenticación mediante IBKR Mobile
- Consulte el artículo KB3234 para obtener más información sobre la solución de problemas de las notificaciones IBKR Mobile
- Consulte el artículo KB2748 para obtener información acerca de la recuperación mediante la autenticación con IBKR Mobile
Cómo volver a usar el sistema de acceso seguro
Overview:
Los clientes que hayan dejado de usar el dispositivo desde el programa Sistema de acceso seguro (SLS) se exponen a ciertos riesgos y, por lo tanto, quedan condicionados a determinadas restricciones (p. ej., capacidad de negociar acciones Pink Sheet y OTCBB). Teniendo esto en cuenta, junto con los beneficios de protección que se obtienen mediante una protección SLS completa, podrá decidir volver a usar el sistema de acceso seguro. El siguiente artículo proporciona instrucciones paso a paso para conseguir esto.
Background:
Tenga en cuenta que, para modificar los ajustes de configuración para una cuenta, el usuario primario debe iniciar sesión en Client Portal. En caso de que su usuario no tenga permitido cambiar los ajustes de seguridad, el sistema le mostrará un aviso y le indicará cuál es el usuario que tiene los derechos.
Para volver a usar el sistema de acceso seguro, proceda del siguiente modo:
1. Abra su explorador y visite la página web ibkr.com.
2. Haga clic en Iniciar sesión > Client Portal
(1).png)
3. Ingrese sus credenciales y complete la autenticación utilizando su dispositivo de seguridad
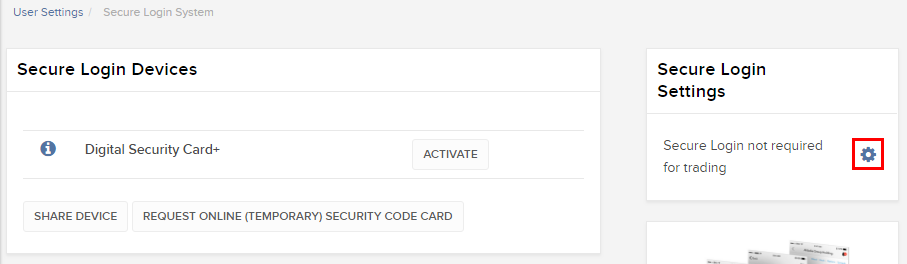
4. En el menú del lado izquierdo, haga clic en Configuración > Configuración del usuario. Luego, en el cuadro de Seguridad, haga clic en el icono del "engranaje" Configurar junto a Sistema de acceso seguro1
.png)
5. Verá un cuadro con el título "Configuración de acceso seguro". Dentro de ese cuadro, haga clic en el icono de "engranaje" Configurar . Esto lo llevará a los ajustes para Acceso seguro no necesario para negociar.
6. Seleccione el botón junto a "Siempre quiero usar mi dispositivo de acceso seguro al iniciar sesión" y haga clic en Continuar
.png)
7. Recibirá una confirmación de que su configuración se ha actualizado. Haga clic en Aceptar para finalizar el procedimiento
.png)
Notas
1. Si está usando la versión clásica de Client Portal, haga clic en el menú arriba Gestionar cuenta, luego en Seguridad >Sistema de acceso seguro > Volver a usar SLS. Seleccione el botón Volver a usar en la línea correspondiente a su usuario.
Referencias
- Consulte el artículo KB1131 para obtener un resumen sobre el sistema de acceso seguro
- Consulte el artículo KB1943 para obtener instrucciones para solicitar una tarjeta de seguridad digital+ de reemplazo
- Consulte el artículo KB2636 para obtener información y consultar los procedimientos relacionados con dispositivos de acceso seguro
- Consulte el artículo KB2481 para obtener instrucciones acerca de cómo compartir el dispositivo de acceso seguro entre dos o más usuarios
- Consulte el artículo KB975 para obtener instrucciones acerca de cómo devolver su dispositivo de acceso seguro a IBKR
- Consulte el artículo KB2260 para obtener instrucciones para activar la autenticación con IB Key a través de IBKR Mobile
- Consulte el artículo KB2895 para obtener información sobre el sistema de autenticación múltiple en 2 factores (M2FS)
- Consulte el artículo KB1861 para obtener información acerca de los cargos o gastos relacionados con los dispositivos de acceso seguro
- Consulte el artículo KB69 para obtener información acerca de la validez de la clave de acceso temporaria
How to generate a ".har" file
Background:
When troubleshooting a non-trivial website issue, it is sometimes necessary for our Client Services team to obtain additional information about your browser communication. You may be asked record and provide a .har file. This file contains additional information about the network requests that are sent and received by your browser. Your browser can generate such file by recording content, timeline and status of HTTP/HTTPS requests and responses while the issue occurs.
In this article we explain how to generate a .har file. Please click on the browser that you use in the list below:
To generate the HAR file for Google Chrome:
1. Open Google Chrome and go to the page where the issue is occurring.
2. Press CRTL +SHIFT + I on your keyboard. Alternatively, click on the Chrome menu icon (three vertical dots at the top-right of your browser window) and select More Tools > Developer Tools
3. The Developers Tools opens as a docked panel at the side or bottom of Chrome. Select the tab Network (Figure 1.)
Figure 1.
.png)
4. Look for a round Record button in the upper left corner of the Developer Tools toolbar and make sure it is red. If it is grey, click it once to start recording or just press CTRL+E (Figure 2.)
Figure 2.

5. Activate the checkbox Preserve log (Figure 3.)
Figure 3.
.png)
6. Click the Clear button to clear out any existing logs. The Clear button has a stop icon and is located on the right of the Record button (Figure 4.)
Figure 4.
![]()
7. Reproduce the issue you are experiencing while the network requests are being recorded.
8. Once you have reproduced the issue, right-click anywhere on the list of recorded network requests, select Save all as HAR with Content, and save the file to a location of your preference on your computer (e.g. on your Desktop).
9. From the IBKR Client Portal, go to the Message Center and create a new Web Ticket (or use an existing one when applicable)
10. Within the Web Ticket, attach the .har file previously generated. In case the IBKR Client Services has provided you with a reference ticker number or representative name, please add this information to the ticket body.
11. Submit the Web Ticket
To generate the HAR file for Firefox:
1. Open Firefox and go to the page where the issue is occurring
2. Press F12 on your keyboard. Alternatively click the Firefox menu icon (three horizontal parallel lines at the top-right of your browser window), then select Web Developer > Network
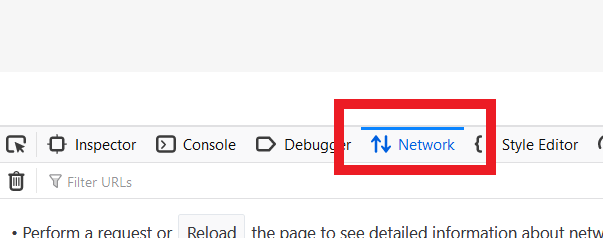
3. The Developers Network Tools opens as a docked panel at the side or bottom of Firefox. Select the tab Network (Figure 5.)
Figure 5.
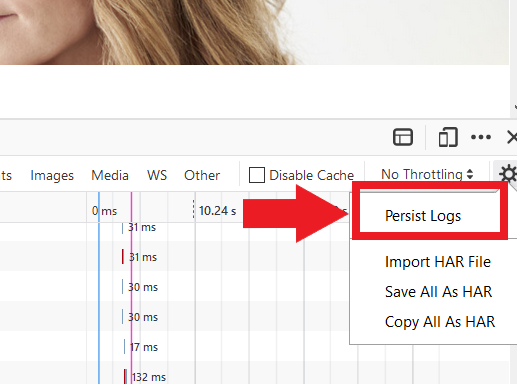
4. Activate the checkbox Persists logs (Figure 6.)
Figure 6.
5. Reproduce the issue you are experiencing. The recording of the network request starts automatically.
6. Once you have reproduced the issue, right-click anywhere on the list of recorded requests and select Save All As HAR
7. Save the file to a location of your preference on your computer (e.g. on your Desktop)
8. From the IBKR Client Portal, go to the Message Center and create a Web Ticket (or use an existing one when applicable)
9. Within the Web Ticket, attach the .har file previously generated. In case the IBKR Client Services has provided you with a reference ticker number or representative name, please add this information to the ticket body
10. Submit the Web Ticket
To generate the HAR file for Microsoft Edge:
1. Open Edge and go to the page where the issue is occurring.
2. Press F12 on your keyboard. Alternatively click the Edge menu icon (three horizontal dots at the top-right of your browser window), then select More Tools > Developers Tools
3. Click the Network tab (Figure 10.)
Figure 10.
.png)
4. Reproduce the issue that you were experiencing before, while the network requests are being recorded.
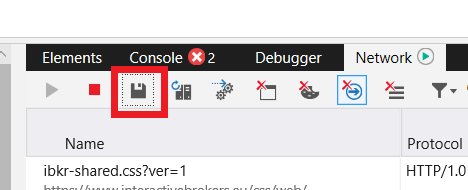
5. Once done click the floppy disk icon (Export as HAR) or press CTRL+S (Figure 11.)
Figure 11.
6. Provide a filename and a location of your preference on your computer (e.g. on the Desktop). Then click the Save button
7. From the IBKR Client Portal, go to the "Message Center" and create a Web Ticket (or use an existing one when applicable)
8. Within the Web Ticket, attach the .har file previously generated. In case the IBKR Client Services has provided you with a reference ticker number or representative name, please add this information to the ticket body.
9. Submit the Web Ticket
To generate the HAR file for Safari:
Note: Before generating the HAR file, make sure you can see the Develop menu in Safari. If you do not see this menu, click on the menu Safari, choose Preferences, go to the tab Advanced and activate the checkbox next to Show Develop menu in menu bar
1. Open the Develop menu and select Show Web Inspector or press CMD+ALT+I
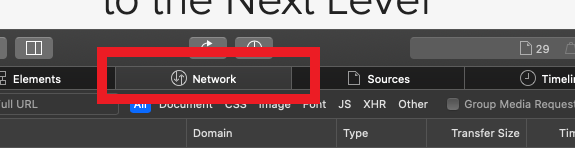
2. Click the Network tab (Figure 12.)
Figure 12.
3. Activate the checkbox Preserve log (Figure 13.)
Figure 13.
.png)
4. Click on the icon Export (or press CMD+S), provide a filename and a location of your preference on your computer (e.g. on the Desktop) and save the .har file
5. From the IBKR Client Portal, go to the "Message Center" and create a Web Ticket (or use an existing one when applicable)
6. Within the Web Ticket, attach the web archive file previously generated. In case the IBKR Client Services has provided you with a reference ticker number or representative name, please add this information to the ticket body.
7. Submit the Web Ticket
Introducción a los fórex (FX)
Overview:
IB ofrece centros y plataformas de negociación dirigidos a operadores que negocian princialmente con fórex, así como aquellos cuya actividad ocasional con fórex se origina a partir de acciones en múltiples divisas y/o transacciones de derivados. El siguiente artículo describe las cuestiones básicas para ingresar órdenes de fórex en la plataforma TWS, así como consideraciones relacionadas con convenciones para cotizaciones e informes de posiciones (posnegociación).
Background:
Una negociación con fórex (FX) comprende la compra simultánea de una divisa y la venta de otra, a cuya combinación se refiere comúnmente como par cruzado. En los ejemplos a continuación, el par cruzado EUR.USD se considerará aquel en donde la primera divisa en el par (EUR) se conoce como la divisa de la transacción que uno desea comprar o vender, y la segunda divisa (USD) es la divisa de liquidación.
Ir a un tema específico en este artículo:
- Cotizaciones de precios para fórex
- Crear una línea de cotización
- Crear una orden
- Valor PIP
- Informe de posiciones (posnegociación)
Cotizaciones de precios para fórex
Un par de divisas es la cotización del valor relativo de una unidad de divisa contra la unidad de otra en un mercado de divisas. La divisa que se utiliza como referencia se denomina la divisa de cotización, mientras que la divisa cotizada con relación a esta se denomina divisa base. En la plataforma TWS ofrecemos un símbolo de ticker por cada par de divisas. Podría utilizar FXTrader para revertir la cotización. Los operadores compran o venden la divisa base, y compran o venden la divisa de cotización. Por ej. el símbolo de ticker del par de divisas EUR/USD es:
EUR.USD
en donde:
- EUR es la divisa base
- USD es la divisa de cotización
El precio del par de divisas anterior representa la cantidad de unidades de USD (divisa de cotización) que se necesitan para negociar una unidad de EUR (divisa base). En otras palabras, el precio de 1 EUR expresado en USD.
Una orden de compra en EUR.USD comprará EUR y venderá una cantidad equivalente en USD, según el precio de negociación.
Crear una línea de cotización
Los pasos para añadir una línea de cotización de divisas en TWS son los siguientes:
1. Ingrese la divisa de la transacción (ejemplo: EUR) y presione enter.
2. Elija el tipo de producto fórex
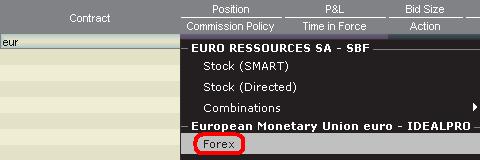
3. Seleccione la divisa de liquidación (ejemplo: USD) y elija el centro de negociación de fórex.
.jpg)
Notas:
IDEALFX proporciona acceso directo a cotizaciones de fórex interbancarias para órdenes que exceden el requisito de cantidad mínima de IDEALFX (normalmente 25,000 USD). Las órdenes dirigidas a IDEALFX que no cumplan con el requisito de tamaño mínimo se redirigirán automáticamente a un centro para órdenes pequeñas, principalmente para conversiones de fórex. Haga clic aquí para obtener información sobre las cantidades mínima y máxima para IDEALFX.
Los dílers de divisas cotizan los pares FX en un sentido específico. Como resultado, es posible que los operadores deban ajustar el símbolo de la divisa que se ingresó para encontrar el par de divisas deseado. Por ejemplo, si se utilizó el símbolo de divisa CAD, los operadores verán que la divisa de liquidación USD no puede encontrarse en la ventana de selección del contrato. Esto se debe a que este par se cotiza como USD.CAD y solo puede accederse a él ingresando el símbolo subyacente como USD y luego seleccionando fórex.
Crear una orden
Dependiendo de los encabezados que se muestren, el par de divisas se visualizará del siguiente modo:
Las columnas Contrato y Descripción mostrarán el par en el formato divisa de transacción.divisa de liquidación (ejemplo: EUR.USD). La columna Subyacente solo mostrará la divisa de transacción.
Haga clic aquí para saber más acerca de cómo cambiar los encabezados de las columnas que se muestran.

1. Para ingresar una orden, haga clic izquierdo sobre demanda (para vender) o sobre oferta (para comprar).
2. Especifique la cantidad de la divisa de negociación que desea comprar o vender. La cantidad de la orden se expresa en la divisa base, que es la primera divisa del par en TWS.
Interactive Brokers no sabe cuál es el concepto de los contratos que representan una cantidad fija de divisa base en un mercado de divisas. En cambio, el tamaño de la negociación es la cantidad necesaria en la divisa base.
Por ejemplo, una orden de compra por 100,000 EUR.USD servirá para comprar 100,000 EUR y vender la cantidad equivalente en USD según el tipo de cambio mostrado.
3. Especifique el tipo de orden deseado, el tipo de cambio (precio) y transmita la orden.
Nota: las órdenes podrán presentarse en términos de unidades de divisas completas y no existen contratos o tamaños de lote mínimos a tener en cuentaademás de los mínimos de mercado de los centros de negociación como se especifica arriba.
Pregunta habitual: ¿cómo se ingresa una orden en el FX Trader?
Valor PIP
El PIP es una medida de cambio en un par de divisas, la cual para la mayoría de los pares representa el cambio más pequeño, aunque para otros se permiten cambios en PIP fraccionados.
Por ej. en EUR.USD 1 PIP equivale a 0.0001, mientras que en USD.JPY 1 PIP equivale a 0.01.
Para calcular el valor de 1 PIP en unidades de divisa de cotización, se puede aplicar la siguiente fórmula:
(cantidad teórica) x (1 PIP)
Ejemplos:
- Símbolo del ticker = EUR.USD
- Cantidad = 100,000 EUR
- 1 PIP = 0.0001
Valor de 1 PIP = 100’000 x 0.0001= 10 USD
- Símbolo del ticker = USD.JPY
- Cantidad = 100’000 USD
- 1 PIP = 0.01
Valor de 1 PIP = 100’000 x (0.01)= JPY 1000
Para calcular el valor de 1 PIP en unidades de la divisa base se puede aplicar la siguiente fórmula:
(cantidad teórica) x (1 PIP/tipo de cambio)
Ejemplos:
- Símbolo del ticker = EUR.USD
- Cantidad = 100’000 EUR
- 1 PIP = 0.0001
- Tipo de cambio = 1.3884
Valor de 1 PIP = 100’000 x (0.0001/1.3884)= 7.20 EUR
- Símbolo del ticker = USD.JPY
- Cantidad = 100’000 USD
- 1 PIP = 0.01
- Tipo de cambio = 101.63
Valor de 1 PIP = 100’000 x (0.01/101.63)= 9.84 USD
Informe de posiciones (posnegociación)
La información sobre la posición FX es un aspecto importante de la negociación con IB que debería entenderse antes de ejecutar transacciones en una cuenta activa. El software de negociación de IB refleja las posiciones FX en dos sitios distintos, los cuales pueden verse en la ventana de la cuenta.
1. Valor de mercado
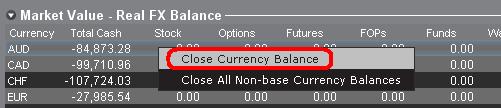
La sección Valor de mercado en la ventana Cuenta refleja las posiciones de las divisas en tiempo real expresadas en términos de cada divisa individual (no como par de divisas).

La sección Valor de mercado en la ventana Cuenta es el único sitio en el que los operadores pueden ver la información sobre la posición FX reflejada en tiempo real. Los operadores de múltiples posiciones de divisas no tienen la obligación de cerrarlas utilizando el mismo par usado para abrir la posición. Por ejemplo, un operador que ha comprado el par EUR.USD (comprando EUR y vendiendo USD) y que también ha comprado el par USD.JPY (comprando USD y vendiendo JPY) puede cerrar la posición resultante negociando el par EUR.JPY (vendiendo EUR y comprando JPY).
Notas:
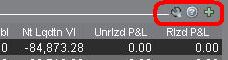
La sección Valor de mercado puede expandirse o minimizarse. Los negociadores deberían verificar el símbolo que aparece por encima de la columna Valor neto de liquidación para asegurarse de que se muestre el signo menos en verde. Si aparece un símbolo más en verde, algunas posiciones activas pueden estar ocultas.
Los operadores pueden iniciar transacciones de cierre desde la sección Valor de mercado haciendo clic derecho sobre la divisa que desean cerrar y eligiendo las opciones "cerrar saldo de divisa" o "cerrar todos los saldos de divisa no base".
2. Cartera FX
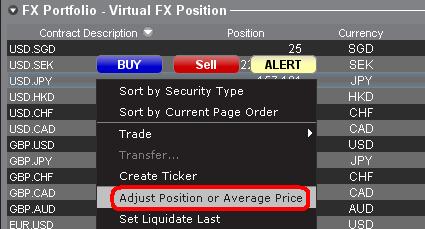
La sección Cartera FX de la ventana de cuenta proporciona una indicación de las Posiciones virtuales y muestra información sobre la posición en términos de pares de divisas en lugar de divisas individuales como aparece en la sección Valor de mercado. Este formato de visualización especial tiene por objetivo ajustarse a una convención que es común entre los operadores de fórex institucionales, y normalmente los operadores minoristas u ocasionales de fórex pueden desestimarlo. Las cantidades de la posición de la Cartera FX no refleja toda la actividad de FX; sin emabrgo, los operadores pueden modificar las cantidades de la posición y los costes promedio que aparecen en esta sección. La capacidad de manipular la información sobre la posición y el coste promedio sin ejecutar una transacción puede ser útil para los operadores que negocien con divisas además de productos de divisa no base. Esto les permitirá a los operadores separar conversiones automáticas de forma manual (lo cual se produce automáticamente cuando se negocian productos sin divisa base) de una actividad de negociación de FX directa.

La sección de cartera FX hace accesible la posición de FX y la información sobre pérdidas y ganancias que se visualiza en todas las demás ventanas de negociación. Esto tiene la tendencia de causar cierta confusión respecto de la determinación de la información real sobre posiciones en tiempo real. Para limitar o eliminar esta confusión, los operadores pueden optar por una de las siguientes alternativas:
a. Minimizar la sección Cartera FX
Al hacer clic en la flecha hacia la izquierda de la expresión Cartera FX, los operadores pueden minimizar la sección Cartera FX. Minimizar esta sección evitará que se muestre la información sobre la Posición virtual en todas las páginas de negociación. (Nota: esto no hará que la información de Valor de mercado se visualice; solo evitará que se muestre la información de Cartera FX.)

b. Ajustar posición o precio promedio
Al hacer clic derecho en la sección de cartera FX de la venta de cuenta, los operadores tienen la opción de ajustar la posición o el precio promedio. Una vez que los operadores han cerrado todas las posiciones sin divisa base, y han confirmado que la sección de valor de mercado refleja todas las posiciones sin divisa base, los operadores pueden restablecer en 0 los campos de posición y precio promedio. Esta pantalla restablecerá a cantidad de la posición reflejada en la sección de cartera FX, y debería permitirles a los operadores visualizar con mayor precisión la posición y la información sobre pérdidas y ganancias en las pantallas de negociación. (Nota: este es un proceso manual y debería realizarse cada vez que se cierren las posiciones de divisas). Los operadores siempre deberían confirmar la información sobre la posición en la sección Valor de mercado para asegurarse de que las órdenes transmitidas alcancen el resultado deseado de apertura o cierre de una posición.

Les aconsejamos a los operadores familiarizarse con FX Trading utilizando una cuenta de negociación simulada o Demo antes de ejecutar transacciones en una cuenta activa. Usted puede Contactar con IB para obtener aclaraciones sobre la información proporcionada arriba.
Otras preguntas habituales:
How to Add Another User to an Active IBKR Mobile Authentication (IB Key) for iPhone
Overview:
This page covers the steps required to add a user to the Authentication section in the IBKR Mobile app for iOS devices.
Requirements:
- The IBKR Mobile app must be installed and IBKR Mobile Authentication (IB Key) already activated on this iOS device.
- For more information on the installation and activation on iOS devices, please refer to KB2278.
Instructions:
1. On your iOS device, open the IBKR Mobile app.
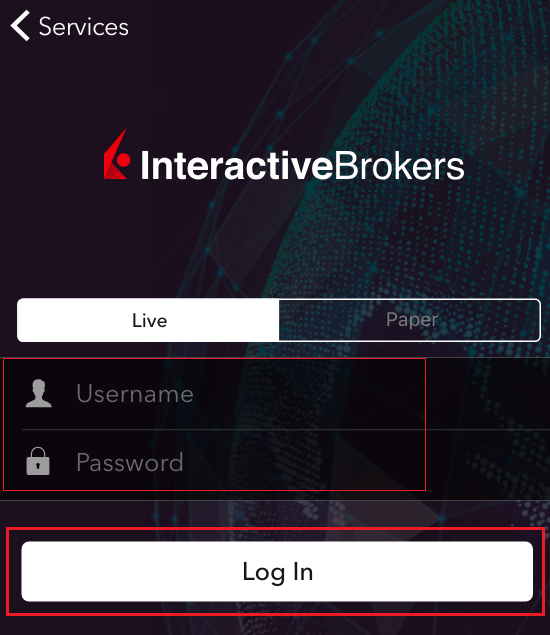
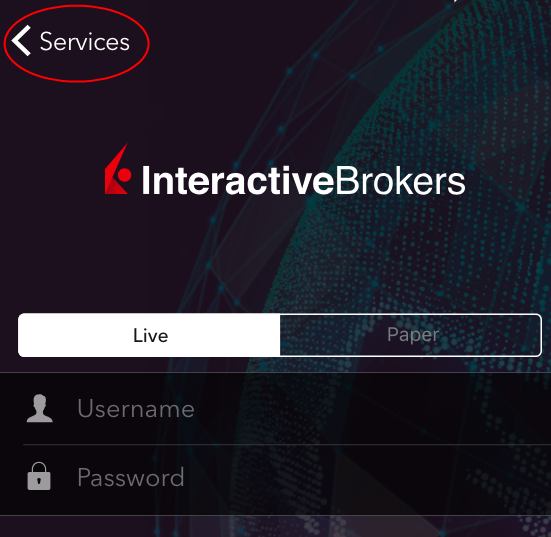
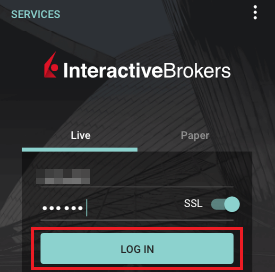
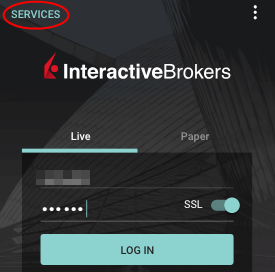
1.a. If the app opens with the login screen (Figure 1), tap on Services on the top-left corner (red arrow) and proceed with step 2.
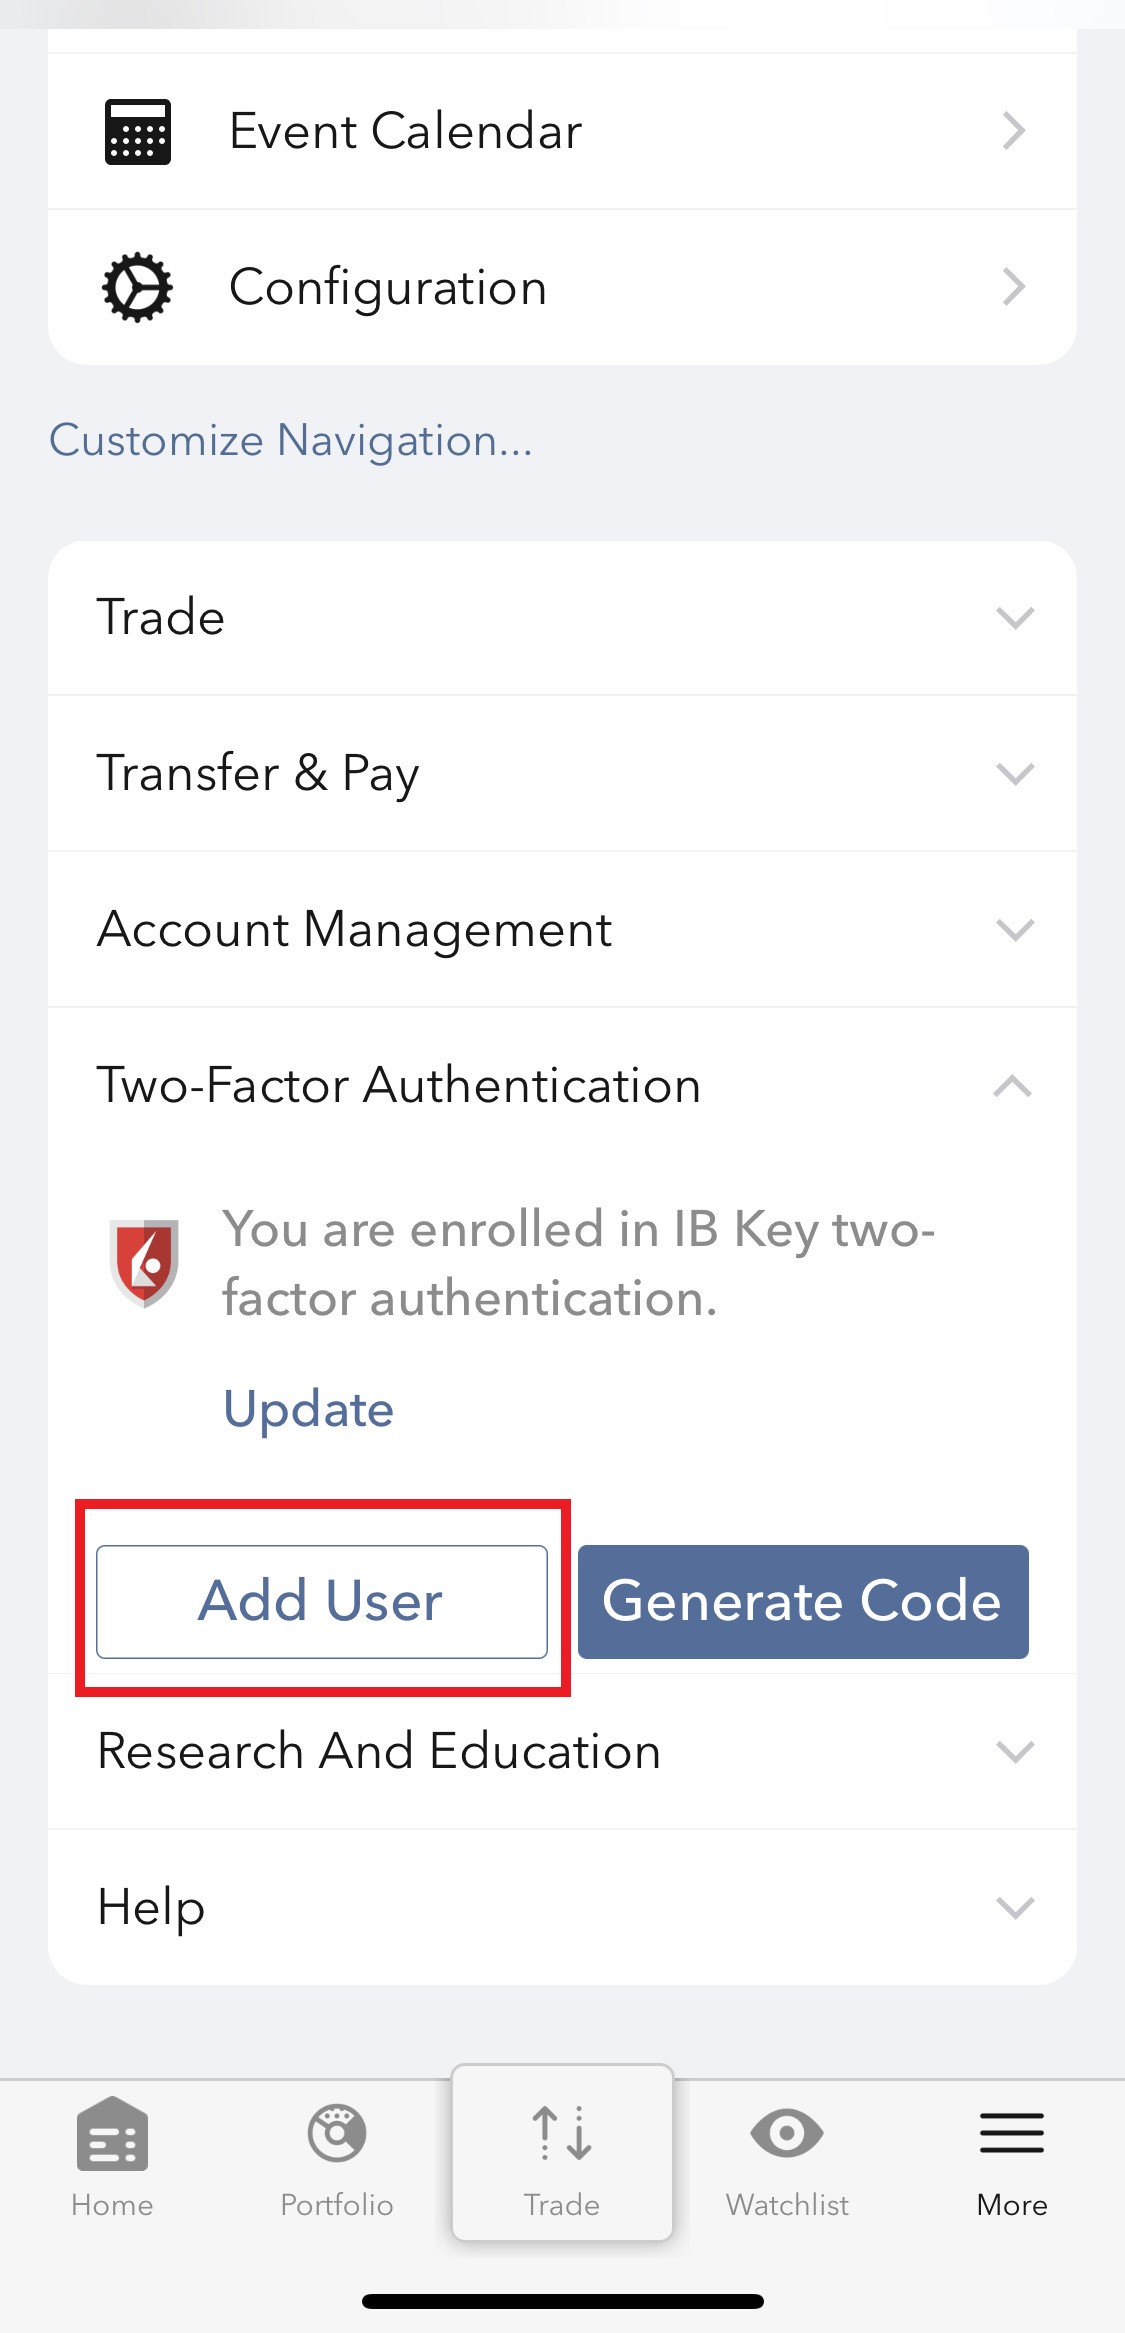
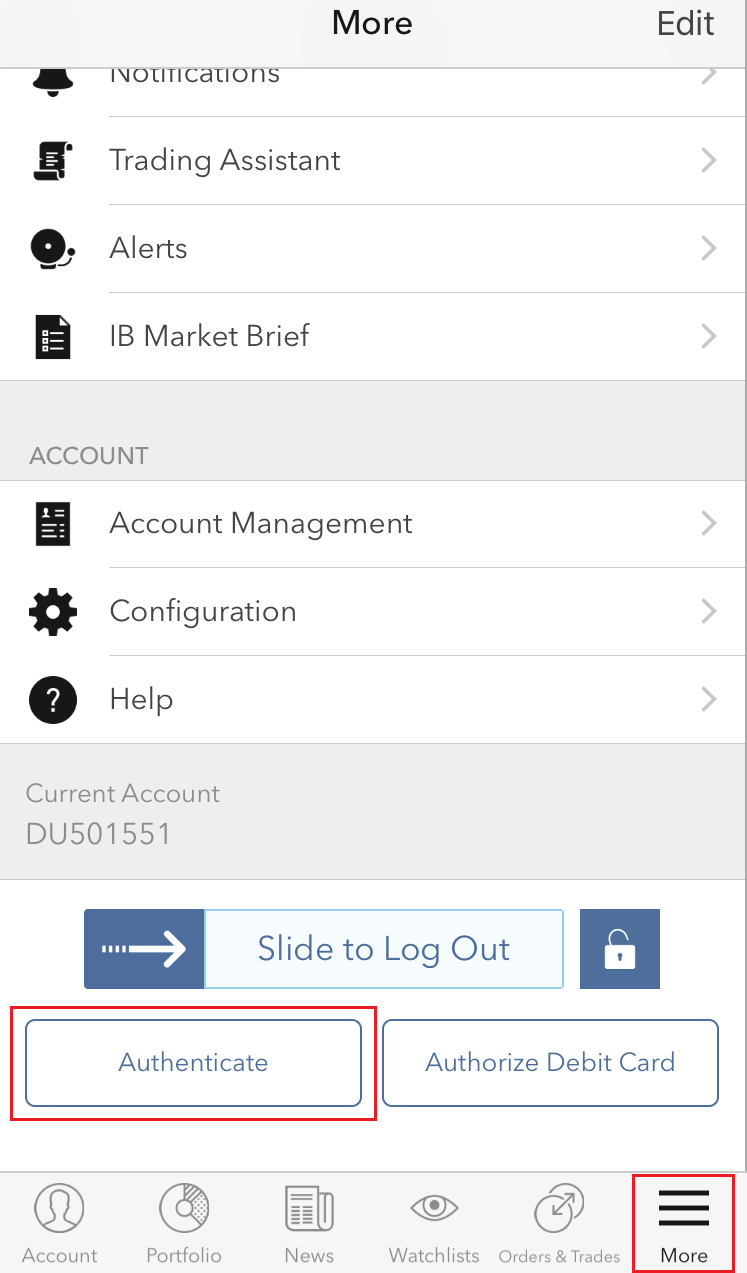
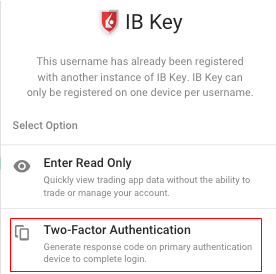
1.b. If the app opens with your Home Page, Portfolio, Watchlists, or similar, tap on More on the bottom-right corner (Figure 2). Then tap on Two-Factor Authentication (Figure 3), followed by Add User (Figure 4) and proceed with step 3.
Figure 1. Figure 2. Figure 3.
(1).jpeg)
.jpeg)
.jpeg)
Figure 4.
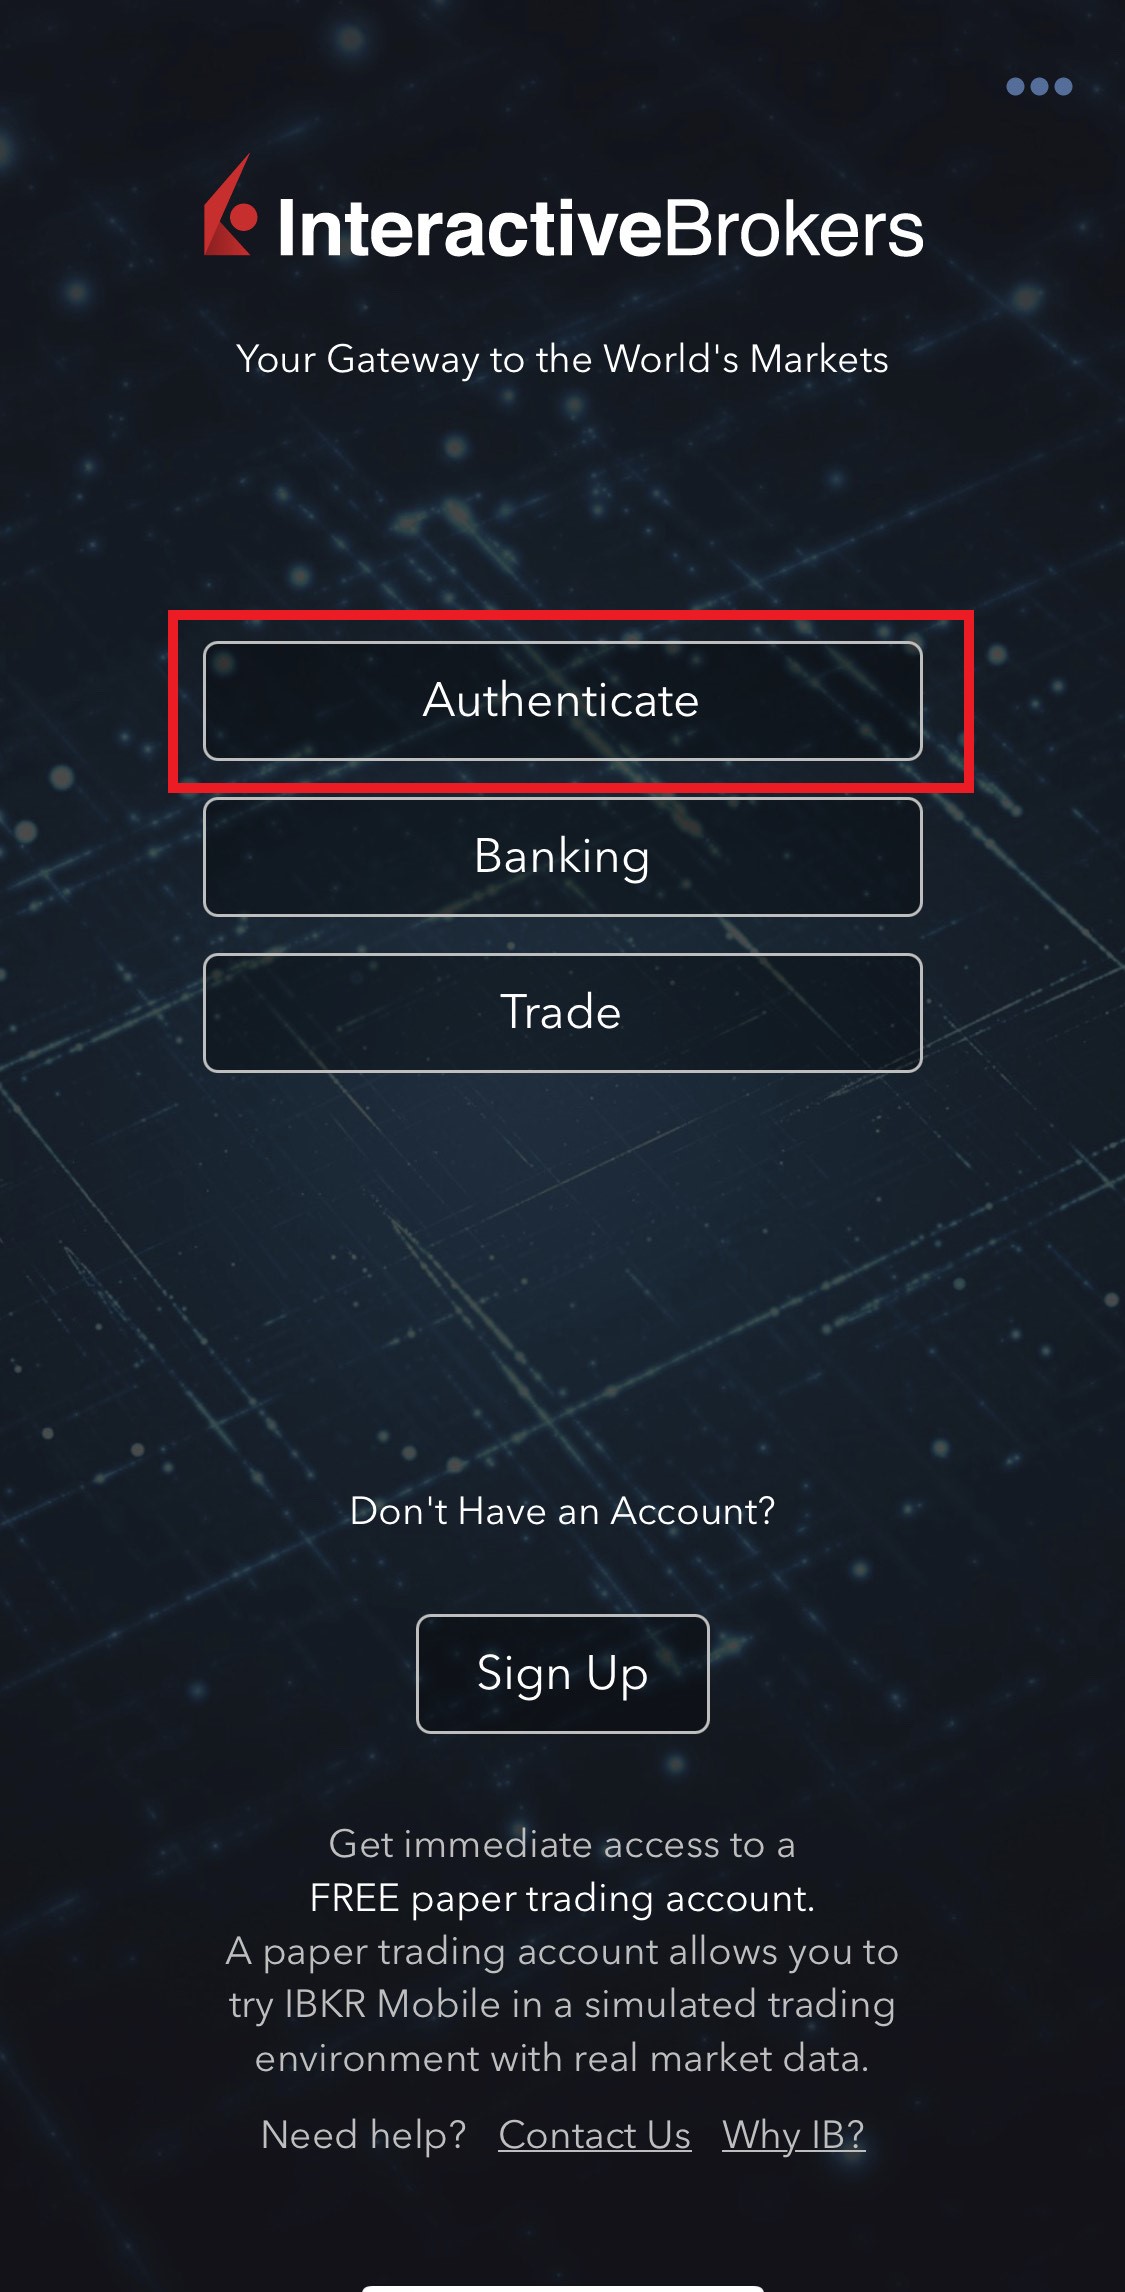
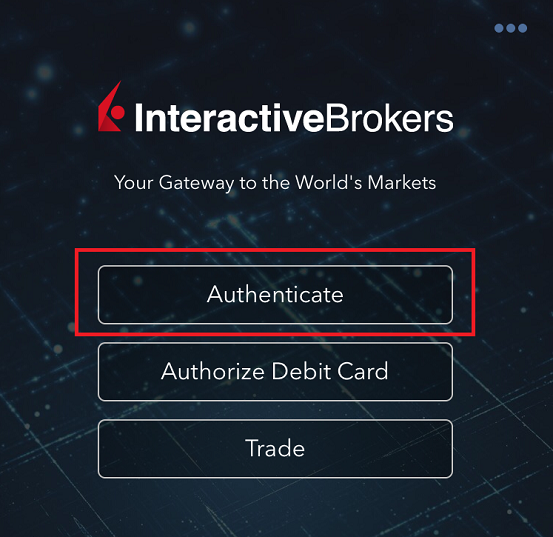
2. Tap on Authenticate (Figure 5) and then on Add User (Figure 6).
Figure 5. Figure 6.

3. Read the instructions and then tap on Continue (Figure 7).
Figure 7.

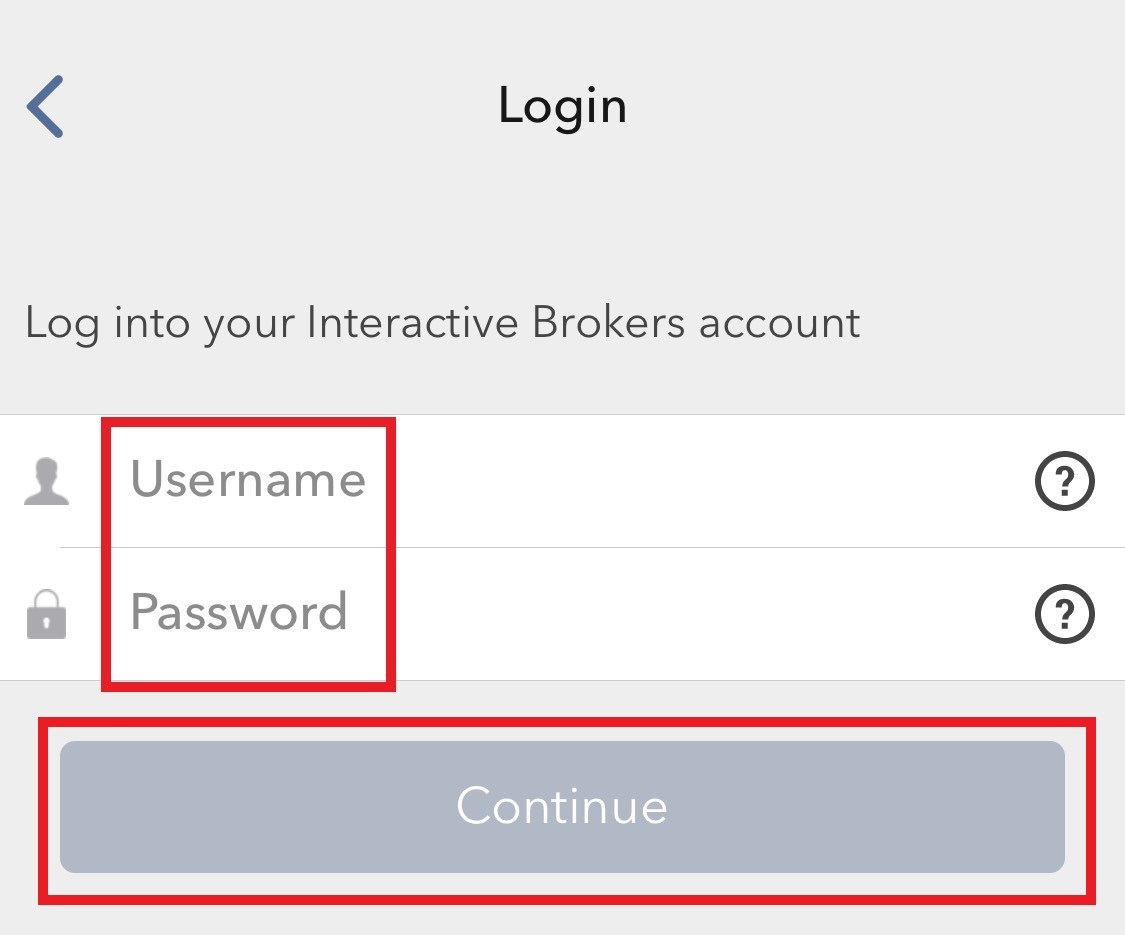
3. Enter your Username and Password, and then tap on Continue (Figure 8).
Figure 8.
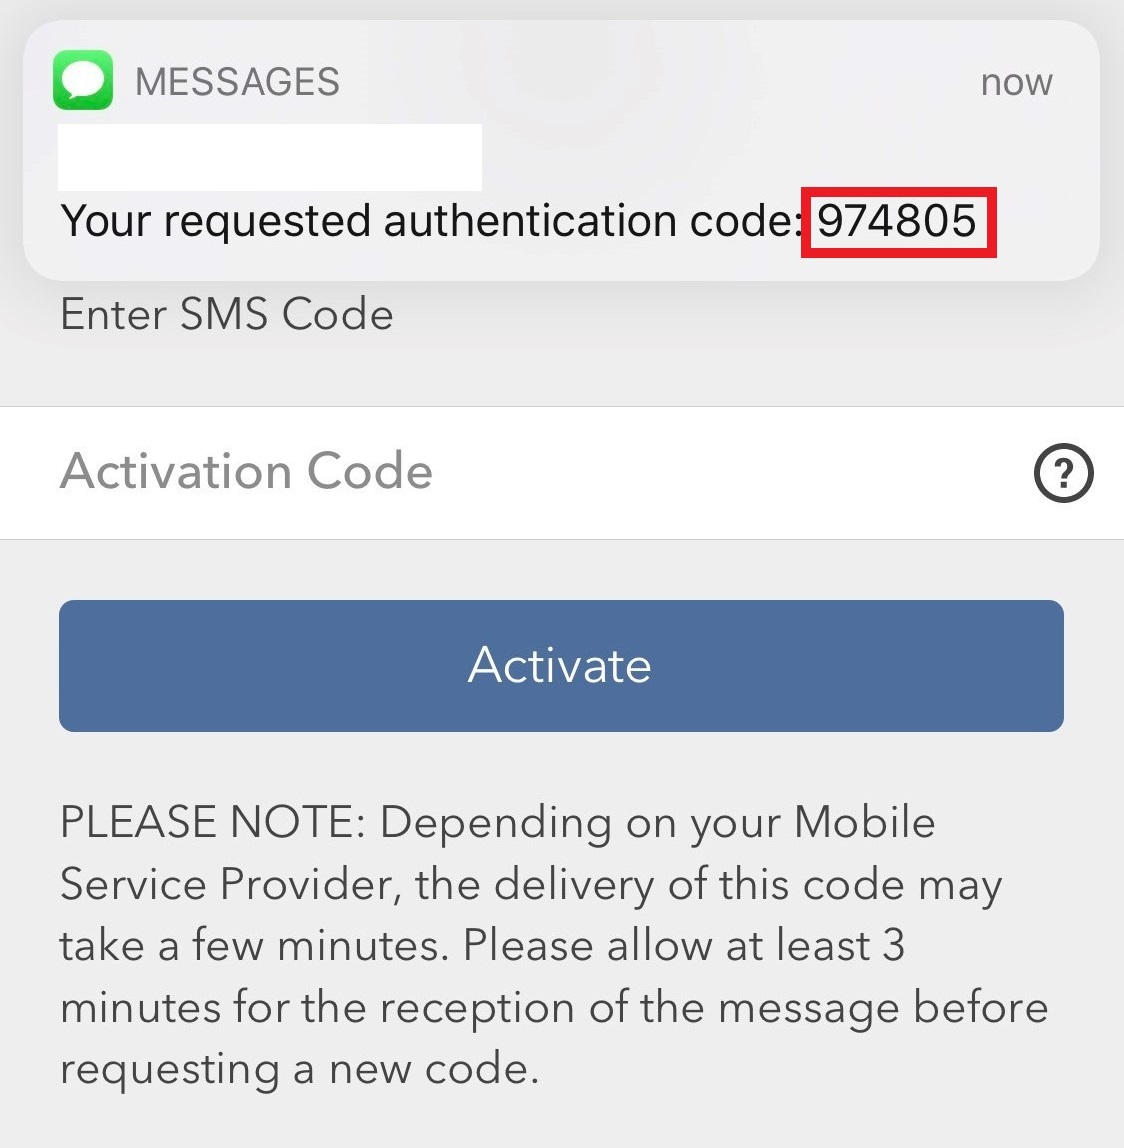
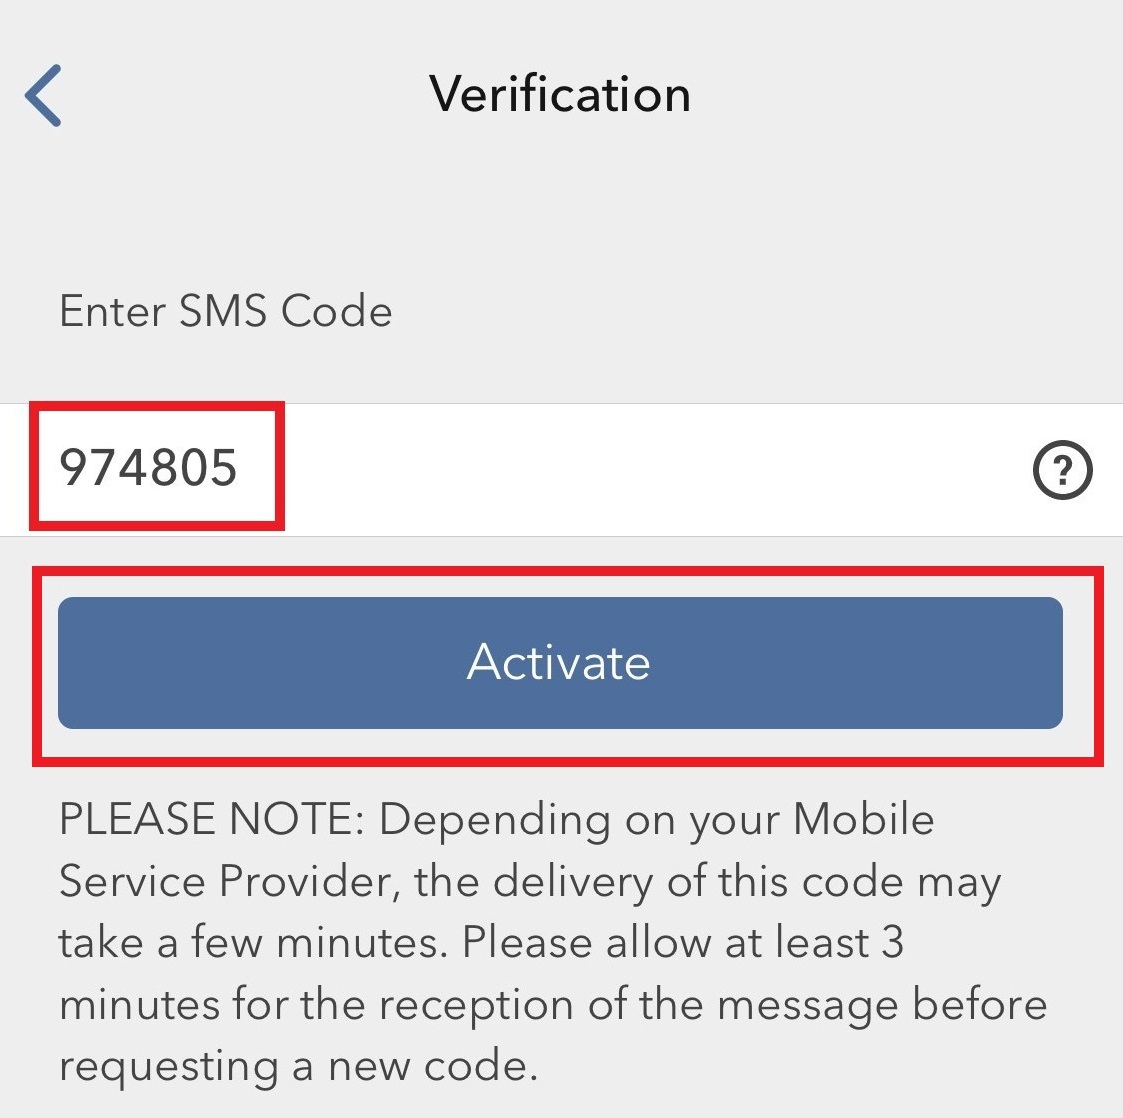
4. An Authentication Code will be sent via SMS to the mobile phone number listed on your account (Figure 9). Enter this Authentication Code in the Activation Code field and tap on Activate (Figure 10).
Figure 9. Figure 10.
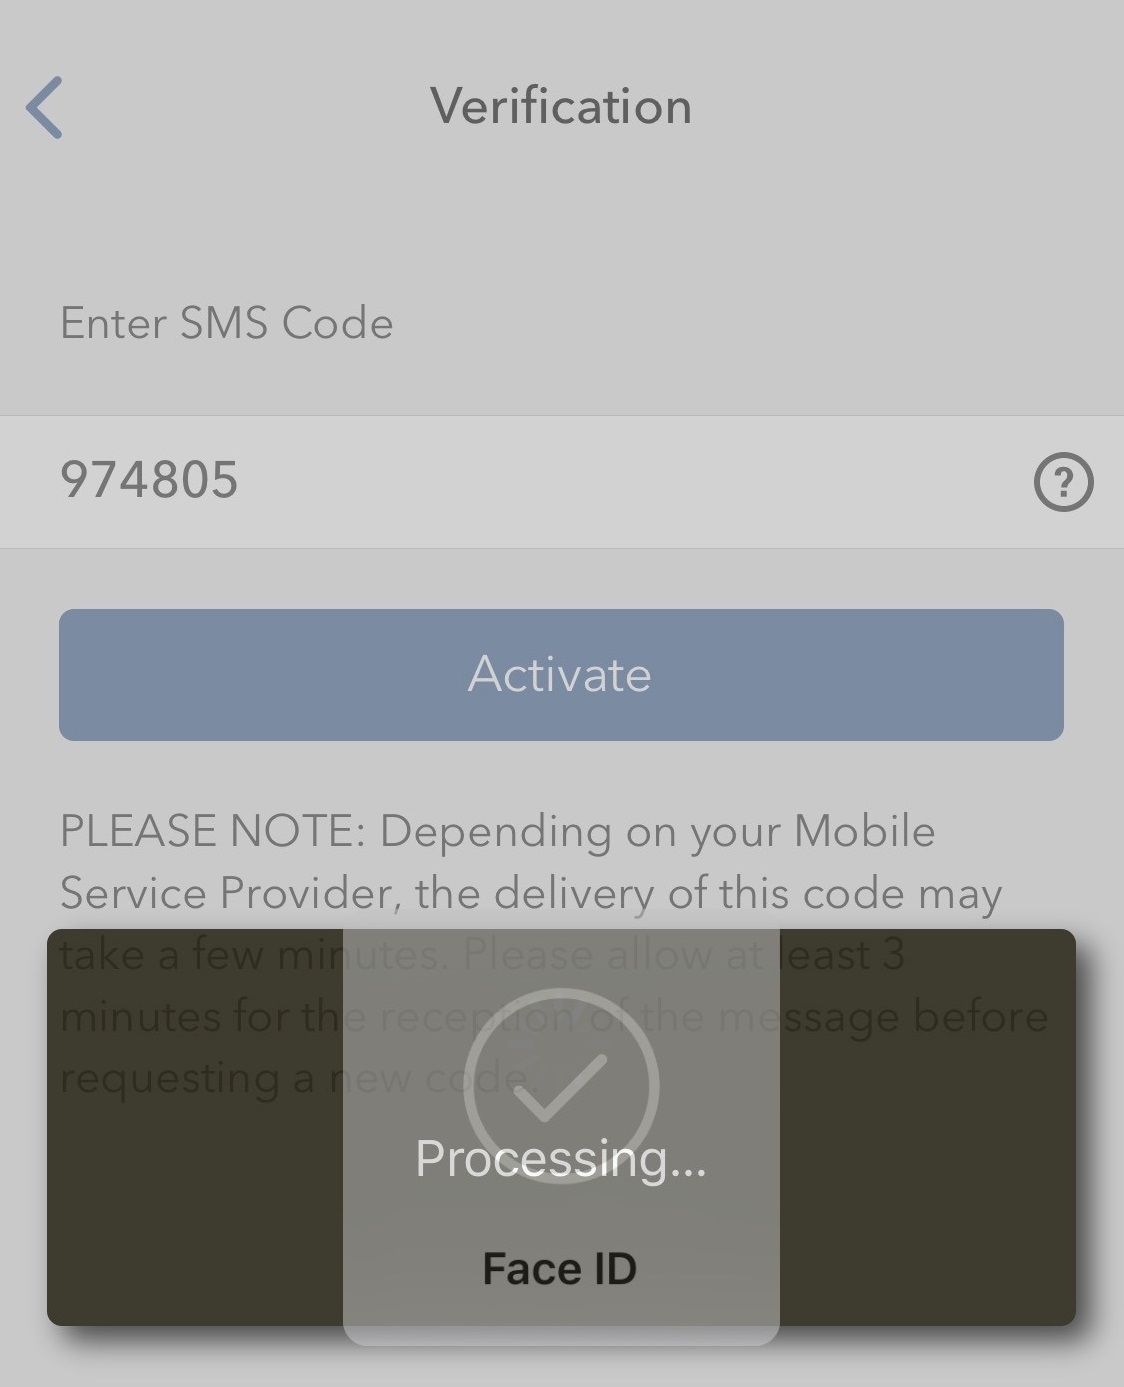
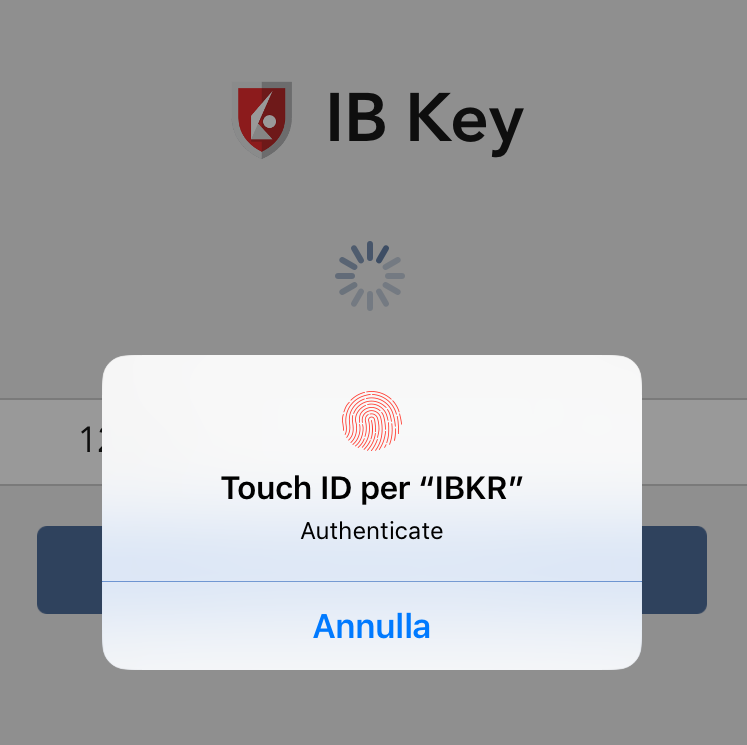
5. Depending on your smartphone's security settings, you will be asked to use your Passcode, Touch ID, or Face ID (Figure 11).
Figure 11.
6. If the activation has been successful, you will see a confirmation screen. Finally, tap on Done to complete the procedure (Figure 12).
Figure 12.
.jpeg)
Cómo iniciar sesión en IBKR Mobile cuando la autenticación a través de IBKR Mobile (IB Key) está activada en otro dispositivo
Background:
Este artículo está dirigido a los clientes que han activado la función de autenticación de IBKR Mobile (IB Key) en su smartphone y, a su vez, disponen de otro dispositivo móvil con el que desean llevar a cabo actividades de negociación.
Los clientes con dicha configuración podrán iniciar sesión en la plataforma de negociación de IBKR en el dispositivo de seguridad secundario. Deberán utilizar su smartphone y activar la función de autenticación de dos factores.
En este artículo se utilizará la terminología siguiente:
Dispositivo de autenticación: smartphone en el que se activará la función de autenticación de IBKR Mobile (IB Key)
Dispositivo de negociación: dispositivo en el que se llevarán a cabo sus actividades de negociación a través de la aplicación IBKR Mobile.
Procedimiento
Haga clic en el enlace que figura a continuación en función del sistema operativo de su dispositivo:
Para Apple iOS
1.USTED ACEPTA QUE LA TRADUCCIÓN SE LE HA FACILITADO PARA SU COMODIDAD Y QUE LA VERSIÓN INGLESA DE LAS NORMAS GOBERNARÁ EL CONCURSO. En su dispositivo de negociación, abra la aplicación IBKR Mobile. Introduzca sus credenciales en la pantalla de inicio de sesión y pulse Iniciar sesión
Figura 1
2. Pulse la opción de autenticación de dos factores (Figura 2). Se mostrará un código de desafío (Figura 3)
Figura 2 Figura 3
.png)
3. En el dispositivo utilizado para la autenticación, abra la aplicación IBKR Mobile.
Figura 4
.png)
4a. En caso de que no se inicie sesión de manera automática, pulse la opción Servicios (Figura 5) ubicada en la esquina superior izquierda, y pulse el botón Autentificar (Figura 6).
Figura 5 Figura 6
4b. En caso de ya se haya iniciado sesión, pulse en la opción Más ubicada en la esquina inferior derecha A continuación, deslícese hacia abajo y pulse la opción Autenticar
Figura 7
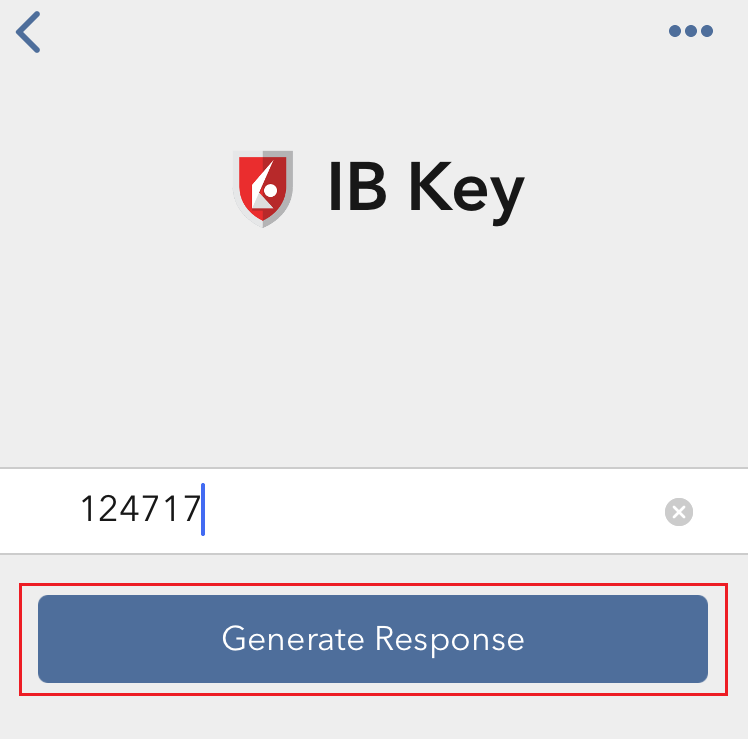
5. Introduzca el código de desafío obtenido en el paso 2. A continuación, pulse el botón Generar respuesta (Figura 8). Una vez haya facilitado todos los elementos de seguridad (Figura 9), recibirá una cadena de respuesta (Figura 10).
Figura 8 Figura 9 Figura 10
6. En su dispositivo de negociación, introduzca la cadena de respuesta en el campo "Introducir cadena de respuesta" y pulse el botón Enviar para finalizar el proceso de autenticación.
Figura 11
.png)
Para Android
1.USTED ACEPTA QUE LA TRADUCCIÓN SE LE HA FACILITADO PARA SU COMODIDAD Y QUE LA VERSIÓN INGLESA DE LAS NORMAS GOBERNARÁ EL CONCURSO. En su dispositivo de negociación, abra la aplicación de IBKR Mobile. Introduzca sus credenciales en la pantalla de inicio de sesión y pulse el botón Iniciar sesión
Figura 1
2. Pulse la opción Autenticación de dos factores (Figura 2). Se mostrará un código de desafío (Figura 3)
Figura 2 Figura 3
(1).png)
3. En el dispositivo de autenticación, abra la aplicación de IBKR Mobile.
Figura 4
4a. En caso de que no se inicie sesión de manera automática, pulse la opción Servicios (Figura 5) y a continuación pulse la opción Autenticar (Figura 6).
Figura 5 Figura 6
.png)
4b. En caso de que ya se haya iniciado sesión, pulse el botón de Menú (Figura 7), deslícese hacia abajo y pulse la opción Autenticar (Figura 8).
Figura 7 Figura 8
.png)
.png)
Figura 7 Figura 8
5. Introduzca el PIN de IBKR Mobile y el código de desafío obtenido en el paso 2. A continuación, pulse el botón generar respuesta (Figura 9). Se mostrará la cadena de respuesta (Figura 10)
Figura 9 Figura 10
.png)
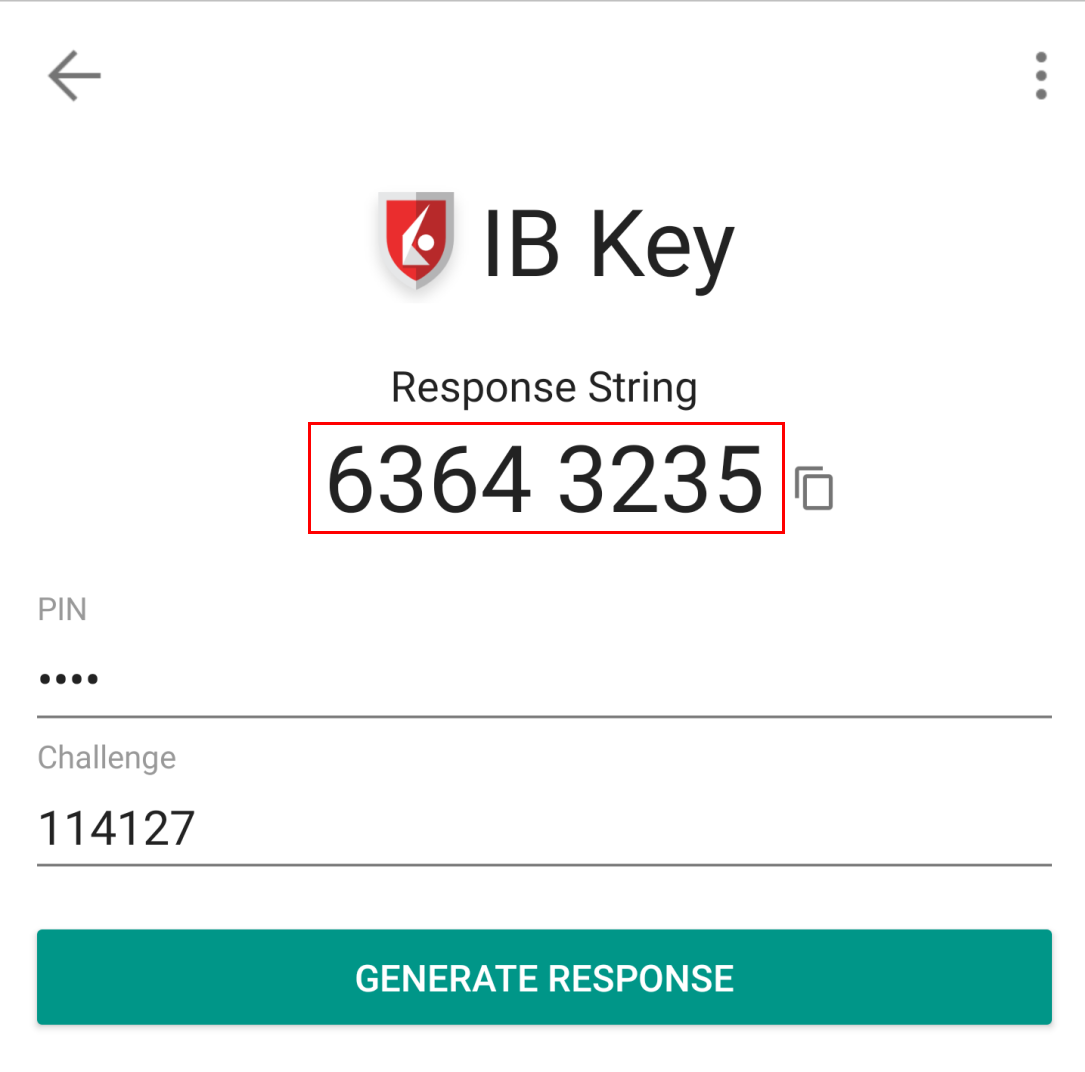
Figura 9 Figura 10
6. En el dispositivo de negociación, introduzca la cadena de respuesta en el campo "Introducir cadena de respuesta" y pulse el botón Iniciar sesión para finalizar el proceso de autenticación.
Figura 11

Referencias
- Consulte el artículo KB2260 para obtener instrucciones generales acerca de cómo utilizar la autenticación a través de IBKR Mobile (IB Key)
- Para obtener instrucciones acerca de cómo migrar la autenticación a través de IBKR Mobile (IB Key) a un nuevo smartphone, consulte el artículo KB3073.
- Para obtener instrucciones acerca de cómo realizar la autenticación a través de IBKR Mobile (IB Key), consulte el artículo KB2748.
How to fix the "Cannot create ... file" error during TWS installation on MacOS
Background:
The filesystem permissions are controlled by your machines operating system. One of their functions is to secure your files, preventing unauthorized access or undesired modifications to the system and to your personal data.
Some software on your computer may modify or override the permissions assigned by the operating system. Under certain circumstances, this prevents the TWS installer from accessing the folder where the application core files have to be created (/users/youruser/home/Applications). In such cases, the TWS installation usually displays the error "Cannot create ... file. Shall I try again?"
In this article we explain how to reset the filesystem permission of the "Applications" folder located under your user home folder in order to allow a smooth run of the TWS installation.
Procedure:
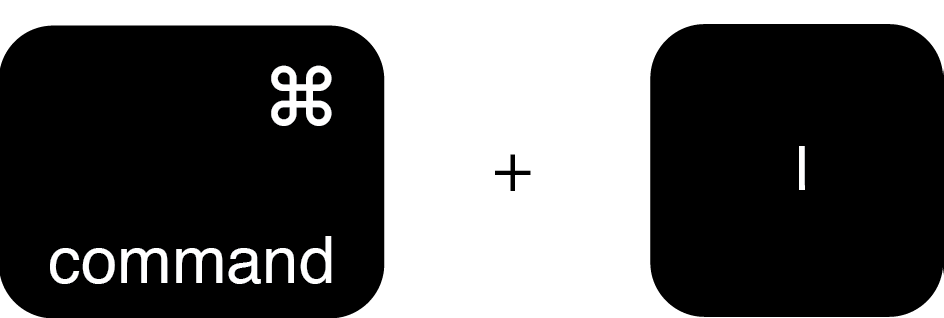
1. On your keyboard, press ⌘CMD + ⇧Shift +H to open your home folder
Figure 1

2. Select the folder "Applications" within your home folder and press ⌘CMD + I to open the Info panel
Figure 2
2. At the bottom right of the panel, click on the padlock
Figure 3
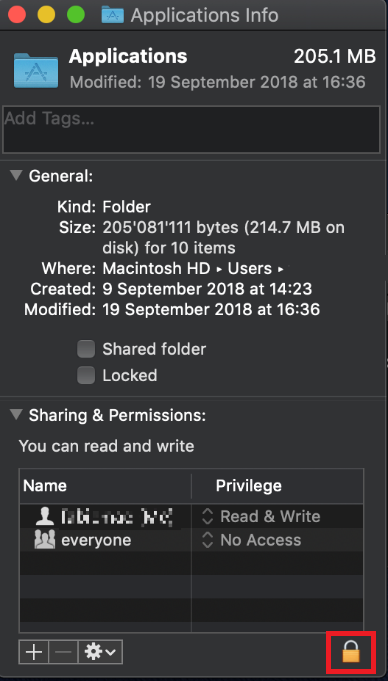
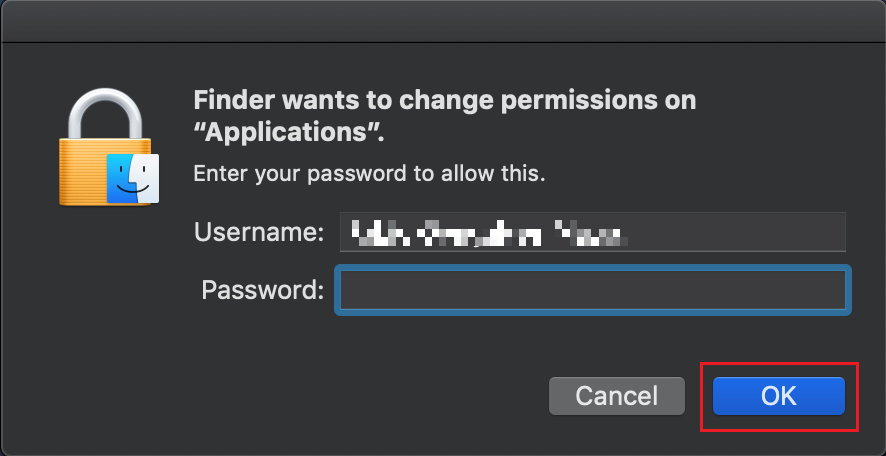
3. To unlock the permissions panel, enter your MacOS credentials and click OK
Figure 4
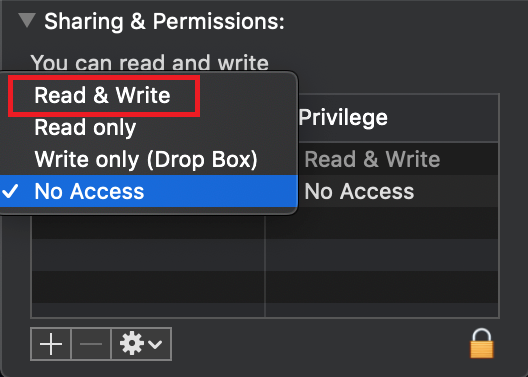
4. In the line correspondent to "everyone", click on "No Access" (Figure 5) and then select "Read & Write" (Figure 6)
Figure 5 Figure 6
.png)
5. Click on the icon bellow the permissions panel and select “Apply to enclosed items..."
Figure 7
.png)
6. Now run the TWS installer and click on Next> until you complete the installation
Figure 8
.png)
7. Once the installation has completed successfully, repeat the previous steps from 1. to 5. setting back the permissions of “everyone” to “Read Only” to revert your changes to the initial status
How to Log in to IBKR Mobile when IBKR Mobile Authentication (IB Key) is Enabled on Another Phone
Background:
This article is intended for clients who have activated the IBKR Mobile Authentication (IB Key) on their smartphone and possess as well an additional mobile device, on which they desire to trade.
Clients with this setup will be able to log in to the IBKR Mobile trading platform on their secondary device, using their smartphone to complete the Two-Factor Authentication step.
For the purposes of this article, we will use the following naming convention:
Authentication device: this is the smartphone on which you activated the IBKR Mobile Authentication (IB Key)
Trading device: this is where you want to use IBKR Mobile app for trading.
Procedure
Please click on one of the link below according to your phone operating system:
Apple iOS
1. On your Trading device, launch the IBKR Mobile app. Enter your your credentials in the login screen and tap Log In
Figure 1
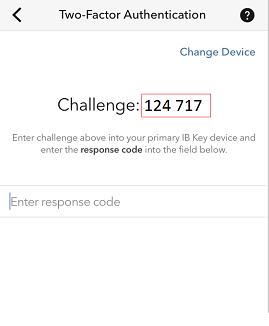
2. Tap Two-Factor Authentication (Figure 2). A Challenge code will be displayed (Figure 3)
Figure 2 Figure 3
3. On the Authentication device, launch the IBKR Mobile app
Figure 4
4a. If you are not automatically logged in, tap Services (Figure 5) on the top left, then tap Authenticate (Figure 6).
Figure 5 Figure 6
4b. If you are already logged in, tap on the More button on the bottom right. Then, scroll down and tap on Authenticate
Figure 7
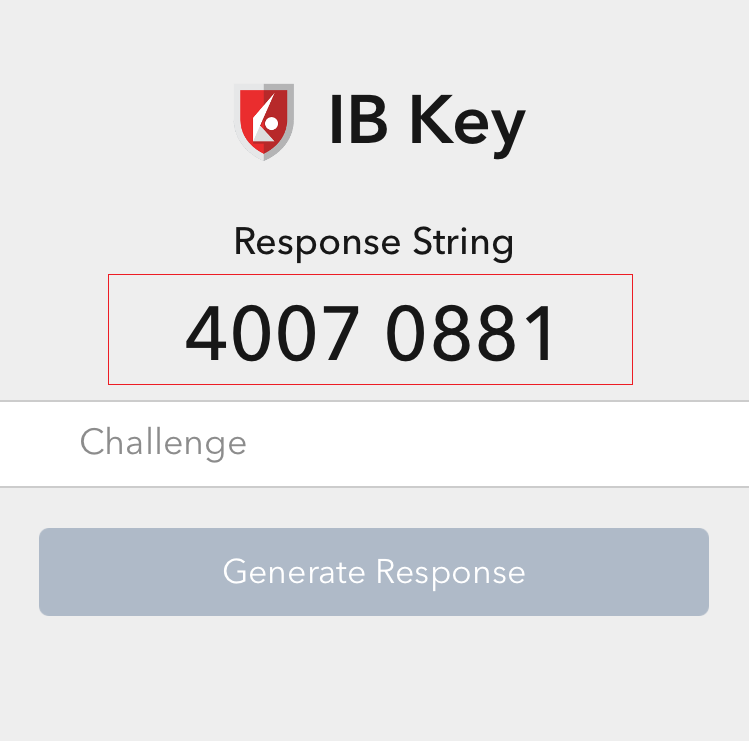
5. Enter the Challenge code you obtained at point 2. Then tap Generate Response (Figure 8). Once you have provided your security element (Figure 9), you will receive a Response String (Figure 10).
Figure 8 Figure 9 Figure 10
6. On your Trading device, enter the Response String into the "Enter response code" field and tap Send to finalize the authentication process.
Figure 11
Android
1. On your Trading device, launch the IBKR Mobile app. Enter your your credentials in the login screen and tap Log In
Figure 1
2. Tap on the option Two-Factor Authentication (Figure 2). You will see a Challenge code (Figure 3)
Figure 2 Figure 3
3. On the Authentication device, launch the IBKR Mobile app
Figure 4
4a. If you are not automatically logged in, tap Services (Figure 5) and then tap Authenticate (Figure 6).
Figure 5 Figure 6
4b. If you are already logged in, tap the Menu button (Figure 7), scroll down and tap Authenticate (Figure 8).
Figure 7 Figure 8
Figure 7 Figure 8
5. Enter your IBKR Mobile PIN and the Challenge code you obtained at point 2. Then tap Generate Response (Figure 9). A Response String will be displayed (Figure 10)
Figure 9 Figure 10
Figure 9 Figure 10
6. On your Trading device, enter the Response String in to the "Enter response code" field and then tap Log In to finalize the authentication process.
Figure 11
How do I enable the Notifications for the IBKR Mobile app
Overview:
What is a notification?
A push notification is a brief message which is sent ("pushed") from a back-end server to your device over the Internet. Apps developers use those attention-grabbing messages to quickly and effectively reach the recipients, even if they are not currently engaging with their application. Notifications can deliver information to users or advise them of a specific action they are invited or required to perform.
Background:
Why does the IBKR Mobile app use notifications?
The IBKR Mobile application uses notifications for informational purposes, as well as two-factor authentication. In the latter case, the user is invited to tap on the notification, which will automatically open the IBKR Mobile app and begin the authentication process.
This procedure explains how to manually enable notifications for the IBKR Mobile app. Please click the link below that matches your smartphone's operating system.
1. On your home screen, tap Settings (Figure 1), then Notifications (Figure 2) and finally IBKR (Figure 3)
Figure 1 Figure 2 Figure 3
2. In the IBKR app settings, you will see a number of different options. We recommend to set them in the following way (Figure 4):
-
Allow Notifications: enabled
-
Lock Screen, Notification Center, Banners: selected
-
Banner style: Persistent
-
Badges: enabled
-
Show Previews: Always
Figure 4
1. Go the Settings of your phone, then tap Apps & notifications1 (Figure 1) then IBKR Mobile (Figure 2) and finally App notifications (Figure 3)
Figure 1 Figure 2 Figure 3
Figure 1 Figure 2 Figure 3
2. Ensure that notifications for this app are globally On and the switches Allow notification dots, Allow interruptions, On the lock screen are all enabled (Figure 4). According to your personal preference, you may want to enable as well the switch Override Do Not Disturb
Figure 4
Figure 4
Please note that menu items labels and positions may vary according to your device vendor and software version.
1. The Apps & notifications item may be called Sound & notification on certain devices
References:
- See KB2260 for instruction on how to activate and operate IBKR Mobile Authentication
- See KB3234 for troubleshooting missing IBKR Mobile notifications
- See KB2748 for information about IBKR Mobile Authentication recovery