Cómo enviar documentos a IBKR utilizando su smartphone
Interactive Brokers le permite enviarnos la copia de un documento incluso si no tiene actualmente acceso a un escáner. Puede tomar una fotografía del documento solicitado con su smartphone.
A continuación, encontrará las instrucciones sobre cómo tomar una fotografía y enviarla por correo electrónico a Interactive Brokers con los siguientes sistemas operativos:
Si ya sabe cómo hacer para tomar y enviar imágenes por correo electrónico utilizando su smartphone, haga clic AQUÍ - Adónde enviar el correo electrónico y qué incluir en el asunto.
iOS
1. Deslice el dedo desde abajo hacia arriba sobre la pantalla de su smartphone y pulse el icono de cámara.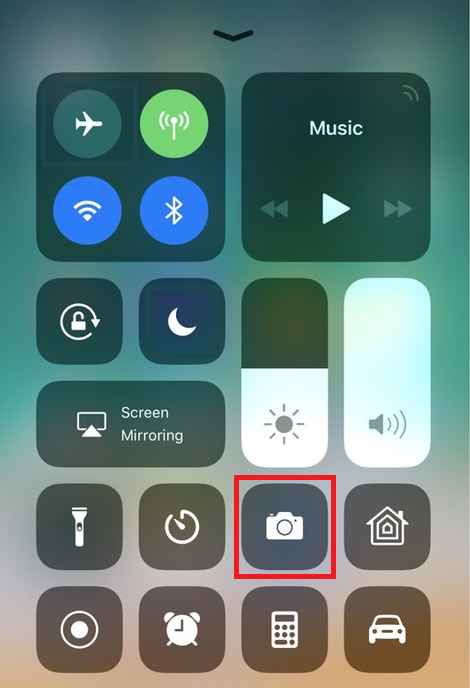
Si no tiene el icono de cámara, pulse el icono de la aplicación de la cámara desde la pantalla de inicio de su iPhone.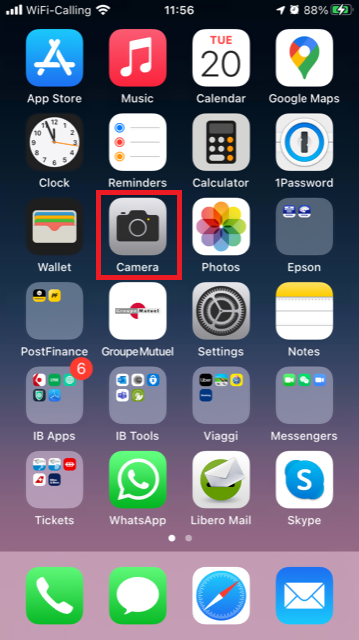
Normalmente, su móvil debería ahora activar la cámara posterior. Si activa la cámara frontal, pulse el botón para cambiar de cámara.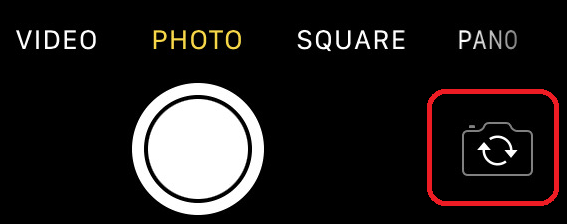
2. Coloque su iPhone sobre el documento y enmarque el segmento o la parte de la página del documento que desea capturar.

3. Asegúrese de tener una luz uniforme suficiente y de no crear sombras sobre el documento debido a su posición. Sostenga el smartphone firmemente con sus manos y evite temblar. Pulse sobre el botón de captura para tomar la fotografía.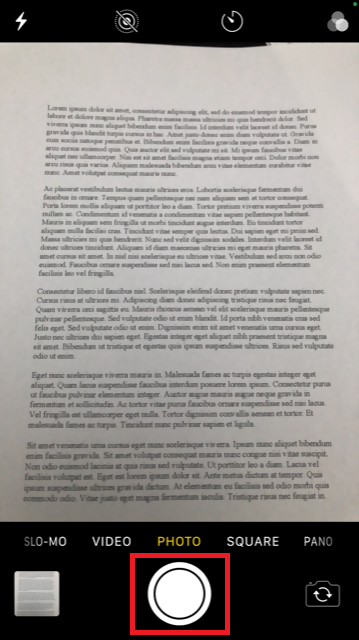
4. Pulse sobre la vista miniatura de la imagen en la esquina inferior izquierda para acceder a la imagen que acaba de capturar.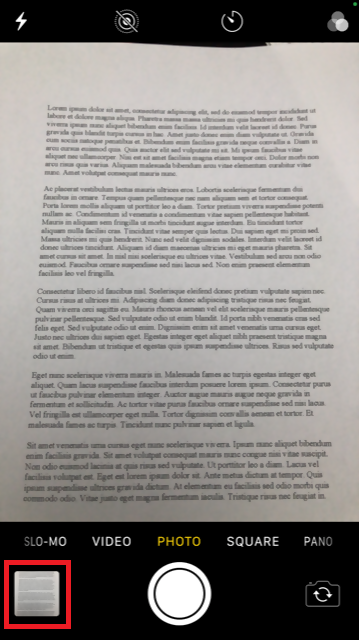
5. Asegúrese de que la imagen sea clara y que el documento pueda verse claramente. Puede agrandar la imagen y verla en detalle, mantenga pulsada una parte de la pantalla con dos dedos y sepárelos para ampliar la imagen.

Si la imagen no presenta una buena calidad o luz, repita los pasos anteriores para tomar una fotografía más nítida.
6. Pulse sobre el icono de compartir en la esquina inferior izquierda de la pantalla.
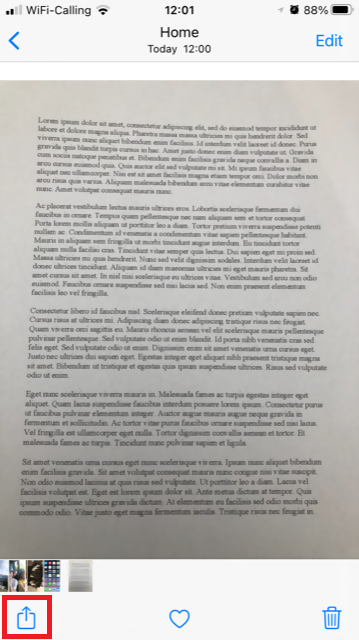
7. Pulse sobre el icono de correo.
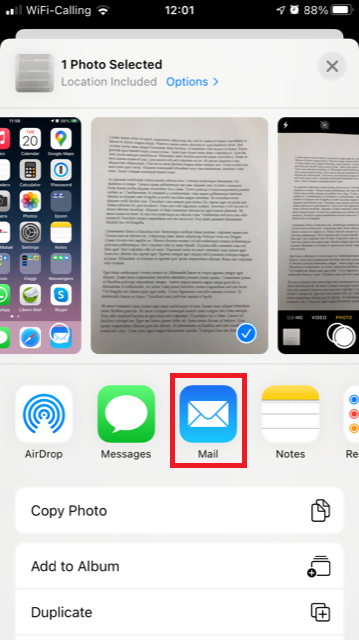
Nota: para enviar correos, su móvil debe estar configurado para eso. Contacte con su proveedor de correo electrónico si no está familiarizado con este procedimiento.
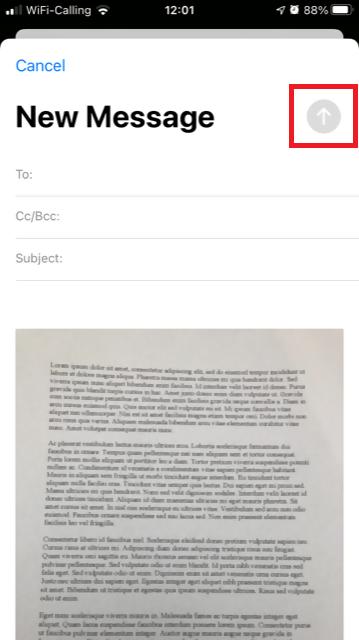
8. Consulte AQUÍ sobre cómo rellenar los campos Para: y Asunto: de su correo. Una vez que el correo esté listo, pulse el icono de flecha en la parte superior derecha para enviarlo.
Android
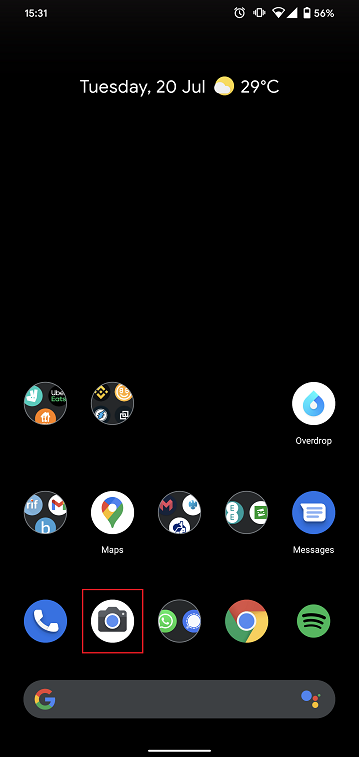
1. Abra su lista de aplicaciones e inicie la aplicación de la cámara. Alternativamente, iníciela desde su pantalla de inicio. Dependiendo del modelo de su móvil, fabricante o configuración, la aplicación podrá tener otro nombre.
Normalmente, su móvil debería ahora activar la cámara posterior. Si activa la cámara frontal, pulse el botón para cambiar de cámara.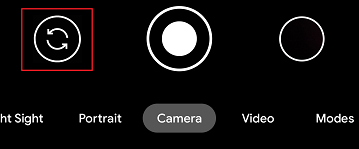
2. Coloque su Android sobre el documento y enmarque el segmento o la parte de la página del documento que desea capturar.

3. Asegúrese de tener una luz uniforme suficiente y de no crear sombras sobre el documento debido a su posición. Sostenga el smartphone firmemente con sus manos y evite temblar. Pulse sobre el botón de captura para tomar la fotografía.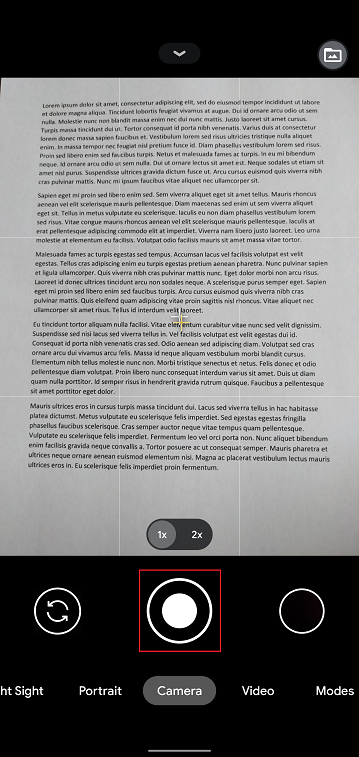
4. Asegúrese de que la imagen sea clara y que el documento pueda verse claramente. Puede agrandar la imagen y verla en detalle, mantenga pulsada una parte de la pantalla con dos dedos y sepárelos para ampliar la imagen.

Si la imagen no presenta una buena calidad o luz, repita los pasos anteriores para tomar una fotografía más nítida.
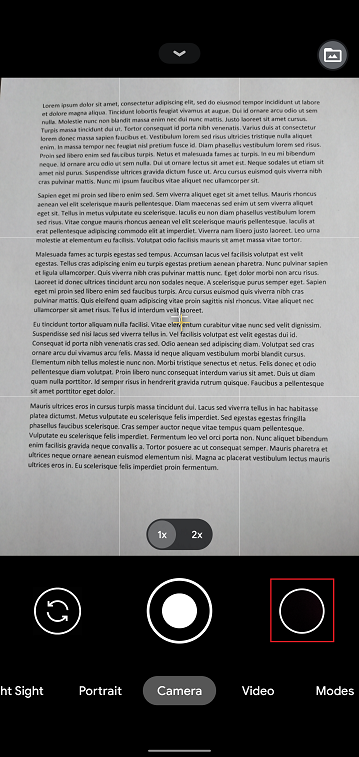
5. Pulse el icono de círculo vacío en la esquina inferior derecha de la pantalla.
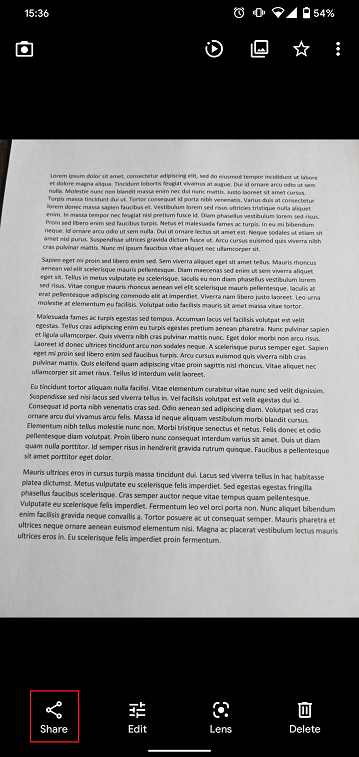
6. Pulse sobre el icono de compartir en la esquina inferior izquierda de la pantalla.
7. En el menú de compartir que se mostrará, pulse el icono del cliente de correo electrónico configurado en su móvil. En el ejemplo de la imagen debajo, se llama Gmail, pero el nombre podrá variar de acuerdo con su configuración específica.
.png)
Nota: para enviar correos, su móvil debe estar configurado para eso. Contacte con su proveedor de correo electrónico si no está familiarizado con este procedimiento.
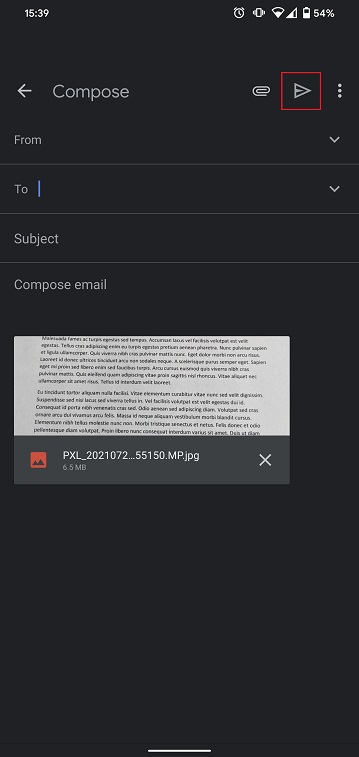
8. Vea AQUÍ cómo rellenar los campos Para y Asunto de su correo electrónico. Una vez que el correo esté listo, pulse el icono del avión en la parte superior derecha para enviarlo.
ADÓNDE ENVIAR EL CORREO ELECTRÓNICO Y QUÉ INCLUIR EN EL ASUNTO
El correo electrónico ha de crearse siguiendo las instrucciones a continuación:
1. En el tipo de campo Para::
- newaccounts@interactivebrokers.com si es residente de un país no europeo
- newaccounts.uk@interactivebrokers.co.uk si es residente europeo
2. El campo Asunto: deberá contener toda la información siguiente:
- Su número de cuenta (normalmente tiene el formato Uxxxxxxx, en donde x son números o su nombre de usuario
- El propósito de enviar el documento. Utilice la convención siguiente:
- PoRes para prueba de dirección residencial
- PID para prueba de identidad
Resolución de problemas de conexión con las plataformas de negociación
Haga clic en el enlace a continuación que mejor describe su situación:
a. Si se encuentra operando con una clave de acceso temporal, tenga en cuenta que los caracteres alfanuméricos son sensibles a mayúsculas y minúsculas, y deberán ingresarse en mayúsculas
b. Si se encuentra operando una tarjeta de seguridad o un dispositivo electrónico, tenga en cuenta que no deberá haber espacios entre los caracteres
c. Los puertos 4000/4001 están bloqueados. Estos puertos están a menudo bloqueados para conexiones públicas, como las de hoteles, cafés, etc., y deben abrirse para cumplir con el protocolo TCP entrante/saliente. Además, si tiene un enrutador conectado a su ordenador, estos puertos deberán estar abiertos en el enrutador.*
*Haga clic aquí para comprobar su estado de conectividad: Página de prueba de conectividad dedicada de IBKR.
How to verify your identity using your Secure Login Device
Some tasks in Client Portal will ask you to verify your identity by using the Challenge Code/Response String method in order to proceed further.
This article will guide you in completing these tasks with the following Secure Login Devices:
-----------------------------------------------------------------------------------------------------------------------------------------------------------
Verify your identity with IB Key (iOS)
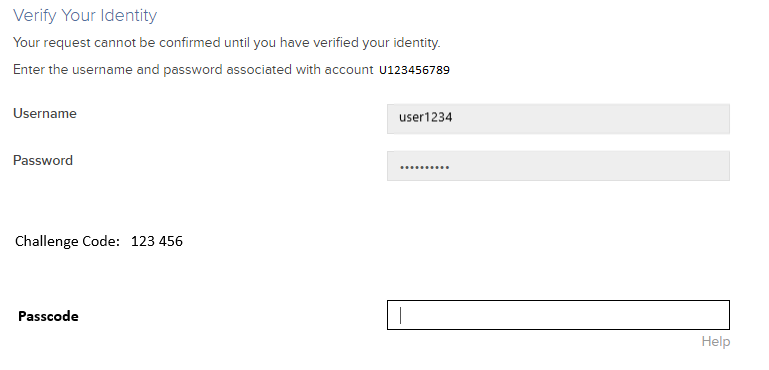
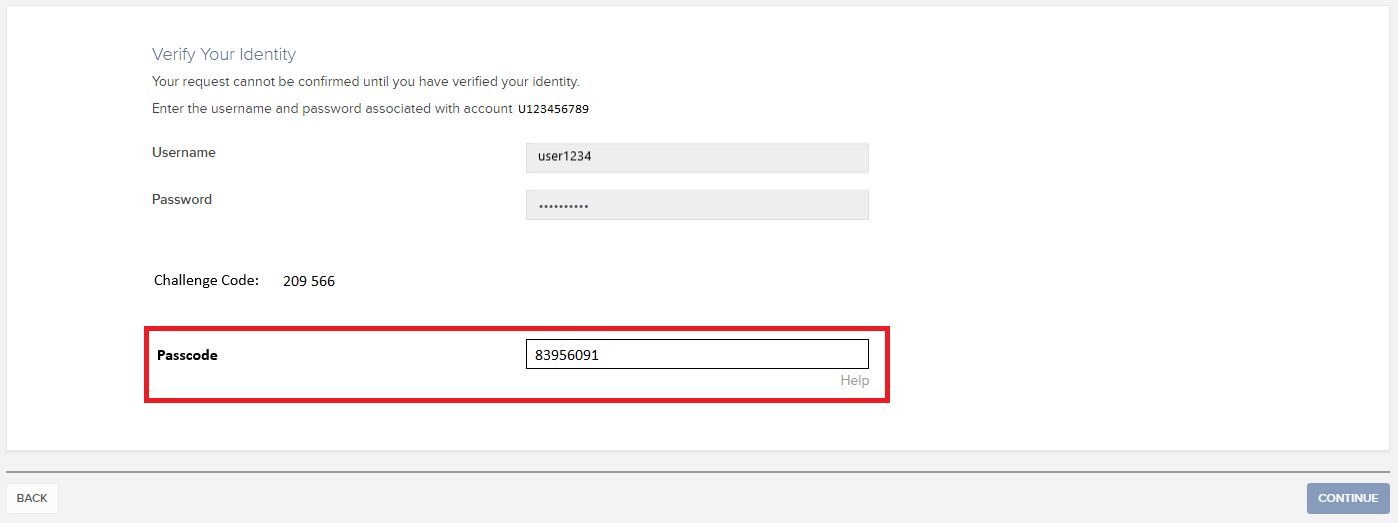
1. When you initiate a task that requires a verification, you will be prompted to enter Username and Password. Fill out the information and click on Continue (Figure 1).
Figure 1.
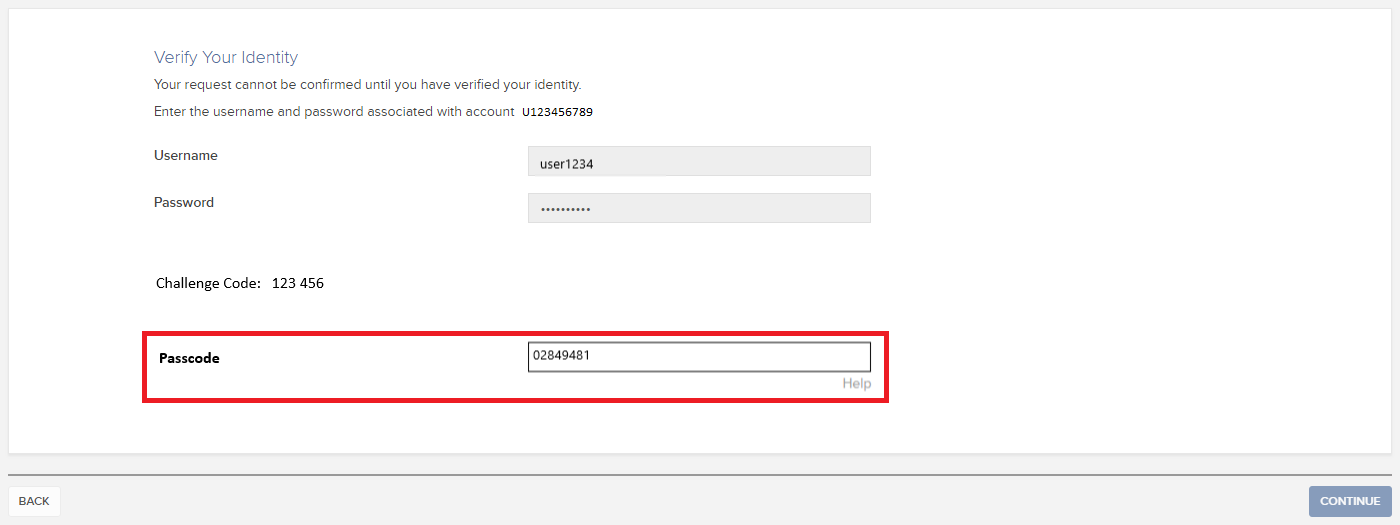
2. A Challenge Code will be displayed, along with a passcode field to enter a response (Figure 2). You will enter this Challenge Code onto your phone.
Figure 2.
3. Launch IBKR Mobile on your iOS smartphone, and...
3.a. If the app opens with the home screen (Figure 3), select Authenticate then proceed with step 4.
3.b. If the app opens with the login screen (Figure 4), tap Services on the top left (red arrow), select Authenticate (Figure 3) and proceed with step 4.
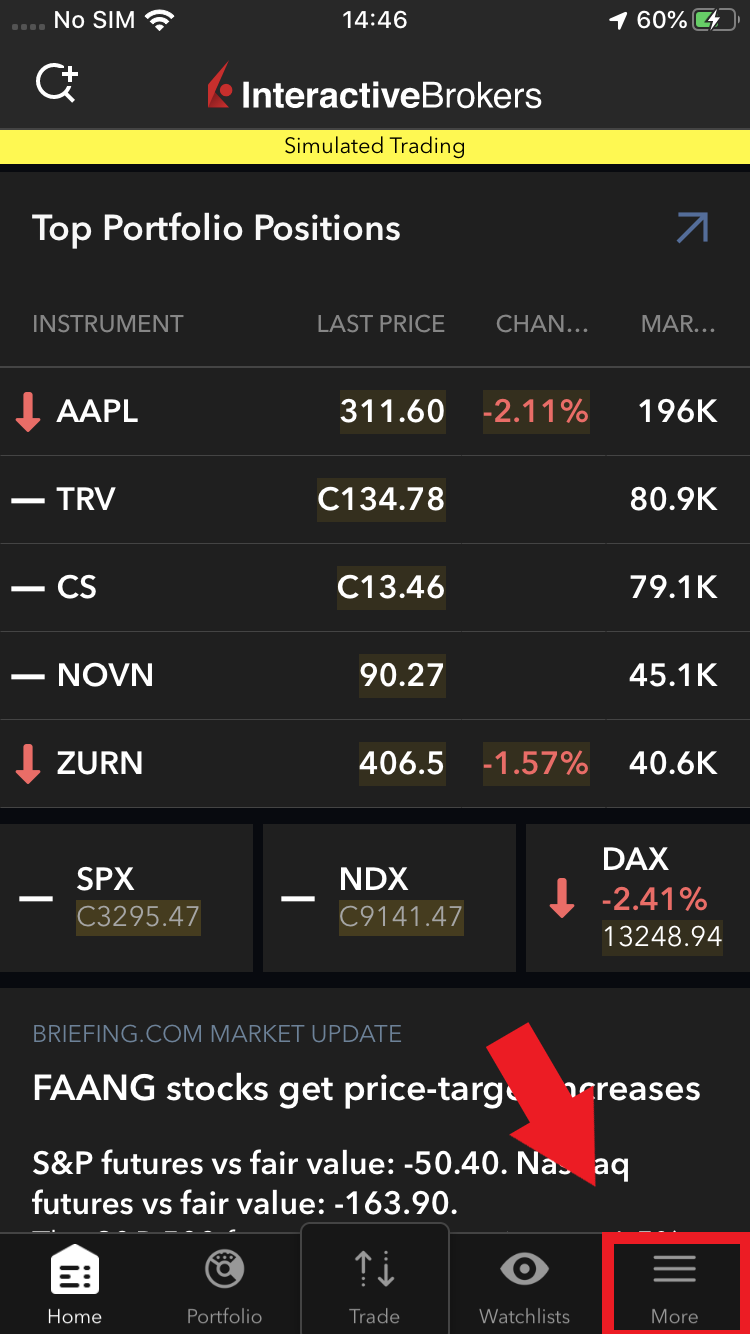
3.c. If the app opens with your Home Page, Portfolio, Watchlists, or similar (Figure 5), tap More on the bottom-right (red arrow). Then tap Two-Factor Authentication (Figure 6), tap Generate Code (Figure 7) and proceed with step 4.
Figure 3. Figure 4.
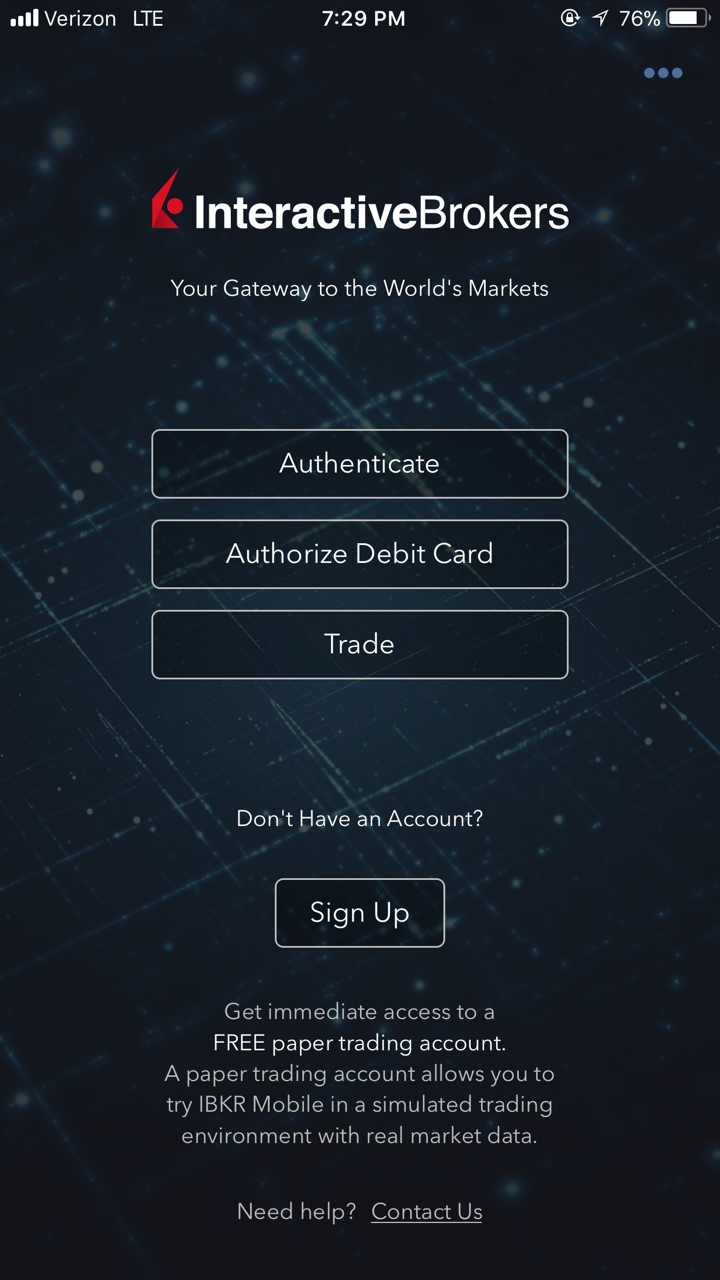
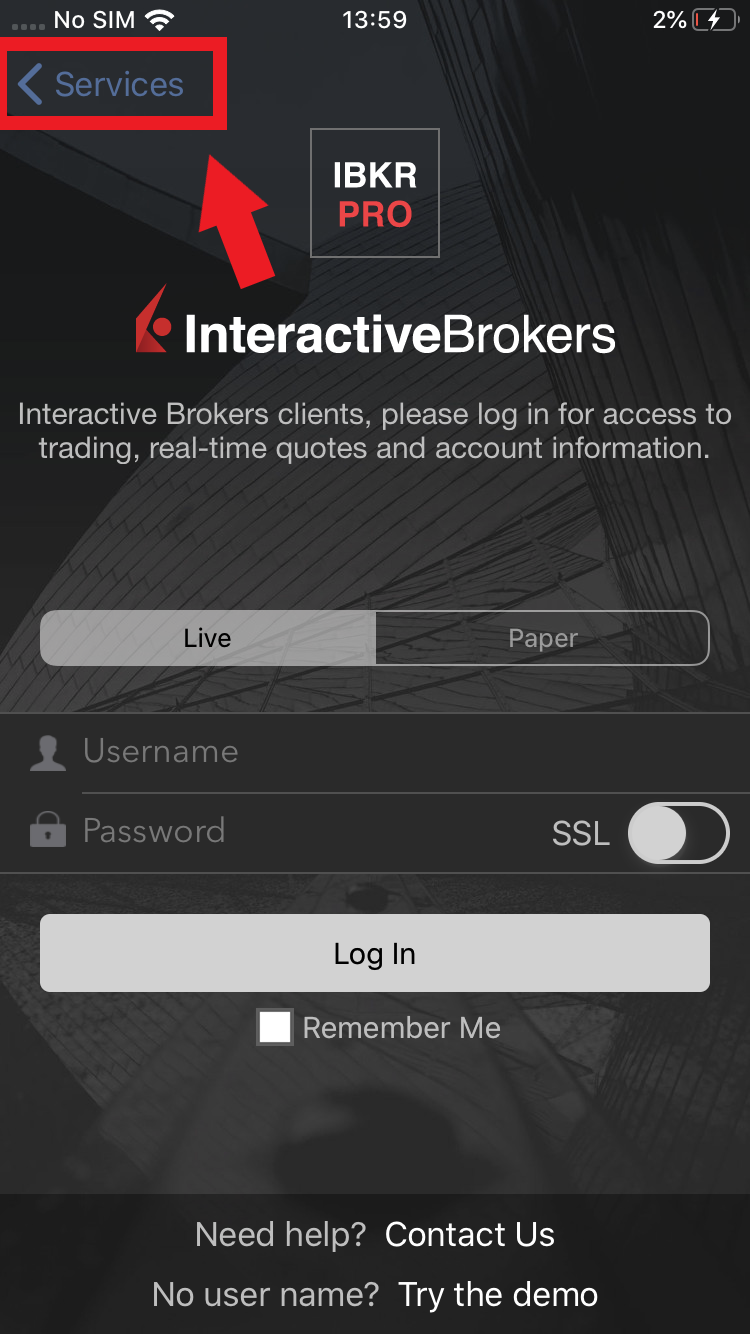
Figure 5. Figure 6. Figure 7.
.jpeg)
.jpeg)
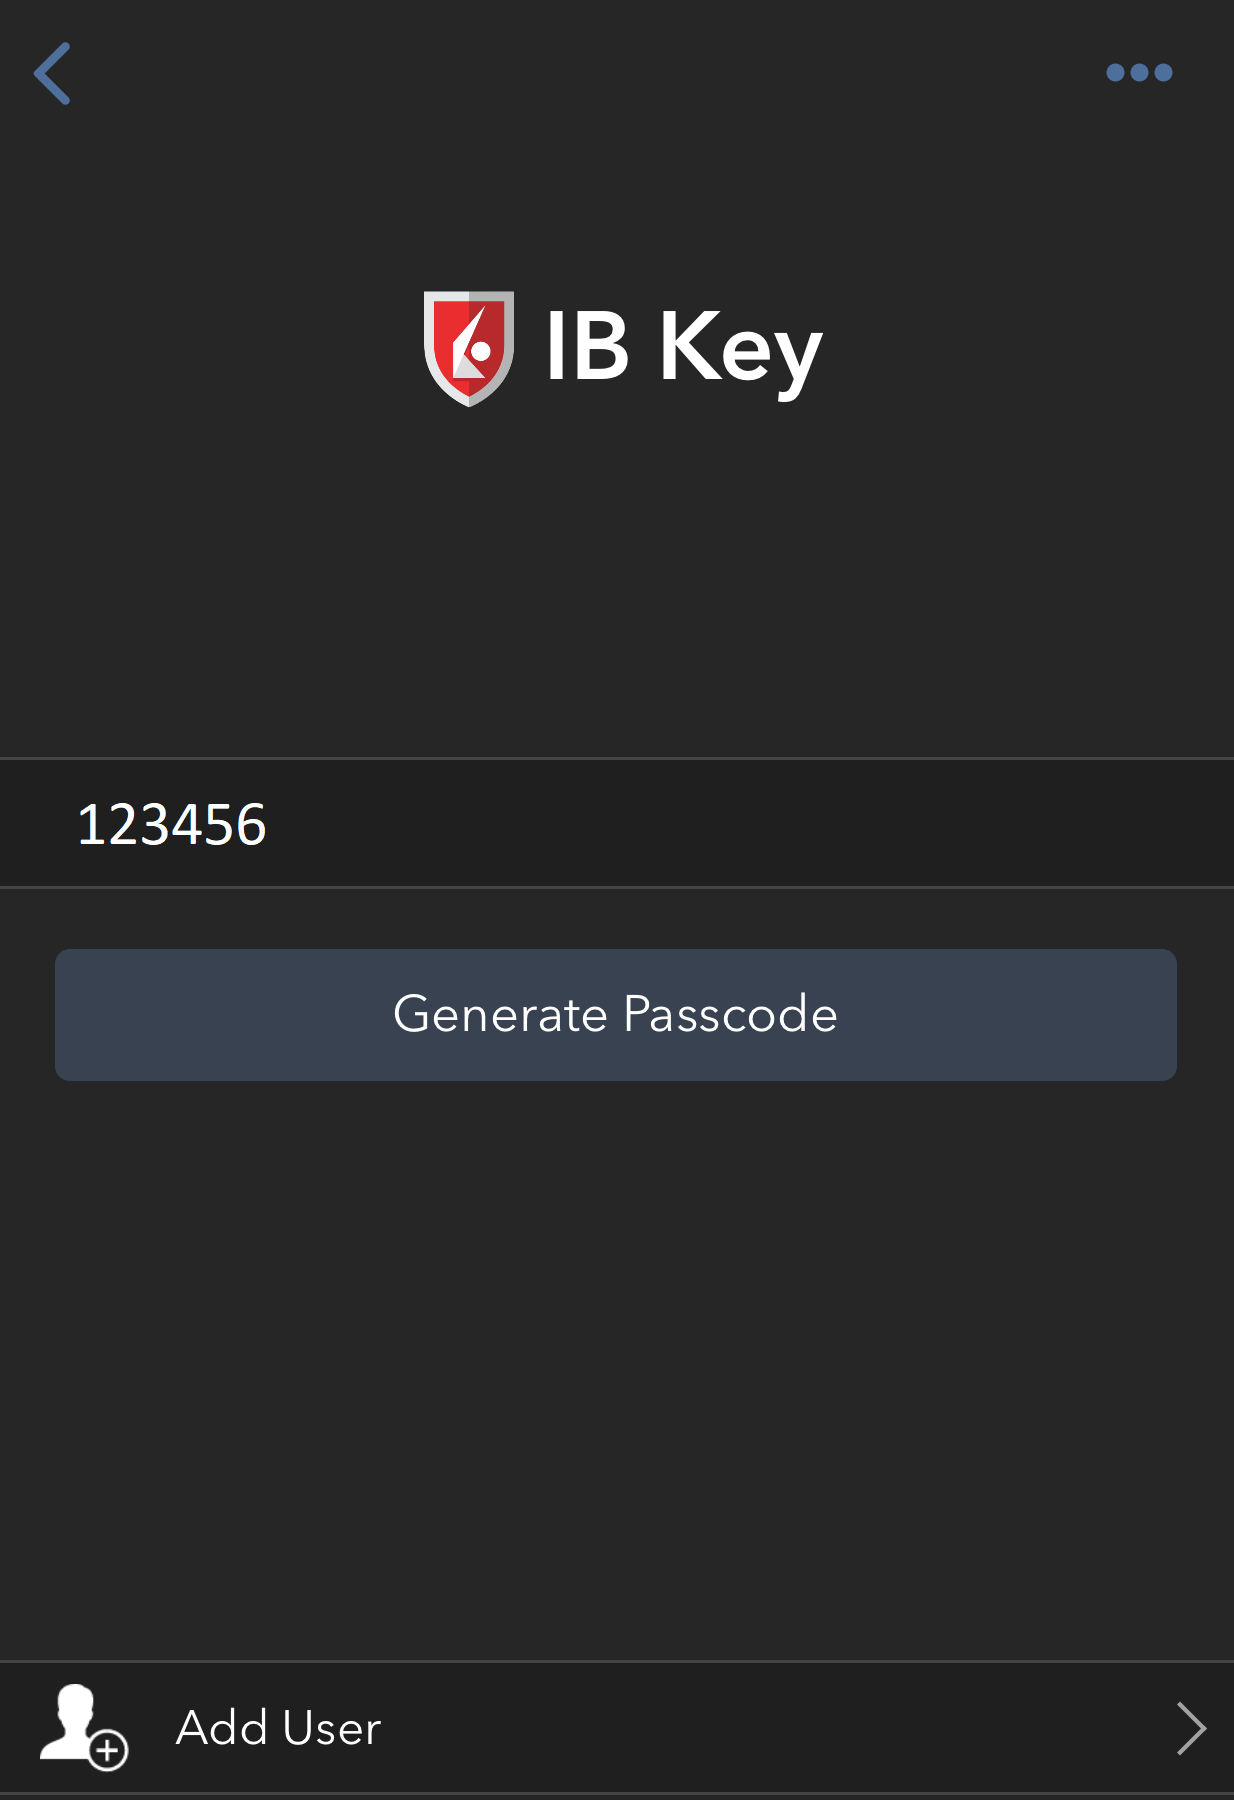
4. Type the Challenge Code from Client Portal (see step 2.) into the corresponding field and select Generate Passcode (Figure 8).
Figure 8.
5. Use Touch ID or Face ID for two-factor authentication.
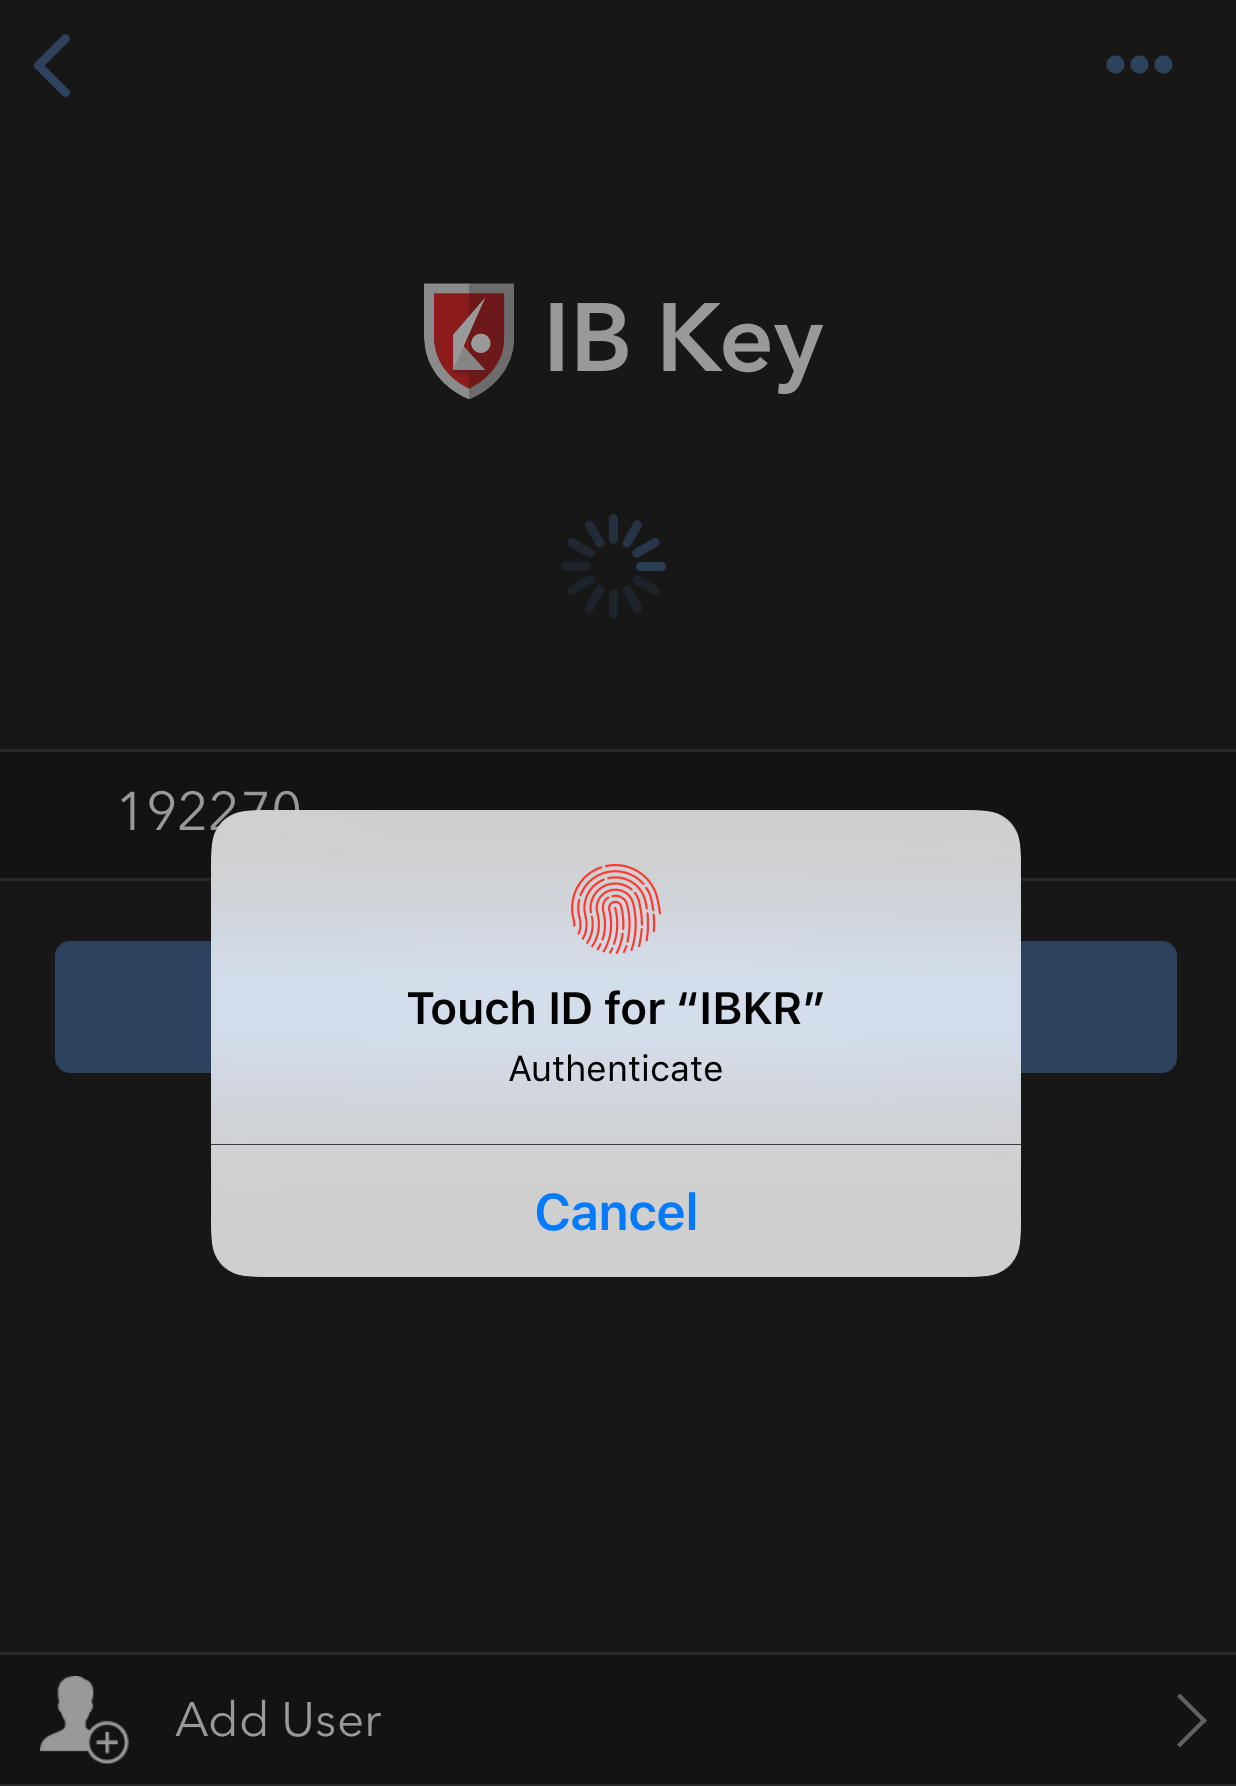
If Touch ID has not been activated, IB Key will prompt you to enter your smartphone's passcode. A response string will then be generated (Figure 9).
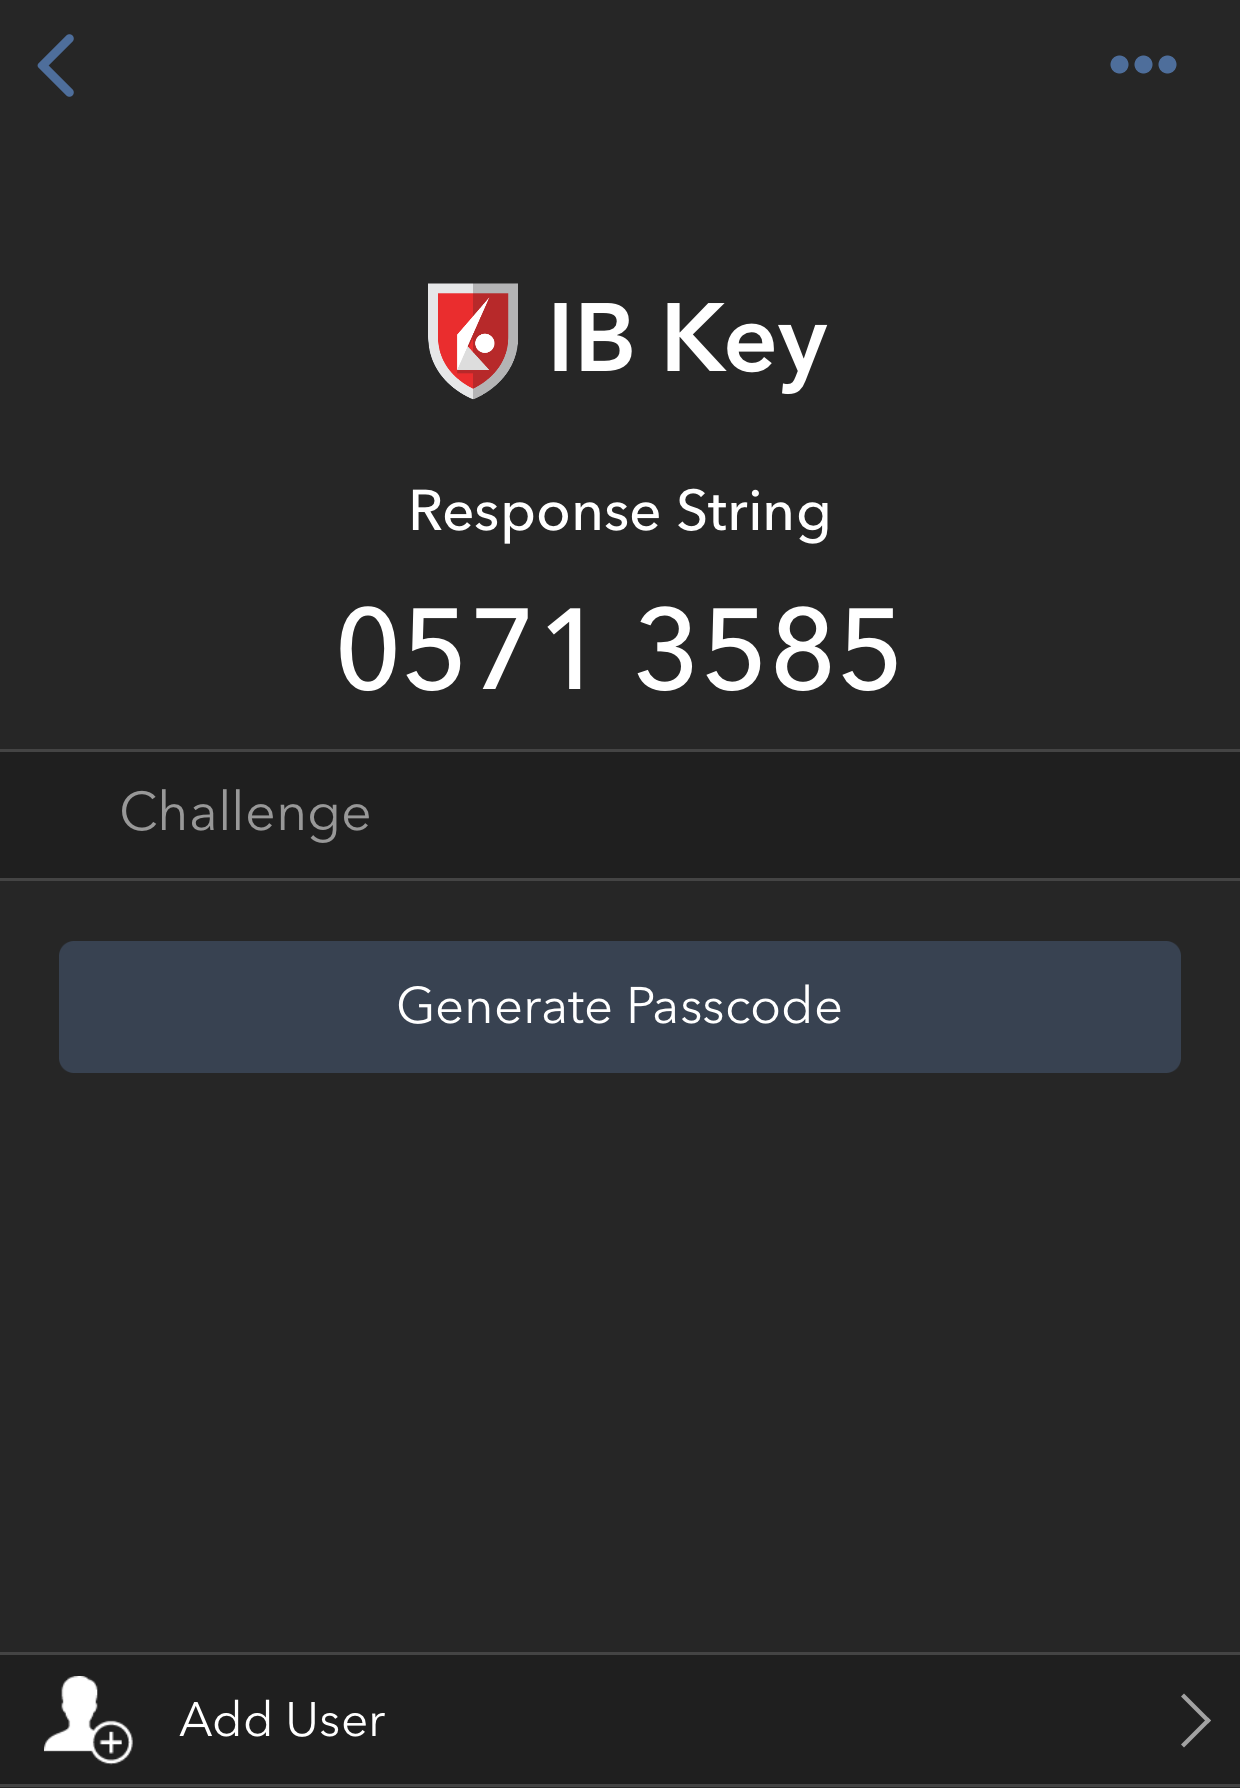
5.1 If you use Touch ID, place your registered finger on the Home Button (Figure 9). A response string will then be generated (Figure 10).
Figure 9. Figure 10.
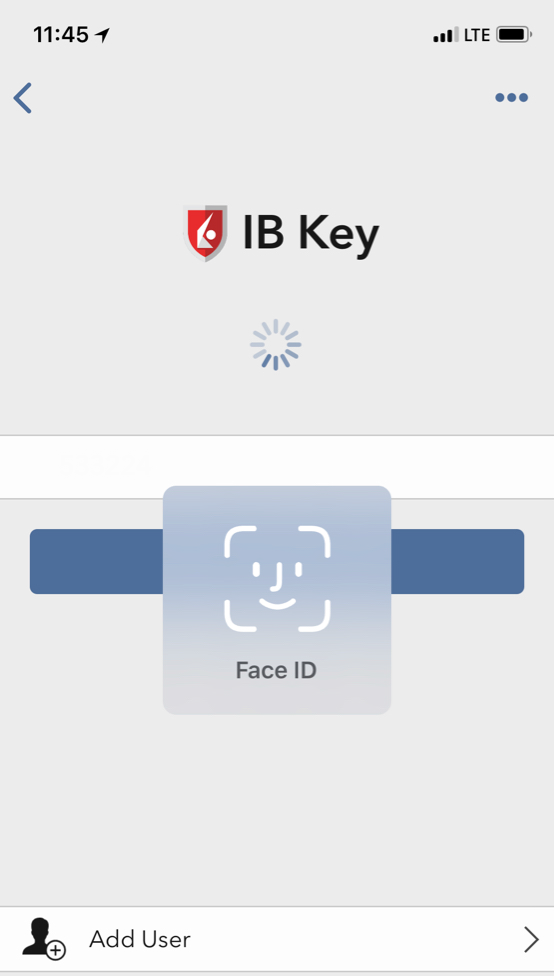
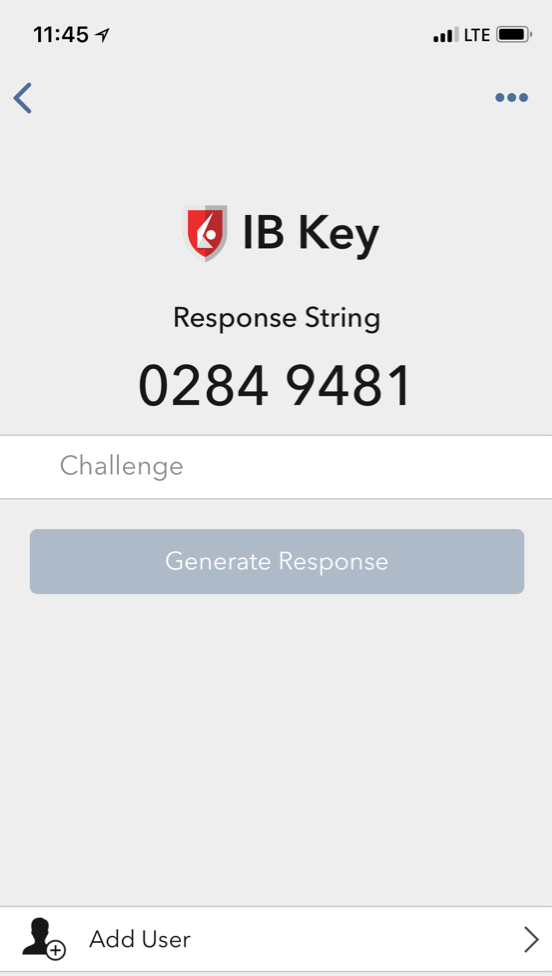
5.2 If you use Face ID, look at your iOS smartphone screen (Figure 11). A response string will then be generated (Figure 12).
Figure 11. Figure 12.
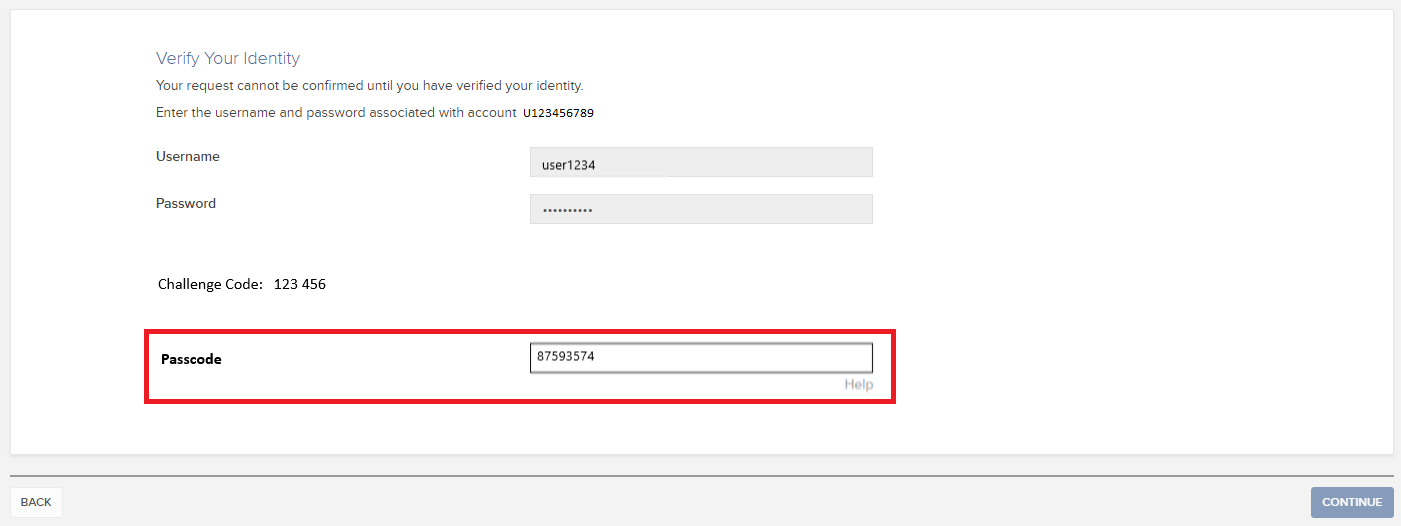
6. Enter the response string from IB Key into the passcode field of Client Portal and click Continue (Figure 13).
Figure 13.
-----------------------------------------------------------------------------------------------------------------------------------------------------------
Verify your identity with IB Key (Android)
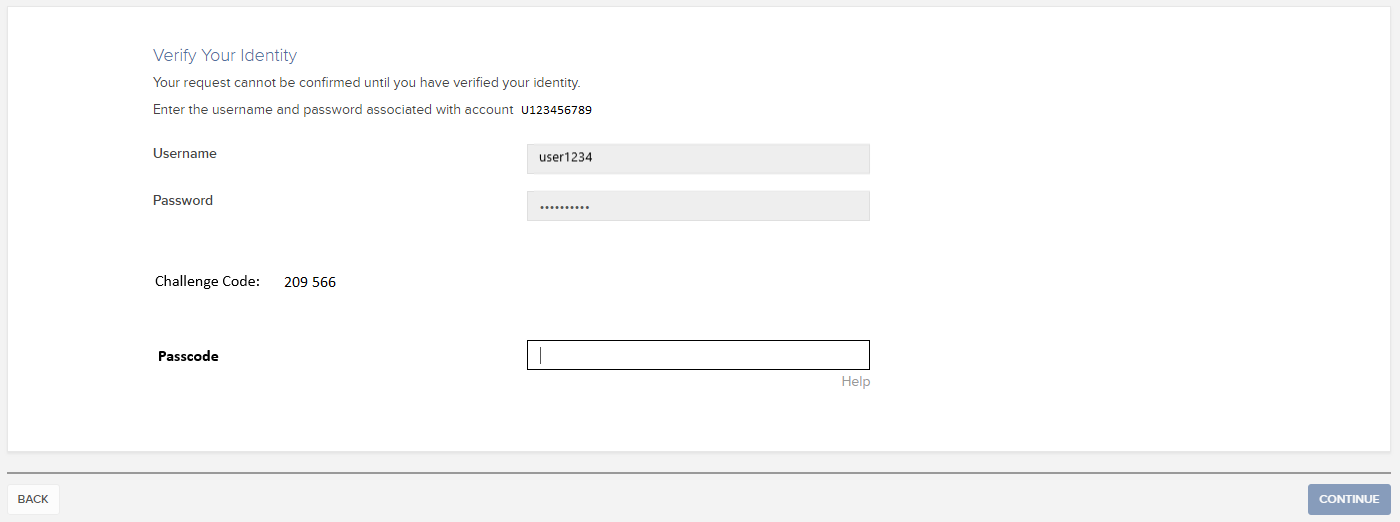
1. When you initiate a task that requires a verification, you will be prompted to enter Username and Password. Fill out the information and click on Continue (Figure 1A).
Figure 1A.
2. A Challenge Code will be displayed, along with a passcode field to enter a response (Figure 2A). You will enter this Challenge Code onto your phone.
Figure 2A.
3. Launch IBKR Mobile on your Android smartphone, and...
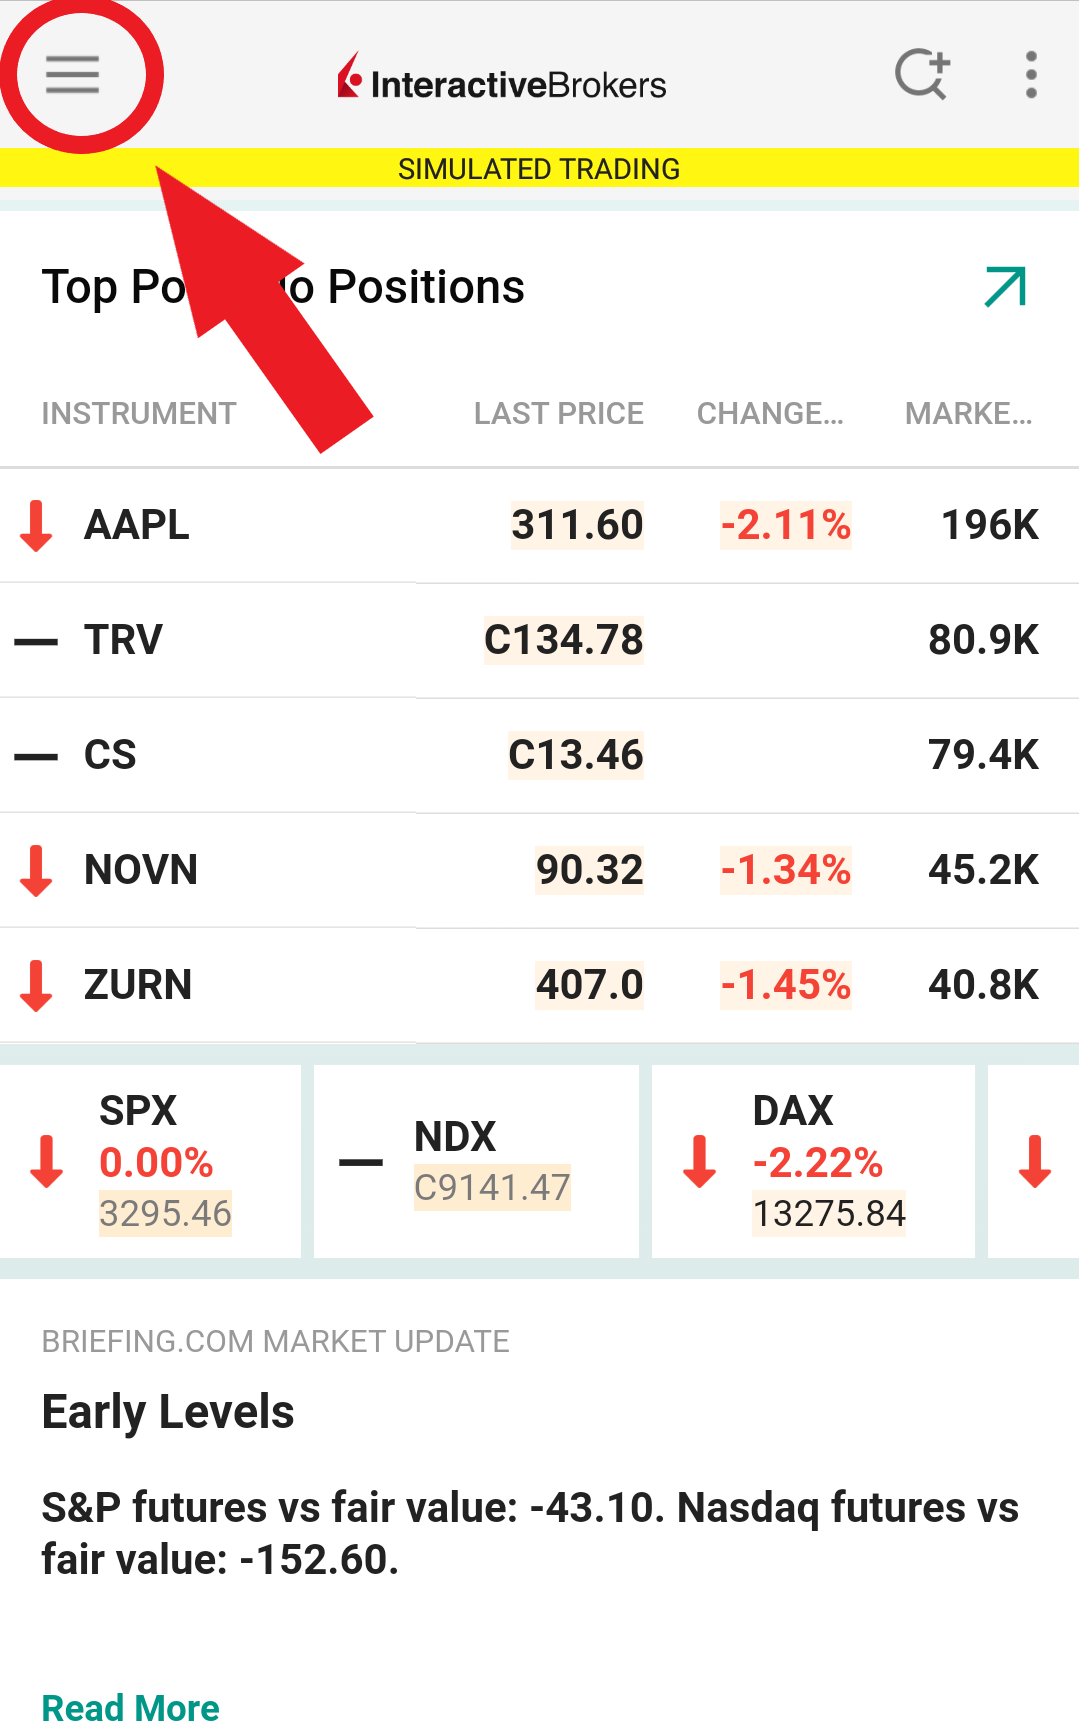
3.a. If the app opens with the home screen (Figure 3A), select Authenticate then proceed with step 4.
3.b. If the app opens with the login screen (Figure 4A), tap Services on the top left (red arrow), select Authenticate (Figure 3A) and proceed with step 4.
3.c. If the app opens with your Home Page, Portfolio, Watchlists, or similar (Figure 5A), tap More on the bottom-right (red arrow). Then tap Two-Factor Authentication (Figure 6A), followed by Generate Response (Figure 7A), and proceed with step 4.
Figure 3A. Figure 4A.

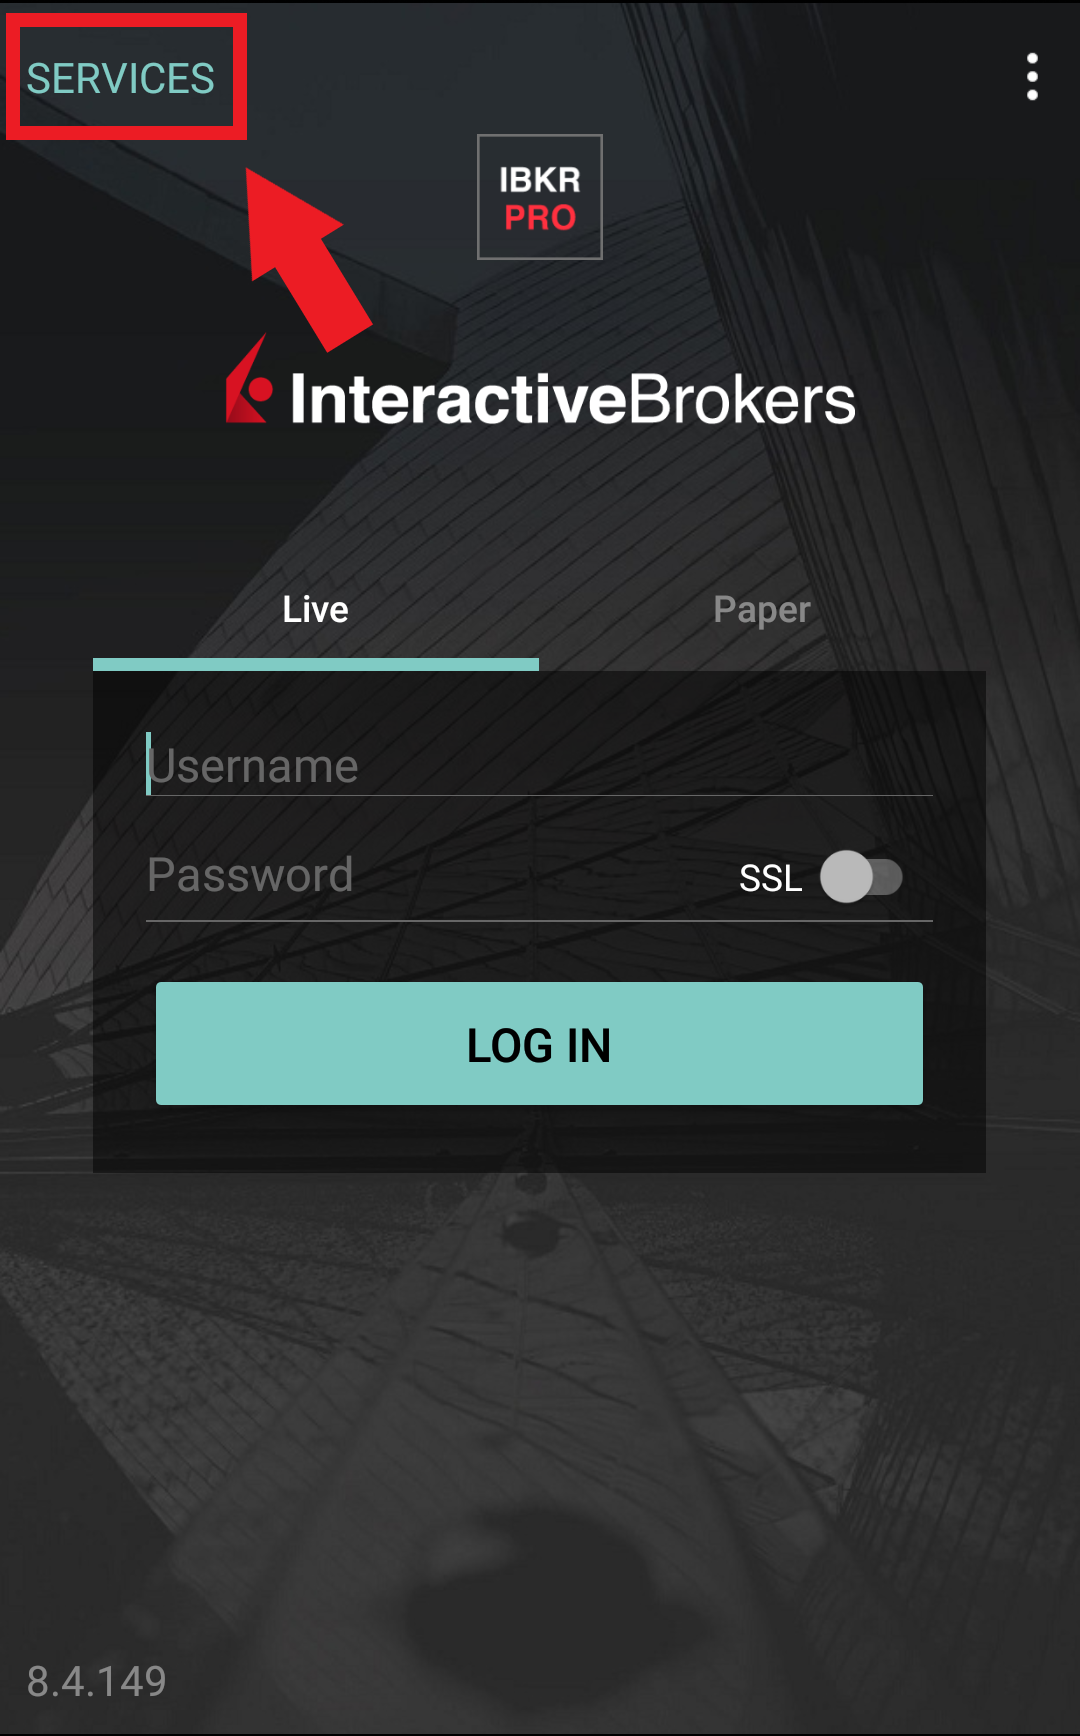
Figure 5A. Figure 6A. Figure 7A.
.jpeg)
.jpeg)
4. Type the PIN that you determined during the IB Key registration process and the Challenge Code from Client Portal into the corresponding fields, then select Generate Passcode. A response string will then be generated (Figure 8A).
Figure 8A.
.png)
5. Enter the response string from IB Key into the passcode field of Client Portal and click Continue (Figure 9A).
Figure 9A.
-----------------------------------------------------------------------------------------------------------------------------------------------------------
Verify your identity with Digital Security Card+ (DSC+)
1. When you initiate a task that requires a verification, you will be prompted to enter Username and Password. Fill out the information and click on Continue (Figure 1B).
Figure 1B.
2. A Challenge Code will be displayed, along with a passcode field to enter a response (Figure 2B). You will enter this Challenge Code onto your DSC+.
Figure 2B.
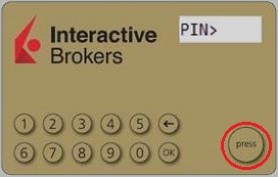
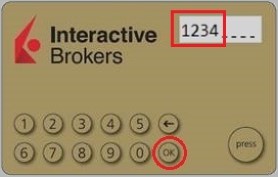
3. Turn on your DSC+ using the “press” button until 'PIN>' is displayed (Figure 3B). Enter the 4-digit PIN code you specified at the time you requested the device, then confirm with the “OK” button (Figure 4B).
Figure 3B. Figure 4B.
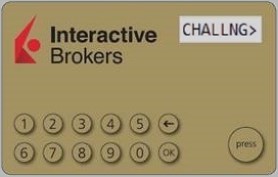
4. When 'CHALLNG>' is displayed (Figure 5B), enter the 6-digit Challenge Code from the Client Portal screen into the DSC+, then confirm with the "OK" button (Figure 6B).
Figure 5B. Figure 6B.
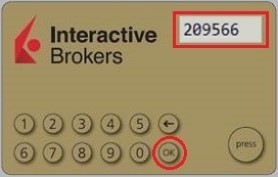
5. A response code will appear (Figure 7B).
Figure 7B.
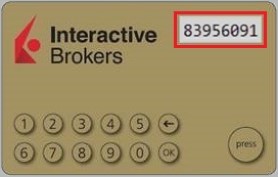
6. Enter the response string from your DSC+ into the passcode field of Client Portal and click Continue (Figure 8B).
Figure 8B.
Cómo obtener su tarjeta de códigos de seguridad en línea
La tarjeta de código de seguridad en línea le proporciona acceso temporario a su cuenta y plataforma de negociación durante 21 días. Esta es una solución provisoria normalmente necesaria en estos casos:
A. Se encuentra temporariamente lejos de su dispositivo de seguridad permanente, y está esperando obtener acceso a él.
B. Ha perdido su dispositivo de seguridad permanente, y desea solicitar un reemplazo o mantener acceso a su cuenta mientras espera que se realice la entrega.
Para los casos mencionados arriba, asumiremos que ya ha notificado a atención al cliente de IBKR y ha obtenido un código temporario, tal como se explica en el artículo KB70. Ahora puede prolongar la duración de su acceso temporario del siguiente modo:
Procedimiento de activación
1. Abra su explorador y visite la página web ibkr.com
2. Haga clic en Iniciar sesión
.png)

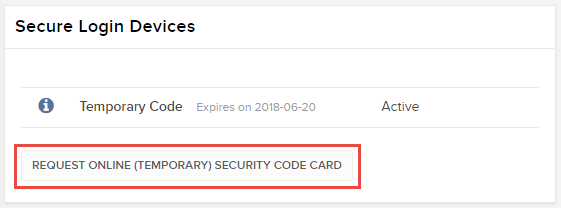
6. Se mostrará su tarjeta de seguridad en línea. Haga clic en Imprimir2
(1).png)
7. Asegúrese de que la tarjeta se haya impreso correctamente en todas sus partes y que pueda leerse claramente. Luego, haga clic en Continuar 
8. Aparecerán dos números índices en la ventana de activación. Ubique el primer número índice en su tarjeta e ingrese el código de tres dígitos correspondiente en el campo Valores de la tarjeta. Luego, repita el mismo procedimiento para el segundo número índice, sin dejar espacio entre los códigos. Luego, haga clic en Continuar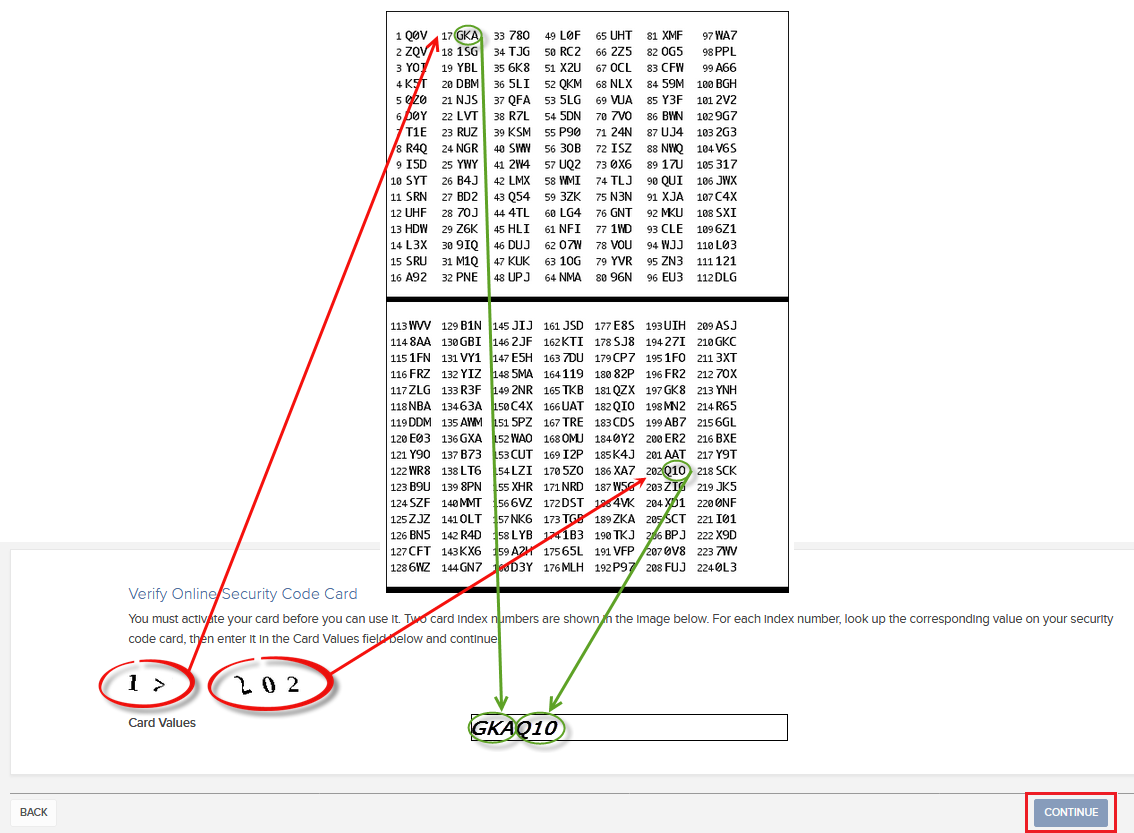
9. Verá un mensaje de confirmación que indicará la fecha de caducidad de la tarjeta. Haga clic en Aceptar para finalizar el procedimiento.png)
Notas
1. Si utiliza la gestión de cuenta clásica, haga clic en el menú de la parte superior Gestionar cuenta > Seguridad > Sistema de acceso seguro > Dispositivo de seguridad

Referencias
- Consulte el artículo KB1131 para ver un resumen del sistema de acceso seguro
- Consulte el artículo KB1943 para obtener instrucciones sobre cómo solicitar una tarjeta de seguridad digital+ de reemplazo
- Consulte el artículo KB2636 para obtener información y consultar los procedimientos relacionados con dispositivos de acceso seguro
- Consulte el artículo KB2481 para obtener instrucciones acerca de cómo compartir el dispositivo de acceso seguro entre dos o más usuarios
- Consulte el artículo KB2545 para obtener instrucciones acerca de cómo dejar de usar el sistema de acceso seguro
- Consulte el artículo KB975 para obtener instrucciones acerca de cómo devolver su dispositivo de acceso seguro a IBKR
- Consulte el artículo KB2260 para obtener instrucciones para activar la autenticación con IB Key a través de IBKR Mobile
- Consulte el artículo KB2895 para obtener información acerca del sistema de autenticación múltiple en dos factores (M2FS)
- Consulte el artículo KB1861 para obtener información acerca de los cargos o gastos relacionados con los dispositivos de acceso seguro
- Consulte el artículo KB69 para obtener información acerca de la validez de la clave de acceso temporaria
How to send documents to IBKR using your smartphone
Interactive Brokers allows you to send us a copy of a document even if you do not currently have access to a scanner. You can take a picture of the requested document with your smartphone.
Below you will find the instructions on how to take a picture and send it per email to Interactive Brokers with the following smartphone operating systems:
If you already know how to take and send pictures per email using your smartphone, please click HERE - Where to send the email to and what to include in the subject.
iOS
1. Swipe up from the bottom of your smartphone screen and tap the camera icon.
If you do not have the Camera icon, you can tap the Camera app icon from the home screen of your iPhone.
Normally your phone should now activate the rear camera. If it activates the front one, tap the camera switch button.
2. Place your iPhone above the document and frame the desired portion or page of the document.

3. Make sure to have uniform, sufficient lighting and not to cast any shadow on the document due to your position. Hold the smartphone firmly with your hand/s and avoid shaking. Tap on the shutter button to take the photo.
4. Tap the thumbnail image in the lower left-hand corner to access the picture you have just taken.
5. Make sure that the picture is clear and the document is well legible. You can enlarge the picture and see it in detail by swiping apart two fingers on the picture itself.

If the picture does not present a good quality or lighting, please repeat the previous steps in order to take a sharper one.
6. Tap the share icon in the lower left-hand corner of the screen.

7. Tap the Mail icon.

Note: to send emails your phone has to be configured for that. Please contact your email provider if you are not familiar with this procedure.
8. Please see HERE how to populate the To: and Subject: fields of your email. Once the email is ready, tap the up arrow icon on the top right to send it.

Android
1. Open your applications list and start the Camera app. Alternatively start it from your Home screen. Depending on your phone model, maker or setup, the app might be called differently.

Normally your phone should now activate the rear camera. If it activates the front one, tap the camera switch button.
2. Place your Android above the document and frame the desired portion or page of the document.

3. Make sure to have uniform, sufficient lighting and not to cast any shadow on the document due to your position. Hold the smartphone firmly with your hand/s and avoid shaking. Tap on the shutter button to take the photo.
4. Make sure that the picture is clear and the document is well legible. You can enlarge the picture and see it in detail by swiping apart two fingers on the picture itself.

If the picture does not present a good quality or lighting, please repeat the previous steps in order to take a sharper one.
5. Tap the empty circle icon in the lower right-hand corner of the screen.

6. Tap the share icon in the lower left-hand corner of the screen.

7. In the sharing menu that will be displayed now tap the icon of the email client set up on your phone. In the example picture below, it is called Gmail but the name may vary according to your specific setup.
.png)
Note: to send emails your phone has to be configured for that. Please contact your email provider if you are not familiar with this procedure.
8. Please see HERE how to populate the To and Subject fields of your email. Once the email is ready, tap the airplane icon on the top right to send it.

WHERE TO SEND THE EMAIL AND WHAT TO INCLUDE IN THE SUBJECT
The email has to be created observing the below instructions:
1. In the field To: type:
- newaccounts@interactivebrokers.com if you are a resident of a non-European country
- newaccounts.uk@interactivebrokers.co.uk if you are a European resident
2. The Subject: field must contain all of the below:
- Your account number (it usually has the format Uxxxxxxx, where x are numbers) or your username
- The purpose of sending the document. Please use the below convention:
- PoRes for a proof of residential address
- PID for a proof of identity
How to obtain an Online Security Code Card
The Online Security Code Card provides you temporary access to your account and trading platform for a duration of 21 days. This is an ad-interim solution usually needed in those cases:
A. You are temporarily away from your permanent security device and you are waiting to regain access to it.
B. You have lost your permanent security device and you want to either request a replacement or maintain access to your account while waiting for the delivery to happen.
For the cases mentioned above, we assume you have already notified IBKR Client Services and obtained a Temporary Code, as explained in KB70. You can now extend the duration of your temporary access as follows:
Activation procedure
1. Open your browser and go to the web page ibkr.com
2. Click on Login
.png)
.png)

6. Your Online Security Card will be displayed. Click on Print2
(1).png)
7. Please make sure the card has been printed correctly in all its parts and it is clearly readable. Then click on Continue 
8. Two index numbers will appear on the activation screen. Locate the first index number on your card and enter the correspondent three digits code into the Card Values field. Then repeat the same operation for the second index number, leaving no spaces between the codes. Then click on Continue
9. You will see a confirmation message stating the expiration date of the card. Click on OK to finalize the procedure.png)
Notes
1. If you use the Classic Account Management, click on the top menu Manage Account > Security > Secure Login System > Security Device

References
- See KB1131 for an overview of the Secure Login System
- See KB1943 for instructions on requesting a replacement Digital Security Card+
- See KB2636 for information and procedures related to Security Devices
- See KB2481 for instructions about sharing the Security Login Device between two or more users
- See KB2545 for instructions on how to opt back in to the Secure Login System
- See KB975 for instructions on how to return your security device to IBKR
- See KB2260 for instructions on activating the IB Key authentication via IBKR Mobile
- See KB2895 for information about Multiple Two-Factor Authentication System (M2FS)
- See KB1861 for information about charges or expenses associated with the security devices
- See KB69 for information about Temporary passcode validity
Troubleshooting Trading Platform Login Failures
Click on the link below which best describes your situation:
a. If operating with a temporary passcode, note that alpha characters are case sensitive and are required to be input in upper case format
b. If operating a security card or electronic device, note that there are no spaces between characters
c. Ports 4000/4001 are being blocked. These ports are often blocked from public connections such as hotels, cafes, etc. and required to be open to accommodate Inbound/Outbound TCP protocol. In addition, if you have a router connected to your computer, these ports must be open on the router.*
*Please click here to check your connectivity status: IBKR Dedicated Connectivity Test Page.


