空売り株式からの収益に対する利息
株式借入ポジションに関連する利息または費用の割り出し方
口座保有者が株式を空売りする場合、IBKRでは購入者に株式を引き渡す義務を履行するため、口座保有者に変わって同額の株式の借入を行います。 株式の借入を行うための株式借入に関する同意書は、IBKRが株式の貸し手に対し、借入のための現金担保を提供することを義務としています。 現金担保の金額は、担保マークと呼ばれる、株価の業界標準計算に基づいています。
株式の貸し手は、現金担保の利息をIBKRに提供し、また現金担保預金の実勢市場金利(通常、米ドル建て現金預金に対するフェデラル・ファンド実行金利に固定されています)よりも低い金額に支払われる利息を調整することによって、このサービスを提供することに対する手数料を請求します。 借入困難な銘柄の場合、株式提供に対する貸し手の手数料により、IBKRにマイナス金利が請求される可能性があります。
多くの証券会社ではこのリベートの一部を機関投資家にのみパススルーしますが、IBKRではすべてのお客様に対し、 USD 100,000または他通貨での同等額を超える空売り株式の売却収益に対して利息をお支払いしています。借入可能な証券の供給が借入需要に対して多い場合、口座保有者は、ベンチマーク・レート(例:米ドル建て残高に対するフェデラル・ファンドによるオーバーナイト実行金利)からスプレッド(現在、USD 100,000の残高に対して1.25%、USD 3,000,000以上の残高に対して0.25%の範囲)を差し引いた額と同額の空売り株式残高に対する利息の受け取りを期待できます。レートは予告なく変更される可能性があります。
特定の銘柄の需要と供給の属性によって銘柄が借入困難になる場合、貸し手が提供するリベートが減少し、口座に対する請求が発生する可能性があります。リベートまたは請求は、より高い借入手数料として口座保有者にパススルーされ、これが空売り収益の利息を上回り、口座に対する請求となる可能性があります。レートは銘柄と日付の両方に左右されるため、IBKRでは、クライアントポータル/アカウント・マネジメントからアクセス可能な空売り可能株式ツールを使用して、空売りに対する指標レートをご確認いただくことをお勧めします。ツールに表示される指標レートは、IBKRがTier IIIの残高に対して支払う空売り収益利息、つまり300万米ドル以上の空売り収益にも適用されることにご留意ください。残高が少ない場合、レートは取引通貨に関連するティアおよびベンチマークレートに基づいて調整されます。正確なレートは、「空売り(ショートセル)の売却代金の現金に対する受取金利計算機能」からご確認いただけます。
その他の例や計算機能は、有価証券ファイナンシングのページをご参照ください。
ご留意事項
空売り可能株式ツール及びTWSで提供される、借入可能な株式及び指標レートに関する情報は、正確性または有効性に関する保証なしに、ベストエフォートベースで提供されます。空売り可能株式には、リアルタイムで更新されない、サードパーティからの情報が含まれます。レートに関する情報はあくまでも目安です。現在の取引セッションで約定される取引は通常、2営業日で決済され、実際の借入可能株式と借入にかかるコストは決済日に決定されます。取引が特に少ない株式、小型株、および今後のコーポレートアクション(配当を含め)がある株式クラスの場合、取引日から決済日までの間にレートと利用可能株が大幅に変化する可能性があることにご注意ください。詳細は、空売りにかかる運用リスクをご参照ください。
アクティビティステートメントの未払金払戻とは何ですか?
IBKRでは、毎日、アクティビティステートメントの未払い利息の項目において、計算期間中に獲得される又は支払われる利息の予想額や金額を計算し報告します。毎月の第1週目頃に、前月に発生した利息が取消/払い戻しされ、当月の実際の利息が現金報告の項目に掲載されます。月1回行われる払い戻しは実際の利息の予想額であるため、必ずしも完全に同じ金額になるわけではありませんが、実際の利息に近い金額となります。
未払い利息は金額がプラスまたはマイナスのいずれであっても、報告期間中に$1を超えた場合のみ掲載されることにご留意ください。$1未満の残高はいったん取りおかれ、将来の未払い利息と合計して金額が$1を超えた時点で掲載されます。
How to set up sFTP for using Certificate Authentication on Linux
These instructions apply to users who are receiving their statements via sFTP. If you elected to receive your statements via sFTP, you would first need to generate an RSA Key pair.
There are many Linux distributions and there are multiple methods to access the IBKR sFTP server. sFTP clients such as Filezilla can be used. In this article we explain how to realize the connection to the IBKR FTP server using Ubuntu Linux and Filezilla.
1. On your Linux machine, click on the Applications icon in the bottom left corner of you screen.


4. Once the software installation is complete, type puttygen -t rsa -b 2048 -o privatekey.ppk in order to generate the RSA Key pair.


8. Click on the FileZilla top menu File -> Site Manager...


- Select SFTP - SSH File Transfer Protocol as Protocol
- Enter xfer.interactivebrokers.com in the Host field
- Enter 32 in the Port field
- Select Key file as Logon Type
- Enter the username provided to you by Interactive Brokers in the User field


Important Note: do NOT send us your private key. Send us only your public one
Once IBKR has configured the parameters for your connection on our servers, you will be notified. After that, you will be able to access your sFTP repository by using the Site connection you have created in FileZilla. In case you have not yet set up a Site connection, please follow the steps from 6. to 14. which are a prerequisite to the below steps:


Common issues and solutions
-
Ensure the correct login details are being used to connect to the sFTP server. The username and password you are entering should match the ones you have received from the Reporting Integration Team.
-
Confirm you have configured your sFTP Client to use the Private Key file for the logon authentication (see steps 9. and 10. of the above procedure.)
-
Try accessing the sFTP server using a different Client (CyberDuck, ect.)
-
Ensure the Private Key file being used to Authenticate the server login attempt is related to the Public Key you originally sent to the Reporting Integration Team.
-
Should the above checks be unable to resolve the issue, please generate a new RSA Public/Private Key pair and send only the Public part to the Reporting Integration Team, as per IBKB3842.
-
In case you have an antivirus or a security software installed on your machine, make sure it is not blocking the FTP connection attempt. Normally, security software allows to set up exceptions for specific connections in order to whitelist them.
-
Verify that the public IP Address of the machine running the sFTP client, is the same you have originally provided to the Reporting Integration Team for being whitelisted. You can discover your public IP Address by searching the Internet for “what is my IP”. If your current IP Address is not the same you provided to us, please send it to our Reporting Integration Team for being whitelisted.
-
Ask your network administrator/s to confirm that your firewall allows both incoming and outgoing traffic from/to xfer.interactivebrokers.com on port TCP 32.
-
Should the above steps be unable to resolve the issue, please generate a new RSA Public/Private Key pair and send only the new Public part to our Reporting Integration Team, as per IBKB3842.
KB3968 - Generate a key pair using GPG for Windows
KB4205 - Generate a key pair using GPG Suite on macOS
KB4108 - Decrypt your Reports using GPG for Windows
KB4210 - Decrypting Reports using your PGP Key pair on macOS
KB4407 - Generate RSA Key Pair on Windows
KB4410 - How to set up sFTP for using Certificate Authentication on macOS
KB4411 - How to backup your public/private Key pair
KB4323 - How to transfer your public/private key pair from one computer to another
非米国居住者は源泉徴収の対象になりますか?
納税義務に関する情報は、お客様の居住国の税務当局に義務として報告され、また取引商品が現地で源泉徴収の対象となる場合には、その他の国にも報告されます。 IBKRでは税務当局からの特別な指示がない限り、有価証券の売却に対する源泉徴収は行いません。米国の税法により、例えば米国の法人が外国人に支払う配当金に対しては、30%の源泉徴収を義務付けられています。税率は米国とお客様の国の間で租税条約が結ばれている場合には、これより低いことがあります。また、投資の利子による収益は米国源泉徴収の対象になりません。米国外の個人および法人の源泉徴収はすべて、各年度末にForm 1042-Sで報告されます。詳細は、「IRS publication 901」をご参照いただくか、専門の税理士にお問合せ下さい。
アクティビティーステートメントのキャッシュ・レポートの項目に証券とコモディティの口座間の移動が表示される理由
IBKRでは規制のため、口座内の有価証券資産をコモディティ資産と分別することを義務とされています。 コモディティ資産には、先物ポジションのオプションの市場価値や、コモディティの先物や先物ポジションのオプトアウトのために証拠金として必要となる現金が含まれることがあります。 コモディティのポジションの必要証拠金は定期的に計算し直され、証拠金額が下がる場合には、コモディティの必要証拠金として余る分が口座のコモディティ側から有価証券側に移動します。 また、コモディティの必要証拠金額が上がる場合、IBKRでは有価証券側で利用可能な現金をコモディティ側に移します。 SIPC保険は口座内のコモディティ側ではなく、有価証券側の資産を対象としているため、定期的な移動は現金残高に対する保護が最大となるように行われます。 なお、これらの仕分けはお互いに相殺されるため、口座内の現金残高の合計には影響しません(アクティビティーステートメントの現金残高項目内の、「合計」コラムをご覧下さい)。
Generate RSA Key Pair on Windows
These instructions apply to users who are receiving their statements via sFTP. If you elected to receive your statements via sFTP, you would first need to generate an RSA Key pair.
To generate an RSA Key pair:
2. Run the installer and make sure to check PuTTYgen (key generator) as one of the components to install.
3. Start WinSCP and from the button Tools select Run PuTTYgen.
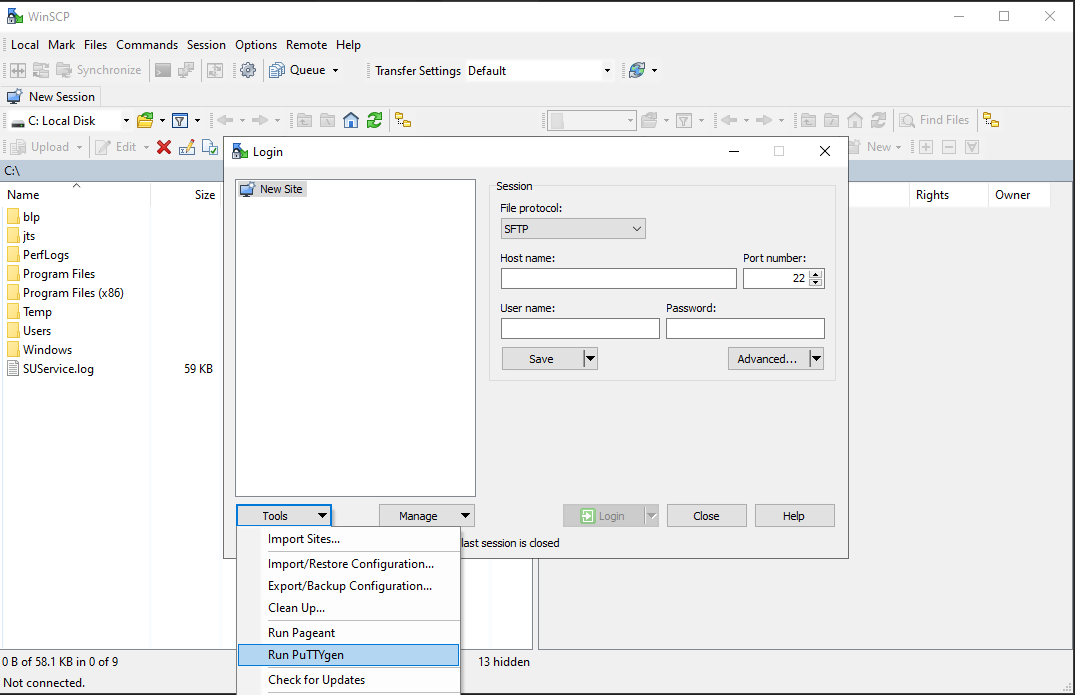
4. Once the tool PuTTYgen has been launched, click Generate. Select RSA as Type of key to generate, 2048 as Number of bits in generated key and click on the button Generate.
5. Click "Save private key" and give the file a name (like private). Leave the extension as .ppk ('ale.ppk', in the picture below is an example filename).
Important Note: do NOT save your public key yet. Save only your private one.
.png)
6. Open WinSCP, create a new connection and:
- Select SFTP as File protocol.
- Enter xfer.interactivebrokers.com in the Host name field.
- Enter 32 in the Port number field.
8. In the Advanced Site Settings screen, left side menu, expand SSH and select Authentication. Click on the button ... at the end of the field Private Key file and open the private key you previously saved at point 5):
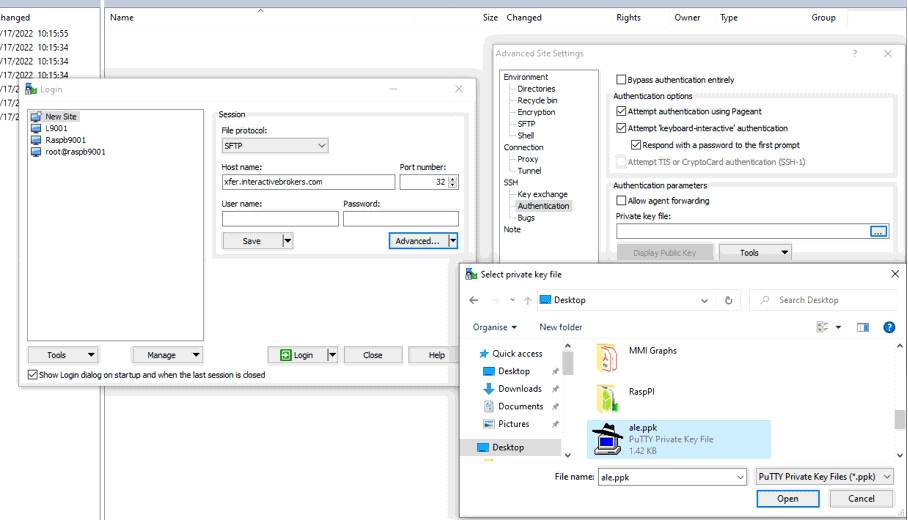
9. Click on the button Display public key:
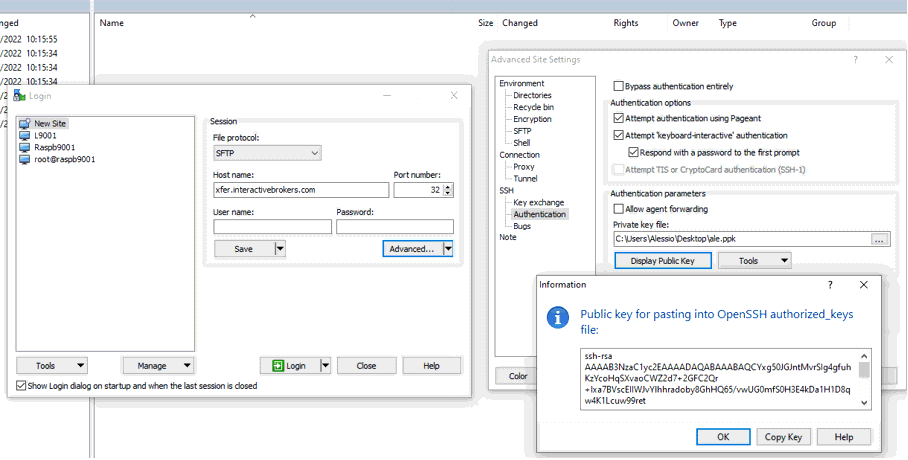
11. Open Notepad, press CTRL+V to paste the key string (which is one string of characters without spaces) and then save the file with the name public.key in a folder of your preference:

12. Send the file you saved at the previous step to us via Message Center ticket or email as per instructions on IBKB3842
KB3842 - Using GPG/RSA encryption keys to guarantee the privacy and security of your Reports
KB3968 - Generate a key pair using GPG for Windows
KB4205 - Generate a key pair using GPG Suite on macOS
KB4108 - Decrypt your Reports using GPG for Windows
KB4210 - Decrypting Reports using your PGP Key pair on macOS
Decrypting Reports Using Your PGP Key Pair on macOS
Note: This tutorial assumes you received reports via email or via FTP that were encrypted with the public key you sent to IBKR . If you need guidance to set up the encrypted statement delivery, please refer to this article, which is a prerequisite to the instructions below.
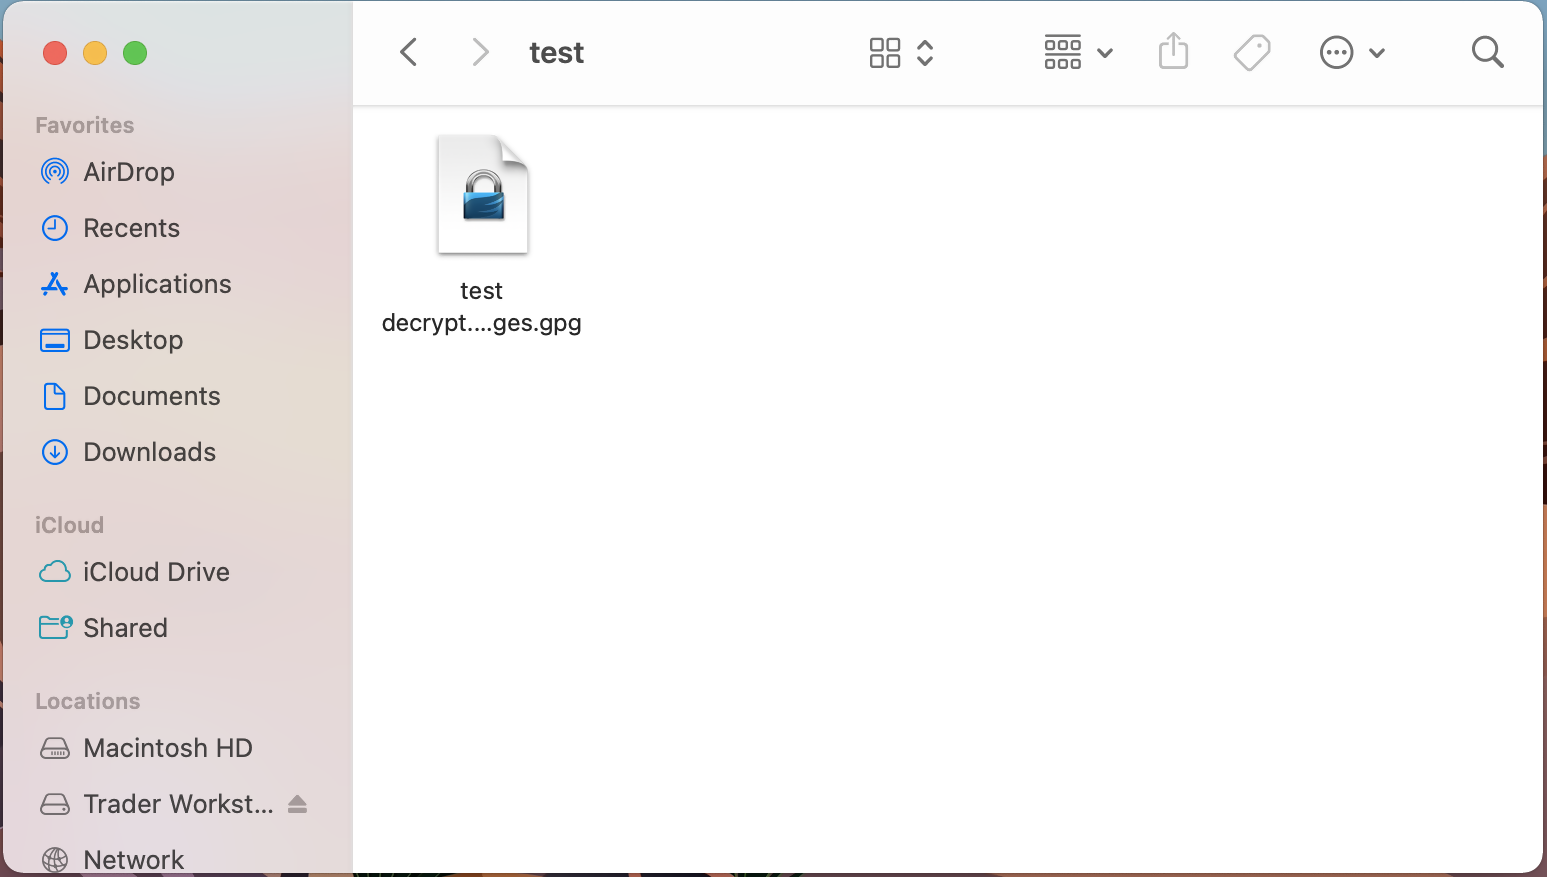
1. Open Finder
2. Right click on the .gpg file you want to decrypt
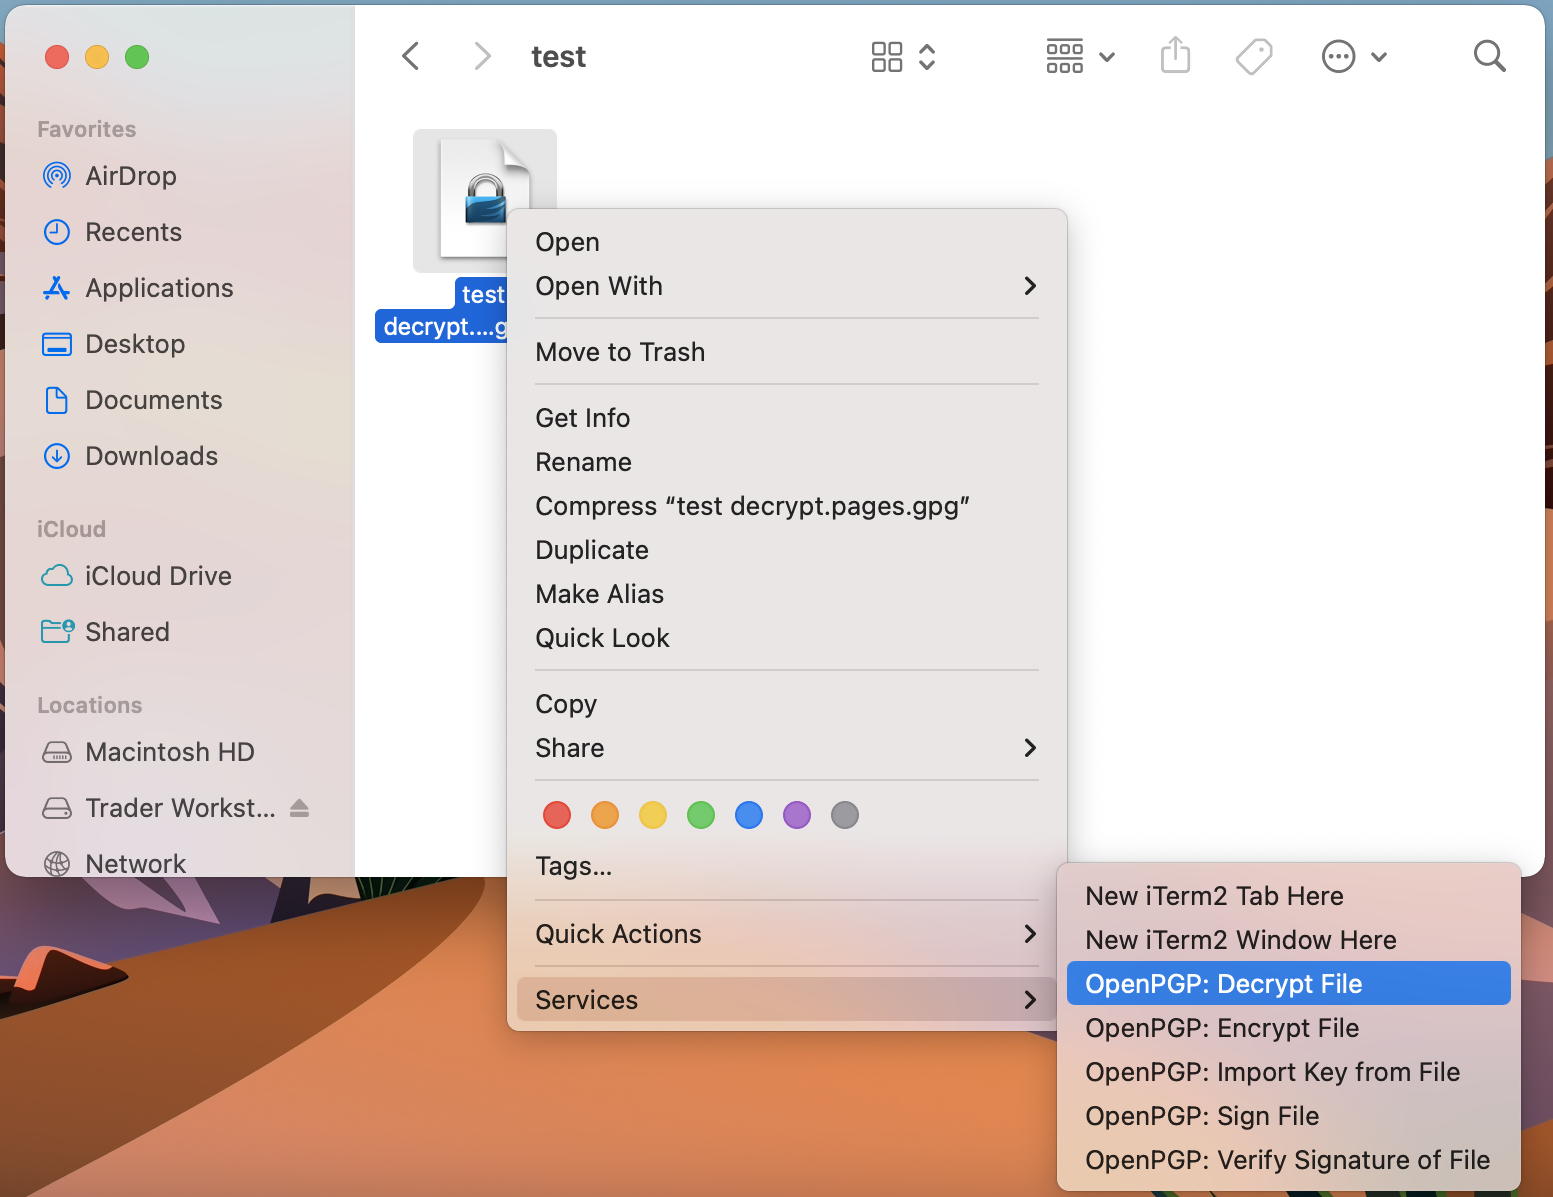
3. Select Services > OpenPGP: Decrypt File
Common Issues/Questions
- Decryption failed with error 'No Secret Key'
This is commonly caused when the wrong encryption key is used to decrypt the file. If decryption is being done on a computer other than the original computer used to create the public/private keys, the keys would have to be transferred from the original computer to the new computer.
If the above does not help, then a new public/private key pair needs to be created and sent to us.
KB3842 - Using GPG/RSA encryption keys to guarantee the privacy and security of your Reports
KB3968 - Generate a key pair using GPG for Windows
KB4205 - Generate a key pair using GPG Suite on macOS
KB4108 - Decrypt your Reports using GPG for Windows
KB4407 - Generate RSA Key Pair on Windows
Generate a Key Pair Using GPG Suite on macOS
If you elected to receive your statements in an encrypted form, you would first need to generate an RSA Key pair. To generate an RSA Key:
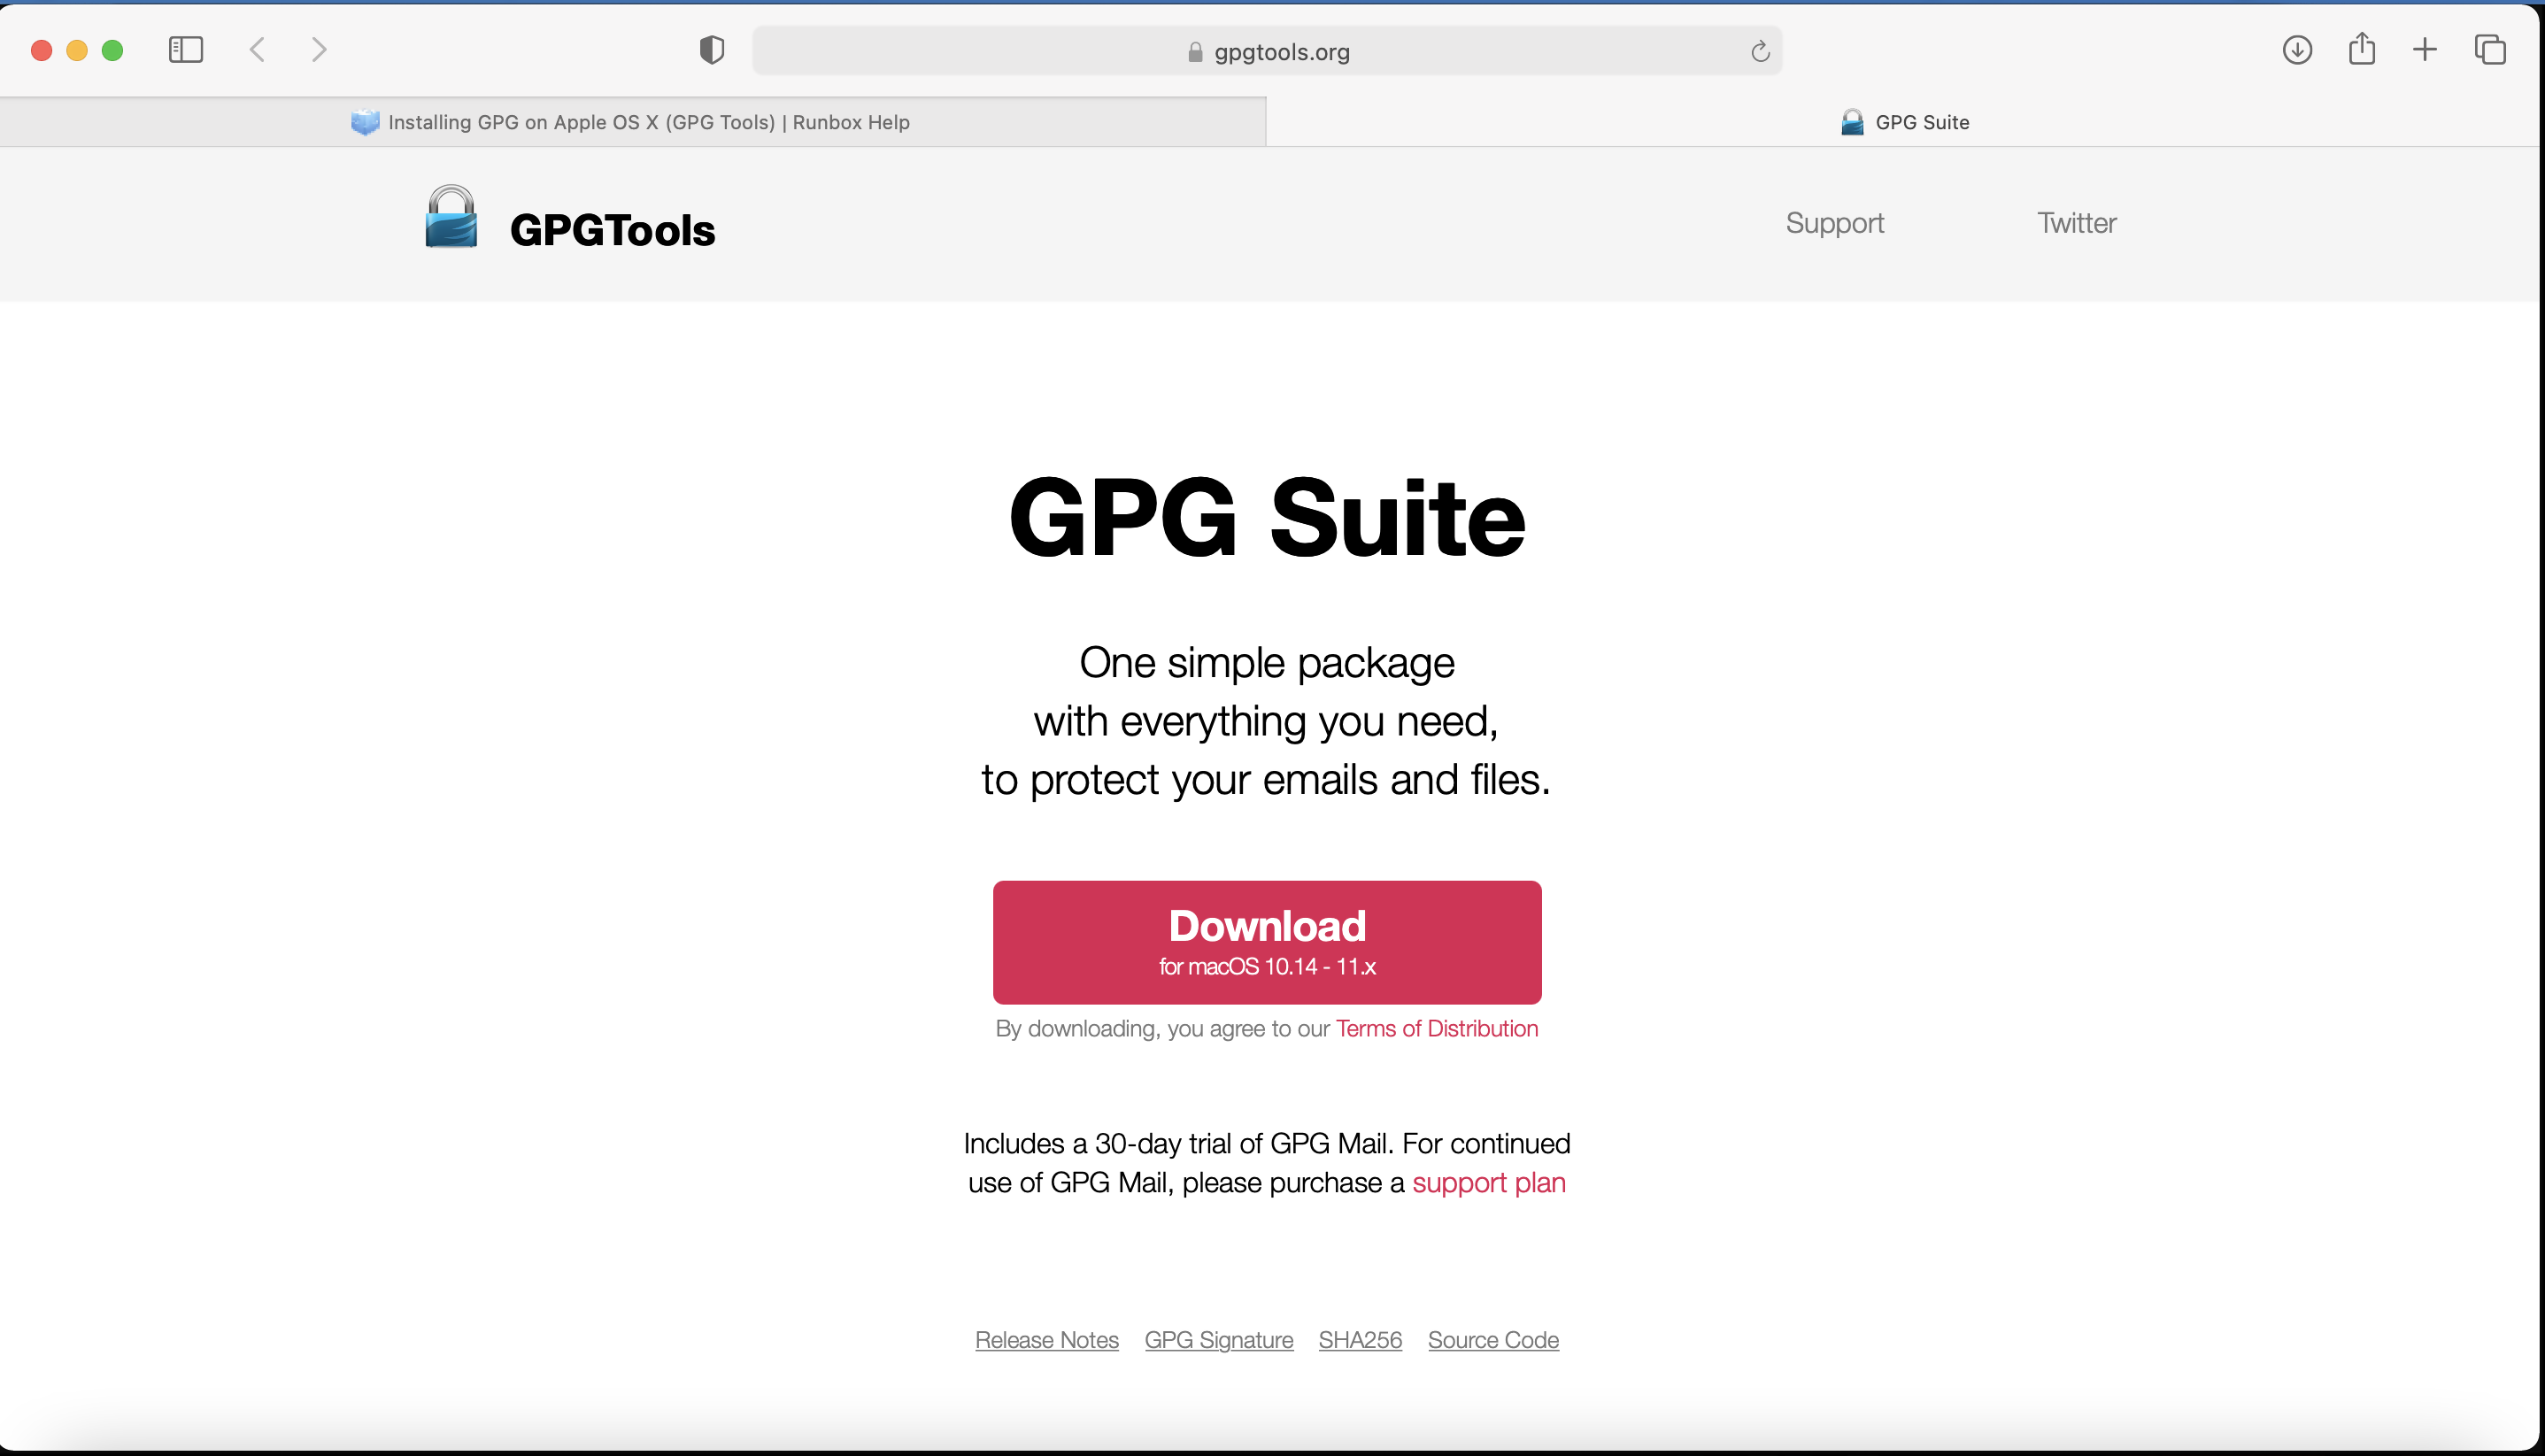
1. Download the GPG Suite for macOS
2. Double click on the downloaded installation file:

3. Click on Install
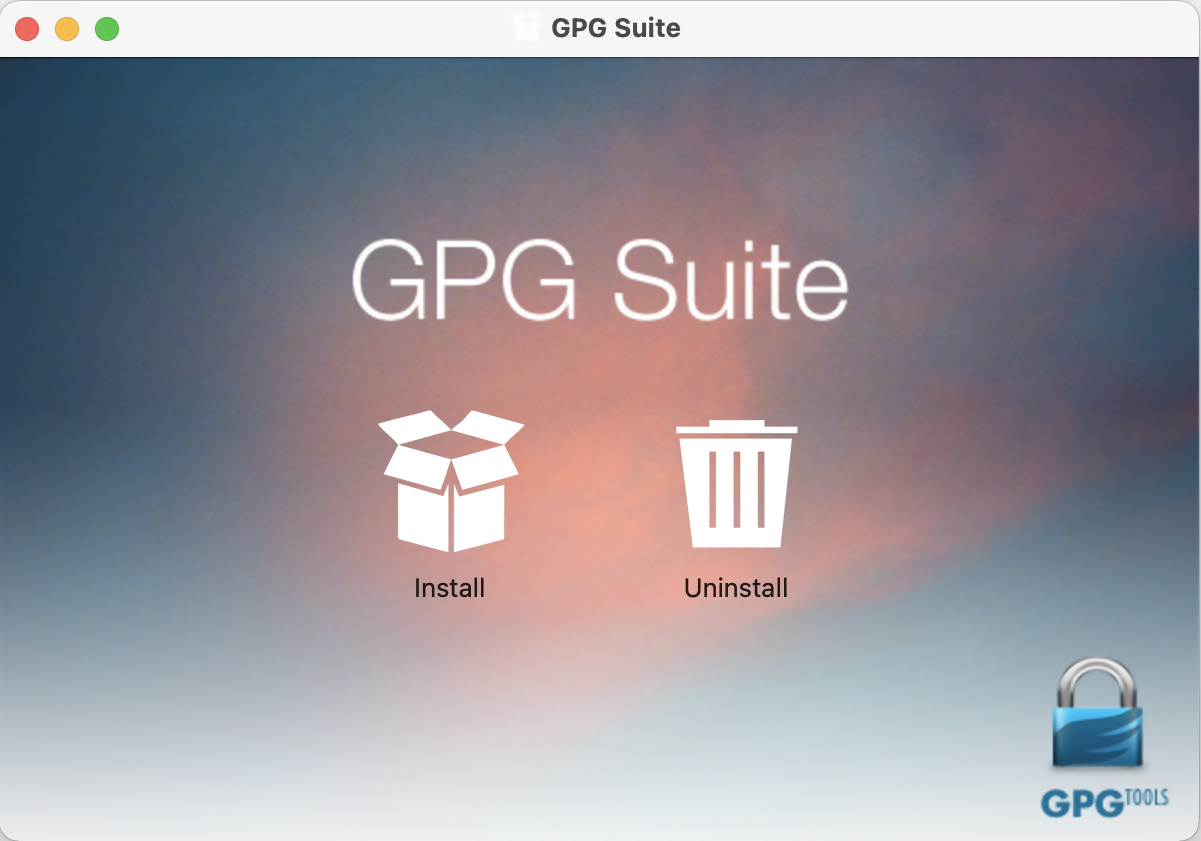
4. Click Continue
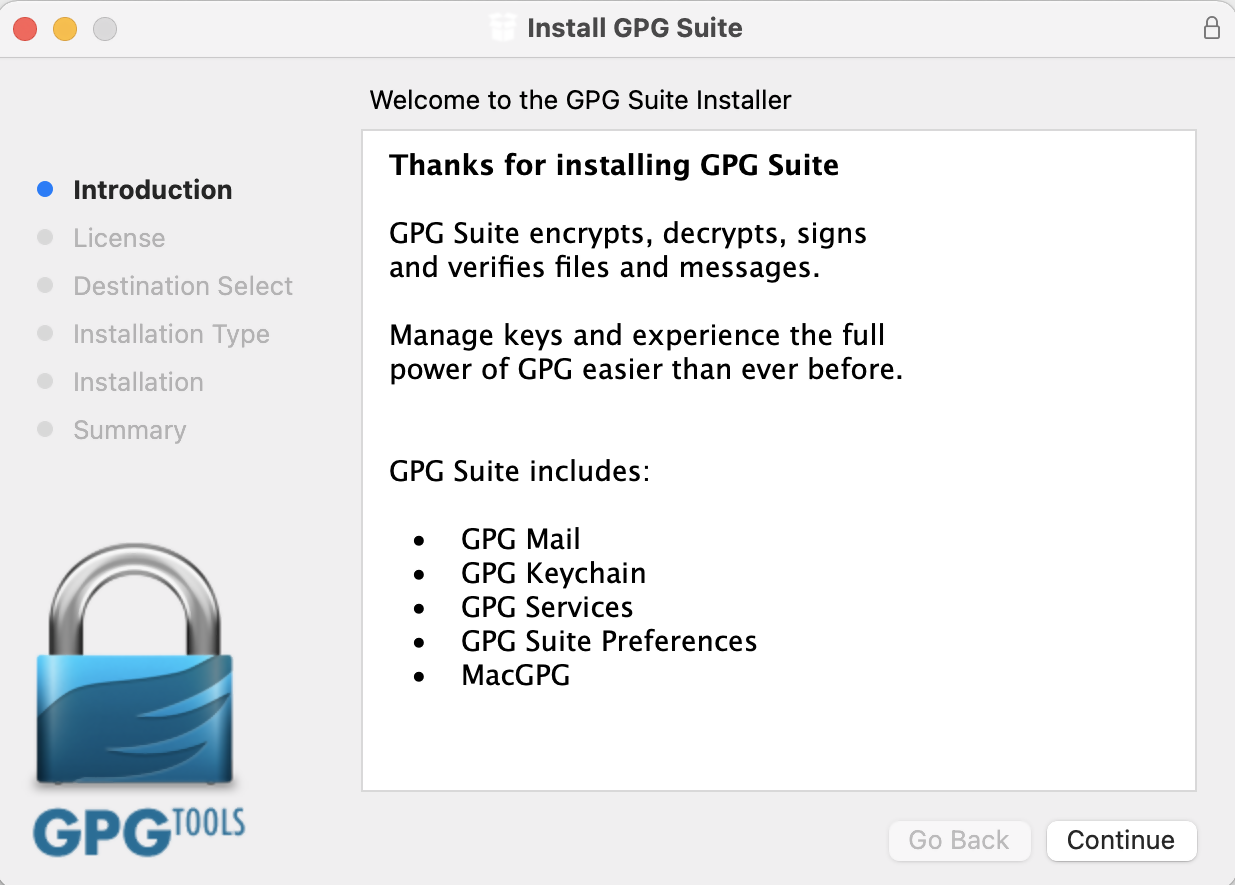
5. Click on Install

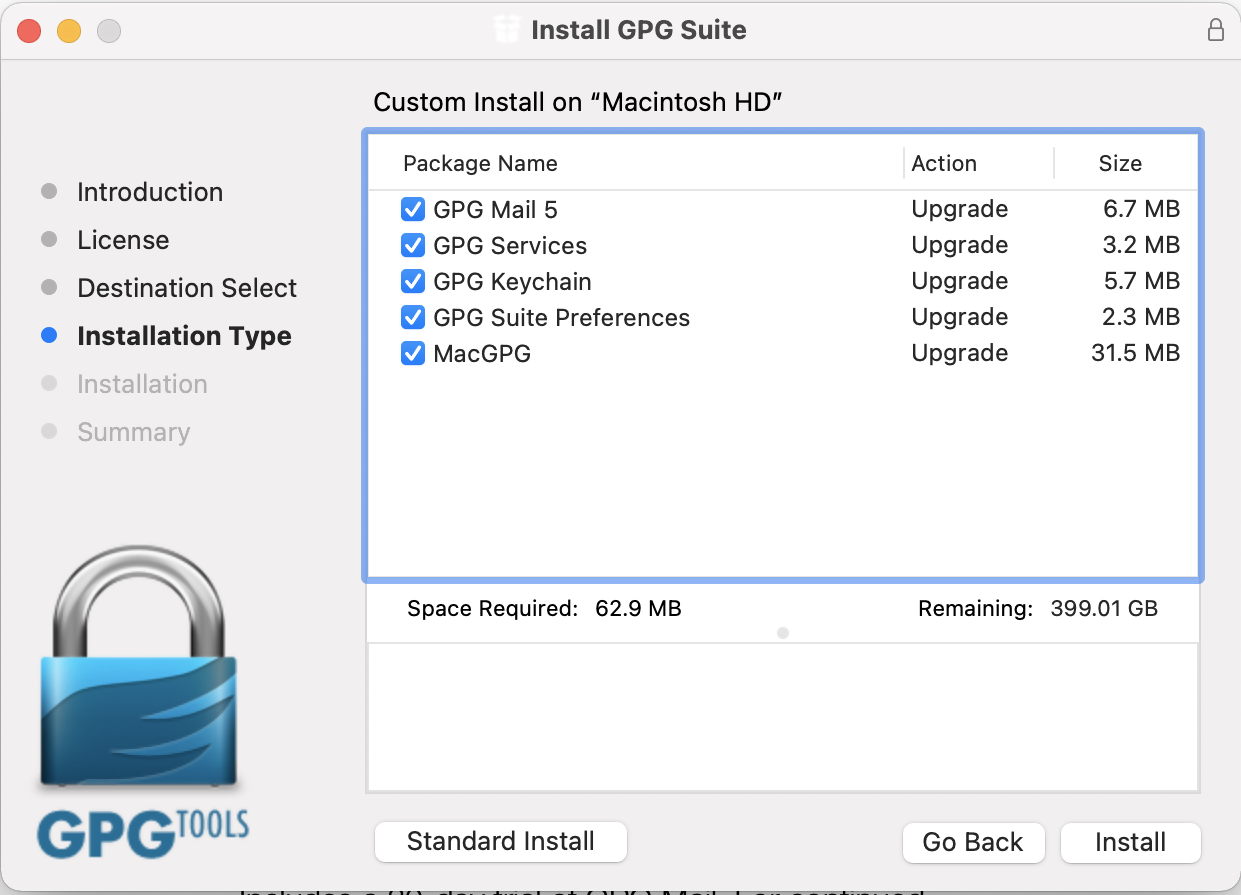
6. Click Install
Note: By default the installation includes an add-on for Apple Mail called GPG Mail. If you don't use Apple Mail and do not need this add-on, you can de-select it during this step.
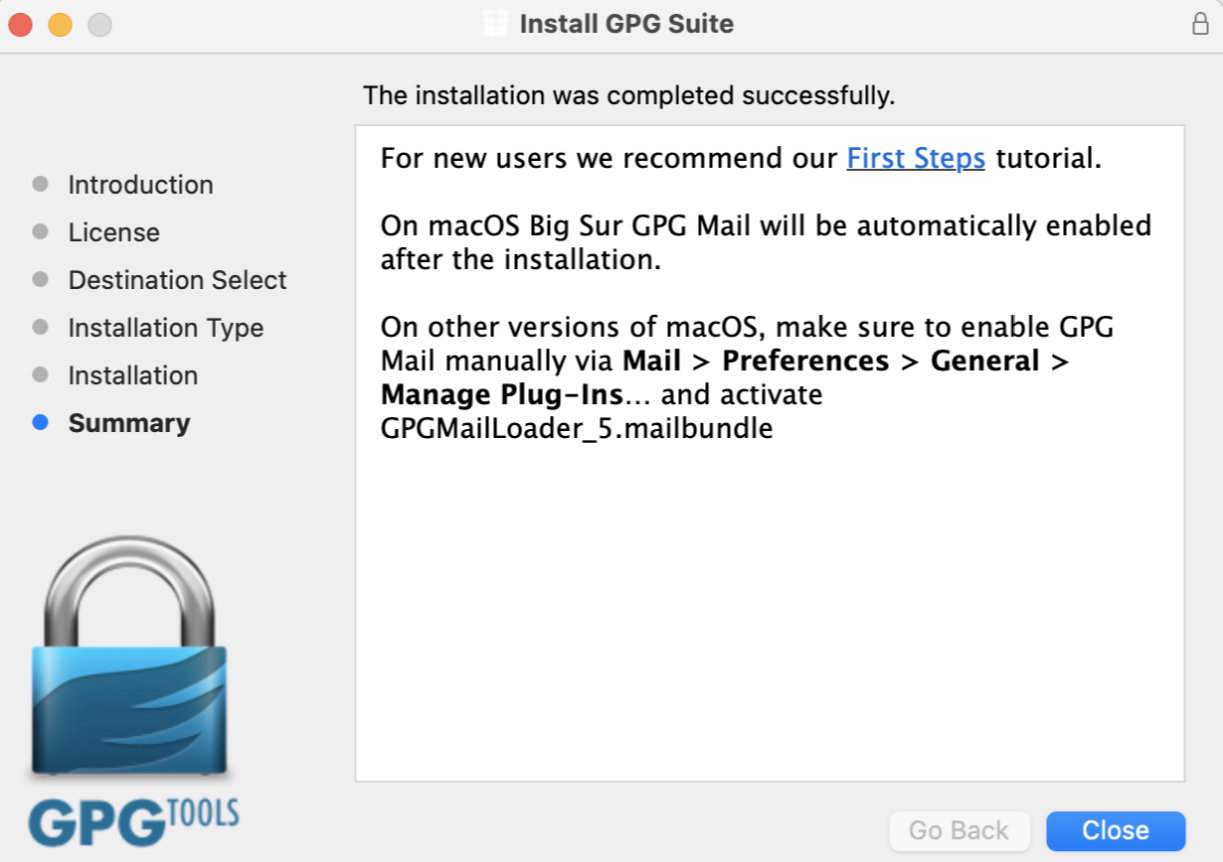
7. Click on Close:
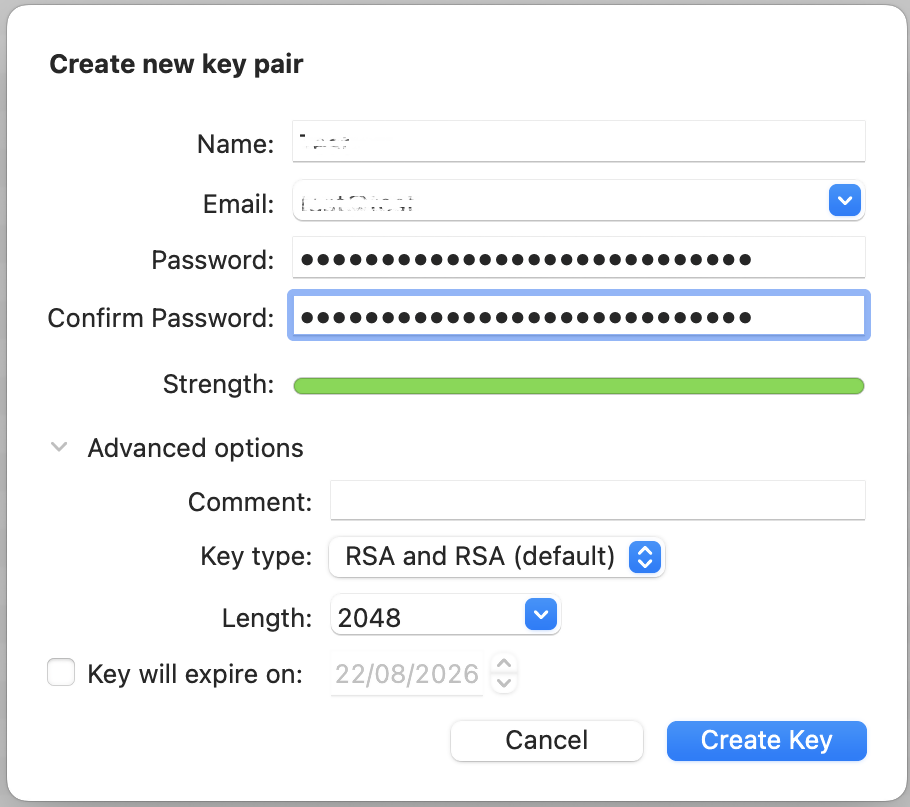
- The "Key type" drop-down is set to "RSA and RSA (default)"
- "Length" is set to "2048"
- The checkbox "Key will expire on" must remain NOT active
Important Note: Please be absolutely certain to set "Key type" to "RSA and RSA (default)" otherwise the key will be unusable.
.png)
11. Once the key pair is created it will be listed in your Key ring. Right click on it and select Export...
.png)
12. Choose a location to save the key pair in the Where field and make sure the checkbox Include secret key in exported file is deactivated. Click on Save.
.png)
13. You will receive a prompt indicating that the key pair was created successfully. Click on No, Thanks! to prevent uploading the public key to the PGP servers
.png)
14. Open Finder and go to the location you selected for saving the public key (at point 12).
15. Send the public key file to us via Message Center ticket or email as per instructions on IBKB3842.
KB3842 - Using GPG/RSA encryption keys to guarantee the privacy and security of your Reports
KB3968 - Generate a key pair using GPG for Windows
KB4108 - Decrypt your Reports using GPG for Windows
KB4210 - Decrypting Reports using your PGP Key pair on macOS
KB4407 - Generate RSA Key Pair on Windows
KB4409 - How to set up sFTP for using Certificate Authentication on Windows
KB4410 - How to set up sFTP for using Certificate Authentication on macOS
KB4411 - How to backup your public/private Key pair
KB4323 - How to transfer your public/private key pair from one computer to another
Generate a Key Pair Using GPG for Windows
To generate a key pair using GPG for Windows:
1. Download the GPG Installer for Windows.
2. Run the installer and click Next >.

3. Make sure that the component Kleopatra is selected as one of the sub components to include in the installation and click Next >.
.png)
4. The default installation folder will be displayed. Click Install.
.png)
5. Once the installation has completed, click Next >.

6. Make sure the checkbox Run Kleopatra is active and click Finish.


- Select RSA + RSA as Key type
- Select 2,048 bits and 2,048 bits as Key lengths
- Activate the checkboxes: Encryption, Certification, Signing and Authentication. The first two should be already active by default
- Deactivate the option Valid until
Once all the parameters have been set exactly as in the image below, click OK.

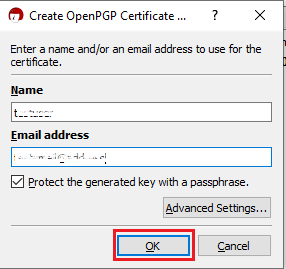

.png)


16. Although this is not strictly needed, we strongly recommend you to perform a backup of your Key Pair, following the steps in KB4411. This backup copy of the certificates can be imported again in Kleopatra in case the original set becomes corrupted or accidentally deleted.
KB3842 - Using GPG/RSA encryption keys to guarantee the privacy and security of your Reports
KB4205 - Generate a key pair using GPG Suite on macOS
KB4108 - Decrypt your Reports using GPG for Windows
KB4210 - Decrypting Reports using your PGP Key pair on macOS
KB4407 - Generate RSA Key Pair on Windows
KB4409 - How to set up sFTP for using Certificate Authentication on Windows
KB4410 - How to set up sFTP for using Certificate Authentication on macOS
KB4411 - How to backup your public/private Key pair
KB4323 - How to transfer your public/private key pair from one computer to another
デイリーアクティビティーステートメントの「Cash FX Translation Gain/Loss」の項目は何を表し、どのように計算されているのですか?
ステートメントの作成にあたり、お客様の口座資産の包括的なスナップショットをご提供するために、お客様が基準通貨として指定した通貨以外の通貨で建てられたお客様の口座のロングまたはショートの現金残高は、その時点で実勢為替レートで換算する必要があります。為替レートは期間ごとに変動する傾向があるため、この変換処理により、現金FX換算残高はプラス(すなわち利益)またはマイナス(すなわち損失)になる可能性があります。 これらの損益は時価計算(すなわち、すべての非基軸通貨の残高が終日の為替レートで決済されたかのような計算)であり、実際の損益は非基軸通貨の残高が決済されるまで確定しないことに留意する必要があります。
ある非基軸通貨の現金為替換算損益は、まず、毎日の計算書期間の前後における基軸通貨の換算レートの差(為替レートC – 為替レートP、レートは各計算書の基軸通貨の為替レート欄に記載されています)を計算して求められます。この差額(プラスまたはマイナス)に、当明細書期間の開始時の現金残高を乗じて、現金為替換算の利益(プラスの場合)または損失(マイナスの場合)を決定します。基軸通貨以外のすべての明細(取引の純売却代金・純購入代金、手数料、利息など)は、通貨換算のために期末時点で計上されるため、定義上、換算損益はありません。

