I am unable to scan the QR Code in Client Portal. How can I add a User to IBKR Mobile Authentication (IB Key) for Android?
Requirements:
- The IBKR Mobile app must be installed and IBKR Mobile Authentication (IB Key) already activated on this Android device.
- For more information on the installation and activation on Android devices, please consult KB2277.
Instructions:
1) On your Android device, open the IBKR Mobile app.
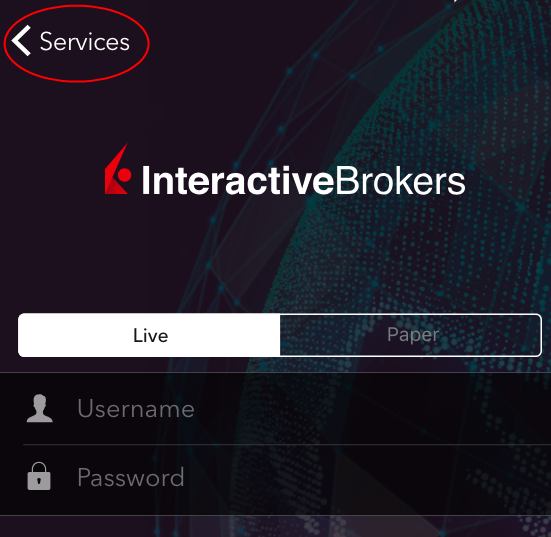
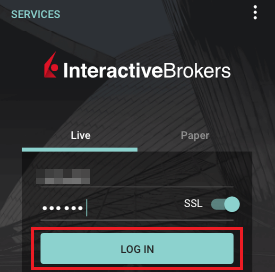
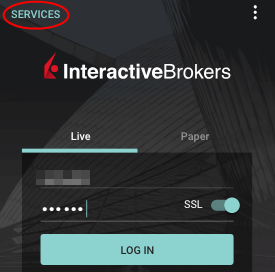
1.a) If the app opens with the login screen (Figure 1), tap on Services on the top-left corner (red arrow) and proceed with step 2)
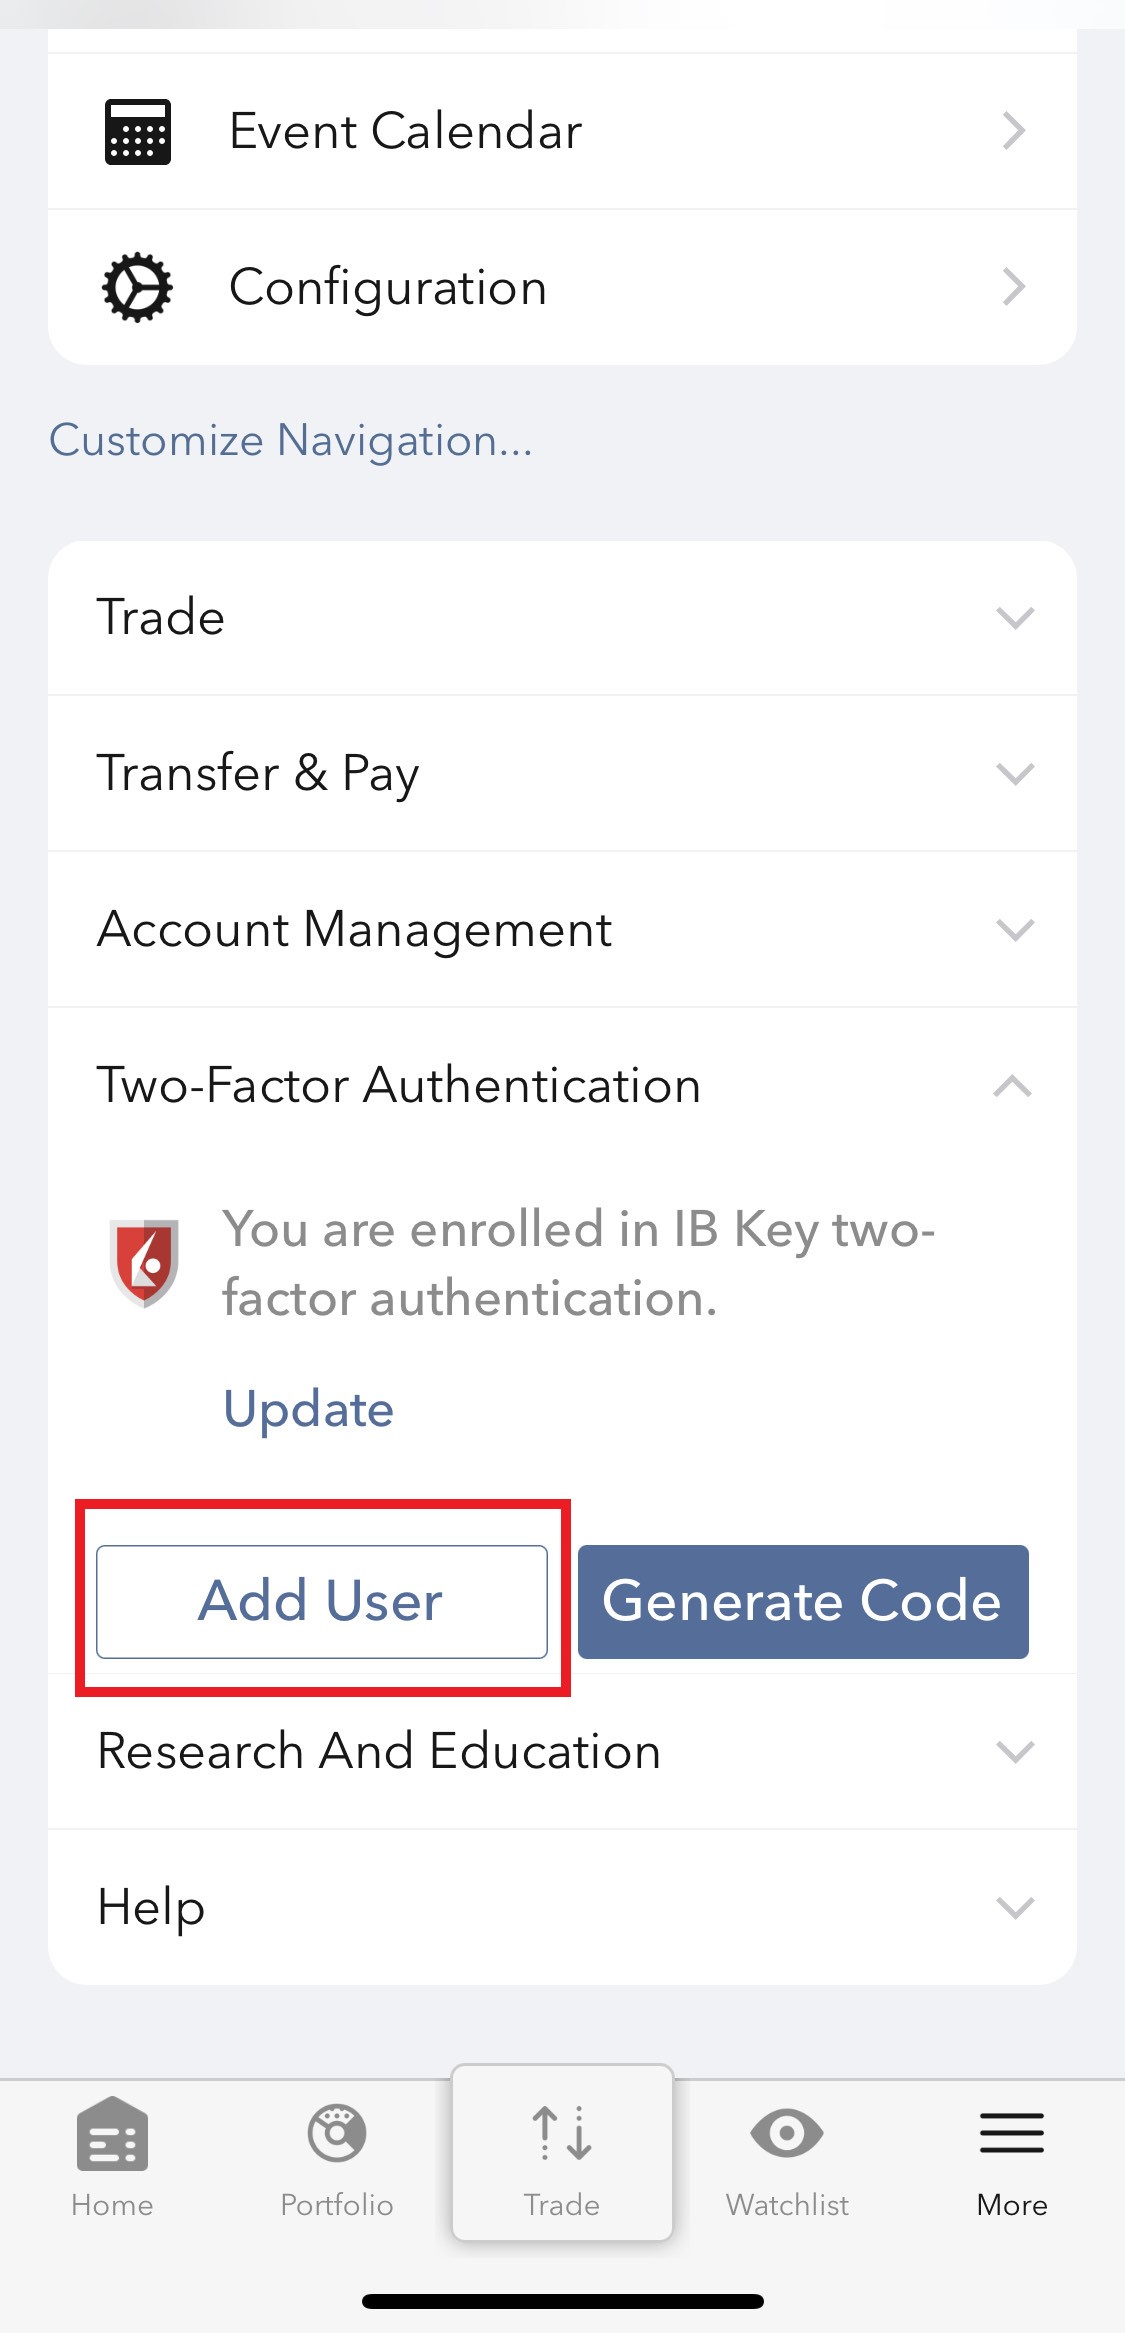
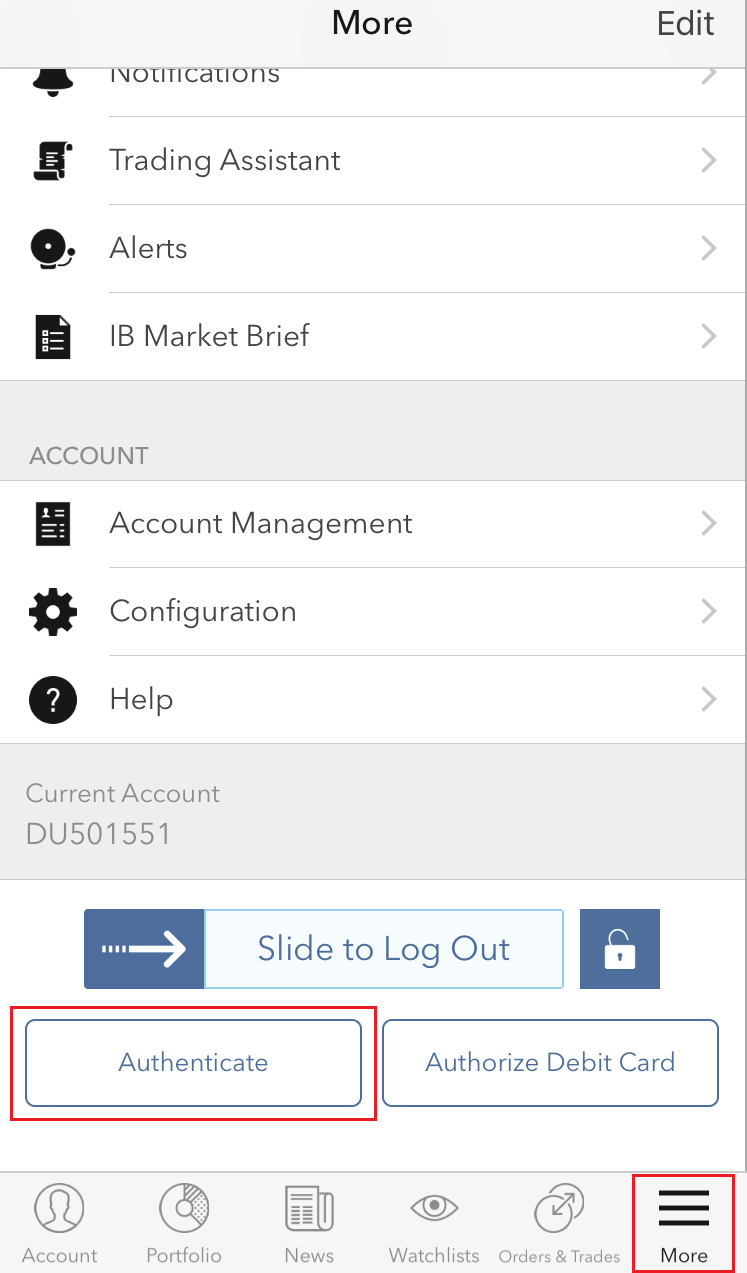
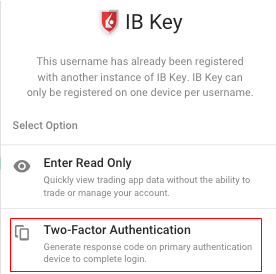
1.b) If the app opens with your Home Page, Portfolio, Watchlists, or similar, tap on More on the top-left corner (Figure 2). Then tap on Two-Factor Authentication (Figure 3), followed by Add User (Figure 4) and proceed with step 3)
Figure 1 Figure 2 Figure 3
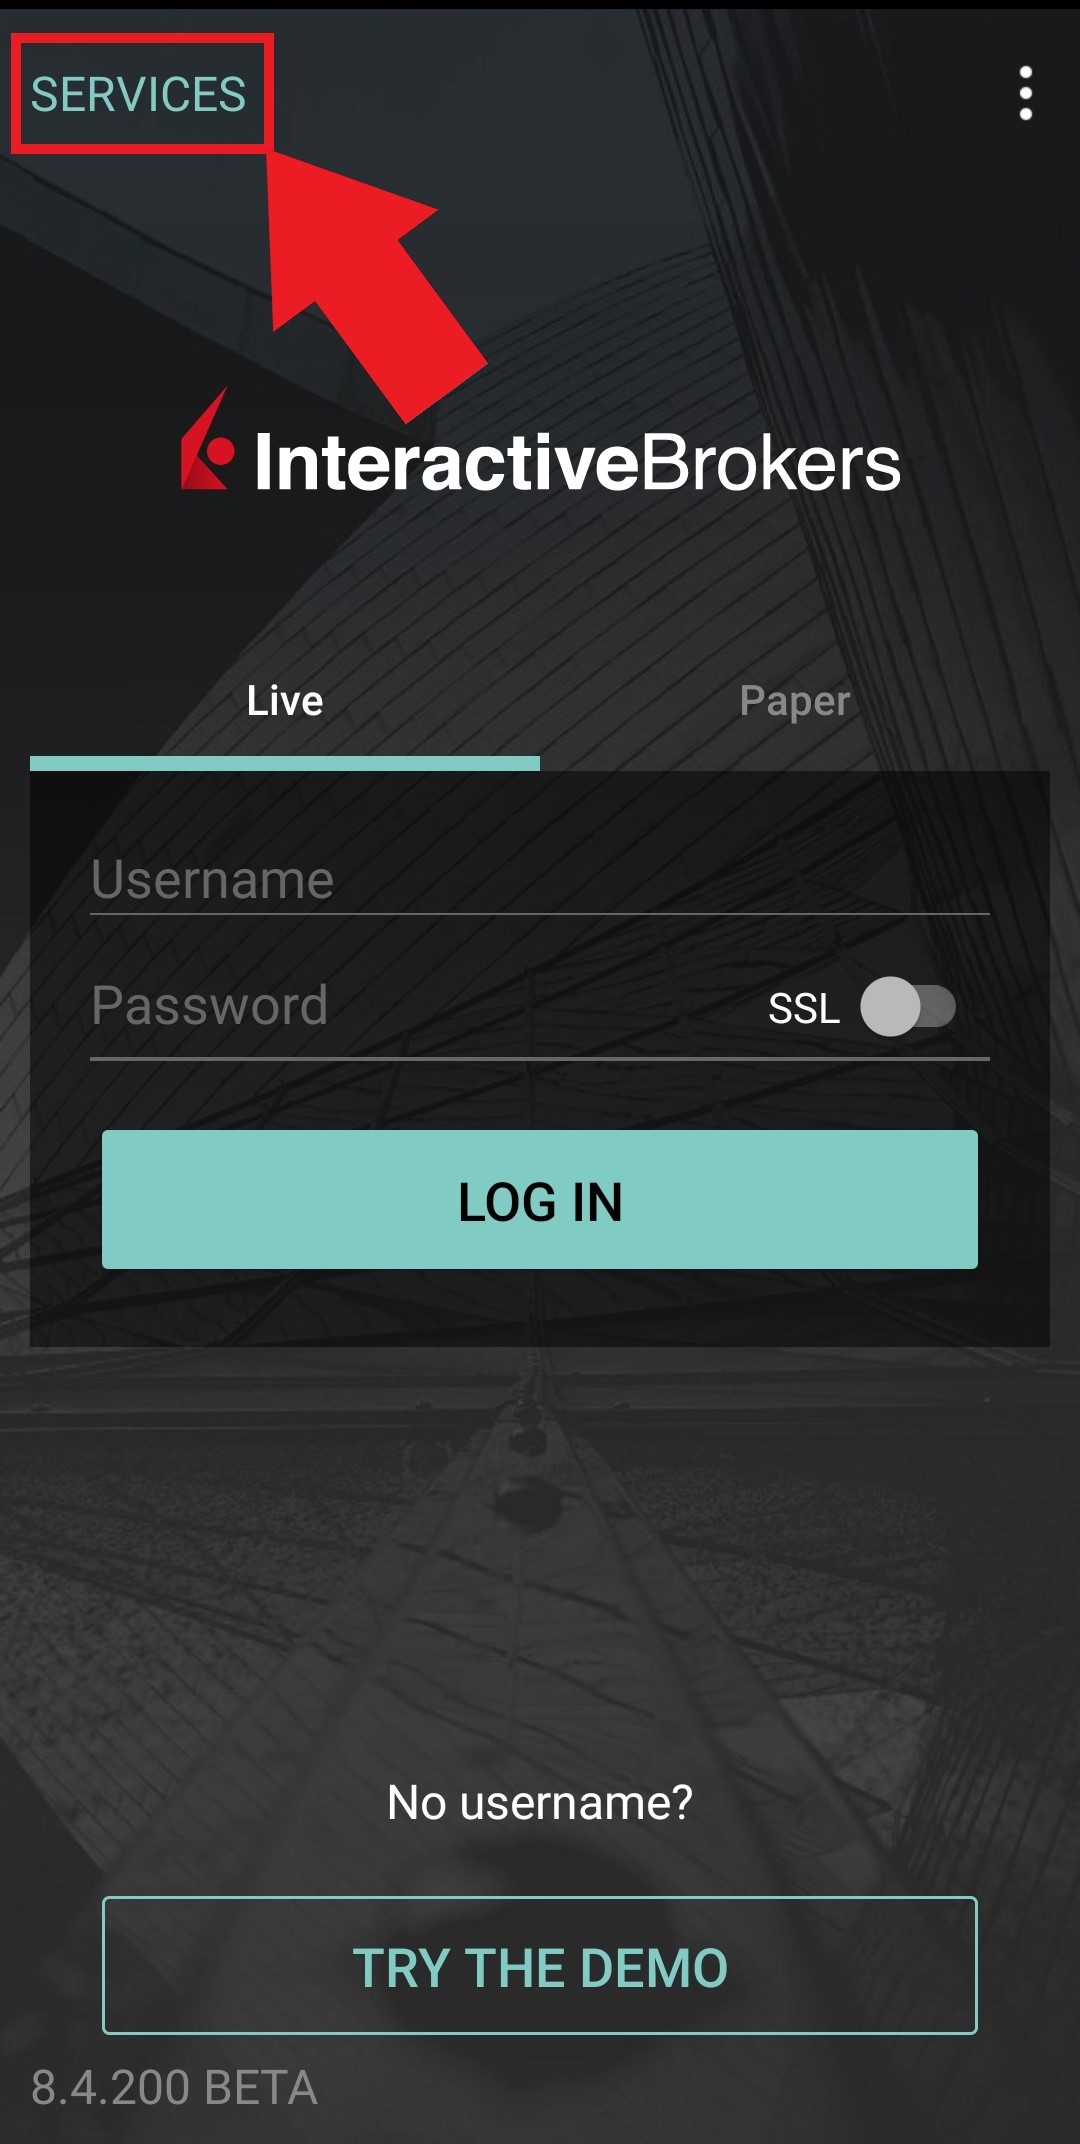

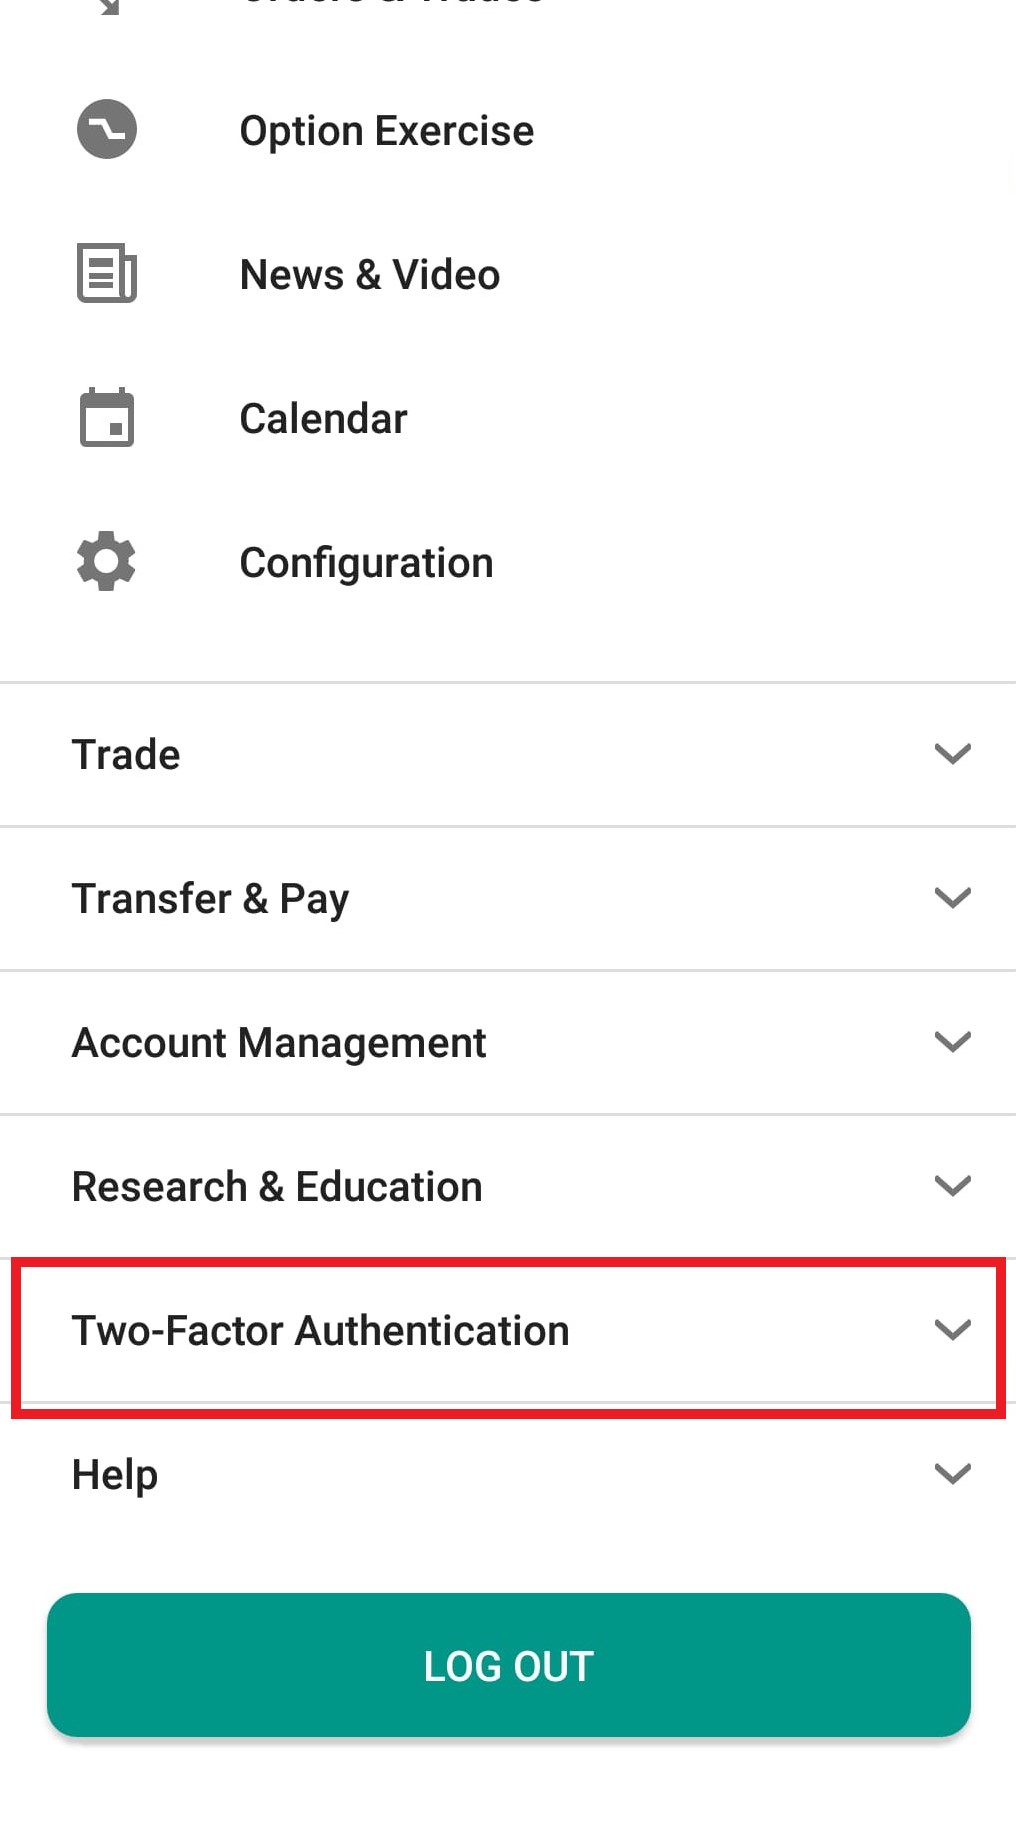
Figure 4
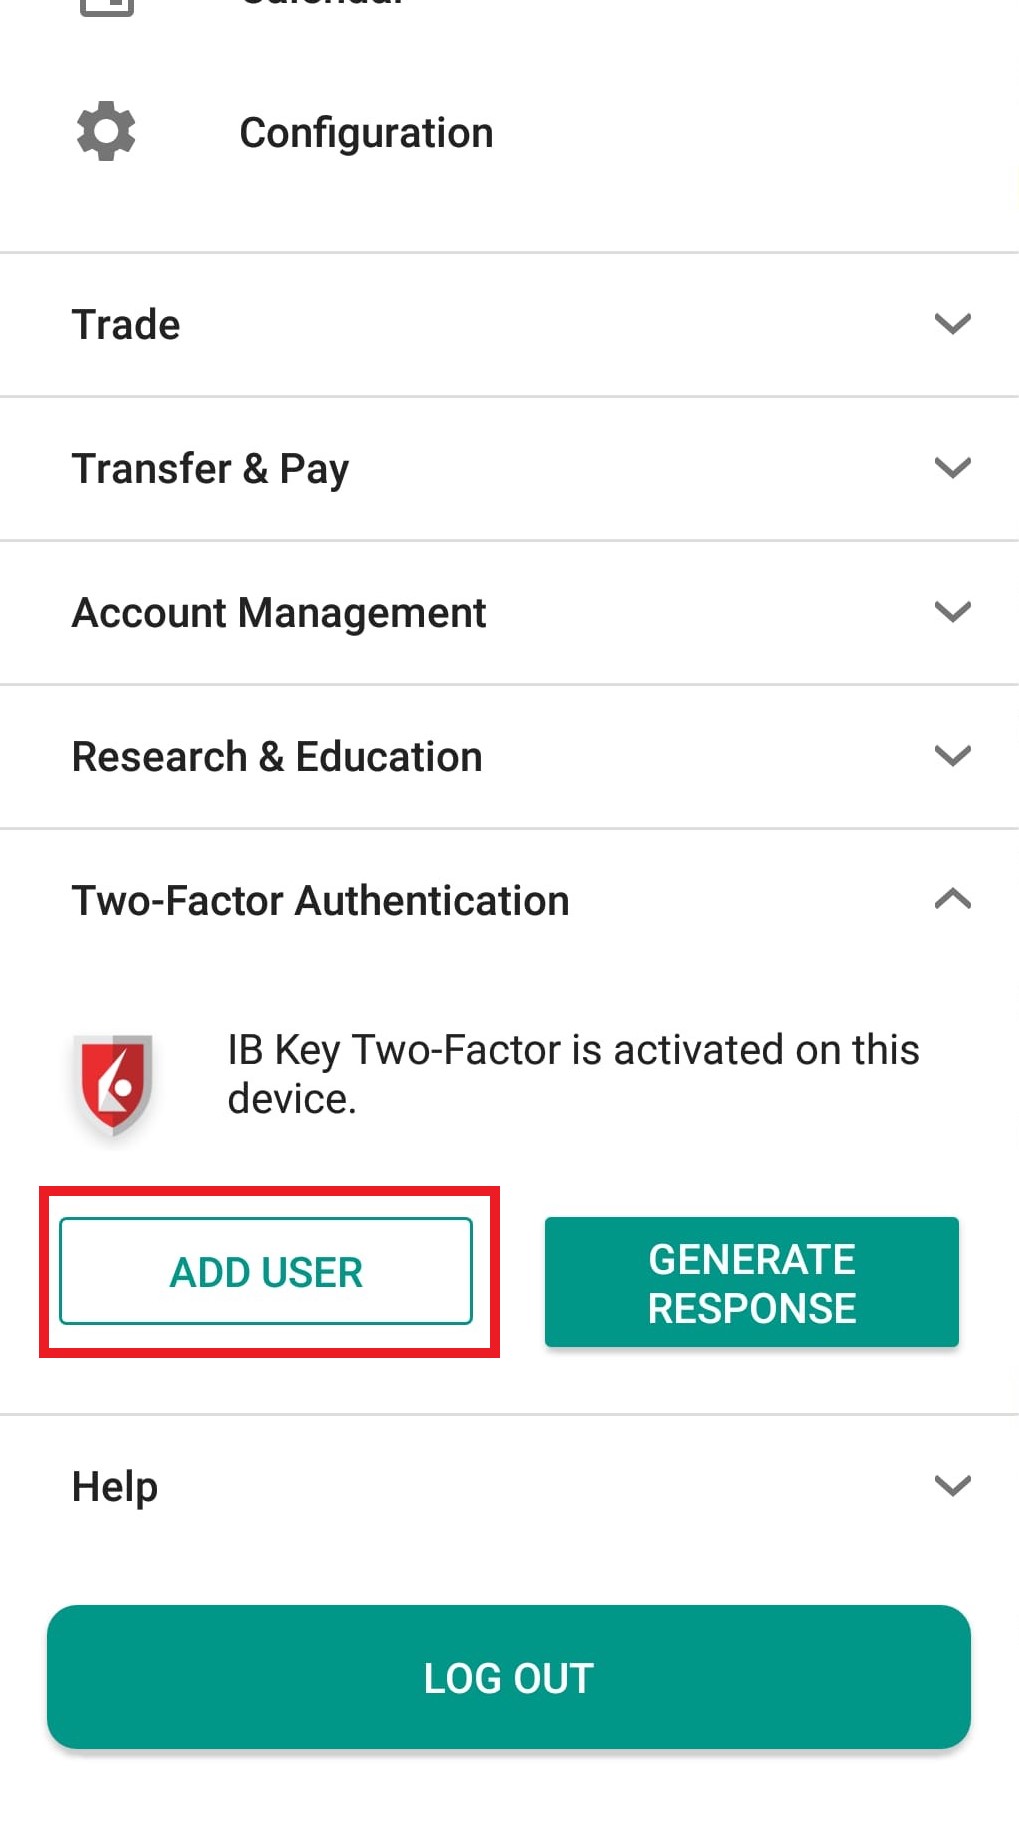
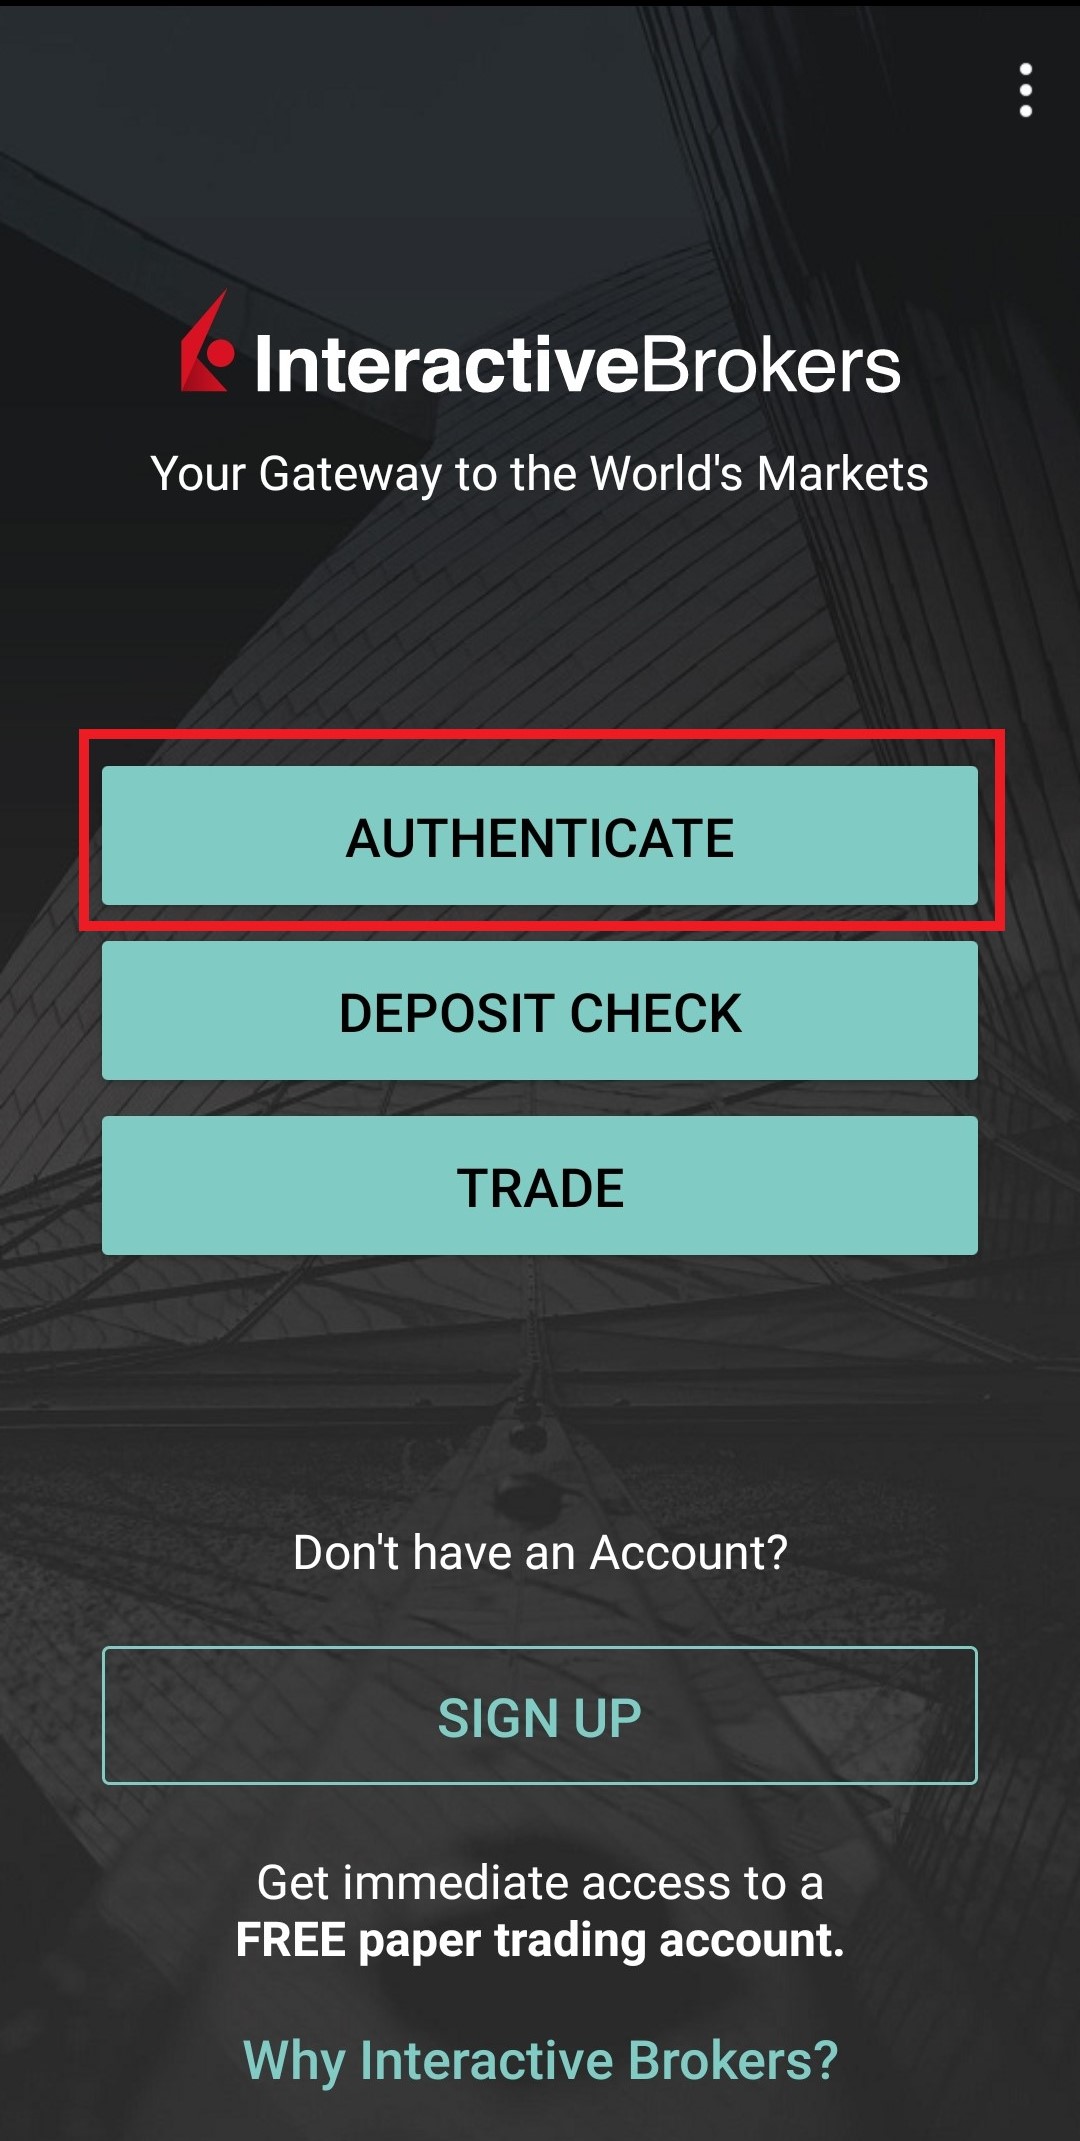
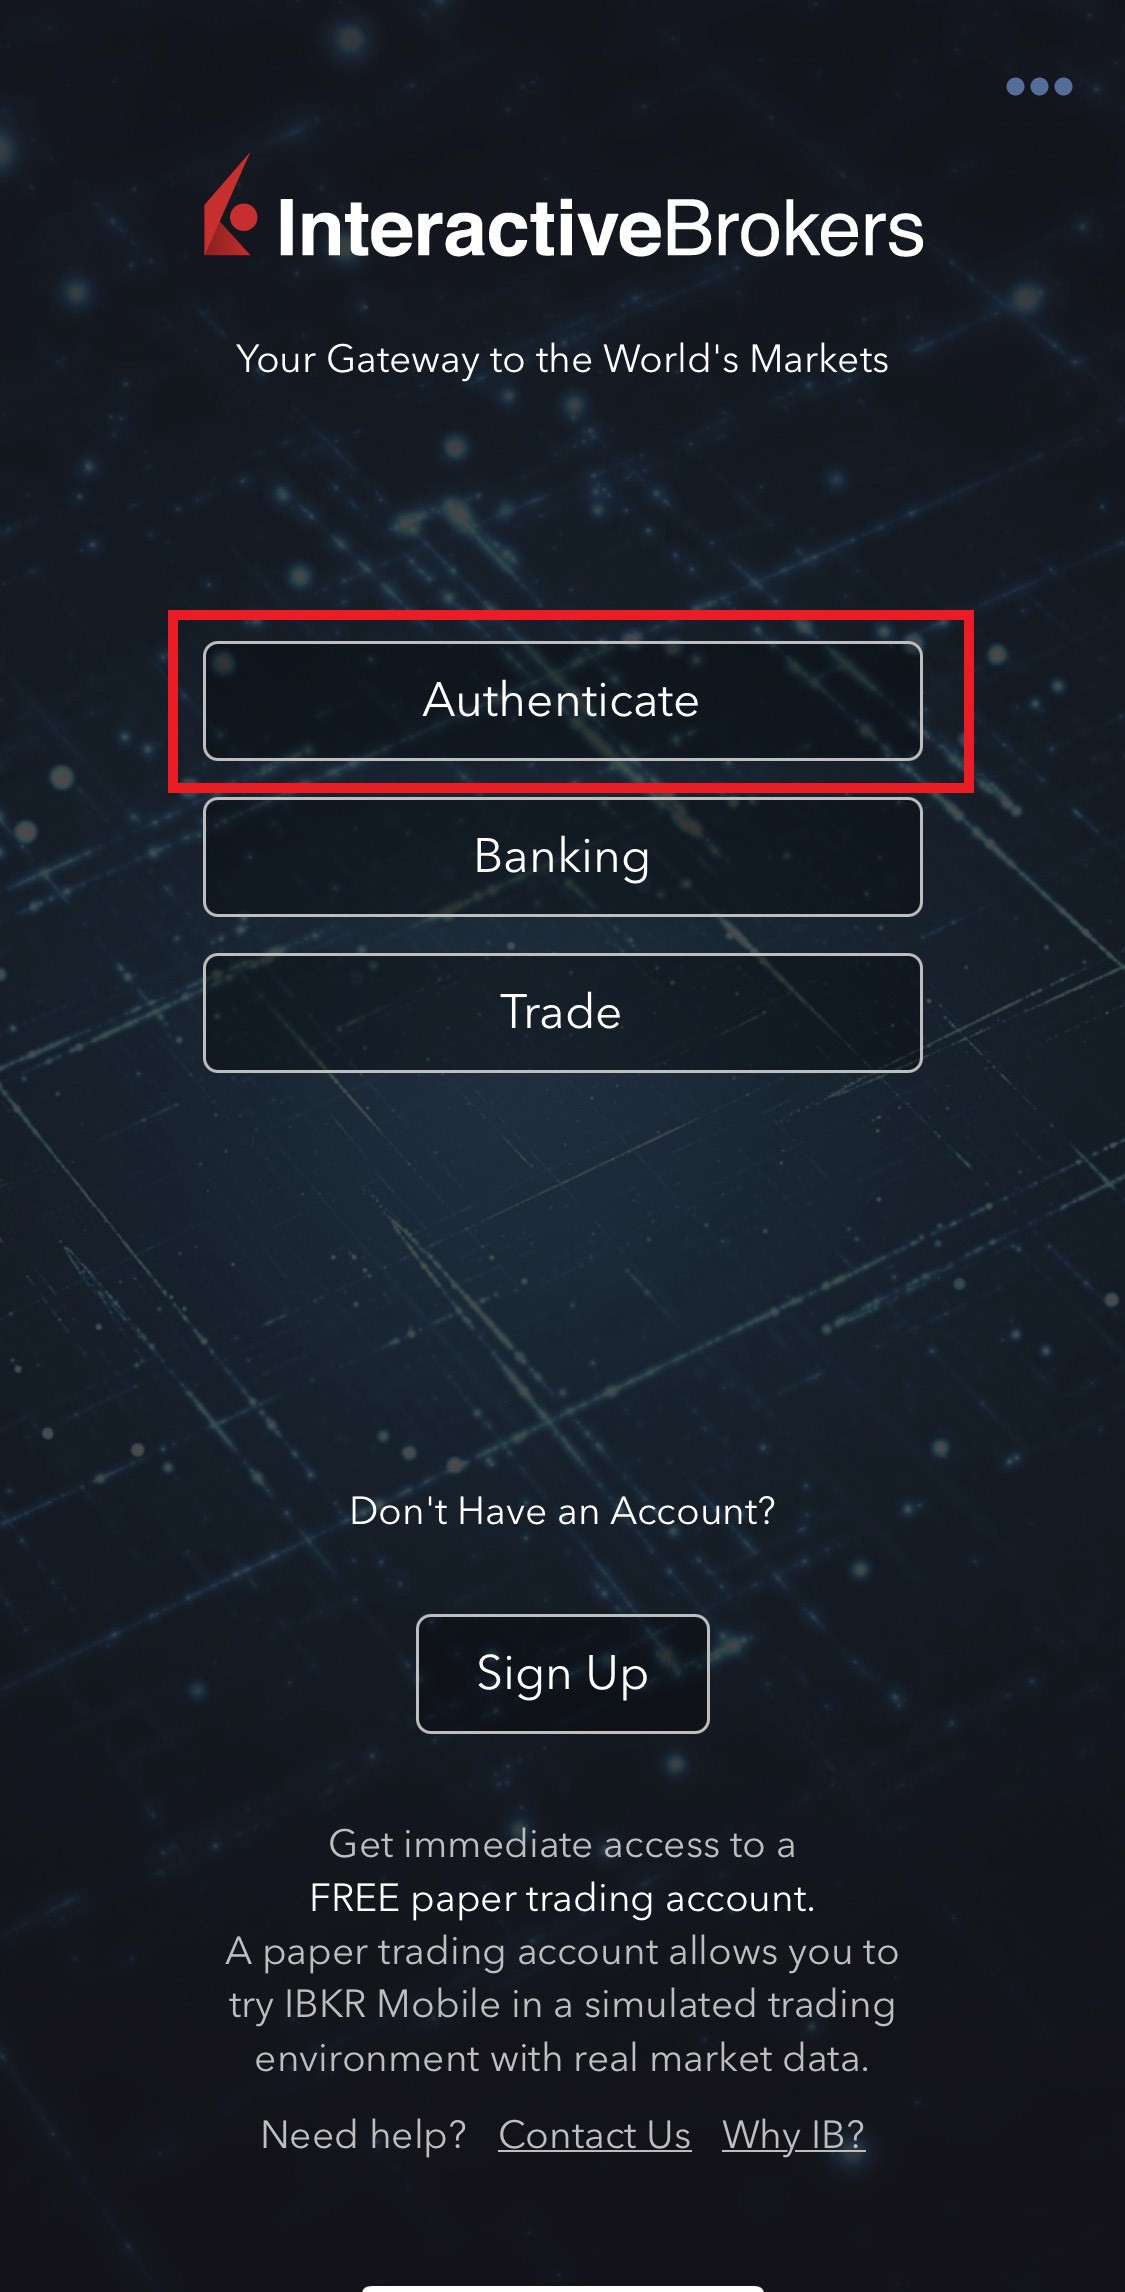
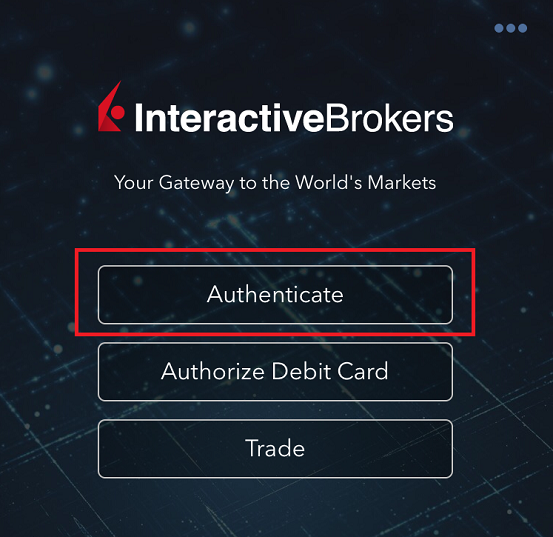
2) Tap on AUTHENTICATE (Figure 5) and then on Add User (Figure 6).
Figure 5 Figure 6


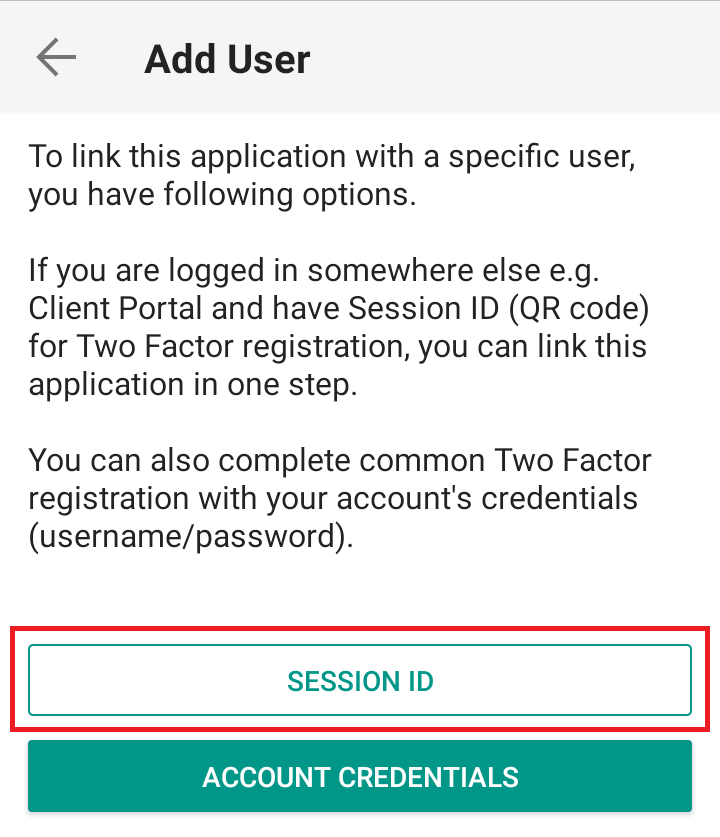
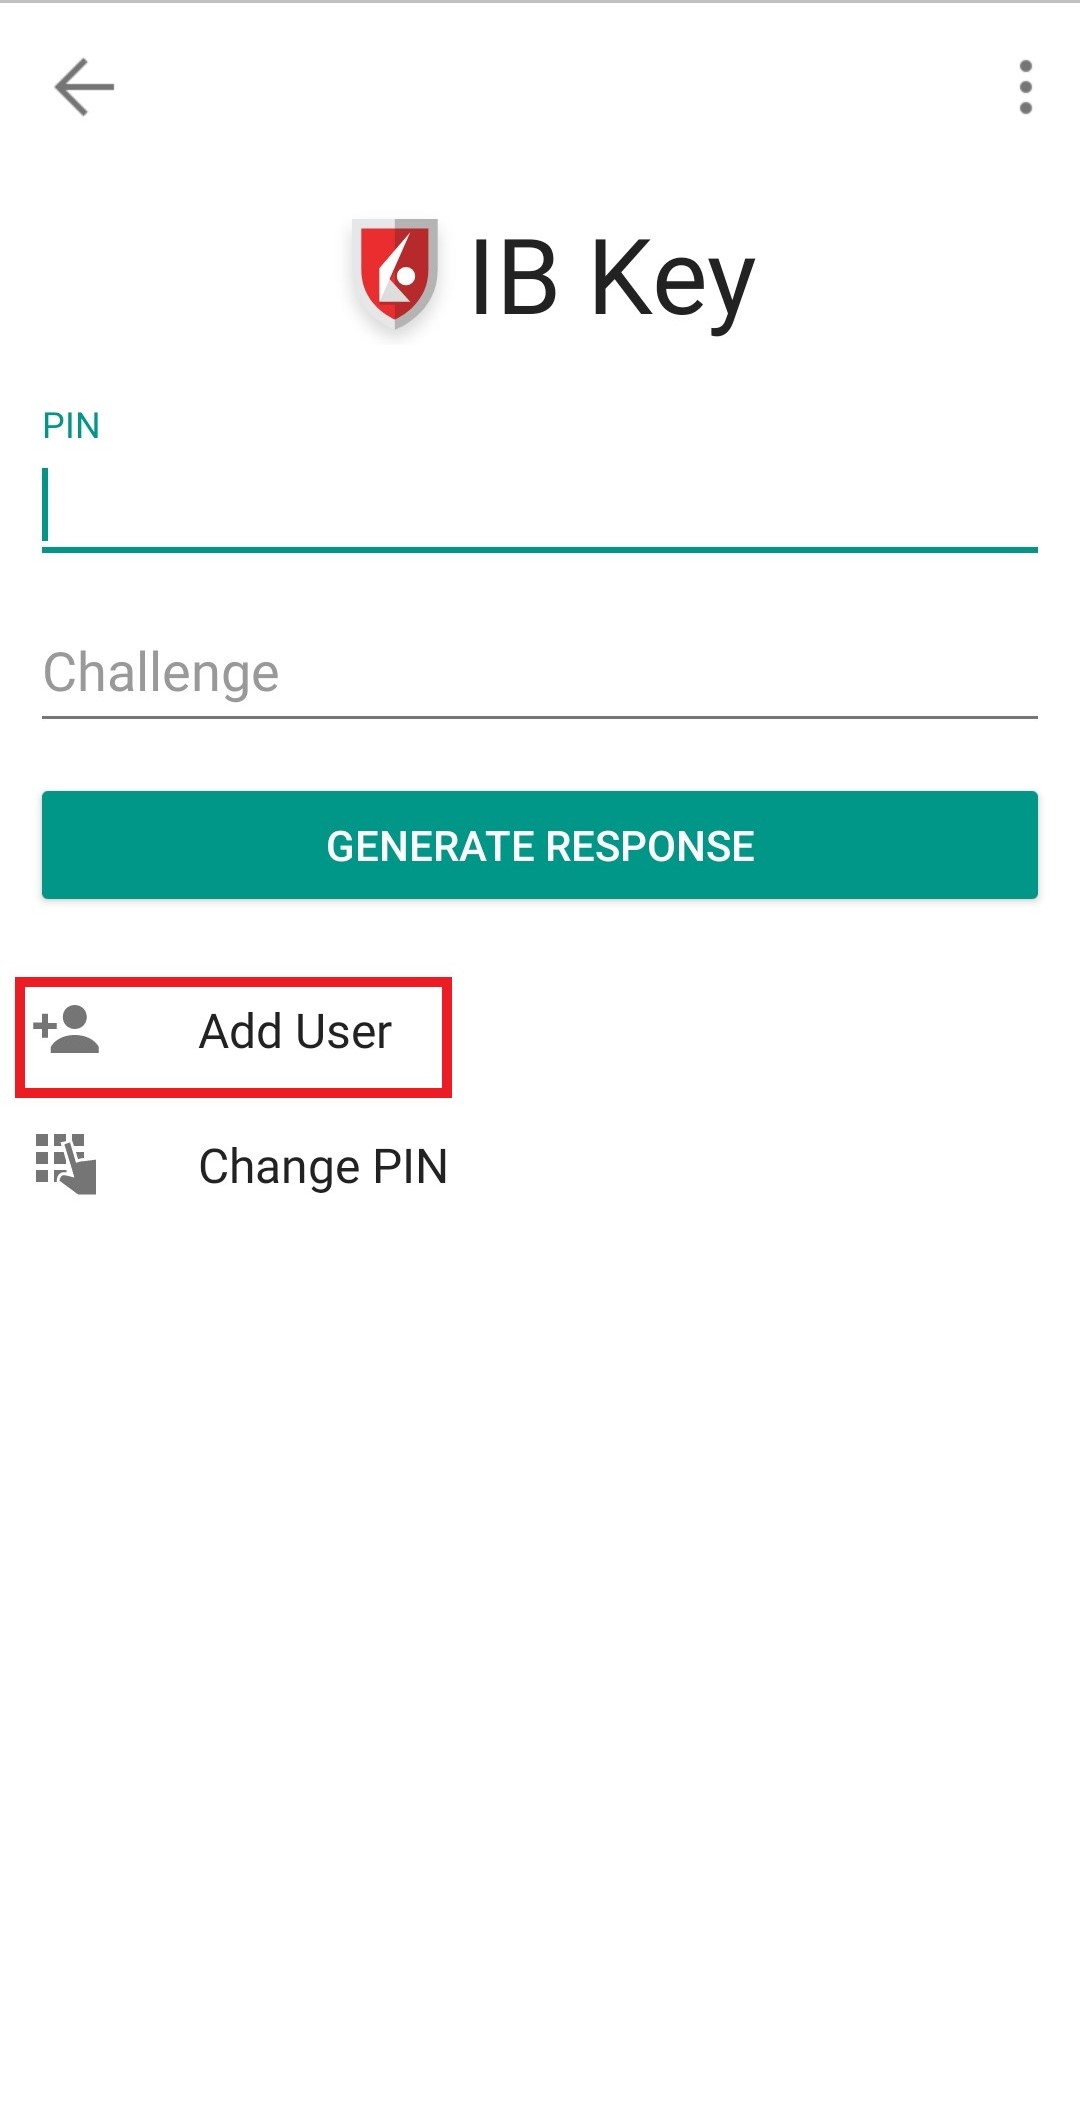
3) Read the instructions and then tap on SESSION ID (Figure 7).
Figure 7
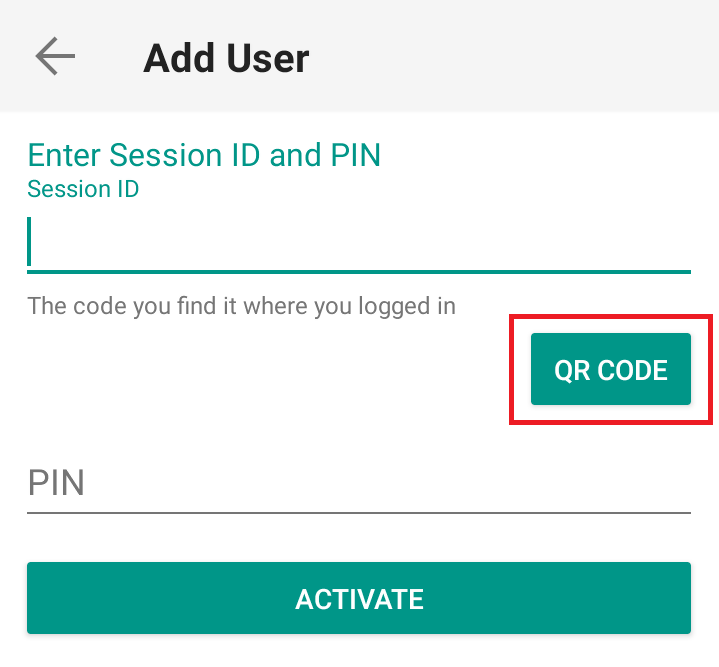
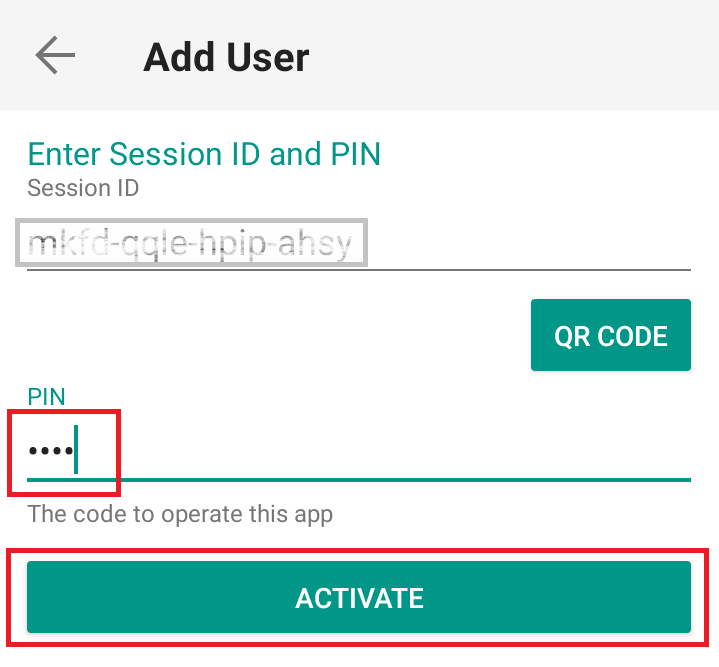
4) Type the alphanumeric string present below the QR code in the Session ID field (Figure 8).
Figure 8
.png)
5) Provide your PIN then tap ACTIVATE (Figure 9).
Figure 9

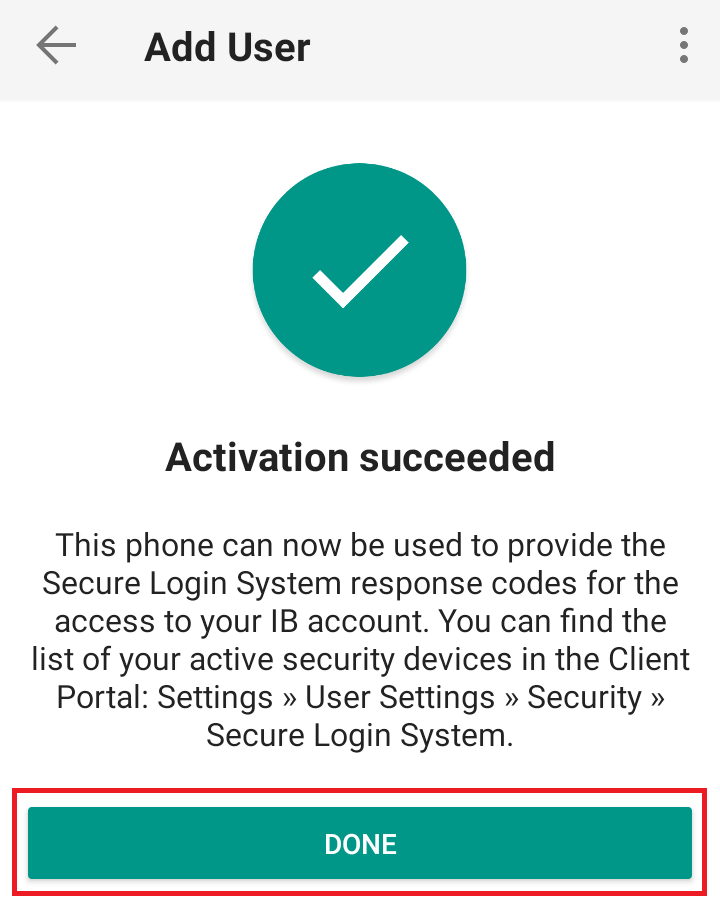
6) You will receive a message indicating the successful activation of IBKR Mobile Authentication (IB Key). Tap DONE to confirm (Figure 10).
Figure 10

Possible Issues and Solutions
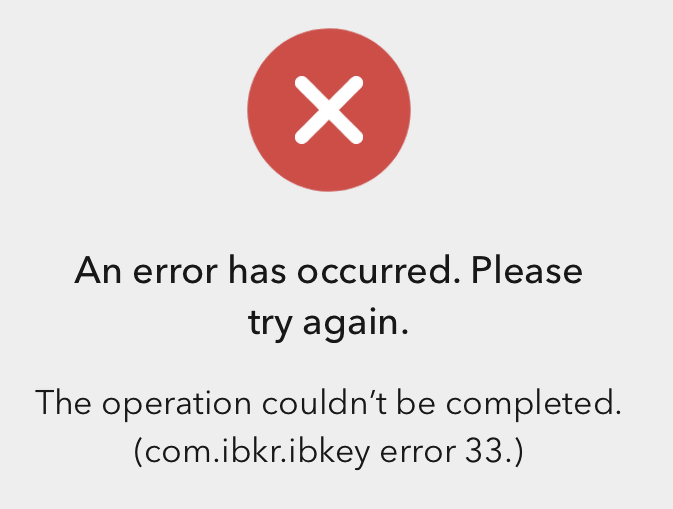
- During the IBKR Mobile Authentication (IB Key) activation, I receive an error message "An error has occurred. Please try again."
Figure 11

This error message (Figure 11) may indicate you are attempting to activate the IBKR Mobile Authentication (IB Key) for a user which was already enrolled. Please try to log that user in to the Client Portal again. If you receive a notification on your smartphone once you have entered the credentials and you are able to complete the authentication once you tap on that notification, then the user was already enrolled and you no longer need to follow the steps on this article.
Alternatively, the error message may be displayed when the QR code shown in the Client Portal was already used to attempt an activation and is expired. In this case, please log out of the Client Portal and log back in to obtain a fresh QR code.
I am unable to scan the QR Code in Client Portal. How can I add a User to IBKR Mobile Authentication (IB Key) for iPhone?
Requirements:
- The IBKR Mobile app must be installed and IBKR Mobile Authentication (IB Key) already activated on this iOS device.
- For more information on the installation and activation on iOS devices, please refer to KB2278.
Instructions:
1) On your iOS device, open the IBKR Mobile app.
1.a) If the app opens with the login screen (Figure 1), tap on Services on the top-left corner (red arrow) and proceed with step 2)
1.b) If the app opens with your Home Page, Portfolio, Watchlists, or similar, tap on More on the bottom-right corner (Figure 2). Then tap on Two-Factor Authentication (Figure 3), followed by Add User (Figure 4) and proceed with step 3)
Figure 1 Figure 2 Figure 3


Figure 4
2) Tap on Authenticate (Figure 5) and then on Add User (Figure 6).
Figure 5 Figure 6


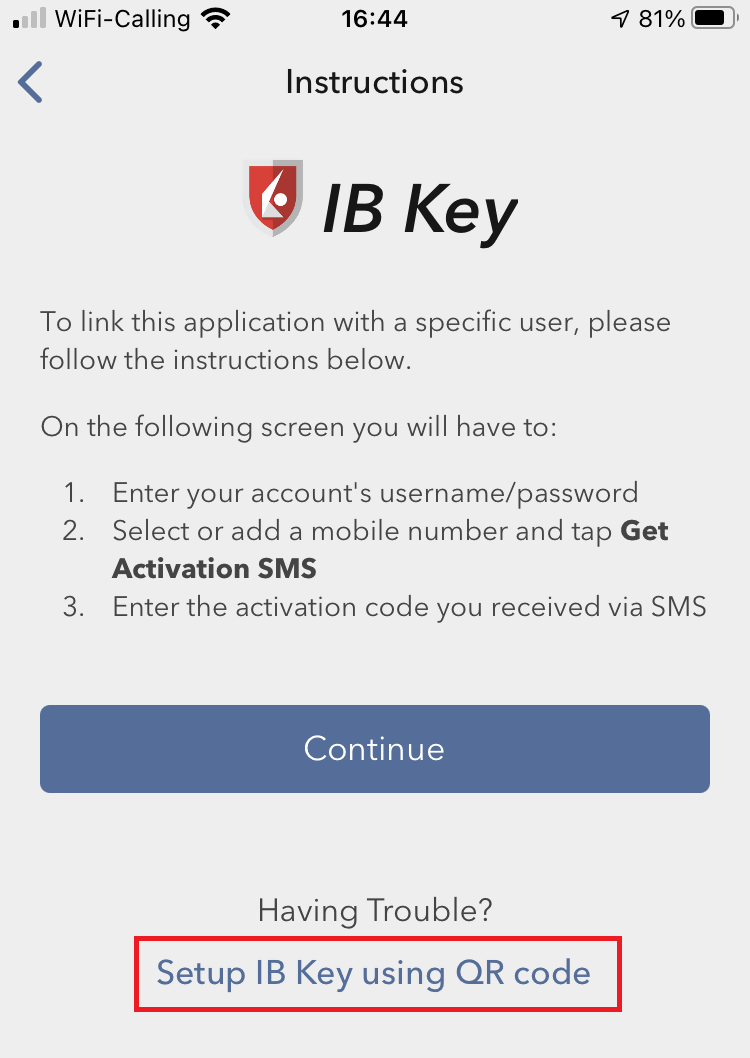
3) Tap Setup IB Key using QR code (Figure 7).
Figure 7

4) Type the alphanumeric string present below the QR code in the Activation Code field (Figure 8).
Figure 8
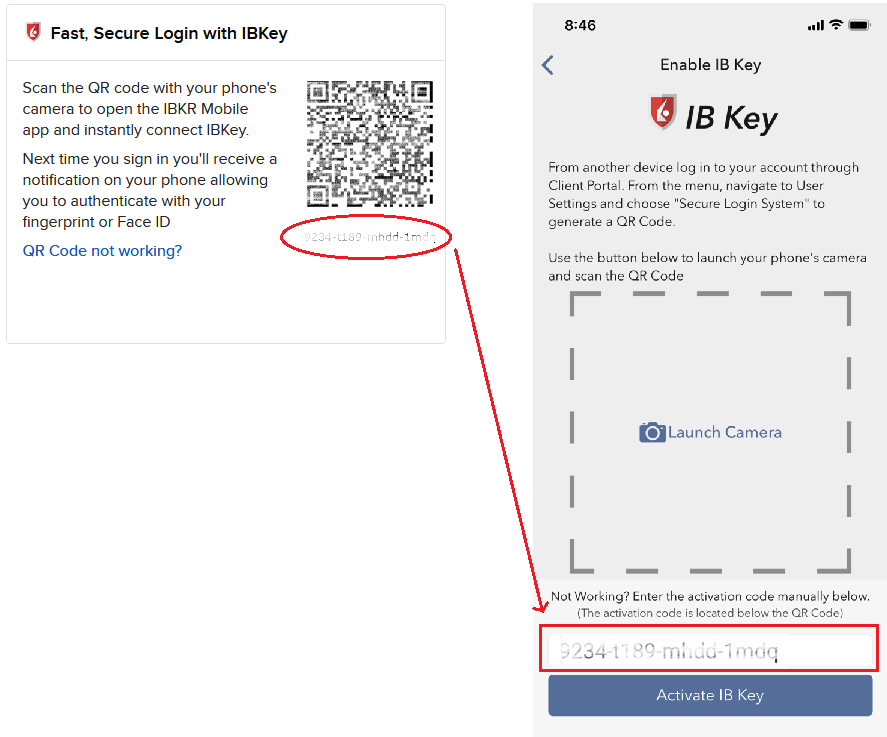
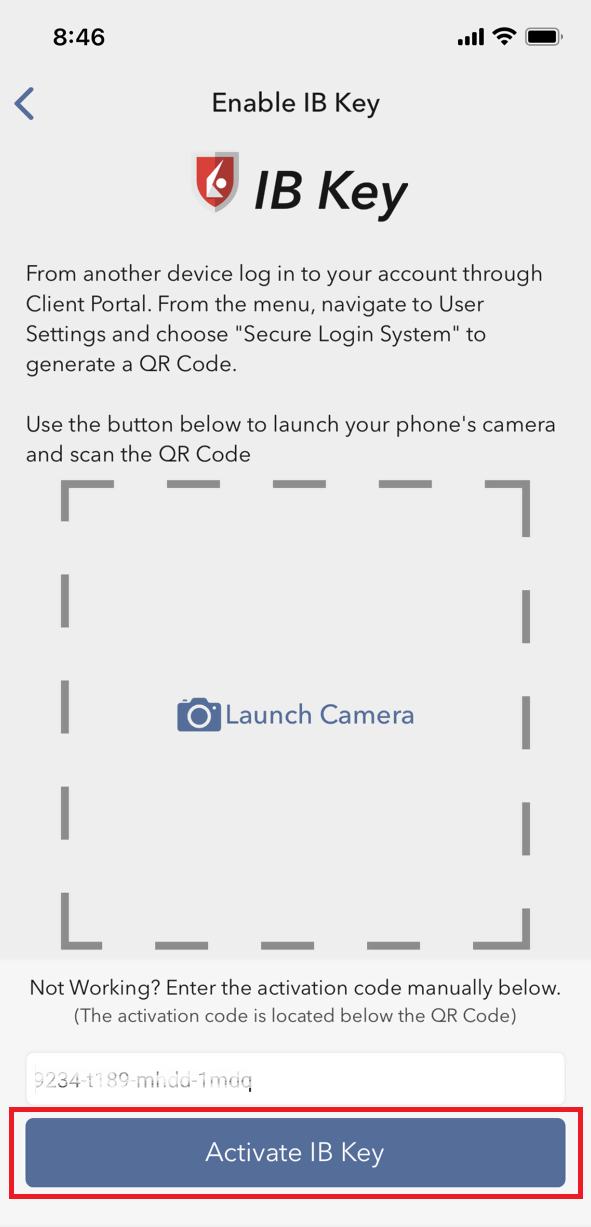
8) Tap Activate IB Key (Figure 9).
Figure 9
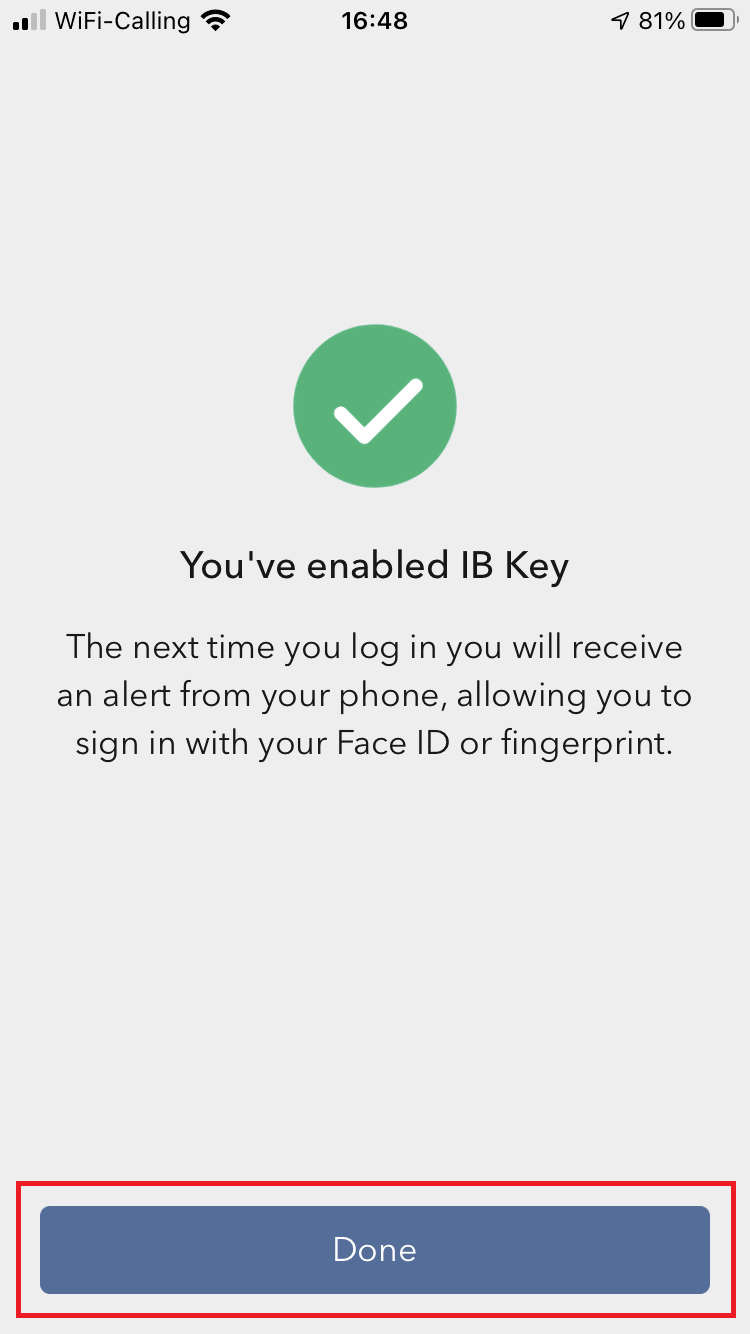
9) You will receive a message indicating the successful activation of IBKR Mobile Authentication (IB Key). Tap DONE to confirm (Figure 10).
Figure 10
Possible issues and solutions
- During the IBKR Mobile Authentication (IB Key) activation, I receive an error message "An error has occurred. Please try again."
Figure 11

This error message (Figure 11) may indicate you are attempting to activate the IBKR Mobile Authentication (IB Key) for a user which was already enrolled. Please try to log that user in to the Client Portal again. If you receive a notification on your smartphone once you have entered the credentials and you are able to complete the authentication once you tap on that notification, then the user was already enrolled and you no longer need to follow the steps on this article.
Alternatively, the error message may be displayed when the QR code shown in the Client Portal was already used to attempt an activation and is expired. In this case, please log out of the Client Portal and log back in to obtain a fresh QR code.
References:
- See KB2260 for instruction on how to activate and operate IBKR Mobile Authentication (IB Key).
- See KB2748 for instructions on how to recover IBKR Mobile Authentication (IB Key).
- See KB3236 for instructions on how to enable notifications for the IBKR Mobile app.
- See KB3234 for troubleshooting missing IBKR Mobile notifications.
- See KB3073 for instructions on how to migrate the IBKR Mobile Authentication (IB Key) to a new smartphone.
I want to add a User to IBKR Mobile Authentication (IB Key) for Android with the QR Code from Client Portal
Requirements:
- The IBKR Mobile app must be installed and IBKR Mobile Authentication (IB Key) already activated on this Android device.
- For more information on the installation and activation on Android devices, please consult the IBKR Knowledge Base.
Instructions:
1) On your Android device, open the IBKR Mobile app.
1.a) If the app opens with the login screen (Figure 1), tap on Services on the top-left corner (red arrow) and proceed with step 2)
1.b) If the app opens with your Home Page, Portfolio, Watchlists, or similar, tap on More on the top-left corner (Figure 2). Then tap on Two-Factor Authentication (Figure 3), followed by Add User (Figure 4) and proceed with step 3)
Figure 1 Figure 2 Figure 3

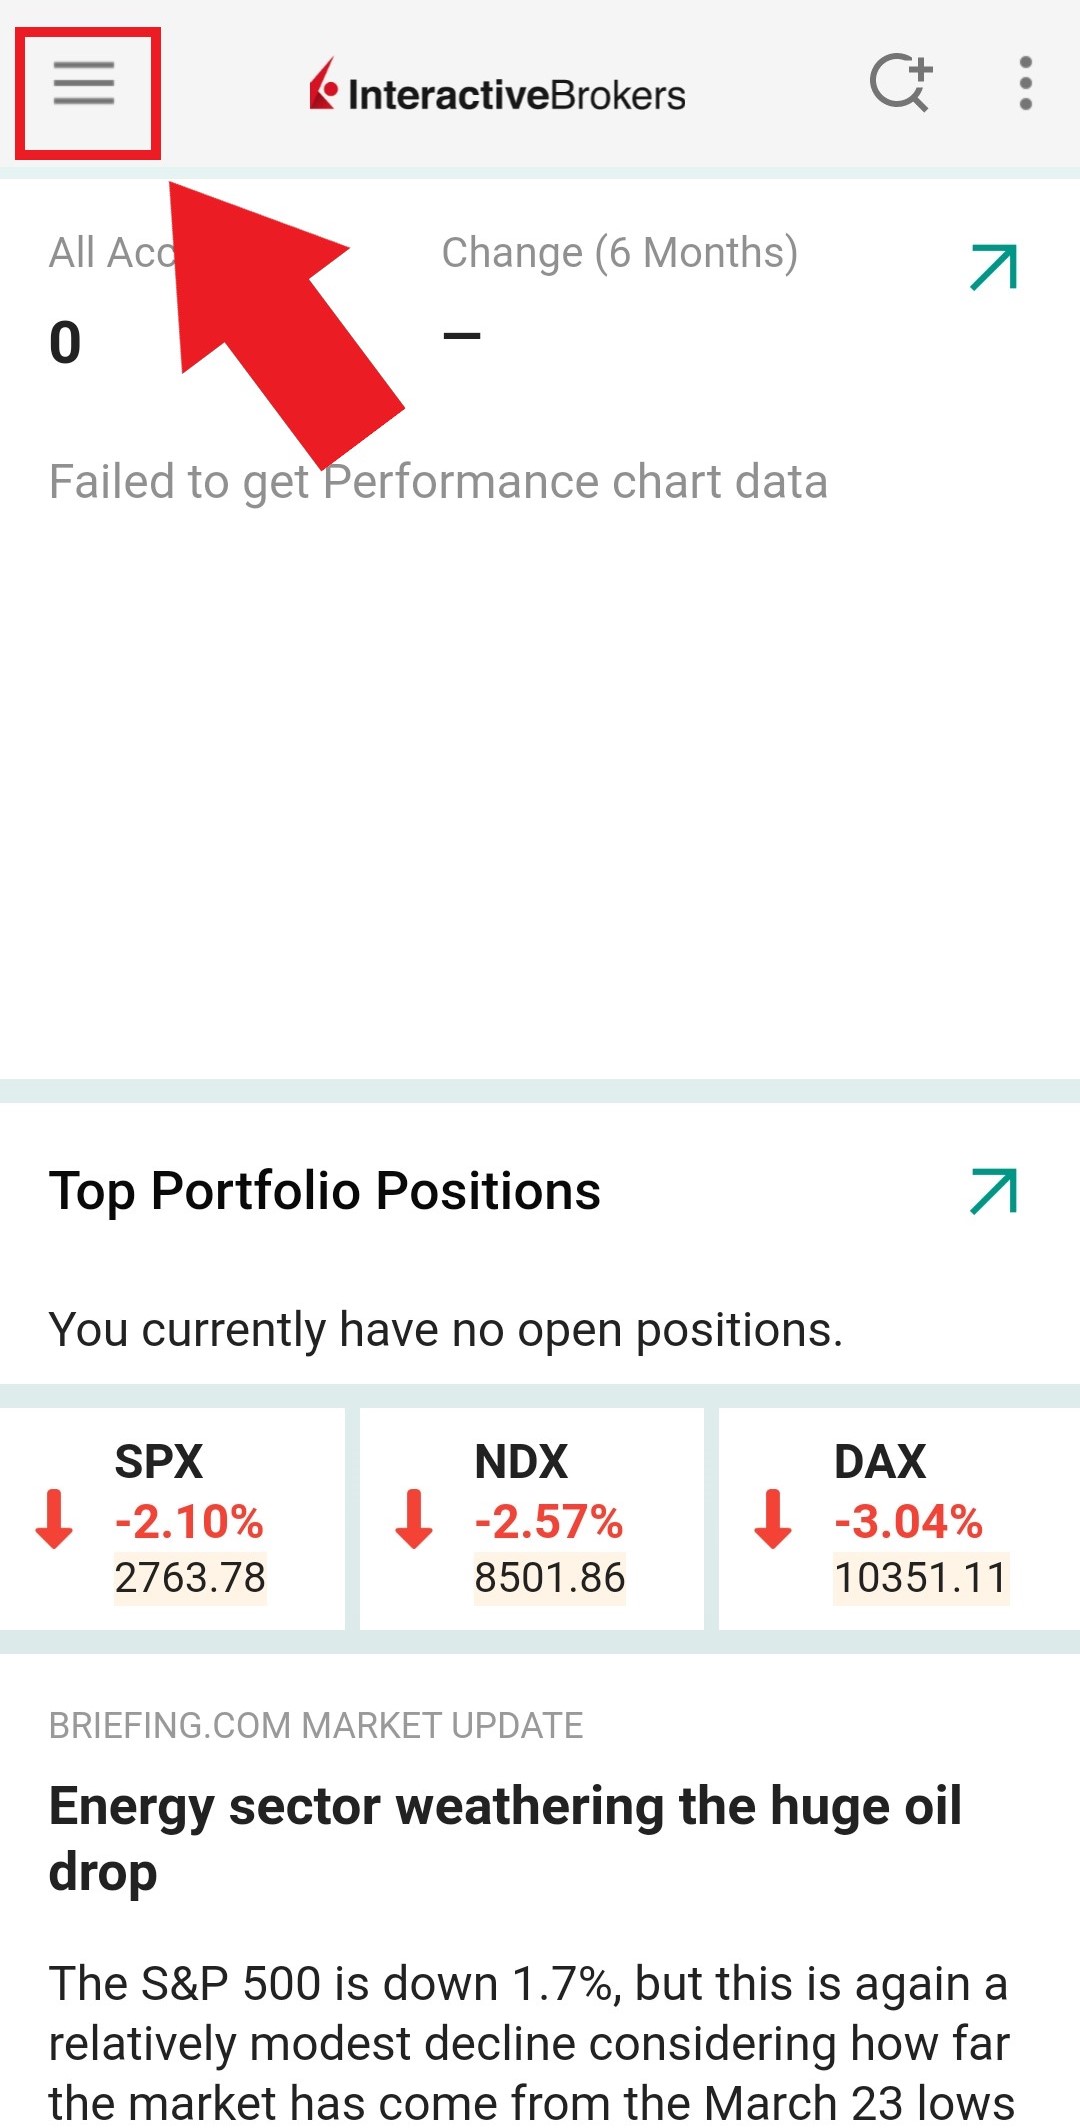

Figure 4

2) Tap on Authenticate (Figure 5) and then on Add User (Figure 6).
Figure 5 Figure 6
3) Read the instructions and then tap on SESSION ID (Figure 7).
Figure 7

4) Tap QR CODE (Figure 8).
Figure 8
5) Tap Allow if asked for permission to use the phone camera (Figure 9).
Figure 9

6) Point the lens of your smartphone camera towards the QR code (Figure 10). You don't need to "take a picture." When the code is in focus, it is automatically captured. If your phone does not seem to recognize the QR code try to move your phone closer or farther away to the QR code in order to gain focus. If your phone does not recognize the QR code, please see the section Possible Issues and solutions at the bottom of this article.
Figure 10
7) Provide your PIN then tap on ACTIVATE (Figure 11).
Figure 11
8) You will receive a message indicating the successful activation of IBKR Mobile Authentication (IB Key). Tap DONE to confirm (Figure 12).
Figure 12
Possible issues and solutions
- My smartphone did not manage to read the QR code. What should I do?
Make sure you have activated the switch "Scan QR codes" from the Camera Settings of your smartphone (Figure 13).
Figure 13

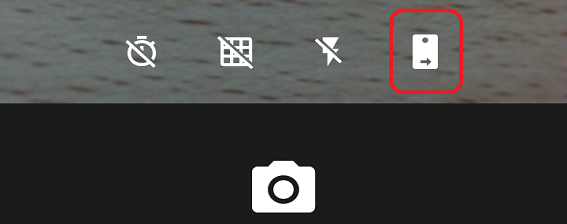
- My phone activates the front camera. How can I switch to the rear one?
Usually there is a specific button in the camera view to switch from front to rear lenses (Figure 14).
Figure 14
- During the IBKR Mobile Authentication (IB Key) activation, I receive an error message "An error has occurred. Please try again."
Figure 15

This error message (Figure 15) may indicate you are attempting to activate the IBKR Mobile Authentication (IB Key) for a user which was already enrolled. Please try to log that user in to the Client Portal again. If you receive a notification on your smartphone once you have entered the credentials and you are able to complete the authentication once you tap on that notification, then the user was already enrolled and you no longer need to follow the steps on this article.
Alternatively, the error message may be displayed when the QR code shown in the Client Portal was already used to attempt an activation and is expired. In this case, please log out of the Client Portal and log back in to obtain a fresh QR code.
References:
- See KB2260 for instruction on how to activate and operate IBKR Mobile Authentication (IB Key).
- See KB2748 for instructions on how to recover IBKR Mobile Authentication (IB Key).
- See KB3236 for instructions on how to enable notifications for the IBKR Mobile app.
- See KB3234 for troubleshooting missing IBKR Mobile notifications.
- See KB3073 for instructions on how to migrate the IBKR Mobile Authentication (IB Key) to a new smartphone.
I want to add a User to IBKR Mobile Authentication (IB Key) for iPhone with the QR Code from Client Portal
Requirements:
- The IBKR Mobile app must be installed and IBKR Mobile Authentication (IB Key) already activated on this iOS device.
- For more information on the installation and activation on iOS devices, please refer to the IBKR Knowledge Base.
Instructions:
1) On your iOS device, open the IBKR Mobile app.
1.a) If the app opens with the login screen (Figure 1), tap on Services on the top-left corner (red arrow) and proceed with step 2)
1.b) If the app opens with your Home Page, Portfolio, Watchlists, or similar, tap on More on the bottom-right corner (Figure 2). Then tap on Two-Factor Authentication (Figure 3), followed by Add User (Figure 4) and proceed with step 3)
Figure 1 Figure 2 Figure 3

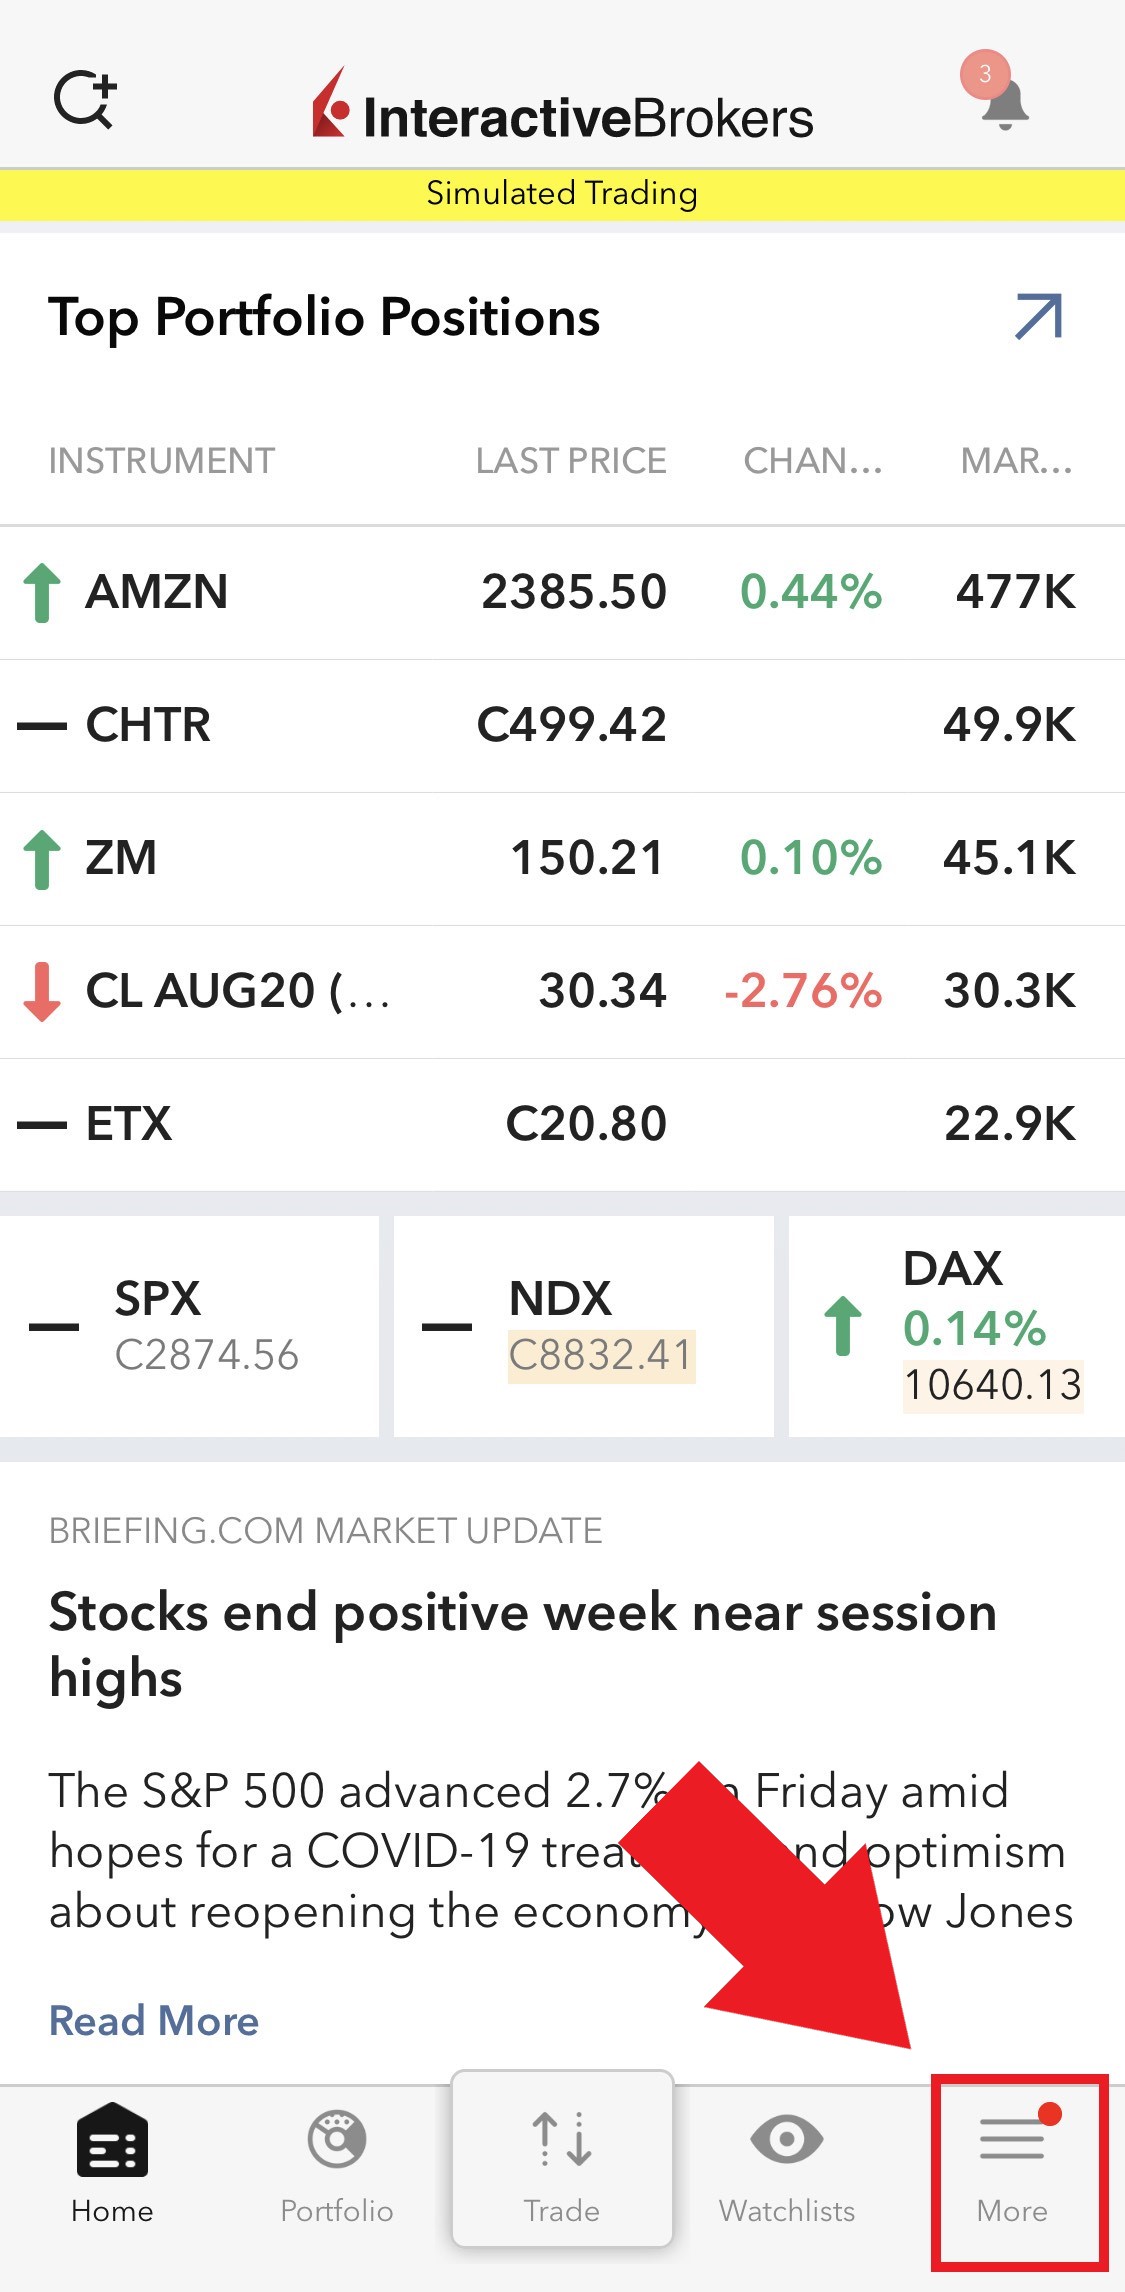
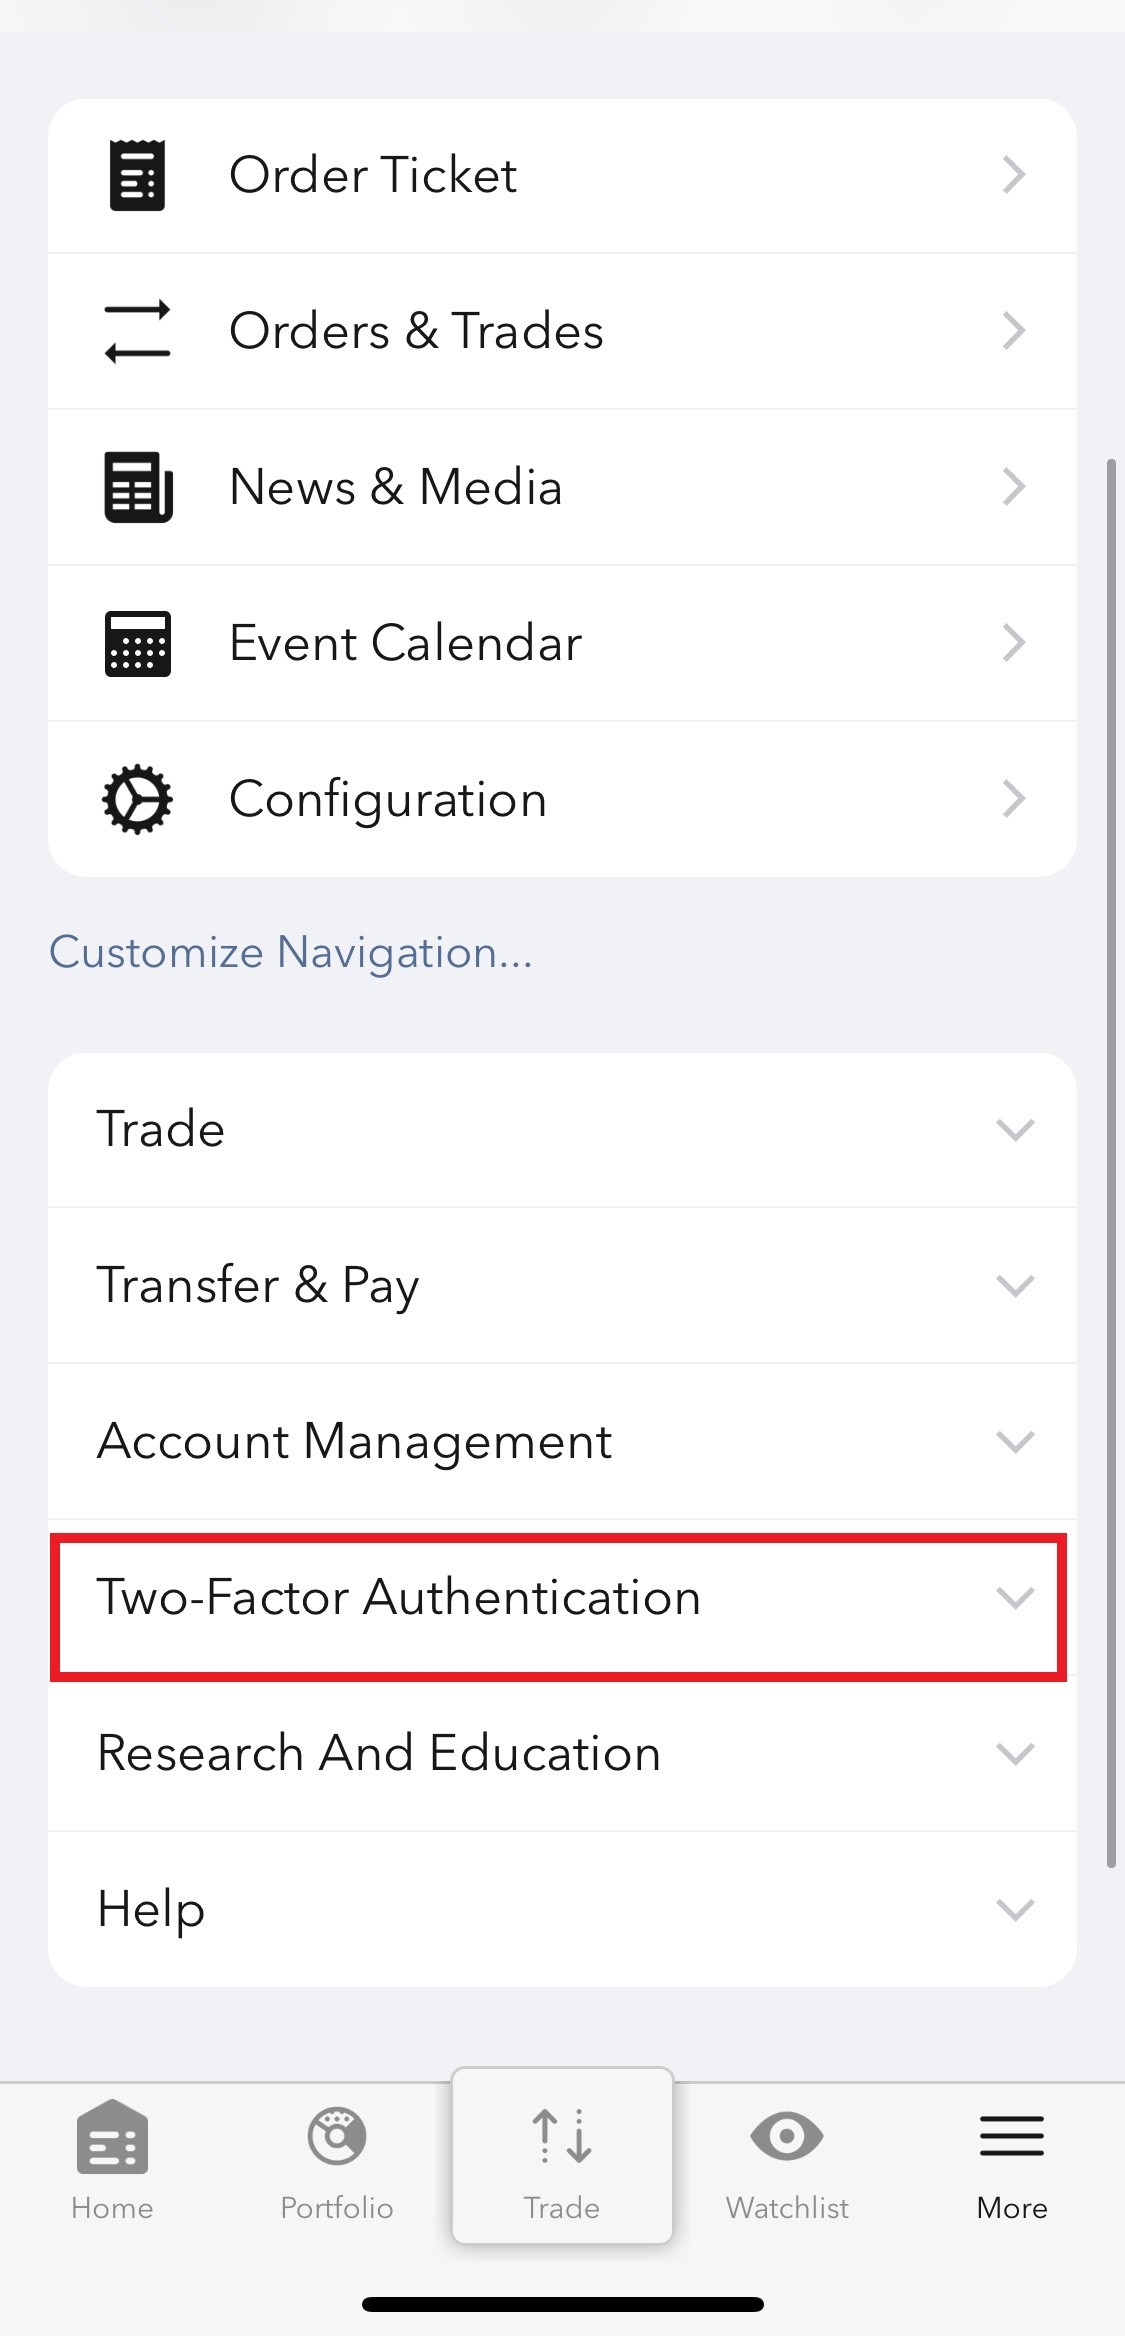
Figure 4

2) Tap on Authenticate (Figure 5) and then on Add User (Figure 6).
Figure 5 Figure 6

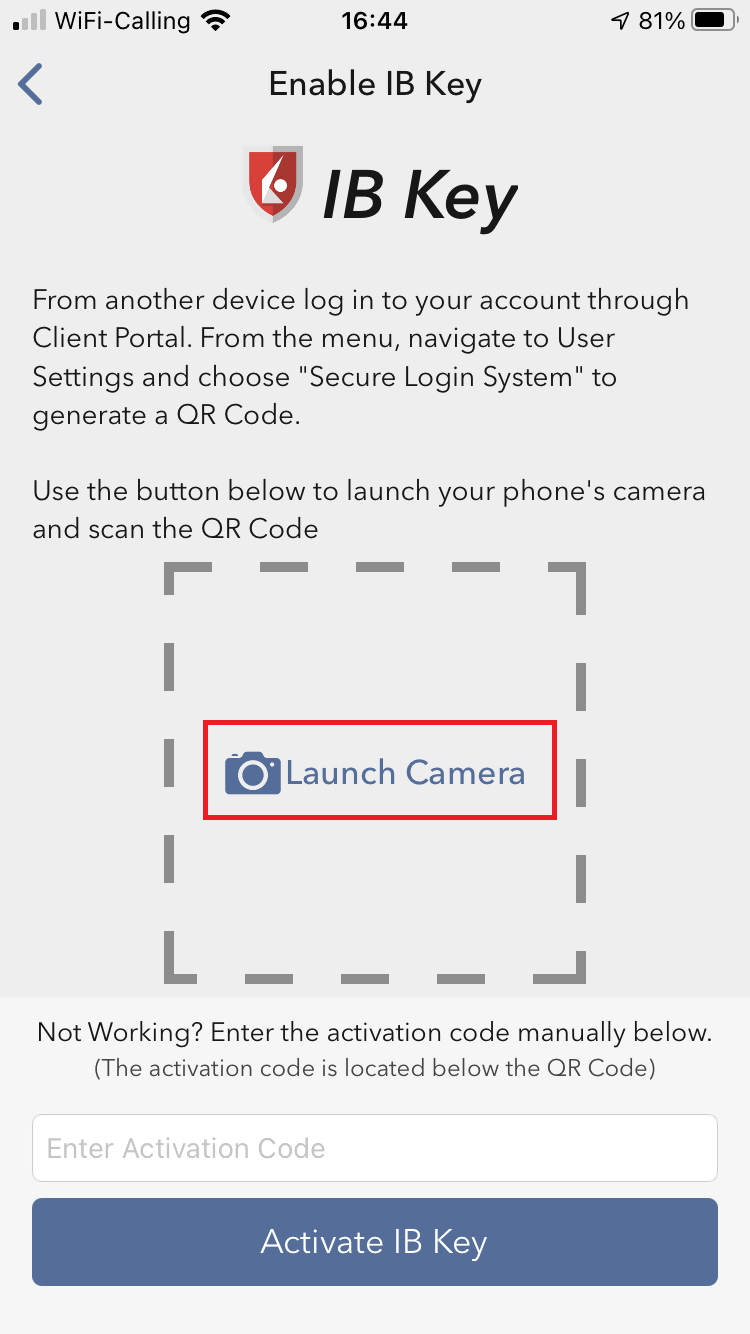
3) Tap Setup IB Key using QR code (Figure 7).
Figure 7
4) Tap Launch Camera (Figure 8).
Figure 8
5) Tap OK if you are asked for permission to use camera (Figure 9).
Figure 9

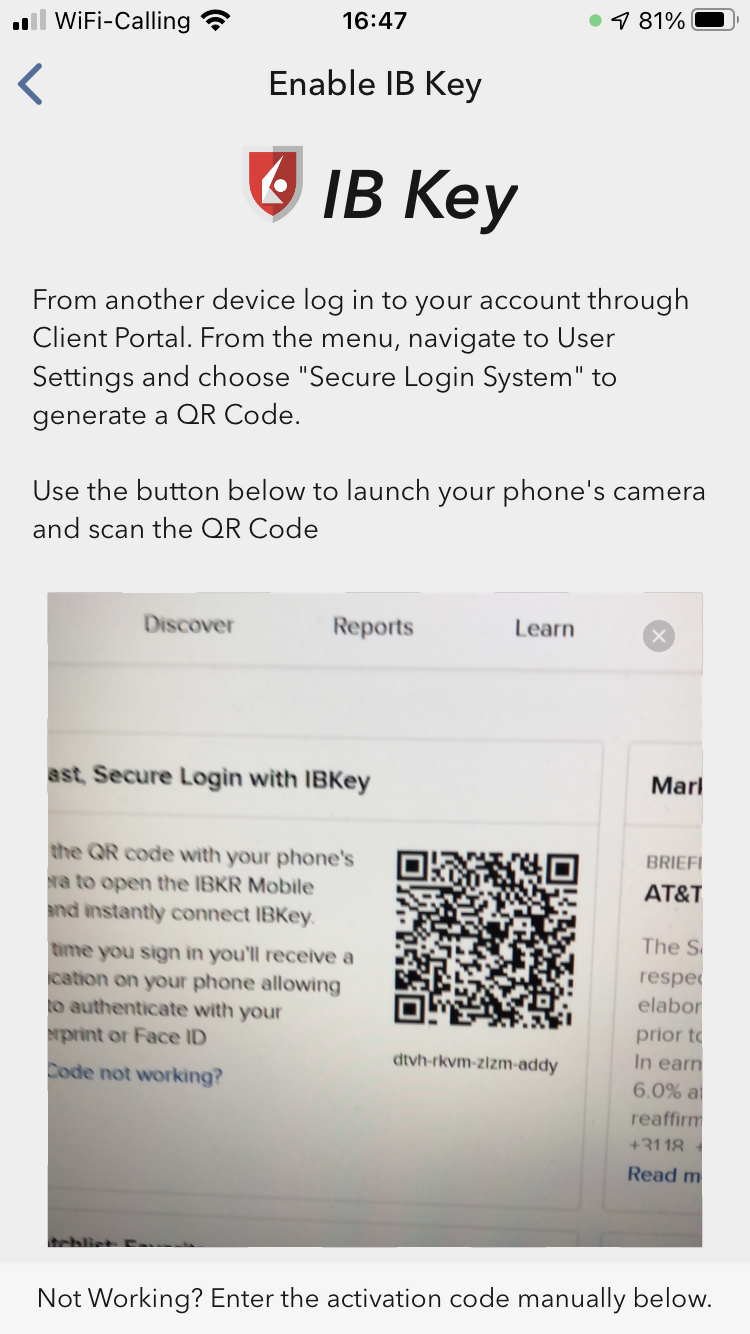
6) Point the lens of your smartphone camera towards the QR code (Figure 10). You don't need to "take a picture." When the code is in focus, it is automatically captured. If your phone does not seem to recognize the QR code try to move your phone closer or farther away to the QR code in order to gain focus. If your phone does not recognize the QR code, please see the section Possible Issues and solutions at the bottom of this article.
Figure 10
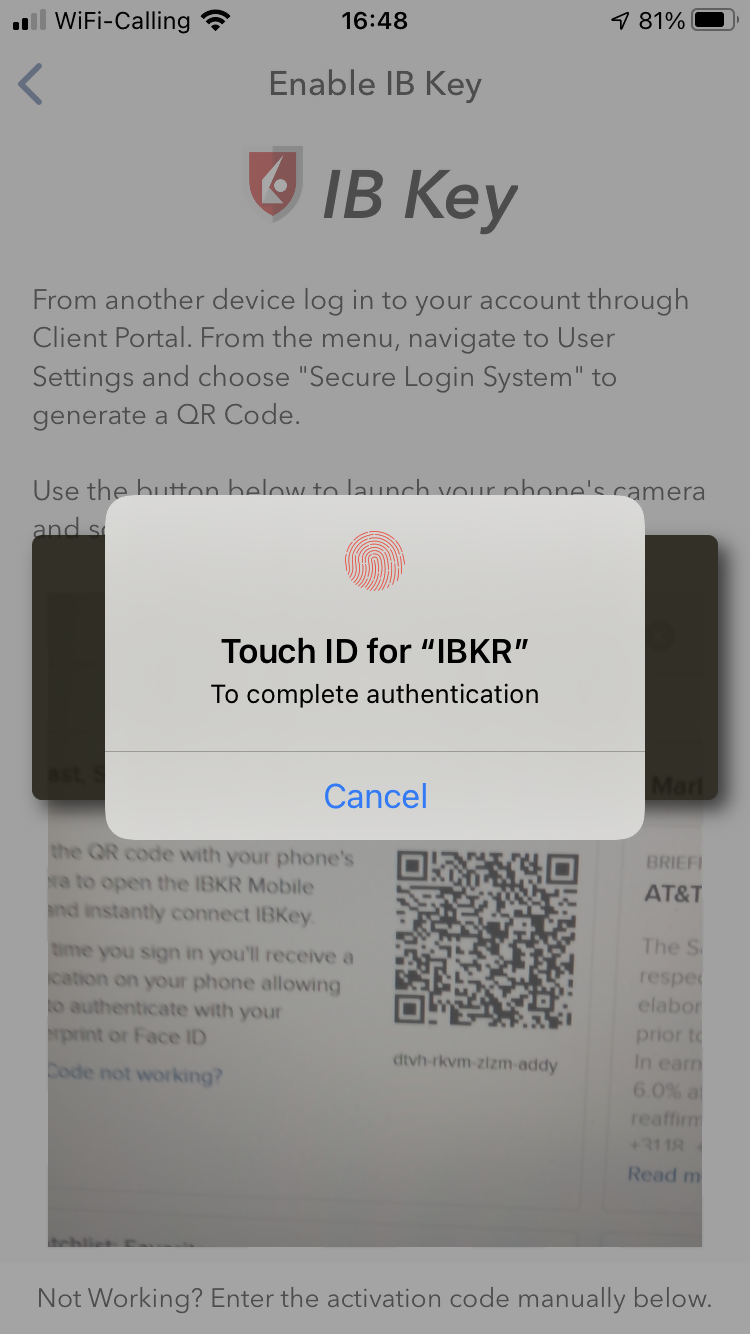
7) You will be asked to provide the security element you use to unlock your phone (FaceID, Fingerprint or Passcode). Please provide it (Figure 11).
Figure 11
8) You will receive a message indicating the successful activation of IBKR Mobile Authentication (IB Key). Tap Done to confirm (Figure 12).
Figure 12

Possible issues and solutions
- My smartphone did not manage to read the QR code. What should I do?
Make sure you have activated the switch "Scan QR codes" from the Camera Settings of your smartphone (Figure 13).
Figure 13

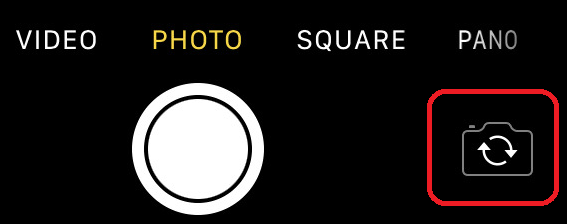
- My phone activates the front camera. How can I switch to the rear one?
Usually there is a specific button in the camera view to switch from front to rear lenses (Figure 14).
Figure 14
- During the IBKR Mobile Authentication (IB Key) activation, I receive an error message "An error has occurred. Please try again."
Figure 15
This error message (Figure 15) may indicate you are attempting to activate the IBKR Mobile Authentication (IB Key) for a user which was already enrolled. Please try to log that user in to the Client Portal again. If you receive a notification on your smartphone once you have entered the credentials and you are able to complete the authentication once you tap on that notification, then the user was already enrolled and you no longer need to follow the steps on this article.
Alternatively, the error message may be displayed when the QR code shown in the Client Portal was already used to attempt an activation and is expired. In this case, please log out of the Client Portal and log back in to obtain a fresh QR code.
References:
- See KB2260 for instruction on how to activate and operate IBKR Mobile Authentication (IB Key).
- See KB2748 for instructions on how to recover IBKR Mobile Authentication (IB Key).
- See KB3236 for instructions on how to enable notifications for the IBKR Mobile app.
- See KB3234 for troubleshooting missing IBKR Mobile notifications.
- See KB3073 for instructions on how to migrate the IBKR Mobile Authentication (IB Key) to a new smartphone.
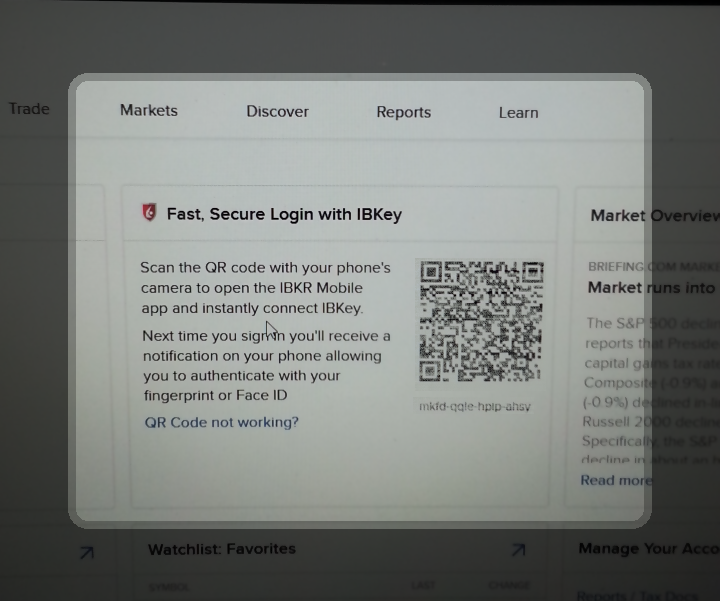
I want to activate IBKR Mobile Authentication (IB Key) for iPhone with the QR Code from Client Portal
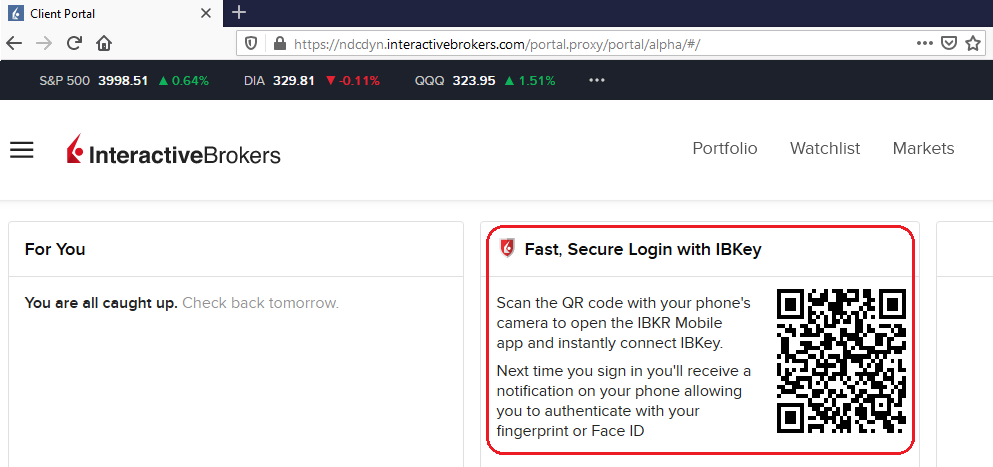
You may have seen a QR code when you logged into Client Portal. In this article we will cover the steps for activating IBKR Mobile Authentication (IB Key) using that code.
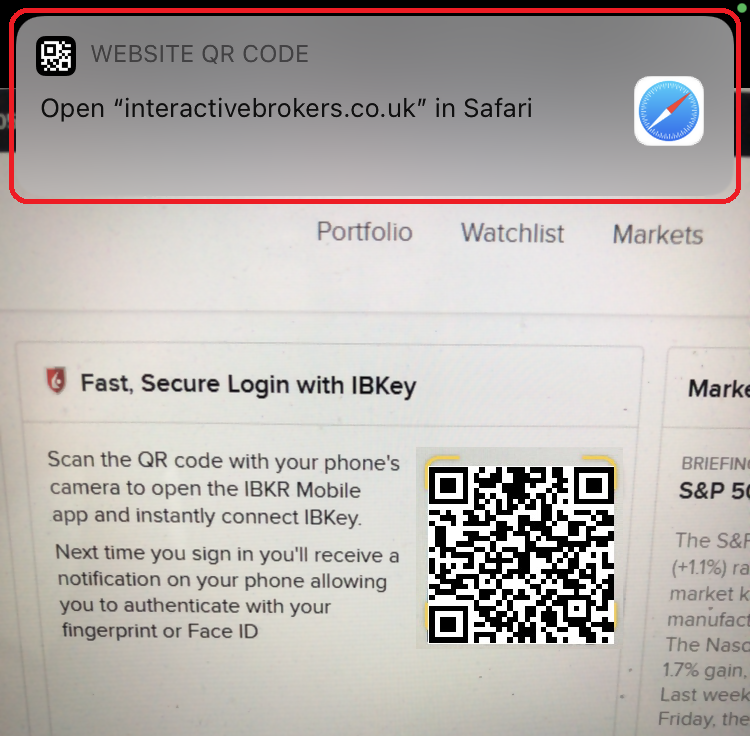
1) Log into Client Portal. You will see a banner recommending that you activate IBKR Mobile Authentication (IB Key) by scanning the accompanying QR Code:
Figure 1
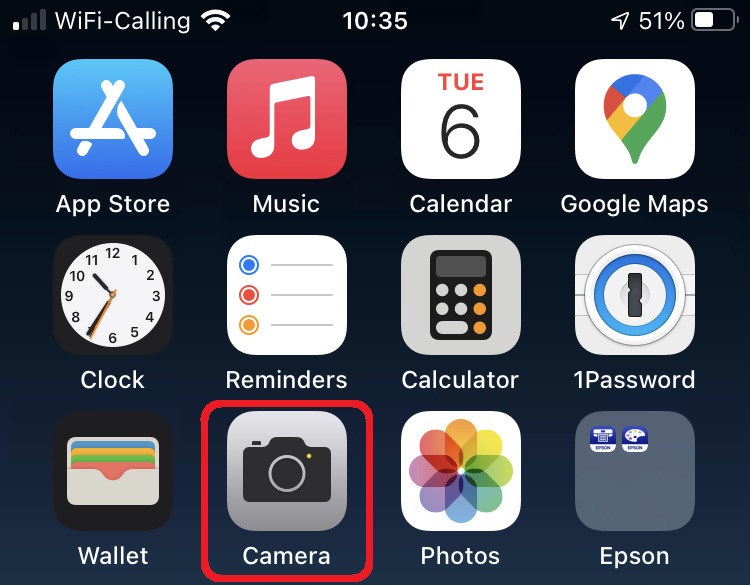
2) On your smartphone, launch the "Camera" app.
Figure 2
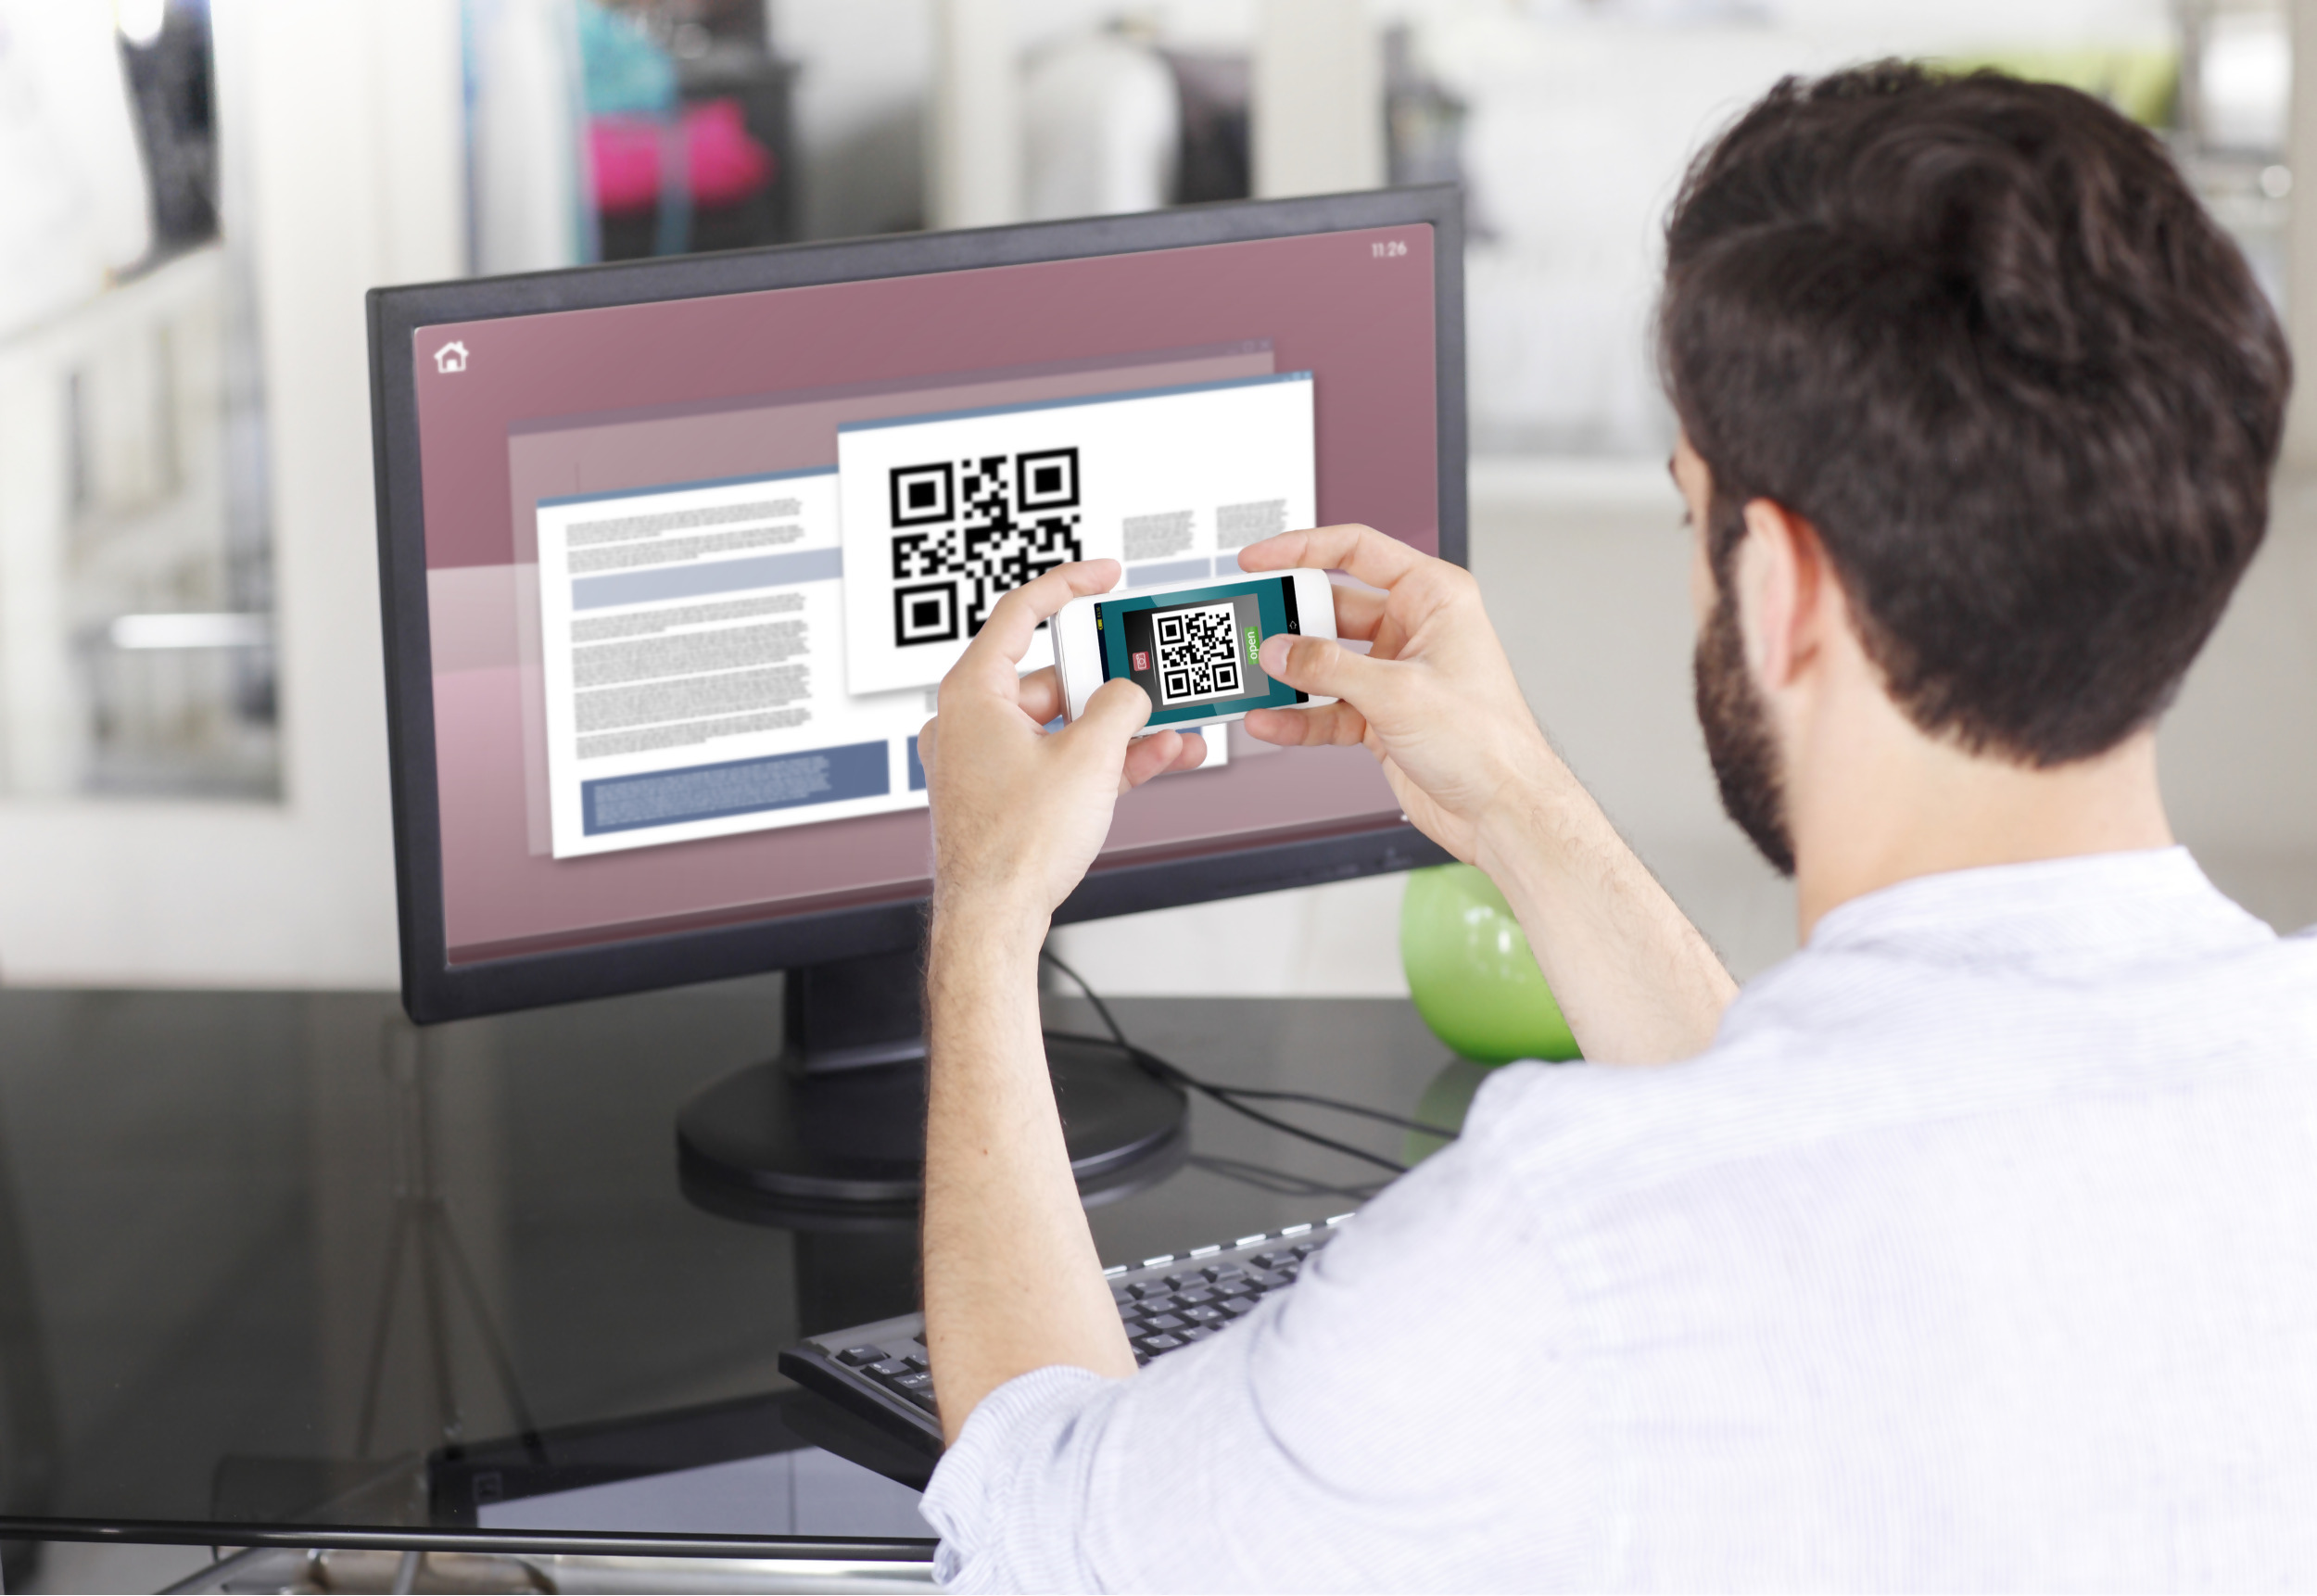
3) Point the lens of your smartphone camera towards the QR code. You don't need to "take a picture." When the code is in focus it is automatically captured. If your phone does not seem to recognize the QR code try to move your phone closer or farther away to the QR code in order to gain focus. If your phone does not recognize the QR code, please see the section Possible Issues and solutions at the bottom of this article.
Figure 3
4) If your device was able to read the QR code successfully, you will see a banner on the top of your smartphone screen.
- If the banner asks you to open the IBKR web site on your smartphone browser (as in Figure 4.1), please proceed directly to next step, 5)
- If the banner asks you to open the IBKR Mobile app (as in Figure 4.2), please jump to step 8)
Figure 4.1 Figure 4.2
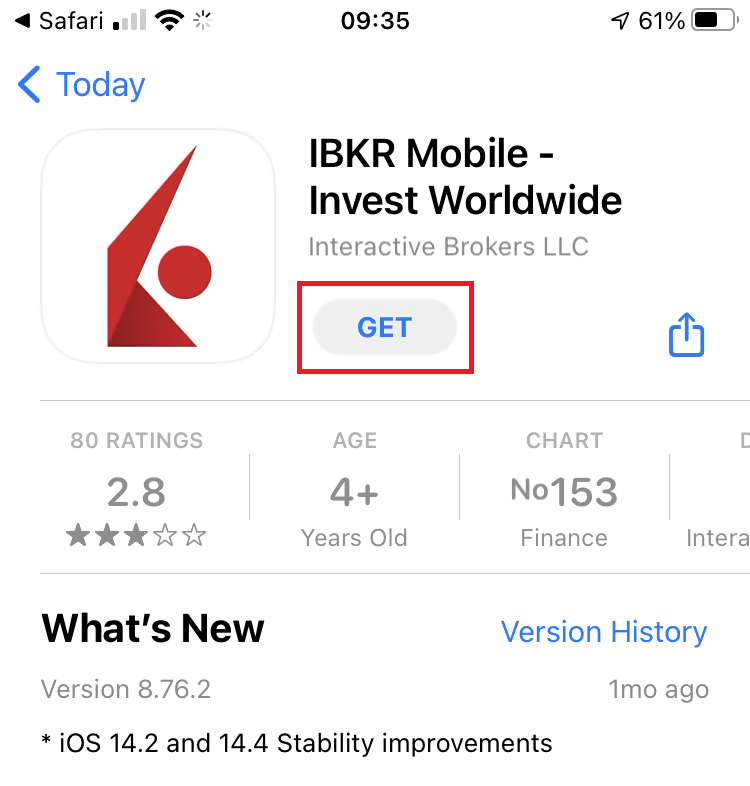
5) Tap on the banner on the top of your smartphone screen, asking you to open the IBKR Web site. You will be redirected to the AppStore.
Figure 5
6) Tap the download icon GET to install IBKR Mobile on your phone.
Figure 6
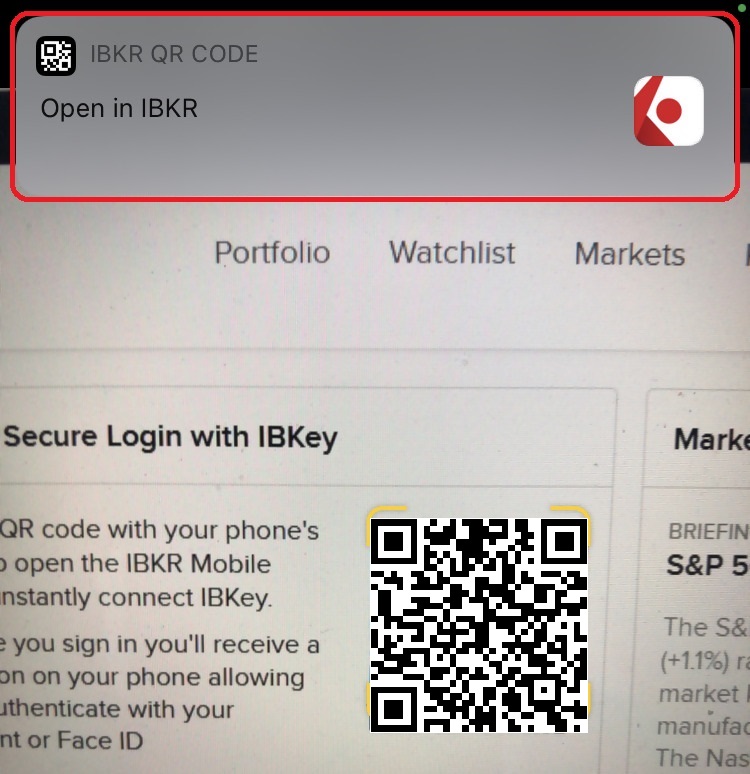
7) Once the installation is complete, do not launch the IBKR Mobile app. Open your camera and again focus on the QR code displayed in Client Portal.
Figure 7
8) Tap on the banner on the top of your screen, asking you to open the IBKR Mobile app.
Figure 8
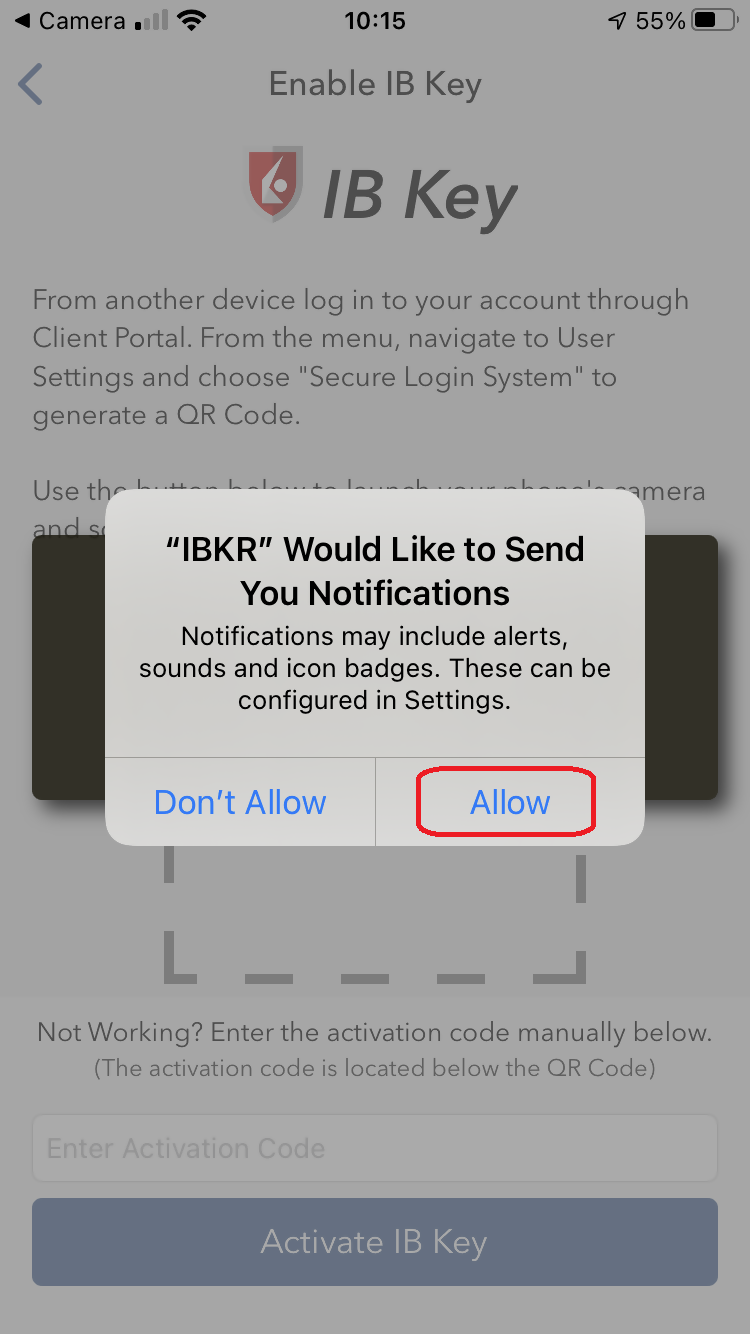
9) Tap Allow if asked whether to allow or disallow notifications for IBKR Mobile.
Figure 9
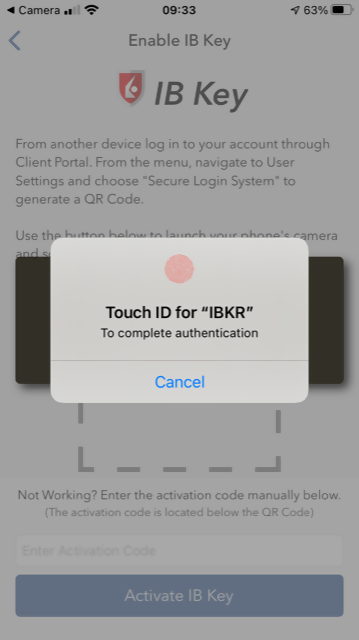
10) You will be asked to provide the security element you use to unlock your phone (FaceID, Fingerprint or Passcode).
Figure 10
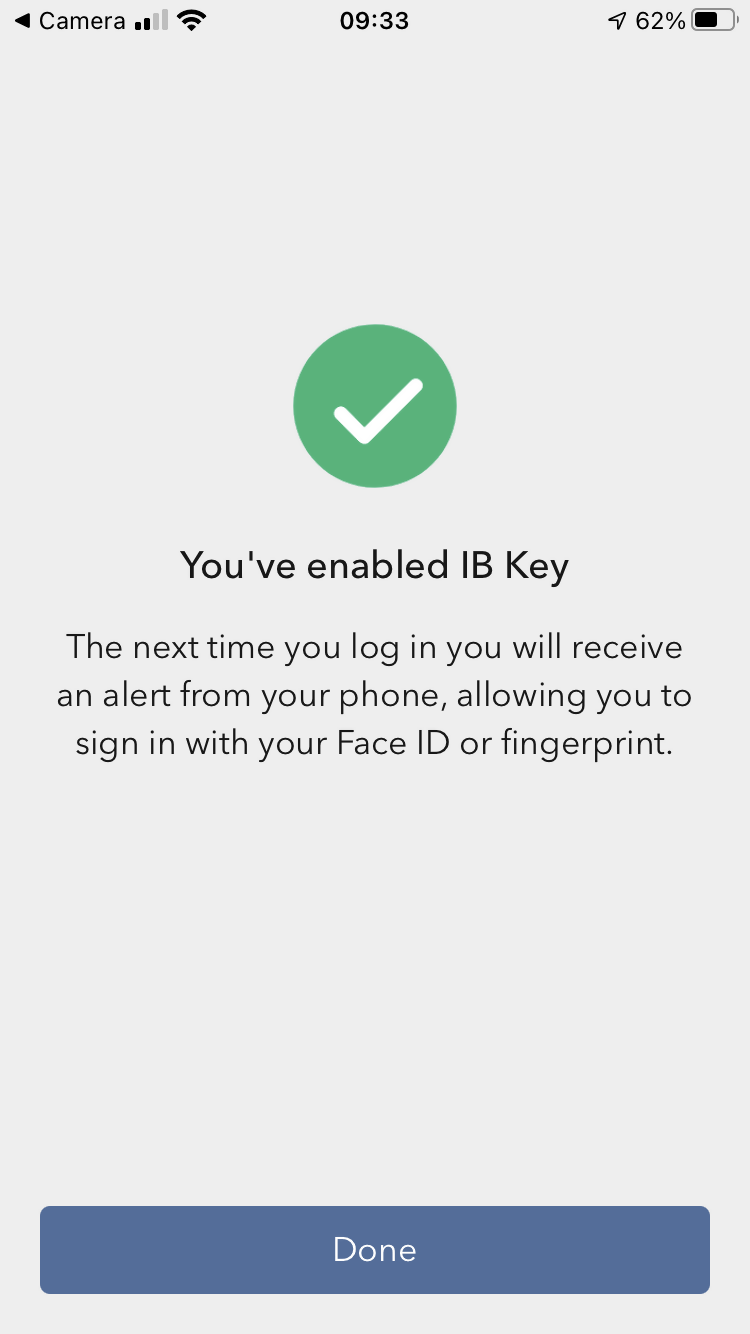
11) You will receive a message confirming the successful activation of IBKR Mobile Authentication (IB Key). Tap Done to complete the procedure
Figure 11
Possible issues and solutions
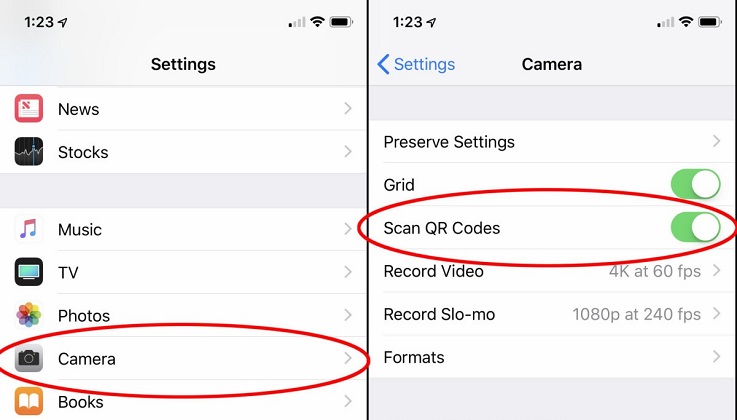
- My smartphone did not manage to read the QR code. What should I do?
Make sure you have activated the switch "Scan QR codes" from the Camera Settings of your smartphone.
Figure 12
- My phone activates the front camera. How can I switch to the rear one?
Usually there is a specific button in the camera view to switch from front to rear lenses.
Figure 13

- During the IBKR Mobile Authentication (IB Key) activation, I receive an error message "An error has occurred. Please try again."
Figure 14

This error message may indicate you are attempting to activate an IBKR Mobile Authentication (IB key) instance that is already activated. Please try to log in to the Client Portal again. If you receive a notification on your smartphone once you have entered the credentials and you are able to complete the authentication once you tap on that notification, then your IBKR Mobile Authentication (IB Key) instance is already activated and you no longer need to follow the steps on this article.
Alternatively, the error message may be displayed when the QR code shown in the Client Portal was already used to attempt an activation and is expired. In this case, please log out of the Client Portal and log back in to obtain a fresh QR code.
References:
- See KB2260 for instruction on how to activate and operate IBKR Mobile Authentication (IB Key).
- See KB2748 for instructions on how to recover IBKR Mobile Authentication (IB Key).
- See KB3236 for instructions on how to enable notifications for the IBKR Mobile app.
- See KB3234 for troubleshooting missing IBKR Mobile notifications.
- See KB3073 for instructions on how to migrate the IBKR Mobile Authentication (IB Key) to a new smartphone.
How to generate a ".har" file
Background:
When troubleshooting a non-trivial website issue, it is sometimes necessary for our Client Services team to obtain additional information about your browser communication. You may be asked record and provide a .har file. This file contains additional information about the network requests that are sent and received by your browser. Your browser can generate such file by recording content, timeline and status of HTTP/HTTPS requests and responses while the issue occurs.
In this article we explain how to generate a .har file. Please click on the browser that you use in the list below:
To generate the HAR file for Google Chrome:
1. Open Google Chrome and go to the page where the issue is occurring.
2. Press CRTL +SHIFT + I on your keyboard. Alternatively, click on the Chrome menu icon (three vertical dots at the top-right of your browser window) and select More Tools > Developer Tools
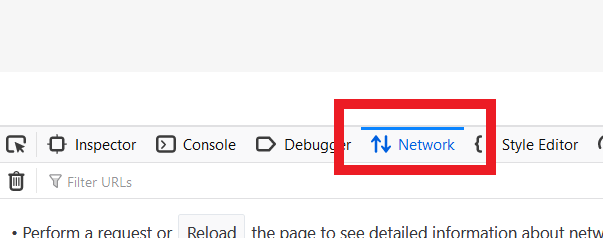
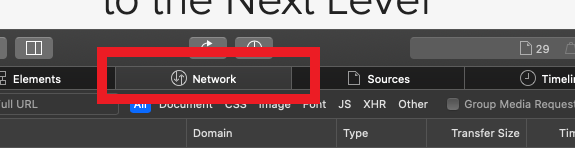
3. The Developers Tools opens as a docked panel at the side or bottom of Chrome. Select the tab Network (Figure 1.)
Figure 1.
.png)
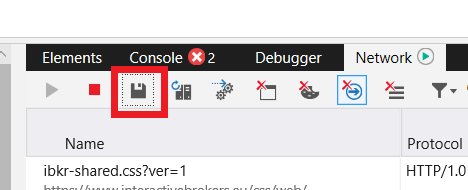
4. Look for a round Record button in the upper left corner of the Developer Tools toolbar and make sure it is red. If it is grey, click it once to start recording or just press CTRL+E (Figure 2.)
Figure 2.

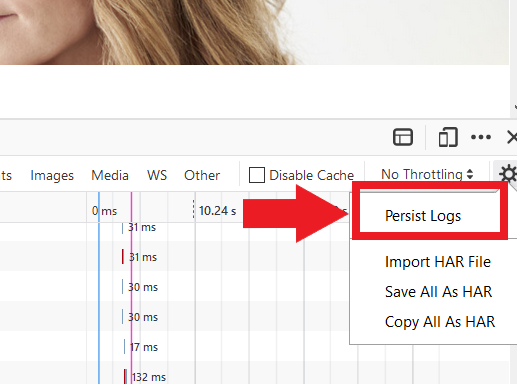
5. Activate the checkbox Preserve log (Figure 3.)
Figure 3.
.png)
6. Click the Clear button to clear out any existing logs. The Clear button has a stop icon and is located on the right of the Record button (Figure 4.)
Figure 4.
![]()
7. Reproduce the issue you are experiencing while the network requests are being recorded.
8. Once you have reproduced the issue, right-click anywhere on the list of recorded network requests, select Save all as HAR with Content, and save the file to a location of your preference on your computer (e.g. on your Desktop).
9. From the IBKR Client Portal, go to the Message Center and create a new Web Ticket (or use an existing one when applicable)
10. Within the Web Ticket, attach the .har file previously generated. In case the IBKR Client Services has provided you with a reference ticker number or representative name, please add this information to the ticket body.
11. Submit the Web Ticket
To generate the HAR file for Firefox:
1. Open Firefox and go to the page where the issue is occurring
2. Press F12 on your keyboard. Alternatively click the Firefox menu icon (three horizontal parallel lines at the top-right of your browser window), then select Web Developer > Network
3. The Developers Network Tools opens as a docked panel at the side or bottom of Firefox. Select the tab Network (Figure 5.)
Figure 5.
4. Activate the checkbox Persists logs (Figure 6.)
Figure 6.
5. Reproduce the issue you are experiencing. The recording of the network request starts automatically.
6. Once you have reproduced the issue, right-click anywhere on the list of recorded requests and select Save All As HAR
7. Save the file to a location of your preference on your computer (e.g. on your Desktop)
8. From the IBKR Client Portal, go to the Message Center and create a Web Ticket (or use an existing one when applicable)
9. Within the Web Ticket, attach the .har file previously generated. In case the IBKR Client Services has provided you with a reference ticker number or representative name, please add this information to the ticket body
10. Submit the Web Ticket
To generate the HAR file for Microsoft Edge:
1. Open Edge and go to the page where the issue is occurring.
2. Press F12 on your keyboard. Alternatively click the Edge menu icon (three horizontal dots at the top-right of your browser window), then select More Tools > Developers Tools
3. Click the Network tab (Figure 10.)
Figure 10.
.png)
4. Reproduce the issue that you were experiencing before, while the network requests are being recorded.
5. Once done click the floppy disk icon (Export as HAR) or press CTRL+S (Figure 11.)
Figure 11.
6. Provide a filename and a location of your preference on your computer (e.g. on the Desktop). Then click the Save button
7. From the IBKR Client Portal, go to the "Message Center" and create a Web Ticket (or use an existing one when applicable)
8. Within the Web Ticket, attach the .har file previously generated. In case the IBKR Client Services has provided you with a reference ticker number or representative name, please add this information to the ticket body.
9. Submit the Web Ticket
To generate the HAR file for Safari:
Note: Before generating the HAR file, make sure you can see the Develop menu in Safari. If you do not see this menu, click on the menu Safari, choose Preferences, go to the tab Advanced and activate the checkbox next to Show Develop menu in menu bar
1. Open the Develop menu and select Show Web Inspector or press CMD+ALT+I
2. Click the Network tab (Figure 12.)
Figure 12.
3. Activate the checkbox Preserve log (Figure 13.)
Figure 13.
.png)
4. Click on the icon Export (or press CMD+S), provide a filename and a location of your preference on your computer (e.g. on the Desktop) and save the .har file
5. From the IBKR Client Portal, go to the "Message Center" and create a Web Ticket (or use an existing one when applicable)
6. Within the Web Ticket, attach the web archive file previously generated. In case the IBKR Client Services has provided you with a reference ticker number or representative name, please add this information to the ticket body.
7. Submit the Web Ticket
How to Add Another User to an Active IBKR Mobile Authentication (IB Key) for iPhone
Overview:
This page covers the steps required to add a user to the Authentication section in the IBKR Mobile app for iOS devices.
Requirements:
- The IBKR Mobile app must be installed and IBKR Mobile Authentication (IB Key) already activated on this iOS device.
- For more information on the installation and activation on iOS devices, please refer to KB2278.
Instructions:
1. On your iOS device, open the IBKR Mobile app.
1.a. If the app opens with the login screen (Figure 1), tap on Services on the top-left corner (red arrow) and proceed with step 2.
1.b. If the app opens with your Home Page, Portfolio, Watchlists, or similar, tap on More on the bottom-right corner (Figure 2). Then tap on Two-Factor Authentication (Figure 3), followed by Add User (Figure 4) and proceed with step 3.
Figure 1. Figure 2. Figure 3.
(1).jpeg)
.jpeg)
.jpeg)
Figure 4.

2. Tap on Authenticate (Figure 5) and then on Add User (Figure 6).
Figure 5. Figure 6.


3. Read the instructions and then tap on Continue (Figure 7).
Figure 7.

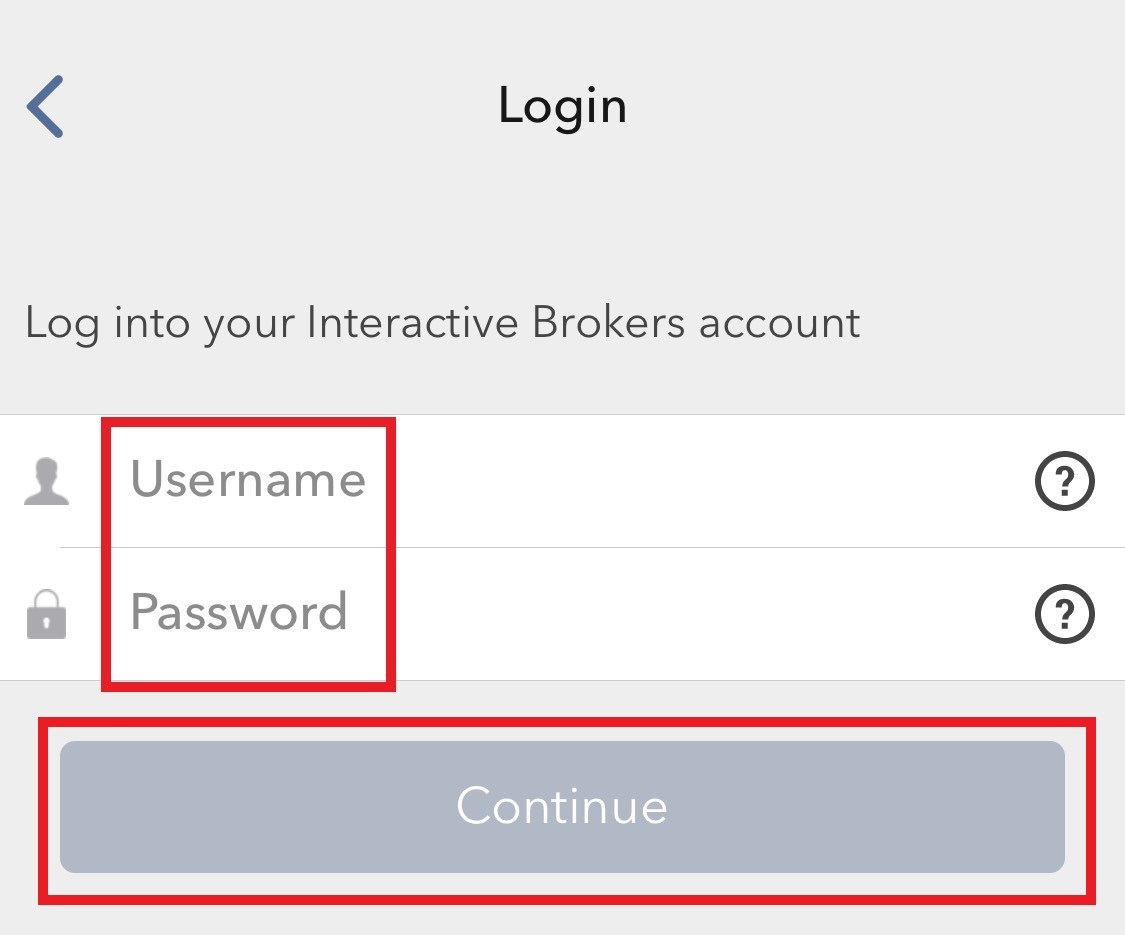
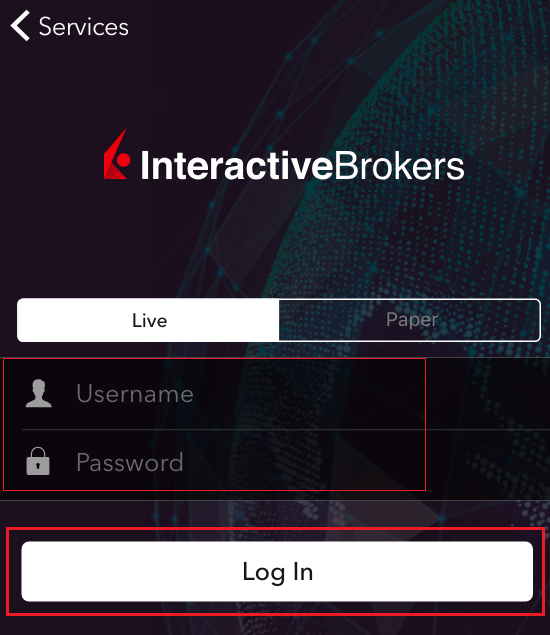
3. Enter your Username and Password, and then tap on Continue (Figure 8).
Figure 8.
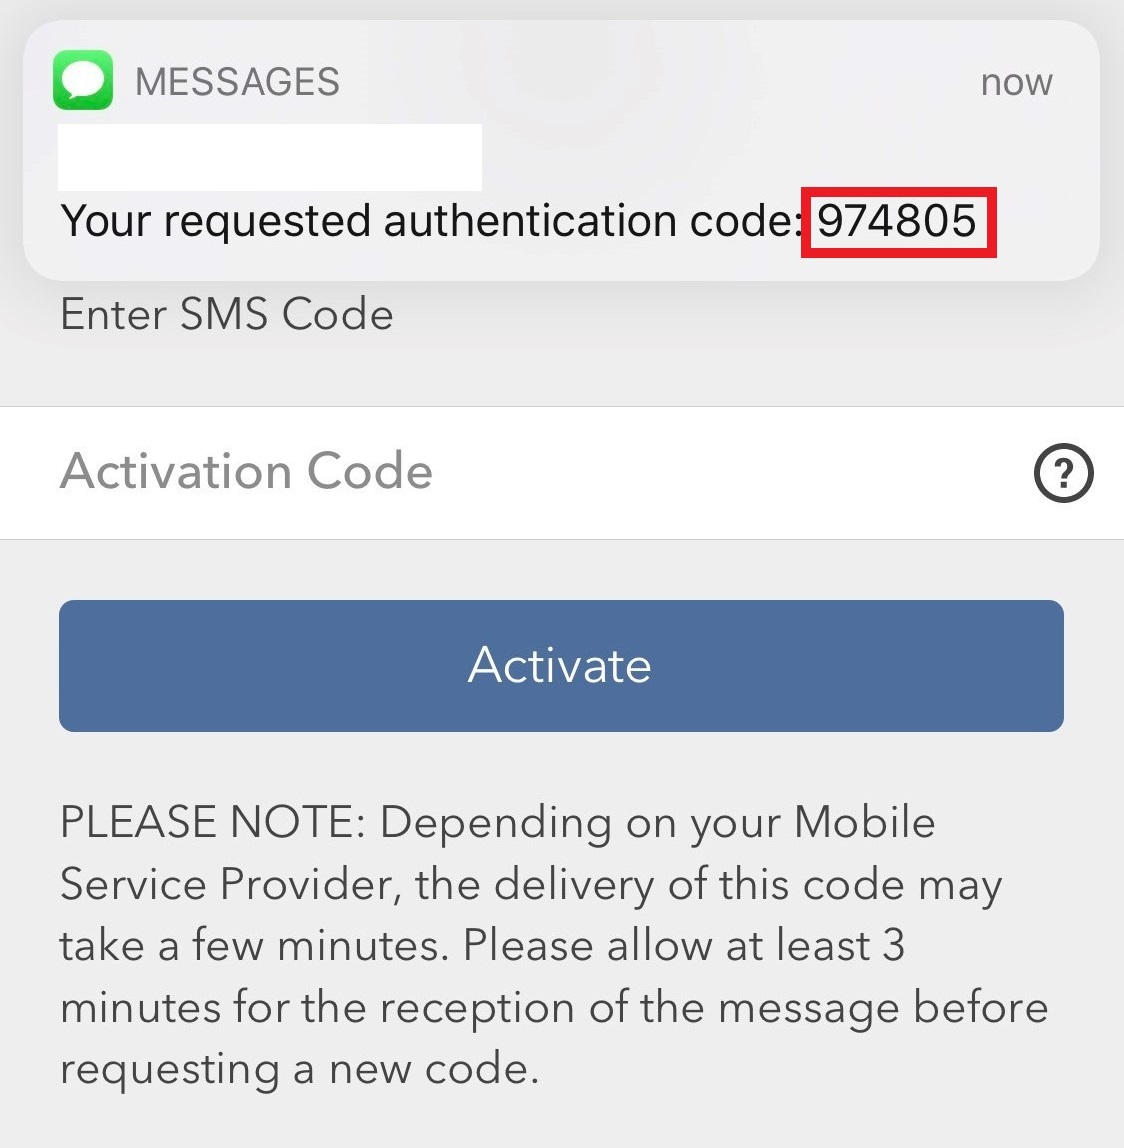
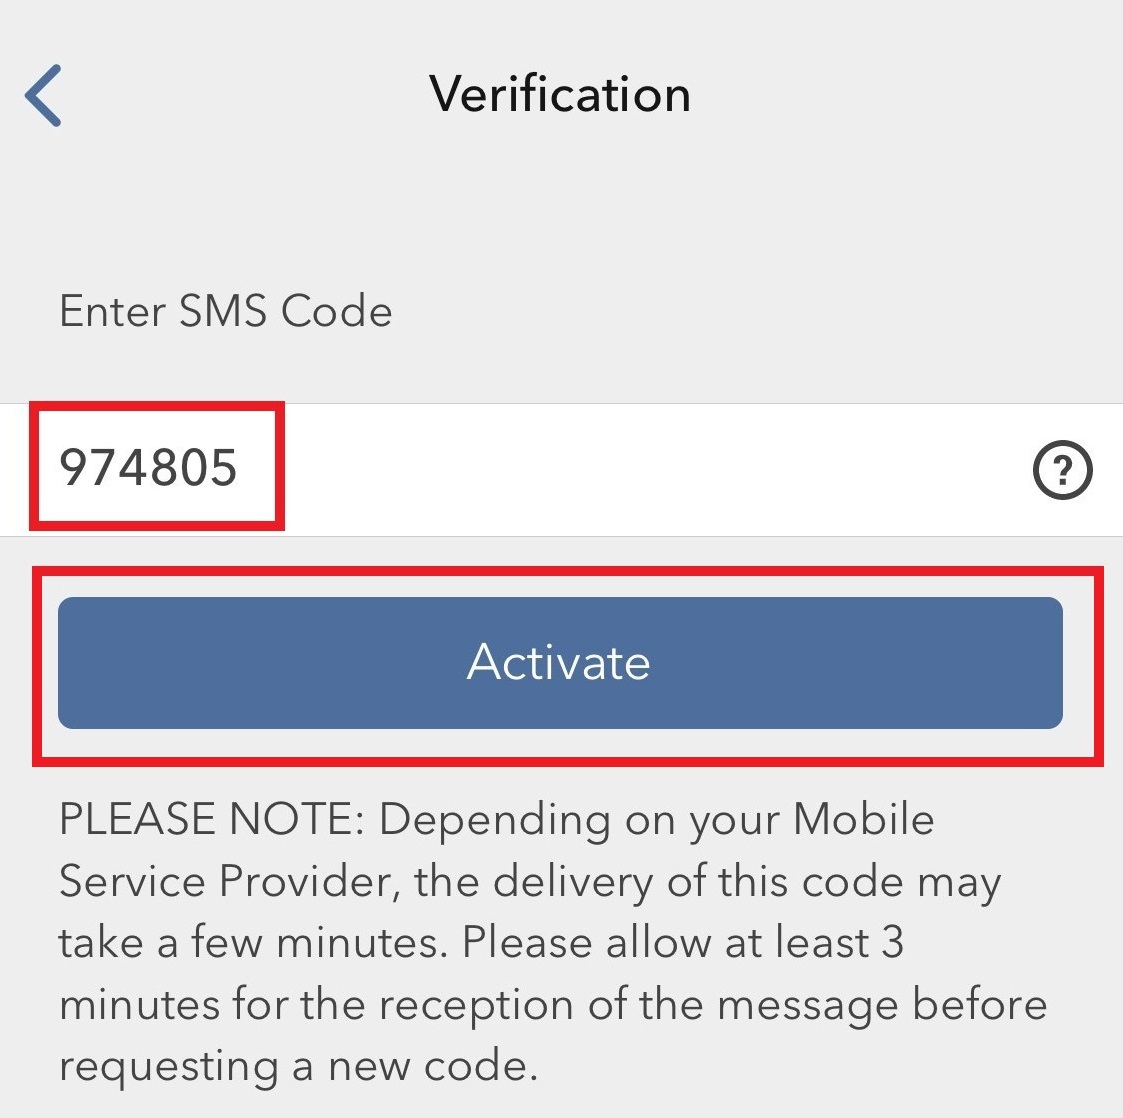
4. An Authentication Code will be sent via SMS to the mobile phone number listed on your account (Figure 9). Enter this Authentication Code in the Activation Code field and tap on Activate (Figure 10).
Figure 9. Figure 10.
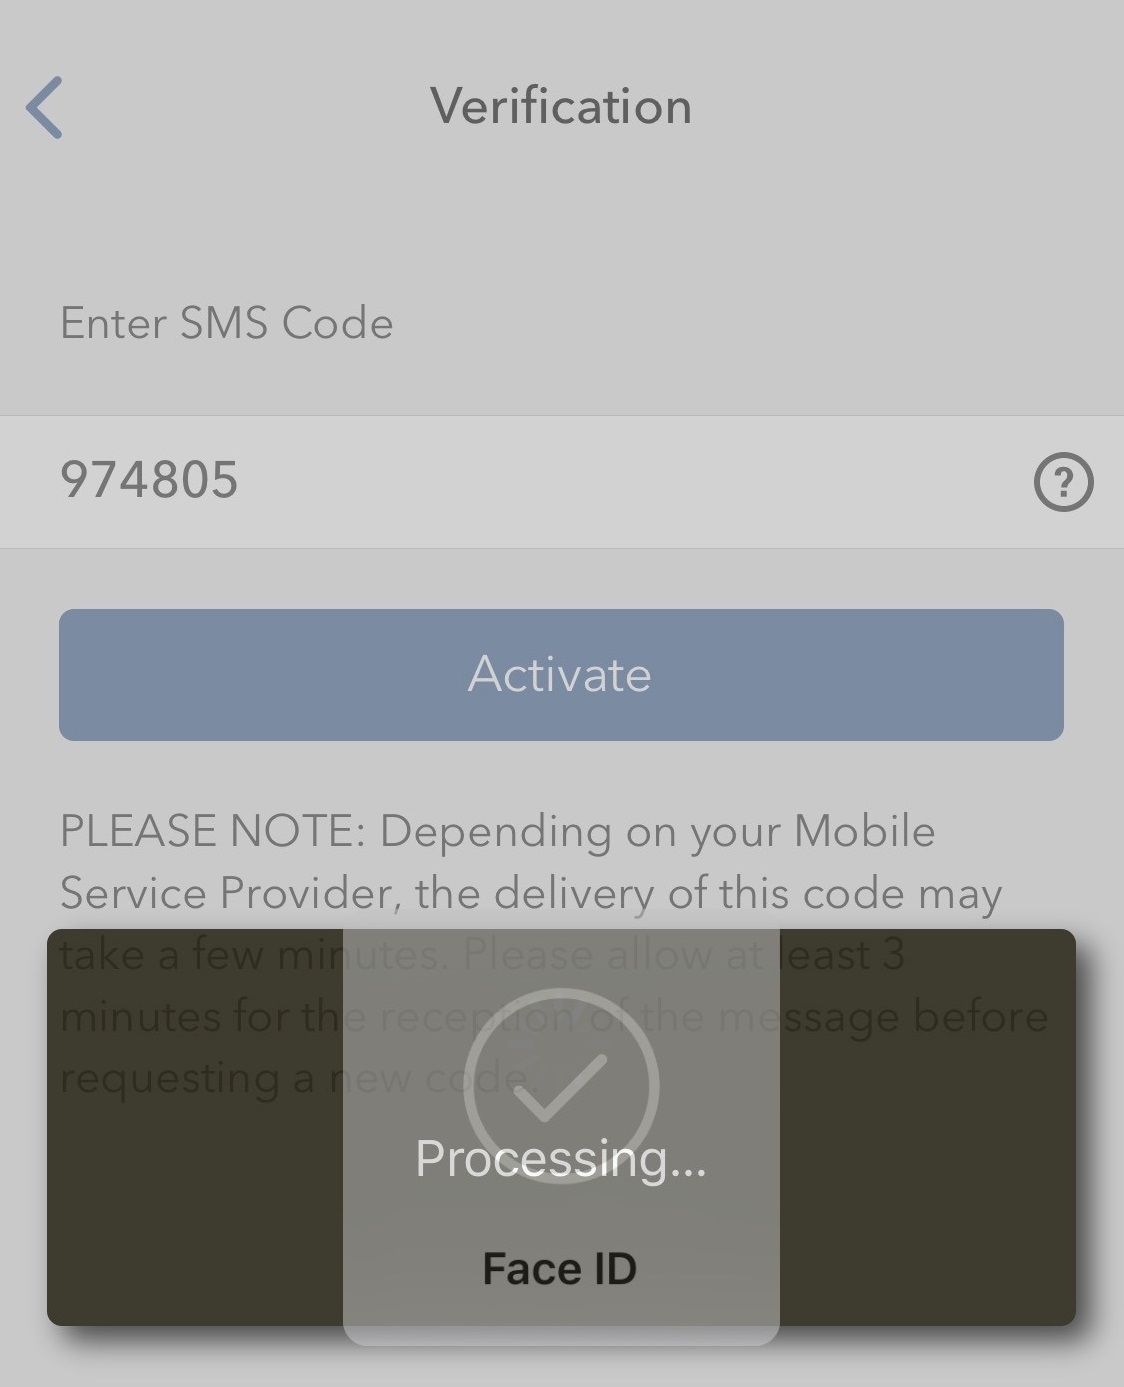
5. Depending on your smartphone's security settings, you will be asked to use your Passcode, Touch ID, or Face ID (Figure 11).
Figure 11.
6. If the activation has been successful, you will see a confirmation screen. Finally, tap on Done to complete the procedure (Figure 12).
Figure 12.
.jpeg)
How to fix the "Cannot create ... file" error during TWS installation on MacOS
Background:
The filesystem permissions are controlled by your machines operating system. One of their functions is to secure your files, preventing unauthorized access or undesired modifications to the system and to your personal data.
Some software on your computer may modify or override the permissions assigned by the operating system. Under certain circumstances, this prevents the TWS installer from accessing the folder where the application core files have to be created (/users/youruser/home/Applications). In such cases, the TWS installation usually displays the error "Cannot create ... file. Shall I try again?"
In this article we explain how to reset the filesystem permission of the "Applications" folder located under your user home folder in order to allow a smooth run of the TWS installation.
Procedure:
1. On your keyboard, press ⌘CMD + ⇧Shift +H to open your home folder
Figure 1

2. Select the folder "Applications" within your home folder and press ⌘CMD + I to open the Info panel
Figure 2

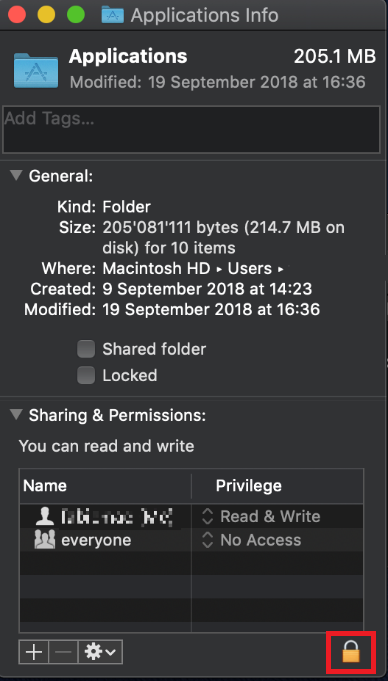
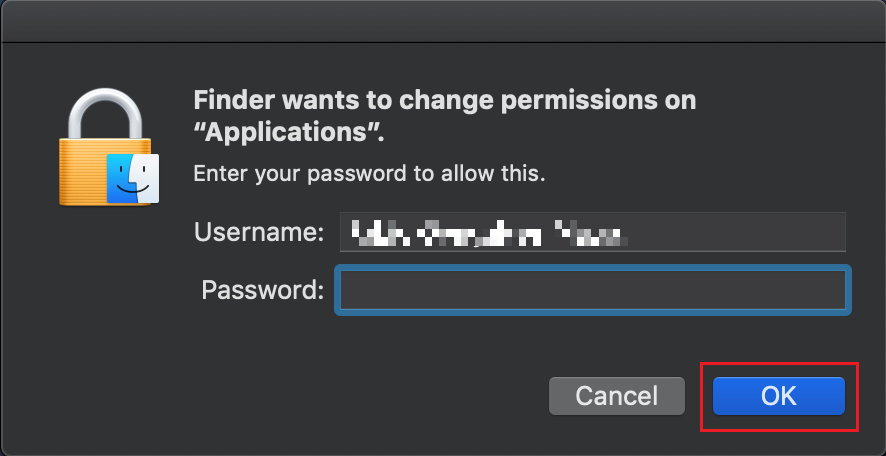
2. At the bottom right of the panel, click on the padlock
Figure 3
3. To unlock the permissions panel, enter your MacOS credentials and click OK
Figure 4
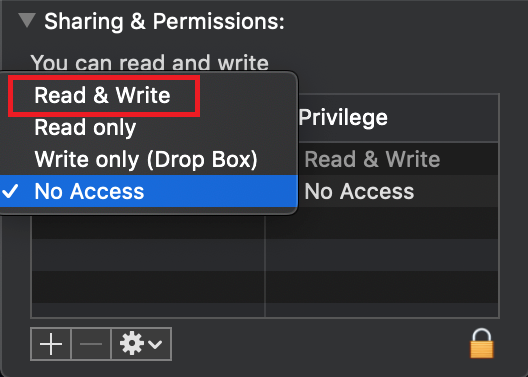
4. In the line correspondent to "everyone", click on "No Access" (Figure 5) and then select "Read & Write" (Figure 6)
Figure 5 Figure 6
.png)
5. Click on the icon bellow the permissions panel and select “Apply to enclosed items..."
Figure 7
.png)
6. Now run the TWS installer and click on Next> until you complete the installation
Figure 8
.png)
7. Once the installation has completed successfully, repeat the previous steps from 1. to 5. setting back the permissions of “everyone” to “Read Only” to revert your changes to the initial status
How to Log in to IBKR Mobile when IBKR Mobile Authentication (IB Key) is Enabled on Another Phone
Background:
This article is intended for clients who have activated the IBKR Mobile Authentication (IB Key) on their smartphone and possess as well an additional mobile device, on which they desire to trade.
Clients with this setup will be able to log in to the IBKR Mobile trading platform on their secondary device, using their smartphone to complete the Two-Factor Authentication step.
For the purposes of this article, we will use the following naming convention:
Authentication device: this is the smartphone on which you activated the IBKR Mobile Authentication (IB Key)
Trading device: this is where you want to use IBKR Mobile app for trading.
Procedure
Please click on one of the link below according to your phone operating system:
Apple iOS
1. On your Trading device, launch the IBKR Mobile app. Enter your your credentials in the login screen and tap Log In
Figure 1
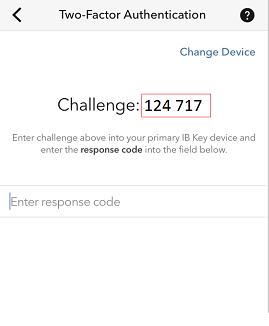
2. Tap Two-Factor Authentication (Figure 2). A Challenge code will be displayed (Figure 3)
Figure 2 Figure 3
.png)
3. On the Authentication device, launch the IBKR Mobile app
Figure 4
.png)
4a. If you are not automatically logged in, tap Services (Figure 5) on the top left, then tap Authenticate (Figure 6).
Figure 5 Figure 6
4b. If you are already logged in, tap on the More button on the bottom right. Then, scroll down and tap on Authenticate
Figure 7
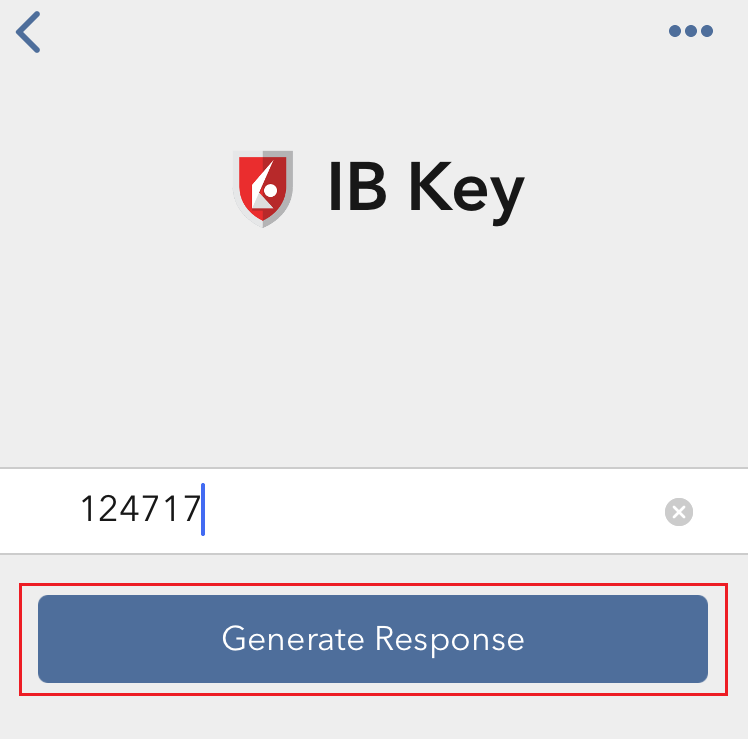
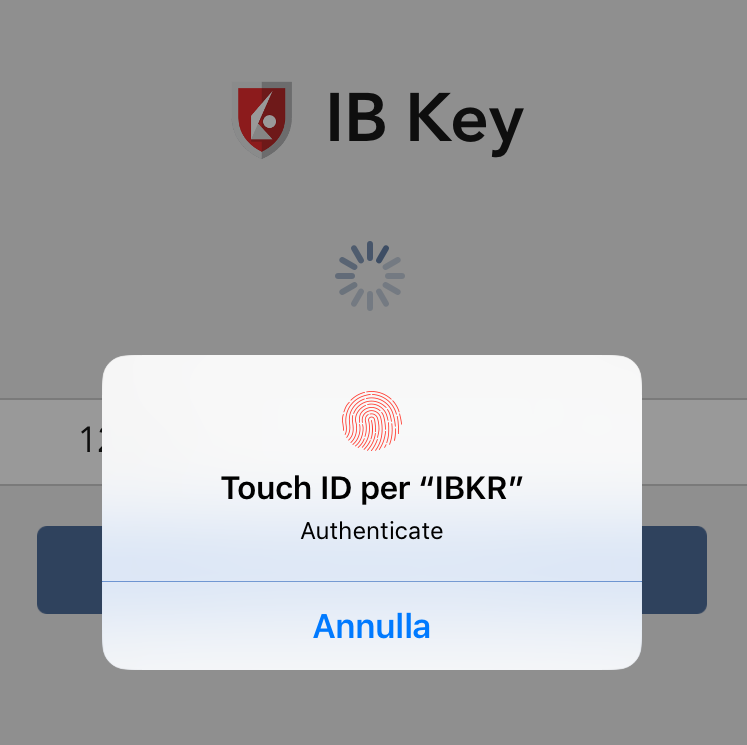
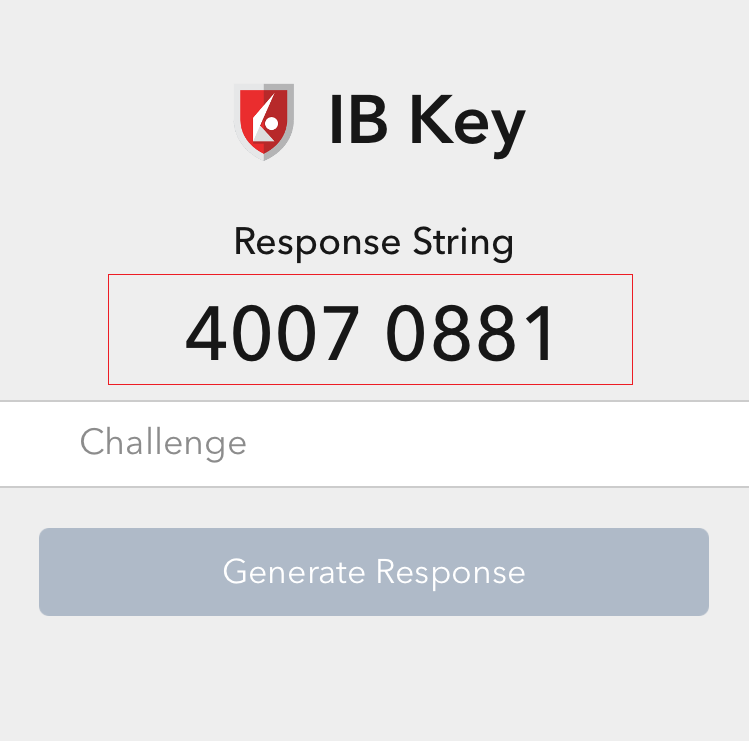
5. Enter the Challenge code you obtained at point 2. Then tap Generate Response (Figure 8). Once you have provided your security element (Figure 9), you will receive a Response String (Figure 10).
Figure 8 Figure 9 Figure 10
6. On your Trading device, enter the Response String into the "Enter response code" field and tap Send to finalize the authentication process.
Figure 11
.png)
Android
1. On your Trading device, launch the IBKR Mobile app. Enter your your credentials in the login screen and tap Log In
Figure 1
2. Tap on the option Two-Factor Authentication (Figure 2). You will see a Challenge code (Figure 3)
Figure 2 Figure 3
(1).png)
3. On the Authentication device, launch the IBKR Mobile app
Figure 4
4a. If you are not automatically logged in, tap Services (Figure 5) and then tap Authenticate (Figure 6).
Figure 5 Figure 6
.png)
4b. If you are already logged in, tap the Menu button (Figure 7), scroll down and tap Authenticate (Figure 8).
Figure 7 Figure 8
.png)
.png)
Figure 7 Figure 8
5. Enter your IBKR Mobile PIN and the Challenge code you obtained at point 2. Then tap Generate Response (Figure 9). A Response String will be displayed (Figure 10)
Figure 9 Figure 10
.png)
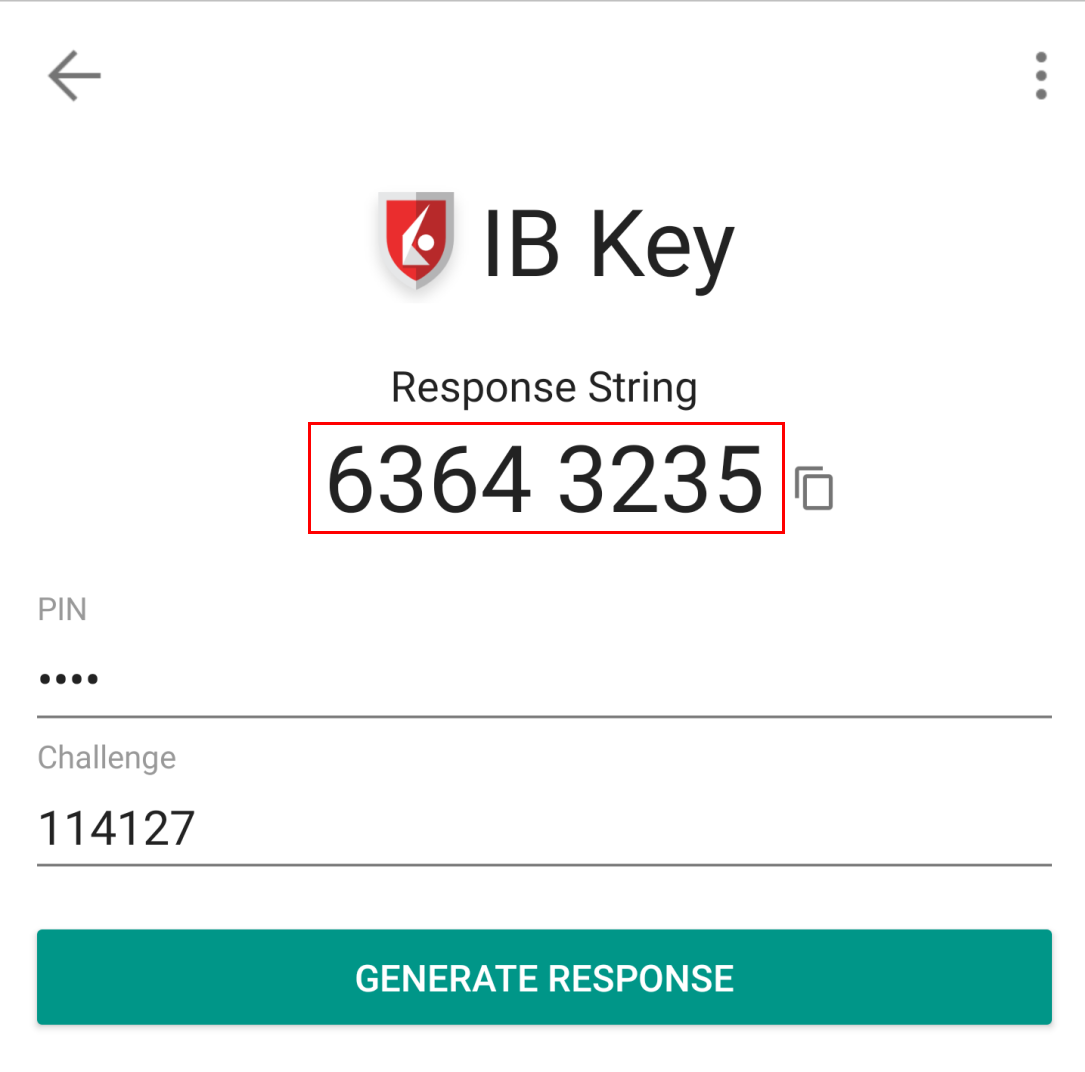
Figure 9 Figure 10
6. On your Trading device, enter the Response String in to the "Enter response code" field and then tap Log In to finalize the authentication process.
Figure 11

How do I enable the Notifications for the IBKR Mobile app
Overview:
What is a notification?
A push notification is a brief message which is sent ("pushed") from a back-end server to your device over the Internet. Apps developers use those attention-grabbing messages to quickly and effectively reach the recipients, even if they are not currently engaging with their application. Notifications can deliver information to users or advise them of a specific action they are invited or required to perform.
Background:
Why does the IBKR Mobile app use notifications?
The IBKR Mobile application uses notifications for informational purposes, as well as two-factor authentication. In the latter case, the user is invited to tap on the notification, which will automatically open the IBKR Mobile app and begin the authentication process.
This procedure explains how to manually enable notifications for the IBKR Mobile app. Please click the link below that matches your smartphone's operating system.
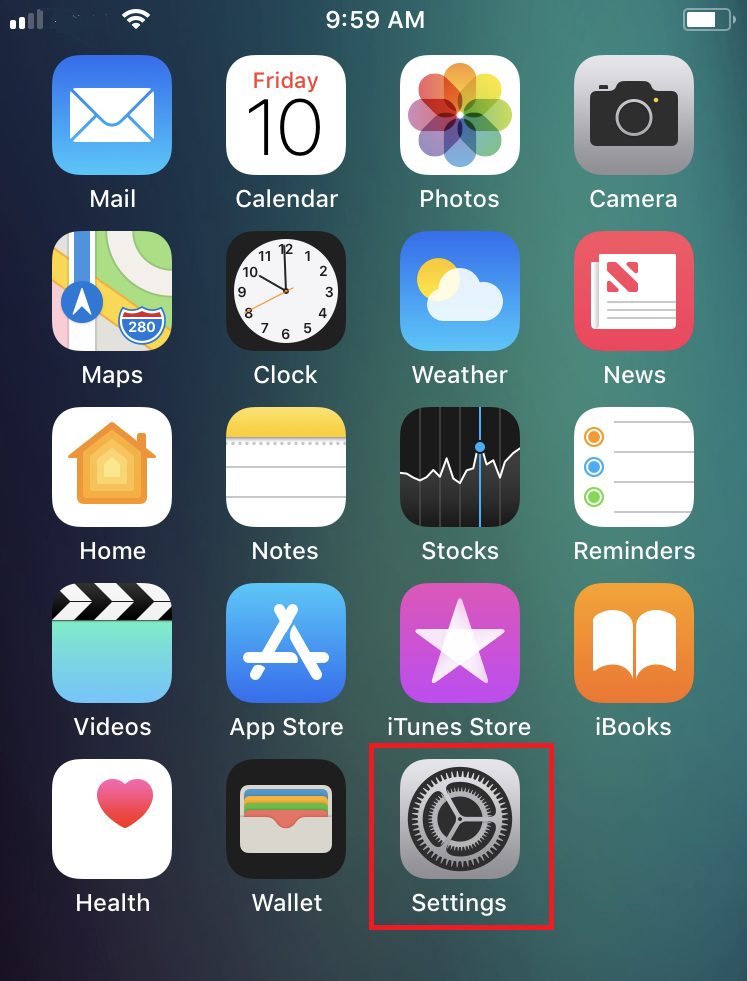
1. On your home screen, tap Settings (Figure 1), then Notifications (Figure 2) and finally IBKR (Figure 3)
Figure 1 Figure 2 Figure 3
(1).png)
(1).png)
2. In the IBKR app settings, you will see a number of different options. We recommend to set them in the following way (Figure 4):
-
Allow Notifications: enabled
-
Lock Screen, Notification Center, Banners: selected
-
Banner style: Persistent
-
Badges: enabled
-
Show Previews: Always
Figure 4
.png)
1. Go the Settings of your phone, then tap Apps & notifications1 (Figure 1) then IBKR Mobile (Figure 2) and finally App notifications (Figure 3)
Figure 1 Figure 2 Figure 3


Figure 1 Figure 2 Figure 3
2. Ensure that notifications for this app are globally On and the switches Allow notification dots, Allow interruptions, On the lock screen are all enabled (Figure 4). According to your personal preference, you may want to enable as well the switch Override Do Not Disturb
Figure 4
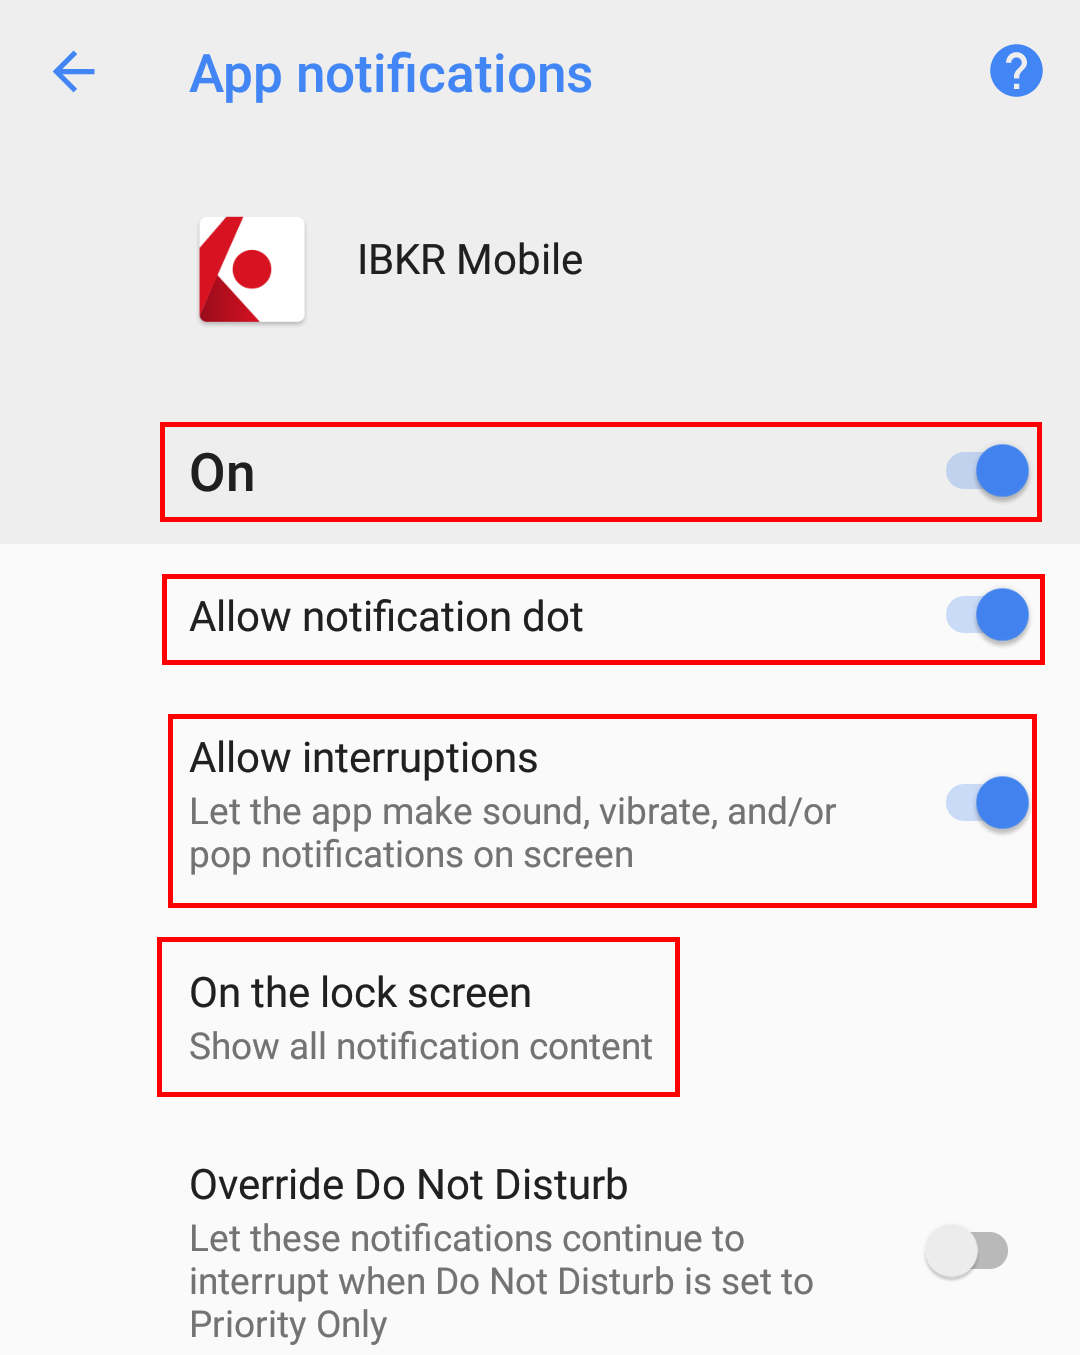
Figure 4
Please note that menu items labels and positions may vary according to your device vendor and software version.
1. The Apps & notifications item may be called Sound & notification on certain devices
References:
- See KB2260 for instruction on how to activate and operate IBKR Mobile Authentication
- See KB3234 for troubleshooting missing IBKR Mobile notifications
- See KB2748 for information about IBKR Mobile Authentication recovery