На мой телефон не приходят SMS-сообщения от IBKR
Background:
Если Вы подтвердили свой номер телефона на "Портале клиентов", на него должны приходить текстовые сообщения (SMS) от IBKR. В этой статье приведены основные способы устранения неполадок в случае, если сообщения не приходят на Ваш телефон.
1. Активируйте аутентификацию IBKR Mobile (IB Key) для двухфакторной защиты
Чтобы не зависеть от неполадок с беспроводной/телефонной сетью, мы рекомендуем активировать аутентификацию с помощью IBKR Mobile (IB Key) на своем телефоне.
Аутентификация по IB Key в нашем приложении IBKR Mobile обеспечивает двухфакторную защиту, тем самым устраняя необходимость получать коды безопасности по SMS при входе на свой счет в IBKR.
Приложение IBKR Mobile поддерживается на телефонах с Android и iOS. Инструкции по установке, активации и работе с приложением можно найти в следующих статьях:
2. Перезагрузите телефон
Полностью выключите телефон и затем снова включите. Как правило, после перезагрузки на телефон начинают приходить сообщения.
Обратите внимание, что в некоторых случаях, например, в роуминге, сообщения могут не приходить.
3. Используйте обратный голосовой звонок
Если после перезагрузки Вы все равно не получаете сообщения, выберите вариант "Голосовое сообщение" (Voice). Тогда Вы получите код с помощью автоматического обратного голосового вызова. Инструкции об использовании голосового вызова приведены в статье IBKB 3396.
4. Проверьте, не заблокировано ли сообщение от IBKR Вашим оператором
Некоторые операторы ошибочно принимают сообщения от IBKR за спам и автоматически их блокируют. Ниже приведены сервисы по регионам, в которые можно обратиться, чтобы узнать, установлен ли для Вашего номера фильтр SMS-сообщений:
США:
- Все операторы: реестр Федеральной торговой комиссии США
- T-Mobile: настройки блокировки сообщений на сайте T-Mobile и в приложении T-Mobile
Индия:
- Все операторы: Управление Индии по телекоммуникации
Китай:
- Чтобы узнать, не заблокированы ли сообщения от IBKR, обратитесь напрямую к своему оператору
Справка:
- Как авторизоваться с помощью SMS
- Общая информация о "Системе безопасного входа"
- Информация и инструкции по устройствам безопасности
- Аутентификация с помощью IBKR Mobile
Как использовать обратный звонок для получения кода аутентификации
Background:
Если Вы активировали двухфакторную аутентификацию по SMS, то можете использовать для получения кодов аутентификации обратный голосовой звонок. Статья содержит пошаговые инструкции для настройки обратного голосового звонка для авторизации на наших платформах.
Как использовать обратный голосовой звонок
Вы можете выбрать голосовой звонок, если не получили код аутентификации. Тогда Вы получите код с помощью автоматического обратного голосового вызова. Следуйте инструкциям для платформы, в которую хотите войти.
Портал клиентов
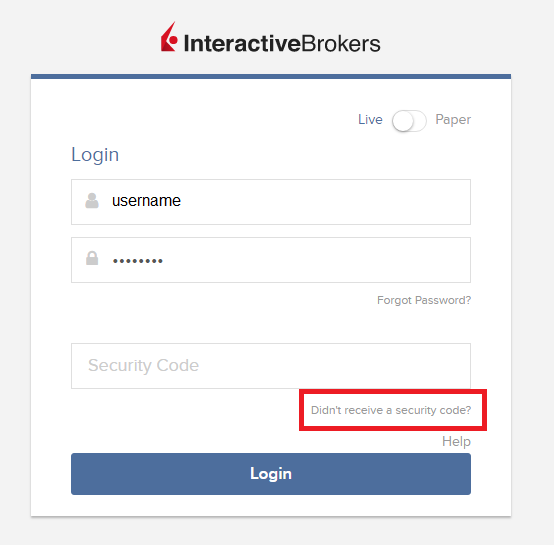
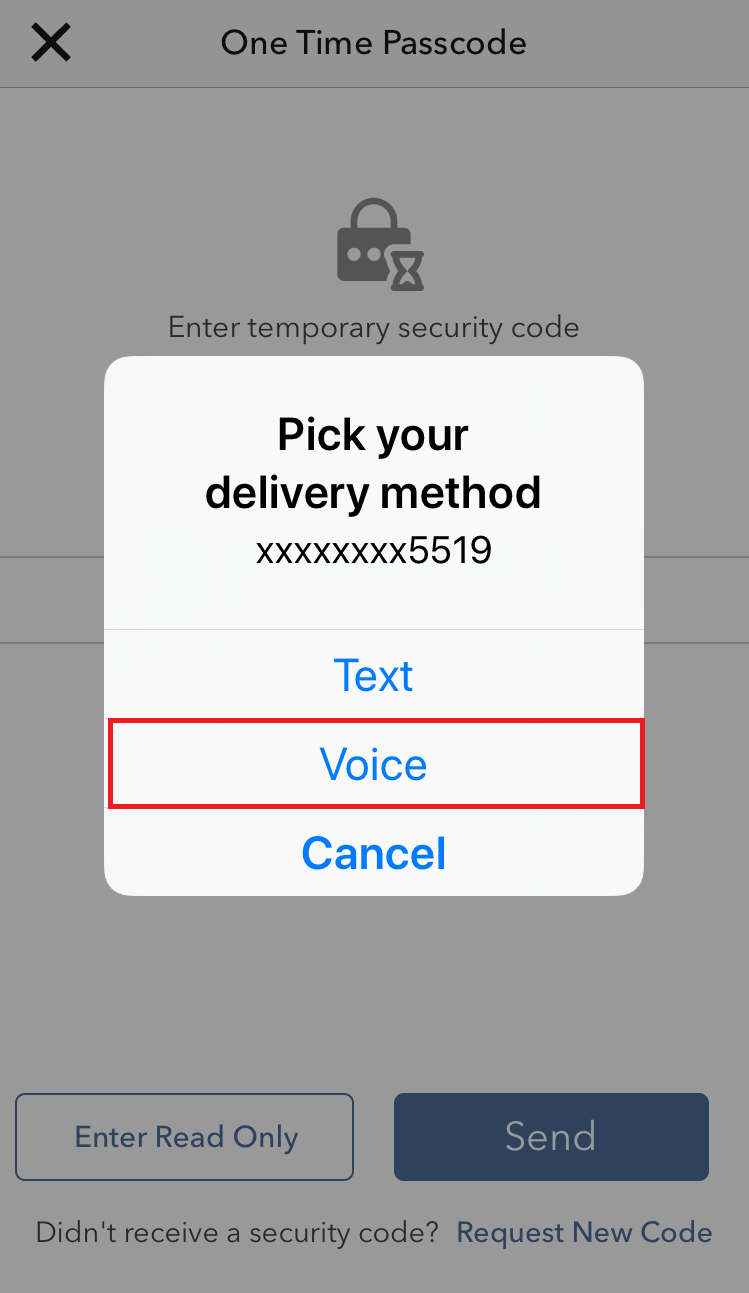
1. Нажмите на "Не получили код безопасности?" (Didn't receive a security code?).
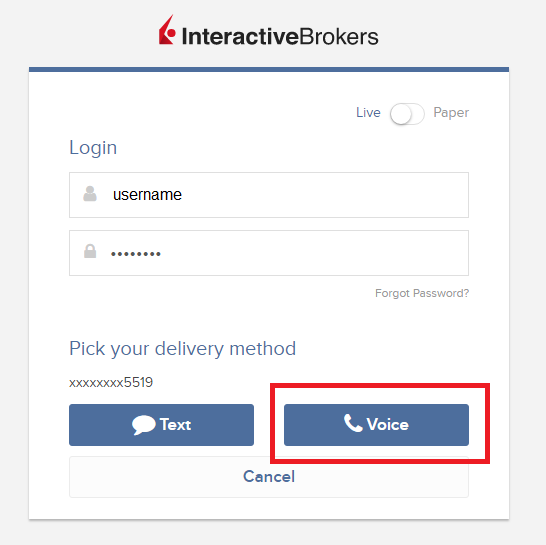
2. Из двух вариантов выберите "Голосовое сообщение" (Voice) и дождитесь звонка.
3. Вызов должен начаться в течение минуты. Будьте готовы записать код, который услышите по телефону.
TWS
1. Нажмите "Запросить новый код безопасности" (Request new Security Code).

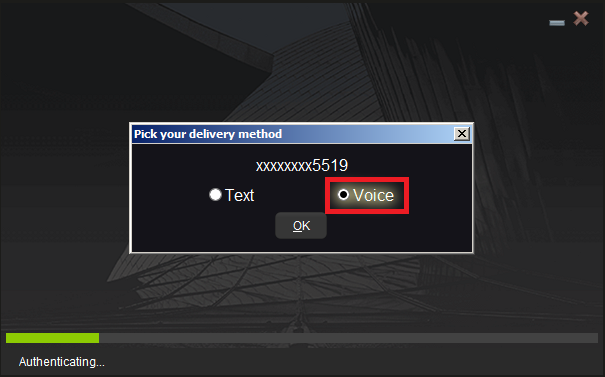
2. Из двух вариантов выберите "Голосовое сообщение" (Voice) и нажмите OK. Дождитесь звонка.
3. Вызов должен начаться в течение минуты. Будьте готовы записать код, который услышите по телефону.
Примечание. Функция голосового вызова доступна только в последней и бета-версии TWS.
IBKR Mobile – iOS
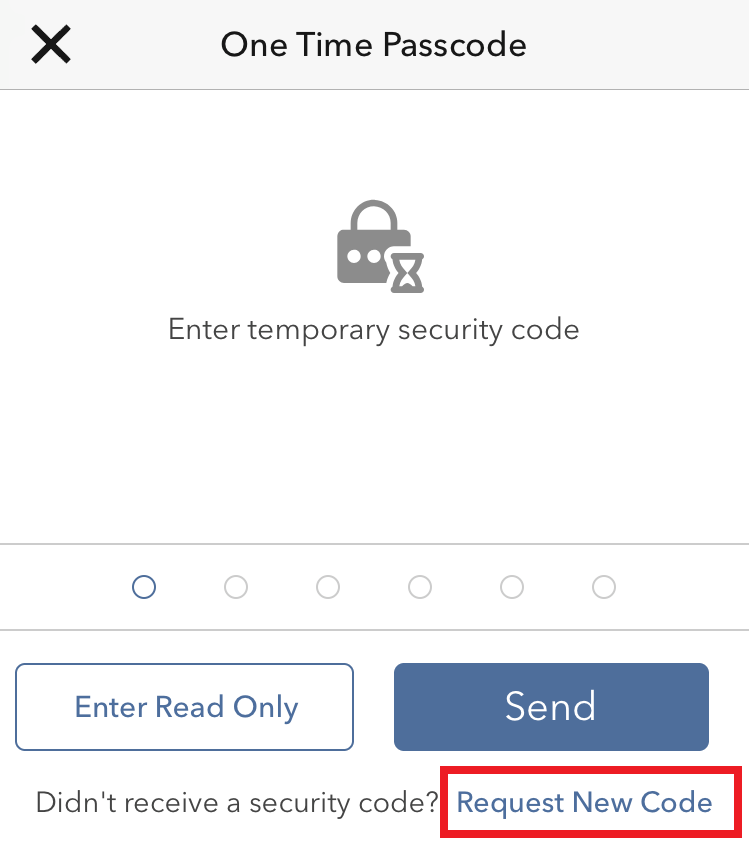
1. Нажмите "Запросить новый код" (Request New Code).
2. Из двух вариантов выберите "Голосовое сообщение" (Voice) и дождитесь звонка.
3. Вызов должен начаться в течение минуты. Будьте готовы записать код, который услышите по телефону.
IBKR Mobile – Android
1. Нажмите "Запросить новый код безопасности" (Request New Security Code).
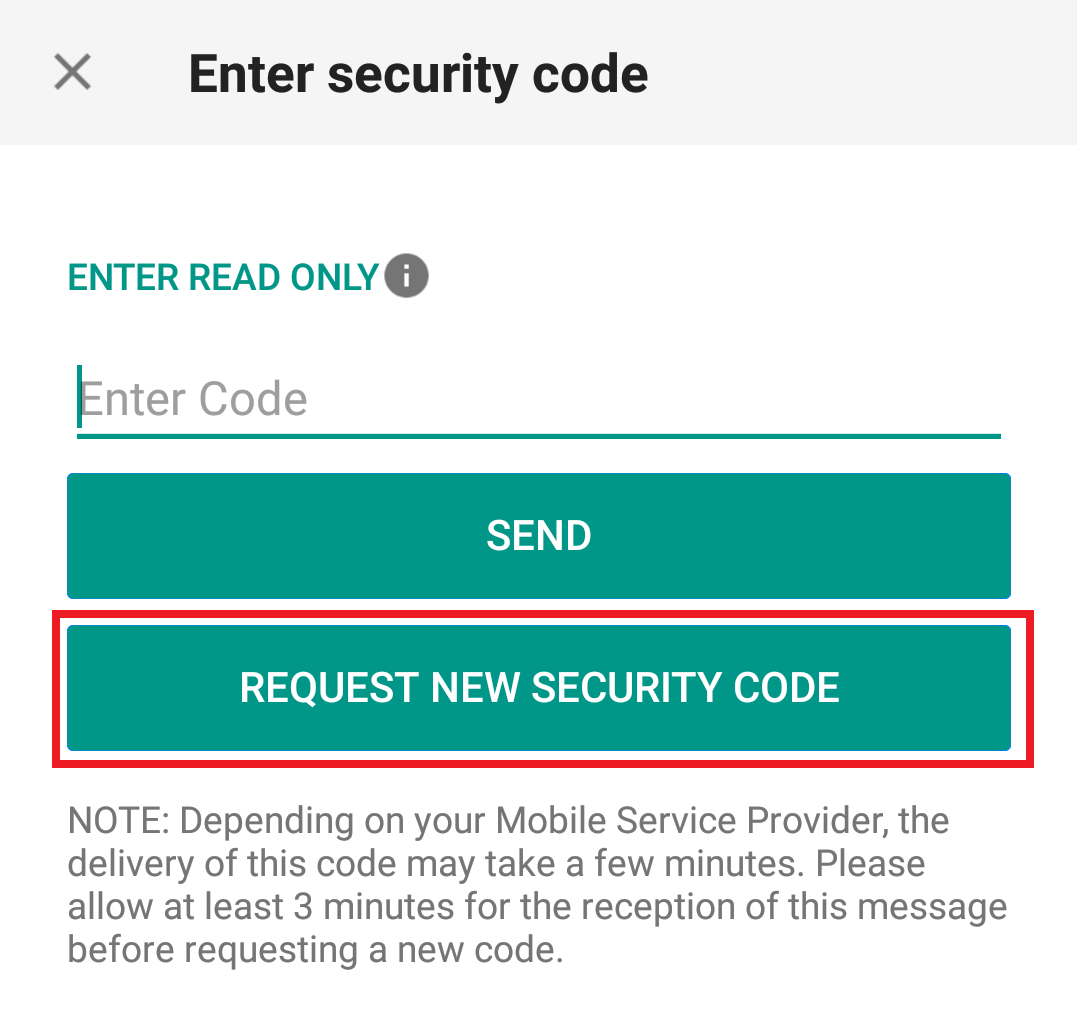
2. Из двух вариантов выберите "Голосовое сообщение" (Voice) и дождитесь звонка.
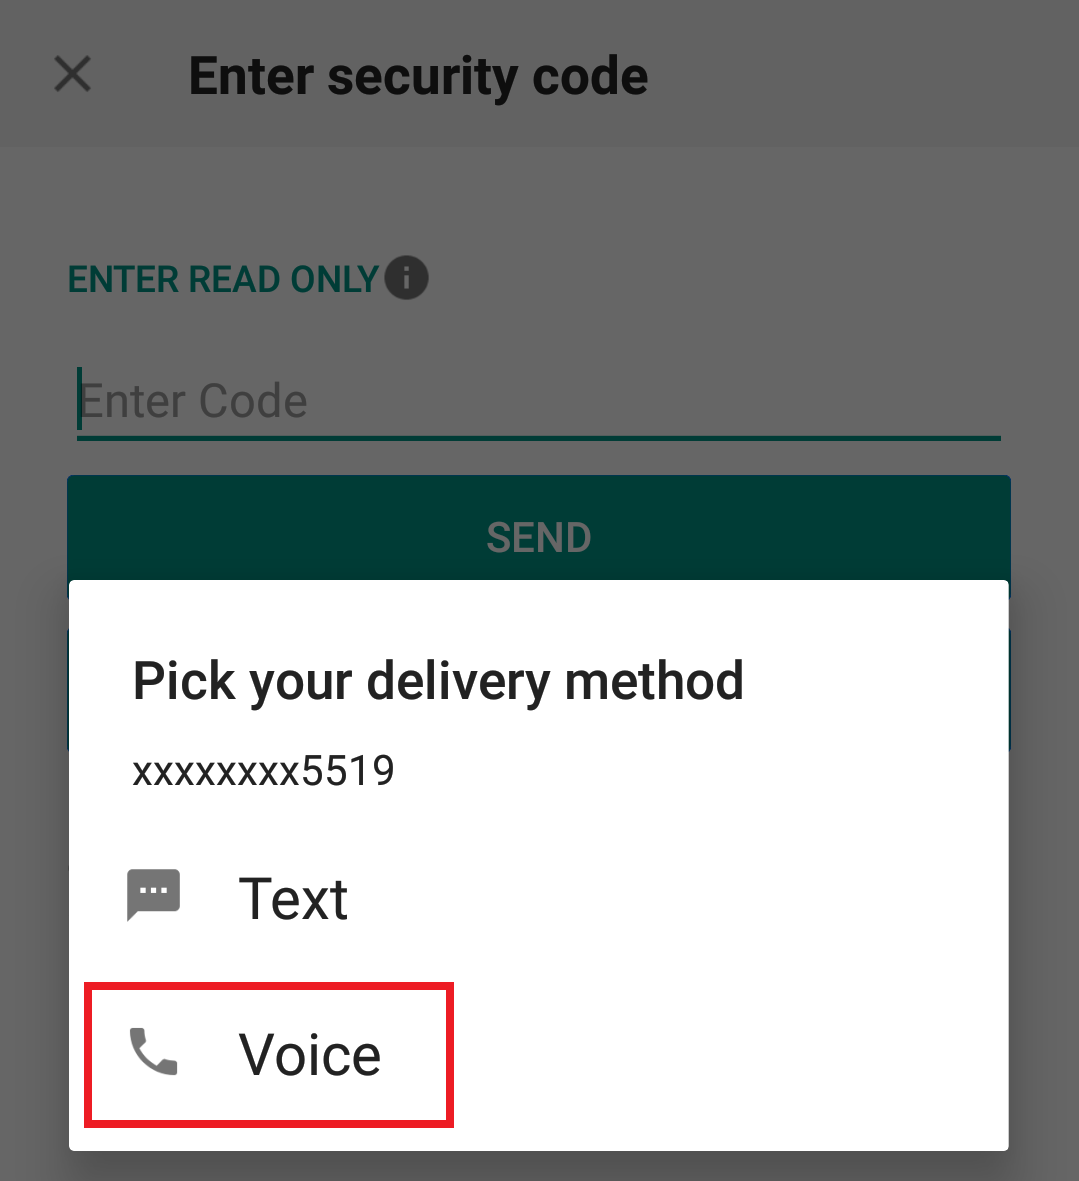
3. Вызов должен начаться в течение минуты. Будьте готовы записать код, который услышите по телефону.
Справка:
- Как авторизоваться с помощью SMS
- Общая информация о "Системе безопасного входа"
- Информация и инструкции по устройствам безопасности
- Аутентификация с помощью IBKR Mobile
Совместное использование устройства безопасности
Overview:
IBKR разрешает клиентам иметь несколько пользователей на одном счете или в группе счетов под их управлением. Клиенты, которые не желают иметь несколько физических устройств безопасности, могут использовать одно устройство для нескольких пользователей. Что для этого нужно, описано ниже.
Примечание. Данные инструкции не относятся к клиентам, которые используют аутентификацию с помощью IBKR Mobile (IB Key), поскольку активировать данный способ аутентификации для нескольких пользователей можно прямо в приложении IBKR Mobile (на странице Аутентификация -> Добавить пользователя).
Background:
Требования
Совместно использовать физическое устройство безопасности можно, только если соблюдены ВСЕ указанные условия:
a) Пользователи относятся к тому же лицу или к разным лицам, у которых одинаковые идентификационные данные (дата рождения, гражданство, страна проживания, тип и номер удостоверения личности или номер соц. страхования для граждан и резидентов США).
b) Пользователи в настоящее время НЕ ИМЕЮТ временных устройств безопасности (временного кода, онлайн-карты кодов безопасности).
c) Для совместного использования должно быть выбрано физическое устройство с самым высоким уровнем защиты. В случае если все устройства имеют одинаковый уровень защиты, можно использовать любое из них. Узнать уровень защиты устройства можно в таблице ниже:
|
Уровень защиты |
Название устройства |
Изображение устройства |
| Самый высокий | Цифровая карта безопасности+ (ЦКБ+) | 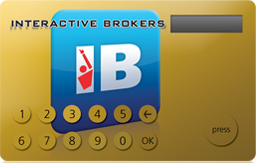 |
| Самый низкий | Карта кодов безопасности (SLS-карта) | 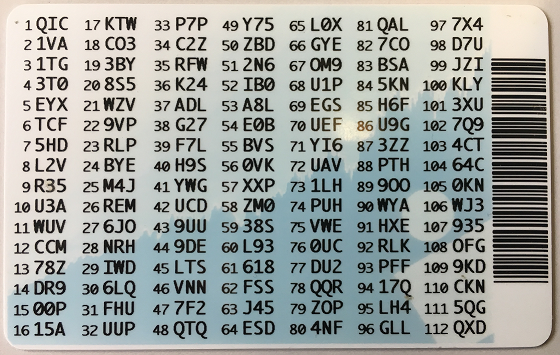 |
Инструкции:
1. Выберите пользователя, чье устройство имеет самый высокий уровень защиты. Мы будем обозначать этого пользователя как "владелец устройства".
2. Зайдите на "Портал клиентов" под именем запрашивающего пользователя (НЕ владельца устройства).
3. Нажмите на иконку меню в левом верхнем углу и выберите Настройки (Settings), затем Настройки пользователя
(User Settings).(1).png)
(User Settings).
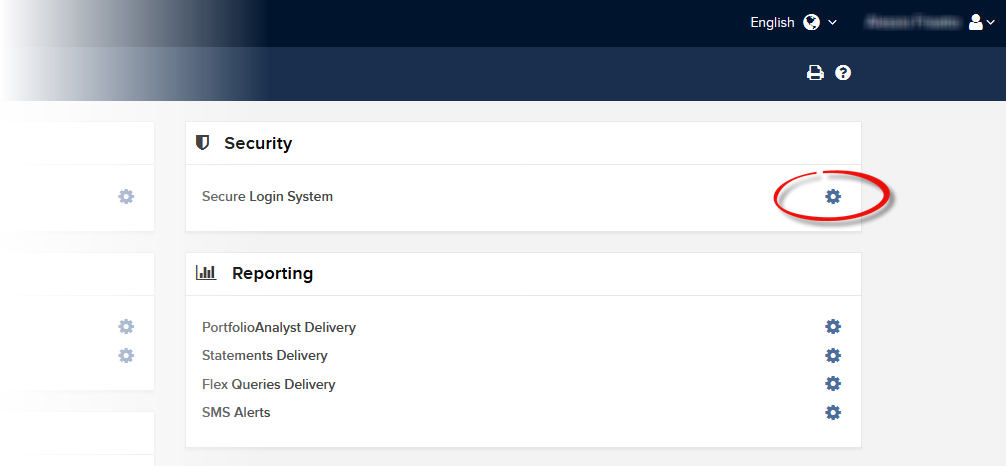
4. Нажмите на значок шестеренки (настройки) рядом с пунктом Система безопасного входа (Secure Login System).
5a. Если у этого пользователя нет активных устройств, на экране отобразится меню для активации системы безопасного входа. Выберите вариант "У меня уже есть доступ к устройству безопасного входа через другое имя пользователя" (I already have access to a Secure Login Device under a different username) и нажмите Далее.
.png)
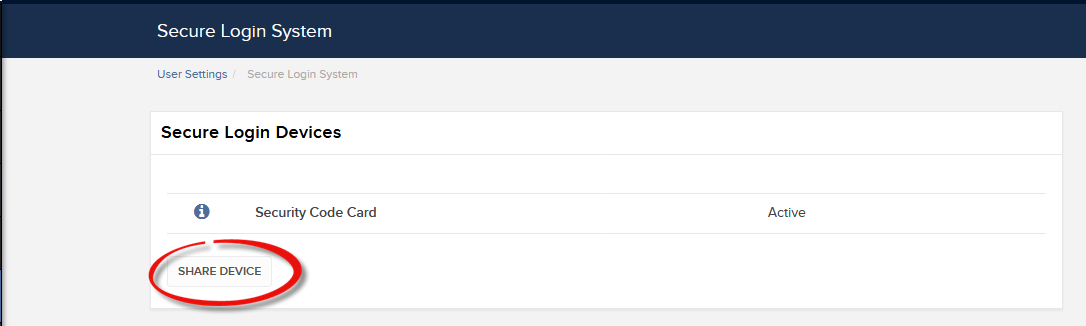
5b. В остальных случаях на экране отобразится список устройств. Нажмите на Совместное использование устройства (Share Device).
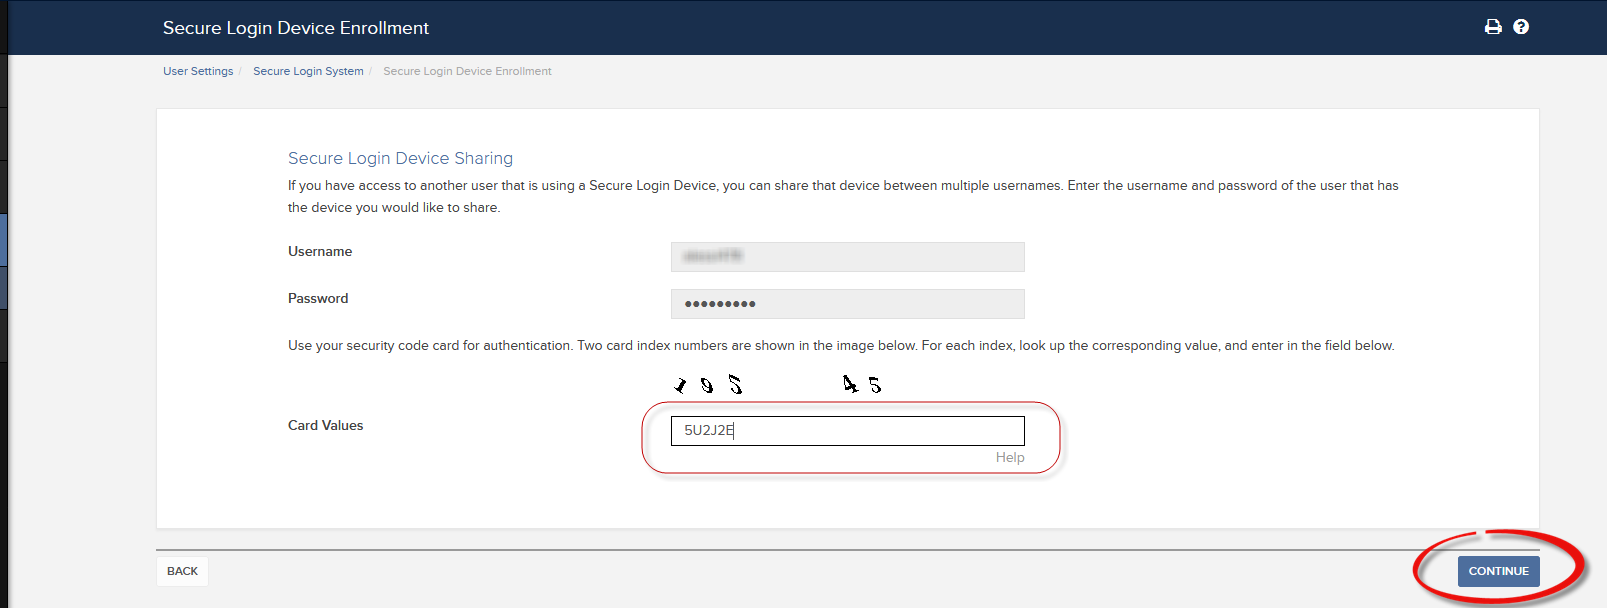
6. Введите учетные данные владельца устройства, выбранного в пункте 1, и нажмите Далее.
.png)
7. В зависимости от выбранного устройства безопасного входа, на экране отобразится защитный элемент (проверочный код или два проверочных номера). Используйте устройство безопасного входа и защитный элемент, чтобы сгенерировать ответный код. Введите ответный код в соответствующее поле и нажмите Далее.
8. Проверьте данные и нажмите Далее.
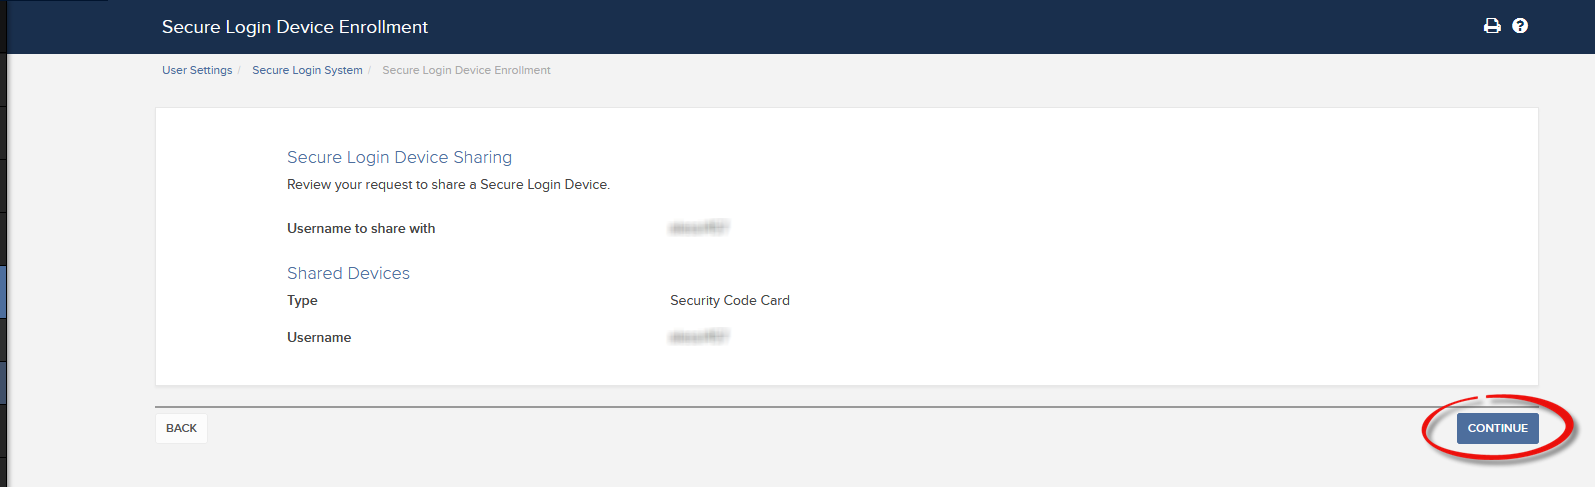
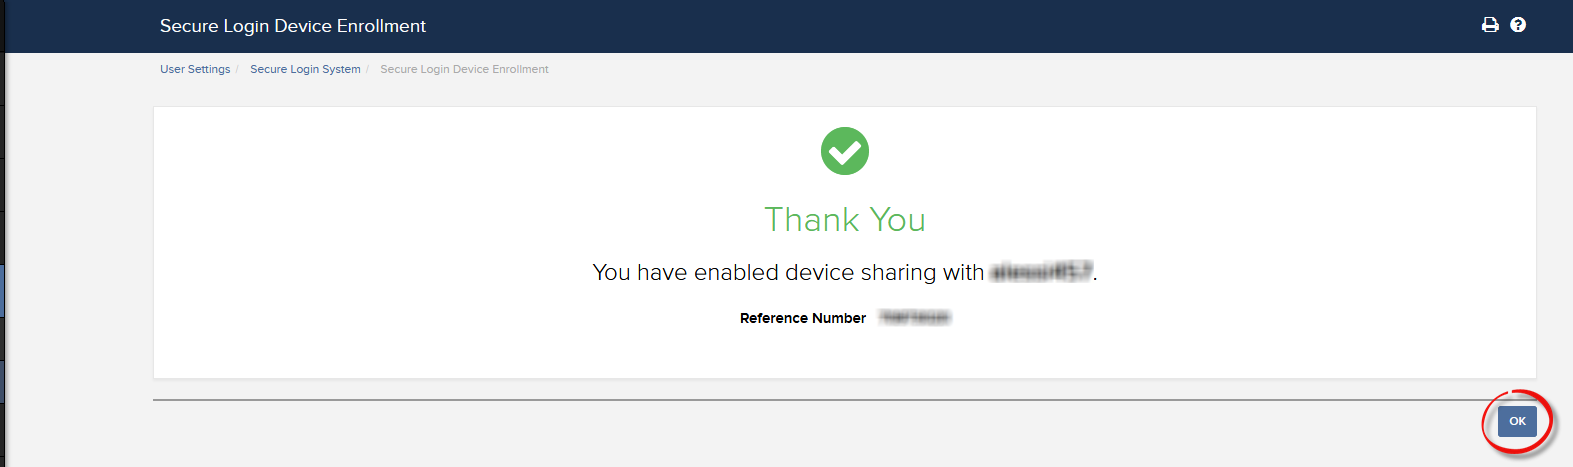
a. В подавляющем большинстве случаев запрос будет автоматически принят, обработан и одобрен. Если требуется одобрение отдела правового контроля, до его выполнения запрос будет в статусе ожидания.
b. После одобрения запроса храните неиспользуемые устройства в безопасном месте. Возможно, в будущем Вы захотите отменить совместное использование устройства и заново их активировать. Если Вы не хотите хранить эти устройства, Вы можете вернуть их (только ЦКБ+), следуя инструкциям на странице:
c. Ниже перечислены самые распространенные сообщения об ошибках и их причины:
- Более низкий уровень защиты: эта ошибка возникает, если в качестве совместного устройства выбрано не самое безопасное устройство. Определите самое безопасное устройство и используйте его.

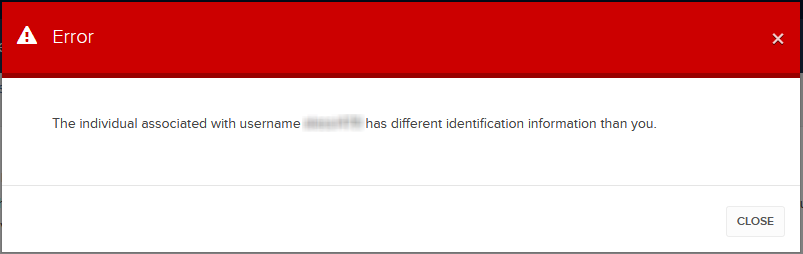
- Разные идентификационные данные:
Эта ошибка вызвана тем, что идентификационные данные организаций/лиц, желающих совместно использовать устройство, не совпадают. Если пользователи принадлежат разным юр./физ. лицам, то совместное использование устройства невозможно.
Если пользователи принадлежат одному и тому же юр./физ. лицу, несовпадение данных может быть связано с тем, что в системе сохранены устаревшие данные. В этом случае обратитесь в нашу службу поддержки для предоставления верных данных.
Справка:
- Общие сведения о системе безопасного входа: KB1131 или ibkr.com/sls
- Двухфакторная система на нескольких устройствах (M2FS): KB2895
- Совместное использование устройства безопасного входа двумя или более пользователями: KB2481
- Как повторно присоединиться к "Системе безопасного входа": KB2545
- Меры предосторожности при отказе от "Системы безопасного входа": KB1198
- Взимается ли плата за использование устройств безопасности? KB1861
- Устранение проблем при входе в "Портал клиентов": KB1132
- Устранение проблем при входе в торговую платформу: KB1133
How to generate a ".har" file
Background:
When troubleshooting a non-trivial website issue, it is sometimes necessary for our Client Services team to obtain additional information about your browser communication. You may be asked record and provide a .har file. This file contains additional information about the network requests that are sent and received by your browser. Your browser can generate such file by recording content, timeline and status of HTTP/HTTPS requests and responses while the issue occurs.
In this article we explain how to generate a .har file. Please click on the browser that you use in the list below:
To generate the HAR file for Google Chrome:
1. Open Google Chrome and go to the page where the issue is occurring.
2. Press CRTL +SHIFT + I on your keyboard. Alternatively, click on the Chrome menu icon (three vertical dots at the top-right of your browser window) and select More Tools > Developer Tools
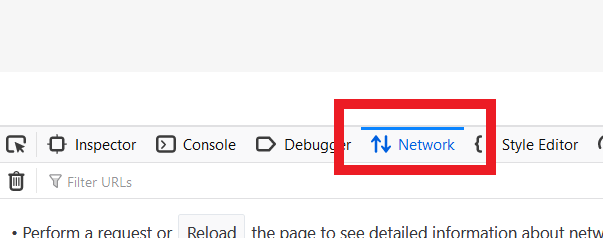
3. The Developers Tools opens as a docked panel at the side or bottom of Chrome. Select the tab Network (Figure 1.)
Figure 1.
.png)
4. Look for a round Record button in the upper left corner of the Developer Tools toolbar and make sure it is red. If it is grey, click it once to start recording or just press CTRL+E (Figure 2.)
Figure 2.

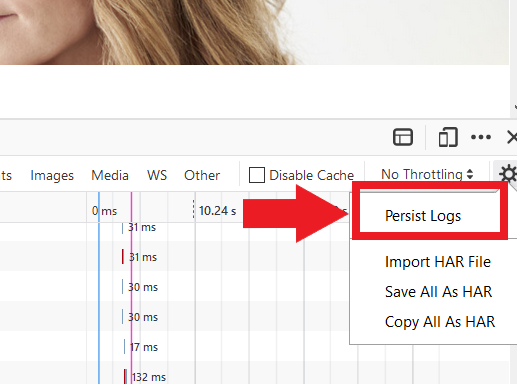
5. Activate the checkbox Preserve log (Figure 3.)
Figure 3.
.png)
6. Click the Clear button to clear out any existing logs. The Clear button has a stop icon and is located on the right of the Record button (Figure 4.)
Figure 4.
![]()
7. Reproduce the issue you are experiencing while the network requests are being recorded.
8. Once you have reproduced the issue, right-click anywhere on the list of recorded network requests, select Save all as HAR with Content, and save the file to a location of your preference on your computer (e.g. on your Desktop).
9. From the IBKR Client Portal, go to the Message Center and create a new Web Ticket (or use an existing one when applicable)
10. Within the Web Ticket, attach the .har file previously generated. In case the IBKR Client Services has provided you with a reference ticker number or representative name, please add this information to the ticket body.
11. Submit the Web Ticket
To generate the HAR file for Firefox:
1. Open Firefox and go to the page where the issue is occurring
2. Press F12 on your keyboard. Alternatively click the Firefox menu icon (three horizontal parallel lines at the top-right of your browser window), then select Web Developer > Network
3. The Developers Network Tools opens as a docked panel at the side or bottom of Firefox. Select the tab Network (Figure 5.)
Figure 5.
4. Activate the checkbox Persists logs (Figure 6.)
Figure 6.
5. Reproduce the issue you are experiencing. The recording of the network request starts automatically.
6. Once you have reproduced the issue, right-click anywhere on the list of recorded requests and select Save All As HAR
7. Save the file to a location of your preference on your computer (e.g. on your Desktop)
8. From the IBKR Client Portal, go to the Message Center and create a Web Ticket (or use an existing one when applicable)
9. Within the Web Ticket, attach the .har file previously generated. In case the IBKR Client Services has provided you with a reference ticker number or representative name, please add this information to the ticket body
10. Submit the Web Ticket
To generate the HAR file for Microsoft Edge:
1. Open Edge and go to the page where the issue is occurring.
2. Press F12 on your keyboard. Alternatively click the Edge menu icon (three horizontal dots at the top-right of your browser window), then select More Tools > Developers Tools
3. Click the Network tab (Figure 10.)
Figure 10.
.png)
4. Reproduce the issue that you were experiencing before, while the network requests are being recorded.
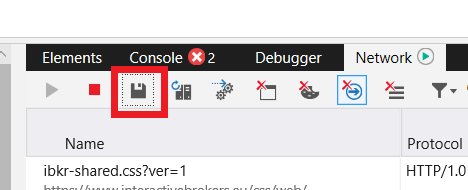
5. Once done click the floppy disk icon (Export as HAR) or press CTRL+S (Figure 11.)
Figure 11.
6. Provide a filename and a location of your preference on your computer (e.g. on the Desktop). Then click the Save button
7. From the IBKR Client Portal, go to the "Message Center" and create a Web Ticket (or use an existing one when applicable)
8. Within the Web Ticket, attach the .har file previously generated. In case the IBKR Client Services has provided you with a reference ticker number or representative name, please add this information to the ticket body.
9. Submit the Web Ticket
To generate the HAR file for Safari:
Note: Before generating the HAR file, make sure you can see the Develop menu in Safari. If you do not see this menu, click on the menu Safari, choose Preferences, go to the tab Advanced and activate the checkbox next to Show Develop menu in menu bar
1. Open the Develop menu and select Show Web Inspector or press CMD+ALT+I
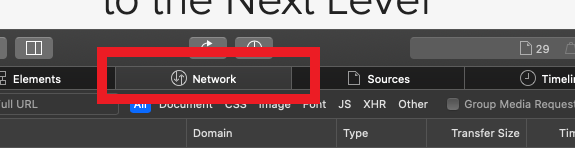
2. Click the Network tab (Figure 12.)
Figure 12.
3. Activate the checkbox Preserve log (Figure 13.)
Figure 13.
.png)
4. Click on the icon Export (or press CMD+S), provide a filename and a location of your preference on your computer (e.g. on the Desktop) and save the .har file
5. From the IBKR Client Portal, go to the "Message Center" and create a Web Ticket (or use an existing one when applicable)
6. Within the Web Ticket, attach the web archive file previously generated. In case the IBKR Client Services has provided you with a reference ticker number or representative name, please add this information to the ticket body.
7. Submit the Web Ticket
How to use Voice callback for receiving login authentication codes
Background:
If you have SMS enabled as two-factor authentication method, you may use Voice callback to receive your login authentication codes. This article will provide you steps on how to select voice callback when logging in to our platforms.
How to use Voice callback
You may select Voice if you do not receive your login authentication code. You will then receive your login authentication code via an automated callback. Follow the instructions below, depending on which platform you are trying to login to.
Client Portal
1. Click on "Didn't receive a security code?"
2. From the two options, select "Voice" and wait for the callback.
3. After selecting Voice, you should receive the callback within a minute. Please wait for the callback and be ready to write down the code that will be provided over the callback.
TWS
1. Click on "Request new Security Code"
2. From the two options, select "Voice" and click on OK. Then wait for the callback.
3. After selecting Voice, you should receive the callback within a minute. Please wait for the callback and be ready to write down the code that will be provided over the callback.
Note: Voice callback for the TWS is only available in the LATEST and BETA version.
IBKR Mobile - iOS
1. Click on "Request New Code"
2. From the two options, select "Voice" and wait for the callback.
3. After selecting Voice, you should receive the callback within a minute. Please wait for the callback and be ready to write down the code that will be provided over the callback.
IBKR Mobile - Android
1. Click on "Request New Security Code"
2. From the two options, select "Voice" and wait for the callback.
3. After selecting Voice, you should receive the callback within a minute. Please wait for the callback and be ready to write down the code that will be provided over the callback.
References:
- How to login using SMS authentication
- Overview of Secure Login System
- Information and procedures related to Security Devices
- IBKR Mobile Authentication
IBKR Mobile Authentication (IB Key) Use Without Notifications
In case your smartphone is unable to receive IBKR Mobile notifications, you can still complete the login process using the IBKR Mobile Authentication (IB Key) Challenge/Response method, described on the following pages (according to your device operating system):
The same information applies to you if your phone has no Internet connectivity (you are in roaming, out of coverage, without an active mobile data plan, etc.)
If your smartphone is unable to receive IBKR Mobile notifications despite having Internet connectivity, we recommend you to perform the steps outlined in the IBKR Knowledge Base.
TWS / IB Gateway and their interaction with Proxy servers
Table of contents
Configuration instructions
- Can the TWS / IB Gateway operate through a Proxy server, and how?
- If I use a SOCKS Proxy server, do I need to configure the TWS / IB Gateway?
- If I use a SOCKS Proxy server, do I need to configure the client machines where TWS / IB Gateway runs?
- If I use a Web (HTTP) Proxy server, do I need to configure the TWS / IB Gateway?
- What alternatives do I have in case I cannot implement a proxy solution on my network?
Common issues
Technical Background
Configuration instructions
1. Can the TWS / IB Gateway operate through a Proxy?
Upon start-up and during the run-time, the TWS / IB Gateway must establish and maintain direct network connections to our gateways and market data servers1. Such connections are created from random local TCP ports (above 1024) and are directed to TCP ports 4000 and TCP 4001. Since those are not HTTP connections, they cannot be serviced by a Web (HTTP) Proxy. They can only be serviced by a SOCKS Proxy.
From within the TWS interface, you can access several external services, such as IBKR Client Portal, Statements, Contract details, Bond Search, etc. Those services, being web-based, can be accessed through a Web (HTTP) Proxy (see section 6 for details and configuration) or through a SOCKS Proxy (see sections 4. and 5. for details and configuration).
2. If I use a SOCKS Proxy server, do I need to configure the TWS / IB Gateway?
The TWS / IB Gateway does not contemplate an option for SOCKS proxy forwarding. Therefore, it does not have a place where an explicit SOCKS Proxy host/port can be configured. This does not mean that the TWS / IB Gateway cannot work with a Proxy. It simply means that the TWS / IB Gateway is unaware of the underlying SOCKS proxy setup (proxy-agnostic).
Important Note: While it is impossible for us to determine whether a Proxy is enabled on your network, we assure you that all IBKR platforms, including the TWS, do not impact nor influence your network configuration.
3. If I use a SOCKS Proxy server, do I need to configure the client machines where TWS / IB Gateway runs?
The connections started by the TWS / IB Gateway can be redirected to a SOCKS (Application) Proxy through a specific client machine setup. We mention some of them below. Please note that the final decision is yours and none of the below suggestions can be recommended by us as best adapted to your setup and requirements.
3a. Using a Proxy Client software installed on the client machine where TWS / IB Gateway is running
With this setup, the Proxy client will intercept the connections (not only HTTP but for other ports as well) initiated by the TWS / IB Gateway and redirect them to a SOCKS proxy server. The typical benefits of a transparent proxy include a standard enterprise configuration where all clients routed to the Internet will always be filtered and protected no matter what the end users do, or change, on their machines and the added benefit of reduction in typical user’s client-proxy configuration troubleshooting.
3b. Using a so-called Proxifier
This configuration is very similar to the one at point 5a with the only difference that the Proxifier software can be set to redirect to a Proxy all the requests started by a specific process (e.g., C:\Jts\tws.exe; C:\JTS\ibgateway\XYZ\ibgateway.exe), hence instating a process level packet forwarding instead of a port level forwarding. This setup allows handling environments where different proxy servers are used for different applications or where you would like to address a specific application requirement without modifying/disrupting the connectivity schema for other software installed. The advantage of this solution is minimal maintenance since the connectivity schema is bound to the process and not to the hosts/ports.
3c. Using specific network routing on a client machine
With this setup, you can modify the client machine standard network routes, adding new ones in order to forward packets with specific destinations (e.g., Order routing and Market Data servers1) to a different gateway.
This gateway will then be in charge of routing those requests to the destination hosts. This solution has as well the benefit of not modifying/disrupting the connectivity schema for other software installed but usually requires more maintenance on the gateway and on the client machine in case the IP of the destination servers are changed or in case new servers are added.
4. If I use a Web (HTTP) Proxy server, do I need to configure the TWS / IB Gateway?
If the Workstations on your local network access the Web content through a Web (HTTP) Proxy, you need to specify the Web Proxy IP Address and port. To do this, click More Options at the bottom of the TWS Login Screen, and enter your Proxy server details in the fields Host and Port (see Figure 1 below). The same fields are present in the IB Gateway Login Screen.
Figure 1.
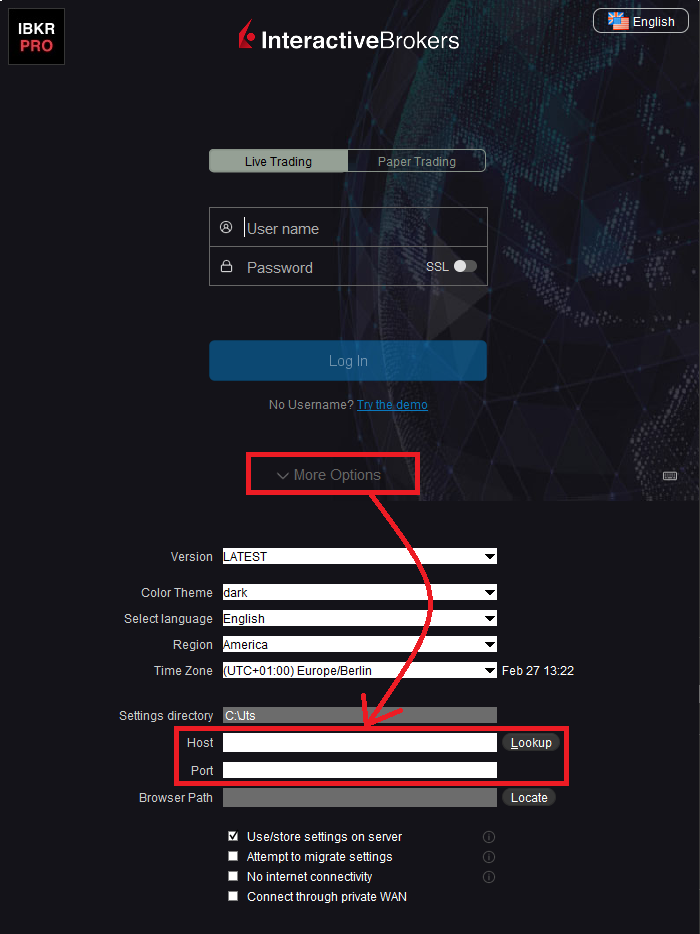
The Web Proxy you set there will ONLY be used to fetch the web content accessible from within the TWS (e.g., Client Portal, Statements, Product Details, etc.)
5. What alternatives do I have in case I cannot implement a proxy solution on my network?
In this case, you might orient yourself towards a different type of access to the IBKR infrastructure, which includes a special connection type and a FIX/CTCI engine setup. This setup would, on the other hand, have different requirements in terms of commissions2.
Common Issues
6. What happens if the proxy configuration on your computer is wrong or outdated?
Occasionally, third-party software, even if already uninstalled, may leave behind a SOCKS proxy configuration on your computer. This may also happen if your computer has been infected with malware. In such cases, the proxy server, although configured, is non-existent or not accessible on the network. In such scenarios, the TWS will show an error message (e.g., No Internet Connectivity) and/or start the "Connection attempt #" loop upon login. The same will happen if the Proxy server exists, but has not been correctly configured on the client machines.
6a. How can I correct the proxy configuration if wrong?
When applicable, we recommend you always consult the IT / Networking team of your company first and ask for guidance.
If you are autonomously managing your network, please follow the instructions below according to the Operating System of your machine/s:
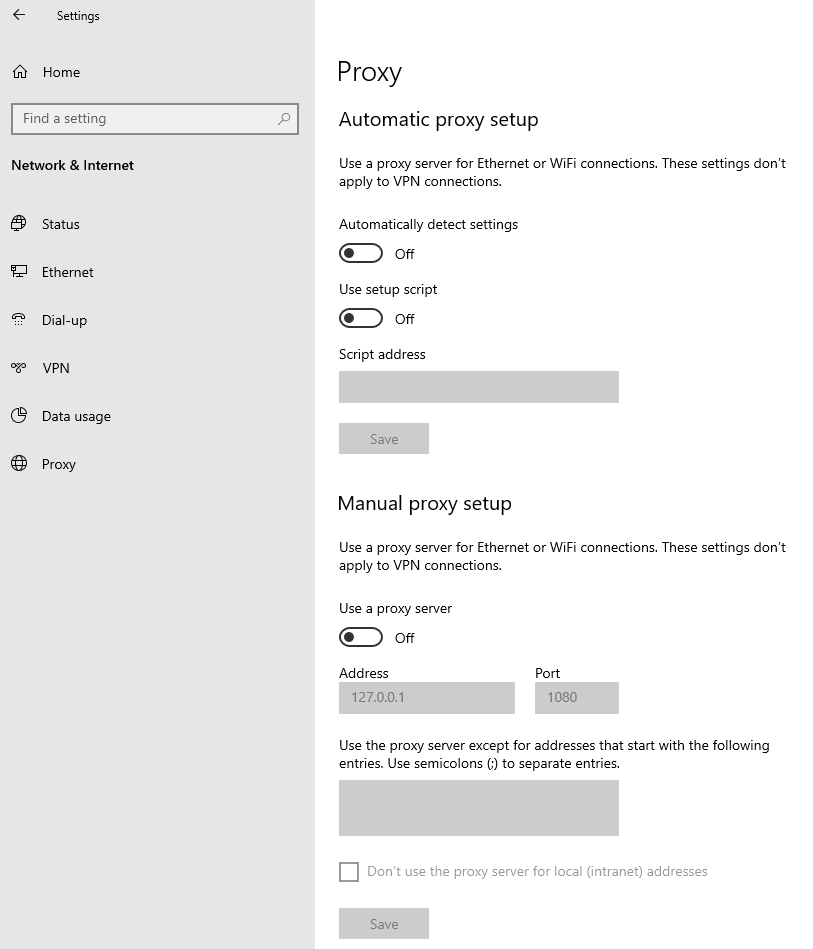
Windows
W.1 Press CTRL+S to open the Windows search
W.2 Type Proxy Settings and press Enter
W.3 If no Proxy is present on your network, make sure the switch "Use a proxy server" is deactivated (see Figure 2 below). If a Proxy server is active on your network, make sure the Address (or hostname) and Port are correctly defined.
Figure 2.
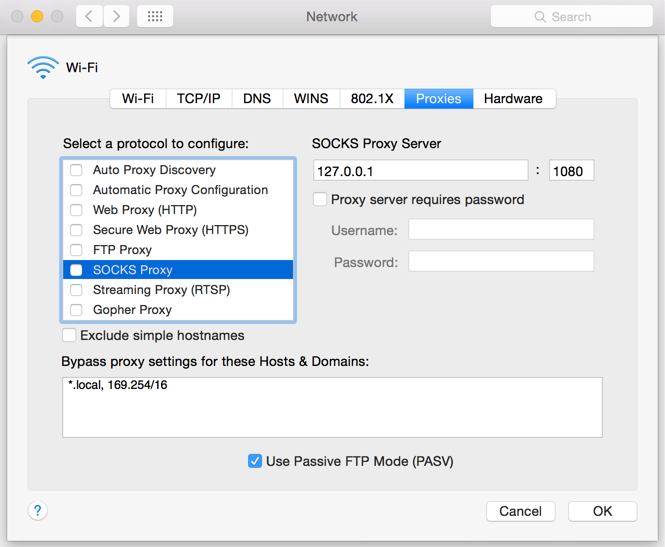
Mac
M.1 Click on the Apple icon at the top left corner of the screen and select System Preferences
M.2 Click on Network
M.3 Select the Network connection you are using to access the Internet (e.g. Wi-Fi) and click on it
M.4 Click on the Advanced button and then on the Proxies tab
5. If no proxy is present on your network, make sure all the checkboxes (SOCKS Proxy, Web Proxy, Secure Web Proxy) are deactivated (see Figure 3 below). If a Proxy is present on your network, ensure the Protocol, Address (or hostname) and Port are correct.
Figure 3.
7. You are using Public proxies and proxy chains to hide your presence or identity
There are public proxy and proxy chain services purposed to disguise or hide the identity and the activity of the subscriber or to bypass regional restrictions. One of the most famous services is the "Tor" network.
While those services may not necessarily be used for criminal purposes, they render subscriber traceability very difficult when not impossible. Since IBKR is obliged by the financial industry regulators to maintain records of trading activities and trade initiators, we do not allow our clients to reach our systems while using an anonymizing service. If you are using such a service, your TWS connection attempts will be automatically rejected by our gateways.
Technical Background
A proxy server usually acts as a gateway and as a barrier between your local network and the Internet. The proxy listens for outgoing connection requests from the internal workstation/s and forwards them to the desired target host or service on the Internet. When the target replies to such requests, the proxy routes the incoming responses back to the internal workstation/s that initiated the process.
Being the proxy, the only machine of your network actually accessing the Internet, it prevents the other machines and the internal segment of your network (LAN) from being accessible by external actors and hence from being exposed to threats and intrusion attempts.
Additionally, a proxy server can offer a variety of other services, such as web content caching and filtering.
9. Which types of Proxy servers are commonly used and where?
Proxy servers are commonly found within enterprise-grade networks. In the vast majority of cases, proxies are not used by individuals since private broadband connections are established through consumer-grade routers that already offer built-in proxy/firewall solutions. An exception is represented by public proxy or proxy chains discussed in detail in the section You are using Public proxies and proxy chains to hide your presence or identity
There are two main types of Proxy servers:
The HTTP (Hypertext Transfer Protocol) defines the rules and the standards for fetching Web content from a Web server and rendering such content on your Web Browser.
A Web Proxy handles only the routing of HTTP requests and HTTP responses. Those requests are transparently generated and sent by your browser whenever you access a Web page. Such requests are normally sent using specific ports (TCP 80 and TCP 443). Hence a Web Proxy usually listens for outgoing HTTP requests coming from your internal network (LAN) only on the TCP ports mentioned above.
SOCKS (Socket Secure) Proxies are designed to handle any type of traffic (not only HTTP/S traffic), generated by any protocol or program (including Trader Workstation).
Notes
1. More information about the servers accessed by the TWS is available in IBKB2816.
2. For an overview of the different special connection options and related requirements, please click here.
For an overview of the FIX infrastructure, please click here.
How to fix the "Cannot create ... file" error during TWS installation on MacOS
Background:
The filesystem permissions are controlled by your machines operating system. One of their functions is to secure your files, preventing unauthorized access or undesired modifications to the system and to your personal data.
Some software on your computer may modify or override the permissions assigned by the operating system. Under certain circumstances, this prevents the TWS installer from accessing the folder where the application core files have to be created (/users/youruser/home/Applications). In such cases, the TWS installation usually displays the error "Cannot create ... file. Shall I try again?"
In this article we explain how to reset the filesystem permission of the "Applications" folder located under your user home folder in order to allow a smooth run of the TWS installation.
Procedure:
1. On your keyboard, press ⌘CMD + ⇧Shift +H to open your home folder
Figure 1

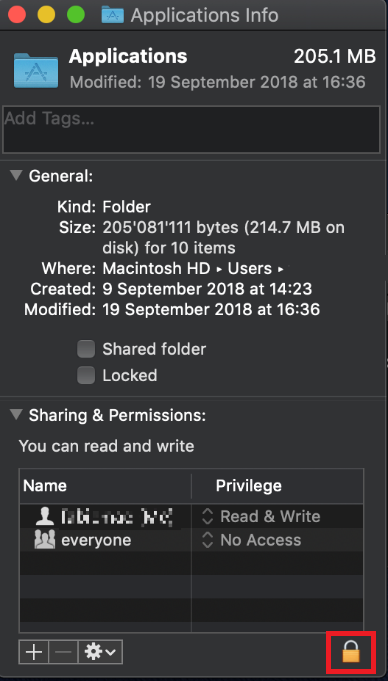
2. Select the folder "Applications" within your home folder and press ⌘CMD + I to open the Info panel
Figure 2

2. At the bottom right of the panel, click on the padlock
Figure 3
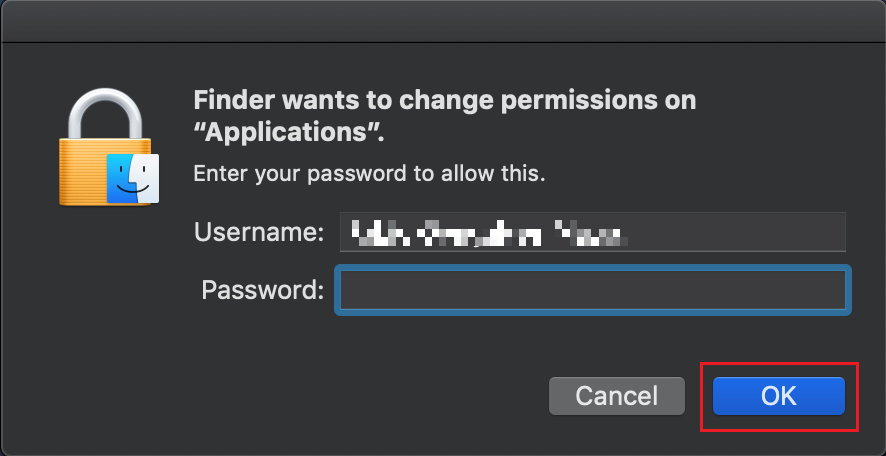
3. To unlock the permissions panel, enter your MacOS credentials and click OK
Figure 4
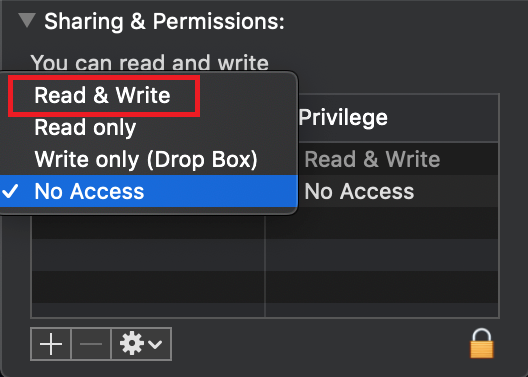
4. In the line correspondent to "everyone", click on "No Access" (Figure 5) and then select "Read & Write" (Figure 6)
Figure 5 Figure 6
.png)
5. Click on the icon bellow the permissions panel and select “Apply to enclosed items..."
Figure 7
.png)
6. Now run the TWS installer and click on Next> until you complete the installation
Figure 8
.png)
7. Once the installation has completed successfully, repeat the previous steps from 1. to 5. setting back the permissions of “everyone” to “Read Only” to revert your changes to the initial status
I am not receiving text messages (SMS) from IBKR on my mobile phone
Background:
Once your mobile phone number has been verified in the Client Portal, you should immediately be able to receive text messages (SMS) from IBKR directly to your mobile phone. This article will provide you with basic troubleshooting steps in case you are unable to receive such messages.
1. Activate the IBKR Mobile Authentication (IB Key) as 2-Factor security device
In order to be independent of wireless/phone carrier-related issues and have a steady delivery of all IBKR messages we recommend to activate the IBKR Mobile Authentication (IB Key) on your smartphone.
The smartphone authentication with IB Key provided by our IBKR Mobile app serves as a 2-Factor security device, thereby eliminating the need to receive authentication codes via SMS when logging in to your IBKR account.
Our IBKR Mobile app is currently supported on smartphones running either Android or iOS operating system. The installation, activation, and operating instructions can be found here:
2. Restart your phone:
Power your device down completely and turn it back on. Usually this should be sufficient for text messages to start coming through.
Please note that in some cases, such as roaming outside of your carrier's coverage (when abroad) you might not receive all messages.
3. Use Voice callback
If you do not receive your login authentication code after restarting your phone, you may select 'Voice' instead. You will then receive your login authentication code via an automated callback. Further instructions on how to use Voice callback can be found in IBKB 3396.
4. Check whether your phone carrier is blocking the SMS from IBKR
Some phone carriers automatically block IBKR text messages, as they are wrongly recognized as spam or undesirable content. According to your region, those are the services you can contact to check if a SMS filter is in place for your phone number:
In the US:
- All carriers: Federal Trade Commission Registry
- T-Mobile: Message Blocking settings are available on T-Mobile web site or directly on the T-Mobile app
In India:
- All carriers: Telecom Regulatory Authority of India
In China:
- Call your phone carrier directly to check whether they are blocking IBKR messages
References:
- How to login using SMS authentication
- Overview of Secure Login System
- Information and procedures related to Security Devices
- IBKR Mobile Authentication
Документация о хостах и портах IBKR
Background:
TWS подключается к серверам IBKR через порты 4000 и 4001 в случае применения протокола SSL; программа не будет работать через другие порты. При использовании прокси-сервера для корректной работы TWS должны быть открыты входящий и исходящий порты.
Ниже Вы найдете перечень всех шлюзов, а также сопряженные конечные хосты, которые могут потребоваться TWS при работе с нашими службами. Необходимо разрешить к ним доступ.
Самый простой способ диагностики соединения – это использовать проверочную страницу IBKR, которая произведет динамический тест Вашего подключения к нашим основным торговым и информационным серверам торговли и рыночных данных. Если результат – "Успешно" ("Success"), то Вам не нужно ничего делать. Если же отобразится сообщение об ошибке ("Failure"), мы рекомендуем добавить исключение для новых хостов в конфигурацию Вашей сети или проверить настройки.
Примечание. Если в Вашем браузере используется прокси, то тест может дать ложноположительный результат. В таком случае (или если Вы не знаете настроек своей сети) обратитесь к своему сетевому администратору, который сможет произвести ping- и telnet-тесты нижеуказанных хостов, чтобы подтвердить соответствие требованиям подключения.
Характеристики:
|
"ПОРТАЛ КЛИЕНТОВ" И САЙТ |
||||
|
ПРОДУКТ/РЕГИОН |
СЕРВЕР (ХОСТ) |
ПОРТЫ1 |
||
|
САЙТ IBKR – АМЕРИКА |
443 |
|||
|
САЙТ IBKR – КАНАДА |
443 |
|||
|
САЙТ IBKR – ВЕЛИКОБРИТАНИЯ |
443 |
|||
|
САЙТ IBKR – ИНДИЯ2 |
443 |
|||
|
САЙТ IBKR – ЯПОНИЯ2 |
443 |
|||
|
САЙТ IBKR – ГОНКОНГ2 |
www.interactivebrokers.com.hk | 443 | ||
|
САЙТ IBKR – КИТАЙ2 |
www.ibkr.com.cn | 443 | ||
|
САЙТ IBKR WEBSITE - АВСТРАЛИЯ |
www.interactivebrokers.com.au | 443 | ||
|
ПОРТАЛ КЛИЕНТОВ – ВОСТОК |
443 |
|||
|
ПОРТАЛ КЛИЕНТОВ – ЦЕНТРАЛЬНЫЙ |
443 |
|||
1. Стандартное подключение: порт TCP 80 | SSL-подключение: порт TCP 443/
2. Данный хост сервера IB не поддерживает ping-запросы.
Важное примечание. Подключаясь к "Порталу клиентов" через корпоративную сеть, использующую оборудование балансировки нагрузки, Вы можете столкнуться с ошибками об истекшей/недействительной сессии и/или отсутствующих данных. Балансировщик разделяет исходящие соединения между несколькими сетевыми интерфейсами для урегулирования загруженности сети. Из-за этого механизма Ваши HTTP-запросы приходят в наши системы с разных IP-адресов, делая Вашу сессию в "Портале клиентов" недействительной. Вы можете решить данную проблему, попросив своего сетевого администратора или отдел информационных технологий настроить Ваш компьютер/устройство для обхода балансировщика нагрузки. Это устранит прерывания сессии и позволит ей оставаться активной.
|
TWS ДЛЯ ПК |
|||
|
РЕГИОН/ИНСТРУМЕНТ |
ОСНОВНОЙ/РЕЗЕРВ |
СЕРВЕР (ХОСТ) |
ПОРТЫ |
|
|
ОСНОВНОЙ |
|
|
|
РЕЗЕРВ |
|||
|
|
ОСНОВНОЙ |
|
|
|
РЕЗЕРВ |
|||
|
|
ОСНОВНОЙ |
|
|
|
РЕЗЕРВ |
|||
|
TWS АЗИЯ |
ОСНОВНОЙ |
4000 / 4001 |
|
|
РЕЗЕРВ |
|||
|
TWS АЗИЯ - КИТАЙ3 |
ОСНОВНОЙ |
4000 / 4001 |
|
|
РЕЗЕРВ |
mcgw1_hb1.ibllc.com.cn | ||
| TWS АВТО-ОБНОВЛЕНИЕ | ОСНОВНОЙ | 443 | |
|
НАВИГАТОР РИСКА |
ОСНОВНОЙ |
443 |
|
|
НАСТРОЙКИ ОБЛАКА TWS |
ОСНОВНОЙ |
443 |
|
|
IB CAM |
ОСНОВНОЙ |
4000 / 4001 |
|
|
ОТЧЕТЫ ДИАГНОСТИКИ |
ОСНОВНОЙ |
443 |
|
3. Шлюз выделен для счетов клиентов, прикрепленных к гонконгскому серверу, но физически подключающихся с материкового Китая.