How to install the TWS API Components on Mac / Unix
NOTE: If you have already agreed to the API License Agreement please start at Step 3 below.
Instructions
- Click directly on the button below to access the API software download page

- This will direct you to Interactive Brokers API License Agreement, please review it
- Once you have clicked "I Agree", refer to the Mac / Unix section to download the API Software version of your preference
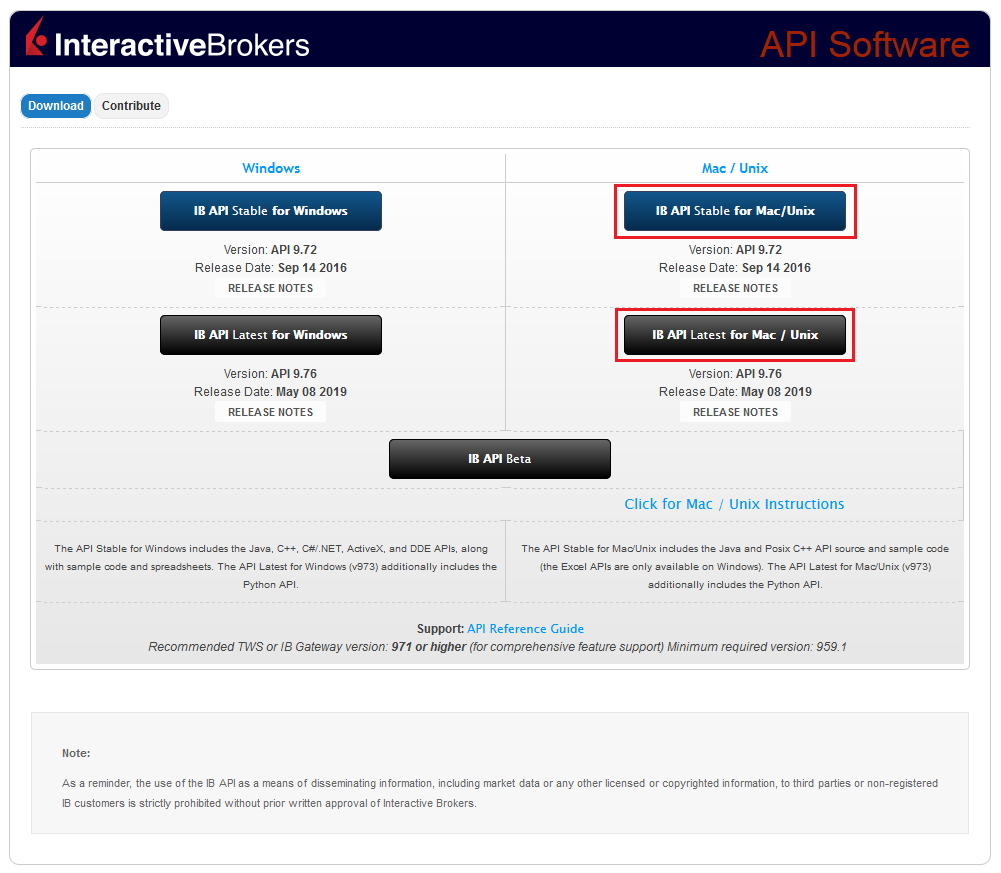
- This will download twsapi_macunix.n.m.zip to your computer
(where n and m are the major and minor version numbers respectively) - Open Terminal (Ctrl+Alt+T on most distributions)
(On Mac press Command+Space to launch Spotlight, then type terminal and press Return) -
Navigate to the directory where the installer has been downloaded (normally it should be the Download folder within your home folder) and confirm the file is present
$ cd ~/Downloads
$ ls
- Unzip the contents the installer into your home folder with the following command (if prompted, enter your password):
$ sudo unzip twsapi_macunix.n.m.zip -d $HOME/

- To access the sample and source files, navigate to the IBJts directory and confirm the subfolders samples and source are present
$ cd ~/IBJts
$ ls

Legacy Instructions - API Version ≤ 9.71
Note: IB only offers API Version 9.72+. In the event you already have an existing legacy version and need to install it, please refer to the directions below:
- locate the file twsapi_macunix.n.m.jar on your computer
(where n and m are the major and minor version numbers respectively.) - Open Terminal (Ctrl+Alt+T on most distributions)
(On Mac press Command+Space to launch Spotlight, then type terminal and press Return) - Navigate to the directory where the .jar file has been located (normally it should be the Download folder within your home folder) and confirm it is present
$ cd ~/Downloads
$ ls - Extract the contents of the .jar file into your home folder
$ jar xf twsapi_macunix.n.m.jar -d $ HOME/ - To access the sample and source files, navigate to the IBJts directory and confirm the subfolders samples and source are present
$ cd ~/IBJts
$ ls
How to Transfer the TWS Layout Settings via USB or Network Drive
Overview:
The TWS layout settings can be saved on a USB or Network Drive, in order to import them from the same or from a different computer / TWS session. This article outlines the needed steps.
Please click one of the links below, according to your scenario:
B. I want to save my TWS settings on a USB or Network Drive and import them to a session with a different user
A. I want to save my TWS settings on a USB or Network Drive and import them to a session with the same user
1. Log in the Trader Workstation with the user whose layout settings you would like to export.
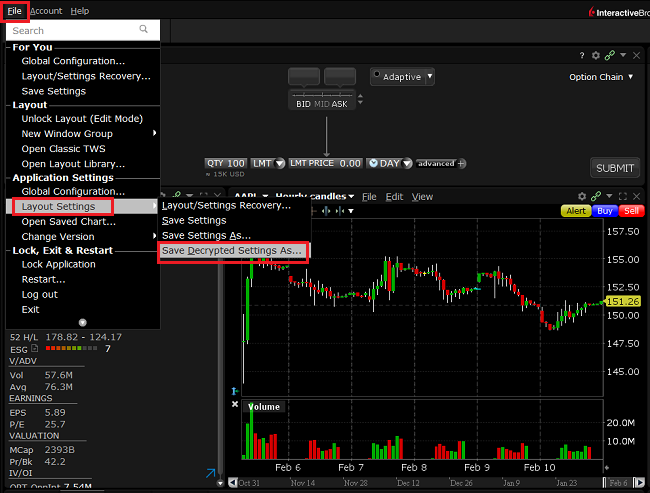
2. Click the top menu File > Layout Settings > Save Settings As...
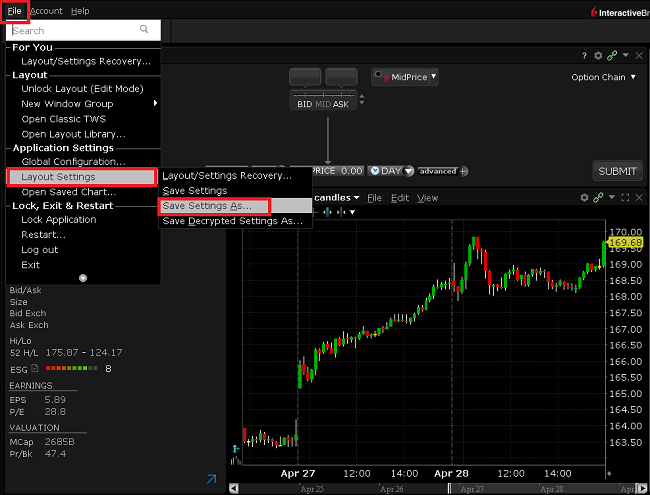
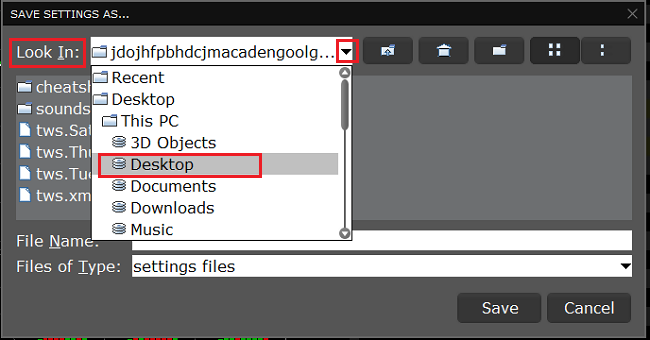
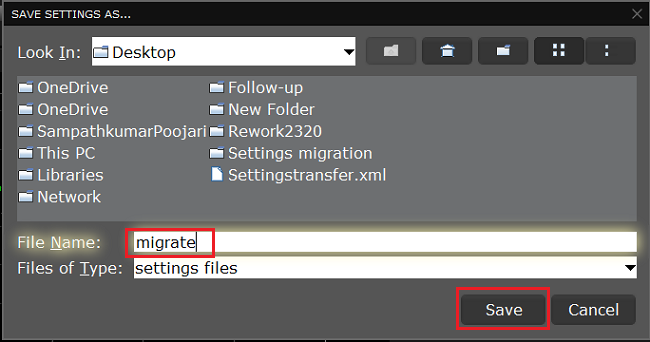
3. Expand the Look In drop-down and select where you want to save the file (e.g. USB or Network Drive). Use a file name which would be easy to identify (e.g. migrate) and click Save. The file will be saved with the extension '.xml'.
.png)
4. Proceed with the workflow, starting with step 5 in the following section.
B. I want to save my TWS settings on a USB or Network Drive and import them to a session with a different user
1. Log in the Trader Workstation with the user whose layout settings you would like to export.
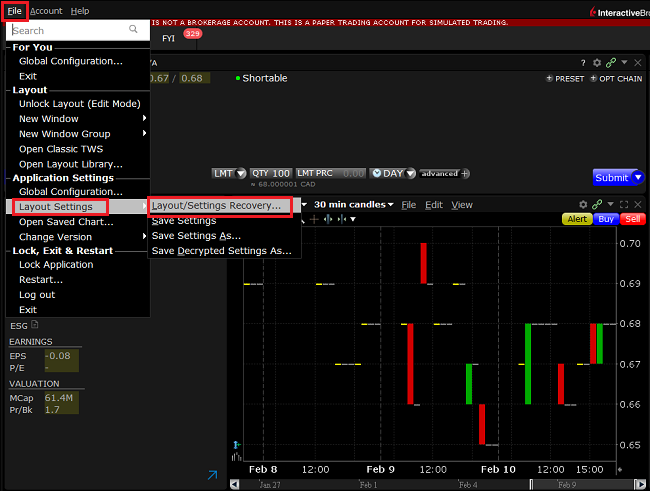
2. Click the top menu File > Layout Settings > Save Decrypted Settings As...
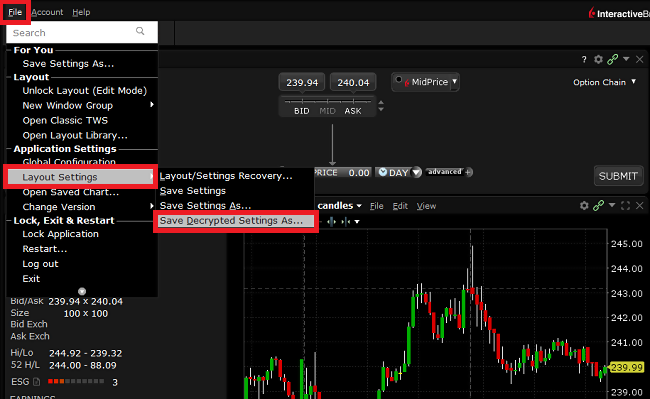
3. Take notice of the information about the file format and click Yes.

4. Expand the Look In drop-down and select where you want to save the file (e.g. USB or Network Drive). Use a file name which would be easy to identify (e.g. migrate) and click Save. The file will be saved with the extension '.xml'.
5. Close the TWS and log in again with the user which should import the layout (that can be a different computer).
6. Connect the USB or Network Drive to the computer.
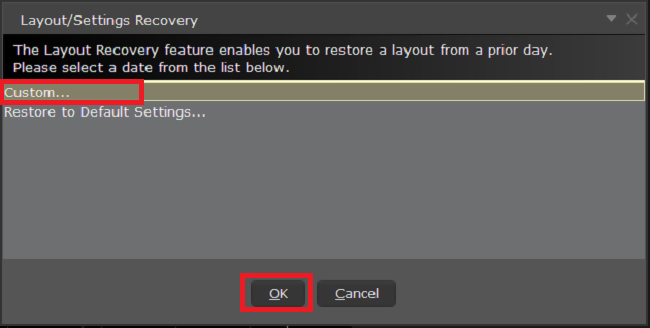
7. Click on the top menu File > Layout Settings > Layout/Settings Recovery...
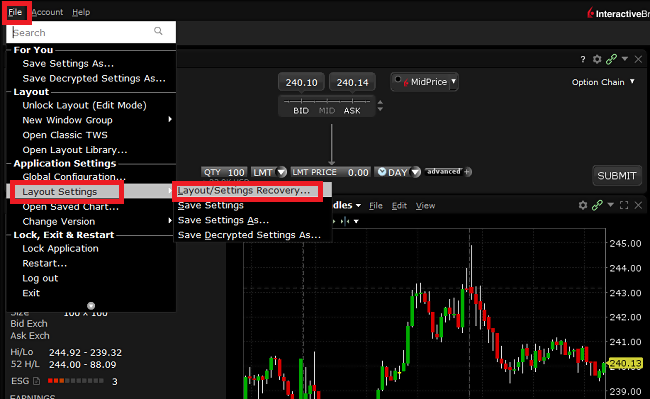
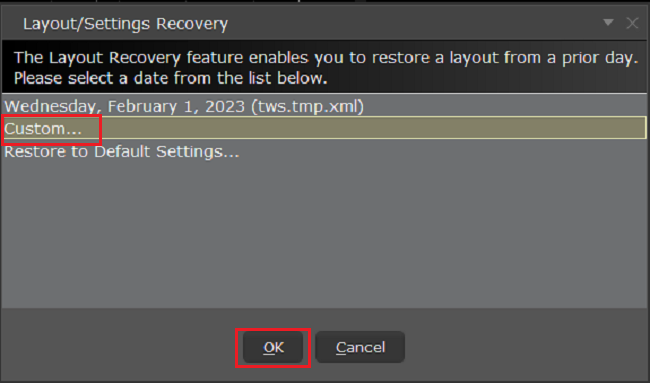
8. Select Custom... and click OK
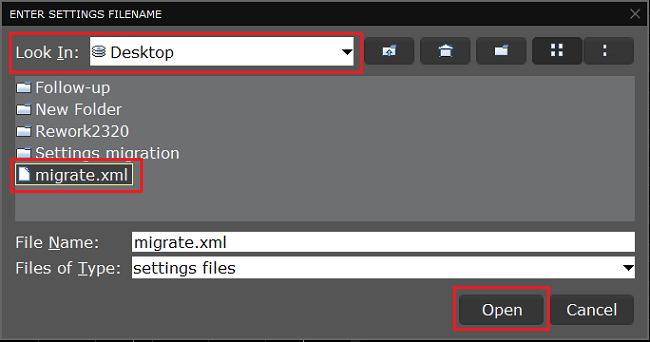
9. Expand the Look In drop-down and select the drive where you previously saved the TWS settings file (e.g. USB or Network Drive). Select the settings file (e.g. migrate.xml) and click Open.
.png)
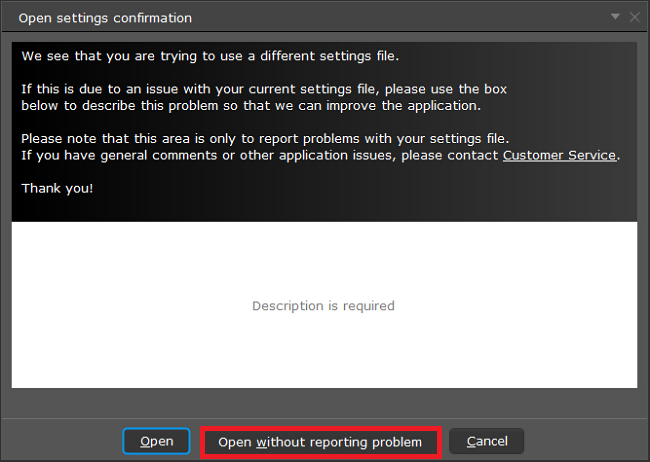
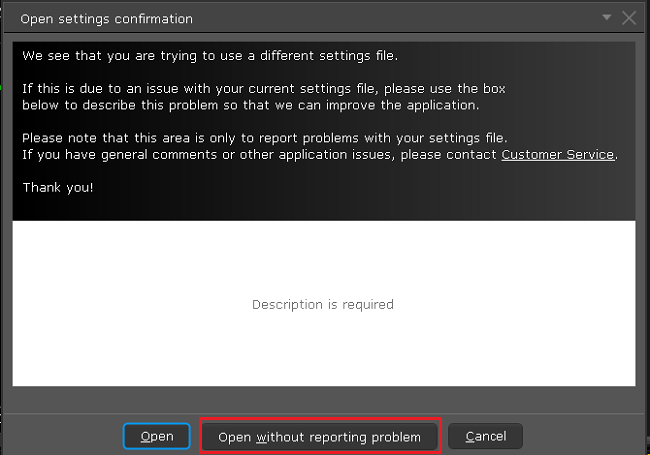
10. Click Open without reporting problem
11. Your TWS will automatically restart, applying the new layout settings.
Related articles
See KB3146 for instructions on overcoming the "Downloading settings from server failed" error
See KB2320 for instructions on transferring settings from one user to another
See KB2282 for instructions on how to transfer settings from one computer to another
How to Transfer TWS Settings from One User to Another
Overview:
Trader Workstation (TWS) layout settings files contains few sensitive details that are now being protected by encrypting them. Hence, you can only transfer your TWS settings from one user to another if you have a decrypted settings file from the primary user.
In this article, we will explain how to export your current TWS layout settings in decrypted format and load it on a different TWS session. You can use the same procedure to export layout settings of your Paper (Simulated) TWS and load it on your Live TWS (and vice versa).
Please follow the below steps to transfer your TWS layout settings from one user to another:
1. Log in to TWS with the user whose settings you would like to export
2. Navigate to the top menu File followed by Layout Settings > Save Decrypted Settings As...
3. Click Yes on the warning pop up

4. Open the Look In drop-down and select the folder (e.g. Desktop) where you want the decrypted settings file to be saved
5. Choose a name of your preference (e.g., migrate) and click Save. A pop-up will flash to inform you that the file has been written
6. Restart the TWS. Log in with the user which should import the layout settings
7. In the top left, click on File > Layout Settings > Layout/Settings Recovery
8. Select Custom and click OK
9. Open the Look In drop-down and select the location where you previously saved the decrypted settings file (step 5). Click Open
10. Click Open without reporting problem
11. Your TWS will automatically restart, loading the imported layout settings
References
See KB2323 for instructions on how to restore TWS settings from external storage
See KB2282 for instructions on how to transfer settings from one computer to another.
See KB3146 for instructions on how to overcome the "Download settings from server failed" error
How to install MobileTWS on BlackBerry OS10
Background:
Currently, Interactive Brokers does not offer a native IBKR Mobile app for the Blackberry 10 Operating System. Due to a recent partnership between Amazon and Blackberry, clients who own a Blackberry device running Blackberry 10 OS can install the Android version of the IBKR Mobile app directly from the Amazon Store.
Blackberry 10 OS Devices:
- Q5, Z3, Leap, Classic, Passport, Q10, Z10, Z30, P'9982, P'9983
*Please notice that these devices have limited hardware capabilities and this could negatively affect the performance of the IBKR Mobile app.
Installation
You can download the IBKR Mobile app on your Blackberry phone directly from the Amazon Appstore.
How to install IBKR Mobile from the Amazon App Store:
- On your Blackberry phone open the Amazon App Store
 app.
app. -
Enter your Amazon e-mail and password, and tap Sign in.
(If you don't have an Amazon account, tap Create a new Amazon account.)
-
Tap on the search bar at the top, type IBKR Mobile then tap Search.

-
Tap on IBKR Mobile from the search results and install.

5. Once installed, tap on the IBKR Mobile app from one of your home screens to launch it

How to transfer TWS settings from one computer to another
Overview:
This article applies to:
- Platform(s): Windows, Mac, Linux
- TWS Build(s): Build 959 and Above
Background:
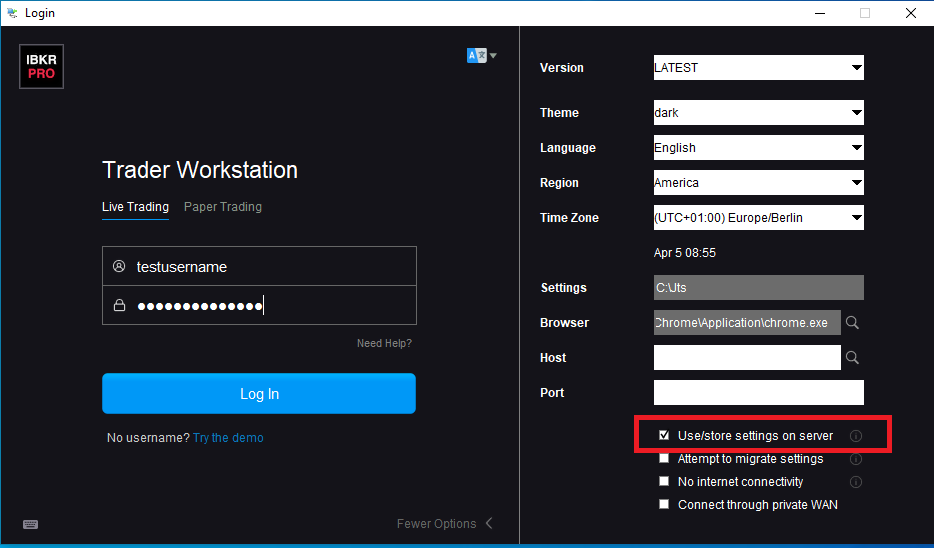
The 'Store Settings on Server' feature stores the Trader Workstation (TWS) settings/configuration in the cloud and retrieve them at anytime from another computer. This allows you to transfer settings from the same user on two different machines, but not between different accounts/users.
How to upload your TWS settings to the server:
To transfer settings from one computer to another for the same username you will need to enable the option Use/store settings on server:
1. On the computer which currently has your settings, on the lower right of the login window, click on More Options >
2. Make sure the Use/store settings on server option is unchecked and login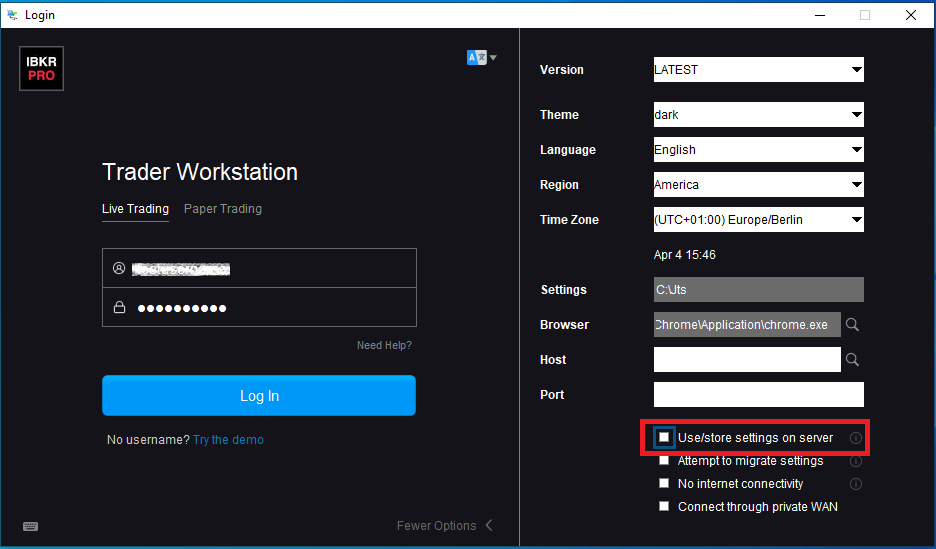
3. Once you are logged in, enable this function:
- If you are using the Classic layout, navigate to Edit >> Global Configuration >> Lock and Exit and check the box Use store settings on server
- If you are using the Mosaic layout navigate to File >> Global Configuration >> Lock and Exit and check the box Use store settings on server
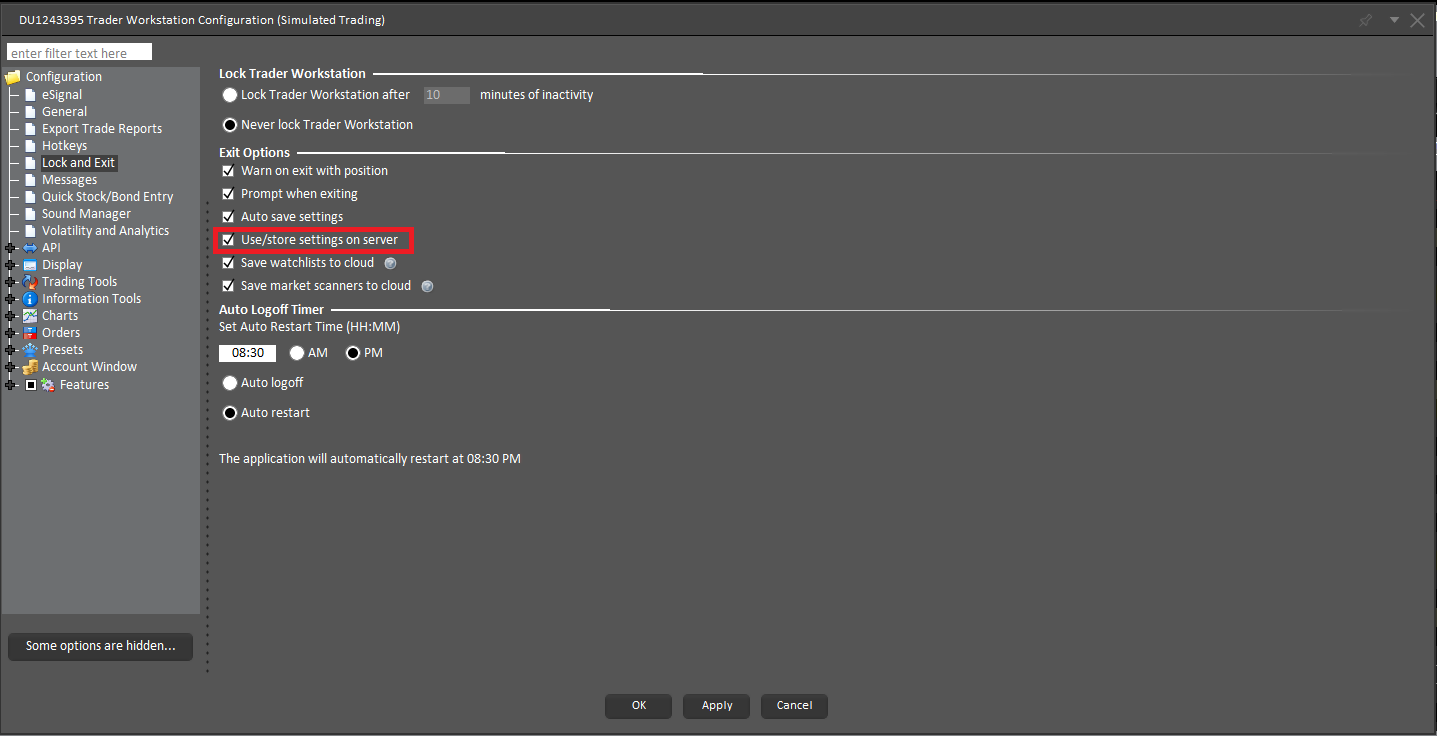
4. Select Apply and OK.
5. Click on File -> Save Settings.
6. To Exit the application navigate to File and Exit.
IMPORTANT NOTE: The above operation will only save one copy of the TWS settings on the server. The serve does not store any backup copies.
How to download your TWS settings from the server:
On any computer (on which you want to use the same settings as above): Login with the Use/store settings on server option checked on the login window. This will download the settings, which you previously saved on our server.
Related articles
See KB3146 for instructions on how to overcome the "Downloading settings from server failed" error
See KB2323 for instructions on how to restore TWS settings from external storage
See KB2320 for instructions on transferring settings from one user to another
Financial Advisor How To: Linking Related Client Accounts
Overview:
Account linkage provides account holders who maintain multiple accounts under a single advisor, the ability to group the accounts together under a single user name. The benefits of account linking include the following:
- The ability to log into all accounts via a single user name and password;
- Account accessed using a common security device;
- Activity fee minimums, when applicable, are determined based on commissions consolidated across the linked accounts;
- Consolidated reporting of accounts.
While linking may be performed by the client, this article outlines the steps by which an advisor may link accounts on behalf of the client
Steps:
1. Linkage begins by logging into Account Management at the master account level and selecting the Manage Clients, Accounts and then Link Client Accounts menu options.
.jpg)
2. You will then be provided with a drop down list of client which are eligible to be linked. While multiple clients may be linked in a given session, the linkage steps must be completed for a given client before proceeding to another.
.jpg)
3. After selecting the client to be linked, a list of all of the client's accounts that are eligible to be linked will be presented. Here, you will be prompted to specify which of the user names is to be retained for future account access. Once the linkage process has been completed, all other user names will be deactivated.
.jpg)
4. Next you will be presented with the Account Information page where confirmation of the client's personal information will be performed. In the event the client maintains information which differs among accounts (e.g., residential address), you will be prompted to select that which is accurate and is to be retained following completion of linkage.
.jpg)
5. Next, select any or all of the standing banking instructions which will be retained.
.jpg)
6. Confirmation of the linkage request is then provided.
.jpg)
IMPORTANT NOTES:
- You must select the client account with the highest level security device.
- Once the accounts are linked, the unique usernames and passwords for the accounts to be linked with this account will no longer function. The surviving username and password associated with the account will function for all linked accounts.
- Interactive Brokers will link these accounts on Fridays.
- Once the accounts are linked, the security devices for the accounts to be linked with this account will no longer function and the device associated with this account will function for all linked accounts. Those device do not need to be returned to IB, as per KB975
Comment demander une Digital Security Card+ (DSC+) de remplacement
Overview:
Les étapes ci-dessous sont nécessaires pour :
- Remplacer une Digital Security Card+ qui a été perdue, volée ou ne fonctionne plus
- Demander une Digital Security Card+ avec votre appareil d'accès sécurisé actuel (si vous êtes une nouveau client ou un client existant ayant un capital supérieur à 1 000 000 $ ou équivalent)
Background:
1. Informer le Service clientèle IBKR- Contactez le Service clientèle IBKR pour obtenir un accès temporaire à votre compte. Ce service ne peut être fournit que par téléphone et nécessite la vérification de l'identité du détenteur du compte, comme indiqué dans la base de connaissances IBKR.
2. Obtenir une carte de codes de sécurité en ligne - Activez votre carte de codes de sécurité en ligne, qui offre une meilleure protection et les fonctionnalités complètes du Portail Client pour une période de 21 jours. Veuillez consulter la base de connaissances IBKR pour plus d'informations sur cette étape.
3. Demander la DSC+ de remplacement - Quand l'activation de la carte de codes de sécurité est terminée, veuillez rester dans la section Système de connexion sécurisé du Portail Client pour commander votre nouvelle DSC.
Demander une DSC+
1. Cliquez sur le bouton Demander un appareil physique.
.png)
2. L'adresse de livraison sera affichée sur l'écran d'information de l'appareil. Si votre adresse n'est plus à jour ou invalide, vous pouvez la changer en cliquant sur Changer l'adresse, puis suivez les instructions. Si vous n'avez pas besoin de mettre à jour votre adresse, veuillez passer à l'étape 3..png)
3. Saisissez un Soft PIN1 à quatre caractères pour votre DSC+. Assurez-vous de vous souvenir du PIN car il sera requis pour activer et faire fonctionner votre appareil. Vous pouvez changer le compte où la caution de 20 USD est retenue, si et quand applicable2. Complétez cette étape en cliquant sur Poursuivre..png)
4. Le système affichera un récapitulatif de votre choix. Veuillez vous assurer de l'exactitude des informations. Si besoin, vous pouvez effectuer des changements en cliquant sur le bouton blanc Retour sous le champ d'informations (et non le bouton retour de votre navigateur), sinon vous pouvez envoyer la demande en cliquant sur Poursuivre.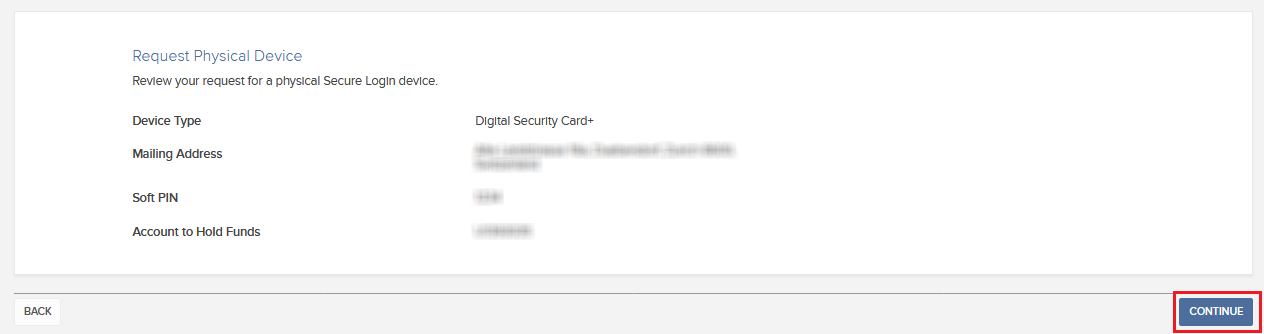
5. Vous recevrez une confirmation finale contenant la date d'envoi estimée3. Cliquez sur Ok pour terminer la procédure.
1. Veuillez consulter la base de connaissances IBKR pour plus d'informations sur le PIN.
2. Le code de sécurité et l'envoi sont gratuits. Toutefois, lors de la commande de votre appareil, nous gèlerons un faible montant dans votre fonds (20 USD). Si votre appareil est perdu, intentionnellement endommagé, volé ou si vous fermez votre compte sans le rendre à IBKR, nous utiliserons ce montant en compensation de la perte du matériel. Dans tout autre cas, la retenue sera rendue quand l'appareil sera rendu à IBKR. Plus de détail dans la base de connaissances IBKR.
3. Pour des raisons de sécurité, l'appareil de remplacement s'activera automatiquement sous trois semaines, à la date d'envoi. IBKR vous informera à l'approche de la date d'activation automatique puis à son imminence.
Références - Base de connaissances IBKR
- Consultez KB1131 pour une présentation du Système d'accès sécurisé
- Consultez KB2636 pour plus d'informations et procédures concernant les dispositifs de sécurité
- Consultez KB2481 pour le partage de l'appareil de connexion sécurisée entre deux ou plus d'utilisateurs
- Consultez KB2545 pour la procédure d'adhésion complète au Système d'accès sécurisé
- Consultez KB975 pour savoir comment retourner votre appareil de connexion sécurisée à IBKR
- Consultez KB2260 pour la procédure d'activation de l'authentification IB Key via IBKR Mobile
- Consultez KB2895 pour plus d'informations sur le système d'authentification à double facteur (M2FS)
- Consultez KB1861 pour plus d'informations sur les frais liés aux appareils de connexion sécurisée
- Consultez KB69 pour plus d'informations sur la validité des codes de sécurité temporaires
Welcome to Interactive Brokers
Overview:
Now that your account is funded and approved you can start trading. The information below will help you getting
started as a new customer of Interactive Brokers.
- Your Money
- Configure your account to trade
- How to trade
- Trade all over the World
- Five points to enrich your IB experience
1. Your Money
Deposits & Withdrawals General Info. All transactions are administered through your secure Account Management
Deposits
First, you create a deposit notification through your Account Management > Funding > Fund Transfers > Transaction Type: “Deposit” How to create a deposit notification. The second step is to instruct your Bank to do the wire transfer with the bank details provided in your Deposit Notification.
Withdrawals
Create a withdrawal instruction via your secure Account Management > Funding > Fund Transfers > Transaction Type: "Withdrawals" How to create a withdrawal instruction
If you instruct a withdrawal over the Withdrawal limits, it will be considered an exceptional withdrawal and we will therefore need to match bank account holder and IB account. If destination bank account has been used for a deposit, withdrawal will be processed; otherwise, you must contact customer service and provide the documents needed.
Troubleshooting
Deposits: My bank sent the money but I do not see it credited into my IB account. Possible reasons:
a) A fund transfer takes 1-4 business days
b) A Deposit Notification is missing. You have to create it via your Account Management and send a ticket to Customer Service
c) Amending details are missing. Your name or IB account number is missing in the transfer details. You have to contact your bank and ask for the full amending details.
d) ACH initiated by IB is limited to 100k USD in a 7 business period. If you opened a Portfolio Margin account where the initial requirement is 110k, a wire deposit might be the better deposit option to reduce wait time for your first trade. If selecting ACH a wait time of almost 2 weeks or a temporary downgrade to RegT can be possible solutions.
Withdrawals: I have requested a withdrawal but I do not see the money credited to my bank account. Possible reasons:
a) A fund transfer takes 1-4 business days
b) Rejected. Over the max it can be withdrawn. Please check your account cash balance. Note that for regulatory requirements, when the funds are deposited, there is a 3 day holding period before they can be withdrawn.
c) Your bank returned the funds. Probably because receiving bank account and remitting bank account names do not match.
2. Configure your account to trade
Difference between Cash and Margin accounts: If you have chosen the FastTrack application, by default your account type is a cash account with US stock permission. If you would like to get leverage and trade on margin, here how to upgrade to a RegT Margin account
Trading Permissions
In order to be able to trade a particular asset class in a particular country, you need to get the trading permission for it via your Account Management. Please note that trading permissions are free. You might however be asked to sign risk
disclosures required by local regulatory authorities. How to Request Trading Permissions
Market Data
If you want to have market data in real-time for a particular product/exchange, you need to subscribe to a market data package charged by the exchange. How to subscribe to Market data
The Market data assistant will help you choose the right package. Please watch this Video explaining how it works.
Customers have the option to receive delayed market data for free by clicking the Free Delayed Data button from a non-subscribed ticker row.
Advisor Accounts
Have a look at the user guide getting started as advisors. Here you see how to create additional users to your advisor account and grant them access and much more.
3. How to trade
The Trader's University is the place to go when you want to learn how to use our Platforms. Here you will find our webinars, live and recorded in 10 languages and tours and documentation about our various Trading Platforms.
Trader Workstation (TWS)
Traders who require more sophisticated trading tools can use our market maker-designed Trader Workstation (TWS), which optimizes your trading speed and efficiency with an easy-to-use spreadsheet interface, support for more than 60 order types, task-specific trading tools for all trading styles, and real-time account balance and activity monitoring. Try the two models
TWS Mosaic: for intuitive usability, easy trading access, order management, watchlist, charts all in one window or
TWS Classic: the Advanced Order Management for traders who need more advanced tools and algos.
General Description and Information / Quick start guide / Usersguide
Interactive Tours: TWS Basics / TWS configuration / TWS Mosaic
How to place a trade: Video Classic TWS / Video Mosaic
Trading tools: General Description and Information / Users guide
Requirements: How to install Java for Windows / How to install Java for MAC / Port 4000 and 4001 needs to be open
Login TWS / Download TWS
WebTrader
Traders who prefer a clean and simple interface can use our HTML-based WebTrader, which makes it easy to view market data, submit orders, and monitor your account and executions. Use the latest WebTrader from every browser
Quick Start Guide / WebTrader User's Guide
Introduction: Video WebTrader
How to place a Trade: Video WebTrader
Login WebTrader
MobileTrader
Our mobile solutions allow you to trade your IB account on the go. The mobileTWS for iOS and the mobileTWS for BlackBerry are custom-designed for these popular models, while the generic MobileTrader supports most other Smart phones.
General Description and Information
Order Types Order Types available and Description / Videos / Tour / Users guide
Paper Trading General Description and Information / How to get a Paper Trading Account
Once your paper account is created, you can share the market data of your real account with your paper trading account: Account Management > Manage Account > Settings > Paper trading
4. Trade all over the World
IB accounts are multi-currency accounts. Your account can hold different currencies at the same time, this allows you to trade multiple products around the world from a single account.
Base Currency
Your base currency determines the currency of translation for your statements and the currency used for determining margin requirements. Base currency is determined when you open an account. Customers may change their base currency at any time through Account Management.
We do not automatically convert currencies into your Base currency
Currency conversions must be done manually by the customer. In this video you can learn how to do a currency conversion.
In order to open a position denominated in a currency that you do not have in your account, you have two possibilities:
A) Currency conversion.
B) IB Margin Loan. (Not available for Cash Accounts)
Please see this course explaining the mechanics of a foreign transaction.
5. Five points to enrich your IB experience
1. Contract Search
Here you will find all our products, symbols and specifications.
2. IB Knowledge Base
The Knowledge Base is a repository of glossary terms, how-to articles, troubleshooting tips and guidelines designed to assist IB customers with the management of their IB accounts. Just enter in the search button what you are looking for and you will get the answer.
3. Account Management
As our trading platforms give you access to the markets, the Account Management grants you access to your IB account. Use Account Management to manage account-related tasks such as depositing or withdrawing funds, viewing your statements, modifying market data and news subscriptions, changing your trading permissions, and verifying or changing your personal information.
Log In Account Management / AM Quick Start Guide / AM Users Guide
4. Secure Login System
To provide you with the highest level of online security, Interactive Brokers has implemented a Secure Login System (SLS) through which access to your account is subject to two-factor authentication. Two-factor authentication serves to confirm your identity at the point of login using two security factors: 1) Something you know (your username and password combination); and 2) Something you have (an IB issued security device which generates a random, single-use security code). As both knowledge of your username/password and physical possession of the security device are required to login to your account, participation in the Secure Login System virtually eliminates the possibility of anyone other than you accessing your account.
How to Activate your Security Device / How to Obtain a Security Code Card / How to return Security device
In case you forgot your password or lost your security code card, please call us for immediate assistance.
5. Statements and Reports
Easy to view and customize, our statements and reports cover all aspects of your Interactive Brokers account. How to view an Activity Statement