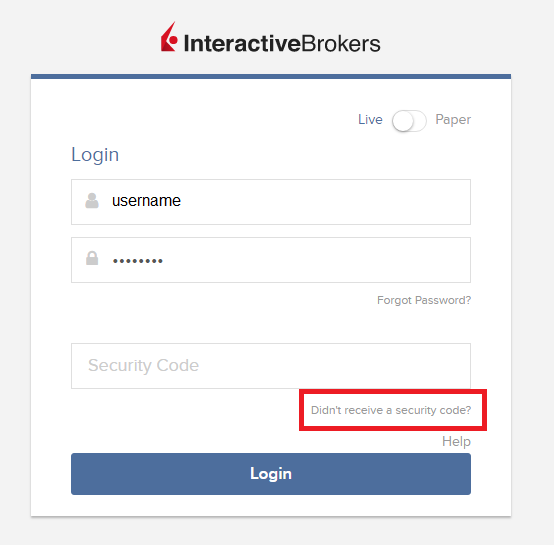
Je ne reçois pas les SMS d'IBKR sur mon téléphone portable
Background:
Une fois que votre numéro de portable a été vérifié dans le Portail Client, vous devriez recevoir immédiatement un SMS d'IBKR directement sur votre téléphone portable. Cet article vous fournira les étapes de résolution de problèmes si vous ne recevez pas ces messages.
1. Activer l'authentification mobile IBKR (IB Key) en tant qu'appareil de sécurité à 2 facteurs
Pour ne pas dépendre des problèmes liés à votre opérateur et avoir une bonne réception de tous les messages d'IBKR, nous vous recommandons d'activer l'authentification mobile IBKR (IB Key) sur votre smartphone.
L'authentification sur smartphone avec IB Key, disponible sur notre appli IBKR Mobile sert d'appareil de sécurité à 2 facteurs. Ainsi, vous n'aurez plus besoin de recevoir les codes d'authentification par SMS lors de la connexion à votre compte IBKR.
L'appli IBKR Mobile est actuellement disponible pour les smartphones qui utilisent les systèmes d'exploitation Android ou iOS. Vous pouvez accéder aux consignes d’installation, d’activation et d’utilisation ici :
2. Redémarrer votre téléphone
Éteignez complètement votre appareil et rallumez-le. Cette mesure est généralement suffisante pour recevoir les messages.
Veuillez noter que, dans certains cas, comme en cas d'utilisation de votre téléphone en dehors de la couverture de votre opérateur (à l'étranger), vous pouvez ne pas recevoir tous les messages.
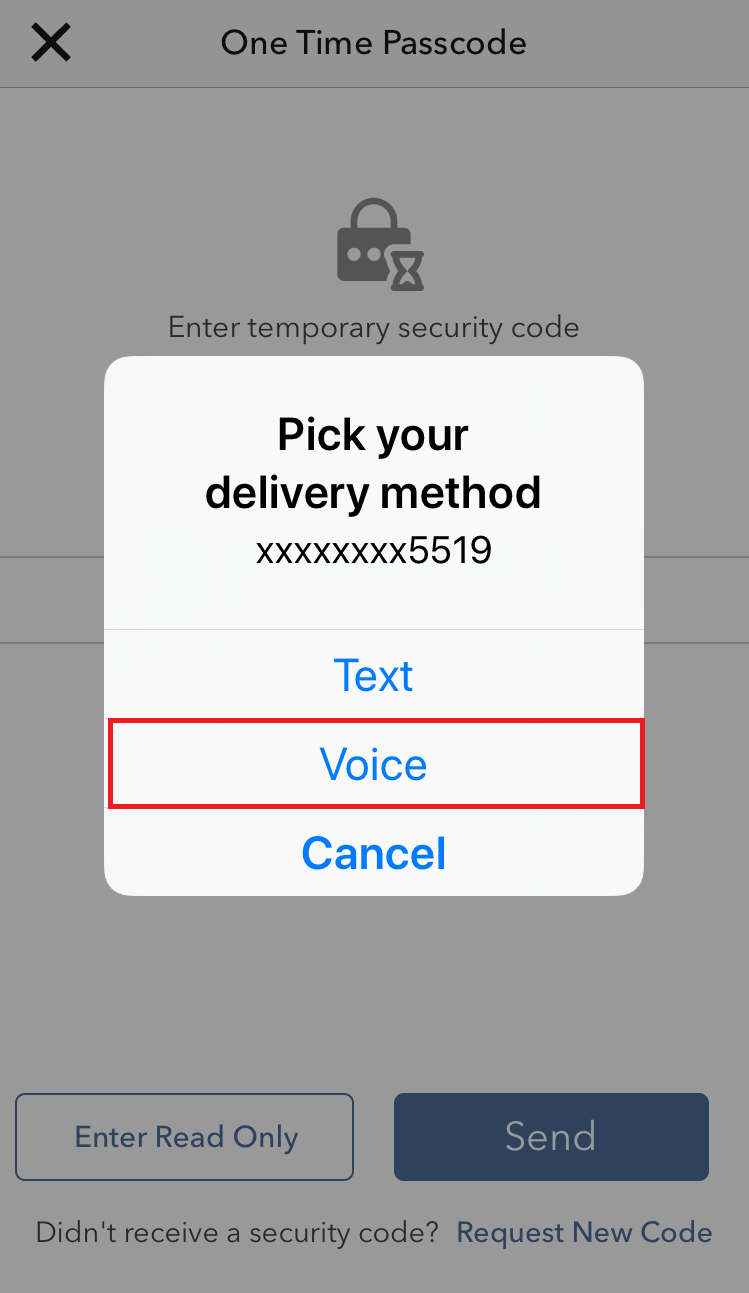
3. Utiliser l'appel téléphonique
Si vous ne recevez pas de code d'authentification après avoir redémarré votre téléphone, vous pouvez choisir « Appel » à la place. Vous recevrez ensuite votre code d'authentification par un rappel automatique. Pour plus d'informations sur l'appel téléphonique : IBKB 3396.
4. Vérifier que votre opérateur ne bloque pas les SMS de la part d'IBKR
Certains opérateurs tJléphoniques bloquent automatiquement les SMS d'IBKR car ils sont reconnus à tort comme spam ou contenu indésirable. Selon votre zone géographique, voici les services que vous pouvez contacter pour vérifier si un filtre SMS est en place pour votre numéro de téléphone :
Aux États-Unis :
- Tous les opérateurs : Federal Trade Commission Registry
- T-Mobile : les paramètres de blocage des messages sont disponibles sur le site de T-Mobile ou directement sur l'appli T-Mobile
En Inde :
- Tous les opérateurs : Telecom Regulatory Authority of India
En Chine :
- Veuillez appeler directement votre opérateur téléphonique pour vJrifier s'ils bloquent les messages IBKR
Références :
- Comment se connecter en utilisant l'authentification par SMS
- Présentation du système d'accès sécurisé
- Informations et procédures concernant les dispositifs de sécurité
- Authentification IBKR Mobile
Comment partager un appareil de sécurité
Overview:
IBKR permet aux clients de maintenir plusieurs noms d'utilisateurs pour un seul compte ou sur plusieurs comptes différents qu'ils contrôlent. Les clients ne souhaitant pas avoir plusieurs appareils de sécurité physiques peuvent choisir de grouper et partager un seul appareil pour tous les utilisateurs. Les prérequis et la procédure de partage des appareils sont indiqués ci-dessous.
Remarque : Les clients utilisant l'Authentification IBKR Mobile (IB Key) ne doivent pas utiliser la présente procédure de partage d'appareil car l'authentification IBKR Mobile (IB Key) permet à plusieurs utilisateurs d'être activés directement depuis l'appli IBKR Mobile (Authentifier -> Ajouter un utilisateur).
Background:
Prérequis
La possibilité de partager un appareil physique sera accordée seulement si TOUTES les conditions ci-dessous sont respectées :
a) Les utilisateurs participants soit appartiennent à la même société soit à différentes société mais avec les mêmes données d'identification (date de naissance, nationalité, pays de résidence légale, type de document d'identification et numéro ou SSN pour les résidents ou citoyens des États-Unis).
b) Les utilisateurs participants n'ont PAS d'appareil de sécurité temporaire (code temporaire, carte de codes de sécurité en ligne) qui leur sont actuellement attribué.
c) L'appareil physique offrant le plus haut niveau de protection doit être partagé. Si tous les appareils proposent le même niveau de sécurité, ils peuvent tous être utilisés. Vérifiez le niveau de sécurité de votre appareil dans le tableau ci-dessous
|
Niveau de sécurité |
Nom de l'appareil |
Image |
| Les plus élevés | Digital Security Card+ (DSC+) | 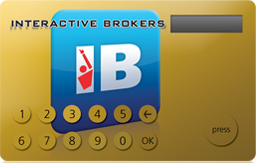 |
| Les moins élevés | Carte de codes de sécurités (carte SLS) |  |
Procédure :
1. Parmi les choix possibles, identifiez l'appareil offrant le niveau de sécurité le plus élevé ainsi que l'utilisateur détenant cet appareil. Nous appellerons cet utilisateur le titulaire de l'appareil
2. Connectez-vous au Portail Client avec l'utilisateur demandeur (PAS le titulaire de l'appareil)
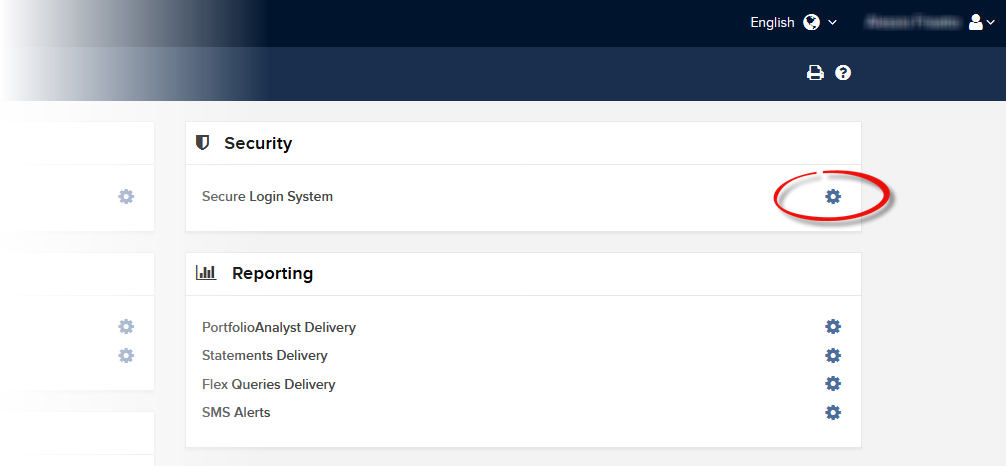
3. Cliquez sur l'icône du menu en haut à gauche puis sélectionnez Paramètres puis Paramètres utilisateur
(1).png)
4. Cliquez sur la roue dentée (Paramètres) à côté de Système d'accès sécurisé (SLS)
5a. Si votre utilisateur n'a pas d'appareil actif, le système affichera le menu d'inscription au SLS. Sélectionnez « J'ai déjà accès à un appareil d'accès sécurisé sous un différent nom d'utilisateur » et cliquez sur Poursuivre
.png)
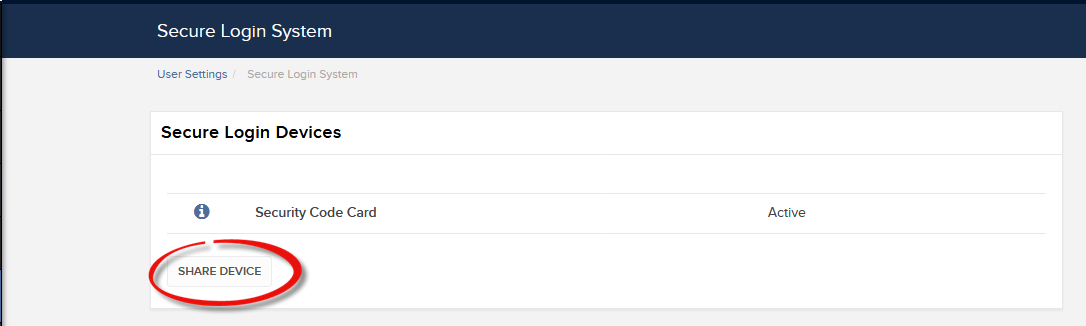
5b. Dans tous les autres cas, le système affichera la liste d'appareils. Cliquez sur Partager l'appareil pour continuer
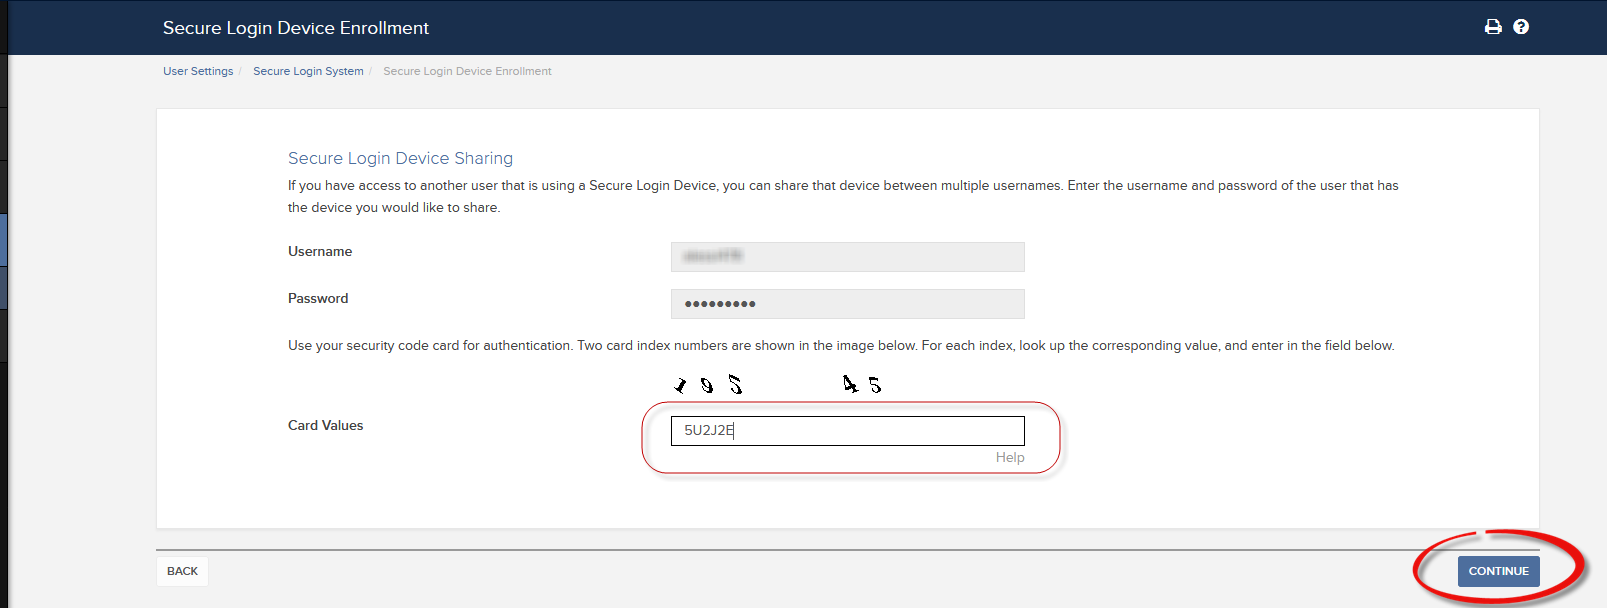
6. Saisissez les identifiants du titulaire de l'appareil que vous avez identifié au point 1. et cliquez sur Poursuivre.
.png)
7. Selon l'appareil SLS qui sera partagé, le système affichera un élément de sécurité (un code Challenge ou des chiffres). Actionnez l'appareil SLS et, avec l'élément de sécurité fournit par le système, générez un code de réponse. Saisissez le code de réponse dans le champ correspondant et cliquez sur Poursuivre.
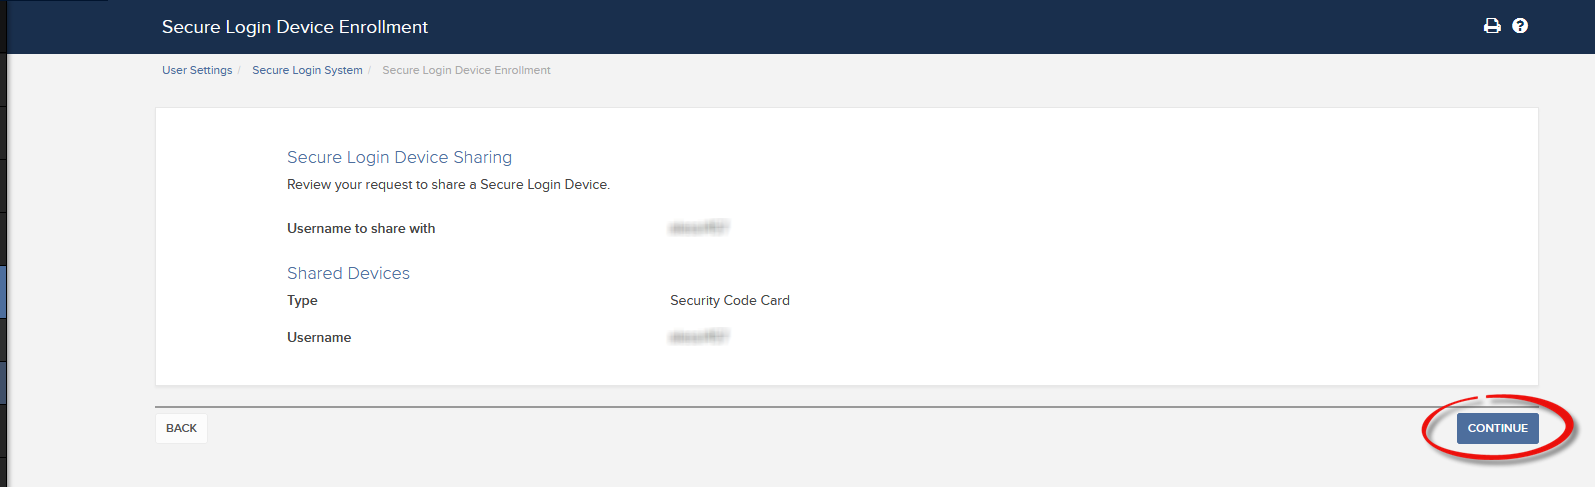
8. Quand vous aurez vérifié l'exactitude des informations saisies, cliquez sur Poursuivre.
9. Le système affichera le statut de votre demande (voir la remarque a. pour plus d'informations). Cliquez sur OK pour finaliser la procédure.
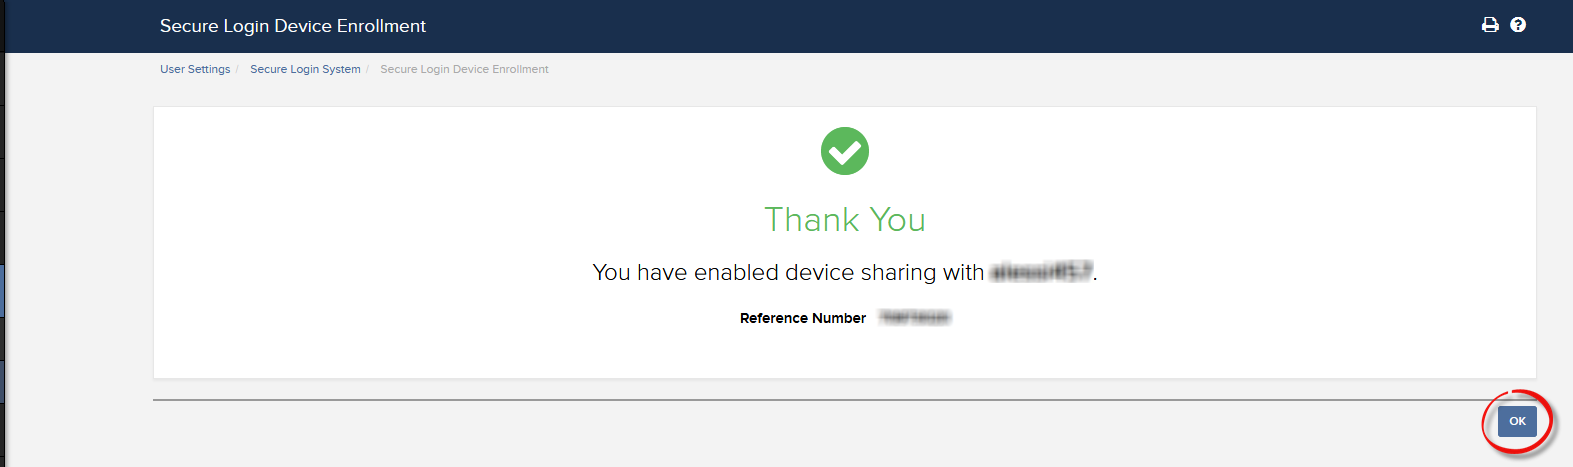
a. Dans la majorité des cas, votre demande de partage sera acceptée, traitée et mise en place automatiquement et immédiatement. Si l'approbation par notre service de Conformité est nécessaire, votre demande restera en attente jusqu'à ce que cette étape soit terminée.
b. Quand la demande de partage aura été traitée, vous pouvez conserver les appareils superflus en lieu sûr. À l'avenir, vous pourrez décider d'annuler le partage d'appareil et les réactiver. Si vous pensez ne pas avoir besoin de les conserver, vous pouvez nous les renvoyer (uniquement la DSC+) en suivant les instructions sur cette page :
c. Retrouvez ci-dessous les messages d'erreur les plus fréquents et leurs causes :
- Appareil moins sécurisé : Cette erreur est affichée si vous choisissez de partager l'appareil le moins sécurisé. Veuillez identifier l'appareil le plus sécurisé et partager celui-ci.

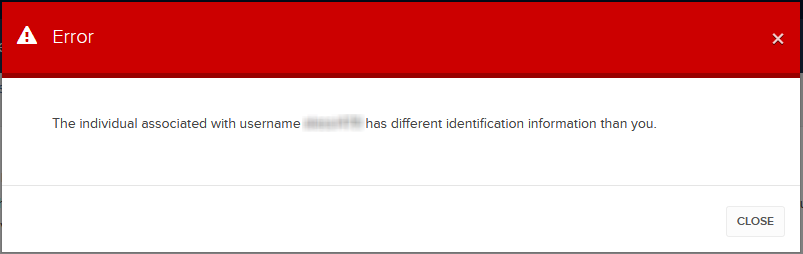
- Informations d'identification différentes :
Cette erreur est affichée si les données d'identification de l'entité/des individus prenant part au partage ne sont pas identiques. Si les utilisateurs appartiennent à différentes entités/individus, veuillez noter que le partage de code de sécurité ne sera PAS possible.
Si les utilisateurs appartiennent bien à la même entité/individu, la différence peut être due , par exemple, à un document d'identification enregistré qui n'est plus à jour. Dans ce cas, veuillez contacter notre Service clientèle pour rectifier les données.
Références :
- Présentation générale du système d'accès sécurisé : KB1131 or ibkr.com/sls
- Système d'authentification multiple à double facteur (M2FS): KB2895
- Comment partager l'appareil de connexion sécurisée entre deux (ou plus) utilisateurs : KB2481
- Comment revenir au Système d'accès sécurisé : KB2545
- Considérations de sécurité à la suite du désengagement au Système d'accès sécurisé : KB1198
- Quels sont les frais liés aux appareils de sécurité ? KB1861
- Quelles sont les solutions aux problèmes de connexion au Portail Client : KB1132
- Quelles sont les solutions aux problèmes de connexion aux plateformes de trading : KB1133
Comment utiliser Voice callback pour recevoir les codes d'authentification de connexion
Background:
Si vous avez activer les SMS comme méthode d'authentification à 2 facteurs, vous pouvez utiliser Voice callback pour recevoir les codes d'authentification de connexion. Cet article vous donnera les étapes à suivre pour sélectionner Voice callback en vous connectant à nos plateformes.
Comment utiliser Voice callback
Vous pouvez sélectionner Voice si vous ne recevez pas votre code d'authentification de connexion. Vous recevrez ensuite votre code d'authentification par un rappel automatique. Suivez les instructions ci-dessous en fonction de la plateforme que vous souhaitez utiliser.
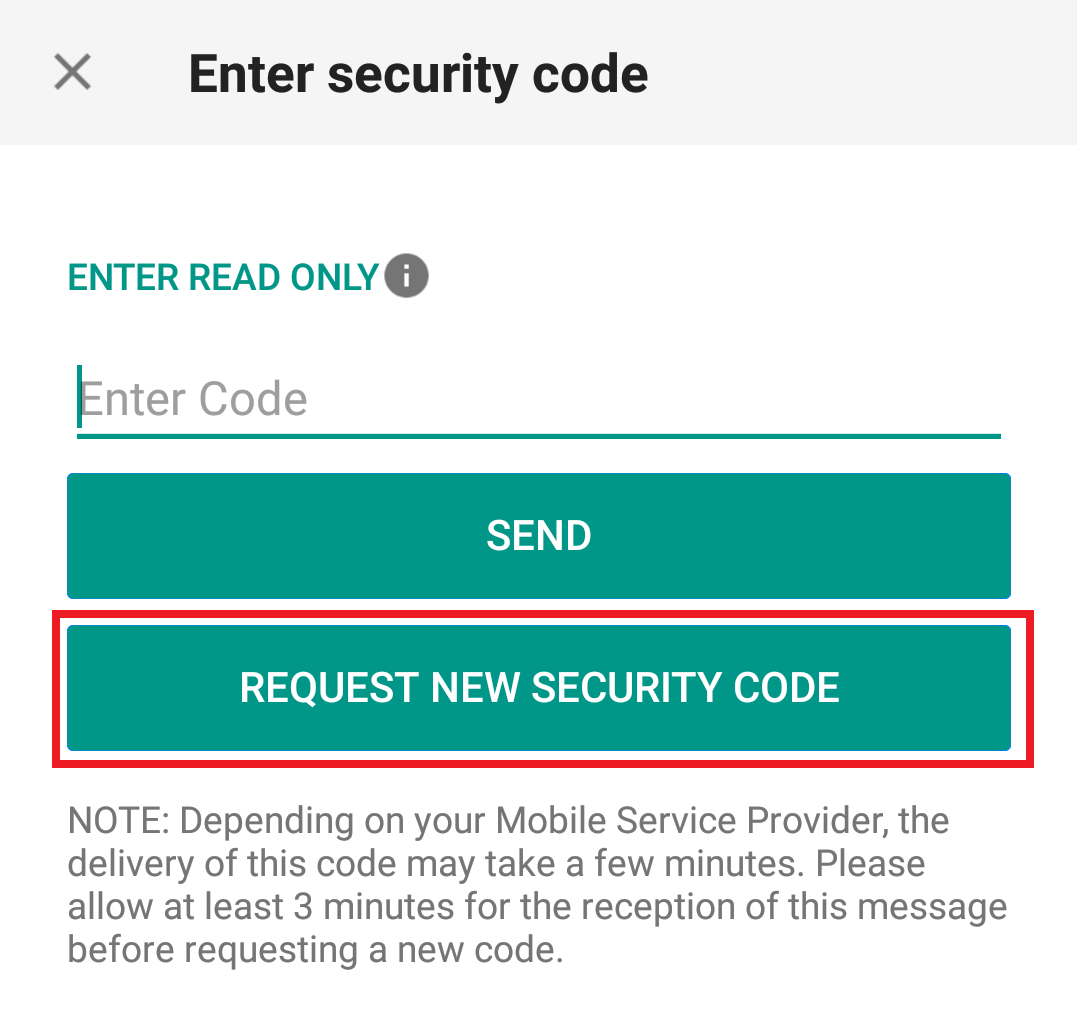
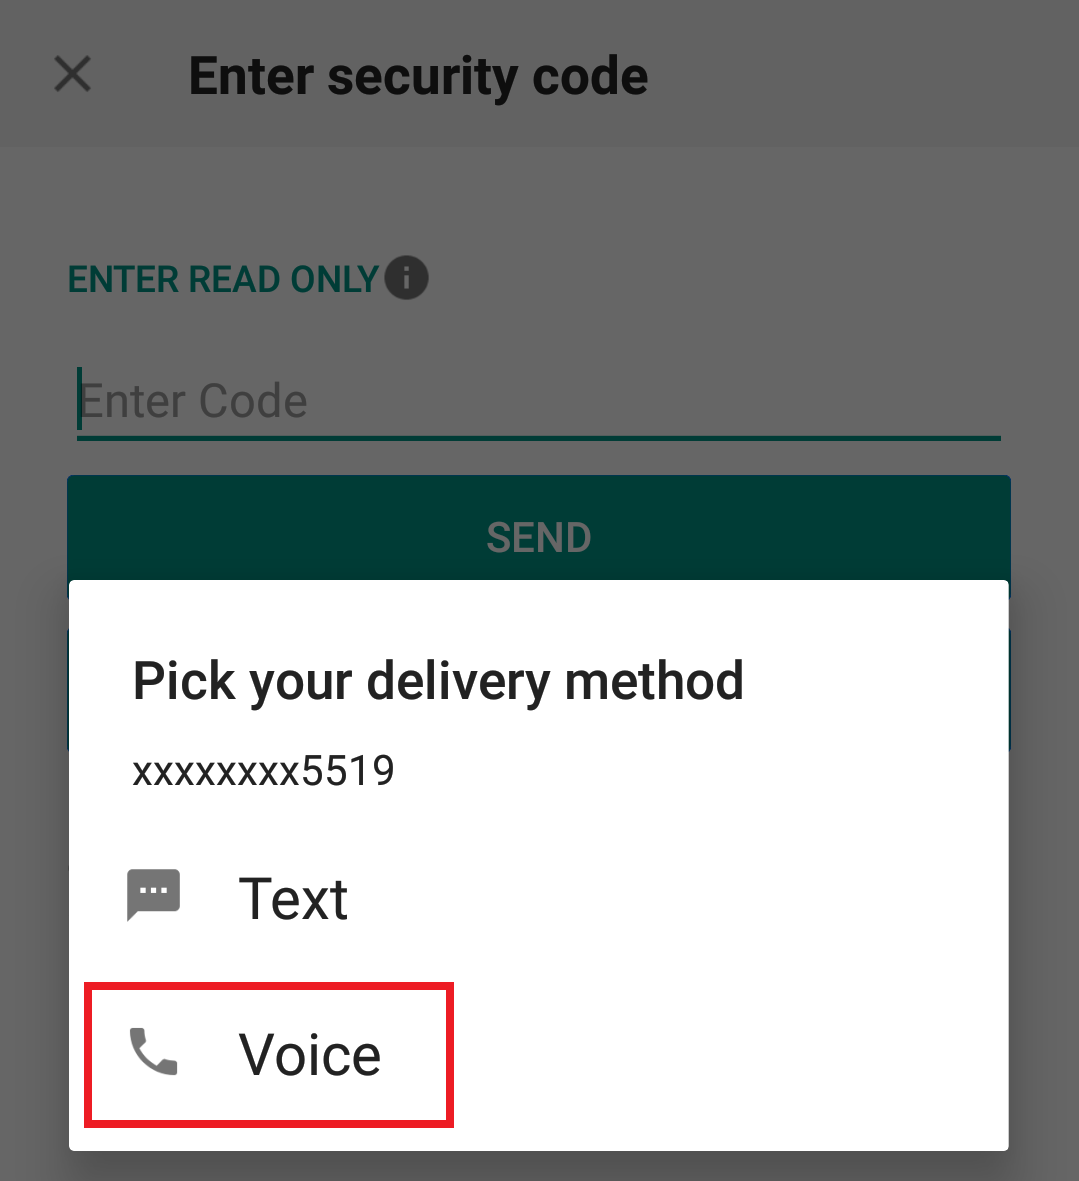
Portail Client
1. Cliquez sur « Vous n'avez pas reçu de code de sécurité ? »
2. Parmi les 2 options, choisissez « Voice » et attendez l'appel.
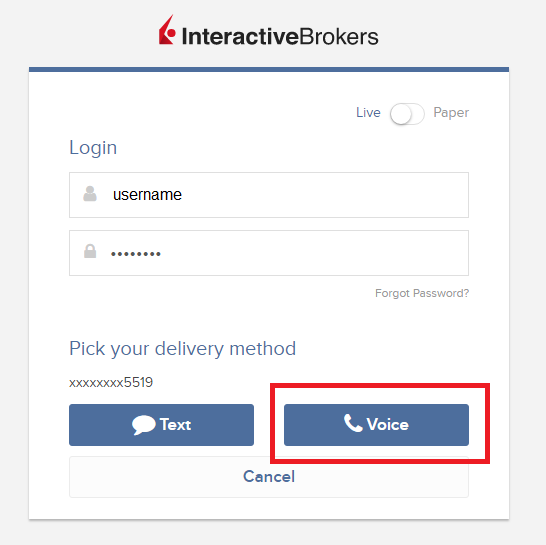
3. Après avoir sélectionné Voice, vous devriez recevoir l'appel dans la minute qui suit. Veuillez attendre l'appel et soyez prêt à écrire le code qui vous sera fourni.
TWS
1. Cliquez sur « Demander un nouveau de sécurité »

2. Parmi les deux options, sélectionnez « Voice » et cliquez sur OK. Puis attendez l'appel.
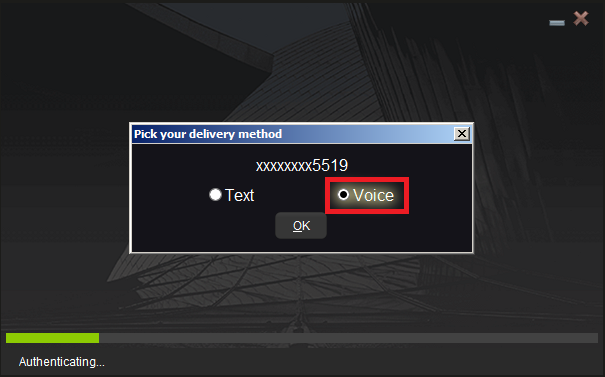
3. Après avoir sélectionné Voice, vous devriez recevoir l'appel dans la minute qui suit. Veuillez attendre l'appel et soyez prêt à écrire le code qui vous sera fourni.
Remarque : Le Voice callback pour TWS n'est disponible que dans les versions LATEST et BETA.
IBKR Mobile - iOS
1. Cliquez sur « Demander un nouveau code »
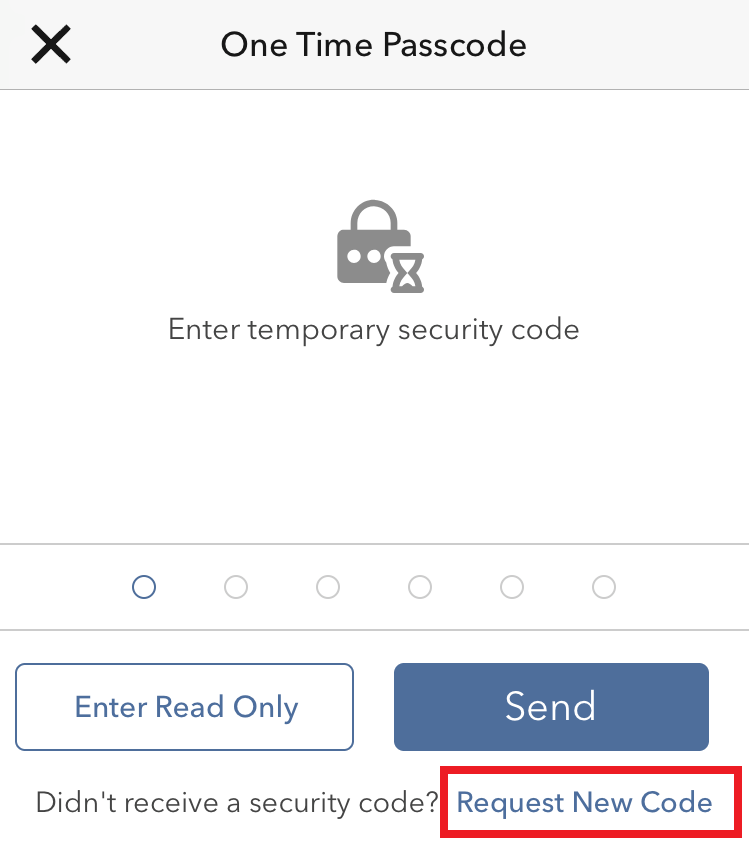
2. Parmi les 2 options, choisissez « Voice » et attendez l'appel.
3. Après avoir sélectionné Voice, vous devriez recevoir l'appel dans la minute qui suit. Veuillez attendre l'appel et soyez prêt à écrire le code qui vous sera fourni.
IBKR Mobile - Android
1. Cliquez sur « Demander un nouveau de sécurité »
2. Parmi les 2 options, choisissez « Voice » et attendez l'appel.
3. Après avoir sélectionné Voice, vous devriez recevoir l'appel dans la minute qui suit. Veuillez attendre l'appel et soyez prêt à écrire le code qui vous sera fourni.
Références :
- Comment se connecter en utilisant l'authentification par SMS
- Présentation du système d'accès sécurisé
- Informations et procédures concernant les dispositifs de sécurité
- Authentification IBKR Mobile
How to generate a ".har" file
Background:
When troubleshooting a non-trivial website issue, it is sometimes necessary for our Client Services team to obtain additional information about your browser communication. You may be asked record and provide a .har file. This file contains additional information about the network requests that are sent and received by your browser. Your browser can generate such file by recording content, timeline and status of HTTP/HTTPS requests and responses while the issue occurs.
In this article we explain how to generate a .har file. Please click on the browser that you use in the list below:
To generate the HAR file for Google Chrome:
1. Open Google Chrome and go to the page where the issue is occurring.
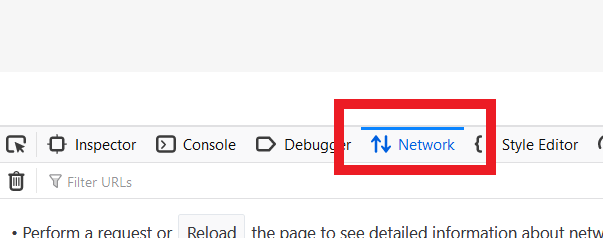
2. Press CRTL +SHIFT + I on your keyboard. Alternatively, click on the Chrome menu icon (three vertical dots at the top-right of your browser window) and select More Tools > Developer Tools
3. The Developers Tools opens as a docked panel at the side or bottom of Chrome. Select the tab Network (Figure 1.)
Figure 1.
.png)
4. Look for a round Record button in the upper left corner of the Developer Tools toolbar and make sure it is red. If it is grey, click it once to start recording or just press CTRL+E (Figure 2.)
Figure 2.

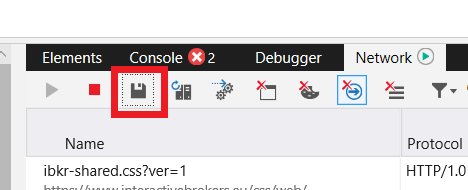
5. Activate the checkbox Preserve log (Figure 3.)
Figure 3.
.png)
6. Click the Clear button to clear out any existing logs. The Clear button has a stop icon and is located on the right of the Record button (Figure 4.)
Figure 4.
![]()
7. Reproduce the issue you are experiencing while the network requests are being recorded.
8. Once you have reproduced the issue, right-click anywhere on the list of recorded network requests, select Save all as HAR with Content, and save the file to a location of your preference on your computer (e.g. on your Desktop).
9. From the IBKR Client Portal, go to the Message Center and create a new Web Ticket (or use an existing one when applicable)
10. Within the Web Ticket, attach the .har file previously generated. In case the IBKR Client Services has provided you with a reference ticker number or representative name, please add this information to the ticket body.
11. Submit the Web Ticket
To generate the HAR file for Firefox:
1. Open Firefox and go to the page where the issue is occurring
2. Press F12 on your keyboard. Alternatively click the Firefox menu icon (three horizontal parallel lines at the top-right of your browser window), then select Web Developer > Network
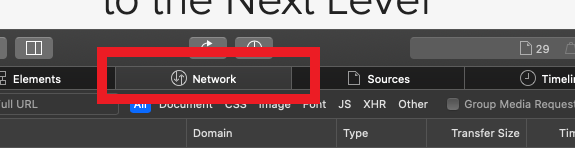
3. The Developers Network Tools opens as a docked panel at the side or bottom of Firefox. Select the tab Network (Figure 5.)
Figure 5.
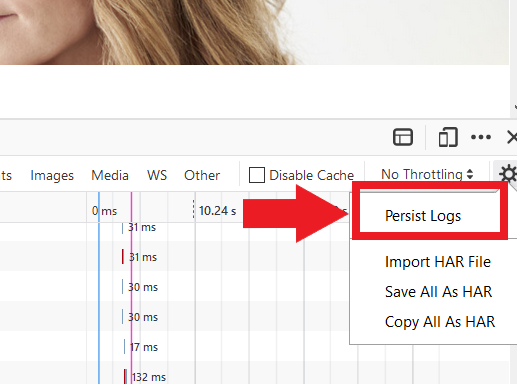
4. Activate the checkbox Persists logs (Figure 6.)
Figure 6.
5. Reproduce the issue you are experiencing. The recording of the network request starts automatically.
6. Once you have reproduced the issue, right-click anywhere on the list of recorded requests and select Save All As HAR
7. Save the file to a location of your preference on your computer (e.g. on your Desktop)
8. From the IBKR Client Portal, go to the Message Center and create a Web Ticket (or use an existing one when applicable)
9. Within the Web Ticket, attach the .har file previously generated. In case the IBKR Client Services has provided you with a reference ticker number or representative name, please add this information to the ticket body
10. Submit the Web Ticket
To generate the HAR file for Microsoft Edge:
1. Open Edge and go to the page where the issue is occurring.
2. Press F12 on your keyboard. Alternatively click the Edge menu icon (three horizontal dots at the top-right of your browser window), then select More Tools > Developers Tools
3. Click the Network tab (Figure 10.)
Figure 10.
.png)
4. Reproduce the issue that you were experiencing before, while the network requests are being recorded.
5. Once done click the floppy disk icon (Export as HAR) or press CTRL+S (Figure 11.)
Figure 11.
6. Provide a filename and a location of your preference on your computer (e.g. on the Desktop). Then click the Save button
7. From the IBKR Client Portal, go to the "Message Center" and create a Web Ticket (or use an existing one when applicable)
8. Within the Web Ticket, attach the .har file previously generated. In case the IBKR Client Services has provided you with a reference ticker number or representative name, please add this information to the ticket body.
9. Submit the Web Ticket
To generate the HAR file for Safari:
Note: Before generating the HAR file, make sure you can see the Develop menu in Safari. If you do not see this menu, click on the menu Safari, choose Preferences, go to the tab Advanced and activate the checkbox next to Show Develop menu in menu bar
1. Open the Develop menu and select Show Web Inspector or press CMD+ALT+I
2. Click the Network tab (Figure 12.)
Figure 12.
3. Activate the checkbox Preserve log (Figure 13.)
Figure 13.
.png)
4. Click on the icon Export (or press CMD+S), provide a filename and a location of your preference on your computer (e.g. on the Desktop) and save the .har file
5. From the IBKR Client Portal, go to the "Message Center" and create a Web Ticket (or use an existing one when applicable)
6. Within the Web Ticket, attach the web archive file previously generated. In case the IBKR Client Services has provided you with a reference ticker number or representative name, please add this information to the ticket body.
7. Submit the Web Ticket
How to use Voice callback for receiving login authentication codes
Background:
If you have SMS enabled as two-factor authentication method, you may use Voice callback to receive your login authentication codes. This article will provide you steps on how to select voice callback when logging in to our platforms.
How to use Voice callback
You may select Voice if you do not receive your login authentication code. You will then receive your login authentication code via an automated callback. Follow the instructions below, depending on which platform you are trying to login to.
Client Portal
1. Click on "Didn't receive a security code?"
2. From the two options, select "Voice" and wait for the callback.
3. After selecting Voice, you should receive the callback within a minute. Please wait for the callback and be ready to write down the code that will be provided over the callback.
TWS
1. Click on "Request new Security Code"
2. From the two options, select "Voice" and click on OK. Then wait for the callback.
3. After selecting Voice, you should receive the callback within a minute. Please wait for the callback and be ready to write down the code that will be provided over the callback.
Note: Voice callback for the TWS is only available in the LATEST and BETA version.
IBKR Mobile - iOS
1. Click on "Request New Code"
2. From the two options, select "Voice" and wait for the callback.
3. After selecting Voice, you should receive the callback within a minute. Please wait for the callback and be ready to write down the code that will be provided over the callback.
IBKR Mobile - Android
1. Click on "Request New Security Code"
2. From the two options, select "Voice" and wait for the callback.
3. After selecting Voice, you should receive the callback within a minute. Please wait for the callback and be ready to write down the code that will be provided over the callback.
References:
- How to login using SMS authentication
- Overview of Secure Login System
- Information and procedures related to Security Devices
- IBKR Mobile Authentication
IBKR Mobile Authentication (IB Key) Use Without Notifications
In case your smartphone is unable to receive IBKR Mobile notifications, you can still complete the login process using the IBKR Mobile Authentication (IB Key) Challenge/Response method, described on the following pages (according to your device operating system):
The same information applies to you if your phone has no Internet connectivity (you are in roaming, out of coverage, without an active mobile data plan, etc.)
If your smartphone is unable to receive IBKR Mobile notifications despite having Internet connectivity, we recommend you to perform the steps outlined in the IBKR Knowledge Base.
TWS / IB Gateway and their interaction with Proxy servers
Table of contents
Configuration instructions
- Can the TWS / IB Gateway operate through a Proxy server, and how?
- If I use a SOCKS Proxy server, do I need to configure the TWS / IB Gateway?
- If I use a SOCKS Proxy server, do I need to configure the client machines where TWS / IB Gateway runs?
- If I use a Web (HTTP) Proxy server, do I need to configure the TWS / IB Gateway?
- What alternatives do I have in case I cannot implement a proxy solution on my network?
Common issues
Technical Background
Configuration instructions
1. Can the TWS / IB Gateway operate through a Proxy?
Upon start-up and during the run-time, the TWS / IB Gateway must establish and maintain direct network connections to our gateways and market data servers1. Such connections are created from random local TCP ports (above 1024) and are directed to TCP ports 4000 and TCP 4001. Since those are not HTTP connections, they cannot be serviced by a Web (HTTP) Proxy. They can only be serviced by a SOCKS Proxy.
From within the TWS interface, you can access several external services, such as IBKR Client Portal, Statements, Contract details, Bond Search, etc. Those services, being web-based, can be accessed through a Web (HTTP) Proxy (see section 6 for details and configuration) or through a SOCKS Proxy (see sections 4. and 5. for details and configuration).
2. If I use a SOCKS Proxy server, do I need to configure the TWS / IB Gateway?
The TWS / IB Gateway does not contemplate an option for SOCKS proxy forwarding. Therefore, it does not have a place where an explicit SOCKS Proxy host/port can be configured. This does not mean that the TWS / IB Gateway cannot work with a Proxy. It simply means that the TWS / IB Gateway is unaware of the underlying SOCKS proxy setup (proxy-agnostic).
Important Note: While it is impossible for us to determine whether a Proxy is enabled on your network, we assure you that all IBKR platforms, including the TWS, do not impact nor influence your network configuration.
3. If I use a SOCKS Proxy server, do I need to configure the client machines where TWS / IB Gateway runs?
The connections started by the TWS / IB Gateway can be redirected to a SOCKS (Application) Proxy through a specific client machine setup. We mention some of them below. Please note that the final decision is yours and none of the below suggestions can be recommended by us as best adapted to your setup and requirements.
3a. Using a Proxy Client software installed on the client machine where TWS / IB Gateway is running
With this setup, the Proxy client will intercept the connections (not only HTTP but for other ports as well) initiated by the TWS / IB Gateway and redirect them to a SOCKS proxy server. The typical benefits of a transparent proxy include a standard enterprise configuration where all clients routed to the Internet will always be filtered and protected no matter what the end users do, or change, on their machines and the added benefit of reduction in typical user’s client-proxy configuration troubleshooting.
3b. Using a so-called Proxifier
This configuration is very similar to the one at point 5a with the only difference that the Proxifier software can be set to redirect to a Proxy all the requests started by a specific process (e.g., C:\Jts\tws.exe; C:\JTS\ibgateway\XYZ\ibgateway.exe), hence instating a process level packet forwarding instead of a port level forwarding. This setup allows handling environments where different proxy servers are used for different applications or where you would like to address a specific application requirement without modifying/disrupting the connectivity schema for other software installed. The advantage of this solution is minimal maintenance since the connectivity schema is bound to the process and not to the hosts/ports.
3c. Using specific network routing on a client machine
With this setup, you can modify the client machine standard network routes, adding new ones in order to forward packets with specific destinations (e.g., Order routing and Market Data servers1) to a different gateway.
This gateway will then be in charge of routing those requests to the destination hosts. This solution has as well the benefit of not modifying/disrupting the connectivity schema for other software installed but usually requires more maintenance on the gateway and on the client machine in case the IP of the destination servers are changed or in case new servers are added.
4. If I use a Web (HTTP) Proxy server, do I need to configure the TWS / IB Gateway?
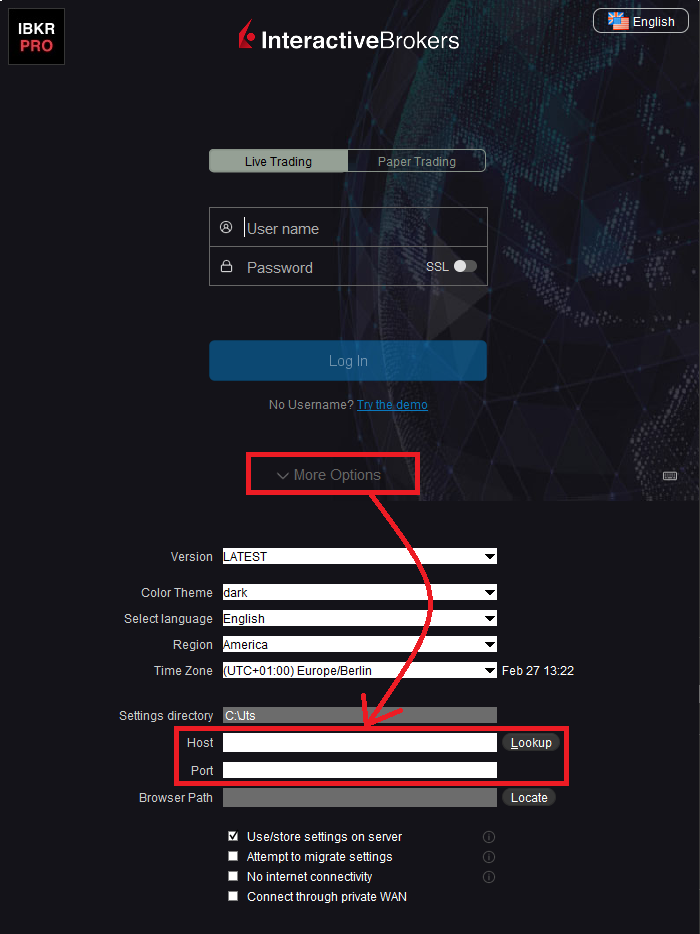
If the Workstations on your local network access the Web content through a Web (HTTP) Proxy, you need to specify the Web Proxy IP Address and port. To do this, click More Options at the bottom of the TWS Login Screen, and enter your Proxy server details in the fields Host and Port (see Figure 1 below). The same fields are present in the IB Gateway Login Screen.
Figure 1.
The Web Proxy you set there will ONLY be used to fetch the web content accessible from within the TWS (e.g., Client Portal, Statements, Product Details, etc.)
5. What alternatives do I have in case I cannot implement a proxy solution on my network?
In this case, you might orient yourself towards a different type of access to the IBKR infrastructure, which includes a special connection type and a FIX/CTCI engine setup. This setup would, on the other hand, have different requirements in terms of commissions2.
Common Issues
6. What happens if the proxy configuration on your computer is wrong or outdated?
Occasionally, third-party software, even if already uninstalled, may leave behind a SOCKS proxy configuration on your computer. This may also happen if your computer has been infected with malware. In such cases, the proxy server, although configured, is non-existent or not accessible on the network. In such scenarios, the TWS will show an error message (e.g., No Internet Connectivity) and/or start the "Connection attempt #" loop upon login. The same will happen if the Proxy server exists, but has not been correctly configured on the client machines.
6a. How can I correct the proxy configuration if wrong?
When applicable, we recommend you always consult the IT / Networking team of your company first and ask for guidance.
If you are autonomously managing your network, please follow the instructions below according to the Operating System of your machine/s:
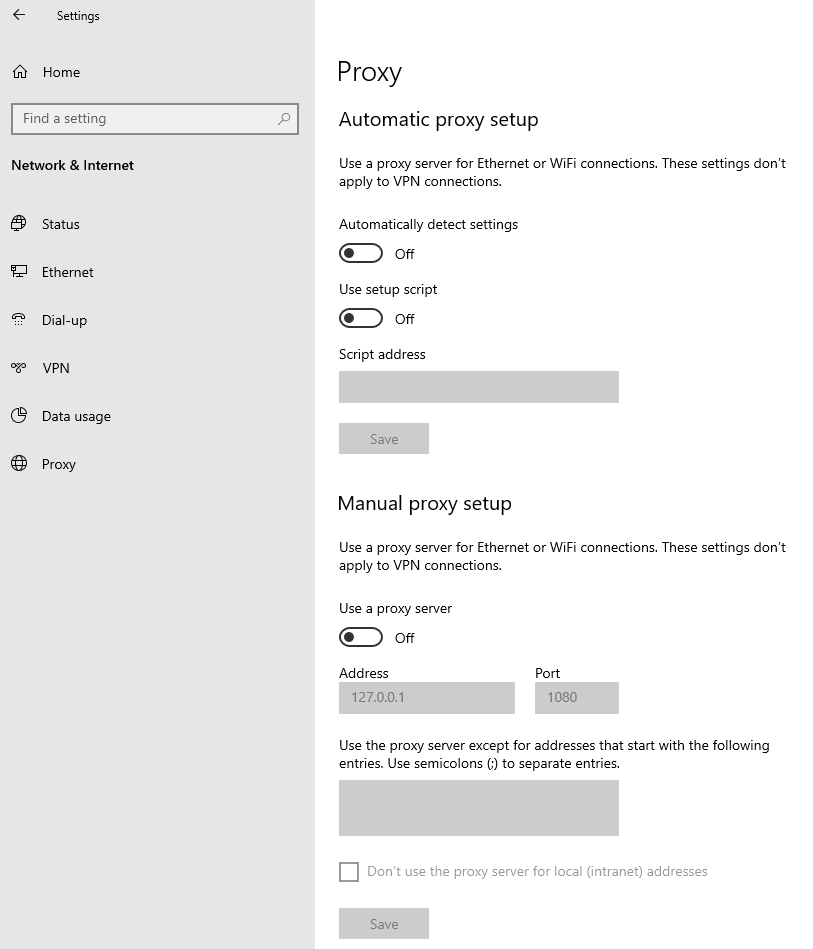
Windows
W.1 Press CTRL+S to open the Windows search
W.2 Type Proxy Settings and press Enter
W.3 If no Proxy is present on your network, make sure the switch "Use a proxy server" is deactivated (see Figure 2 below). If a Proxy server is active on your network, make sure the Address (or hostname) and Port are correctly defined.
Figure 2.
Mac
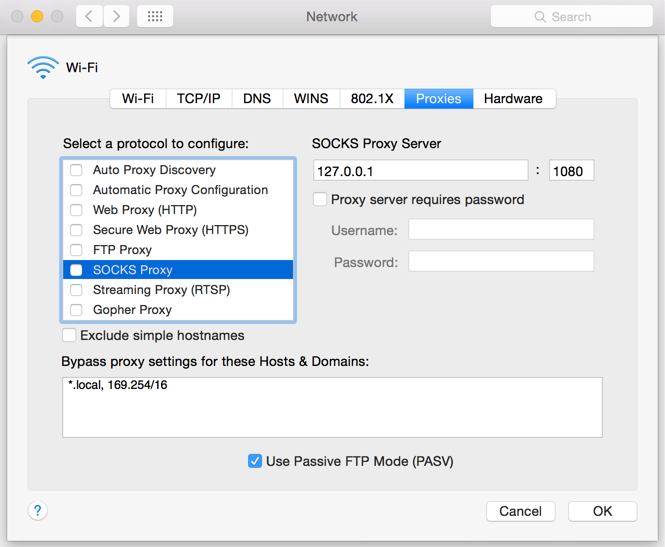
M.1 Click on the Apple icon at the top left corner of the screen and select System Preferences
M.2 Click on Network
M.3 Select the Network connection you are using to access the Internet (e.g. Wi-Fi) and click on it
M.4 Click on the Advanced button and then on the Proxies tab
5. If no proxy is present on your network, make sure all the checkboxes (SOCKS Proxy, Web Proxy, Secure Web Proxy) are deactivated (see Figure 3 below). If a Proxy is present on your network, ensure the Protocol, Address (or hostname) and Port are correct.
Figure 3.
7. You are using Public proxies and proxy chains to hide your presence or identity
There are public proxy and proxy chain services purposed to disguise or hide the identity and the activity of the subscriber or to bypass regional restrictions. One of the most famous services is the "Tor" network.
While those services may not necessarily be used for criminal purposes, they render subscriber traceability very difficult when not impossible. Since IBKR is obliged by the financial industry regulators to maintain records of trading activities and trade initiators, we do not allow our clients to reach our systems while using an anonymizing service. If you are using such a service, your TWS connection attempts will be automatically rejected by our gateways.
Technical Background
A proxy server usually acts as a gateway and as a barrier between your local network and the Internet. The proxy listens for outgoing connection requests from the internal workstation/s and forwards them to the desired target host or service on the Internet. When the target replies to such requests, the proxy routes the incoming responses back to the internal workstation/s that initiated the process.
Being the proxy, the only machine of your network actually accessing the Internet, it prevents the other machines and the internal segment of your network (LAN) from being accessible by external actors and hence from being exposed to threats and intrusion attempts.
Additionally, a proxy server can offer a variety of other services, such as web content caching and filtering.
9. Which types of Proxy servers are commonly used and where?
Proxy servers are commonly found within enterprise-grade networks. In the vast majority of cases, proxies are not used by individuals since private broadband connections are established through consumer-grade routers that already offer built-in proxy/firewall solutions. An exception is represented by public proxy or proxy chains discussed in detail in the section You are using Public proxies and proxy chains to hide your presence or identity
There are two main types of Proxy servers:
The HTTP (Hypertext Transfer Protocol) defines the rules and the standards for fetching Web content from a Web server and rendering such content on your Web Browser.
A Web Proxy handles only the routing of HTTP requests and HTTP responses. Those requests are transparently generated and sent by your browser whenever you access a Web page. Such requests are normally sent using specific ports (TCP 80 and TCP 443). Hence a Web Proxy usually listens for outgoing HTTP requests coming from your internal network (LAN) only on the TCP ports mentioned above.
SOCKS (Socket Secure) Proxies are designed to handle any type of traffic (not only HTTP/S traffic), generated by any protocol or program (including Trader Workstation).
Notes
1. More information about the servers accessed by the TWS is available in IBKB2816.
2. For an overview of the different special connection options and related requirements, please click here.
For an overview of the FIX infrastructure, please click here.
How to fix the "Cannot create ... file" error during TWS installation on MacOS
Background:
The filesystem permissions are controlled by your machines operating system. One of their functions is to secure your files, preventing unauthorized access or undesired modifications to the system and to your personal data.
Some software on your computer may modify or override the permissions assigned by the operating system. Under certain circumstances, this prevents the TWS installer from accessing the folder where the application core files have to be created (/users/youruser/home/Applications). In such cases, the TWS installation usually displays the error "Cannot create ... file. Shall I try again?"
In this article we explain how to reset the filesystem permission of the "Applications" folder located under your user home folder in order to allow a smooth run of the TWS installation.
Procedure:
1. On your keyboard, press ⌘CMD + ⇧Shift +H to open your home folder
Figure 1

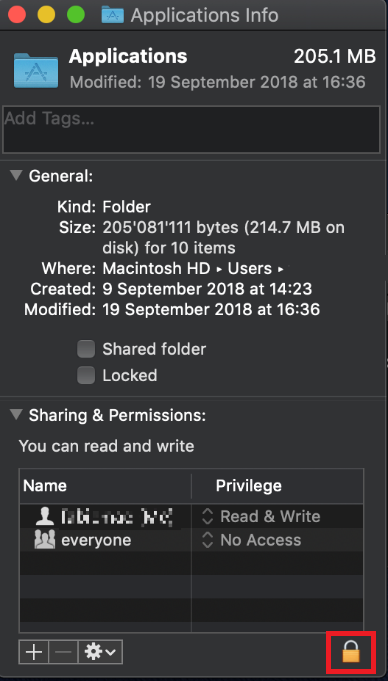
2. Select the folder "Applications" within your home folder and press ⌘CMD + I to open the Info panel
Figure 2

2. At the bottom right of the panel, click on the padlock
Figure 3
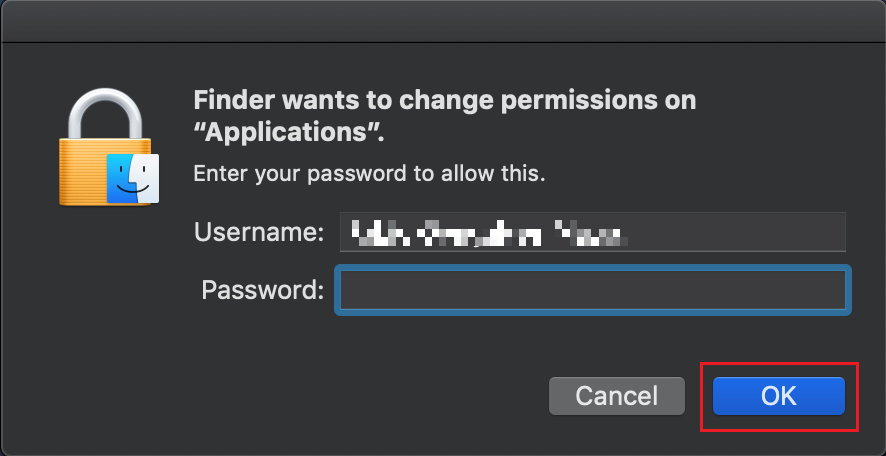
3. To unlock the permissions panel, enter your MacOS credentials and click OK
Figure 4
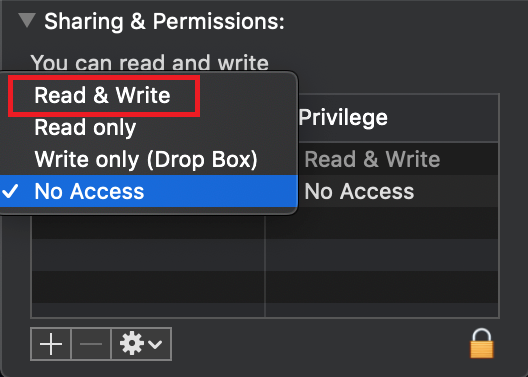
4. In the line correspondent to "everyone", click on "No Access" (Figure 5) and then select "Read & Write" (Figure 6)
Figure 5 Figure 6
.png)
5. Click on the icon bellow the permissions panel and select “Apply to enclosed items..."
Figure 7
.png)
6. Now run the TWS installer and click on Next> until you complete the installation
Figure 8
.png)
7. Once the installation has completed successfully, repeat the previous steps from 1. to 5. setting back the permissions of “everyone” to “Read Only” to revert your changes to the initial status
I am not receiving text messages (SMS) from IBKR on my mobile phone
Background:
Once your mobile phone number has been verified in the Client Portal, you should immediately be able to receive text messages (SMS) from IBKR directly to your mobile phone. This article will provide you with basic troubleshooting steps in case you are unable to receive such messages.
1. Activate the IBKR Mobile Authentication (IB Key) as 2-Factor security device
In order to be independent of wireless/phone carrier-related issues and have a steady delivery of all IBKR messages we recommend to activate the IBKR Mobile Authentication (IB Key) on your smartphone.
The smartphone authentication with IB Key provided by our IBKR Mobile app serves as a 2-Factor security device, thereby eliminating the need to receive authentication codes via SMS when logging in to your IBKR account.
Our IBKR Mobile app is currently supported on smartphones running either Android or iOS operating system. The installation, activation, and operating instructions can be found here:
2. Restart your phone:
Power your device down completely and turn it back on. Usually this should be sufficient for text messages to start coming through.
Please note that in some cases, such as roaming outside of your carrier's coverage (when abroad) you might not receive all messages.
3. Use Voice callback
If you do not receive your login authentication code after restarting your phone, you may select 'Voice' instead. You will then receive your login authentication code via an automated callback. Further instructions on how to use Voice callback can be found in IBKB 3396.
4. Check whether your phone carrier is blocking the SMS from IBKR
Some phone carriers automatically block IBKR text messages, as they are wrongly recognized as spam or undesirable content. According to your region, those are the services you can contact to check if a SMS filter is in place for your phone number:
In the US:
- All carriers: Federal Trade Commission Registry
- T-Mobile: Message Blocking settings are available on T-Mobile web site or directly on the T-Mobile app
In India:
- All carriers: Telecom Regulatory Authority of India
In China:
- Call your phone carrier directly to check whether they are blocking IBKR messages
References:
- How to login using SMS authentication
- Overview of Secure Login System
- Information and procedures related to Security Devices
- IBKR Mobile Authentication
Documentation : Hôtes et ports IBKR
Background:
TWS se connecte aux serveurs via les ports 4000 et 4001 si SSL est utilisé et ne fonctionnera sur aucun autre port. Si vous utilisez un serveur proxy, il devra être transparent avec des ports entrants et sortants ouverts afin que TWS fonctionne correctement.
Vous trouverez ci-dessous une liste de toutes les passerelles ainsi que les destinations correspondantes qui peuvent être utilisées par TWS lorsque vous faites usage de nos services. Vous devez permettre l'accès à ces hôtes.
La façon la plus simple de tester si votre connexion requiert une configuration particulière ou si elle a bien été configurée, est d'utiliser la Page IBKR dédiée aux tests, qui fournira un test dynamique de votre connexion réseau à nos serveurs de trading et données de marché principaux. Si vous avez confirmation que l'opération est réussie : « Success », aucune autre action ne sera requise. En revanche, si l'opération échoue : « Failure », nous recommandons l'ajout d'une exception à votre configuration réseau pour les nouveaux hôtes ou nous vous conseillons de revoir vos modifications.
Remarque : si votre réseau utilise un navigateur proxy, la page de test peut produire des faux positifs. Dans ce cas, ou dans le cas où vous n'êtes pas certain de la configuration du réseau, consultez votre administrateur de réseau qui peut effectuer des tests ping et telnet des hôtes mentionnés ci-dessous pour confirmer la conformité aux conditions de connectivité.
Spécifications :
|
PORTAIL CLIENT ET SITE |
||||
|
RÉGION/PRODUIT |
SERVEUR (HÔTE) |
PORTS1 |
||
|
SITE IBKR – AMÉRIQUE |
443 |
|||
|
SITE IBKR – Canada |
443 |
|||
|
SITE IBKR – UK |
443 |
|||
|
SITE IBKR – INDE2 |
443 |
|||
|
SITE IBKR – JAPON2 |
443 |
|||
|
SITE IBKR – HONG KONG2 |
www.interactivebrokers.com.hk | 443 | ||
|
SITE IBKR – CHINE2 |
www.ibkr.com.cn | 443 | ||
|
SITE IBKR - AUSTRALIE |
www.interactivebrokers.com.au | 443 | ||
|
PORTAIL CLIENT – EST |
443 |
|||
|
PORTAIL CLIENT – CENTRE |
443 |
|||
1 : Communication Standard: TCP Port 80 | Communication SSL : TCP Port 443.
2 : Ce serveur IB ne prend pas en charge les demandes ping.
Remarque importante : si vous accédez au réseau client depuis un réseau d'entreprise où l'accès Internet est fourni via un équipement d’équilibrage de charge, vous pourrez recevoir des messages d'erreur concernant une session ayant expiré ou invalide et/ou du contenu web manquant durant ou après la phase de connexion. L'équilibreur de charge crée des cycles de connexion externe sur deux (ou plus) interfaces de réseau pour équilibrer la charge du réseau. En raison de ce mécanisme, vos demandes HTTP atteignent nos systèmes depuis différentes adresses IP, ce qui rend invalide votre session sur le Portail Client. Si cela se produit, veuillez demander à votre administrateur de réseau ou groupe informatique de configurer votre appareil de sorte qu'il contourne l'équilibreur de charge. Cela permettra à votre session de rester valide et active.
|
TWS SUR BUREAU |
|||
|
RÉGION/OUTIL |
PRINCIPAL/DE SAUVEGARDE |
SERVEUR (HÔTE) |
PORTS |
|
|
PRINCIPAL |
|
|
|
SAUVEGARDE |
|||
|
|
PRINCIPAL |
|
|
|
SAUVEGARDE |
|||
|
|
PRINCIPAL |
|
|
|
SAUVEGARDE |
|||
|
TWS ASIE |
PRINCIPAL |
4000 / 4001 |
|
|
SAUVEGARDE |
|||
|
TWS ASIE- CHINE3 |
PRINCIPAL |
4000 / 4001 |
|
|
SAUVEGARDE |
mcgw1_hb1.ibllc.com.cn | ||
| TWS - MISE À JOUR AUTOMATIQUE | PRINCIPAL | 443 | |
|
RISK NAVIGATOR |
PRINCIPAL |
443 |
|
|
PARAMÈTRES TWS CLOUD |
PRINCIPAL |
443 |
|
|
IB CAM |
PRINCIPAL |
4000 / 4001 |
|
|
RAPPORTS DIAGNOSTIQUES |
PRINCIPAL |
443 |
|
3 : Portail dédié aux clients dont les comptes sont assignés au serveur de Hong Kong mais qui sont physiquement connectés depuis la Chine continentale.